

Page 1
Page 2
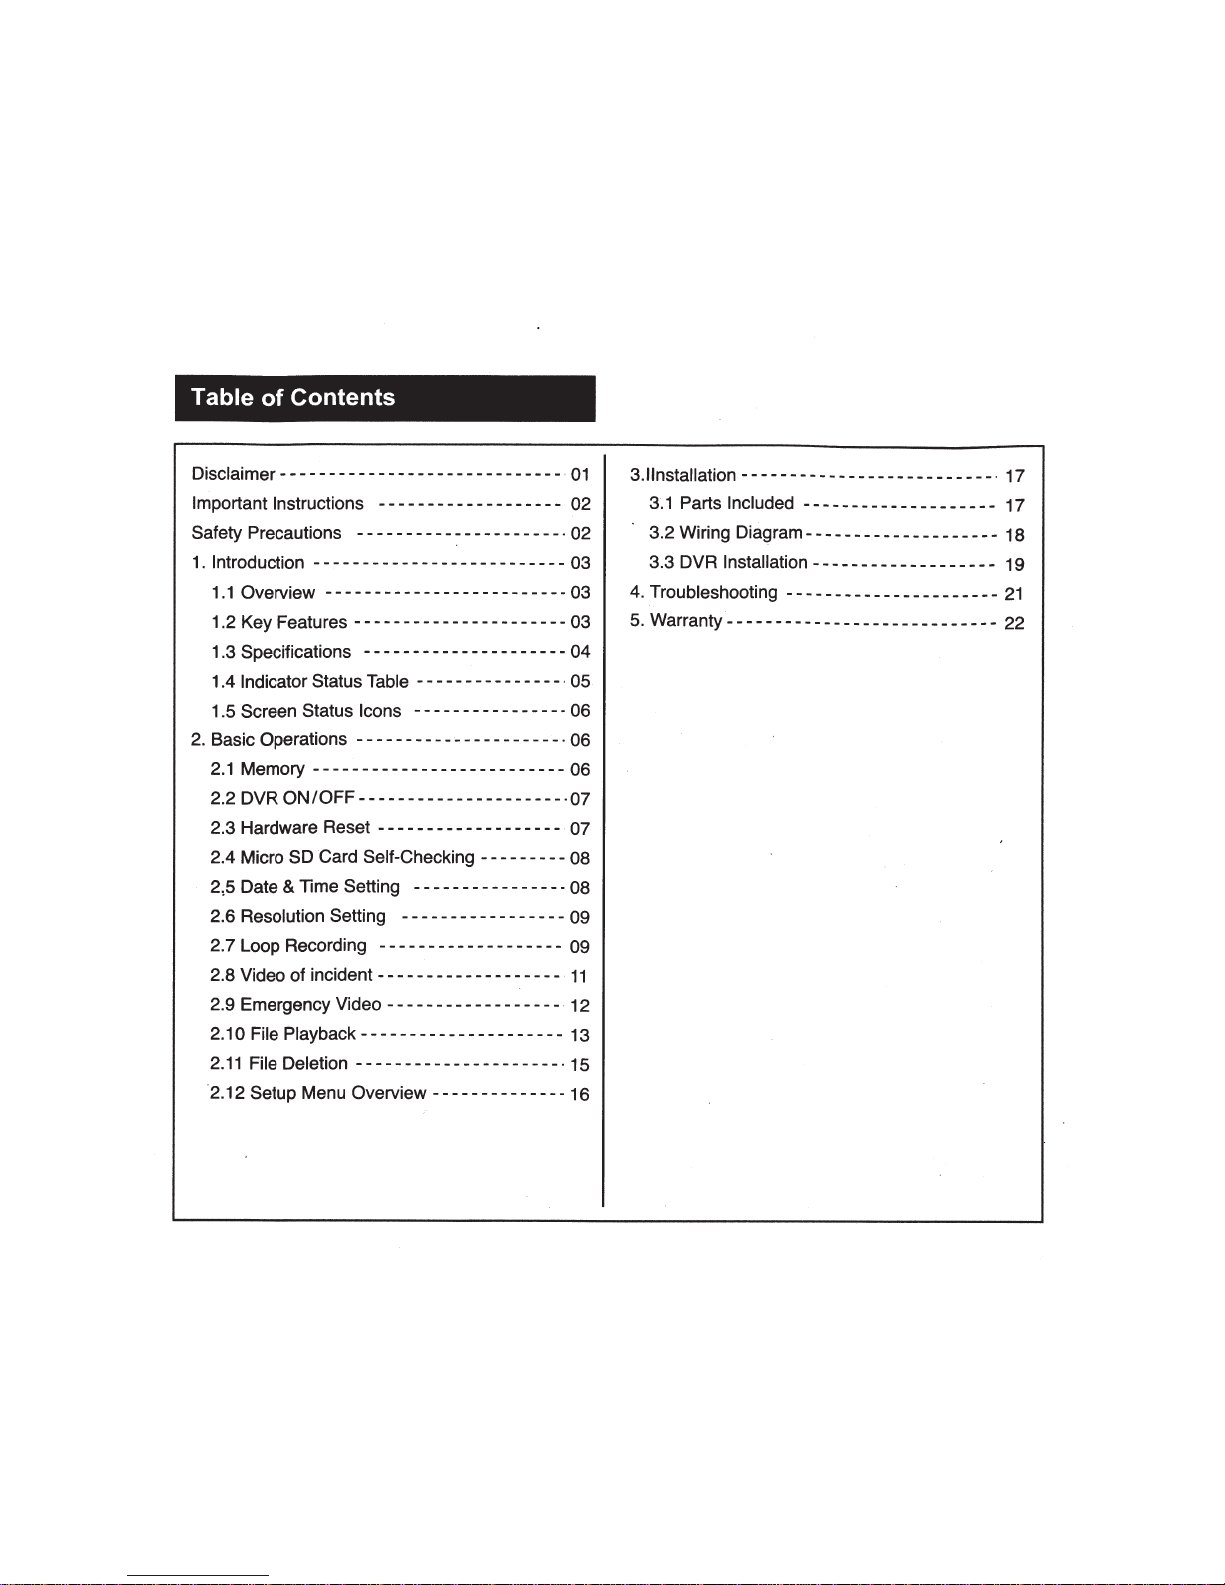
Table
of
Contents
Disclaimer
-----------------------------
·
01
Important Instructions
-------------------
02
Safety Precautions - - - ------- - - - - - - - - - - -
· 02
1.
Introduction
--------------------------
03
1
. 1 Overview - - - - - - - - - - - - - - - - - - - - - - - - -
03
1.2 Key Features
----------------------
03
1
.3
Specifications - - - - - - - - - - - - - - - - - - - - -
04
1.4
Indicator
Status
Table
-
-
----
---
- - -
---
· 05
1.5 Screen Status
Icons
---
--
---
----
- -
--
06
2.
Basic Operations - - - - - - - - - - - - - - - - - - - - -
· 06
2.1
Memory
--------------------------
06
2.2 DVR
ON/OFF---------------------·
07
2.3 Hardware Reset -
--
-
--
---
-
--
- -
--
- - - · 07
2.4 Micro
SD Card Self-Checking
-
-
---
- -
--
08
2:5
Date
&
Time Setting
----------------
08
2.6
Resolution
Setting
-----------------
09
2.
7 Loop Recording -
--
-
--
-
---
--
- -
--
- - -
09
2.8 Video of incident
-------------------
·
11
2.9 Emergency Video
--
-
--
-
---
----
- - -
--
· 12
2.1
0 File Playback
-
- - - - - - - - - - - - - - - - - - - - 13
2.11
File Deletion
---------------------
·
15
2.12 Setup Menu Overview -
----
----
-
---
- 16
3.11nstallation
-
-
----
- - - - -
------
---------
·
17
3.1
Parts
Included--------------------
17
3.2 Wiring Diagram-
-------
----
--
------
18
3.3 DVR
Installation
---
..
---------------
19
4.
Troubleshooting
-
--
-
------------------
21
5.
Warranty -- - - - - - - - - - - - - - - - - - - - - - - - - - - 22
Page 3
User Manual
Disclaimer
• VOXX
reserves the right to change
details
and
specifications in this
manual
without notice.
VOXX does not warranty this manual
is error-
free.
VOXX
assumes no
liability
for damage
incurred
directly
or
indirectly
from errors,
omission, or discrepancies between the recorder
and the
manual.
• This
Digital
Audio Video Recorder (DVR) is for
personal use, it is not designed for commercial
purposes.
• Please
read this
manual carefully
before using
the DVR.
Page 4
Important Instructions
1.
This DVR is for
vehicles
with 12V
DC
only.
2.
It is highly recommended to have the DVR
installed by a professional technician.
3.
This DVR should
be
installed near the rear-view
mirror to get the best view.
4.
Make sure the lens is within the scope of the
windshield wipers to ensure good vision even
on a rainy day, this will ensure a good picture.
5.
Do not touch the lens directly.
Oils
and or dirt
from your fingers may be
left on the lens,
resulting in a poor image quality. Please clean
the lens periodically with a soft dry cloth or lens
cleaner.
6.
Do not
install
the DVR on tinted windows as
this could damage the tint film.
7.
Make sure the view
will
not be blocked when
determining the installation location of DVR.
8.
The image quality may be affected by intensity
of light.
9.
The image may be distorted due to vehicle
speed changing.
Safety Precautions
Power
Supply
•
Use only the charger
supplied
with the
OVA.
Use of another type of charger may result in
malfunction and/or damage to the DVR.
•
Do not use the charger if the cord becomes
damaged.
•
Do not attempt to repair the
OVA.
There are
no repairable parts inside. Replace the DVR
if it
is
damaged or exposed to excess moisture.
About the
built-in battery
•
This DVR contains a non-replaceable built-in
Lithium lon battery.
•
To
reduce the risk of fire
or
burns, do not
disassemble, crush, puncture, or dispose of
in
fire or water. The battery could burst or explode,
releasing hazardous chemicals if disposed of
in this manor.
• If
connected to other power supplies or cables
not designed for
th_is
product the battery could
be damaged.
Page 5
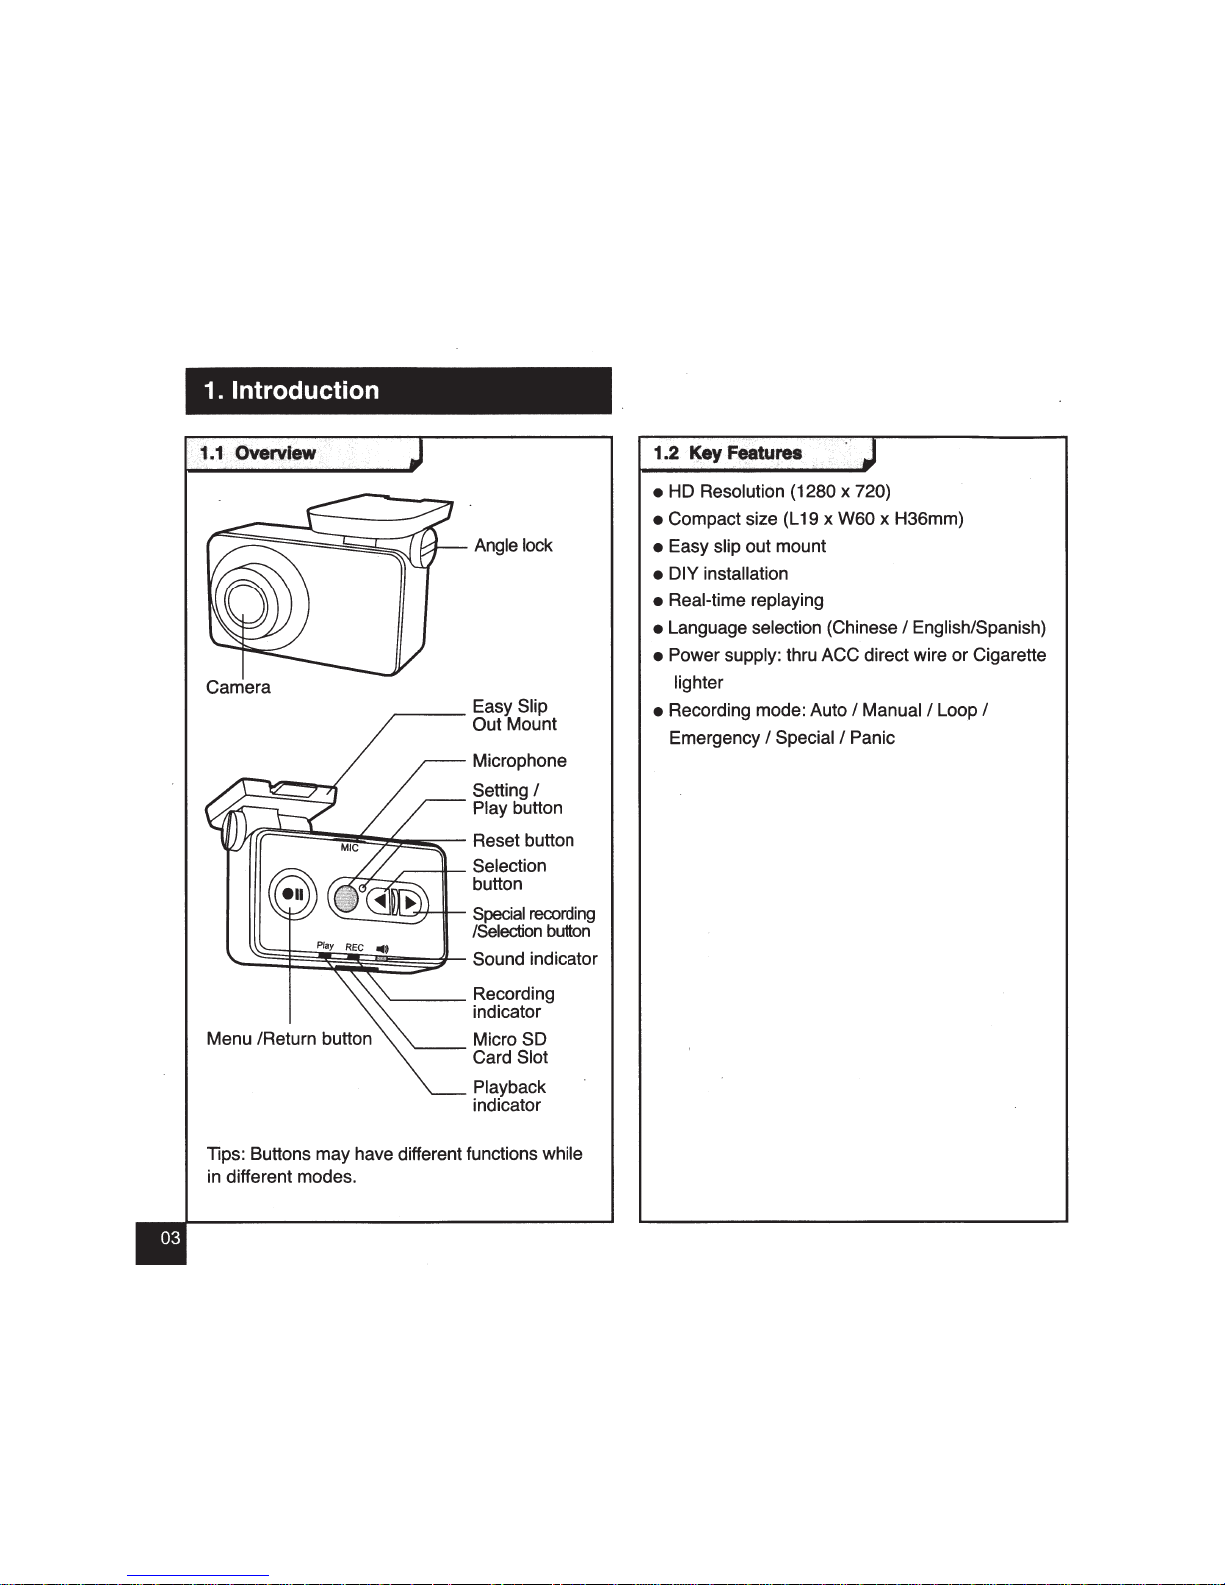
1. Introduction
Camera
~--
Easy Slip
Out Mount
Microphone
Setting
I
Play button
((F======~~~~~~-
Reset button
,----11--
Selection
,.....--,--r-..,c____
button
----.J!JrL...,;,'"+-ilt--
Special
recording
/Selection
button
~::§:~~~~~~~'--
Sound indicator
Menu /Return button
'-----
Recording
indicator
Micro
SO
~-Card
Slot
Playback
indicator
Tips: Buttons may have different functions while
in different modes.
1
••.
2 ·
~·r
,._
..
,.._
.J
• HD Resolution (1280 x 720)
• Compact size (L 19 x W60 x H36mm)
• Easy slip out mount
• DIY installation
• Real-time replaying
• Language selection (Chinese
I English/Spanish)
• Power supply: thru ACC direct wire or Cigarette
lighter
• Recording mode: Auto
I Manual I Loop I
Emergency I Special I Panic
Page 6
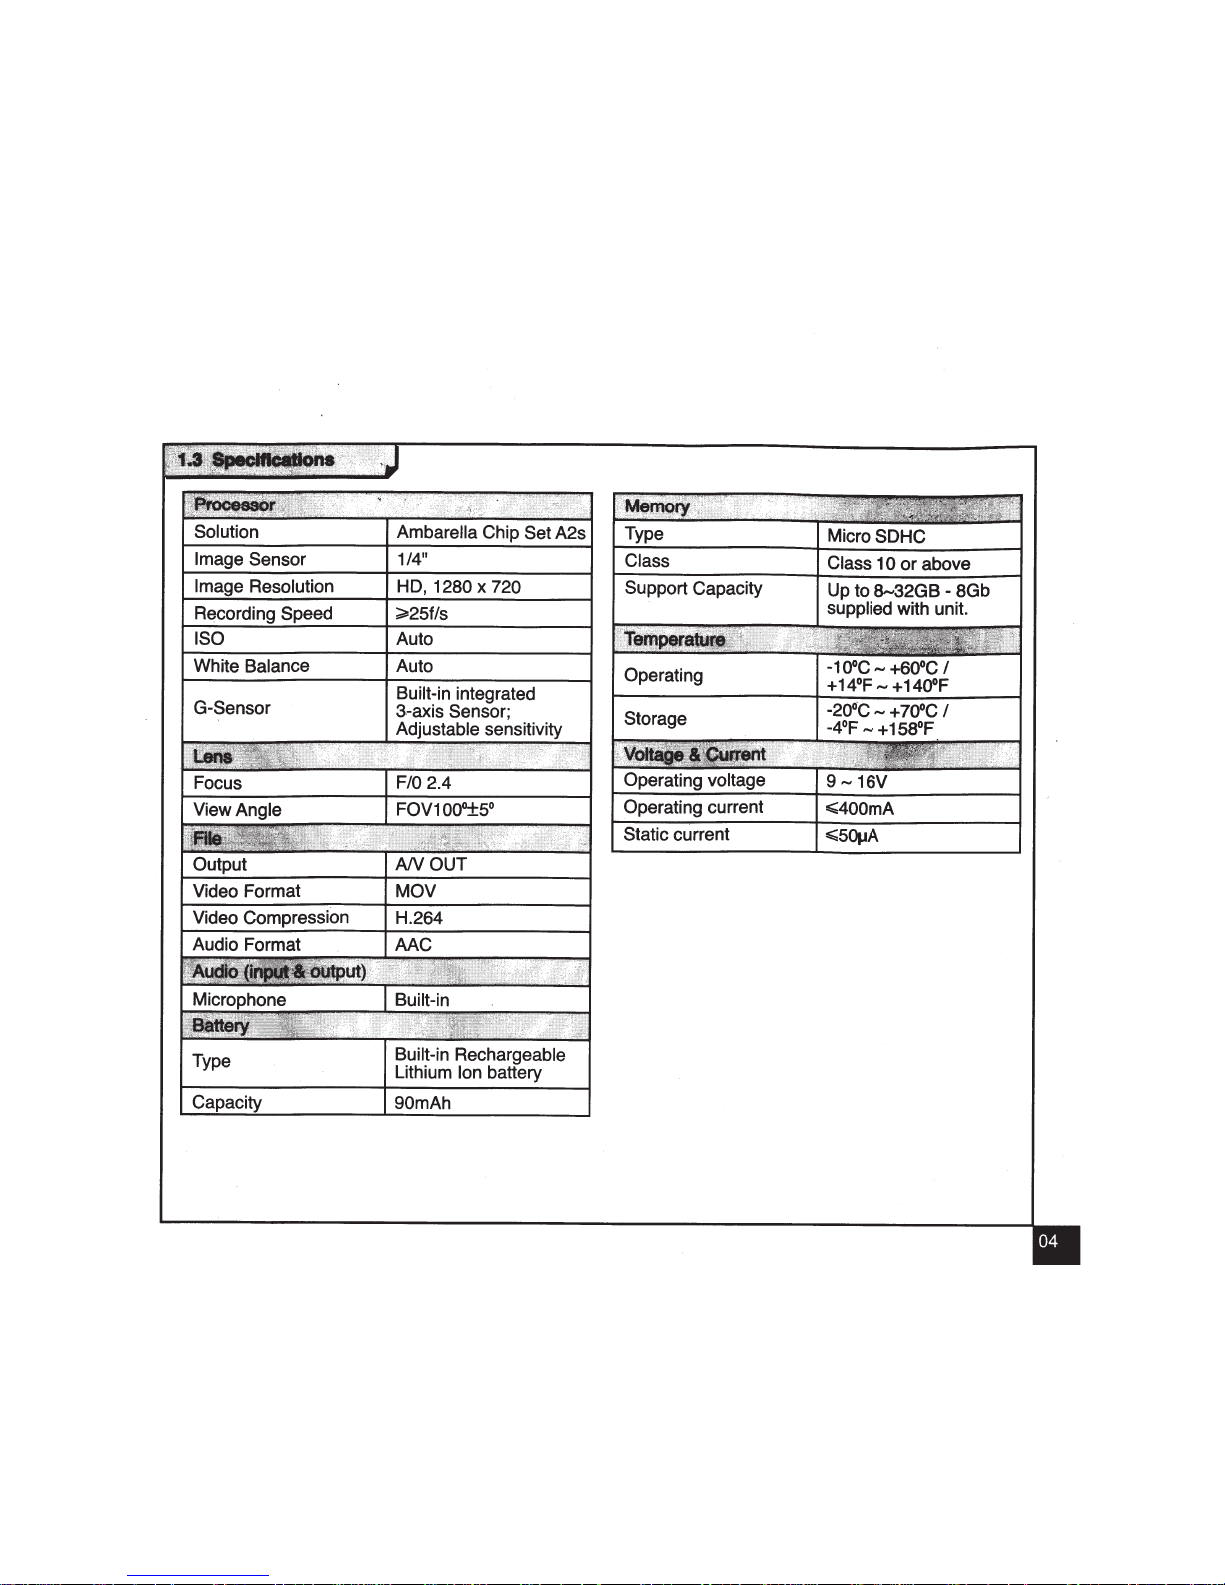
e Resolution
Recording Speed
ISO
White Balance
G-Sensor
Output
Video Format
Video Compression
Audio Format
114"
HD,
1280
x
720
~25fls
Auto
Auto
Built-in integrated
3--axis
Sensor;
Adjustable sensitivity
AN
OUT
MOV
H.264
AAC
Built-in Rechargeable
Lithium lon battery
90mAh
Type
Micro
SDHC
Class
Class
1 0
or
above
Support Capacity
Up to
S....32GB
- 8Gb
supplied
with unit.
Operating
-10°C,.., +600C
I
+14°F,.., +140°F
Storage
-20°C-
+70°C
I
-4°F
......
+158°F
Operating voltage
9-16V
Operating current
E;;;400mA
Static current
E;;;SOIJA
Page 7
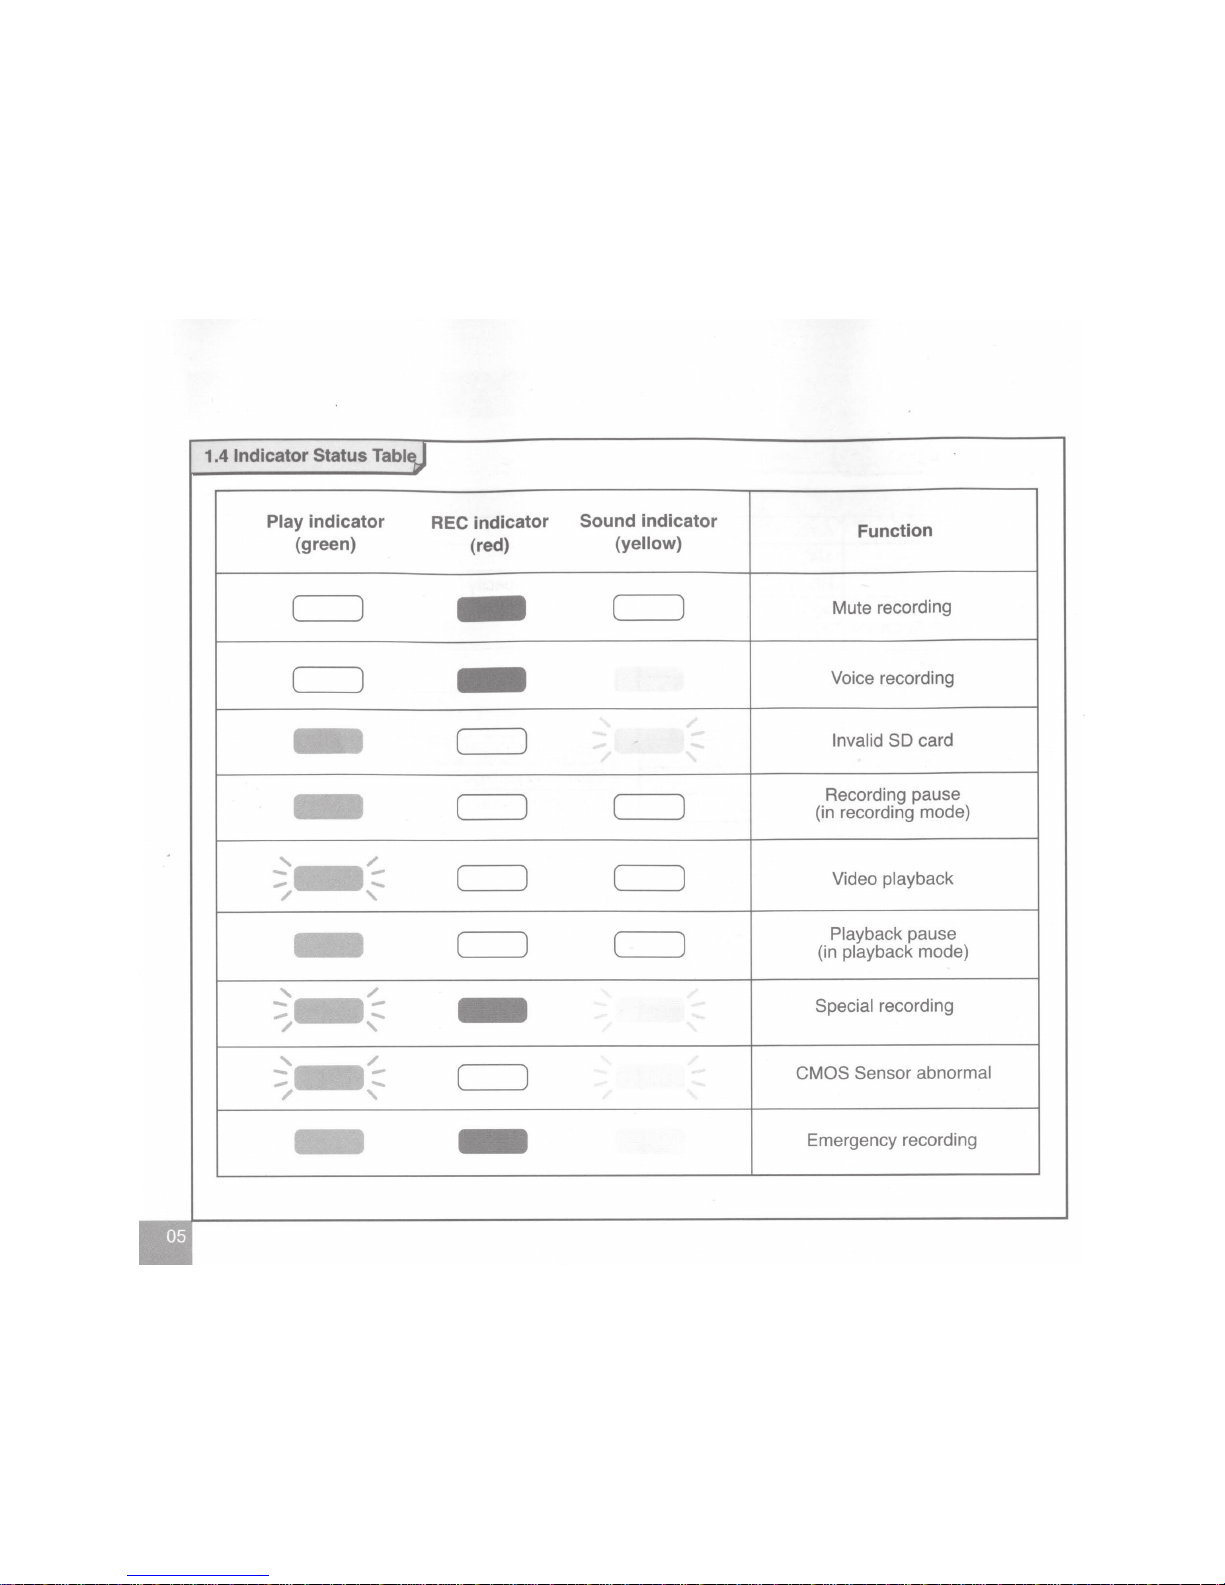
1.4
Indicator Status
Play
indicator
REC indicator
Sound
indicator
Function
(green)
(red)
(yellow)
(
)
-
(
)
Mute recording
(
)
-
Voice recording
,1'
-
(
)
-
Invalid
SO
card
,
-
(
)
(
)
Recording pause
(in recording mode)
~-~
(
)
(
)
Video
playback
-
-
/
'
Playback
pause
-
(
)
(
)
(in playback mode)
'
/
---
-
Special
recording
-
-
/
'
,_/
- -
(
)
CMOS Sensor abnormal
- -
/
'
- -
Emergency recording
Page 8
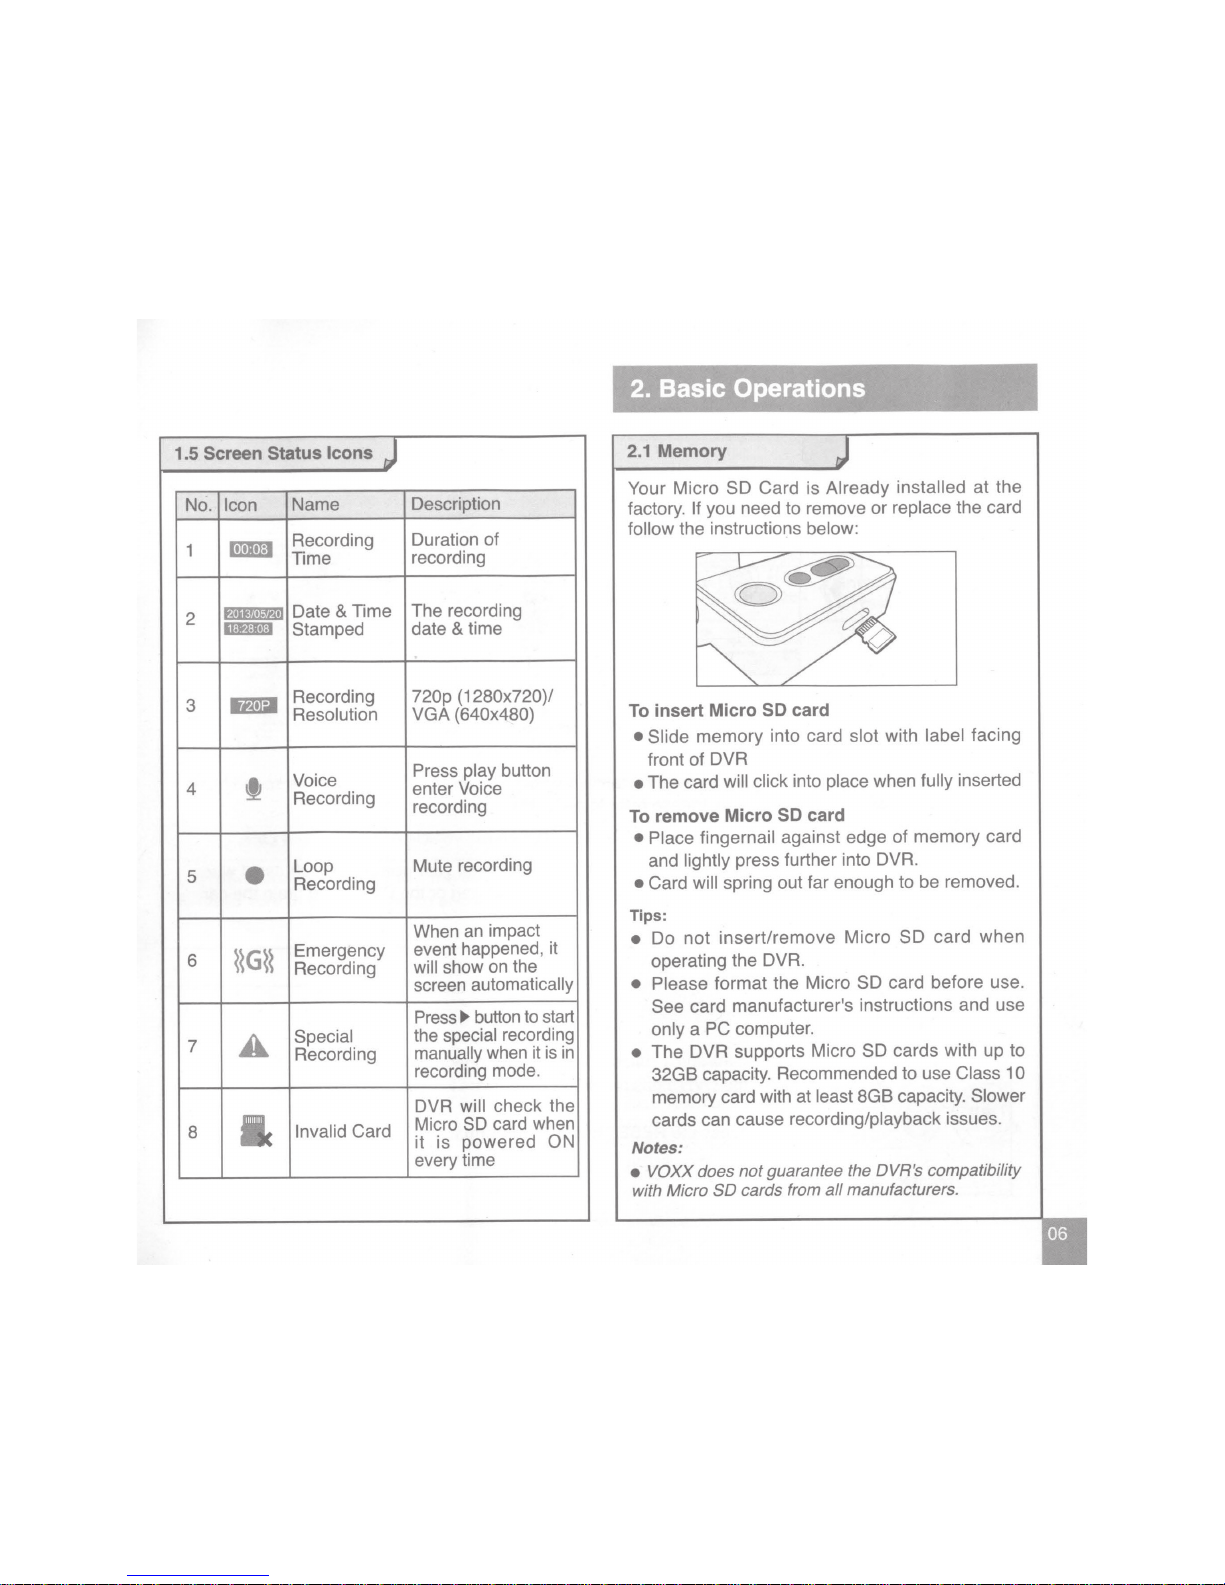
1.5
Screen Status Icons
J
No.
Icon
Name
1
mmJ
Recording
Time
2
l==r
Date
&
Time
Stamped
3
mnl
Recording
Resolution
t
Voice
4
Recording
5
•
Loop
Recording
6
~~G~~
Emergency
Recording
7
A
Special
Recording
8
lc
Invalid
Card
Description
Duration of
recording
The recording
date
& time
720p (1280x720)/
VGA
(640x480)
Press
play
button
enter Voice
recording
Mute recording
When
an
impact
event happened, it
will
show on the
screen
automatically
Press
~
button
to
start
the
special
recording
manually
when it
is
in
recording mode.
DVR will
check the
Micro
SD
card when
it
is
powered
ON
every time
2. Basic Operations
2.1
Memory
Your Micro SD Card is Already
installed at the
factory.
If
you need to remove or replace the card
follow
the instructions below:
To insert Micro
SD
card
• Slide
memory into card
slot
with
label facing
front of
DVR
•
The card
will click into
place
when
fully
inserted
To remove Micro
SD
card
• Place fingernail against edge
of
memory card
and
lightly
press further into
DVR.
• Card
will spring out far enough to be removed.
Tips:
•
Do
not
insert/remove Micro SD
card
when
operating the
DVR.
• Please
format the Micro SD card before use.
See card
manufacturer
1
S
instructions and use
only
a PC computer.
•
The
DVR
supports Micro SD cards with up
to
32GB capacity. Recommended to use
Class 10
memory card with at
least
8GB capacity.
Slower
cards can cause recording/playback issues.
Notes:
•
VOXX does
not
guarantee the DVR's compatibility
with Micro
SO
cards from
all
manufacturers.
Page 9

2.2
DVR
ON/OFF
When wired to the ACC circuit in the vehicle:
MIC
~
Play
REG
•»
ACCON
All lights
on
By default:
Driving Video Recorder
Dnve
Safe
===
WELCOME page is
showing on the
monitor (if
AN
out
connected)
Enter recording mode
automatically
The DVR will start Video
&
Audio Recording
automatically
when the
vehicle
ACC is ON.
(The sound Mute
setting can be changed in Setup Menu.
Please
refer to page 16)
The DVR
will
stop recording and save the
files automatically
when the
vehicle
ACC is shut off
OFF.
If
powered
by
the Cigarette
lighter
adapter
supplied please
be sure that your power outlet shuts off when
the car shuts off.
If
it does not then remove the adapter when not driving
or
the DVR
could drain the car
battery over
long
periods of parking.
2.3
Hardware Reset
Play
REC
..
,)
If
for some reason the hardware needed to be reset or restarted,
the
DVR stops recording; or appears to be
"frozen" or
"locked-up".
Press
the
RESET
button to perform a hardware reset.
Page 10

2.4 Micro SO
Card Self-Checking
The DVR checks the Micro
SD
card when it is powered
ON
every time.
If
there is a
problem
with the
SD
card it
will alert
with
a indicator
I
Message.
2.5
Date
&
Time
Setting
Self-Checking Result
Message Pop-up
No memory card inserted
No card
I
Flashing
Yellow
Memory card damaged
Invalid
image card
I
Flashing Yellow
Notes:
• The
DVR
will
start recording automatically
if
the
memory
card
is valid;
You
must connect the DVR to a monitor to see the setup menus, this is
only
needed the first time.
To
make sure of the correct date and time for the recordings,
please
check the date and time settings
before begin the recording.
Press the
"ell"
button
to enter
Setup
Menu.
MENU
1/2
File
Playback
Time
Setup
Resolution
Sound
Rec
Video
Clip
Length
Event Detection
Then press the
" "
button
to
select "Time
Setup"
Press the
"~"
I
"IJl>"
button
for
value
adjustment
Press the " "
button to
save and jump to next
value;
Press the
"ell"
button to return
to
the
Setup
Menu.
Page 11

2.6 Resolution Setting
To
DVR
has two
resolutions
720p(1280X720) and
VGA
(640X480) for option. The
default
720p can be
changed to
VGA
if desired.
Press
the
"ell"
button
to enter
Setup
Menu.
2. 7 Loop Recording
MENU
1/2
File Playback
nmeSelup
ResoluUon
Sound
Rec
Video
Clip
Length
Event DetecUon
Press
the
" "
button to
enter menu page, then
select "Resolution"
Press
the
"<IIIII"
I
"~"
button for
resolution
selection.
Press
the
" "
button
to save and
DVR will
restart
automatically.
•
Loop recording is a process
in
which the
DVR will continuously
record video.
In
the event the memory
becomes
full
it
will
record over the
oldest file
first.
• When
vehicle
ACC is
ON,
the
DVR will
start recording
automatically
(Red
light is
ON)
when in Auto
Recording mode (Default).
The frameless
recording may be divided into
several
video clips (default
is 3
min/video
clips).
The
length
of video
clips
can be changed in
Setup
Menu
(Please
refer to page 16).
• When
vehicle
ACC is
OFF, the
DVR will stop recording and save the
files automatically; OR
press the
"ell"
button to stop recording
manually
(Green
light
is
ON).
The DVR enters the
Standby
mode and Setup
will be shown
automatically when connected to a monitor.
Press
the
"ell"
button to resume recording
(Red
light
is
ON).
•
When recording is not in progress, press the
"~"
button any time to start the recording
manually
(Green
&
Yellow light will flash)
and icon
"
!
"
will
show on screen.
Page 12

ACCON
File naming:
File type: DRF
Date: YYYY/MM/DD
Time: hh/mm/ss
MI
C
Pl
ay REC
..
9
The
red
and
yellow light
will come
ON
and the
system will enter into
recording
automatically.
(Loop Recording)
Press the
II
II
button
to
Mute Voice Recording,
and the red light will
be
ON. (Loop Muted
Recording)
DRF
_20131125_103000
--
j
When the system is
in
Loop Voice
Recording, the
11111
icon will be shown
on
the
screen.
When the system is in Loop Mute
Recording, the
~~.~~
icon will be shown
on the screen.
Notes:
• The files from Loop Recordings can
be
found in the
"General Video" category for File Playback.
Page 13

2.8 Video
of
Incident (from Emergency Recording Triggered by G-sensor)
By
default, if an event happens, such as sudden impact, high-speed driving, an hard turn
or
an accident
or
crash, the G-sensor will trigger the DVR to start an Emergency Recording automatically if the Event
Detection mode is ON.
The
video for before and after 10 seconds from the moment of the event will be
saved and protected. The memory becomes full it will record over the oldest file first.
When an Emergency Recording is in progress ALL lights will be on.
The icons
"\\G\\"
&
"I"
will be shown on the screen as an indication.
REC
._.
Special recording
started when all lights
ON
Notes:
When the system is in Special mode and enter voice
recoding automatically, the
"l\G\\"
and
'lf"
will be shown
on the screen
• The files from Emergency Recordings can
be
found in the "Video
of
incident" category on the SO Card for File Playback.
File naming: EVT _20131125_1 03000
File type: EVT
Date: YYYY/MM/DD
Time: hh/mm/ss
~-1
_j
Page 14

2.9
Emergency Video (from Special/ Panic Recording)
To
lock a Special/Panic Recording manually while in the standard Loop Recording mode, press the
..
.,.
..
button. The Red light will be ON solid and the Yellow & Green lights will flash.
The recording will not automatically stop 10 seconds when pressing any button and the video will be
saved and protected. 2 video clips for both before and after from the moment
of
the Special Recording
will be saved and protected. This can be used in the event that you see something happen
or
a picture
you would like to save.
ACCON
Notes:
Press
11
.,.
11
button and
the green light and
yellow light will be
flashing
When the system is
in
Special I Panic
Recording, the
11 t 11
icon will be shown
on the screen.
• The files from Special Recordings can
be
found
in
the "Emergency Video" category for File Playback.
File naming:
File
type: SPE
Date: YYYY/MM/00
Time: hh/mm/ss
SPE_20131125_103000
Page 15

2.1
0 File Playback
on a connected monitor
If
you do
not
have a monitor connected you
will
remove the SO
card (when the unit is off) and use your
computer
to
view
the
files.
Press
the
"ell"
button
to enter Setup Menu.
Press
the
"ell"
button
to return to the page
for selecting file.
Notes:
MENU
1/2
File
Playback
Time Setup
Resolution
Sound Rec
Video
Clip
Length
Event Detection
Select "File Playback"
Press
the
" "
button
to stop the viewing.
• General Video (from Standard Loop Recording)
MIG
Press
the
" "
button
to confirm
Press the
"~"
I
"~"
button to return to the
page for selecting
file.
•
Video
of
incident (from Emergency Recording Triggered
by
G-sensor)
· •
Emergency Video (from Special
I
Panic Recording)
File Playback
General Video
Video
Of
Incident
Emergency Video
Press
the
"~"
I
"~"
button
to
select
the desired
file
type, and then press the
" "
button to confirm.
Page 16

Other external video players for
File Playback
MIC
Play
REC
..
~
Take out the micro SD card and
plug it into and standard viewing
device that can play
a
.MOV file.
Cell
phone
.... >
TV
PND
Page 17

1.
Press the
~~ell
11
button to enter the Setup Menu.
2.
Select File Deletion, and then press the button to enter.
3.
Press
the~~~~~
I
••II
button to select the desired delete file type, and then press the button to enter.
• General Video (from Loop Recording)
• Video
of
Incident (from Emergency Recording)
• Emergency Video (from
Special/
Panic Recording)
4.
Video overview shown
on
the screen and press
the~~~~~
I~~..,~~
button to select the desired file.
5.
Press the button to enter the Delete Menu. It includes:
• Delete a single file: to delete the current file
• Delete all files: to delete all files of the selected file type
6.
Select and Press the
button to confirm the deletion.
Page 18

Only viewable when connected to a monitor.
Item
Description Option
File Playback
Plays videos
General Video
I Video of Incident I
Emergency Video
Time Setup Sets the system date and time
Press the
..
..._
..
I
..
.,.
..
button to adjust the
value (YYYY
I
MM
I DD
Iss
I mm I hh).
Press the
button to jump to the
next value and confirm.
Resolution
Select image resolution
720p (1280X720 30fps)
VGA (640X480 30fps)
Sound Rec
Sets if mute recording is needed ON
/OFF
(Default On)
Video Clip Length
Sets the length of each video clip for a
Loop Recording.
1 mins
I 3 mins I 5 mins
Event Detection
When enabled, the G sensor will trigger
High
I Medium I Low I Oft
the DVR to start Emergency Recording
automatically when event happened.
The G sensor sensitivity can
be
adjusted.
Language Setting
Language selection English
I Chinese I Spanish
File Deletion
Delete file(s)
General Video
I Video of Incident I
Emergency Video
Format
Formats an external memory card
YES/NO
(All data will be erased)
Default Setting
Restores system settings to factory
YES/NO
defaults
About Software infomation
Version information
Page 19

Installation Manual
3.
Installation
3.1
Parts
Included
DVR
-1
Piece
Cigarette
lighter
adapter
-1
Piece,
Part #
3162221
0
El
Manual
-1
Piece,
Part#
31622020
E
Base For Mounting
Bracket
-1
Piece,
Part #
31622060
Mounting Bracket
-1
Piece,
Part#
31622180
2.6m
AV
out/
ACC
cable
-1
Piece,
Part#
31622160
~
~M.
K.
ount1ng
1t:
Wire ties
-1
Piece,
Part #
31622240
Mounting tape for re-application:
We recommend 3M brand Trim tape available
at any
auto parts store .
Page 20

. For
ACC power
supply
For Cigarette
lighter
power
supply
REC
~~~~
Yellow RCA type connection
Notes:
AN
out
Black wire
-----
GND, 12
volts
'-------
ACC,+
12
volts
White wire with
1
amp fuse
•
There is
no
AN
out
terminal that comes
with the cigarette lighter adapter
I
charger.
•
Use only 1 amp fuse-Located under
cap.
Page 21

_
3.3
DVR
Installation
M\C
Play
REC
IIQ
Page 22

1. Locate an appropriate spot on your
windshield.
Be sure there are no safety devices or other equipment
obstructed by the camera. Do
NOT locate
the camera in your
line of sight. We recommend behind the rear
view mirror.
2. Use an alcohol
pad
or
window
cleaner
and
clean
th~
glass completely.
3. Remove the protective covering from the tape on the mounting foot. Use caution to attach
correctly as the
tape is very strong and
will
not easily release. Place
the mount on the appropriate position on the
windshield
and press and
hold firmly
for
30
seconds to insure a good bond.
4.
Slide
in
the
DVR on the Mounting foot.
5. Adjust the
angle
of the
DVR
to be
level
with the ground and
looking
straight ahead.
6. Tighten the screw on the side of the bracket to
hold
the camera in
place.
Do NOT
over tighten or you could
r
damage the bracket.
Page 23

4.
Troubleshooting
1. After installation,
the
DVR
doesn't
work(NO
lights ON)
•
Make sure the vehicle
ACC
is
ON.
•
Make sure the power supply
is
connected correctly
and properly.
•
Check to insure that your power source
has
power.
•
Check the 1 amp fuse to insure
it
is
not blown out.
2.
The
Yellow
light
keeps flashing
•
An Invalid
I
Damaged Micro
SO
card inserted.
• There in no
SO
card
in
the unit.
•
Type
of Memory or Micro
SO
card
is
not compatible
with the DVR.
3.
The Green
light
keeps
flashing.
• The File Playback mode
is
in
progress. Press the
"ell"
button to exit.
•
Restart the vehicle, the DVR
will
start the Loop
&
Voice Recording mode
automatically.
4.
Incorrect
Date/ Time.
•
Use a monitor and correct the Time/Date setting
as per the manual.
• When the recording is in progress, turn off the
power supply to the DVR and check the Poweroff Delay function is working
or
not.
If yes, the
built-in battery is still good and you
will
adjust the
Date and Time correctly.
5.
No video
output
during
recording.
•
Make sure the external
AN
monitor is on and
the AUX
in
is connected.
• Some
in-dash A/V monitors
will
not show a
picture when driving or cannot work with two
devices connected. Apply your parking brake
and check for video. : Note this
is
only for vehicles
with
AN
input, not Audio input. Refer to your
vehicle or head unit manual for details.
6.
The video
playback
is
not
in
Color.
• The background lighting is dim
or
not bright
enough and this is normal operation in a dark
setting.
7.
The
DVR
doesn't turn
off
automatically
when
the
vehicle
is
powered
OFF 10
seconds.
•
The
white wire is connected
incorrectly
to
constant power and not to the ACC
wire of the
vehicle, please check and re-connect
it
correctly
and. properly.
•
The power outlet that you have plugged the
cigarette lighter adapter into is not shutting off.
Use another power outlet.
•
Press
RESET
button to restore the default
settings.
8.
Video
can't be
played
or
is
not
smooth when
being
played
on
external
video
players,
PC,
tablet,
etc.
Page 24

•
The Micro
SD
card is inserted incorrectly to
the external video players. Please check and
re-inserted it
correctly and properly.
•
The
player may not be compatible with or have
a player
installed
that can play a video with
MOV
file format. Download a free player
by
searching "MOV Player"
on the internet or Play
store.
•
The
player
doesn't
have
enough
memory.
Use another device for playback.
9. Care
for
the
DVR.
•
Keep the
DVR
away
from excessive moisture
and extreme temperatures.
•
Do not drop
the
DVR
or
subject it to severe
shock.
•
Do not subject the
DVR
to sudden and severe
temperature change.
In the event
of
moisture
condensation,
allow
the
DVR
to
dry
out
completely before use.
•
Never attempt
to
disassemble, repair or make
any modifications to the
DVR. Disassembly,
modification
or
any
attempt
at repair could
cause
damage
to
the
DVR
and even bodily
injury
or
property
damage
and
will
void
any
warranty.
•
Please
remove
the
DVR
in an
unattended
vehicle to discourage theft.
Limited Warranty
DO NOT
RETURN THIS
PRODUCT
TO THE
STORE
Voxx Electronics Corporation ("the Company") is
committed
to
quality
and
customer service, and are
pleased to offer you this Warranty. Please read it
thoroughly and contact the Company
at
1-800-323-
4815 with any questions.
Who
is
covered?
The Company extends this warranty
to
the original
retail purchaser of products purchased through
an
authorized Voxx retailer
in
the U.S.A., Puerto Rico
or Canada. This warranty is not transferable or
assignable. Proof of purchase
is
required
in
the form
of
an
original sales receipt.
What
is
covered?
The Company warrants that should this product or
any part thereof, under normal use,
be
proven
defective
in
material
or
workmanship
within
12
months
from the date of original purchase, such defect(s)
will
be
repaired or replaced with a new or reconditioned
product (at the Company's option) without charge for
parts and repair labor.
What
is
not
covered?
This Warranty does not cover the following:
•
Damage incurred
during shipping or transporting
the product to the Company or a service center
•
Elimination of car static or motor noise
•
Defects
in
cosmetic, decorative or non-operative
structural parts
•
Correction of antenna problems
Page 25

•
Costs
incurred
for
installation,
removal
or
reinstallation
of the product
• Consequential damage to compact discs,
USB
devices, digital media cards, accessories or
vehicle
electrical
systems
•
Damage
caused
by
improper
installation,
mishandling,
misuse,
neglect,
accident,
blown fuse,
battery
leakage,
theft or improper storage
•
Products whose factory
serial
number/bar code
label
(s)
or markings have been removed or defaced
•
Damage
resulting
from moisture, humidity, excessive
temperature, extreme
environmental
conditions or
external natural
causes
Please review the Care
and
Maintenance section
of
your Installation
and
Operation Manual for additional
information regarding the proper use
of
your product.
Limitations
THE EXTENT
OF
THE COMPANY'S LIABILITY
UNDER
THIS
WARRANTY
iS LIMITED TO
THE
REPAIR OR
REPLACEMENT PROVIDED ABOVE
AND,
IN
NO
EVENT,
SHALL
THE
COMPANY'S LIABILITY
EXCEED
THE
PURCHASE PRICE
PAID
BY
PURCHASER
FOR
THE
PRODUCT.
This Warranty is
in
lieu
of
all
other
express
warranties
or
liabilities.
ANY
IMPLIED
WARRANTIES,
INCLUDING
ANY
IMPLIED
WARRANTY
OF MERCHANTABILITY,SHALL
BE
LIMITED TO
THE DURATION OF THIS WRITTEN
WARRANTY. ANY
ACTION FOR BREACH OF
ANY
WARRANTY HEREUNDER
INCLUDING
ANY
IMPLIED
WARRANTY
OF
MERCHANTABILITY
MUST
BE
BROUGHT WITHIN
A
PERIOD OF
24
MONTHS
FROM
DATE
OF ORIGINAL PURCHASE.
IN
NO CASE
SHALL
THE
COMPANY
BE LIABLE FOR
ANY
CONSEQUENTIAL
OR
INCIDENTAL DAMAGES FOR
BREACH
OF THIS OR
ANY
OTHER
WARRANTY,
EXPRESS OR IMPLIED, WHATSOEVER.
No
person
or
representative is authorized to assume for the
Company
any
liability
other than expressed herein
in
connection with the
sale
of this product.
Some states
do not
allow limitations
on
how
long
an
implied
warranty
lasts
or the
exclusion or
limitation
of
incidental
or
consequential
damage so the above
limitations
or
exclusions
may not
apply
to you. This Warranty gives
you specific
legal
rights and you may
also have other
rights which vary from state to state.
Obtaining Warranty Service
•
To
obtain repair or
replacement
within the terms of
this Warranty,
call
1-800-323-4815 for the
location
of
a warranty station serving your area.
•
You
must prepay the
initial shipping charges to the
Company. The Company
will
pay the return shipping
charges for
all warranted products returned to an
address within the
U.S.A., Puerto
Rico or Canada.
• Please
package the product
securely
to avoid
shipping damage. We recommend using a carrier that
provides tracking service to prevent
lost
packages.
Lost or damaged packages are not covered by this
warranty.
• Provide
a detailed
description of the
problem(s) for
which you require service.
Page 26

"1J
<
6
0
a>
~
:::0
VOXX Electronics Corporation
Hauppauge, NY 11788
Technical Assistance: 1-800-323-4815
All rights reserved
© 2014 VOXX
Printed
in
China
*Specifications subject to change without notice
II
IIIII
111111111111111
31622020
 Loading...