

Audiovox DV1300B, DV1300C Owner's Manual
w..---"Pt4
,.~...
r~.
0'
s·
..
··=......................·
e""'fWzt".,·
...
(~
... ~ ...• %
•• , ..... " ••
-
AUDIO'~OX
ELECTRONICS CORP.
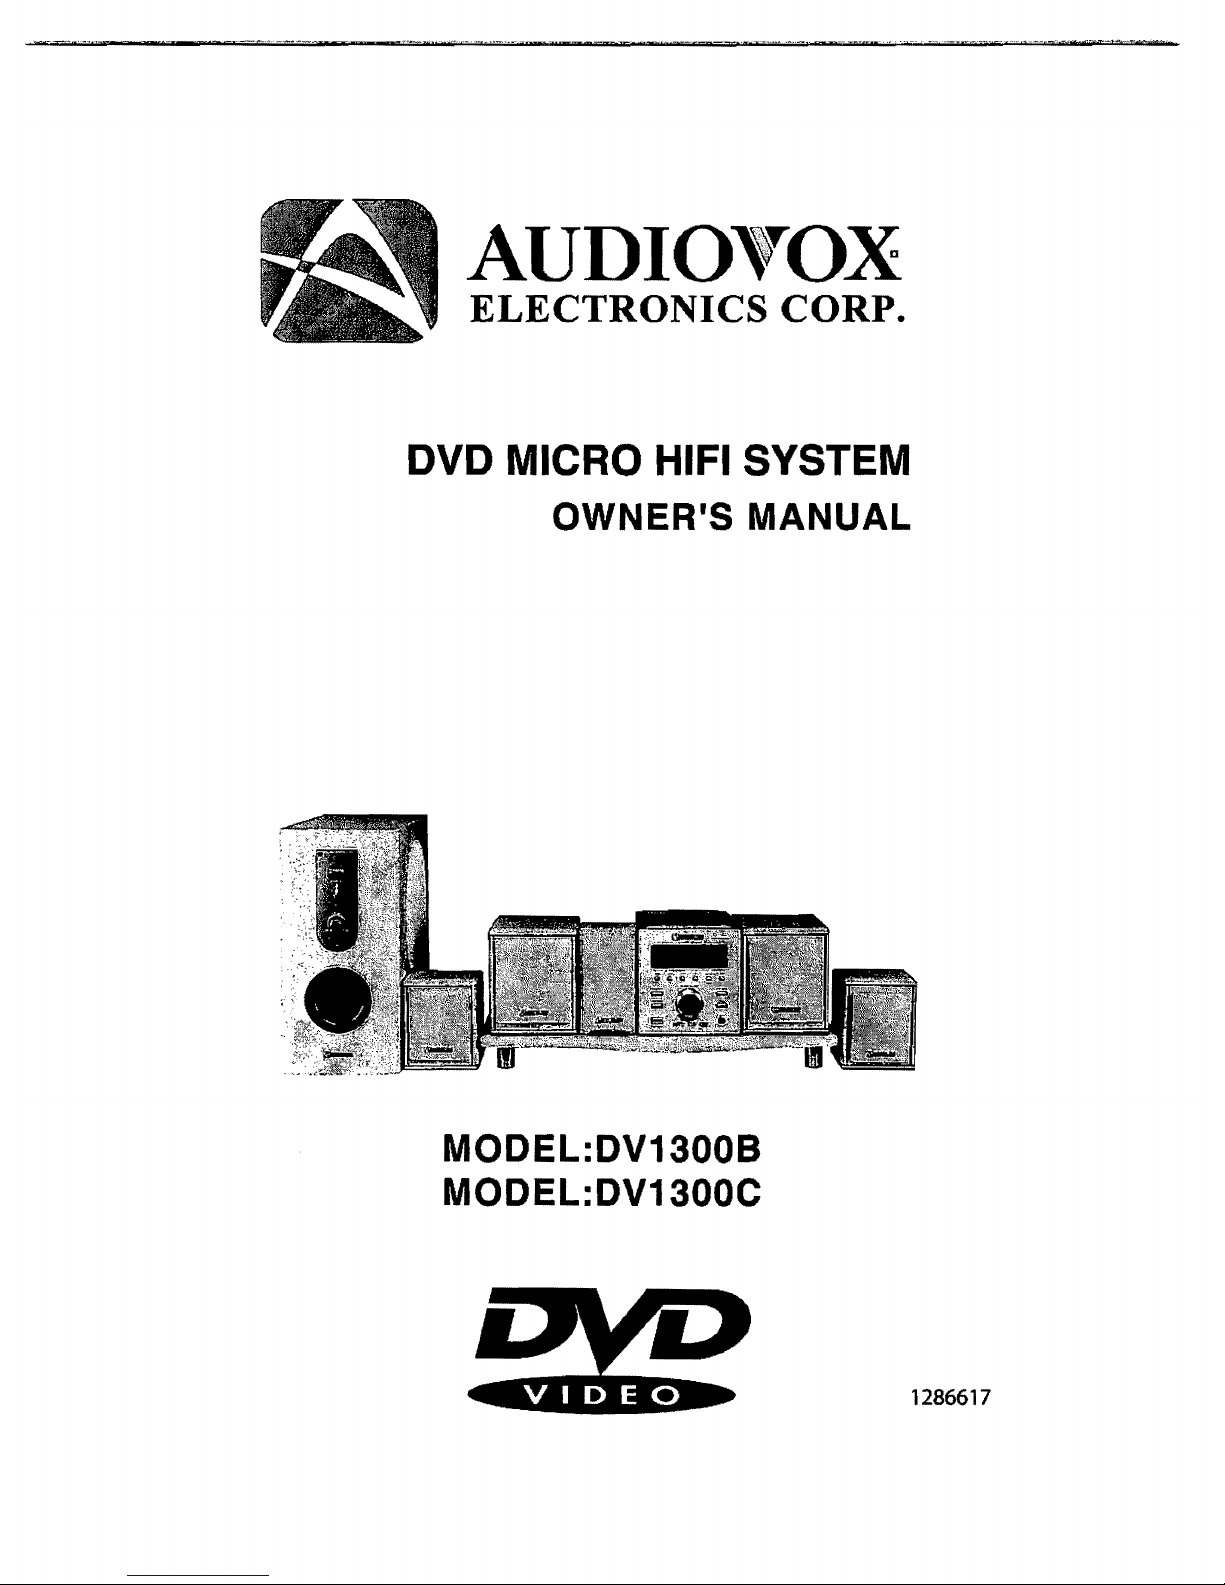
DVD MICRO HIFI SYSTEM
OWNER'S MANUAL
MODEL:DV1300B
MODEL:DV1300C
1286617
Congratulationrs
on
your
purchase
of
the
AUDIOVOX
DVD HOME
THEATER system. For optimum operation I read the manual carefully and
keep it handy for future reference.
&&
~CAUT~ION
&&
RISK
OF
ELECTRIC
SHOCK
DO
NOT
OPEN
..
The lightning flash with arrowhead symbol within a triangle is
intended
to
alert the user
to
the presence
of
un
insulated
"Dangerous Voltage" within the product's enclosure that may
be
of
sufficient magnitude
to
constitute a risk of electric shock.
,-
The
exclamation
point
within
an
equilateral
triangle is
intended
to alert the
user
to the presence
of
important
operating
and
maintenance
(servicing)
instructions
in
the
literature accompanying the product.
WARNING:
To
reduce the risk
of
fire or electric shock. do not expose this equipment
to rain
or
moisture.
Dangerous
High
Voltages
are
present
inside
the
enclosure. Do not open the cabinet.
CAUTION:
To
prevent electric shock. match wide blade plug to wide slot
of
the power
outlet and fully insert .
CAUTION: The DV1300 employs a laser system.
To
ensure the proper use
of
the
DV1300. read this manual carefully and keep it handy for future
reference.
If
the DV1300 requires servicing. contact the seller or the
AUDIOVOX service center (refer
to
"troubleshooting
").
To
prevent direct
exposure to the
laser radiation. do not remove covers. invisible laser
radiation when the covers are removed or
if
the interlocks are
defeated.
Do
not stare into the laser beams. Any adjustments. or procedures other
than those specified herein may
result in hazardous radiation exposure.
WARNING: Any change or modification to the unit. not expressly approved
by
AUDIOVOX
or its authorized dealers. will
void
the
user's authority to operate the unit.
B.
IMPORTANT~SAFETY
INSTRUCTIONS
i
J
1) Read Instructions - All the safety and operating instructions should be read before the
product is operated.
2) Retain Instructions - The safety and operating instructions should be retained for future
reference.
3) Heed All Warnings - All warnings on the product
and
in the operating instructions should
be
adhered to.
4) Follow Instructions - All operating
and
use instructions should be followed.
5) Cleaning - Unplug this product from the wall outlet before cleaning.
Do
not use liquid or
aerosol cleaners. Use only a damp cloth for cleaning.
6) Attachments - Do not use attachments not recommended
by
the product manufacturer as
they may cause hazards.
7) Water and moisture -
Do
not use this product near water - for example. near a bath
tUb.
wash bowl. kitchen sink. or laundry tub;
in
a wet basement; or near a swimming pool; and
the like.
8) Accessories -
Do
not place this product
on
an
unstable cart. stand, tripod, bracket, or table.
The product may fall. causing serious injury to a child or adult. and serious damage to the
product. Use only with a cart. stand, tripod. bracket. or table recommended by the
manufacturer. or sold with the product. Any mounting
of
the product should follow the
manufacturer's instructions, and should use a mounting accessory recommended
by
the
manufacturer.
9) A product and cart combination should be moved with care. Quick stops, excessive force
and uneven surfaces may cause the product and cart combination to overturn.
10) Power Sources - This product should
be
operated only from the type of power source
indicated on the rear panel.
If
you
are not sure of the type
of
power supply to your home
consult your product dealer or local power company. For products intended to operate from
battery power. or other sources. refer to the operating instructions.
11)
Grounding or Polarization - This product may
be
equipped with a polarized alternatingcurrent line plug(a plug having one blade wider than the other). This plug will fit into the
power outlet only one
way.
This is a safety feature. If you are unable to insert the plug fully
into the outlet. try reversing the plug. If the plug should still fail to fit. contact your electrician
to replace your obsolete outlet.
Do
not defeat the safety purpose of the polarized plug.
12) Power- Cord Protection - Power-supply cords should be routed so that they are not likely to
be walked on or pinched by items placed upon or against them. paying particular attention
to cords at plugs. convenience receptacles. and the point where they exit from the product.
13) Lightning - For added protection for this product during a lightning storm. or when it is left
unattended and unused for long periods
of
time. unplug it from the wall outlet and
disconnect the antenna or cable system. This will prevent damage to the product due to
lightning and power-line surges.
]
I
J
14) Power Lines - An outside antenna system should not be located in the vicinity of overhead
power
lines or other electric light
or
power circuits, or where it can fall into such power lines
or circuits. When
installing
an
outside antenna system, extreme care should be taken
to
keep from touching such power lines
or
circuits as contact with them might be fatal.
15) Overloading - Do not overload
wall outlets, extension cords,
or
integral convenience
receptacles as this can
result in a risk
of
fire or electric shock.
16) Object and Liquid Entry
- Never push objects
of
any kind into this product through result in
a fire
or
electric shock. Never spill liquid
of
any kind on the product.
17) Servicing - Do not aHempt to service this product yourself as opening or removing
qualified
service personnel.
18) Damages Requiring Service - Unplug this product from the wall outlet and refer servicing
to
qualified service personnel under the following conditions.
a) When the power- supply cord
or
plug is damaged.
b)
If liquid has been spilled. or objects have fallen into the product.
c)
If the product has been exposed to rain or water.
d)
If the product does not operate normally by following the operating instructions. Adjust
only those controls that are covered by the operating instructions as an improper
adjustment
of
other controls may result in damage and will often require extensive work
by a
qualified technician
to
restore the product to its normal operation.e) If the product
has been dropped or damaged in any
way.
f)
When the product exhibits a distinct change in performance - this indicates a need for
service.
19) Replacement parts
- When replacement parts are required, be sure the service technician
has
used
replacement
parts
specified
by
the
manufacturer
or
have
the
same
characteristics as the original part. Unauthorized substitutions may result in fire. electric
shock or other hazards.
20) Safety Check - Upon completion
of
any service or repair to this product. ask the service
technician to perform safety checks to determine that the product is in proper operating
condition.
21) Heat - The product should be situated away from heat sources such as radiators, heat
registers, stoves or other products(including amplifiers)that produce heat.
This product incorporates copyright protection technology that is protected by method
claims
of
certain U.S. patents and other intellectual property rights owned by Macrovision
Corporation and other rights owners. Use
of
this copyright protection technology must be
authorized by Macrovision Corporation, and is intended for home and other
limited viewing
uses
only unless otherwise authorized by Macrovision Corporation. Reverse engineering
or
disassembly
is
prohibited.
p'"
A.
SAFETY
PRECAUTIONS··· ..••••........•................ .••.•••......•••..•••.••.••..•.. 1
B. IMPORTANT SAFETY INSTRUCTIONS ..
••
....
• ..
••
................................
2
C.
MAIN
FEATURES·················· •..................••••••••.••.•....••.•.....••..••••.... 4
D.
ACCESSORIES .....••••••.••••....•.............••.•••..........•••••............•..•••.. 5
E.
REMOTE
CONTROL
••••
·· ...........•.••....•..•••••• I
................
I........
... ... ...
5
F.
LAYOUT
OF
REMOTE CONTROL
..
••
....
·..
....
.........
......
... ... ...
•••
.........
6
G.
NOTES
ON
DiSCS····.·
•.••••••
····
.•••...............•••••••••...........••••••.••.••.. I 7
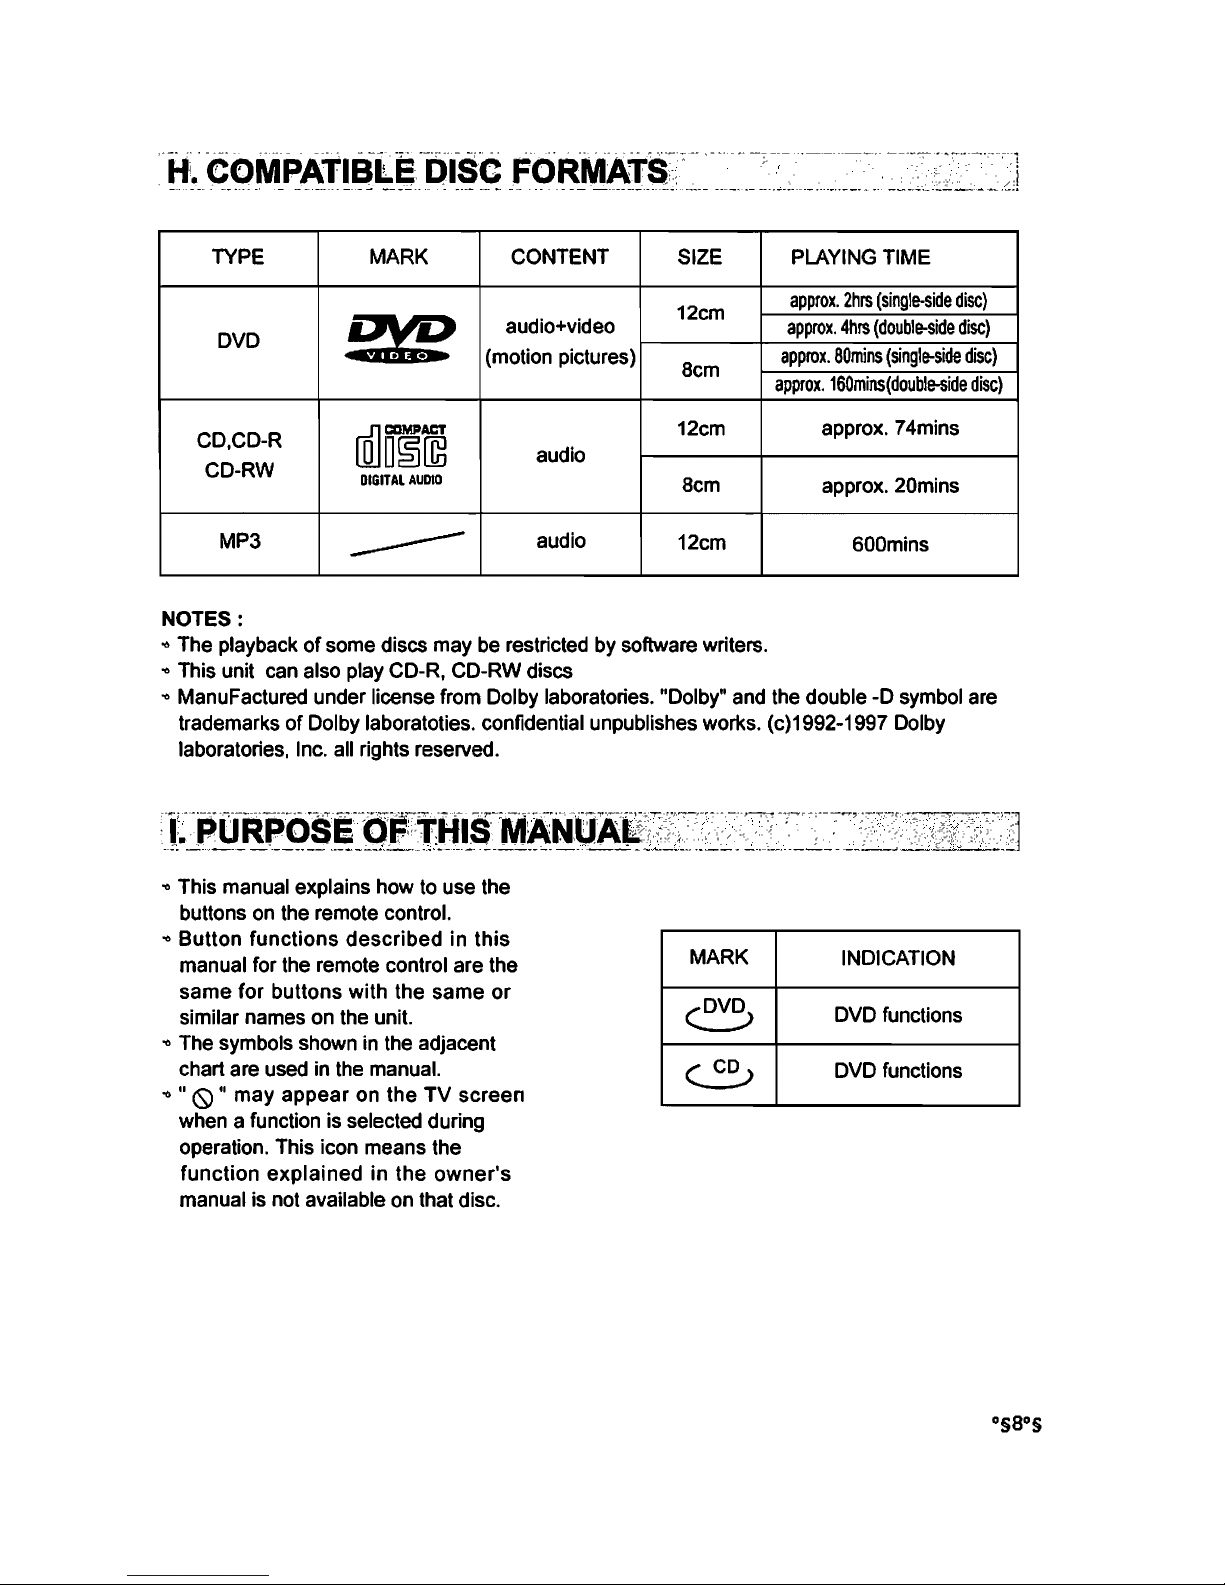
H. COMPATIBLE DISC FORMATS
....
· .. ·
....
·..
............
..........
............
........
8
I. PURPOSE
OF
THIS
MANUAL
.........................................................
8
J.
PREPERATIONAL CONSiDERATIONS· .. •
......................................
9
K.
BASIC
OPERATIONS
••••••••
I
II
••••••••••••••••••••••••••••••••••••••••••
,
•••••••••••••••
14
MODE
SELECTION······························· ...••••......•..•....•••••••••••••.........• 14
PLAY
DiSCS········· ............••.......•.•••••••••..........•....... I
••••••
••••••••••
••••••••
14
PAUSE········· ...•. .•••... ...... ...... ........•
•••
•••...
••.
.........
••• •••
••.
•••
.••.... ........
15
OSO······
•••
•••... •..
•••
......... ... ...... ... ...•••
••••..
... ... •..... ..• •••...•.. •.•...
•••
......
15
VOLUME
CONTROL··· ...........•••....••••..•.•...••••..........•...••••••....••..•.....• 15
DVD
MENU
PLAy······ .....••.•.......•••••.....•.•••••..............•...••••••.••••.••....
15
SELECTING TRACKS USING THE NUMBER BUTTONS·
..
••
.. • ........ • .. • ..
••
16
L.
DISC
PLAY
FEATURES··· ...•..•...••••••.•.••.•...........•••••.....•..•...•••......•••
17
AUDIO
MODE··················································...............................
17
MUTE····························
••••••••••.
····· ... ··· .............••••••••.•..........••....•••. 17
FAST
PLAY···
••.
.•. ...••••••••••••...
••••.•
...........••.. ••••.•.•••.. ...••...•... .... .•••••.. 18
SLOW
PLAY···
•••••
•••••••..... . •..... .. ............. ••..•••••••.....•. •••......•.. ... .•.••.
•••
18
REPEAT
PLAY
•••
······
•••
·•··········
.•••••••••••......•..
·································18
SELECTING SUBTITLES .. •
....
••••••·•
.. • ..
••
..
••
..............
•••··•···
......
••
........
•
19
SELECTING ANGLES
..
• ..
••
................ • ....
••
.. ·
....
··••• .. •
..
•••
....
••
....
• .. ·••• .. 19
TIME SEARCH AND REMAINING TIME
.. • ....
••
........ • ..............................
20
RESUME
PLAY···
••.
.••...
•••
.•.
•.•
•••
•••
................... .....•
.•••••
••••••... ..• •.•...
•••
21
ZOOM
PLAy············ .•. . .. ... ... ...
.••
••.
.••
••.
..•
••.
.•. ... ... .•••..
••.
.••
••.
.•••..
.••
...
22
PROGRAM
PLAy····································.··············
.•..•••••••••••.........
22
SHUFFLE PLAy··················································· •••...••••••••••...........
23
DIGEST
PLAy····················· ••••......••........•.......•.•••••••.....................•• 23
CHANNEL
SELECT··· ••••.. ...
......
...
...
.............
•••
••.•••
•••
•.. ... ... ....•••.•
••.
••.
25
SELECT MUSIC CATEGORy··
........
• .. •
.................................................
25
TREBLE/BASS CONTROL
...... • ....
• ..
••
.. •
............................................
26
M.
FUNCTION
SETTING·············· .••••
•••
••••••••••
••••••
........ .••••••••••
•••••
•••.•
••••••
27
MENU
SEn
..
ING··············································· ••••••••........•••••••.•••.•••
27
N.
MP3
OPERATIONS··· •••..•
•••.••
•••.•....... .......... ..• .•.
.••••.
•••...... •..•••••. •••...
31
O. FM AND
AM
OPERATIONS
...... • ........................................................
33
FM TUNING······ .•.••••••••.•••••••••..•••...........••••••......•.................•••.••. .•..
33
AM
TUNING················································ ..•.•.•....•.•.............••..••••• 34
P.
CLOCK PROGRAMMING·············································· .•...... ......•••••• 35
Q.
OPTIONAL
KARAOKE
MODE
................ • ............ • ........
• .. •
......
• .......... • 36
R.
TROUBLESHOOTING
AND
SPECIFICATIONS·..
...............
......
...
......
37
..
rROUBLESHOO
..
rING············ .........•......••••• .••. ..•..••..••.••••••••.••.•.
••••••
37
TECHNICAL SPECiFiCATIONS
..
••••
......
• .. ··•
.......................................
38
APPENDIX A-SURWOOFER
c.
MA~N
FEATURes·
.
,"
. .
~
" .
.:..
.:.-.~
..
- -
..
-
...
~
-
..
---~
...
~
-::
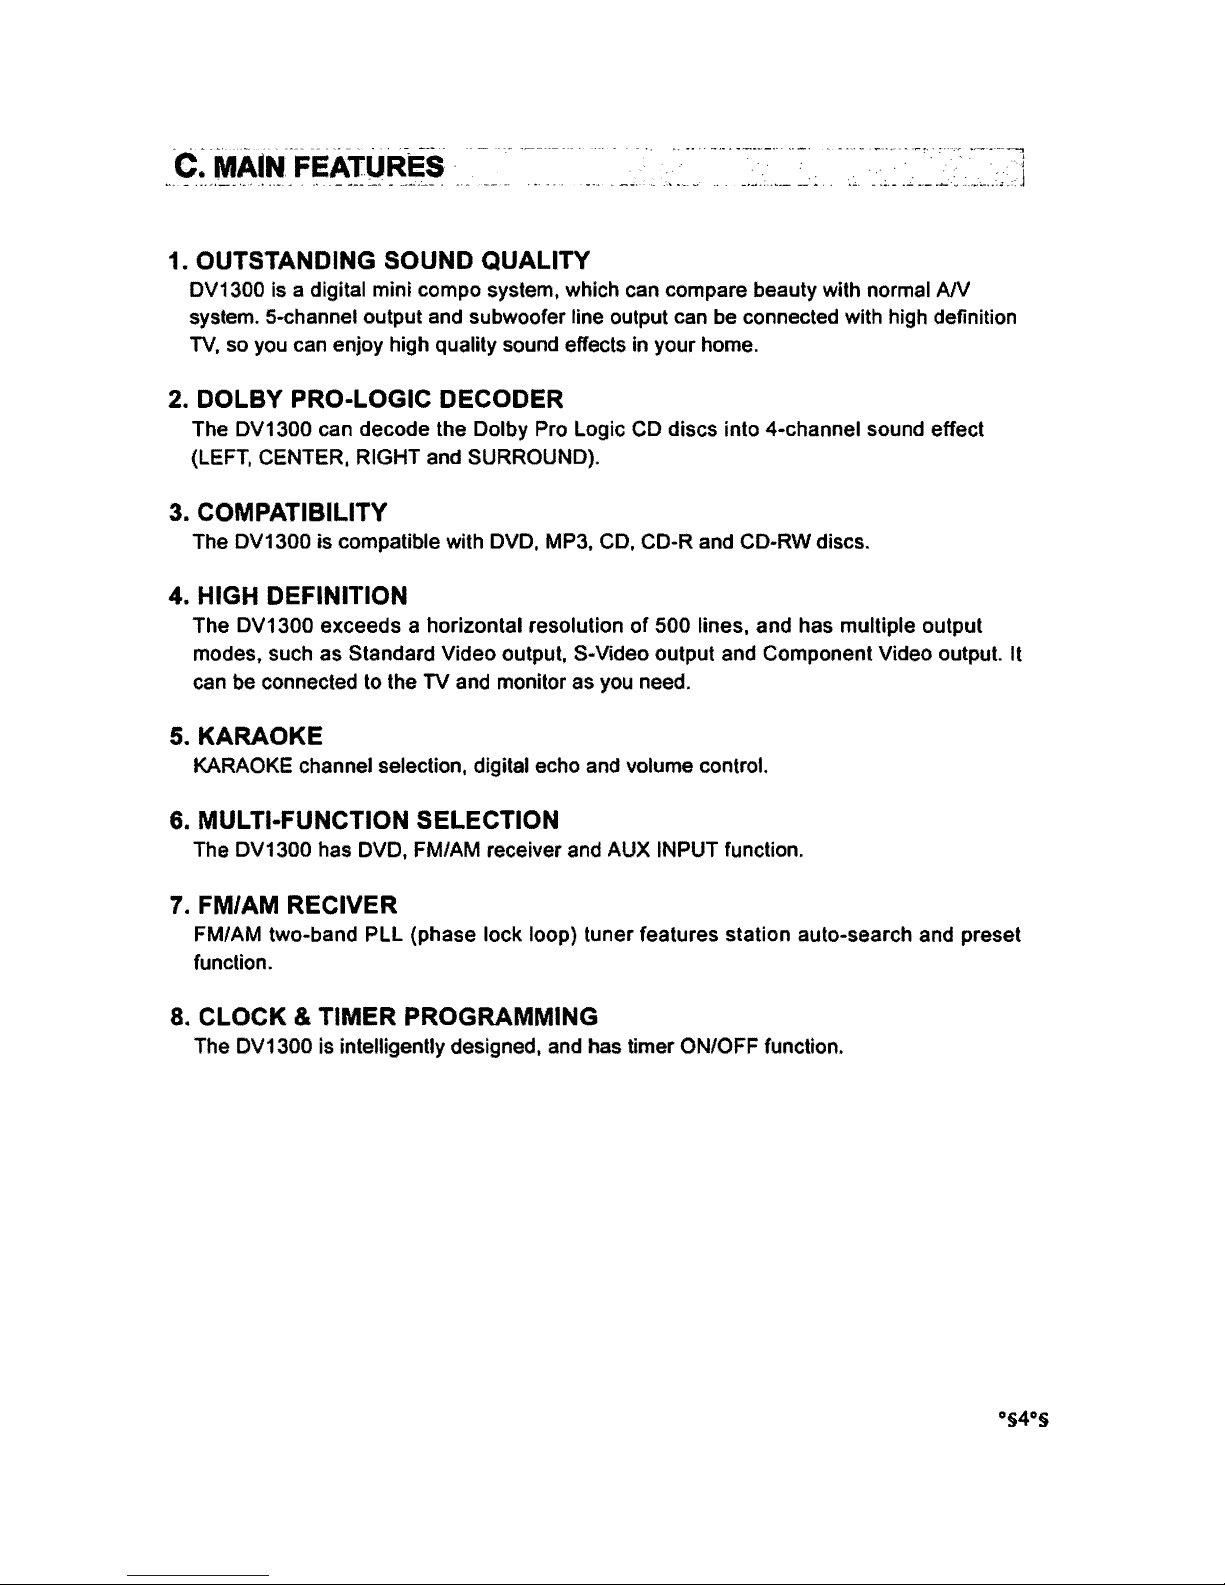
1. OUTSTANDING SOUND QUALITY
DV1300 is a digital mini compo system, which can compare beauty with normal
AN
system. 5-channel output and subwoofer line output can be connected with high definition
TV,
so you can enjoy high quality sound effects in your home.
2.
DOLBY PRO·LOGIC DECODER
The DV1300 can decode the Dolby Pro Logic CD discs into 4-channel sound effect
(LEFT. CENTER.
RIGHT and SURROUND).
3. COMPATIBILITY
The DV1300 is compatible with DVD, MP3. CD, CD-R and CD·RW discs.
4. HIGH DEFINITION
The DV1300 exceeds a horizontal resolution of 500 lines. and has multiple output
modes, such as Standard Video output,
S-Video output and Component Video output. It
can be connected to the TV and monitor as you need.
5. KARAOKE
KARAOKE channel selection, digital echo and volume control.
6. MULTI·FUNCTION SELECTION
The DV1300 has DVD. FM/AM receiver and AUX INPUT function.
7.
FM/AM RECIVER
FM/AM two-band PLL (phase lock loop) tuner features station auto-search and preset
function.
8. CLOCK & TIMER PROGRAMMING
The DV1300 is intelligently designed, and has timer ON/OFF function.
_.
_._-
~-
---_._-
- -- -
_.
D. ACCESSQRIES
l_·.
_ .. _
... : ._._
....
__ . _______ -_,'_
..
_::;:'
___
..:...
__ . ___
._.
__
..
___
._
..
____
~._
Please check and identify the supplied
accessories.
Remote Control
1
AAA Batteries
2
Video Cord 1
Audio Cord
1
AM
Loop Antenna
1
FM
Antenna
1
Speaker Connecting Wire
5
Owner's Manual
1
Power Connecting Wire
1
c
,-.'
_c.
--='·.--·-'_·-~-'--C-·.-~---C-.--.-"_--·
~
-.-
..
_-
--1
.1;!.~~_~MqI~.~~9~~r~9~_"
__
,I
INSTALL BATTERIES
1.
Open the battery cover.
2.
Insert two AAA batteries, make sure to
match
+,-
on the batteries to marks inside
the battery compartment.
3.Close the battery cover.
NOTE:
..
Change batteries when shorting of power
energe .
..
Do
not
use
different
types
of
batteries
together, or mix
old
and new batteries .
..
If
you do not use the remote control for a
long period of time, remove the batteries to
avoid
possible
damage
to
the
remote
control
from
battery
corrosion .
..
Remove
corrosive
batteries in time to
avoid the damage from leakage .
..
If
the
remote
control does
not
function,
replace all batteries with new ones.
USE THE REMOTE CONTROL
..
.......
:::-0
'W
X
!! .
~.
I
r;",
,®.
..
Point
the
remote
control
at
the
remote sensor.
NOTE:
..
In
order to operate normally, place the unit
far
away
from
the
strong light (such as
sunlight and strong fluorescent).
_
..
__
.-...
. ...
-----,._-
---
-------~~-~-.--
.
F~LAYOU,T9P
~EMOTE
CONr~9~
_______
~.
_
-
..
-=:--=::-::~I-
a
(i{j)-~I----...I;~-"':;::~"'='"
-----~~~I-~
3
CD
MUTE
@ FUNCTION
@ SURR.MODE
@ TEST
® NUMBER KEYS
®
ECHO+.-
o P-EQ
® P.B.C.
® RETURN
@)
DIGEST
@ ANGLE
@ LANGUAGE
@ SUBTITLE
@ REMAIN
@ P.MODE
@ SLOWPLAY
@ TUNING+,-
@ PLAY
@ PAUSE
@)
MENU
® DIRECTIONS OF CURSOR
@ ZOOM
@ TITLE
@ OK-CONFORM
@ SETUP
@ STOP
@ PREVINEXT SKIP
@ REPEAT
@ A-BREPEAT
@ SYSTEM '"
@ OSD
@
UR
@ RESUME
®
MICLEVEL
@ TIME SEARCH
® TONE
@
VOL+,-
@ MEMORY
@)
TRIM
@I
POWER
@ REMOTE TRANSMITIER
*NOTE:
The
SYSTEM
button
does
not
work
on
the
DV1300.

ON HANDLING DISCS
...
Do not touch the playback side
of
the disc.
'0
Do not attach paper
or
tape to discs.
Correct Wrong
'0
Wipe the disc from the center outwards
with a soft cloth.
Correct Wrong
Do not use any type
of
solvent such as
thinner, benzine, commercially available
cleaners or antistatis spray .
ON STORING DISCS
...
Do not store discs in a place subject to
direct
sunlight
or
near heat sources.
'0
Do not store discs in place subject to
moisture and dust.
'0
Store discs in a case.
NOTES ON REGION
NUMBER
The region number
of
this unit is 1 with any
other region
OVD the unit will display
"WRONG REGION".
TREMS ON DISCS
...
TITLE
The images or music
of
a DVO are divided
into units. The
TITLE is the biggest one.
The title is made up
of
chapters.
...
CHAPTER
It is smaller than title among the units
of
a
DVD.
Each
title
is
made
up
of
several
chapters and each chapter has a number for
search .
...
TRACK
The music
in
a CD have each track numbers
for search.
STRUCTURE OF DVD
DISC
TITLE
...
1-4-
........ ...,.........
..........................
.
CHAPTER
STRUCTURE OF CD
DISC
....
--....
~
...........
t---l
.......
....
TRACK
TYPE
MARK CONTENT
SIZE
12cm
DVD
2\1?
audio+video
(motion pictures)
Bcm
CD,CD-R
WJ~m
12cm
CD-RW
audio
DIGITAL
AUDIO
Bcm
MP3
-----
audio
12cm
NOTES:
..
The playback of some discs may
be
restricted
by
software writers .
..
This unit
can
also play
CD-R,
CD-RW
discs
PLAYING
TIME
approx.
2hrs
(single-side
disc)
approx.
4hrs
(double-side
disc)
approx.
80mins
(single-side
disc)
approx.
160mins(double-side
disc)
approx.
74mins
approx. 20mins
600mins
..
ManuFactured under license
from
Dolby laboratories. "Dolby"
and
the
double
-0
symbol
are
trademarks of Dolby laboratoties. confidential unpublishes works. (c)1992-1997 Dolby
laboratories,
Inc.
all
rights reserved .
..
This manual explains how
to
use the
buttons
on
the
remote control.
..
Button functions described in this
manual for
the
remote control are the
same for buttons with the same or
similar names
on
the
unit.
..
The
symbols
shown
in
the
adjacent
chart
are
used
in
the
manual.
....
<S>
..
may appear
on
the TV screen
when
a function is selected during
operation. This icon means the
function
explained in the owner's
manual
is
not available
on
that disc.
MARK
INDICATION
c.DV~
DVD
functions
~
DVD
functions
J
J~
PREPARATIONAL.
CONSIDERAtiONS
; " .....
~-
~
._.",
.::::::...:......
-
..
:-
.....
---
,"
::-
'"..
~-
--
....• -;
~---~
-,
,;.."
..
,--.' ----...:... .. - ........
~--.
·1
c._"c
__
._,
__
..
':
...
__
.c_..1
TOP LID
~
__
~==================================~PU~S~H~==r----15
FRONT PANEL
2
3
4
5
.-----+----_+---14
DVD/C
D/TU
NE
R/AMPLI
FIE
R
P.£O
TONE
FUNCTlcm
SURRMODE
o
OHISTAHOBV
CD
DISPLAY
WINDOW
ill
P-EQ
@ TONE
<9
FUNCTION
® SURR.MODE
® POWER
o
MICJACK
.-------------------------+----13
T\JHtNQ /
Q.OCK
/ To.tER
.~----~------_+----12
L--
_______
--==-=--
__
----'''---
______
-+-
___
11
MASTER
VOLUME
PLAY/PAUSE
~I
-11------+----10
STOP
LlIC
-1-------+----7
® STOP
@ PLAY/PAUSE
® CLOCK
@ DOWNlUP(For
TUNNING/CLOCKITIMER)
@ TIMER
® MASTER VOLUME KNOB
@ REMOTE SENSOR
@ PUSH OPEN
- - ,
~
-
-------
----
--">----..
.
•••
~~
-,_.
~---
".
, J.
P~_E;~~~·IIONAL
CON~~DERATIONS:
_____
,_~~~,~
______________
.
__
.
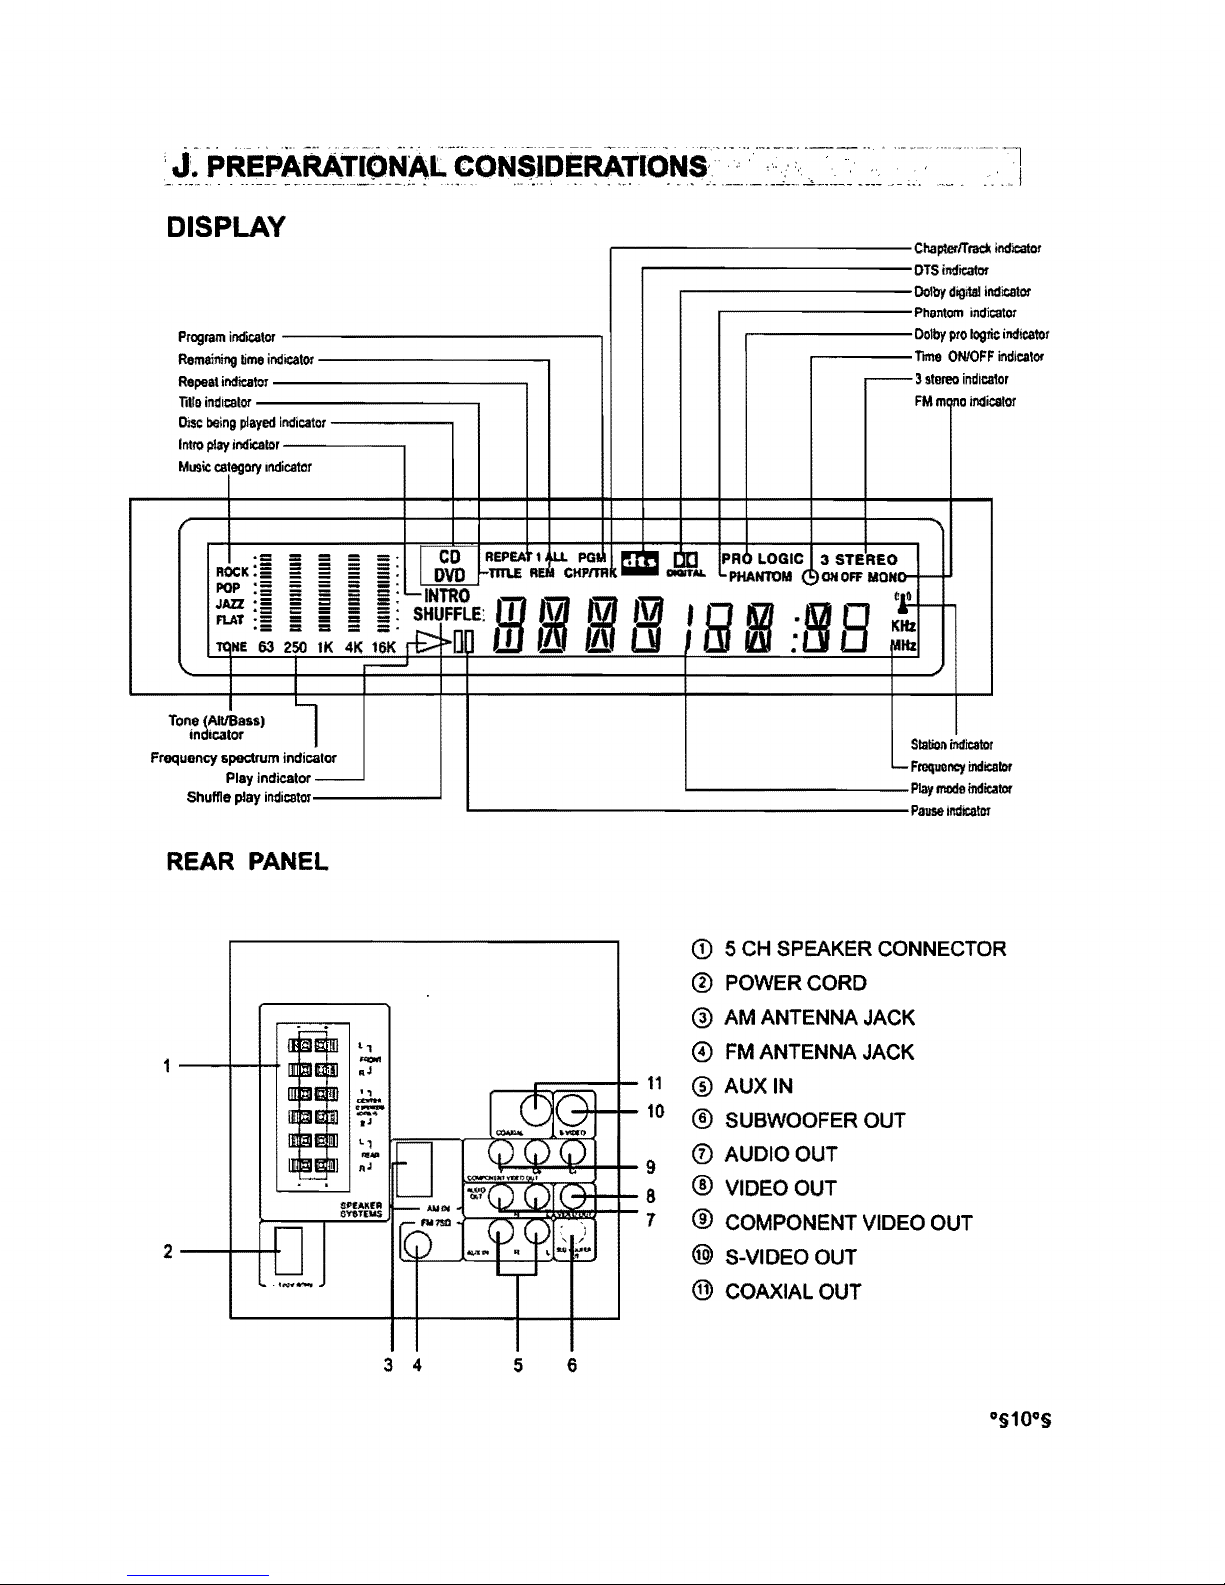
DISPLAY
Programindicalor
------------~
Remaining
time
indiCator
----------,
Repeat
indiCator
------------,
Tdleindlcalor
----------,
Disc
being
played
indicator
-----.,
Intra
play
indicator
-----.,
Music
category
Indicator
.-------------Chapler/Tmck
indicator
,...-----------DTSindiCatOf
,...---------OoIbydigltal
indiCator
.----------Phantom
indicator
.---------Dolby
pro
logric
indicator
.-----
TIme
ONIOFF
indicator
- 3
stereo
indica10r
FM
m
no
indicator
ROCK:
E_-
__
E=
===_=
E : REPU
.~
~
PGI
11!1
PI
J
1tI.
PR
LOGIC 3 STEREO
§
§:
Tm.E
R..
CHPITA: IIiIIIIII
_AI.
PHANTOM
(9OH
OFF
MOHO-I--
~t!
!
!.!:;~
ill
00
00
lJ
'@
1fI
Jl
B
i~~
I
r---I
I
Tone (AlllBassj l
IndICator
Frequency spectrum indicator
Play
indicator-
Shuffle play
indicator------l
REAR PANEL
"
-
oJ
, ,
~
t
J
2
3 4
Station
indicator
'-
Frequency
indicator
'-----------Playmode
indicalor
L...------------------PauseindicalOr
CD
5
CH
SPEAKER
CONNECTOR
® POWERCORD
@)
AM
ANTENNA
JACK
o
FM
ANTENNA
JACK
11
® AUXIN
10
®
SUBWOOFER
OUT
9
CD
AUDIO
OUT
8
®
VIDEO
OUT
1
®
COMPONENT
VIDEO
OUT
@)
S-VIDEO
OUT
®
COAXIAL
OUT
5 6
o§10o§
:
J-~
PREPARAtloNA~-coNsiDERATloKs,','
,
......:..-----.:....-.--. _.
-
-~.
--"-
- -
,".-
-
.-~..........:..--.~~
.••.
;-.---.-
- - * -
,--
------"--_
..
_---
---
...
.:..-
.----~
.. -...
-~-....
-,.
~.
'
....
------.,
-----,I
_.
____
....::.,.
_._-=--_.
__
.J
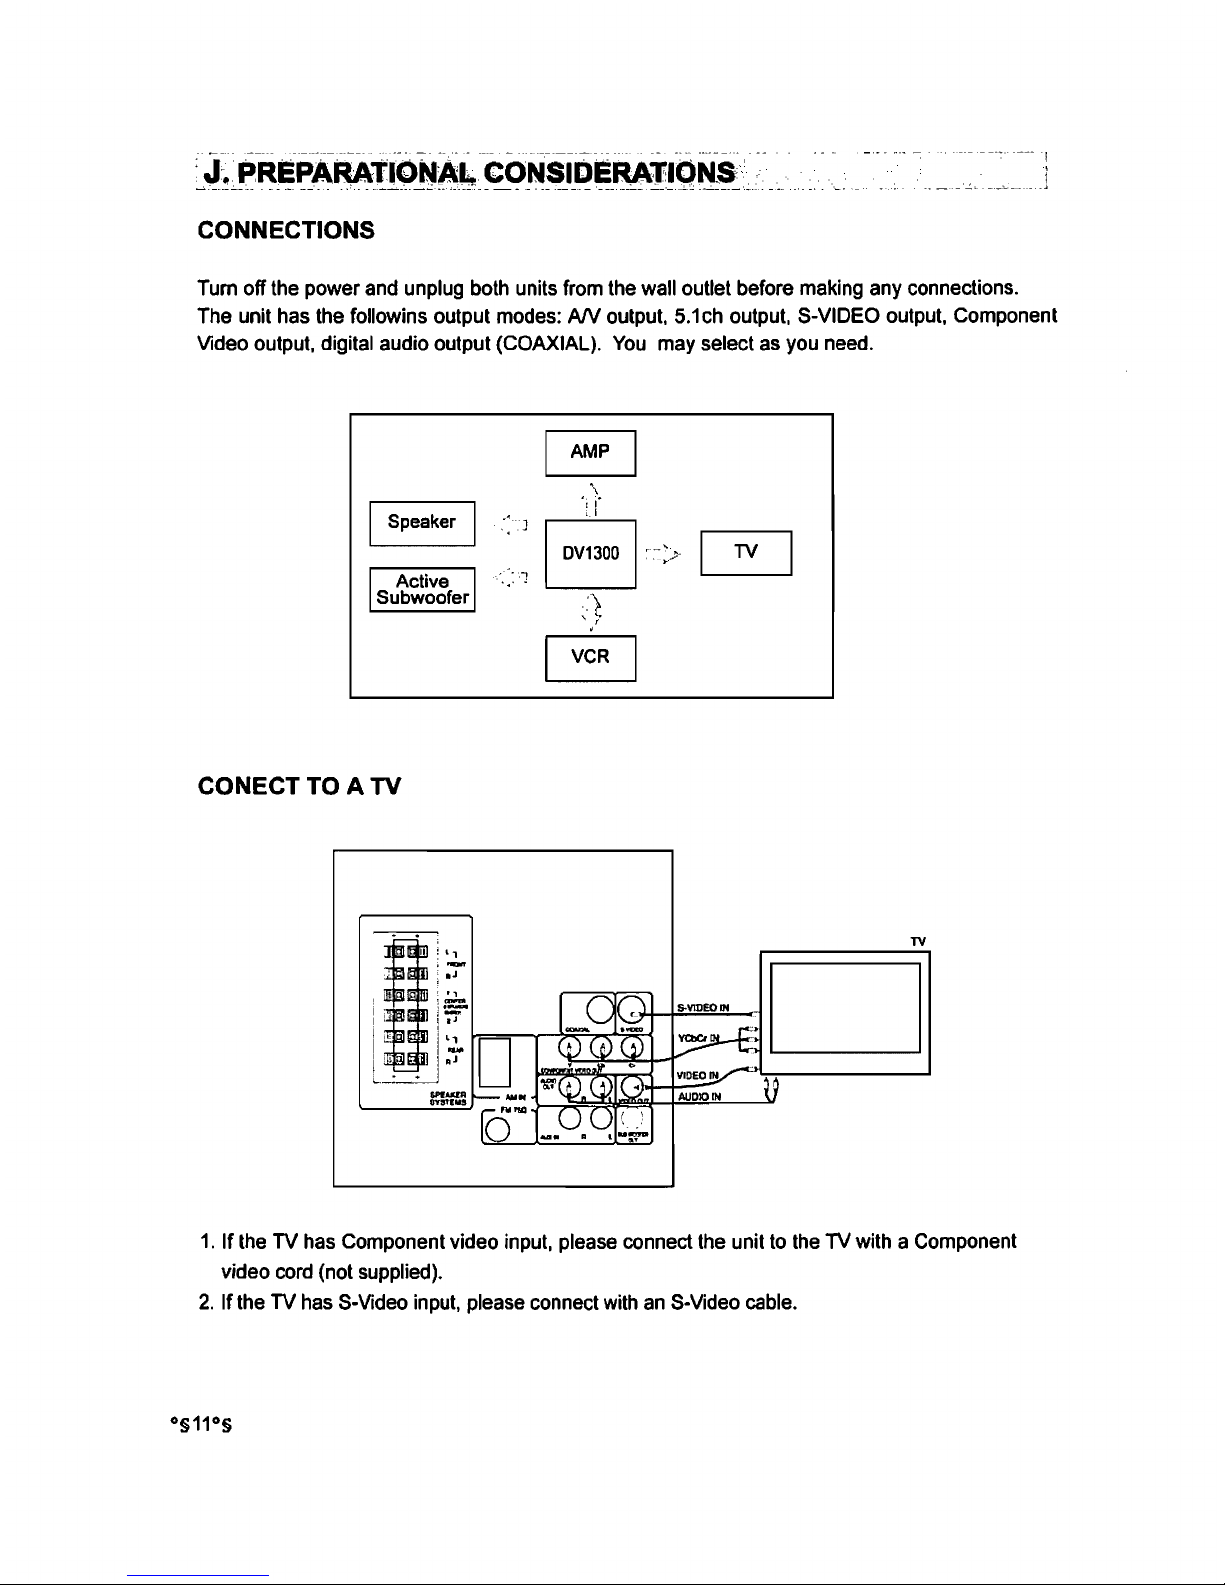
CONNECTIONS
Tum
off
the
power
and
unplug
both
units
from
the
wall outlet before
making
any
connections.
The
unit
has
the
followins output
modes:
AN
output.
5.1
ch
output,
S-VIDEO
output.
Component
Video
output. digital audio output (COAXIAL).
You
may
select
as
you
need.
Speaker
TV
CONECT TO A
TV
1.
If
the
TV
has
Component video
input.
please
connect
the
unit
to
the
TV
with a
Component
video
cord
(not
supplied).
2.
If
the
TV
has
S-Video
input.
please
connect
with
an
S-Video
cable.

-"'!'"
..........
- •
J'.
PREPARATIONAI:..
CONSIDERATIONS
_ _ ,
••
_-
~_.:_
•
__ 4 ••
~.
________ ' ___
_
-,..~.~~-.--
".'-
:~-":.---~~-:}
.:.
.1
-"'-~~
.::.
-.::..:
SPEAKER CONNECTIONS
NOTE:
<0
Be
sure
to
observe correct polarity
when
connecting
speakers.
'0
The
active subwoofer
should
be
placed
between
the
front speakers.
'0
When
connecting
two
center speakers.
the
impedence of
each
speaker
must
be
SO
minimum
'0
When
connecting
one
center
speaker.
impedence
of speaker
can
be
60.
F ron'l
speaker
SPEAKER
AMIN
SYSTEMS
o
Rear speaker
D
Active
subwoofeT
• 120VeGHr
-- --
--
-------.-
---
- -
--
~
--
-"
--
- -
----
.
Ji.
PREPARATrONAl
CONSIDERAtIONS~,'"
_ _
•••
__
•
.~
_.-:.:.._. _ •••
-._
._._:~
_
•• _ ••
:::~
__ • ...:
••
:_
•
.....:.~
••••
_ ~ -.-,
•• _ •••
_ .T
.::-.
__
'.'
"_--' : •••
..:...:.
••
_
~ .~
__ • __
••• _ •••
_
,..,
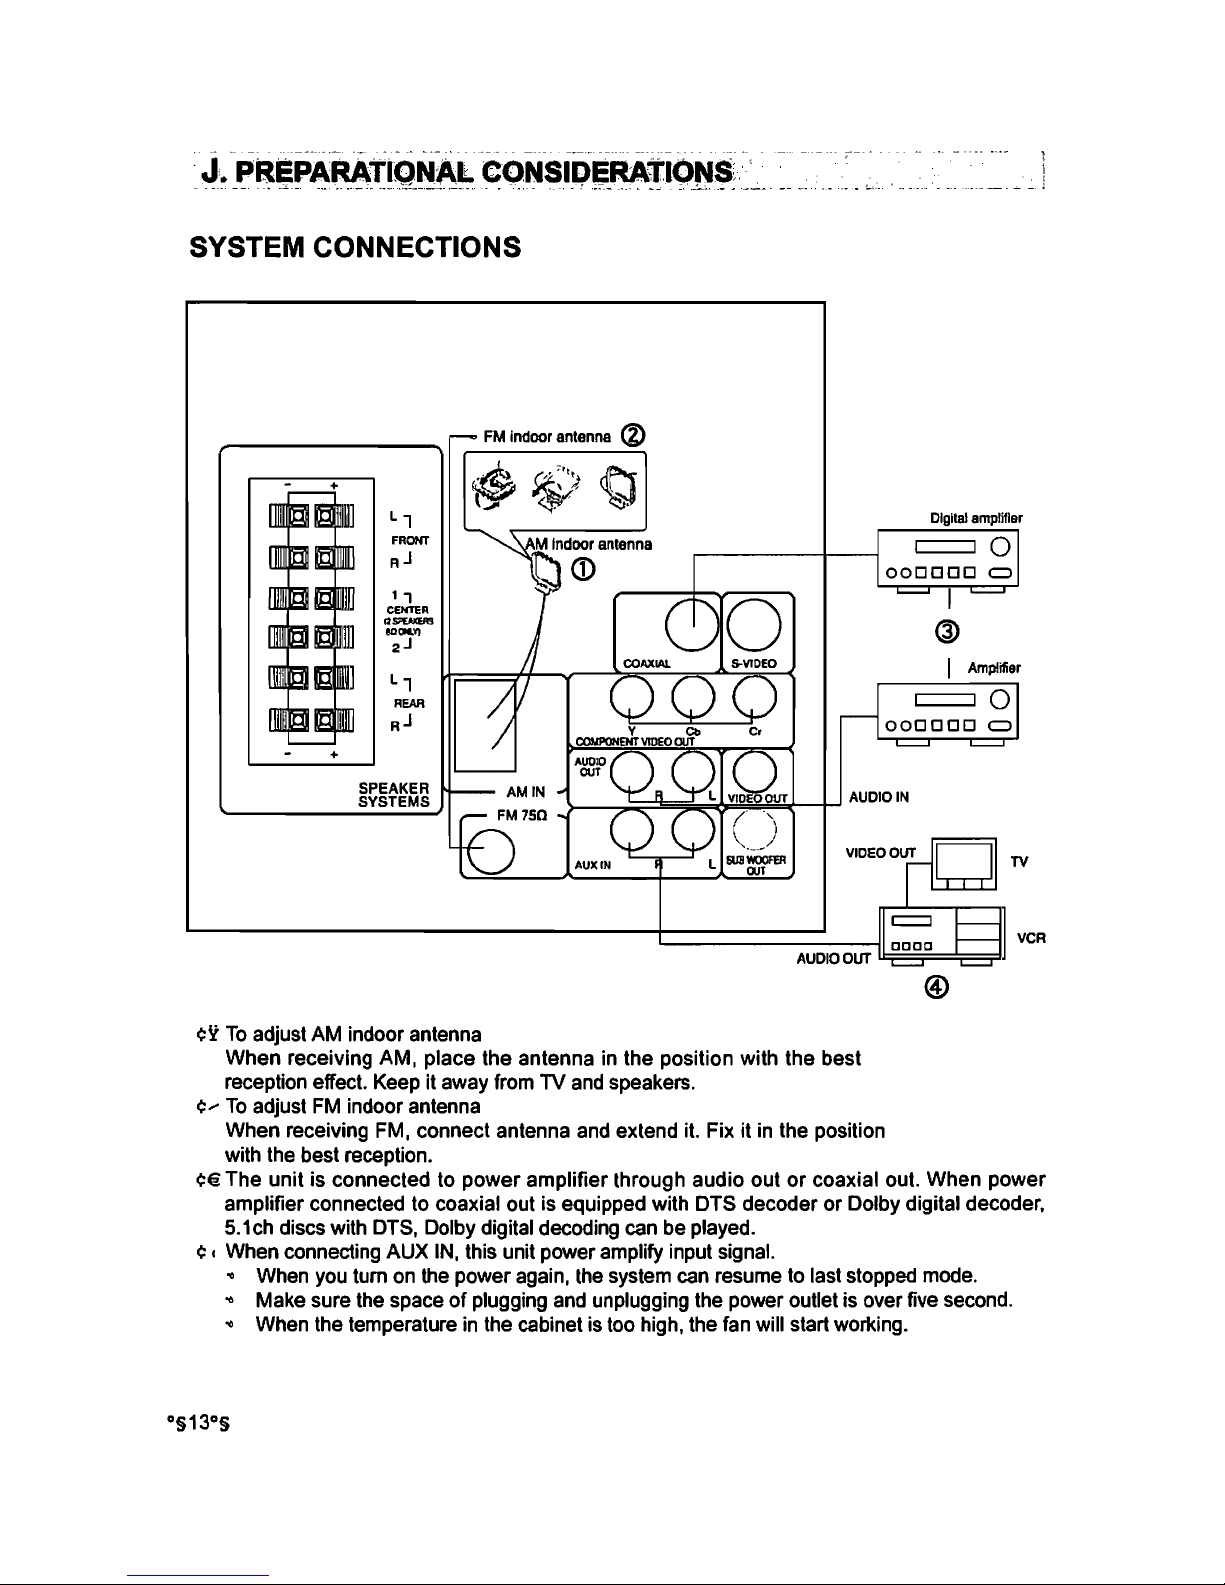
SYSTEM CONNECTIONS
+
+
SPEAKER
SYSTEMS
FM
indoor
antanna
®
Digital amplifier
c:::::::J 0
000000
C>
I
@
I Amplifier
c:::::::J 0
000000
C>
TV
~----------------------------------+-----------AU~DIOO~~~==r=~l
VCR
¢Y
To
adjust AM indoor antenna
When
receiving AM, place the antenna in the position with the best
reception effect. Keep it away from TV and speakers.
¢
'"
To
adjust
FM
indoor antenna
When receiving FM, connect antenna and extend it. Fix it in the position
with the best reception.
¢€
The
unit
is
connected to
power
amplifier through audio out
or
coaxial out. When power
amplifier connected to coaxial out is equipped with
DTS decoder
or
Dolby digital decoder.
5.1ch discs with
DTS, Dolby digital decoding can be played.
¢ c When connecting AUX
IN,
this unit power amplify input signal.
..
When you tum on the power again, the system can resume to last stopped mode.
..
Make sure the space
of
plugging and unplugging the power outlet is over five second.
..
When the temperature in the cabinet is too high, the fan will start working.
 Loading...