Control Over Frequencies: Synthesizer with Dual PLL Associated Crystals
Frequency for Transmission: For Handsets: 925.05 MHz upto 927.75 MHz
Receiving Frequency: To Handset: 902.3 MHz to 905.0 MHz
Nominal Effective Range: Actually, the operational range may be restrictive due to environment size. The FCC and IC allows maximum power to use.
Size: For Handset: 19 x 6 x 3.5 cm (L x W x T), Base: 21.5 x 14.5 x 5 cm (L x W x T)
Weight: Handset: maximum of 250 grams, while Base weighs 415 grams.
Power Requirements: For Handset: 3.6V,600mAh NiCad rechargeable battery, Base:11V DC with 300Ma
Memory: Speed Dial 20 memory locations, with 20 digits if possible for each; Caller ID : 50 memory locations
Phone answering machine or Phonodevice : For message storage it can provide a maximum time of 15 mins
Works in 900 MHz : There is no wire linking the handsets and the base and all communication channels are over the internet
Word Scrambling and Voice communication carries out digitally
ID For Phones: Alphanumeric for Call Waiting Signs
50 memory places available for dialing Codes and Backlit display mounted on handset
20 digit phone number can be stored in memory that is programmable for 20 locations.
Low Battery Detect and Warning indicator
Volume Adjust on Handset
Reciever can be used With a Hearing Aids
Easy answer functionality is available as long as keys other than OFF, MUTE or Volume keys are pressed.
Frequently Asked Questions
Q: What should I do if the phone doesn't work at all?
A: Kindly ensure that the power cord is plugged in, the telephone line cord is connected firmly and the batteries charged propertly.
Q: How can I tell if there's a dial tone?
A: You must first verify that every cord is attached properly. If it remains without a dial tone, use a different phone and connect it to the wall jack.
Q: What if there is noise or static?
A: It is possible to get noise interference from appliances that are plugged into the same circuit. Try moving either the base unit or the appliance around to help reduce the noise.
Q: How to answer a call that is coming in?
A: All that is required is to press the incoming call button that is at hand, Of course, any key that is not the OFF, MUTE or Volume Keys can be used.
Q: How can I store the phone number in memory?
A: With the phone still OFF dial the number which you want to store, then press PROG followed by the number or two digit memory location to be used for that phone number 01 to 20.
Q: Am I able to check the Caller ID information?
A: Notably id information from the memory is suitable, and if yes appropriate key location on the handles are pressed then yes, you wil be able to read the information.
Q: How do I go about programming the answering device?
A: To set up an outgoing message or define the number of rings, use the MENU key to locate the programming options for the answering device.
Q: What steps should I take if I want to delete old messages?
A: While the recording is being played back, press the ERASE key to delete a recorded message, or hold the key down for longer than two seconds to delete all older messages.
INTRODUCTION 1Special Features 2Parts Check List 3FCC AND IC REGULATIONS 4IMPORTANT SAFETY INSTRUCTIONS 7REPLACING THE BATTERY PACK 9
GETTING STARTED : 12WALL MOUNTING 14EXAMPLES OF THE HANDSET DISPLAY 15THE HANDSET LAYOUT 16THE BASE UNIT LAYOUT 17BASE UNIT FEATURES ANSWERING' DEVICE 18QUICK REFERENCE GUIDE 19BASIC OPERATION 21ADVANCED FUNCTIONS 22Call Waiting 22Switching Calls Using Flash 22
Temporary Tone 22Programming Ringer 22
Changing Ringer Types 23
Checking The Ringer Type 24ClearlDelete (CLR/DEL) key 24Advanced Dialing ; 24MEMORY DIALING 25Storing Memory Speed Dial Numbers 25
Quick Memory Diating(MEM1/MEM2 keys) , 27-It1ISS1 ~~CALLER ID (CID) 28Receiving And Storing Calls 28
Dialing From Caller ID (CID) Memory 28Out Of Area Calls 29.Private- Calls 29Transmission Error 29Deleting Numbers 30SETTING UP YOUR DT 941 CI DIGITAL ANSWERING DEVICE 31
Menu. Select. Time/Set Keys 37REMOTE OPERATION -OF THE DT 941CI 38Base Unit Message Window (LED) 38
Review Of Remote Commands 39ADDITIONAL OPERATING TIPS : 40MAINTENACE 41
TECHNICAL SPECIFICATIONS 45
~~
~-.
OT94102.p65
46
6124198. 12:20 PM
+
Page 3
-{fjt-
Thank you for purchasing this
AUDIOVOX telephone. YourAUDIOVOX DT 941 CI Integrated
Telephone Answering Device ( ITAD)
combines the features of a digitalcordless phone with a digital (tapeless)answering device.
Unlike most other cordless phones, the
AUDIOVOX DT 941CI di itizes yourvoice using advance D PC <:Jigitalvoice c Ing o provide noise and
distortion free performance. In most
conditions, you will not be able to tell
you are using a corpless phone. Gone
are the annoyances of static, interfer-
ence and having to listen to other
people's conversations on your cord-
less phone.
The AUDIOVOX DT 941 CI scrambles
your voice before it transmits it. This
allows you the security of knowing thatno one can tune in and eavesdrop on
your conversations.
The AUDIOVOX DT 941 CI decodes
and displays name and/or numberCaller 10 (CIO) information whereavailable and when subscribed to. Thealpha-numeric display can show boththe name and number of the callingparty. Up to 24 name characters or
11 phone number digits can be
displayed.With the AUDIOVOX Dr 941CI, the
user can easily answer a call by
pressing any key other than the OFF,
MUTE or VOLUME Keys. In addition,
the handset keypad and display
illuminate while the. handset rings to
signal an incoming call. This is very
useful in a dark environment.
The AUDIOVOX DT 941 CI alsoprovides a one-way Page/Find.
Pressing the base PAGE key willcause the handset to ring in a mannerwhich distinguishes it from normalincoming ringing. This can be used to
alert the handset user, or to simplylocate the handset in the event that itis misplaced.
The AUDIOVOX DT941 CI uses special
memory in both the base and handset
which is not susceptible to power
failures. This provides permanentstorage of all memory dial numbers,Caller 10 information as well as thebase and handset security codes.
When an optional battery pack isinstalled in the base unit, theAUDIOVOX DT 941 CI uses this batterypack to provide operational backup incase of power failure. In this way you
have access to all normal phone
functions during a total power outage.
Calls can still be placed and receivedwithout interruption. More than 5 hoursbackup will be possible with a fullycharged battery pack in the base unit.
The AUDIOVOX DT 941 CI informs you -when another extension is currently
in use on the same phone line. The
phone will also alert you when you are
Out of Range, even when you're not
using the phone!
+
OT94102.p65
6/24/98. 12:19 PM
.
Page 4
-@-
SPECIAL FEATURES -PHONE.900 MHz Operation..Fully Digital Link between Handset
and Base.
.Digitally-Scrambled Voice Commu-
nication.
.Alphanumeric Call Waiting Caller
ID .,',
.2 row by 12 character Sx7 dot
matrix alphanumeric display..So Caller ID memory locations..Backlit display on the handset..Backlit handset keypad..20 location Programmable Memory
for 20 Digit Ph9ne Number.
.Special one-tou'ch memory keys
(MEM1 and MEM2) for emergency
or frequently dailed numbers.
.10 Channel Operation with auto
channel selection.
.Out-of-Range indication while the
I
handset is in use or in standbymode.
.Removable handset battery pack.
.Spare battery charger in the base
unit.
.Complete battery back-up in case
of power failure (with optional spare
battery pack installed in base).
Face up or Face down Handset
charging.
.Easy answer -When the phone
rings. simply press any key otherthan OFF; MUTE, or the Volume
Keys on the handset to answer.
.Auto hang up when returning the
handset to the base cradle..Extension in use indicator..24 Bit Digital Security Code..Tone and Pulse Dialing..Low Battery Detect and Warning
indicator.
.Up to 7 hours continuous talk time
or 7 days standby time..Volume Adjust on Handset..REDIAL. HOLD, PAGE and MUTE..Hearing-Aid Compatible Receiver.
.Detachable power supply..Non-volatile storage of security
code and memory dial records.
.Programmable Ringer Types.
This manual is designed to make you
familiar with the AUDIOVOX DT941 CI.We strongly recommend you read themanual before using your phone.
-@-I
SPECIAL FEATURES -ANSWERINGDEVICE
.Digital (tapeless) answering device
provides up to 15 minutes ofmessage storage.
Base counter provides data suchas the number of messages,volume level, and answering mode.
.You can record separate outgoing
messages for both answer and
announce only modes.
.Messages are retained in the event
of a power failure: no batteryrequired.
.Messages are tagged with a
-,
, I! I
OT94102.p65
~
2
~
spoken time/day stamp.
.Messages can be erased
individually or collectively-
.The DT 941CI answering device
can be accessed remotely forretrieval of messages and other
functions..Voice prompts for easy setup..Audible message alert.
.Programmable to answer after 2,
4, 6 rings; or toll saver option.
.Ouick feature provides taster
playback of messages.
.Memo feature.
2
6124/98. 12:19 PM
rF
Page 5
~~!'i'f#~
~.~;f!f~.'i-
.'".'!I
{.;,!'~'
f~~tiJ~:~.~:..
I
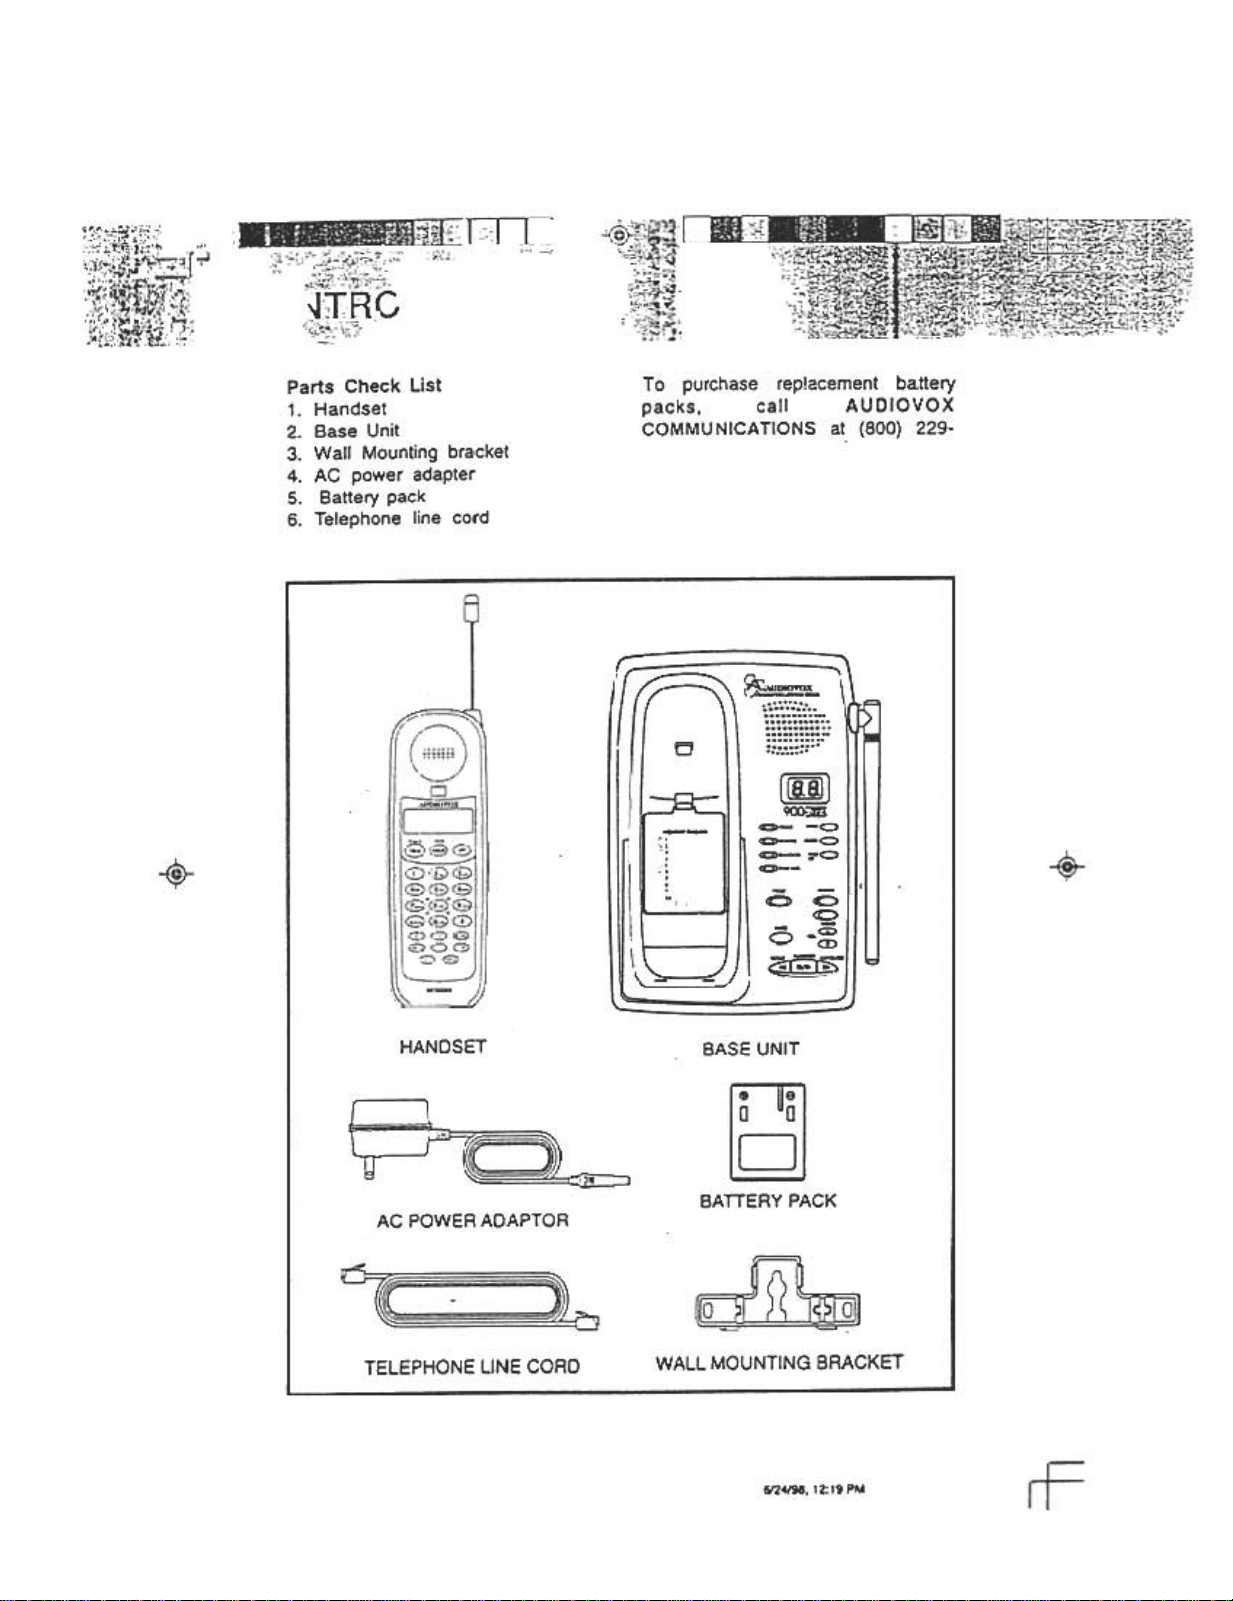
To purchase replacement battery
packs, call AUDIOVOX
COMMUNICATIONS at. (800) 229.
~
.
HANDSET
;:R AnAPTOR
POW!
AC
TFI,EPHONE: LINE CORD
BASE UNIT
AATTERY PAr;1<
WAL I MOUNTING BRACKET
6I24/9a. 12:19 PM
Page 6
u'r:a"tions
c1:"",,,-,.:':.i
...,-.,"'
.~,;~~~~~(
-@-
This equipment complies with Parts 15
and 68 of the Federal CommunicationsCommission (FCC) rules for the United
States. It also complies with regula-tions RSS21O and CS-O3 of Industryand Science Canada. Operation issubject to the following two conditions:( 1) this device may not cause interjer-ence, and (2) this device must acceptany interference. including interfer-ence that may cause undesired opera-tion of the device.
A label is located on the underside ofthe base unit contairing either the FCCregistration number and RingerEquivalence Number (REN) or theIndustry Canada (IC) registration
number and Load Number. You must,upon request, provide this informationto your local telephone company.
This equipment is compatible withinductively coupled hearing aids.
Should you experience trouble withthis telephone equipment, pleasecontact:
AUDIOVOX COMMUNICATIONSSERVICE DEPT. at (800) 229-1235.
For repair/warranty information. The
telephone company may ask you todisconnect this equipment from theline network until the problem has been
corrected.
FCC Part 15Warning: Changes or modifications to
this unit not expressly approved by theparty responsible for compliances couldvoid the user's authority to operate the
equipment.
The equipment has bee"n tested andfound to comply with part 15 of the FCCrules. These limits are designed to
provide reasonable protection against
harmful interference in a residential
installation. This equipment gener-ates, uses and can radiate radiofrequency energy and, it ~ot installedand used in accordance with theinstructions, may cause harmful inter-
terence to radio communications.
However, there is no guarantee thatinterference will not occur in a particu-lar installation. If this equipment does
cause harmful interference to radio ortelevision reception, which can bedetermined by turning the equipmentoff and on, the user is encouraged totry and correct the interference by oneor more of the following measures:
Reorient or relocate the receivingantenna.
Increase the separation between-the equipment and receiver.Connect the equipment into anoutlet or on a circuit different fromthat to which the receiver is con-nected.Consult the dealer or an experi-enced radio/TV technician for help.
-@-
I
OT94102.p65
4
4
6/24/98. 12:19 PM
-~-
~
II
Page 7
-(#$)-
FCC Part 68
The FCC requires that you connect
your cordless telephone to the nation-wide telephone network through a
modular telephone jack {USOC AJ 11 C,AJ11W or AJ14).
Your telephone company may discon-tinue your service if your equipment
causes harm to the telephone network.They will notify you in advance of
disconnection, if possible. Duringnotification, you will be informed of
your right to file a complaint with the
FCC.
Occasionally, your telepnoone com-pany may make changes in its facili.ties, equipment, operation, or proce-dures that could affect the operation
of your equipment. If so, you will begiven advance notice of the change togive you an opportunity to maintainuninterrupted service.
The base unit'contains no user serv-
iceable parts. The handset containsa user replaceable battery pack.
If it is determined that your telephoneequipment is malfunctioning, the FCCrequires that it not be used and thatit be unplugged from the modular jack
until the problem has been corrected.Repairs to this telephone equipment
can only be made by the m~nufactureror its authorized agents or by otherswho may be authorized by the FCC.
For repair procedures, follow the
instructions outlined under theAUDIOVOX Limited Warranty.
This equipment may not be used oncoin service provided by the phonecompany or Party Lines.
The REN is useful in determining thenumber of devices you may connectto your telephone line and still enablethe devices to ring when you receivea call. The general rule is that the RENvalue should not exceed 5.0A total;
however, contact your local telephone
company for the specific number inyour area.
IC (Industry Canada)
This telephone is registered for use in
Canada.
Notice:The REN assigned to this
device denotes the number ofdevices you may connect tothe telephone loop, which isused by the device to preventoverloading. The terminationon a loop may consist of anycombination of devicessubjected only to therequirement that the sum ofthe REN does not exceed five
(5.0)
Notice:The Industry Canada label
identifies certified equipment.This certification means that
the equipment meets certain
telecommunications network
protective. operational andsafe1y requirements. TheDepartment does notguarantee the equipment willoperate to the user's
satisfaction.
+
OT94102.p65
5
.@-
6124198. 12:20 PM
I-I=
Page 8
F~~rC:t; ~~~~(~I~ iltR}};l~l i~t
,~ri~[:
;.:"';,";.'.: ' ~:"anu: ut egu a Ions
,~~tt~;i,;c "
Before installing this equipment, usersshould ensure that it is permissible tobe connected to the facilities of the
local telecommunications company.
The equipment must also be installed
using an acceptable method ofconnection. The customer should be
aware that compliance with the a9°veconditions may not prevent degradation
of services in some situations.
Repairs to certified equipment shouldbe made by an authorized Canadianmaintenance facility designated by thesupplier. Any repairs or alterations
made by the user'to this equipment.or equipment malfunctions, may givethe telecommunications company
cause to request the user to disconnect
the equipment.Users should ensure for their own
~~
,
protection that the electrical groundconnections of the power utility,
telephone lines and intemal metallic
water pipe system. if present, are
connected together. This precautionmay be particularly important in rural
areas.
Cautinn: Users should not attempt to
make such connectionsthemselves, but shouldcontact the appropriate
electrical inspectionauthority, or electrician, as
appropriate.
Your AUOIOVOX OT941 CI is designedto operate at the maximum power
allowed by the FCC and IC. Thismeans your handset and base unit cancommunicate only over a certaindistance. which will depend on the
location of the base unit and handset,
weather, and the consfruction and
layout of your home or office.
-rJit-
--i-:
DT94102.p65
6
6
-@-
6124/98. 12:20 PM
I-F
Page 9
;:t
-@-
When using your telephone equipment,basic safety precautions should alwaysbe followed to reduce the risk of fire,electric shock and injury to persons,including the following:
Read and
instructions.
2. Follow all warnings and instructionsmarked on the product.
3. Unplug this product from the walloutlet before cleaning. Do not useliquid cleaners qr aerosol cleaners.Use a damp cloth for cleaning.
4. Do not use this product near water
(for example, near a bath tub,kitchen sink. or swimming pool).
I
5. 00 not place this product on an
unstable cart, stand, or table. The
product may fall, causing seriousdamage to the product.
6. Slots and openings in the cabinetand the back or bottom are providedfor ventilation. To protect it fromoverheating. these openings mustnot be blocked by placing theproduct on the bed, sofa. rug. or
other similar surface. This productshould never be placed near orover a radiator or heat register.
This product should not be placed
in a built-in installation where proper
ventilation is not provided.
understand
all
7. This product should be operatedonly from the type of power sourceindicated on the marking label. If
you are not sure of the type ofpower supply to your home, consultyour dealer or local power company.
8. Do not allow anything to rest on thepower cord. Do not locate thisproduct where the cord will beabused by persons Walking on it.
9. Never push objects of any kind intothis product through cabinet slotsas they may touch. dangerousvoltage points or short out partsthat could result in a risk of fire orelectric shock. Never spill liquid ofany kind on the product.
10. To reduce the risk of electric
shock. do not disassemble thisproduct. but take it to a AUDIOVOXauthorized service taciiity. Openingor removing cabinet parts other
than specified access doors may
expose you to dangerous voltagesor other risks. Incorrectreassembling can cause electricshock when the appliance issubsequently used.
11.Do not overload waIf outlets andextension cords as this can resultin the risk of fire or electric shock.
+
-:
-000!-OT94102.pSS
7
~4198. 12:20 PM
+
Page 10
~41(~:"
%
12.Unplug this product from the walloutlet and refer servicing to aAUDIOVOX authorized servicefacility under the following
conditions:
A. When the power supply cord or
plug is damaged or frayed!,
If liquid has been spilled into
B.
the product.
c. If the product has been exposed
to rain or water.
D. If the product does not operate
normally by following theoperating instructions. Adjustonly those controls that are~overed by the operatinginstructions, because improperadjustment of other controlsmay result in damage and willoften require extensive work bya AUDIOVOX authorizedtechnician to restore the productto normal operation.
13.Avoid using a telephone (otherthan a cordless type) during anelectrical storm. There may be aremote risk of electric shock from
lighting.
14.Do not use the telephone to report
a gas leak in the vicinity of theleak.
AUDIOVOX COMMUNICATIONSSERVICE DEPT. at (800) 229-1235.
~
OT94102.p65
E. If the product has been dropped
and the cabinet has beendamaged.
F. If the product exhibits a distinct
change in performance.
SAVE THESE INSTRUCTIONS
8
~
6/24198. 12:20 PM
I--F
Page 11
Ch~rging The Handset Battery PackThe handset of your AUDIOVOXDT 941 CI is powered by a recharge-able battery pack. It charges auto-matically whenever the handset is inthe base. You should charge thebattery pack for 16 hours when youfirst receive your phone. You'll kqowthe battery pack needs chargingwhen:
.The phone emits a warning tone
when you press the~key.
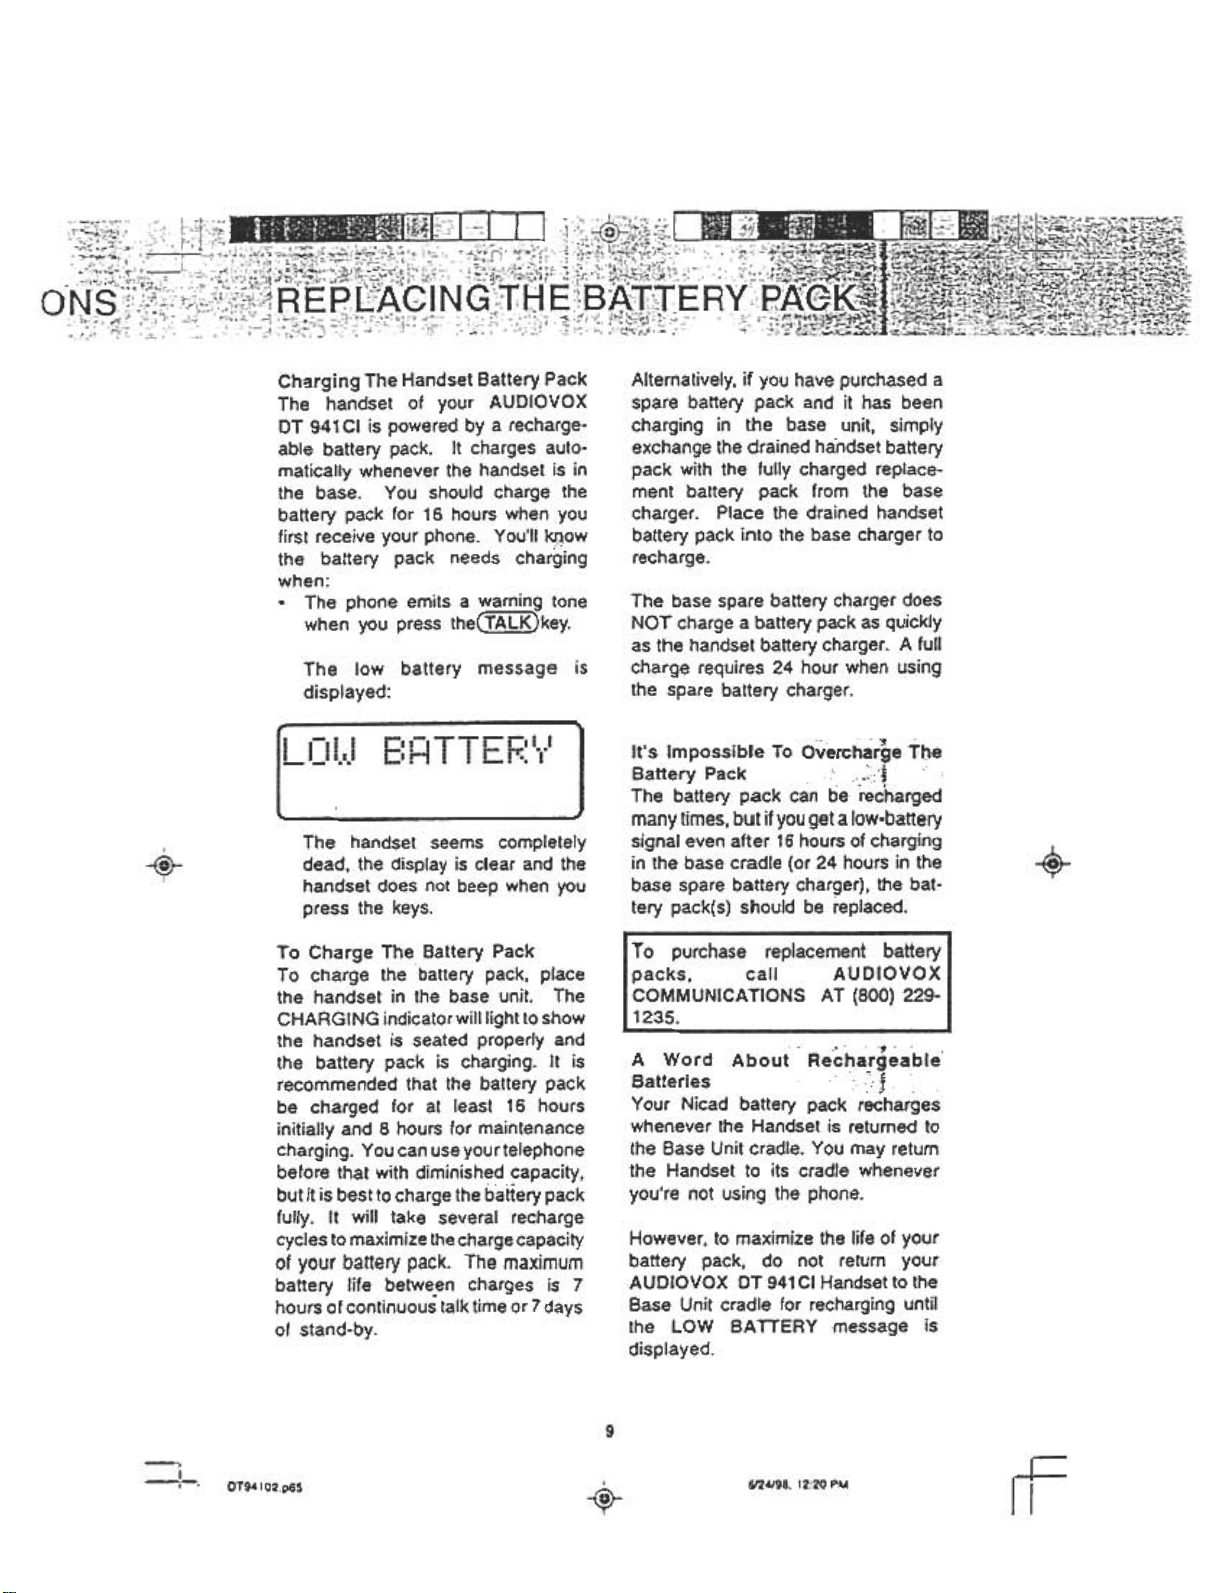
The low battery message isdisplayed:
Alternatively, if you have purchased aspare battery pack and it has beencharging in the base unit, simplyexchange the drained handset batterypack with the fully charged replace-
ment battery pack from the basecharger. Place the drained handsetbattery pack into the base charger to
recharge.The base spare battery charger does
NOT charge a battery pack as quickly
as the handset battery charger. A fullcharge requires 24 hour when usingthe spare battery charger.
-@--
--,.
1:11.1.1
E"-'TTrr,I..1
I n c. r:. I
It's Impossible To Overcharge Tbe
Battery Pack c---:'~The battery pack can be recharged
many times, but if you get a low-battery
I
I
The handset seems completely
dead, the display is clear and thehandset does not beep when youpress the keys.
signal even after 16 hours of charging
in the base cradle (or 24 hours in the
base spare battery charger), the bat-tery pack(s) should be replaced.
.
To Charge The Battery Pack
To charge the battery pack, placethe handset in the base unit. TheCHARGING indicator will light to showthe handset is seated properly and
the battery pack is charging. It is
recommended that the battery packbe charged for at least 16 hoursinitially and 8 hours for maintenance
charging. You can use your telephone
before that with diminished capacity,but it is best to charge the battery pack
A Word About Rechargeable.
Batteries 0:: ,!Your Nicad battery pack recharges
whenever the Handset is returned tothe Base Unit cradle. You may retumthe Handset to its cradle wheneveryou're not using the phone.
., ., .
fully. It will take several rechargecycles to maximize the charge capacityof your battery pack. The maximumbattery life betwe.en charges is 7hours of continuous talk time or 7 daysof stand-by.
However, to maximize the life of yourbattery pack, do not retum yourAUDIOVOX DT 941 CI Handset to theBase Unit cradle for recharging untilthe LOW BA TTERY message is
displayed.
9
-.,
1-
-i.
OT94102.p65
,
6124/98. 12.20 PM
-(ftt-
-'=
Ii
Page 12
To Replace The Handset Battery
Pack
Follow the steps below:
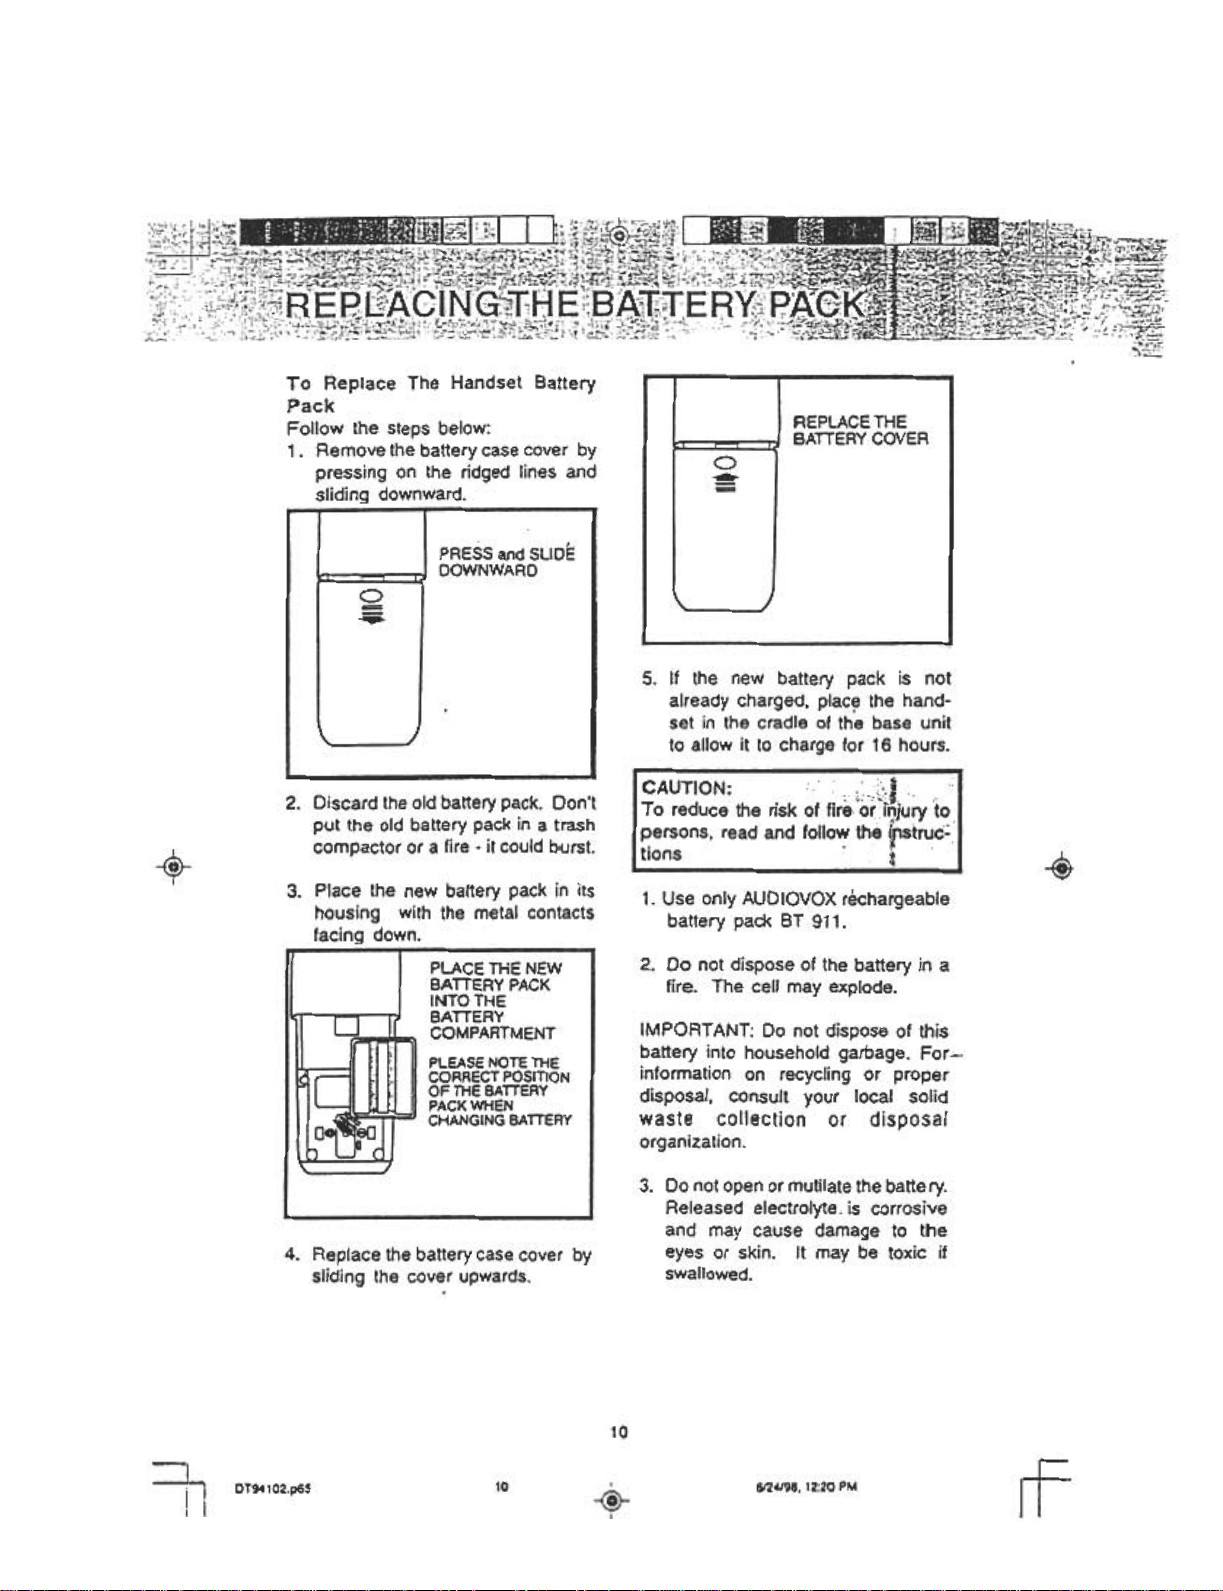
1. Remove the battery case cover bypressing on the ridged lines and
sliding downward.
REPLACE THEBATTERY COVER
0
~
-@-
PRESS and SLIDEDOWNWARD
,
C>
...
5. If the new battery pack is notalready charged. plac~ the hand-set in the cradle of the base unitto allow it to charge for 16 hours.
2. Discard the old battery pack. Don'tput the old battery pack in a trash
I
,
compactor or a fire. it could burst.
3. Place the new battery pack in itshousing with the metal contacts
~
1. Use only AUDIOVOX rechargeablebattery pack BT 911.
facing down.
2. Do not dispose of the battery in afire. The cell may explode.
IMPORT ANT: 00 not dispose of this
battery into household garbage. For -information on recycling or proper
disposal, consult your local solidwaste collection or disposal
organization.
3. Do not open or mutilate the battery.
Released electrolyte. is corrosiveand may cause damage to the
4. Replace the battery case cover bysliding the cover upwards.
-I
OT94102.p65
~
10
-@-
eyes or skin. It may be toxic ifswallowed.
10
,I
6124/98. 12:20 PM
rF
Page 13
.t.;t:v
~ri~~.
~a~
.'fu.
~~~;,~,;~,..,;?;.;~~
I
-(fj';--
4. Exercise care in handling batteriesin order not to short the batterywith conducting materials such as
rings. bracelets, and keys. Thebattery or conductor may overheatand cause burns.
SPARE BATTERY CHARGERThe AUDIOVOX DT 941 CI has a built-in spare Battery .Charger, which islocated in the cradle of the Base Unit.
InstallationRemove the Spare Battery chargercover by pressing the release tab and
lifting up.
Place a battery pack in the SpareBattery charger. Make sure the metalcharging contacts on the underside ofthe battery pack are aligned with thecharging contacts in the Spare Battery
charger.
Power Backup:; ,;' , f
.~
When a Spare Battery pack is installedin the Base Unit, th~ ,AUDIOVOXDT 941CI uses this battery pack toprovide operational backup in case ofa power failure. If you .have a fullycharged battery pack in the SpareBattery pack charger and there is apower outage, you will still be able toplace and receive calls for up to five-hours.
I
-<rt-
Replacing a Drained Handset battery
The Spare battery pack can also be
used to replace a drained Handsetbattery pack to ensure uninterrupteduse. Be sure to put the drained batterypack in the Spare Battery charger for
recharging.Please note that the Spare Battery
compartment charges at a slower ratethan a battery pack charging in theHandset. It takes 24 hours to fullycharge a battery pack in the Spare
Battery charger.
11
OT94102.p65
6124/98. 12:20 PM
+
~
~
Page 14
:;:.:-
i~i[i
~rl~t;1gc- 0, !:",,";~~;"";',. "":;)~i:~t~t
1';;, c ,
~;."r:l~~.~ ;':;,\; ;":j;[.~~;:;!?~;;~::
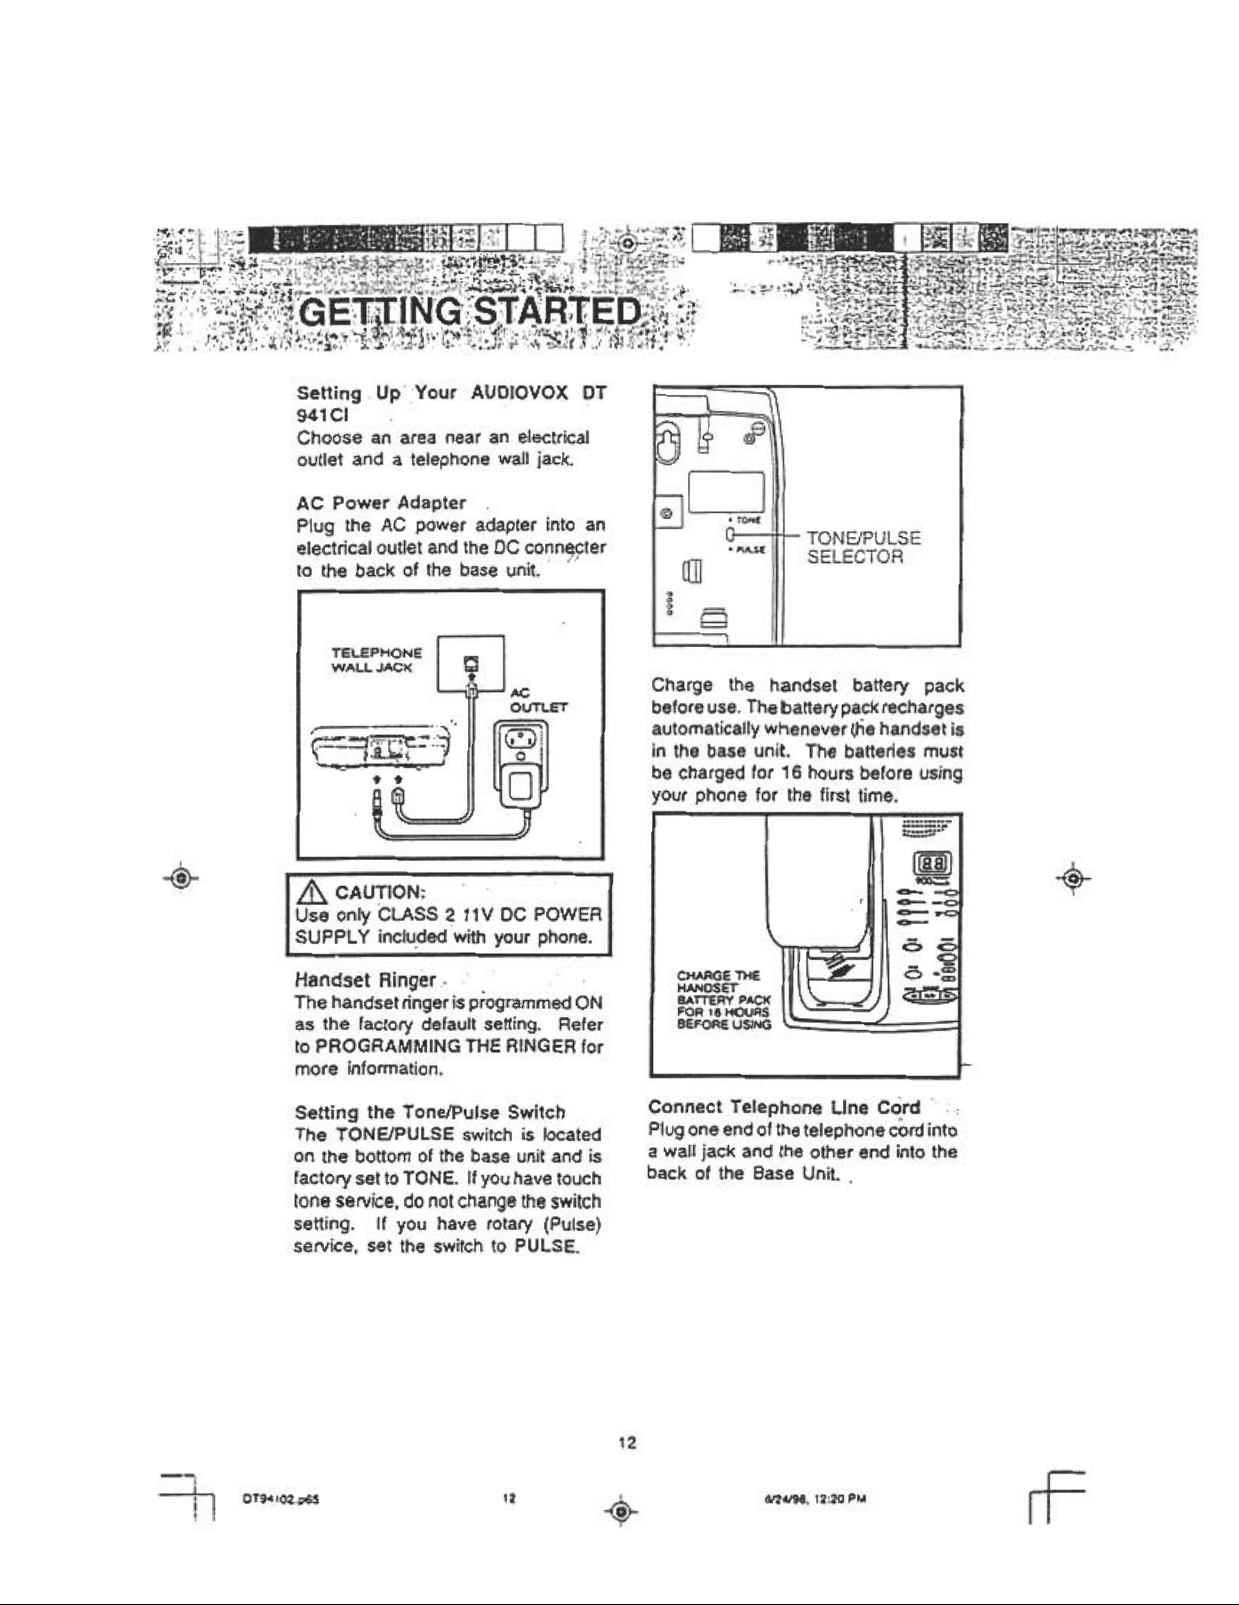
Setting Up Your AUDIOVOX DT94'CI
Choose an area near an electricaloutlet and a telephone wall jack.
AC Power AdapterPlug the AC power adapter into an
electrical outlet and the DC conn~9ler
to the back of the base unit. .
Charge the handset battery packbefore use. The battery pack rechargesautomatically whenever ~lie handset isin the base unit. The batteries mustbe charged for 16 hours before usingyour phone for the first time.
~;'.;;.~,',:;:.:';
1
~
Handset Ringer -The handset ringer is programmed ON
as the factory default setting. Referto PROGRAMMING THE RINGER formore information.
Setting the Tone/Pulse SwitchThe TONE/PULSE switch is locatedon the bottom of the base unit and isfactory set to TONE. If you have touchtone service, do not change the switchsetting. If you have rotary (Pulse)service, set the switch to PULSE.
Connect Telephone LIne Cord. .
Plug one end of the telephone cord intoa wall jack and the other end into theback of the Base Unit. .
12
+
-i
-+.,! I
OT94102.p65
'2
-<f;-
6124/98. 12:20 PM
rF
Page 15
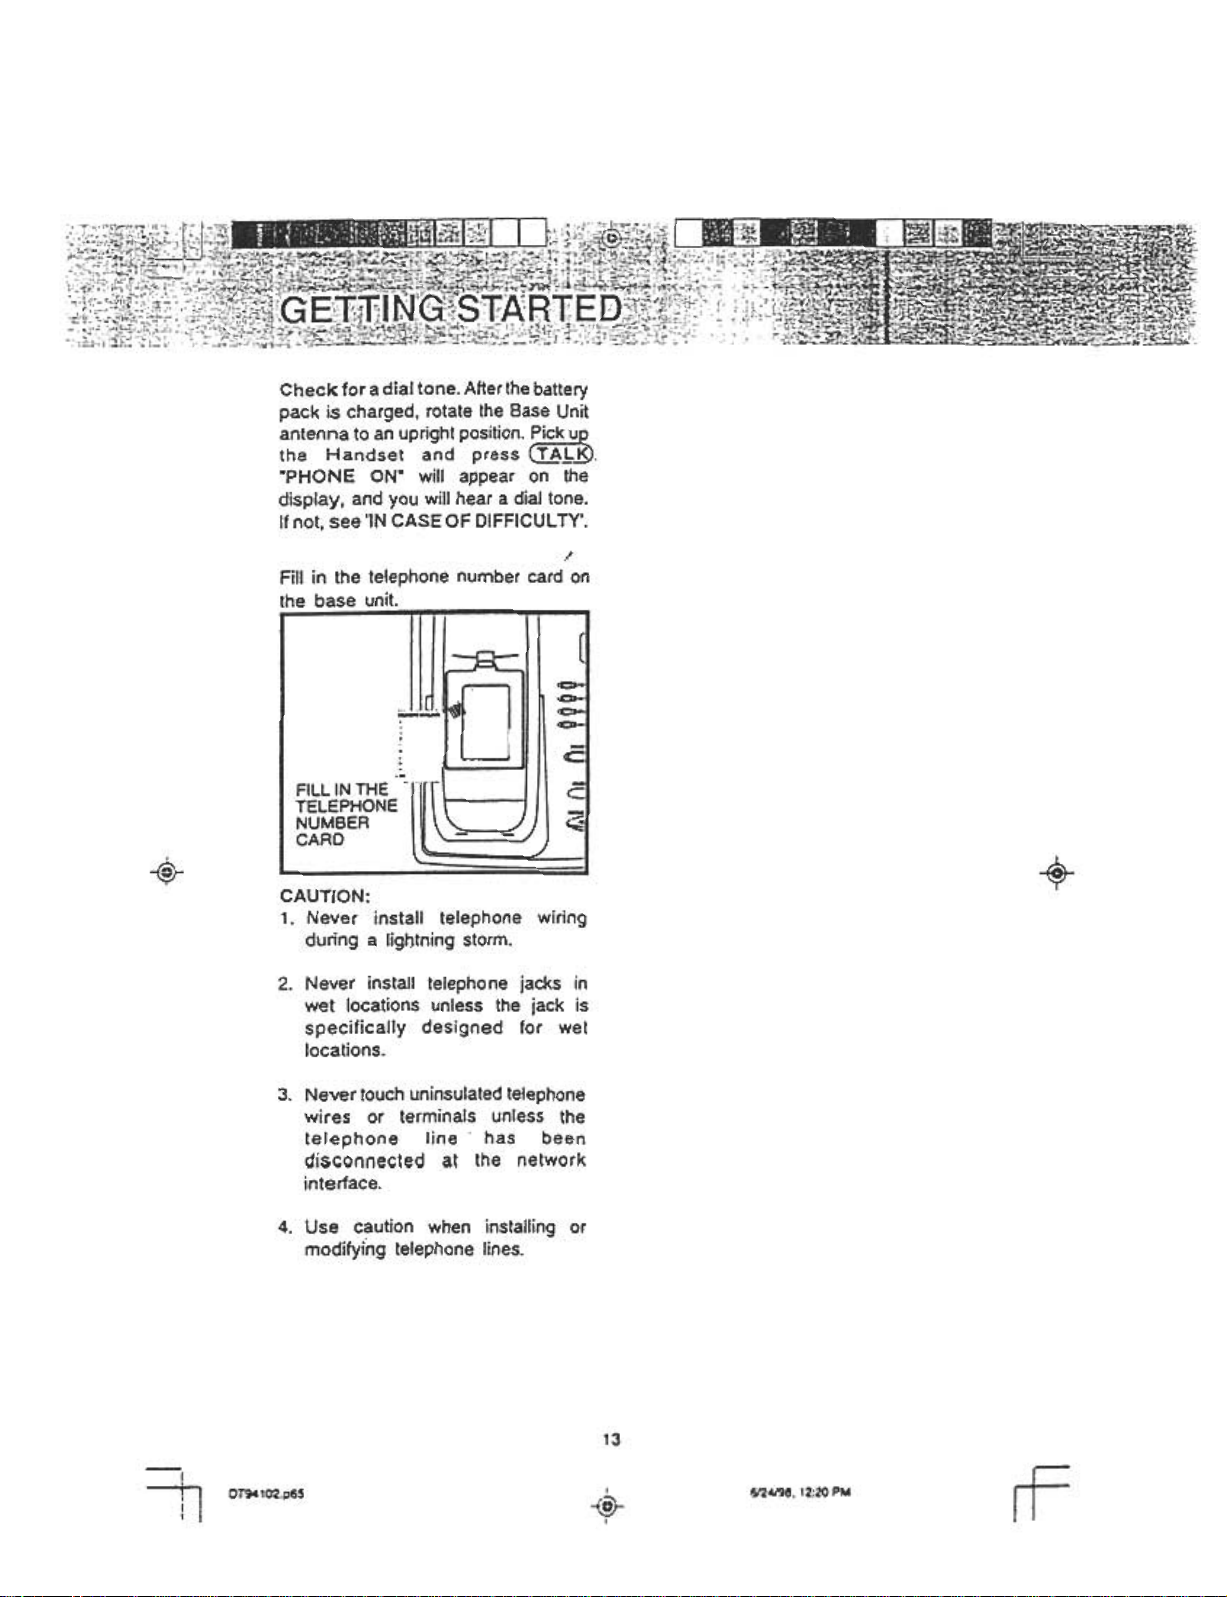
Check for a dial tone. Atterthe batterypack is charged, rotate the Base Unitantenna to an upright position. ~the Handset and press ~1..!.9."PHONE ON" will appear on thedisplay, and you will hear a dial tone.If not, see 'IN CASE OF OIFFICUL TY'.
..'Fill in the telephone number card onthe base unit.
I~
j..ln.(~
FILL IN THE -11\- TELEPHONE
NUMBER
I
~
~
CARD
CAUTION:
1. Never install telephone wiring
during a lig~tning storm.
2. Never install telephone jacks in
wet locations unless the jack isspecifically designed for wetlocations.
3. Never touch uninsulated telephonewires or terminals unless the
telephone line has beendisconnected at the networkinterface.
4. Use caution when installing ormodifying telephone lines.
,~
=.=.'0-.
-=-
c
c
~
~
+
-I
--n
OT94102.p65
-{,fi)-
13
I
I
6/24/98. 12:20 PM
rf
Page 16
~
;;:.::"0;;.. .
.;;,.~,'i I:"
~"
";""N"',;;;; WAbtir:'M O U N](N G t ,,;:ii,~;"'".
Choose a spot near an electricaloutlet and a telephone jack.Your phone requires a modulartelephone jack and a standardelectrical outlet (120v AC). Thepower cord is six feet long; makesure there is an electrical outlet
within reach of the base. The outletshould not be controlled by a wallswitch. If the switch is ever turnedoff, the phone ~ill not operate.
2. Position the wall mountingbracket on the base.Line up the tabs on the wallmounting bracket with the holes
on the bottom of the base {Figure
1 ). Snap the wall mounting bracket
-@-
firmly in place.
Mount the bas~ on the wall.
Position the base so the mountingstuds will fit into the holes on thebottom of the base. Position thepower cord to extend down thewall the phone is to be mountedon. Slide the base down on themounting studs until it locks into
place.
4. Connect the telephone line cord.The telephone line cord has asnap-in plug at each end. Insertone of the plugs into the jack onthe back of the base. Insert the
other end of the plug into the walljack.
.~;t.~.:.:;
,::~~;~;;
located on the back of the BaseUnit. (Figure 2)
9
-<.
Figure 1
-
-
-
-a
~
J.-
:0
$
~
Figure 2
.;;:,...,
+
5. Plug the AC adapter into anelectrical outlet and the DCconnecter into the power jack
14
~
OT94102.p65
14
~
~4/98. 12:20 PM
rf
Page 17
Handset Display Messages
1=1t-~
~
-@-
PHONE ON is displayed when thephone is in use.
After pressing a volume key. thisdisplays the current volume setting.
E:RTTE~~'i.'
This display warns of a low battery
condition. The handset typicallyoperates for at least 5 minutes after thelow battery indication first appears.
This message is displayed when thehandset ringer has been programmedoff.
This display wams that the handsethas lost communication with the baseunit and is attempting to reestablish alink by scanning all channels.
This display confirms that acommunicaton link has beenestablished with the base.
=::.::TEt.45 I 1:lt.4
I I t~ I-ISE
~
This message is displayed while inOFF mode, if another phone is currentlyusing the same line.
This message is displayed when thehandset is on hold.
VOLUME UP KEYVOLUME OOWN KEYPAGE KEYSKIP/OUICK KEYPlAY/STOP KEYREPEAT KEY
CHARGING CONTACTS
.
17
Il
OT94102.p65
t7
-@-I
6124198. 12:20 PM
Page 20
-00- ~ -~ ...,'
.!;{;"1~
~1e;f.~.:j
"::-"", '.
~~I~:i.:i;
~~'~
, :-
..:;i
~,
-@-
ANSWER ON/OFF KeyTurns the answering device ON and
OFF.
SKIP/QUICK Key :, 0";.;:
To skip to the next message during
playback; hold this key down to speedup message playback.
MEMO KeyFor recording outgoing messages and
memos.
VOLUME UP/OOWN Keys ~ .To increase or decrease Base Unitspeaker playback volume.
ERASE Key For erasing individual or all previously
To increase, decrease or.turn off Base
heard messages.
REPEAT Key
To return to the beginning of amessage during playback.
Unit Call-Screening Volume.
MENU, SELECT, TIME/SET KeysUse these keys for answering deviceset-up; once the clock is set, press
I!
TIME/SET for the current day and
PLAY/STOP KeyTo begin and stop message playback;to exit programming mode; to stop
outgoing message recording/playback.
time.
, '"'c -""~ ."--, .
BASE UNIT MESSAGE WINDOW(LED) .;~,' "~:;:::1 :,';"Y;,1
Provides various helpful data aboutyour answering device.
I
MENU KEYSELECT KEY
TIME/SET KEY
ERASE KEY
ON/OFF KEYMEMO KEY
VOLUME UP KEY
VOLUME DOWN KEY
PAGE KEYSK(P/QUICK KEYPLAY/STOP KEY
REPEAT KEY
18
-I
-!-:
OT94102.p65
18
6124/98. 12:20 PM
~
Page 21
Set-Up.Plug AC adapter into a standard
electrical outlet and Base Unit.
To MUTE A Call I:
Press ~ to disable thehandset microphone.
"
Set TONE'PULSE switch to PULSEor TONE. The unit is factory set toTONE.
Let the handset battery pack ch.arge
for 16 hours before first use.
t,.
Connect telephone line cord tobase unit and telephone jack.
Making Calls
" Press the ClliR) key. When
Press ~ again to return to
normal two way conversation.
TO PAGE The Handset " ,~.~ge from the base. press
~.
.To cancel the page either press
~ again on the base or press~ on the handset.
"PHONE ON" is displayed andyou hear a dial tone, dial thenumber.
.Or
Enter the number to be dialed onthe display and then press the
~
@R) key.
Answering Calls ..To answer,a call.~any key
other than @if) ,l~) , or theVolume Keys. The handset willNOT auto-answer when lifted off
the base cradle.
.Enter the number youOwish to store
on the display, up to a maximum of
20 digits.
-@-I
Hanging ~.Press lQ.E.EJ or place the handset
in the cradle to hang up a call.
To Place A Call On HOLD.Press (EQbQ) on the handset to
~n active call on hold. Press
.Press ~ .The handset will
display "PROGRAM LOCATION
"
~ again to return to the call.
Enter a two digit memory location(01 ..20). The unit will store thenumber, emit a happy tone to
confirm successful programmingand exit program mode.
-,
-1!
OT94102.p65
i I
19
19
6/24/98. 12:20 PM
-~
rF
Page 22
.' ~;
iIKf~r' ",~;!~~~;~",
~f:;.t~l;~~;~~~:::; ~;t?;;~r~~':tif
-ritJ-
:~ili'l;i.~;;:i
Memory dialing (speed Dialing):
.Press the (§ill key.
.Press ~ .
Enter the memory location of thephone number you wish to dial(01...20). The number displayedwill be dialed.
Caller ID (CID).To view information stored in CID
memory, press @Q) on thehandset.
~.:~fl;
To view the time and date of thecall press and hold the 7 (D key.The time and date will be shown
along with the phone number.
To view other calls, scroll
backwards and forwards by usingthe < (*) and > (#) keys.
To view additional name characters
not shown on the display, pressand hold the ~ (9) key
To exit press @ffi.
.: ; "
U~lng REDIAL" c; '~',i." Press the @j;K) key: then
C~) to automatically redial
the last number you dialed.
Or
.Press ~so that the number
is shown on the display and thenpress the ~ key.
-(/jT-
DT94102.p6S
The display will show the most
recent call received.
20
HOLD,
.PressC8:9I9J to put a call on hold.
.To return to the call, press ~
again
20
6124/98. 12:20 PM
-@-
rF
Page 23
Making CallsYou can make calls directly from thehandset whether you are at the base
or away from it.
Press the ~ key and wait
for dial tone. Then dial the numberyou want.
FLASH "::' ::
You can use your AUDIOVOX
DT 941 CI cordless phone with servicessuch as Call Waiting. Simply presstheiliill key to FLASH the line.
, .
REDIAL, r
To REDIAL the last number youdialed, .E!!!!-!!le~key. then
press lREDIAl,1. The phone willautomatically dial the number. Thenumber will be shown on the display.
-@-
Or
Clearing The Display' , i
The display can be cleared-by pressing
2. Enter the number, then press the~ key. This will dial the
number that is displayed on thehandset after 2 seconds. See
ADVANCED DIALING.
I
If you make a mistake when dialing,pres.12m to hang up, then pressthe ~ key to get the dial tone
again.
Disconnecting
To end a call, either place the handsetback in the base, or press (Qfflon the handset.
Answering CallsWhen the Handset rin~ss anykey other than (Qff), lMUTEJ or theVOLUME keys to answer your call.
Volume ControlsThe volume controls for the handsetare located on the side of the unit.Press the A (up) "or '\1 (down) keysto increase or decrease the volume.Holding either key down will
continuously change the volume
setting. The earpiece volume levelindicator on the dispaly will changeaccordingly. There are four volumelevels.
and holding the ( CLR/D§Q key downuntil the display clears.
MUTE c :.-1...Press ~ duringaccinversation
to disable the handset microphone.
.Press ~ again to return to
normal operation.
Ringer MUTE' ~';'f
.Press @QI§) while phone is
ringing to disable the ringer for theduration of the call.
HOLD .0 '~!.Press ~ to place an active-
call on hold.
.The Handset will display CALL ON
HOLD.
.Press~again to return to the
call.
PAGE Handset Locator J
.~e from the Base Unit press
l~J .
.The Handset will display BASE
PAGING HANDSET.
.To cancel the pager either press
~~ on the Base Unit, or
press ~ on the Handset.
, .
+
21
-i
DT94102.p65
II
21
6/24/98, 12:20 PM
rF
Page 24
-fJj>-
Call WaitingCALL WAITING is a subscriptionservice, available from most local
telephone service providers. Contactyour provider for details. While you are
on a call, you will hear an alert signal,
warning that a second caller is tryingto reach you. ..:.
If you subscribe to this service linked
with CALLER ID (CID), the name and/
or phone number of the second callercan be displayed on the Handsetimmediately after hearing the CALLWAITING alert. For more details, seeCALLER ID (CID).
Switching calls using FLASH.To switch over to the new call,
press the@:!5]key; the first callis put on hold.
.To switch back to the first call,
press the @:!5] key again.
First, dial the call normally. Then
activate the Temporary Tone featureby pressing TONE (the * key). You
can then press the numbers or symbolsyou need, and your phqne will sendthe proper signals.
To end the call, press @) or place
the handset back in the base. Thephone will automatically go back torotary (PULSE) service.
I
-(ft-
Programming Ringer .
The handset ringer is capable of fourdifferent types of ringer tones. Thefollowing sections detail how to selectdifferent ringer types and how to turnoff the handset ringer.
~
--,-,
Temporary Tone
If you have rotary (PULSE) telephone
service (TONE/PULSE switch is set to
PULSE), this feature allows you totemporarily switch to TONE dialing forsuch purposes as remote access to
answering machines, bank-by-phoneservices, use of calling cards and other
special services.
DT94102.p65
22
22
-~
6/24/98. 12:20 PM
rF
Page 25
--,c,:;~". ,.-, ...~l...'"!~~DVANeED.'
jm,irii
;;,
-"N'
Changing Ringer Types
To program, the handset must be OFF.
a Visual Message Waiting Indicationgenerated by many phone serviceproviders. If you subscribe to Voicemail
T o select a different ringer type do thefollowing:
service from your local telephonecompany. and Visual Message Waiting
Indication is provided. the DT 941 CIwill display the following data to alertyou to new, unplayed messages:
Once you have reviewe.d your new
messages, the MSG.WAITING
indication will be cleared from the
display.
Press: ~Press: ~
Press: 1 for ringer type 1
2 for ringer type 2
~
The handset LCD will show the ringertype selected," for example
3 for ringer type 34 for ringer type 4
You can temporarily clear the MessageWaiting screen. With the Handset in the
OFF mode.
Press and Hold (CLA/QEIJ until the
LCD DISPLAYS:
+
Press ~ or ~ to exit.
Message Waiting
Your Dr 941 CI is capable of detecting
OT94102.p65
Pres~o confirm your decision.
Pressing any key other than ~will cancel the operation.
TheMSG. WAITING afertmay reappear,
as long as unplayed messages remainin your Voicemail box.
23
23
.
6124/98. 12:20 PM
I--r=
Page 26
-@-
Turning Off The RingerTo turn off the ringer do the following:
Clear/Delete (CLR/DEL) i<~y!. c
The CLEAR and DELETE functionscan be accessed separately depending
on how long the key is held down. Forexample, to clear the last di~!t entere~on the display, press thelCLR/OELJkey for less than 1 second. Press andhold the (CLR/DEL) key for more than1 second to completely clear the
display.
-.
The delete function is also used todelete Caller ID (CID) records, memorydial records, and Message Waitingindication. See DELETIN.G STOREDNUMBERS, DELETING NUMBERS
Checking The Ringer TypeTo test the present ringer type, do the
following:
II
and MESSAGE WAITING.
Advanced Dialing i ':'~c
There are two different ways to dial a
number:
1. Press the~key and wait fora dial tone. Then dial the number
you want either manually, using
MEMORY (MEM) dialing, CallerID (CJD) dialing or REDIAL.
+
2. Enter the number you wish to dialon ~Iay first. Then press
th~ TALK) key. This will dial the
number which is displayed after 2-
seconds.
Press ~ or @f) to exit.
.Press and hold (CLR/DEL) until
the display is cleared, then dialnormally.
Or
.Press (Qff) and start over.
24
~
,
~-,
DT94102.p6S
24
-@-I
6124198. 12:20 PM
rF
Page 27
!
Storing Memory (Speed) DialnumbersTo program a speed dial location, dothe following:
-rJft-
With the phone OFF, enter thetelephone number you wish tostore (20 Digits Maximum). -.~.
~rogram mode by pressinglPROGJ. The display will show the
following:
Enter the memory location (01..20)you wish to store the number in.As soon as the second memory
location digit is entered, the unitwill emit a warbled tone (a shortseries of beeps) to confirmsuccessful programming and exitprogram mode.
Unsuccessful programming can result
from not correctly completing theprogramming sequence. If thismessage appears, simply repeat theprogramming sequence.
Quick Memory Dialing :1
The MEM11 MEM2 keys.giveyou onebutton access to the MEMORY DIAL
number stored in memory location 01I 02 respectively. This "may be afrequently dialed friend. business. or
emergency number.
There are two ways to dial usingthe MEM1 I MEM2 KEY.Press PHONE ..Press MEM1 I MEM2 ..The phone number' stored in
memory location 01 I 02 will beautomatically dialed.
"
OR
.With the Handset OFF I press
MEM1IMEM2.
.The phone number stored in
memory location 01 .1 02 will beautomatically dialed after a 2second delay.
~
-I
-..~I I
! I
OT9410"Z.p65
Quick Ref:
MEM1 ~ Memory location 01
MEM2 ~ Memory location 02
25
25
-@r-
6/24/98. 12:20 PM
rF
Page 28
Dialing From Memory.Press @!;K) to get a line.
Press ~; you're prompted toenter a speed dial location
number:
.Note that if digits were on the
display prior to entering memorydial mode, the contents of thespeed dial memory will beappended to those digits. Forexample. if 1503 was on thedisplay and the contents of thememory location is 6438981, thenthe display would show the
following upon exiting memorydial mode:
Enter a 2 digit location number
11="--r
.-11-1.::.1
(01-20).
The number stored in that locationwill be displayed and immediately
dialed.
Or
I
~
.Beginn!!:-9-J!.om the OFF mode,
press ~ followed by a 2 digitlocation number (01..20).
Press ~again to e.xit mem~ry
.Press ~ .the number on the
display will be dialed after a 2second pause.
NOTE:. .' -;..~':,:.:.~f:,'c ,:~ I
IThe abilIty to ~emp~r~!'t:,~9S;~emq~ contents to digits alreadY'eQtered or:l
~~~ ~:~~~y lcie(~:br,.J~~~s:td-, ~ja1'
+
dial mode and leave the numceron the display.
I'~emories. In this way. longdist~c~:a"1da,rea
codes (for example.,: 1 ~~~!~i~~n be,
entered on the :dlsplay~';-and can-i
.' , .' '"",, '.. " I
Ii~e:~~~)n~~~~~ ~~6~tti~~~.~~~~'
is important because only'the: last 7
digits of any number are: di$played
Iwhen dialing from Ca}~erj!~ (~1~~.
memory. " , ,'., ;,:cf ' ; ;
.c "
.' , .
Changing Stored Numbers,l
" .."1
To change or replace a stored number
simply enter the new number on thedisplay and store it in the memorylocation you wish to change.
26
~
DT94102.p65
~
26
-@-I
5/24/98. 12:20 PM
I-F
Page 29
Deleting Stored Numbers
.Press @00 .The display will
change to "SPEED DIALLOCATION- -.
.Enter memory location number
(01..20).Press CCLR/DE~ key. The display
will change to "LOCATION XX
DELETEDo,.
1:11:: H T I 1:1 t.~ ::.:: ::.::l ~I~ L E T E[I.Press @1f) to exit.
-(ijJ-
r
Storing Special Codes
To ins~use in a phone number,
press l!j.QbQJ at the appropriate pointwhen entering the number. This insertsa 2 second pause. A .p .appearsin the display to show ~se. Forlonger pauses, press !,t!Q!:QJ two or
more times. Each press makes thepause 2 seconds longer and is
treated as a stored digit.
If your phone is connected to a PBX,you can store the PBX accessnumber and a pause before the.phone number. For example, to
store 9-PAUSE-555-1234 in memory
location 08, do the following:
1. Press c:::D-
2. Press (!!9];:Q)
3. Dial 5551234
4. Press ~
5. Enter 08
-@-
,
I
-h
OT94102.p65
27
27
.
6/24198. 12:20 PM
rF
Page 30
.~~3;{)~
.
Caller ID (CID)Your AUDIOVOX DT 941 CI cordlessphone is capable of displaying thename and/or phone number of theperson calling, before you answer thephone. Subscription to Caller ID service
through your local phone company is
required to utilize this feature. /:.
If you subscribe to alphanumeric(name and number) Caller ID service,the calling party's name and phonenumber (when available) will bedisplayed on the handset screen while
the phone is ringing.
If you subscribe to numeric (number
only) Caller ID service, the callingparty's phone number (when available )will be displayed on the handsetscreen while the phone is ringing.
Call Waiting Caller ID (Type II CID)
Your AUDIOVOX DT 941CI cordlessphone is also capable ot displayingCaller ID information in connectionwith a Call Waiting signal. If you areon a call, and receive a Call Waitingalert signal, the LCD will display thename and/or number (when available)
of the party trying to reach you. As
above, subscription to Call Waiting IDservice through your local phonecompany is required in order to utilizethis feature.
A Word About Caller ID -CIDDue to regional incompatibilities, CallerID information may not be available for
every call you receive. In addition, the
calling party may intentionally blocktheir name and phone number frombeing sent.
~~f~t4
Receiving and Storing Ca!l~
This unit receives and displays all
Caller ID {CID) information, the caller6s
telephone number, the caJler's nameand the exact date and time of the call.
The phone sequentially numbers these
call records and retains them in the
unit's memory for later review. Thesecall record numbers are displayed asthe first two digits in the display. Theunit can store up to 50 nu':T1bers in its
memory.
Once the Caller ID (CID) memory isfull, any new call forces a deletion ofthe oldest call record.
Dialing From CID "Memory;-:!
For example, when you press and holdthe 7(Dkey to view the phone number,you would see the following:
.!!
I
~
28
DT9410,p6S
"-=ll
28
~
6124/98, 12:20 PM
rF
~
Page 31
+
However. when you dial directly fromCaller ID (CID) memory, only the last7 digits of the received telephonenumber will be used. Consequently.
you would actually dial this:
The AUDIOVOX DT 941CI was
designed to accommodate thissituation. If you need to temporarilyadd a long distance prefix and lor areacode (such as 150:?) before the CallerID (CID) number, do the following:.Beginning from the standby mode,
key in the necessary digits. Yourdisplay will look like this:
11::"-7..-11-1...;1
Then, to temporarily add the last7 digits only from a Caller ID
(cia) memory, ~ CID .
.Using the ~ { * ) and ~ {#) keys,
scroll through the received calls to
locate the number you wish to dial.
Special Message Indicator~
Out of Area Calls c:~'~,::i
If for any reason the telephone numberof the caller is unavailable, or if thecaller is outside the Caller ID {CID)service area, the message UNAVAIL.ABLE is displayed.
"Private" Calls 'i
If the caller has exercised the" optionto block his or her number from being
sent, then the display will show
PRIVATE.
Transmission Error ;If an error is detected, the Caller ID
(CID) information is incomplete and
will not be displayed. "TRANSMISSION
ERROR" will be displayed.
...
, "'
,
+
Once you have located the number
~ish to dial, simply press
lT~!:.!S.) .The last seven digits will
be added to the numbers alreadyin the display, and the wholenumber shown below will be au-tomatically dialed.
I
OT94102.p65
29
Il
The occasional appearance of"TRANSMISSION ERROR" on your
display does not indicate a problem
with your unit or your telephone line.However, if this appears frequently,you may want to notify your telephone
company.
6124/98, 12:20 PM
-<!;t-
I-F
Page 32
-@-
Deleting Numbers
Pressing the (CLR/DELJ Key deletes
the CID number displayed.
.While the phone is in Caller ID
(CID) mode, press the (CLA/DEL.)key once to delete the current call
.Press and hold t6e CLRlDEL
key for more than ~ seconds todelete the entire contents of Caller
ID (CID) memory. The display willshow the following, for a finalconfirmation, before the entire
Caller ID (CID) memory is erased:
and the display will show: ..'!
[IELETE RLL.!I
rCIELET I t.~13
[iEL TI:I RLLI:II.I.!
.=1 I t.~GI-E I::RLL
.~Pres~ing , any key other than
The older Caller ID (CID) recordswill be moved' forward by onelocation .
l CLR/DELj will cancel the opera-
tion. Pressing CCLR/DEL) will
confirm the operation and the
display will then show:
,
The message will remain on thedisplay for 2 seconds.
30
~
OT94102pOS
30
-@-
6/24198. 12:20 PM
rF
Page 33
Your DT 941 CI can answerincoming calls in 2 different ways:
Normal Answerina Mode. Afteryour personal greeting (or thefactory preset greeting, if youchoose), the OT 941CI will recordyour caller's message. .!For
example:
.Upon power-up, the Base Unit
Message Window will alternatebetween CL (indicating that the
Day and Time must be set) and a
digit representing the number of
recorded messages yet to be
played.
'c-?
Answering Device Pr~grart:l~ing
"You have reached 555-1234. Weare unable to answer your call atthis time. Please leave a message
after the tone."
If you prefer fo use the factorypreset greeting, the caller will
hear:"Hello, I'm unable to answer yourcarl right now. Please leave your
name, number and a messageafter the tone."
~
Announce-Onlv Mode. Afteryourpersonal greeting (or the factorypreset greeting, if you choose), the
DT 941 CI will hang up. For
example:
"Sorry, we cannot take your call.
Please call back tomorrow between
9am and Spm".
If you prefer to use the factorypreset greeting, the caller will
after 2 rings, 4 rings, 6 rings, or TollSaver. In Toll Saver mode, your DT941 CI will answer calls after 2rings 2!1!Y-if there are new, unplayed
messages in its memory.Otherwise, it will answer after 4rings. This feature helps you avoidlong distance charges when
checking for messages from a
remote location. Therefore, usingToll Saver, if you call your DT941 CI, and it doesn't pick up bythe third ring, hang up. Therearen't any new messages for youat this time.
.Press ~ until you hear the
desired setting ( 2, 4, 6, Toll Saver).
.Press C;=IME/SETJ to confirm your
choice. The voice prompt will say:"Number of Rings Selected is -
"
.Press ~ to advance to the
next programming .function, orpress PLAY/STOP. to exit
programming mode.
.
-\f)
35
-I
OT94102.p6535
II
+
6/24/98, 12-20 PM
If
~
Page 38
ON/OFF KeyThis key turns the answering deviceON and OFF ..As you press this key, the voice
prompt wilt confirm your choice:"Answering Machine ON (or OFF)"
The ON/OFF indicator glows wl)~nthe answering device is set to ON.
It is recommended that you leaveyour DT 941 CI answering device inthe ON mode, unless you do notwant it to answer incoming calls.
This key has no effect on the
cordless phone portion of your DT
941CI.
~
MEMO Key c.This key is used to:
.Record your outgoing message.
See SETTING UPYOUR DT941CIDIGITAL ANSWERING DEVICE .
Set Outgoing Message.
.Record a MEMO at the Base Unit.
To record a MEMO:
.Press ~. The voice prompt
will say "Now Recording",followed by a beep.
.Begin speaking. Your MEMO can
be up to 4 minutes.
!!~
-@-
If the answering device is OFF; it
can be turned on remotely bycalling in and allowing the line to
I
ring approximately 10 times. SeeREMOTE OPERATION OF THEDT 941CI.
When the answering device is)::~, press and hold theL ERASE J key for more thar}. 2
seconds to delete all old (previ-
ously heard) messages.
REPEAT Key --404
Press this key during message
playback to return to the beginning
of the message.
PLAY/STOP Key ./~.Press this key to begin message
playback. When pressed, the
voice prompt will tell you the
number of new and old messages
stored in memory. It there are any
new (unplayed) messages, the DT941 CI will play them and STOP.You can then press C~~T.9fJagain to review old messages.
Press this key to STOP messageplayback.
Press this key to exit answeringdevice programming mode.
.Hold this key down during message
playback to increase playbackspeed.
VOLUME UP/DOWN Keys- '6; T.These keys control the loudness of
the Base Unit speaker. At thelowest setting (1 ), you will not hearincoming messages. To screencalls as they come in, raise thevolume level from the minimumsetting (1 ). 7 is the loudest setting.
MENU, SELECT, TIME/SET,~~eys c'
.These keys are used for
" --".
answering device setup. See"Setting Up Your DT 941 CI DigitalAnswering Device".
+
(g
900~=- -<:;)=- -C>c=- :" <:;)
=--
<OIc:>
--
O .CD
~7~~~
co
CD
ERASE
PLAY/STOPREPEAT
37
~,
OT94102.p65
37
~
6/24/98. 12:20 PM
rF
Page 40
-@-
BASE UNIT MESSAGE WINDOW(LED).The large Base Unit display provides useful data on the status of your DT
941 CI answering device. Below are examples of the data:
From a remote location, you canaccess many of the DT 941CIanswering device functions, suchas listening to messages, recordinga memo, or changing your outgoing
message.
To access your DT 941 CI re-
motely, you need to call from a
different phone line, using a touch-tone phone.
.(If the DT 941 CI is Or'F when you
call, let the phone ring at least 10times. The answering device willturn itself ON, and prompt you toenter your security code.)
.The factory-set security code is
19. To program a different code,- -see SETTING UP YOUR DT 941 CI
ANSWERING DEVICE -SET
SECURITY CODE.
r
~
-n
Dial your phone number and wait
for the DT 941 CI to answer.
While the DT 941 CI is play~eoutgoing message, press L!-) ,
then enter your 2-digit securitycode.
I
OT94102.p65
38
.Once the security has been
entered, you will hear a beep,confirming that the DT 941 CI hasentered remote operation.
You will then hear the voiceprompt announce the number ofnew (unplayed) messages,
followed by the playback of thenew messages (if any).
38
6124/98. 12:20 PM
+
I-F
Page 41
~
-w-
Approximately 10 seconds after
new messages are played (or afterthe voice prompt says you have"NO new messages. ). you willhear the following menu:
.Press #2 to play all the
messages"
"Press #5 to stop" !,"Press#4torepeat the message""Press #6 to skip the message"
" Press #9 to erase the message "
"Press #1 for other functionsH
Upon pressing #1, you will hear theadvanced menu:
"Press #7 to 'review outgoing
message"
"Press *7 to record outgoing
message"
"Press *8 to record memo"
" Press #4 twice to repeat
previous message"
"Press #0 to turn the system ON
or OFF"
"Press #1 for other functions"
P ressing #1 at this point will return you
to the first menu.
NOTE: Press .0 to exit remoteoperation mode. In addition, theDT 941 CI will exit remote opera-tion mode if there is approximately15 seconds of inactivity.
"Press #5 to stop" Press #5
during review of messages to stopplayback.
"Press # 4 to repeat the
message II During messagereview, press #4 to return to the
beginning of the message beingplayed. Press #4 twice to returnto the previous message.
.HPress #6 to skip the message"
During message review, press #6to skip to the next message.
" Press #9 to erase the- message "
During message review, press #9
to erase the message being played.
"Press #7 to review outgoing
message" To listen to youroutgoing message, press #7.
" Press .7 to record outgoing
message "6To record a newoutgoing message ( replacing theprevious outgoing message ). press
.7. When your outgoing messageis completed, hang up.
"Press .8 to record memo'. To -
record a memo, press .8. Whendone, hang up.
+
Review Of Remote Commands..'Press #2 to play all the
messages ., The system will
announce how many new and oldmessages are in memory. If thereare any new messages, the DT941 CI will play the new messagesonly. Once all new messages areplayed. you can press #2 again toREPLAY all (old) messages.
39
OT94102p65
il
39
-~
HPress #0 to turn system on or
offH As you press #0, the voiceprompt will toggle between"Answering Machine ON" and
" Answering Machine OFF".
6/24/98. 12:20 PM
rF
Page 42
Noise Or InterferenceYour AUDIOVOX DT 941CI cordlesstelephone has auto-channel scancircuitry which will detect excess noise
and change the channel of the phoneto reduce it. This is done automatically.
Out Of Range When Phone ..Is OnSince the AUDIOVOX Dr 941 CI...is afully digital phone, it does not suffer
from noise associated with regular
cordless phones. At times you may
experience occasional "drop outs",especially at the extreme edges of thephone's range. Simply move closer tothe base unit and this will disappear.
Automatic Security CodingYour AUDIOVOX DT 941 CI phone is
factory set with 16.8 million possiblesecurity codes. This unique securitycode allows your handset and base to
recognize each other, and minimizes
.
the possibility of another cordlessphone using your telephone line.
Out Of Range IndicationIf the handset is moved to a pointwhere the base and handset can nolonger communicate, the handset will
display CHANNEL SEARCHING, andscan all channels in an attempt to re-link with the base.
If you are presently engaged in aphone conversation move closer to thebase. If the base unit does notcommunicate with the handset within25 seconds of losing contact, it will
automatically hang up.
Out Of Range When Phone :Is Off
When the phone is OFF, lhe handset
and base still monitor each other to
make sure that they can communicate.
If the handset is moved out of range,
the handset will display .CHANNEL
SEARCHING.. The handset will scan
all channels in an attempt to reestablish
communication with the base. This
process does not require user
intervention; the handset will re-Iink
with the base automatically once it is
brought back within range. The unitwill then be able to receive and placecalls.
When the base unit i~ unplugged-from the power supply, the handset
.,
'I
"
+
will display -CHANNEL SEARCH-
ING". Plug the base in again and thiswill stop.
40
~
OT94102.p6S
40
~
6124/98. 12.20 PM
rF
Page 43
-@-
Cleaning your teleptione~:.i ' .Taking Care Of You TelephoneYour AUDIOVOX DT 941CI cordless
telephone contains sophisticatedelectronic parts, so it must be treated
with care.
Avoid rough treatmentPlace the handset down gently. Savethe original packing materials to protectyour telephone if you ever needto ship it.
Avoid waterYour telephone can be damaged if itgets wet. Do not use the handsetoutdoors in the rai'n, or handle it withwet hands. Do not install your baseunit near a sink, bathtub or shower.
Electrical stormsElectrical storms can sometimes cause
I
I
power surges harmful to electronicequipment.
For your own safety .use caution when
using electric appliances during storms.
Your telephone has a durable plastic
casing that should retain its luster for
many years. Clean it only with a soft
cloth slightly dampened with water or
a mild soap. Do not use excess water
or cleaning solvents of .any kind.
Remember that electrical appliances I
can cause serious injury if used when
you are wet or standing in water. If
your base unit should fall into water,
DO NOT RETRIEVE IT UNTIL YOU
UNPLUG THE POWER CORD AND
TELEPHONE LINE CORDS FROMj
ITHE WALL. Then pull th.e unit out by
the unplugged cords.
+
41
~
OT94102.p65
Il
I
-<ftJ-
6124/98. 12:20 PM
rF
Page 44
-@-
If you have difficulty operating yourphone. the suggestions below shouldsolve the problem. If you still havedifficulty after trying thesesuggestions. call AUDIOVOX
COMMUNICATIONS at (800) 229-
1235.
THE PHONE DOESN'T WORK AT
ALL.Make sure the Power Cord is
pugged
.Make sure the telephone line
cord is plugg~d firmly into the
base unit and the telephone wall
jack.
.Make sure the batteries are
properly charged. If the 'LOWBATTERY' message is shown, thebattery pack needs charging.
NO DIAL TONE.
First check all the suggestionsabove.
It you still don't hear a dial tone,disconnect the base unit from thetelephone jack and connect adifferent phone. It there is no dialtone on that phone either, theproblem is in your wiring or localservice. Call your local telephone
company.
YOU GET NOISE, sTATlc.16~ A:WEAK SIGNAL WHEN ::VOUORE
AWAY FROM THE BASE'UNIT.;"~;
.You may be out of range. Either
move close to the base, or relocatethe base unit.
.The layout of your home may be
limiting the range. Try moving thebase unit to another position.
THE HANDSET DOES NOT, RINGWHEN YOu RECEIVE A CALL.
.Make sure you have'the handset
ringer activated. To set the ringer,see .PROGRAMMING THERINGER..
.Make sure the telephone line
cord is plugged firmly into the
base unit and the telephone jack.Make sure the power cord isplugged in.
.You may be too far from the base
unit.
.You may have too mahy extension
phones on your telephone line toallow all of them to ring. Tryunplugging some of the other
phones.
," ..' "
-.c
..,
-+
-I
--:-
YOU GET NOISE, STATIC, OR AWEAK SIGNAL EVEN WHEN YOU'RENEAR THE BASE UNIT ..Household appliances plugged
into the same circuit as the baseunit can sometimes causeinterference. Try moving theappliance or the base unit toanother outlet.
OT94102p65
YOU HEAR NOISEINTHEHANDSET ~
AND NONE OF THE:'KEYS ORBUTTONS WORK. ,:,:",-:.j. ..i~Make sure the power cord is plugged
in.
42
42
,
6124/98. 12:20 PM
-@-
."
rF
Page 45
COMMON CURE FOR ELECTRONICEQUIPMENT
Electronics, like people, can somelimesget confused. If the unit does not seemto be responding normally, then tryputting the handset in the cradle. Ifit does not seem to respond after tryingthis a few times, do the following {in
the order listed): .,
1. Disconnect the power to the base.
2. Disconnecl the handsel battery.
3. Wait a few minutes.
4. Connect power to the base.
5. Connect the handset battery.
6. Put the handset in the base.
~
43
+
-i
-n
DT94102.p65
43
~
6/24/98. 12:20 PM
rF
Page 46
AUDIOVOX CORPORATION (the Company), warrants to the original retail purchaser ofthis Audiovox Telephone, that should this product or any part thereof (except the itemslisted below), under normal use and conditions, be proven defective in material orworkmanship within the first twelve (12) month period from the date of purchase, suchdefect(s) will-be repaired or replaced (with new or rebuilt parts) at the Company's option,without charge for parts or labor directly related to the defect(s).
The accessories consisting of the antenna and adapter are similarly warranted for twelve(12) months from original purchase.
This Warranty does not apply to batteries, or costs incurred for testing or checking,or to any product or part hereof which has suffered through alteration, serial numberdefacement, improper installation, excessive temperature or humidity, environmentalconditions, mishandling, misuse, neglect or accident. This Warranty is not assignable ortransferable.
To obtain repairs or replacement within the terms of this Warranty, the product should .be delivered with proof of purchase, specification of defect(s). transportation prepaid. to
the Company at the. address shown below.
Call toll free to (800) 229-1235 (in N.Y.State, (516) 233-3410) for reference to anAuthorized Warranty Station in your area.
THE EXTENT OF THE COMPANY'S LIABILITY UNDER THIS WARRANTY PROVIDEDABOVE AND, IN NO EVENT, SHALL THE COMPANY'S LIABILITY EXCEED THE
1;0\-
-~
PURCHASE PRICE PAID BY PURCHASER FOR THE PRODUCT.
..'0'
+
44
~-!
OT94102p6S
44
-~
6174/98. 12:20 PM
rF
Page 47
f;:c
-@-
FREQUENCY CONTROLCrystal Controlled Dual
Synthesizer
TRANSMIT FREQUENCY
Handset: 925.05 MHz to 927.75 MHz
( All ten channels within thisrange) ..."
Base
RECEIVE FREQUENCYHandset: 902.3 MHz to 905.0 MHz
I
NOMINAL EFFECTIVE RANGEMaximum power allowed by FCC and
IC. Actual operating range may varyaccording to e!1vironmental conditions
at the time of use.
902.3 MHz to 905.0 MHz(All ten channels within this
range)
( All ten'channels within thisrange)
925.05 MHz to 927.75MHz( All ten channels within this
range)
PLL
WEIGHTHandset: 250 grams
Base: 415 grams
POWER REOUIREMENTS- !
Handset: Self-contained nickel-
cadmium rechargeablebattery supply, 3.6V
nominal, 600mAh capacity.
Base:
MEMORYSpeed Dial
11V DC @ 300mA
20 Memory locations,
20 digits per location.
Caller ID
SPECIFICATIONS .ARETY,PICALAND MAY CHANGE. WI~HOUT
NOTICE. "'.. ,: f ...
: Alphanumeric Display
50 Memory locations
, "
+
SIZEHandset: 19 x 6 x 3.5cm (L x W xT)
Maximum (Antenna ex-cluded)
21.5 x 14.5 x 5cm (L x Wx T) Maximum (Antennaexcluded)
DT94102.p65
45
45
-~
6/24/98. 12:20 PM
rF
Page 48
I
~
AUDIOVOX COMMUNICATIONS CORP.
555 Wireless Blvd., Hauppauge, New York 11788, 516-233-3300
16808 Marquardt Avenue, Cerritos, California 90701, 562-802-5100


 Loading...