

Page 1
\
1*
\-
DT 911
-^"AUDIOTOX
COMSffir^GATIONS CO
CORP*
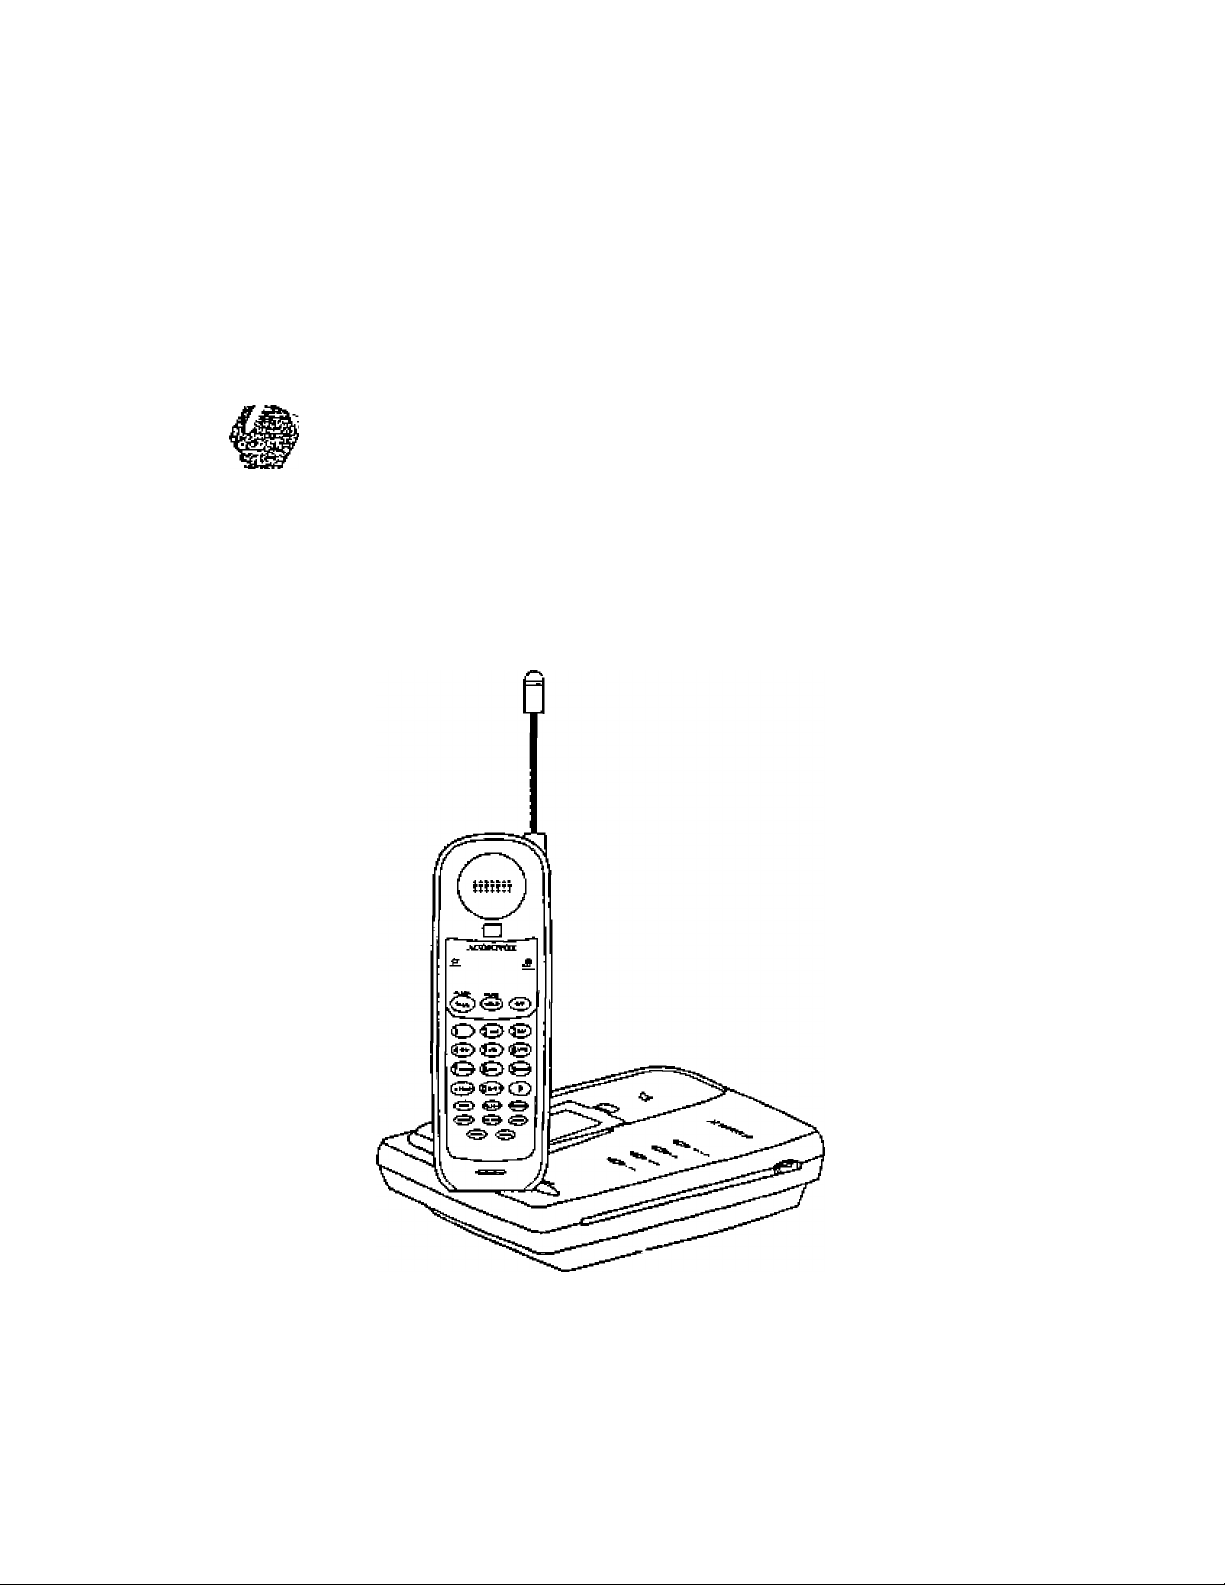
CORDLESS TELEPHONE
• 900MHz DIGITAL
IMPORTANT REVIEW INSTRUCTIONS BEFORE OPERATION
Page 2

Congratulations! You have purchased
one of the most sophisticated cordless
telephones on the market! The
AUDIOVOX DT911 has been de
signed to offer a new standard in
cordless telephone technology.
The AUDIOVOX DT911 uses special
memory in both the base and handset
which is not susceptible to power
failures. This provides permanent
storage of all memory dial numbers, as
well as the base and handset security
codes.
Unlike most other cordless phones, the
AUDIOVOX DT911 digitizes your voice
using advanced ADPCM digital voice
coding to provide noise and distortion
free performance. In most conditions
you will not be able to tell you are using
a cordless phone. Gone are the
annoyances of static, interference and
having to listen to other people's
conversations on your cordless phone.
When an optional spare battery pack
is installed in the base unit, the
AUDIOVOX DT911 uses this battery to
provide operational backup in case of
power failure. In this way you have
access to all normal phone functions
during a total power outage. Calls can
still be placed and received without
interruption. More than 5 hours backup
will be possible with a fully charged
AUDIOVOX DT911 scrambles your
battery in the base unit.
voice before it transmits it. This
ensures that no one can tune in and
eavesdrop on your conversations.
4-
With the AUDIOVOX DT911 the user
can easily answer a call
by sfn^Jiftpressing any ke^otKeTthan
the O^F^, MUTE or Volume Keys. This
The AUDIOVOX DT911 informs you
that another extension is currently in
use on the same phone line. The
phone will also alert you when you are
Out of Range even when you're not
using the phone!
is very useful in a dark environment,
^g^par?th»ib£ef.ujoee-'not^h ave _to
The AUDIOVOX DT911 also provides
a one-way Page/find. Pressing the
base PAGE key will cause the handset
to ring in a manner which distinguishes
it from normal incoming ringing. This
can be used to alert the handset user
or to simply locate the handset in the
event that it is misplaced.
5/15/98. 10:33 AM
Page 3

900 MHz Operation
Fully Digital Link between Handset
and Base with AD PCM voice coding
Digitally-Scrambled Voice
Communication
20 location Programmable Memory
for 20 Digit Phone Number
Special One-Touch memory
keys for emergency or frequently
dialled numbers
10 Channel Operation with auto
channel selection
Out-of-Range indication while the
handset is in use or in standby
mode ’
Removable handset battery pack
Spare battery charger in the base
unit
Complete battery back-up in case
of power failure (with optional spare
battery pack installed in Base Unit)
Easy answer - When the phone
rings simply press any key other
than OFF, MUTE, or the Volume
Keys on the handset to answer
Face up handset charging
wt I
Auto hang up when returning the
handset to the base cradle
Extension In Use indicator
24 Bit Digital Security Code
DTMF and Pulse Dialing
Low Battery Detect and Warning
indicator .
Up to 7.0 hours continuous talk
time, Or 7 days standby time.
Volume Adjust on Handset
REDIAL, HOLD, PAGE and MUTE
Hearing-Aid Compatible Receiver
Detachable power supply. Non
volatile storage of security code
and memory dial memories
Programmable Ringer Types
This manual is designed to make you
familiar with the AUDIOVOX DT911.
We strongly recommend you read the
manual before using your phone.
di9n.p60
1998/6/22. PM 06:16
Page 4
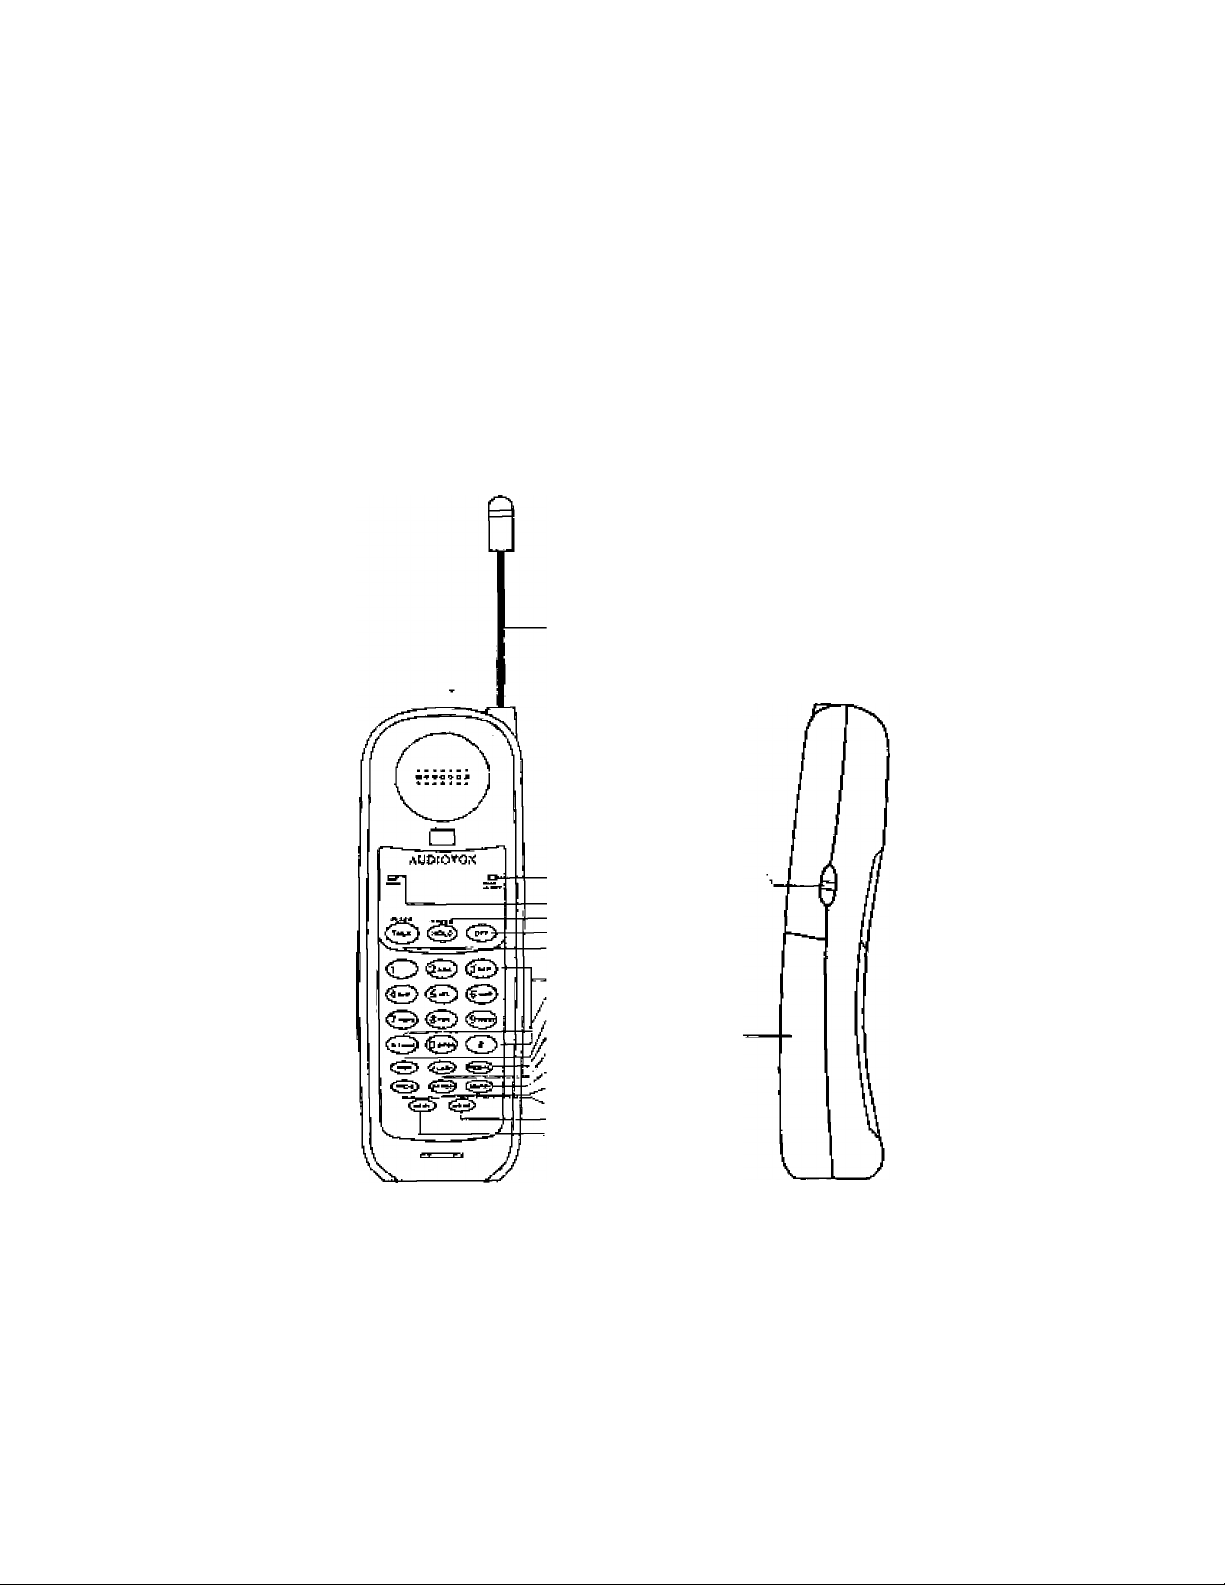
ANT£№A
VOLUMi UFi MWIH
LOW SATTEm'AHJTE
iNDCATOR _
PHON6 indicator
HOLD KEV
OFP KEY
talkkev
TQtiS [T*niD«*iii Ton»!
MEMORY ^
R£)C**t COWPAflTMEHT
PUSH
MUTE
QUICK MEMOnV
PRDORAM
memory;
MEMORY t
BATTEfiV
HANDSET FEATURES
3^194«. 10:33 AM
Page 5
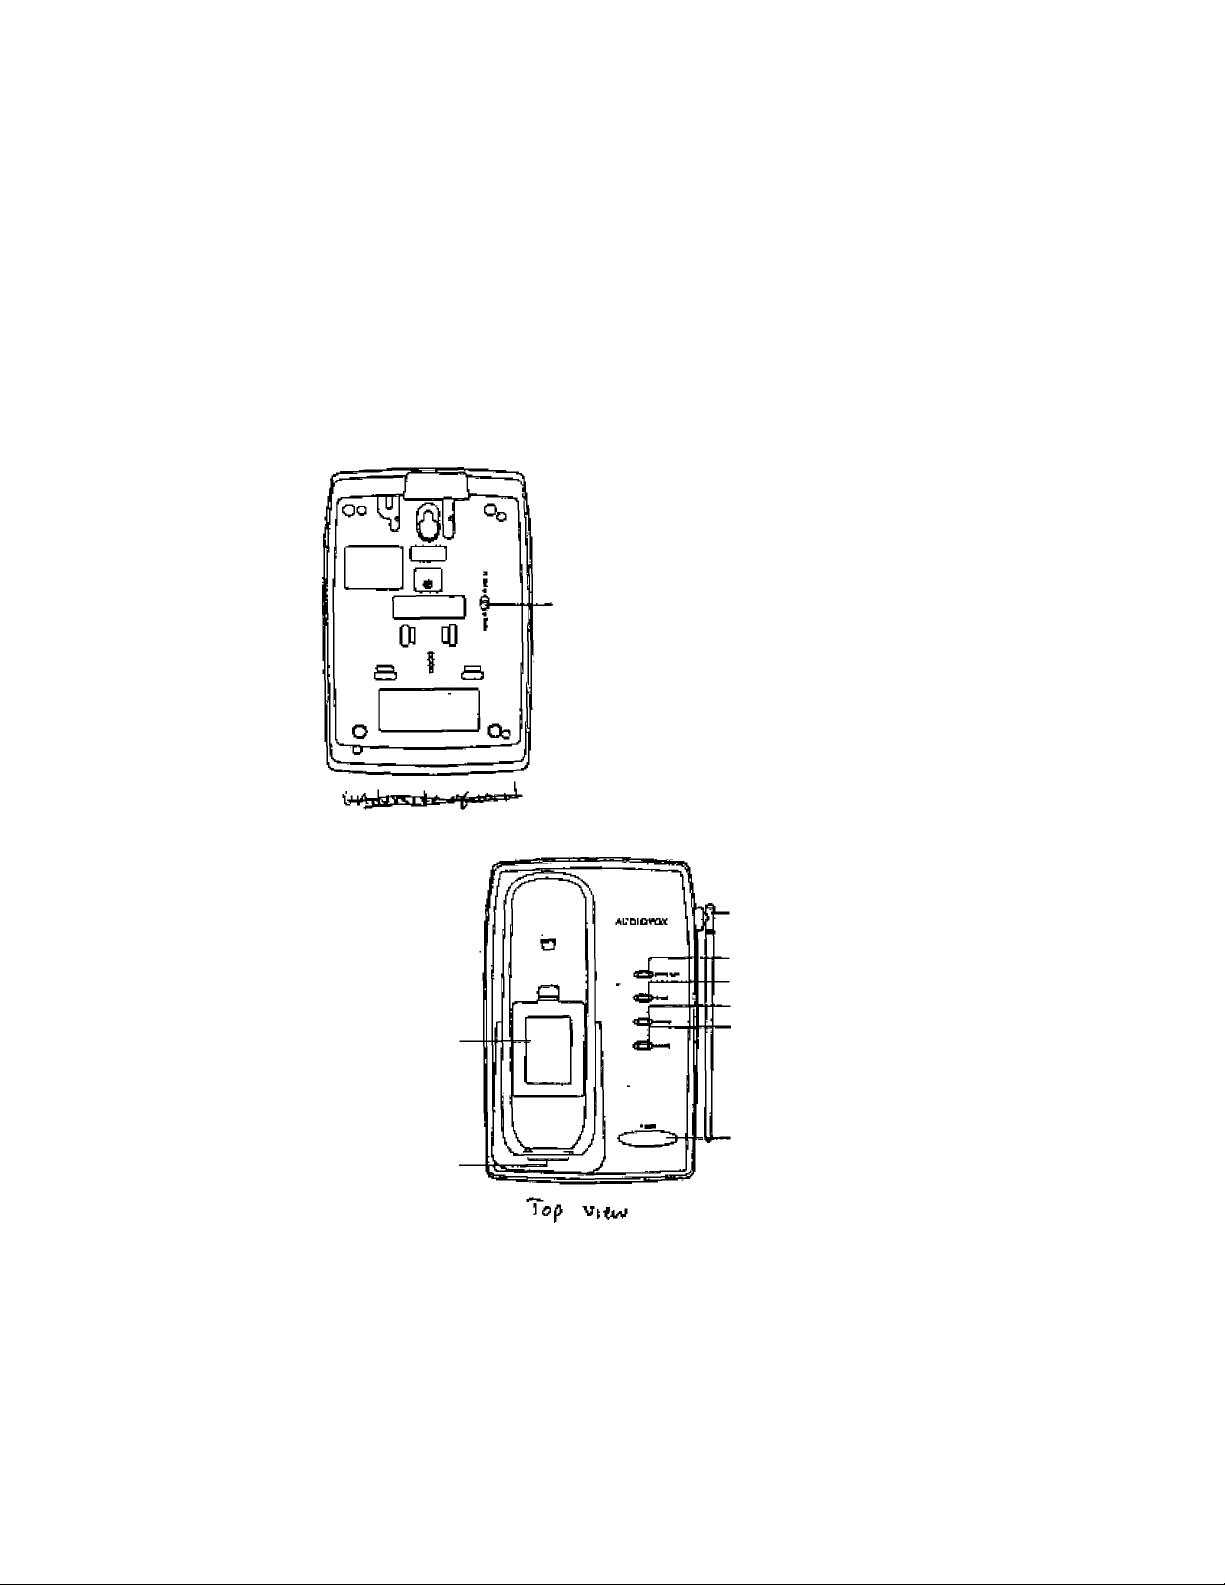
DiAufi«;
TDN&PULse
S£L£CTOfl
AC PQVJtfl JACfi ■
P^^ONe COfiO JACK ■
'^C-IC VJl
4-
'ANTENNA
■ SPAKE BATTEfiy inoicat™
■ IN USE JNIJICATOP
■ HAHOSETCKAflCE №CATOR
POWEniAOtCATOfi ■
>u
PAGE KEY
CHAflOlNQ contacts
BASE UNIT FEATURES
m;J3 AM
Page 6

This equipment compiles with Parts 16
and 63 o( the Federal Communications
Commission (FCC) rutes for (he United
States, Operation is subject lo the
foltowing two conditions: (1) (his det/ice
may not cause interference, and ¡2)
(his device must accept any
interte ranсe, incfuding interterence that
may cause undesired operation of the
device.
A label is located on the underside of
the base unil containing either the FCC
registration number and Ringer
Equivalence Number (REN). You
must, upon request, provide this
Information to your iocaf tefephone
company.
This equipment Is compati&ie with
inductively coupled hearing aids.
Should you experience trouble with
this telephone equipment, please
contact:
AUDIO VOX COMMUNICATIONS
SERVICE DEPT, at (800) 229-1335,
For repair/warranty information. The
telephone company may ask you to
disconnect this equipment trcm the lire
network until the problem has been
corrected.
FCC Part 15
Warning: Charges or modifications to
this unit not expressly approved by the
party responsibte for сотрПаг«ев could
void the user's authority to operate the
equipment.
The equipment has been tested and
found to comply with part IS of the FCC
rules. These, limits are designed lo
provide reasonable protection against
harmful interference in a residentiat
Installation. This equipment generates,
uses and can radiate radio frequency
energy and, If not installed and used
in accordance with the instructions,
may cause harmful interference to
radio commurticalions. However, there
is no guarantee that interference wilt
not occur in a particular installation. 1f
this equipment dees cause harmful
interference to radio or television
reception, which can be determined by
lurning the equipment off and on, the
user is encouraged to try and correct
the interference by one or more of the
following measures:
' Reorient or relocate Ihe receiving
antenna.
- Increase the separation between
the equipment and receiver.
- Connect the equipment into an
outlet or on a circuit different From
that to which the receiver is
connected.
- Consult the deafer or an
experienced radlo/TV teehriieian
for help.
mu
&|'1VU. AM
Page 7

Fee Part 60
Ths FCC requires that you connect
your cardJess telephone to the
nationwide t&iephone netwrorit through
a modular ta lop hone jack {USOC
RJiiC, RJtlWj,
Your telephone company may
discontinue your service if your
equipment causes harm to the
telephone network. They will notify you
in advartco of disconnection, if possible.
During notification, you will be iritofmed
of your right to file a complaint with the
FCC.
Occasionally, your telephone company
may make changes in its facilities,
equipment, operation, or procedures
that could affect the operation of your
equipment, ff so, you will be given
advance notice of the change to gfve
you an opportunity to maintain
uninterrupted service.
The base unit contains no user
serviceable parts. The haridset
contains a user replaceable battery
pack.
This equipmarti may not be used on
coin service provided by the phone
company or Party Lines.
The REN Is useful in determining the
number of devices you may conriect
to your telephone tine and still enable
the devices to ring when you raceiYe
a calf. The general rule is that the REN
value should not eitceed £.0A total;
however, contact your local telephone
company for the specific number In
your area.
1C (iridustry Canada)
This telephone is registered for use in
Canada.
Notice:The REN assigned to this
device denotes the number ot
devices you rqay connect to
the telephone loop which is
used by the device to prevent
overloading The termination
on a loop may consist of any
combination ol devices
subjected only to the
requirenoent that the sum of tl^
REN does not exceed Trve (5,0)
if it is detetmined that your telephone
equipment is malfunctioning, the FCC
requires that it not be used and that
it be unplugged from the modular jack
until the problem has been corrected.
Repairs to this teiephena equipment
can only be made by the manufacturer
or its authorised agents or by others
who may be authorized by the FCC.
For repair procedures, follow the
instructions outlined under the
AUDIO VOX Limited Warranty.
Notice:The Industry Canada label
identifies certified equipment.
This certification means that
the equipment meets certain
tetecommunicatioris network
protective, operational and
safety requirements. The
Department does not
guarantee the equipment will
operate to the user's
satisfaction.
1D;3a AM
Page 8

Before instalíirg this equipment, users
should ensure that it is permissible to
be oonnecled to the facitities of the
local telecommunications company.
The equipment must also be irtstalled
using an acceptable method of
connection. The customer should be
aware that compliance with the above
conditions may not prevent degradation
of services in some situations.
Repairs to certified equipment should
be made by an authorized Canadian
maintenance facility designated by the
supplier. Any repairs or alterations
made by the user lo this equipment,
or equipment malfunctions, may give
!he telecommunications cornpany
cause to request the user to disconnect
the equipment.
Users should ensure tor their own
protection that the elecirica] ground
connections of the power utility,
telephone lines and internal meiatllc
water pipe system, if present, are
connected together. This precaution
may be particularly important in furat
areas.
Your AUDiOVOX DT911 is designed
to operate at the maximum power
aliowed by the FCG. This means у cur
handset and base unit can
communicate only over a certain
dislance • which will depend on the
location of the base unit and handset,
weather, and the construction and
layout of your home or office.
Caution: Users should ml attempt lo
make such connections themselves,
but should contact the appropriate
eleclrical Ina paction authority, or
oiecirlcian. as appropriate.
siivîe. ю-.аз«*
Page 9

When using your telephone
equipment, basic safety precautions
should always be followed to reduce
the risk of fire, electric shock and
injury to persons, including the
following:
1. Read and understand all
instructions.
2. Follow all warnings and
instructions marked on the product.
7. This product should be operated
only from the type of power source
indicated on the marking label. If
you are not sure of the type of
power supply to your home, con
sult your dealer or local power
company.
8. Do not allow anything to rest on the
power cord. Do not locate this
product where the cord will be
abused by persons walking on it.
3. Unplug this product from the wall
outlet before cleaning. Do not use
liquid cleaners or aerosol cleaners.
Use a dry cloth for cleaning.
4. Do not use this product near
water, for example, near a bath
tub, wash bowl, kitchen sink, or
laundry tub, in a wet basement, or
near a swimming pool.
5. Do not place this product on
unstable cart, stand, or table. The
telephone may fall, causing serious
damage to the telephone.
6. Slots and openings in the cabinet
and the back or bottom are
provided for ventilation, to protect
it from overheating, these openings
must not be blocked or covered.
The openings should never be
blocked by placing the product on
the bed, sofa, rug, or other similar
surface. This product should never
be placed near or over a radiator
or heat register. This product
should not be placed in a built-in
installation unless proper
ventilation is provided.
9. Do not overload wall outlets and
extension cords as this can result
in the risk of fire or electric shock.
10. Never push objects of any kind into
this product through cabinet slots
as they may touch dangerous
voltage points or short out parts
that could result in a risk of fire or
electric shock. Never spill liquid of
any kind on the product.
11. To reduce the risk of electric
shock, do not disassemble this
product, but take it to an Audiovox
■ authorized service facility.
Opening or removing covers may
expose you to dangerous voltages
or other risks. Incorrect reassembly
can cause electric shock when
the appliance is subsequently
used.
di9ll.p65
1998/6/23. A.VI 10:08
Page 10

12, Unplug (ills product from the wall
outiel and refer servicing to an
Audiovox authofiiad service
facilityunder the following
condition:
A. When the power supply cord plug
is damaged or frayed.
B. If [¡quid has beerk spilled Into the
product.
C. If the product has been exposed
to rain or watar,
0, If [he product does not operate
normally by following the operating
Instructions. Adjust only those
controls, that are covered by the
operating Instructions because
improper adjustment of other
controls may result in damage and
win often require extensive worfi
by an Audiovox authorized
technician lo restore Uie product
to normal operation.
E. If the product has been dropped
or the cabinet has been damaged,
F. If the product exhibits a distinct
change in performance,
13. Dp not use the telephone lo
report a gas leak in the vicinity of
the leak.
Ic-AiTrioN^pfRED^oniB pièki
fO EFi R BOm N JU ETCT^ERSON St
^ YÎÏ B AITEKV,- READ:AN Dli.o LLOVT
1. Use only lha appropriate type and
size battery pack specified In (he
Instruction manual provided for
this product
2. Do not dispose of the battery pack
Jn a fire. The cell may explode.
Check with Stale and local codes
for possible special disposai
instructions.
3. Do not open or mutilate ihe battery
pack. Reieased eleclrclyto is
cornoslva and may cause damage
lo the eyes or skin. It may be toxic
if swallowed.
4. Exercise care in handling battery
in order not to short the battery
with conducting materials such as
rings, bracelets, and keys. The
battery or conductor may overheat
and cause burns.
5. Charge the battery pack provided
with or identified for use with this
product only in accordance with
the instructions and [imitations
specified in tha instructions manual
provided for [his product,
6. Observe proper polarity orientation
between the battery pack and
battery charger.
1 d<9U.p«
SAVE THESE INSTRUCTIONS
10
iWirdr2j, fMOe»
Page 11

-®-
Charging the handset batteries
The handset of your AUDJOVOX
0ТЭ11 cordless telephone Is pow
ered by a rechargeable battery pack,
il charges automatically whenever
the handset is in the base. You
should charge the battery pack lor
1Й hours when you first receive your
phone. You'll know the battery pack
needs chargirig when:
The phone emits a warning tone
when you press the TALK key.
The MUTE^LO ВАТТ LED is
slowly hashing
The handset seems completely
dead; no lights are evident, and
pressing keys do not generate a
beep.
To Charge The Battery Pack
T0 charge the battery pack, place the
handset in the base unit. The
CHARGE indicator will Jighl to show
the handsel is seated property and
the battery pack is charging, it is
recommended that the battery pack
be charged lor al least 16 hours
initially and 8 hours tor maintenance
charging. You can use your tel
ephone before that with diminished
capacity, but it Is besl to charge the
battery pack fuHy, It will take several
recharge cycles Ic maximize the
charge capacity of your battery pack.
The maximum battery iife between
charges ¡3 7 hours of continuous talk
time or 7 days of stand by.
Alternatively, if you have purchased a
spars battery pack and It has been
charging in the base unit, simply
exchange the drained handset battery
pack with the fully changed replace
ment battery pack from the base
charger. Place the drained handset
battery pack into the base charger to
recharge.
The bass spare battery charger does
MOT charge a battery pack as quickly
as the handset battery charger. A full
charge requires 24 hours, when using
the spare battery charger.
IT'S IMPOSSIBLE TO viSVERCHAFtGE THE BATTEflY PA£k
The battery pack can be recharged
many times, but it you get a low-battery
signal even after 8 hours of mainte
nance charging in the base cradle (or
24 hours in the base spare battery
charger), the battery pack(a) should be
replaced.
To purchase replacement battery
packs, cali AUDIO VOX CommunicaCons at (000) 220-1235,
CT?li
1,1
*^saw
dgb
Page 12

^REPLACING JHE:HANDSETBAnERYïB
Follow the steps below;
1. Remove the battery case cover by
pressing on the ridged lines and
sliding downward.
PRESS and SLIDE
DOWNWARD
TJ
□e 8 eH
a
2. Discard the old battery pack. Don’t
put the old battery pack in a trash
compactor or a fire - it could burst.
3. Place the new battery pack in the
battery compartment with the metal
contacts acing down.
PLACE THE NEW
BATTERY PACK
INTO THE
BATTERY
COMPARTMENT
PLEASE NOTE THE
n -
eU
CORRECT POSITION
OF THE BATTERY
PACK WHEN
CHANGING BATTERY
4. Replace the battery case cover by
sliding the cover upwards.
___________
5. If the new battery pack is not
already charged, place the handset
in the cradle of the base unit to
allow it to charge for 16 hours.
CAUTION:
To Reduce the Risk of Fire oiilhjury
¡re oil
tp Persons, Read and Follow the
Instructions "I
Use only AUDIOVOX recharge
able battery pack BT-911.
2. Do not dispose of the battery in a
fire. The cell may explode.
IMPORTANT: ■ v.;|v
Do not dispose of this battery into
household garbage. For: informa
tion on recycling or proper disposal;
consult your local solid wa^e collectlon or disposal organization.
3. Do not open or mutilate the battery.
Released electrolyte is corrosive
and may cause damage to the
eyes or skin. It may be toxic if
swallowed.
4. Exercise care in handling batteries
in order not to short the battery with
conducting materials such as rings,
bracelets, and keys. The battery or
conductor may overheat and cause
burns.
"n
SLIDE IN THE
BATTERY COVER
To purchase replacement battery
packs, call AUDIOVOX Communica
tions at (800) 229-1235.
12
syi5;98. 10:33 AM
Page 13

Yoor Nicad battery pack recharges
whenever rtie Handset is returned
to the Base Unit cradle. You may
returned the Handset to its cradle
whenever you're not using the
phone.
However, to the life of
your battery pack, do not returri
your DT9'l1 Handset to the Base
Unit cradle Ibr recharging untJl the
MUTE/LO ВАТТ begins to flash.
The DTfl 11 has в buitt-in Spare Battery
Charger, which is located in the cradle
of ihe Base Unit
i regluroSYou^ musliootaj n^gn, optional ]
SSparoBatte гуряс1стпзгтхзгтзищап2ес1;
iXuDiO\^Q>C-doaleX^'^5hyi^f^^^
■"'ТвТоуокСЕгда-"-^^-^^ -
«Ш!ШБ1Я388Ш1ЕЯГр&)1
шяй8а%8ш»ата№г^
Remove the Spare Battery charger
cover by pressing the release tab and
lifting up.
Л)
jpSa
А» '
[ да
□
за:
(|L=vi
Place a battery pack In the Spare
Battery charger, sure the metal
charging contacts on the underside of
the battery pack are aligned with the
charging contact in the Spare Battery
charger.
lÿtwwsBack
When a Spare Battery pack is installed
in the Base Unit, the AU DIO VOX
DT311 uses this battery to provide
operational backup in case of a power
failure. if you have a fully charged
battery pack in the Spare Battery
charger and there is a power outage,
you will still be able to place and
receive caifs for up to five hours.
Replacing a Drained handset bat
tery
The spare battery pack can also he
used to replaça a drained Handset
battery pack to ensure uninterrupted
use. Be sure to put Ihe drained battery
in the Spare Battery charger for
recharging.
Please note that the Spare battery
pack recharges at a slower rate than
a battery pack charging in he Handset,
It lakes 24 hours to fully charge a
battery pack in the Spare Battery
charger.
________
1Э
14W4ÎÎ1. ГМ Ofrli
Page 14

SETTING UP YOUR AUDIOVOX
DT911
Choose an area neaf an electrical
cutlet and a telephone wail jack.
AC POWER ADAPTOR
Plug the AC power adaptor into an
electrical outlet and the OC connector
to the back of the base unit.
Jc.: i ;
“ TONE PULSE
и^(Г, ^ :
» ..
CHARGE THE HANDSET BATTERY
PACK BEFORE USE |
The battery pack recharges
automatically whenever the handset is
in the base unit. The battery pack must
be charged ter t€ hours before using
your phone for the fir^t time.
SELECTION
1¡
. •
j
jf. 4^
¡íí'Tf
HANDSET RINGER
The handsel ringer is progranHaed ON
as Ihe factory default setting. Refer to
PROGRAMMING THE RiNGER on
page # for more information,
SETTl NGTHETONE/PULSESWrrCH
The TONE/PULSE switch i$ located on
the bottom of the base unit and Ss
factory set to TONE. If you have touch
tone service, do not change the switch
setting, if you have rotary [Pulse)
service, set the switch to PULSE.
A
CONNECT TELEPHONE LINE CORD
Plug one end of the telephone cord into
a wall jack, and the othar end into the
back ol the Base Unit.
11
У1ие. ifrjj Aju
Page 15

r; p-or r M ni^SJA RT E D :ii^»^
After charging the battery peck, rotate
the Base Unit antenna to an upright
position. Pick up the Handset, making
sirne the Handset antenna is fully
extended. Now press TALK , you
should hear diai lone. If not, see ‘IN
CASE OF DIFFICULTY'.
Ftti in the telephone number card on
the base unit. .
-TJci Ibcatio nsw:r:'";if;^ii
.'S^everioucb unihsufatediefephona
f-AwtresTfOriiierm i n ais flunless^th g
1} HtWVli. rvi «:!■
15
Page 16

~фь
USmG THE WALL MOUNT
ADAPTOR
1. Position the wali mount bracket
oi% the base.
Line up the tabs on the wall mount
adaptor with the holes on the
bottom of the base (Figure 1J,
Snap the wail mount bracket firmly
in place.
2. Mount the base on the wail.
Position the base so the mounting
studs will nt into the holes on the
bottom of the base. Position the
power 00rd to extend down the wait
the phone is to be mounted on.
Slide the base down on the
mounting studs uritil it locks into
place.
3. Connect the telephone tine cord.
The telephone line cord has э
snap-in plug at each end. Insert
one of the plugs into the jack on the
bottom ot the base, insert the ether
end of the plug Into the wall jack,
4. Plug the AC adaptor into an
electrical outlet and the DC
connector on the back of the
Base Ur^lt,
(TTtll
Figure 2
t6
1й;аз AM
Page 17

SET-UP
• Plug AC adaptor 1fiio a standard electrical outlat and connect to Base Unit,
HANGING UP I
Press OFF . Of place the handset in
the base cradle to hang up a catl.
Set Dial Mode switch to PULSE or
70 NE. The unit Is factory set
to TONE .
Let handset battery pack charge
tor 16 hours before first use.
Connect telephone line cord lo Base
Unît and telephone jack,
MAKiNG CALLS
* Press the TALK key. When you
hear a dial tone, dial the numbar.
AN Severing calls
* To answer a call press any key
other than OFF , MUTE , or the
Volurne Keys. The handset will
auto-answer when lifted off the
base cradle.
TO PLACE A CALL ON HOLD
* Press HOLD to place an acllve catl
on hold. ^
The PHONE LED will flash to
irrdicate call is on hold.
• Press HOLD again to return to the
calk
TO MUTE A CALL ;
• Press MUTE to (Usable the hand
set micrD phone.
» The MUTE/LQ SATT LED will stay
on continuously.
• Press MUTE again to return to two
way conversation
TO PAGE THE HANDSET \
• To page from the Base Unit, press
PAGE .
• To cancel the page, either press
PAGE again on the Base Unit or
press OFF on the handset.
tmii
T7
1Ï
Page 18

STORING MEMORY DIAL NUMBERS
• The phone should be OFF .
» Press PROG .
■ Enier the (wo digit memoiV location
fOO 20).
• Enter the number you wish to
store, up to a maximum of 20
digits.
' Press MEM to store number and
exit program mode.
ОШСК MEMORY DIALING т
■ Press the TALK key
• Press QUI. MEM .
* The phone number stored in
memory focation 00 will be
automaticaify dialed after a 2
second delay.
Г мяв/ттм.
li ■
ioisr^l
©G:e>
oe(5>|
HEMOnV STOni№i
Т1ЧЕ PHONE SHOULD ВЁ
OFF
PRESS®
EHTER МЁМОПТ
LOCATX3N (00-10)
9 e
ENTTER PHONE NUMfiEA
PFESS®
MEMORY DIAUNG
• Press the TALK key.
• Press MEM ,
• Enter the memory location of the
number you wish to diaf [00,,20),
• The number stored in memory will
be automatically dialed.
MEuonv diaunc
pnessv^)
paass®
ENTER meafory
M i I
"5
t-KATTON 030.30)
NOTE: t'V
You can press PHONElbefore
ClUl.MEM, but it is not r^ufred, L
USING REDIAL _ j
* Press the TALK key, then
REDIAL to automatically redial
the East number you diaJed,
Ж
IS
It
VISTH- 10.»AAF
Page 19

ANSWERING CALLS
When the Handset is in (he Base Unit
cradle, simply pick up |ha Handset to
answer an Incoming caEt.
When the Handset is away from the
Base Unit press any key other than
OFF , MUTE or the Volume keys lo
answer an incoming call.
MAKING CALLS
1. Press the TALK key and wait for
a dial tone.
2. Then dial the number you want.
It you make a mistake when diaiing,
press OFF to hang up, then press ihe
TALK key to get the dial tone again.
DISCONNECTING
T0 end a caJI, either place the handset
back in the Base Unit, or press OFF
EXTENSION JN USE INDICATOR
When another phone is in use on the
same line, and the AUDIO VOX DT911
is In standby mode, the PHONE LED
wilt flash slowly.
Extans I on In Use indtcallon will noi
function whert tha Handset is cui oi
range.
VOLUME CONTROLS
The volume controls for the handset
are located on the side of the unit.
Press the ^ or t keys to increase
or decrease the volume. Holding either
key down will continuously change the
volume setting. The earpiece votume
level wilt change accordingly. There
are four volume levels.
FLASH i
You can use your AUOfOVOX DT911
cordless phone with services such as
Call Waiting. Simply press the FLASH
key.
REDIAL
To REDIAL the last number you
dialed, press the TALK key, then
press HEDfAL . The phone will
auiomatlcaliy dial the number.
HOLD j
Press HOLD to place an active ceil
on hold.
The PHONE LEO will Hash to indicate
call is on hold.
Press HOLD again to return to
the call.
MUTE ■ '
Press MUTE In disable the handset
microphone.
The МиТЕЛ_0 ВАТТ LED wHI stay on
continuously.
Press MUTE again to return to two
way conversation.
RINGER MUTE
Press MUTE during incoming ringing
to disable the ringer for the duration of
the cat!.
PAGE ]
To page from the base, press
PAGE .
To cancel the page, either press
PAGE again on the base or press
OFF on the handset.
J
19
sriygi. 10']] AM
Page 20

TEMPOHARV TONE
If you have notary (dial-pulse) telephone
service (TONE/PULSE switch is set lo
PULSE), this feature alfows you to
lemporartiy switch to TONE dialing for
such purposes as remote access to
artswerlfig machines, bank-by-phone
services, use of caFing cards and other
special services.
PROGRAMMING THE RINGER
The handset ringer is capable ol four
different types of ringer tones. The
following section details how to select
different rfnger types and how to turn
off the handset ringer.
CHANGING RINGER TVPES ‘
T0 program, the handset must be OFF,
First, dial the call normally. Then
activate Ihe Temporary Tone feature
by pressing (TONE key). You
can then press the numbers or symboEs
you need, and your phone wilt send the
proper tones, ■
To end the call, press OFF or place
the handset back in the base. The
phorte will automatically go back to
rotary (dlahpufse) service.
& rS
<0 80101
i
1 Si W> I
I '
tcmpoaarv tone
01>v. CALL
nOhuwiaV
PfitSS®
i^AESS IfTiE nUPytSEnS
OR SYMBOLS
PRESS TO END CALL
To select a different ringer type do the
following;
* Press PROG
* Press the # key.
‘ Press;
1 for finger type 1
2 for ringer type 2
3 for ringer type 3
4 for ringer type 4
Press PROG or
OFF to exit
program mode.
MWfpvff^ i I
CHANOINiG rnNGEfl
TYPES
111)0 01
10001
100 CO I
4^ 4 A J|
& ^ ■
\
___
W£SS^
paessiTj
pnesst
PRESS ^ On<S>
OR
20
n
V1»«. tui AM
Page 21

TURNING OFF THE RINGER
To turn off (he ringer do the fol lowing;
• Press PROG
• Press the # key.
> Press 0
• Press PROG or OFF to esftt
TURNinS OFFTNf
WMCEP
PB6SSI®
PBESSiX)
PH63S@i
PHESSiS Oflt®
CHECKING THE RINGER TYPE
To hear the presefil ringer type, do the
following:
■ Press PROG
‘ Press the # key
• Press # to test the ringer
» Press PROG or OFF (o enit
t>mi
£T
jnvu. lUU
Page 22

----
- • — m >i^il^*'MII •■ ■ !■ ! it'
NUMBER^
To pro9ram a speed dial localian, do
the following;
• TTie phone should be OFF ,
* Press PROG , The PHONE LED
will flash quickly to Indicate that the
urll is in program mode.
* Enter the memory localion (00..20)
you wish to store the number in.
• Enter the phone number to be
stored, up to a maximum of 20
digits.
• Press MEM to stone the number
and exit program mode. The unit
will emit a happy tone (a short
series of beeps) to confirm
successful programming and exit
program mode.
* if programming is unsuccessful,
the unit wfir generate an error tone.
- □
STOffllW WEHOKT DIAL
NUHBans
PHONE 3NOUU3 BE
C" &
•m* '9 ,
V,
_____
The QUL MEM key gives you one
button access to the MEMORY DIAL
number stored In memory location 00.
This may he a frequently dialed friend,
business, or emergency number, such
as 9t1.
off
PRESS
ENTER MEMORY
LOCATION (OOOOl
EKTien pnone numseh
^
PflESSiSl
J
There are two ways to dial using
the QUI.MEM KEY
• Press TALK ,
■ Press QUI. MEM .
• The phone number stored in
memory location 00 will be
autbmaticaify dialed.
OR
■ With the Handset OFF
press
QUI, MEM ,
• The phone number stored in
memory location 00 will be
automaticaily dialed after a 2
second delay.
to store ihe fast nurnbar dialed Into a
permanent memory location, do ihe
following:
• The phone should be OFF.
• Press PROG .The PHONE LED
will flash quickly to indicate the unit
is in program mode.
$TQAim MUMBEFI&
X i
USINO RE0AL
TWE PH0*e SHOULD BE
oe fi
@ A
pfiESspftoa
THE rnOH£ LED
WlLLFUkSH
ewfST MEHOHY
LOCATION ^00-20}
PRESS
PRESS O
€*'Ei O
■SESCEi
*9 '3J'
bd
22
in.
driLl.pU
V
IWJVi'll. AJit Hthflff
Page 23

Enter til e memory location [00,-30)
you wish to store the nurrbar in.
Press REDIAL .
Press MEM to store the number
and exit program mode. The unit
will emit a happy tone [a series of
short beeps) to confirm successful
programming,
if programming is ursuccessful the
unit wiii generate an error lone.
Press TALK to get dial tone.
Press MEM .
Enter a 2 digit location number
{00. .20)
The number stored in that location
will be automatically dialed.
DiALIhC from MEhORt
PRESS
PRiSi ¡®>
ÉMEHMÈHOfiT
UOCXTlONDOO-ÍSt
i ¿
■
©■’ICE'
■©i©-0
s) & 1
^ g> j
Ns, .■;>
&C1.ETim «TOR£D
1 KUJJBEfl
PPE5SÍ¿¿)
EhTÍEfl JycMOñT
LOCATKW ¡m-!Cl
\
PRfiS (Sí
liStorecTnumbdrsare re la nod in memory
'evenjirthohase'loses its, power orth e
í¿T0 RÍNgVSPEctecO DE^IríMi^
To insert a pause in a phone number,
press HOLD at the appropriate point
when entering the number. This inserts
a 2 second pause. For longer pauses,
press HOLD two or rno re times. Each
press maltes the pause 2 seconds
longer, and is treated as a stored digit.
tochargeorreplaceastorednumber,
simply store a new number in the
desired memory location following the
instructions listed In STORING
MEMORY DIAL NUMBERS, Seepage
* •
21.
To delete a stored number from
merrvory do the following;
• Press PROG to enter program
mode.
• Enter thememorylocation[00,.20),
• Press MEM toexiiprogram mode.
n
If your phone is connected to a PBX
you can store the PBX access number
andapausebefonathephonenumber.
For example, to store 9-PAUSE-555
1234 in memory location 03, do the
following:
• Press PROG
- Press Ofl (memory loealion)
• Press 9
• Press HOLD (pause)
• Dial 5551234
• Press MEM
23
iy№VH, FM Mill
 Loading...