

Page 1
WIDE
SCREEN
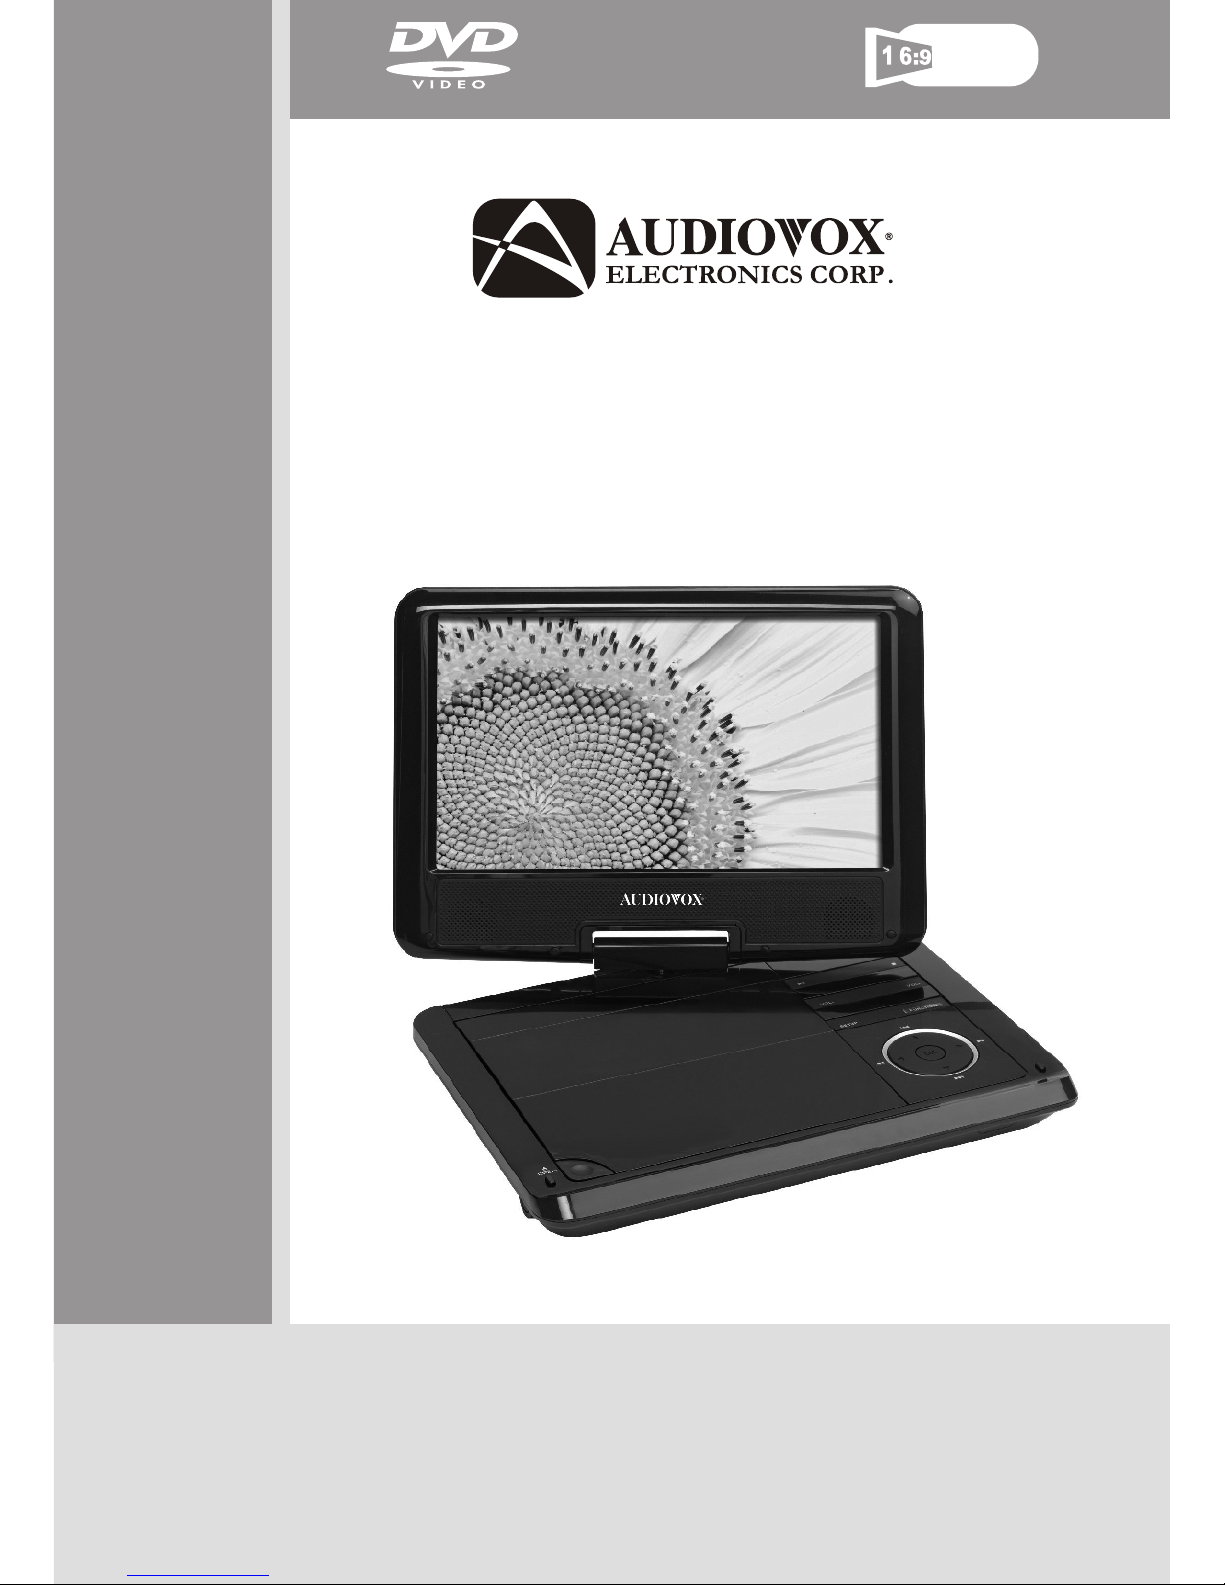
DS9341/DS9341PK
Portable DVD Player
Owner’s Manual
Page 2

WARNINGS AND CAUTIONS
Notice
This Product incorporates copyright protection technology that is protected by method claims of
certain U.S. Patents and other intellectual property rights owned by Macrovision Corporation and
other rights owners. Use of this copyright protection technology must be authorized by Macrovision
Corporation, and is intended for home and other limited viewing uses only unless otherwise
authorized by Macrovision Corporation. Reverse engineering or disassembly is prohibited.
Notice
An LCD panel and/or video monitor may be installed in a motor vehicle and visible to the driver if the
LCD panel or video monitor is used for vehicle information, system control, rear or side observation
or navigation. If the LCD panel or video monitor is used for television reception, video or DVD play,
the LCD panel or video monitor must be installed so that these features will only function when the
vehicle is in "park" or when the vehicle's parking brake is applied.
An LCD panel or video monitor used for television reception, video or DVD play that operates when
the vehicle is in gear or when the parking brake is not applied must be installed to the rear of the
driver's seat where it will not be visible, directly or indirectly, to the operator of the motor vehicle.
Licensed under one or more of the following patents:
Patent Numbers: 5,583,936; 6,381,747; 6,516,132; 6,836,549; and 7,050,698.
-2-
Page 3

WARNINGS AND CAUTIONS
-3-
Placement
!
To prevent fire or electric shock, do not expose this appliance to rain or moisture.
!
Do not place the set on an unstable cart, stand, tripod, bracket or table to prevent it from falling.
!
Keep the unit away from strong magnets, heat sources, direct sunlight, or excessive dust.
!
If the unit is brought directly from a cold to a warm location, moisture may condense inside the unit.
When you move it from a cold to a warm location, wait for about one hour before operating the unit,
or remove the disc and leave the unit turned on until the moisture evaporates.
Installation
!
Ensure that the unit is installed and used in accordance with the instructions and illustrations
provided in this manual.
Objects and Liquids
!
Do not push objects of any kind into the unit through openings.
!
Do not spill, splash or spray liquid of any kind on or in the system (this may result in a fire or electric
shock).
!
Do not place anything heavy on the unit.
!
Do not place any open flame sources, such as lighted candles, on the unit.
Ventilation
!
To ensure proper ventilation and proper operation, never cover or block the slots and openings
with a cloth or other material.
Disassembly
!
Do not attempt to disassemble the case or replace the battery. There is a risk of electric shock
and/or exposure to Laser Radiation. Contact qualified service personnel if your system is in
need of repair.
Cleaning the Unit
!
When cleaning, make sure the system is unplugged from the power source.
!
Do not use liquid cleaners or aerosol cleaners.
!
Use a cloth lightly dampened with water for cleaning the exterior of the DVD Player system only.
Page 4
-4-
WARNINGS AND CAUTIONS
Headphones
!
Excessive sound pressure from headphones can cause hearing loss.
!
Disc
!
Do not use irregularly shaped discs such as heart or star-shaped discs as they may cause the unit
to malfunction.
!
Do not stick paper, tape or glue on the disc.
!
Do not expose the disc to direct sunlight or heat sources such as hot air ducts.
!
Do not touch the surface of the disc.
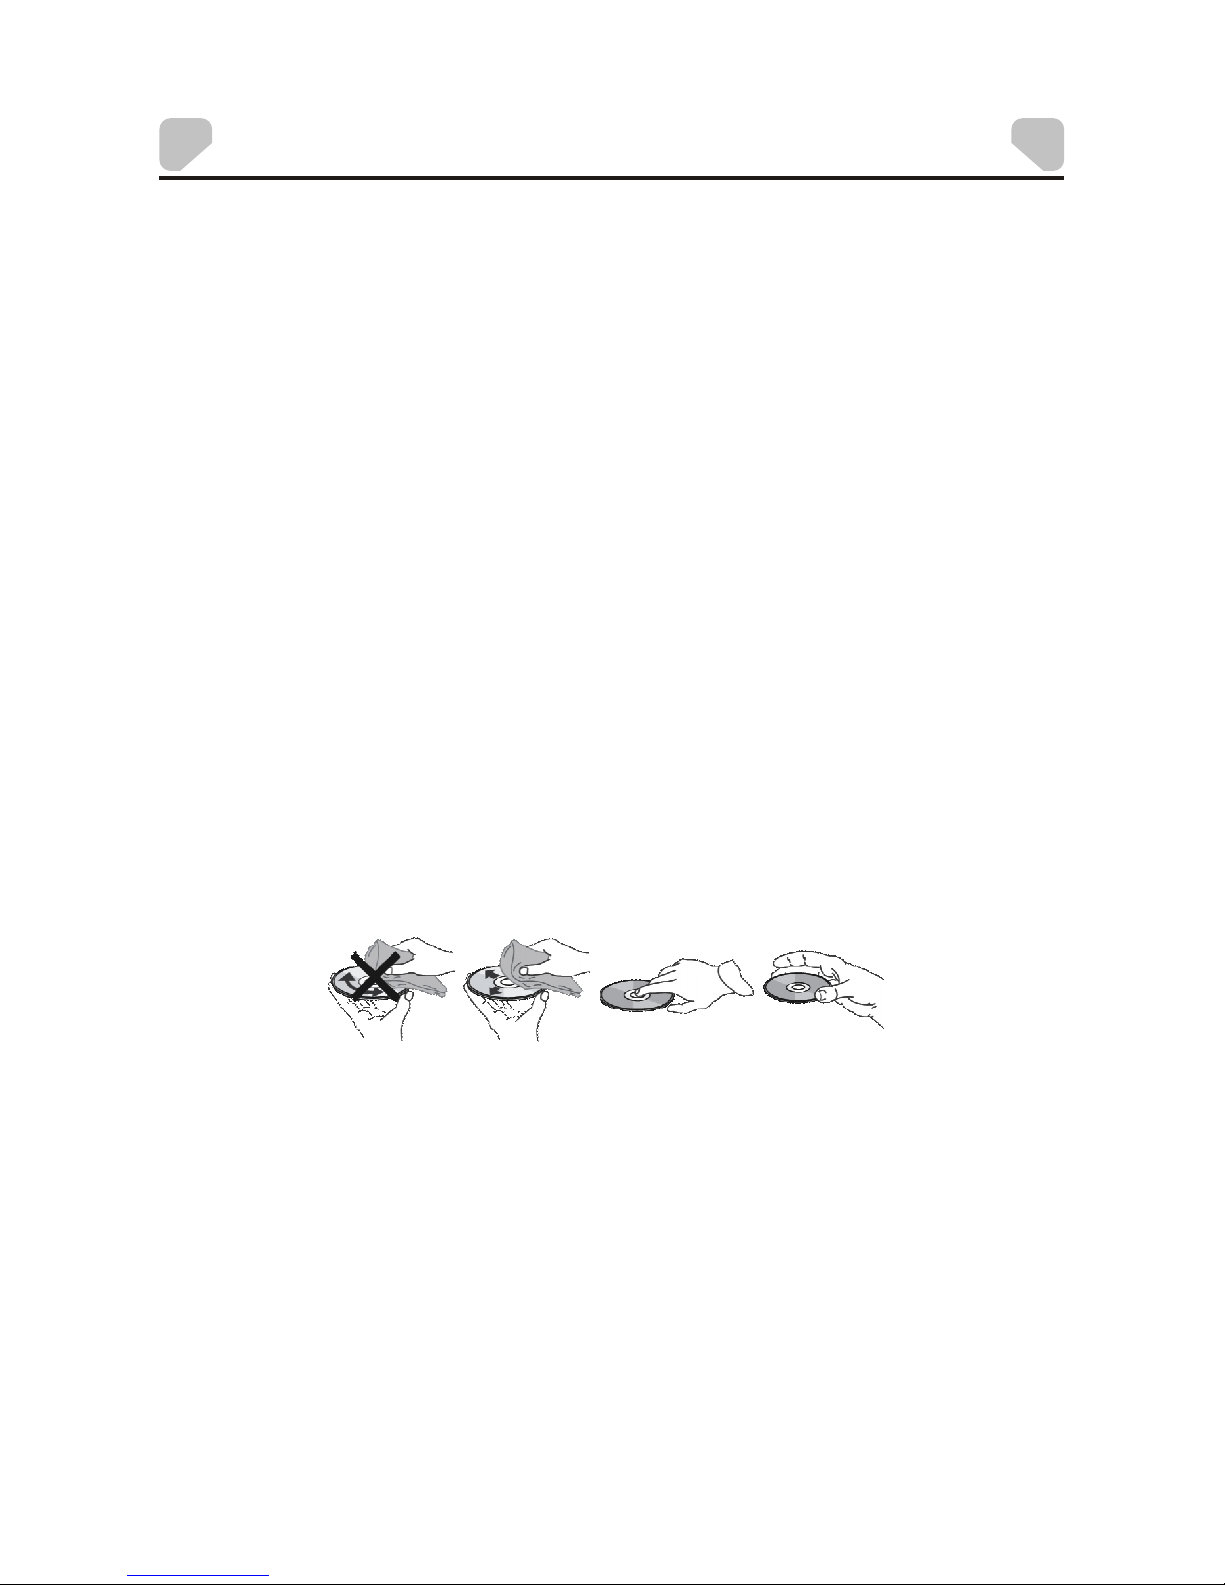
!
Handle the disc by its edge.
!
Clean the disc by wiping the disc from the center out with a cleaning cloth.
!
Remove the disc from the unit and store it in its case after playing.
!
Some playback operations of discs may be intentionally fixed by software producers. Since
this unit plays discs according to the disc contents the software producers designed, some
playback features may not be available. Also, refer to the instructions supplied with the discs.
Connect earphones or headphones to the headphone jack with the volume set low and
increase it if required. When earphones or headphones are connected, no sound will be
emitted from the connected speaker system.
Cleaning and handling the disc
Page 5

Warnings and Cautions..................................................................2
Contents.......................................................................................5
Introduction...................................... ............................................6
Vehicle Installation........................................................................7
Charging the Battery .....................................................................8
Controls and Indicators..................................................................9
Remote Control Operation............................................................11
Connecting to a TV.......................................................................15
System Setup..............................................................................16
Playback.....................................................................................24
Specifications.............................................................................27
Troubleshooting..........................................................................28
Owner’s Notes............................................................................29
CONTENTS
-5-
Page 6

-6-
INTRODUCTION
Thank you for selecting the DS9341/DS9341PK Portable DVD Player. The main features
include a 9" Swivel Screen (16:9 Aspect Ratio) Liquid Crystal Display (LCD) monitor and
a DVD Player.
The unit incorporates the latest state-of-the-art electronics and is designed for use in
hotels, offices, homes or vehicles. The unit is constructed to provide years of reliable,
trouble-free service, is compact so that you can take it with you anywhere, and is
designed for quick and easy installation.
Please read the entire instruction manual supplied with this product prior to operation.
The documentation will assist you in installing the system properly to obtain the best
equipment performance. Please save this manual for later use.
Package Contents
1. 1 X Instruction Manual
2. 1 X Remote Control
1 X L B
4. 1 X AC/DC Adapter
5. 1 X Vehicle DC Power Adapter
6. 1 X Carry/Headrest Bag*
7. 2 X Headphone*
8. 1 X Headphone Splitter*
* DS9341PK only
3. CR2025 ithium attery
Features
!
270-degree Rotatable 9" LCD Screen
!
Two Optional Aspect Ratios 16:9 and 4 :3
!
Remote Control
!
3.5mm Headphone Jack
!
Audio/Video Output Jack
!
Compatible with DVD, VCD, CD, CD-R, DVD-RW, JPEG, Kodak Picture CD, etc.
!
Support Playback Control: Play, Pause, Stop, Fast Forward Playback, Fast Reverse
Playback, etc.
!
4 Hour Playback
!
Internal Rechargeable Li-Polymer Battery
!
Operated with 9-12 VDC Power Supply
Page 7
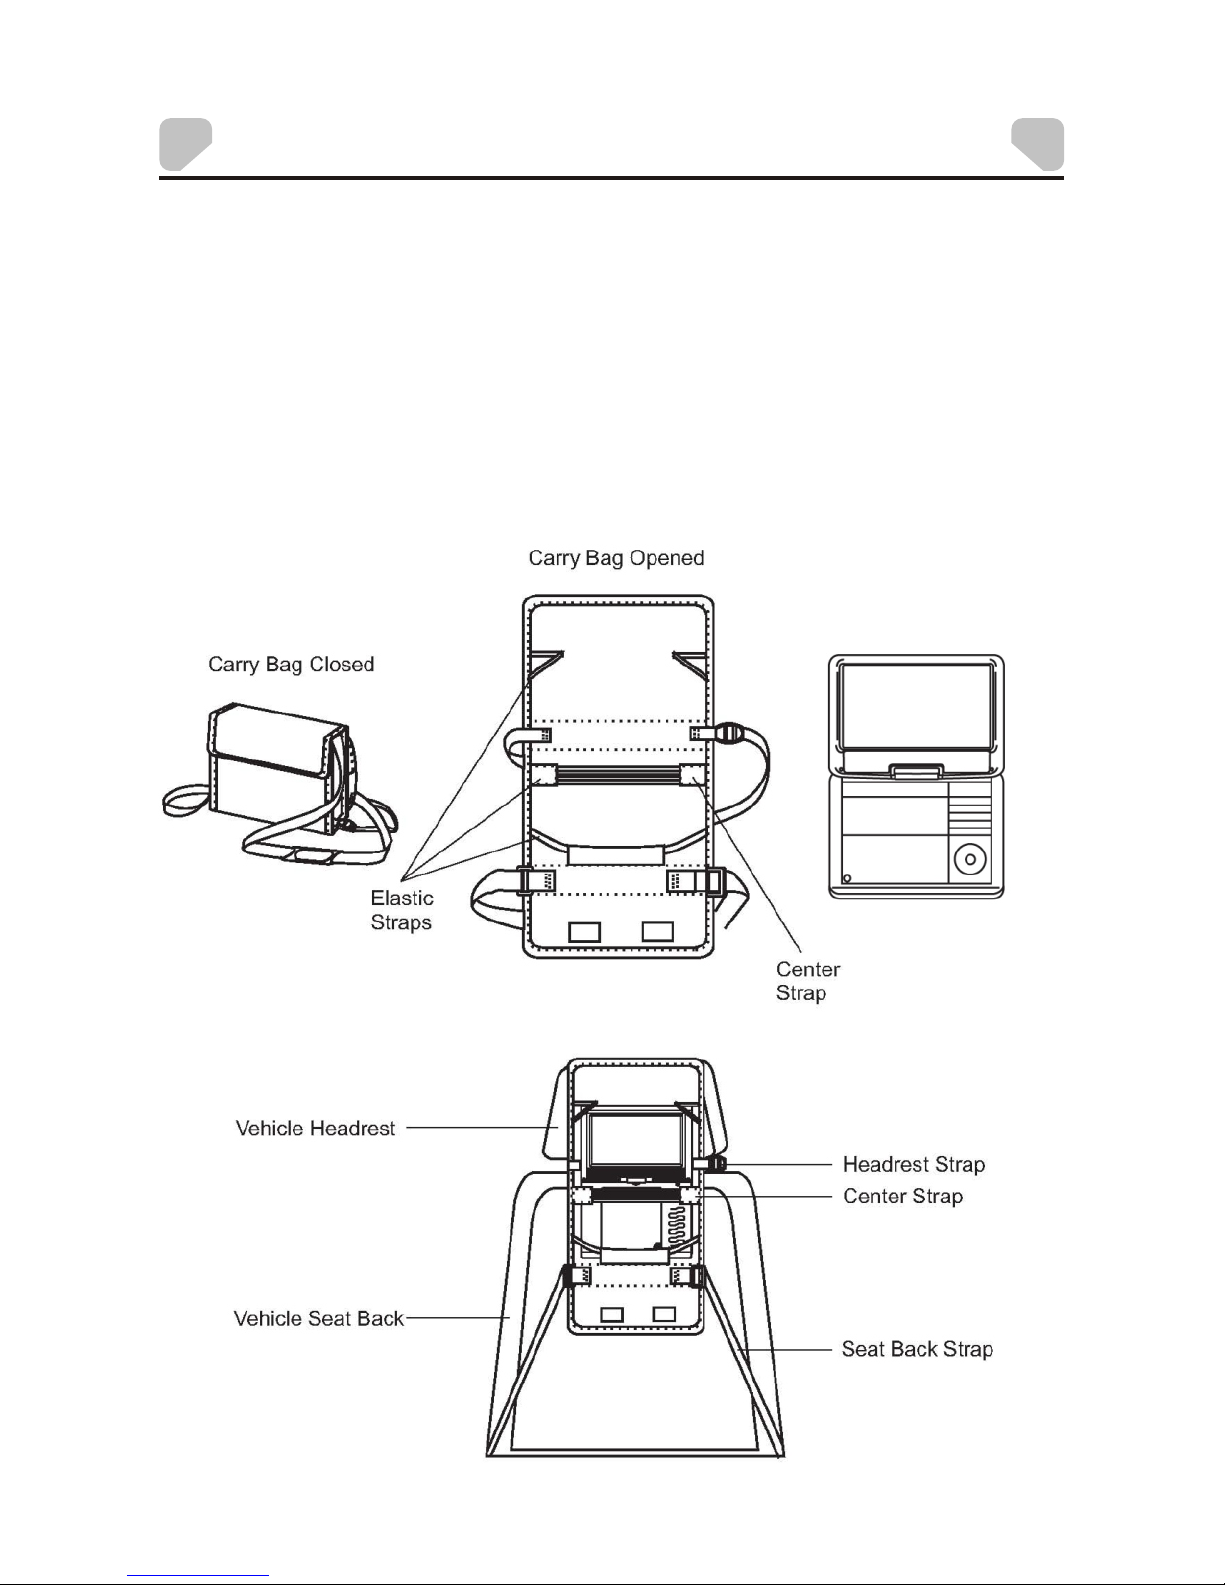
VEHICLE INSTALLATION
INSTALLING THE DVD PLAYER ON A SEAT BACK IN A CAR
(DS9341PK only)
1. Unfold the carry bag, and place the DVD Player on the bag beneath the elastic straps.
Ensure that the unit's corners are secured by the elastic straps. Ensure that the center strap
is across the face of the DVD Player.
2. Secure the upper portion of the carry bag to headrest support bars using the headrest strap.
Adjust the headrest strap until the bag is firmly secured.
3. Secure the lower portion of the carry bag to the vehicle seat back using the seat back strap.
Adjust the seat back strap until the bag is firmly secured.
-7-
Page 8

The player is powered by a lithium-polymer battery. It has no memory effect and thus it
can be recharged at any time regardless of whether it is fully or partially discharged.
The unit can be recharged when it is powered on or off. When the power is off, it takes
about 3~4 hours to fully charge the battery. When the power is on, it takes approxim ately
ten hours to charge the battery. When fully charged, the battery can be used for a bout
four hours.
The unit can be charged using the AC/DC Adapter or the Vehicle DC Power Ada pter.
By AC/DC Adapter:
Connect the AC/DC adapter to the the unit, then plug the adapter
into a 0 VAC outlet.
By Vehicle DC Power Adapter:
Plug one end of the dap ter into the jack on the unit, then
plug the other end into the socket of a car.
Do not charge the DVD player in the vehicle when the vehicle is not running.
While the unit is charging, the red charge indicator will flash. When the battery is fully
charged, the red charge indicator will be steadily lit.
DC IN 9-12V jack on
12
Vehicle DC Power A DC IN 9-12V
vehicle DC accessory
CHA RGING THE BATT ERY
Use and Maintenance of the Rechargeable Battery
1.The working temperature of the rechargeable b attery is 32 °F (0 °C) to 95 ° F (35 °C).
2. Always unplug the unit when it is not being used or charged.
3. If you do not plan to use the battery for an extended period of time (one week or
longer), we recommend that you fully charge the battery. For longer period s of
storage, please recharge the battery at least once every two months to maintain the
battery in optimum condition.
4. Once the battery is fully discharged, immediately recharge the battery (regardless of
whether you plan to use the DVD player or not) in order to maximize battery life.
5. Recharge efficiency will degrade when temperature s drop below 50 °F (10°C) or
exceed 95 °F (35 °C).
6. The battery compartment contains a temperature sensor. If the tempera ture exceeds
104 °F (40 °C) when charging the unit, the power will turn off automatically and the red
charge indicator on the side of the unit will flash. In this case, disconnect the power
adapter, wait for the unit to cool down, then reconnect the power adapter.
7. Heat is produced during charging. This is normal.
8. Do not subject the battery to strong impacts.
9. Keep the battery away from humidity and excessiv e heat.
10. The battery is not user serviceable. Please contact Audiovox in the event the battery
will not charge.
-8-
Page 9
-9-
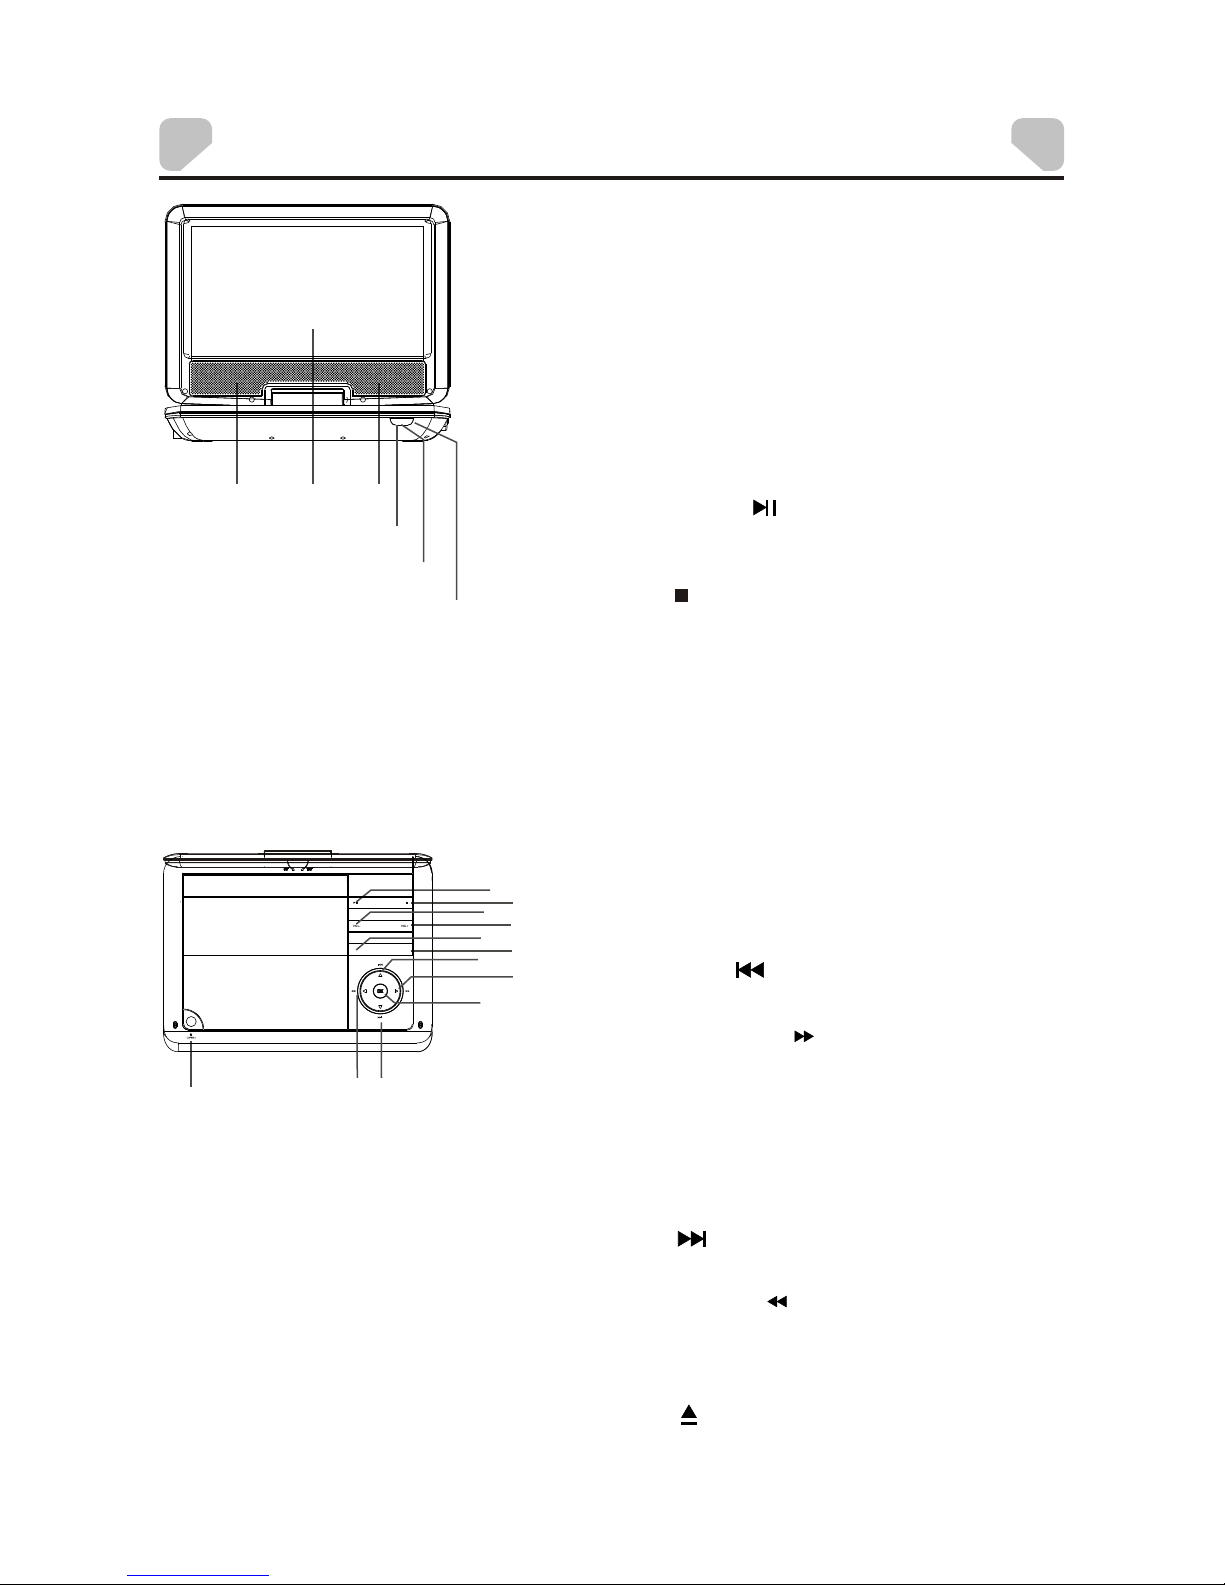
CONTROL AND INDICATORS
1. SPEAKER OUTPUT
2. DISPLAY SCREEN
3. RED LED CHARGE INDICATOR
Flashes when the battery is charging.
Steadily lit when the battery is charged.
4. INFRARED REMOTE SENSOR
5. GREEN LED ON/OFF INDICATOR
Steadily lit when the unit is on.
6. PLAY/PAUSE ( ) BUTTON
7. STOP ( ) BUTTON
8. VOL- BUTTON
. VOL+ B
10. SETUP BUTTON
11. MUTE BUTTON
12. PREVIOUS ( )/UP BUTTON
13. FAST FORWARD ( )/RIGH T BUTTON
14. OK BUTTON
15. NEXT ( )/DOWN BUTTON
16. FAST REWIND ( )/LEFT BUTTON
17. OPEN ( ) BUTTON
Press to open the disc tray cover.
Press once to pause playback, then press
again to continue playback.
Press to stop playback.
Press to enter/exit the setup menu.
Press this button to temporarily switch
the sound off. Press it a gain to switch
the sound on.
Press to skip to the previous chapter/track.
Press repeatedly for fast forward playback.
The available speeds are 2X, 4X, 8X, 16X,
and 32X.
Press to enter a highlighted item in a menu
or to confirm and execute a selection.
Press to skip to the next chapter/track.
Press repeatedly for fast reverse playback.
The available speeds are 2X, 4X, 8X, 16X,
and 32X.
Press to decrease the volume.
9 UTTON
Press to increase the volume.
55
SETUP
SOURCE
1313
1
2
1
6
7
8
9
11
10
12
13
14
17
16
15
3
4
5
Page 10
-10-
9″Swivel LCD Screen
The LCD screen is connected to the main body of the playe r via a rotatable hinge. The
screen can be rotated clockwise horizontally from the beginning position and
counterclockwise from the ending position by 270 degrees. You c an open up the screen
and rotate it the same time.
Note: Do not rotate the screen beyond its maximum extent. Forcing the screen beyond
its maximum extent will damage the unit.
Ending Position
Beginning Position
OFF/ONAV OUTPHONE
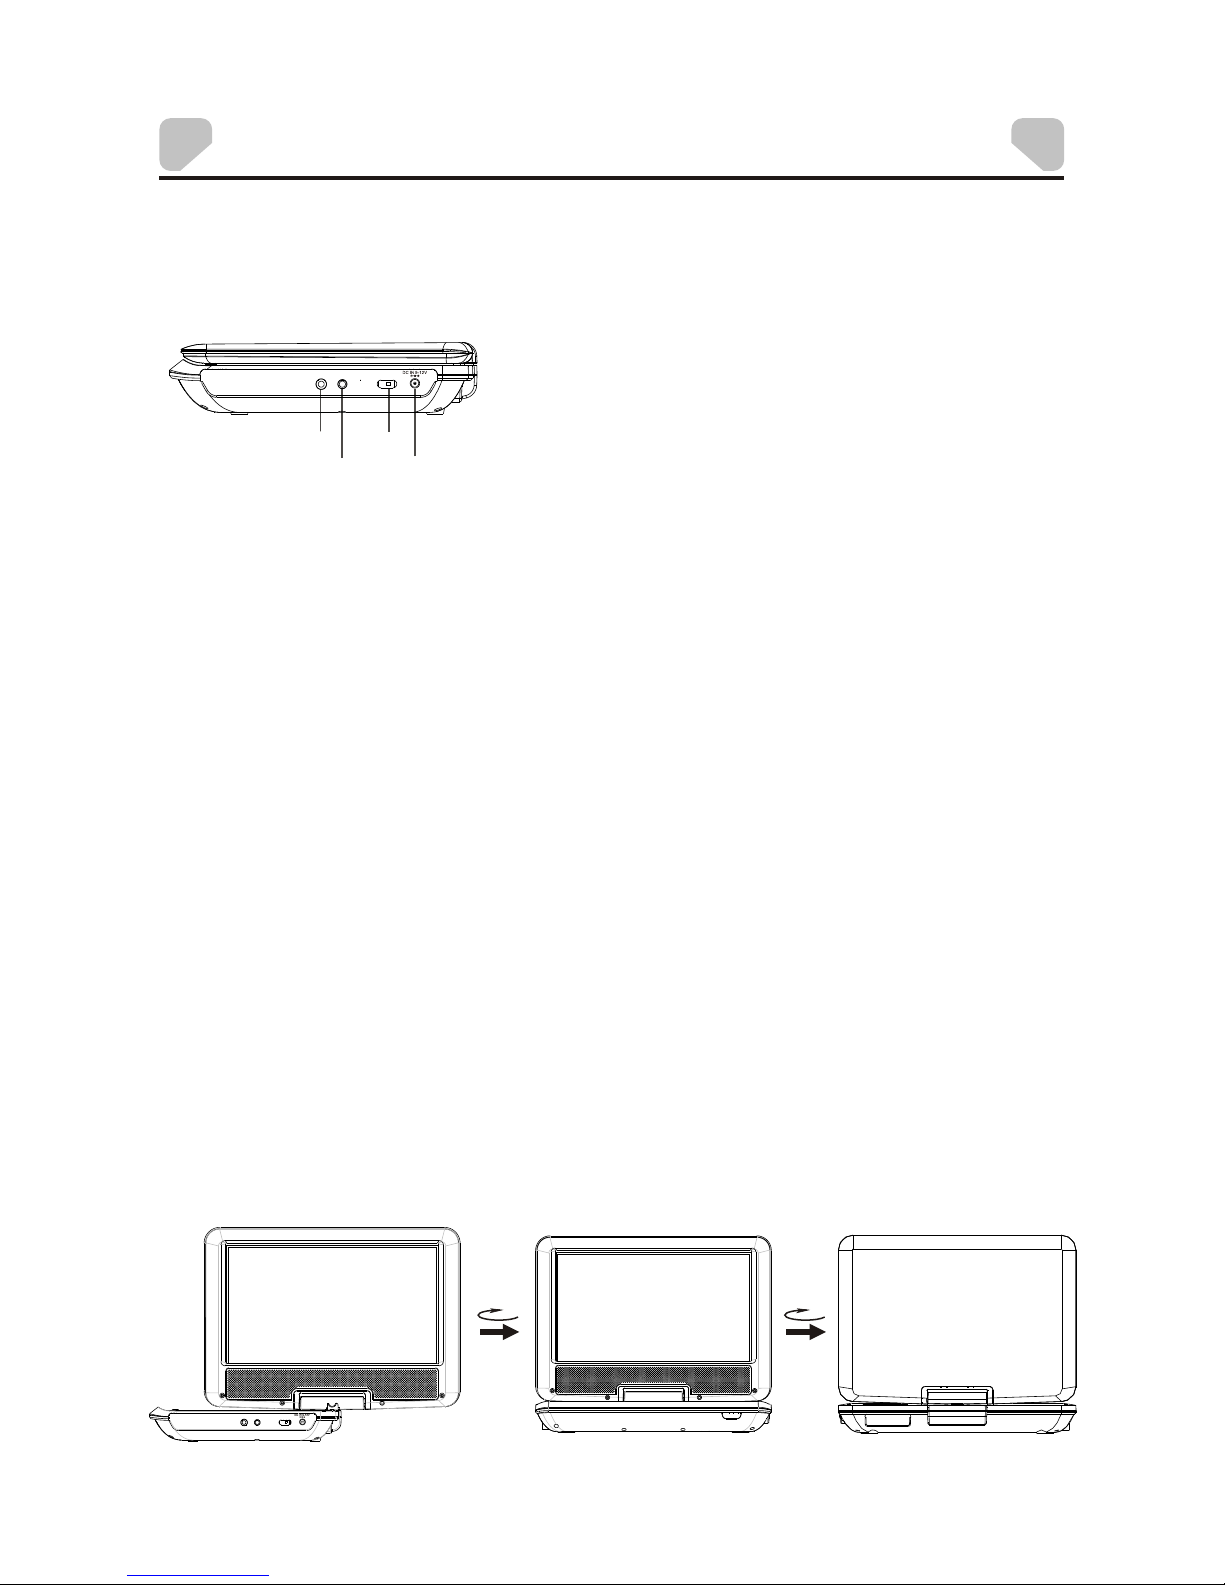
CONTROL AND INDICATORS
18181919
OFF/ONAV OUTPHONE
2
3
4
1
1. 3.5mm HEADPHONE JACK
Note: When headphones are connected, the
speakers are turned off.
2. AV OUT JACK
3. ON/OFF SWITCH
4. DC IN 9-12V JACK
Slide the switch to ON position to turn on
the unit. Slide the switch to OFF position to
switch off the unit.
Side View
Page 11

-11-
REM OTE CO NTRO L OPERA TION
1. ANGLE
2. FUNCTION
3. SETUP
4. REPEAT
5. TITLE
6. PREVIOUS ( )/UP
Press to navigate in an up direction
when a menu is displayed on the
screen.
7. FAST REWIND ( )/LEFT
Press to navigate in a left direction
when a menu is displayed on the
screen.
Press to switch the viewing angles.
Note: This function only works with
discs encoded with multiple camera
angles.
Press to switch between the 16:9 and
4:3 aspect ratios.
Press to enter/exit the Setup Menu.
Press to switch the repeat modes.
Note: For VCD2.0 discs, this function is
invalid when the PBC function is
activated.
Press to return to the title menu of a
DVD disc.
Press to skip to the previous
chapter/track.
Press repeatedly for fast reverse
playback. The available speeds are 2X,
4X, 8X, 16X, and 32X.
BATTERY INSTALLATION/REPLACEMENT
Remove the battery compartment cover accordin g to the
diagram on the right.
1: Press the ridged area to the left.
2: At the same time, pull the battery tray out.
3: Remove the old CR2025 battery. Replace it with a
new CR2025 lithium battery on the tray with the
positive side facing upward.
4: Replace the cover.
Note: Do not expose the battery to excessive heat.
Re mot e Con tro l
REMOTE CONTROL FUNCTIONS
3
4
5
6
7
1
2
FUN CTION
Page 12

REM OTE CO NTRO L OPERA TION
8. SUBTITLE
9. PLAY ( )
10. DIGIT KEYS
11. GOTO
12. MUTE
13. AUDIO
Press repeatedly to switch/show the
subtitle(s) or turn off the subtitle
function.
Note: This function o nly works
with discs encoded with subtitles.
The digit keys can be used to input
numbers or make selection of a track,
a chapter, etc.
During playback, press to enter the
GOTO menu. In the menu, use the
UP/DOWN direction buttons to select
a menu item. Press ENTER to edit.
Use the digit keys to input a specific
track, disc time, track time, chapter,
title, chapter time or title time to go to
directly. Press it aga in to exit the
GOTO menu.
Press this button to temporarily switch
the sound off. Press it again to switch
the sound on.
Press repeatedly to select the
audio languages available on the disc
(for DVD).
Press repeatedly to switch the
audio channels available on the disc
(for VCD).
Note: This function o nly works
with discs encoded with different audio
languages.
Press to start a playback or resume
normal playback from fast forward, fast
reverse, slow-motion, frame-by-frame
playback, etc.
-12-
8
9
10
11
12
13
FUN CTION
Page 13

REM OTE CO NTRO L OPERA TION
14. A-B REPEAT
15. MENU
16. FAST FORWARD ( )/RIGH T
Press to navigate in a right direction
when menu is displayed on the screen.
17. ENTER
18. STEP
Press to repeat a specific section of a
disc.
Press this button to mark down the
starting point (A) and press it again to
mark down the ending point (B). The
unit will play back this section over and
over again. Press this button a third
time to cancel A-B repeat and r esume
normal playback.
Note: Points A and B must be in the
same title/ track.
Press repeatedly for fast forward
playback. The available speeds are
2X, 4X, 8X, 16X, and 32X.
Press to enter a highlighted item in a
menu or to confirm and execute a
selection.
Press repeatedly to advance the video
frame by frame. Press Play ( ) to
resume the normal playback.
Note: Applies to DVD, VCD, etc.
Press to return to the root menu when
playing a DVD.
When playing a disc encoded with the
PBC function, press to display the PBC
menu. Press it again to disable the
PBC function.
Note: A VCD2.0 disc has a PBC
function while DVD, VCD1.1, and CD-
DA discs have no PBC functions.
-13-
14
15
16
17
18
FUN CTION
Page 14

REM OTE CO NTRO L OPERA TION
19. NEXT ( )/DOWN
Press to navigate in a down direction
when menu is displayed on the screen.
20. STOP ( )
21. PAUSE ( )
22. ZOOM
23. OSD
24. VOL+/VOL-
Press to skip to the next chapter/track.
Press once to pause a playback, then
press Play ( ) to co ntinue playback.
Press twice to stop playback.
Press repeatedly to display title
elapsed time, title remaining time,
chapter elapsed time or chapter
remaining time, or hide the display.
Press to temporarily pause playback;
press it again or press Play ( ) to
resume playback.
Press VOL+ to increase the
volume. Press VOL- to decrease the
volume.
Press to zoom in/out of a scene. The
available zoom ratios are 2X, 3X, 4X,
1/2, 1/3, and 1/4. In zoomed-in mode,
the direction keys can be used to move
the zooming center.
Note: Applies to DVD, VCD, etc.
-14-
20
19
21
22
23
24
FUN CTION
Page 15

CONNEC TING TO A TV
-15-
Use an AV cable (not supplied) to
connect the AV OUT jack to the video
input terminal, L/R channel audio input
terminals of a TV.
After the connection has been correctly
made, turn on the connected TV and set
it to AV mode. You can then view the
video with the connected TV.
TV
Yell ow WhiteRed
R L
VID EO
Inp ut
AUD IO
Inp ut
OFF/ONAV OUTPHONE
This player has an AV OUT jack. You can connect it to a TV for viewing.
Page 16

SYSTEM SETUP
MENU OPERATION
1. Press the SETUP button on the remote control or on the unit to show the Setup Menu .
2. Press the LEFT ( ) or RIGHT ( ) button to select the GENERAL, AUDIO, DOLBY,
VIDEO or PREFERENCE setup page. The submenu of the selected page appears.
3. Press the UP ( ) or DOWN ( ) button to select an it em you desire to set in the
submenu, then press the ENTER or RIGHT ( ) button to enter.
4. Press the UP ( ) or DOWN ( ) button to select an op tion, then press the ENTER
button to confirm, or press the LEFT ( ) button to cancel.
5. Press the UP ( ) or DOWN ( ) button to continue t o set other items in the
submenu.
6. Press the LEFT ( ) button to return to the upper menu.
7. Press the SETUP button again to exit the Setup Menu.
GENERAL SETUP PAGE
There are six items in the GENERAL SETUP
PAGE. They are TV DISPLAY, ANGLE MARK,
OSD LANGUAGE, CLOSE CAPTIONS,
SCREEN SAVER, and LAST MEMORY.
TV DISPLAY
4:3 PANSCAN:
4:3 LETTERBOX:
If the unit is connected to a conventional TV set, select 4:3 PANSCAN or 4:3
LETTERBOX. The 4:3 im age will be displayed in full screen in its native aspect ratio. If
the unit is connected to a wide-screen TV set, select 16:9.
Options:
The wide-screen image will be displayed on the screen in its native
aspect ratio with some part on the left and right cut off.
The wide-screen image will be displayed in its native aspect ratio with
black bands on the upper and lower sections of the screen.
16:9: The wide-screen image will be displayed in full screen in its native
aspect ratio. The 4:3 image will be stretched out horizontally to fit
in the screen.
GEN ERAL AUD IO DOL BY V IDEO
PRE FEREN CES
-- GE NERNA L SETUP PAG E --
TV DIS PLAY
ANG LE MARK
OSD L ANG
CLO SE CAPT IONS
SCR EEN SAVER
LAS T MEMORY
GOTO G ENERA L SETUP PAG E
WID E
ON
ENG
OFF
ON
ON
-16-
The System Setup menu allows you to personalize the DVD Player settings to your
preference. Once the initial settings are set, they are retained in the DVD player until
modified.
Page 17

-17-
SYSTEM SETUP
ANGLE MARK
Options:
ON: Enables the Angle Mark function. When a disc with mu ltiple camera angles is
playing, an angle mark will display on the screen. You can then view the video of
different camera an gles by pressing the ANGLE button on the remote control.
OFF: Set this item to OFF to hide the angle mark.
OSD LANGUAGE (On-Screen Display Language)
This function allows you to set the language for the on -screen display.
Options: English, French, Spanish
CLOSED CAPTIONS
SCREEN SAVER
LAST MEMORY
During playback or in a paused status, the Last Memor y function will memorize the last
playback time each time you open the disc tray. The next time you insert the same disc
and close the disc tray to load the disc, the unit will pla y from the memorized point.
Options:
ON: Enables the Last Memory function.
OFF: Disables the Last Memory function.
This function is available when a disc is encoded with multiple camera angles.
This function is available when a disc is encoded with closed captions.
Options:
ON: Enables the Closed Caption function. When a dis c encoded with closed captions,
the closed captions will be shown on the screen.
OFF: Set this item to OFF to hide closed captions.
You can also press the SUBTITLE b utton on the remote control to show or hide the closed
captions.
When the player is not in use for several minutes (for example the disc is paused,
stopped etc) a running DVD logo will move across the LCD screen to protect the LCD
screen.
Options:
ON: Enables the Screen Saver function. If the image remains motionless on the screen
for several minutes, a screen saver will appear on the screen. You can press any
key or button to wake the screen up.
OFF: Disables the Screen Saver function.
Page 18

SYSTEM SETUP
-18-
AUDIO SETUP PAGE
There is one item in the AUDIO SETUP
PAGE - ANALOG AUDIO.
ANALOG AUDIO
DOWNMIX
This function only applies to Dolby AC-3 encoded 5.1-channel discs.
Options:
LT/RT: The 5.1-channel a udio is mixed into the left channel and right channel.
STEREO: The 5.1-channel audio is mixed into a stereo signal.
GEN ERAL AUD IO DOL BY V IDEO
PRE FEREN CES
-- AUD IO SETU P PAGE --
ANA LOG AUDIO
GOTO A UDIO SE TUP PAGE
Page 19

SYSTEM SETUP
-19-
DOLBY DIGITAL SETUP
There are two items in the DOLBY DIGITAL
SETUP PAGE. They are DUAL MONO and
DYMAMIC.
GEN ERAL AUD IO DOL BY V IDEO
PRE FEREN CES
-- DO LBY DIGIT AL SETU P --
DUA L MONO
DYN AMIC
GOTO D OLBY DIG ITAL SET UP
DUAL MONO
Note: This function only applies to the Dolby AC -3 encoded 2-channel discs.
Options:
STEREO: The player outputs the left-channel audio and right-channel audio via the
left and right speaker respectively.
L-MONO: The player outputs the left-channel audio only via both the left and right
speaker.
R- MONO: The player outputs the right-channel audio only via both the left and right
speaker.
MIX- MONO: The player outputs the average signal of the left-channel and right-channel
audio via the left speaker and the right speaker
DYNAMIC
When you watch movies with a large dynamic at a low volume, you can adjust the
dynamic value up to avoid losing sound details resulting from the low volume.
Options:
Off to Full: Adjust the slider bar to the desired level.
Page 20

-20-
SYSTEM SETUP
VIDEO SETUP PAGE
There are two items in the VIDEO
SETUP PAGE. They are COLOR
SETTING and PANEL QUALITY.
COLOR SETTING
The COLOR SETTING menu is used to set up the picture quality when connected to a
external TV set.
Options:
SHARPNESS: Adjusts the ed ge enhancement of the picture. There are three options:
HIGH, MEDIUM, and LOW.
BRIGHTNESS: Adjusts the black level in the picture . Press LEFT ( ) or RIGHT ( )
adjust the value, then press EN TER to confirm it.
CONTRAST: Adjusts the level o f the brightest highlights in the picture. Press
LEFT ( ) or RIGHT ( ) to adjust the value, then press ENTER to
confirm it.
GAMMA: Adjusts the balance between bright and dark areas in the picture.
There are four options: HIGH, MEDIUM, LOW, and NONE.
HUE: Adjusts the level of tint balance. Pres s LEFT ( ) or RIGHT ( )
to adjust the value, then press E NTER to confirm it.
SATURATION: Adjusts the level of color intensity. Press LEFT ( ) or RIGHT ( )
to adjust the value, then press E NTER to confirm it.
PANEL QUALITY
The PANEL QUALITY menu is used to set up the picture quality of the LCD screen.
Options:
SHARPNESS: Adjusts the ed ge enhancement of the picture. There are three options:
HIGH, MEDIUM, and LOW.
BRIGHTNESS: Adjusts the black level in the picture . Press LEFT ( ) or RIGHT ( )
adjust the value, then press EN TER to confirm it.
CONTRAST: Adjusts the level o f the brightest highlights in the picture. Press
LEFT ( ) or RIGHT ( ) to adjust the value, then press ENTER to
confirm it.
HUE: Adjusts the level of tint balance. Pres s LEFT ( ) or RIGHT ( )
to adjust the value, then press E NTER to confirm it.
SATURATION: Adjusts the level of color intensity. Press LEFT ( ) or RIGHT ( )
to adjust the value, then press E NTER to confirm it.
BACKLIGHT: Adjusts the level of illumination of the LCD screen. Press LEFT ( ) or
RIGHT ( ) to adjust the value, then press ENTER to confirm it.
GEN ERAL AUD IO DOL BY VIDE O
PRE FEREN CES
-- VID EO SET UP PAGE --
COL OR SETT ING
PANEL Q UALIT Y
GOTO V IDEO SE TUP PAGE
Page 21

PREFERENCE PAGE
This item is available if there is no disc in the
disc tray, the disc tray i s open or the disc in
the disc tray is stopped.
There are eight items in the PREFERENCE
PAGE. They are TV TYPE, PBC, AUDIO,
SUBTITLE, DISC MENU, PARENTAL,
PASSWORD, and DEFAULT.
TV TYPE
PBC (Play Back Control)
Options:
ON: Activates the PBC function.
OFF: Disables the PBC function.
This function matches video output of the unit to the broadcast system of a connected
TV. The unit supports both National Television System Committee (NTSC) and Phase
Alternating Line (PAL) television broadcasting standards.
Options:
PAL: Select this mode if the connected TV is a PAL syste m. The video signal of a NTSC
disc will be output in PAL format.
AUTO: Select this mode if the connected TV is multi-system. The output format of video
signal will be in accordance with the video signal of the disc.
NTSC: Select this mode if the connected TV is a NTSC system. The video signal of a PAL
disc will be output in NTSC format.
Note: For best performance, this setting should remain at NTSC.
This function only works with discs encoded with PB C function such as VCD 2.0 discs.
DVD, VCD1.1, and CD-DA discs have no PBC menu.
GEN ERAL
AUD IO DOL BY
VID EO
PRE FEREN CES
-- PR EFERE NCE PAGE --
TV TY PE
PBC
AUD IO
SUB TITLE
DIS C MENU
PAREN TAL
PASSW ORD
DEFA ULT
GOTO P REFER ENCE PAG E
PAL
ON
ENG
ENG
ENG
SYSTEM SETUP
-21-
Page 22

SYSTEM SETUP
AUDIO MENU
SUBTITLE MENU
DISC MENU
PARENTAL
This item allows the user to limit the content of movie playback from Kid Safe to Adult.
The lower the value, the more strict the control. Movies rated higher than the level set for
the parental lock can not be viewed without entering the correct password.
Options:
Note: The rating level can be changed only when the correct password is provided.
Note: This function only works with those discs wit h parental function.
This item allows a user to select a preferred audio language. This function only applies to
discs encoded with different audio languages.
Options: English, French, Spanish, Chinese, Japanese, Korean, Russian, and Thai.
You can also change the audio language by pressing AUDIO on the remote control.
Note: If the selected language is not available for the currently playing disc, the disc's
default setting is applied.
This item allows a user to select a preferred subtitl e language. This function only applies
to discs encoded with subtitles.
Options: English, French, Spanish, Chinese, Japanese, Korean, Russian, and Thai.
You can also change the subtitle language by pressing SUBTITLE on the remote contro l.
Note: If the selected language is not available for the currently playing disc, the disc's
default setting is applied.
This item allows a user to select a preferred disc menu l anguage.
Options: English, French, Spanish, Chinese, Japanese, Korean, Russian, and Thai.
Note: If the selected language is not available for the currently playing disc, the disc's
default setting is applied.
1 KID SAFE
2 G
3 PG
4 PG – 13
5 PGR
6 R
7 NC17
8 Adult
-22-
Page 23

SYSTEM SETUP
PASSWORD
This item allows a user to access the Password Setup Pa ge.
Password Setup Page Options:
PASSWORD MODE: You can activate or disable the passwor d function by setting it to
ON or OFF. You m ust key in the correct password and press
ENTER to confirm before you can change the option The def ault
password is 3308.
PASSWORD: Access this item to reset the pa ssword.
To change the password:
1. Enter the old password in the OLD PASSWORD row.
2. Enter the new password in the NEW PASSWORD row.
3. Enter the new password again in the CONFIRM PWD row.
Note: You may reset the password if you forget the old password by using the default
password: 3308.
Note: The default password is 3308. This password is always active even after you
have selected your own password and changed it. To avoid the possibility of
others using the default password to set the parental level and change the
password, record this default password in another area and delete it from
this manual.
DEFAULT
This item allows a user to restore all the default settings except the settings in the
Password Setup Page and the PARENTAL item.
Options:
RESET: Restores the default settings.
-23-
Page 24

PLAYBACK
Region 1 - USA, Canada
Region 2 - Japan, Europe, South Africa, Middle East,
Greenland
Region 3 - S. Korea, Taiwan, Hong Kong, Parts of
South East Asia
Region 4 - Australia, New Zealand, Latin America
(including Mexico)
Region 5 - Eastern Europe, Russia, India, Africa
Region 6 - China
DVD BASICS
To get the optimum use out of the DVD Player, make sure you read this section completely.
DVD REGION CODE
The DVD player is preset to a region code at the factory depending on where the DVD player is sold.
A DVD from a different region cannot be played in this unit and the unit will display "WRONG
REGION”.
-24-
Page 25

-25-
PLAYBACK
To Load and Play a Disc:
1. Slide the power switch to the ON position.
2. Press OPEN ( ) to open the disc door. Place a
disc in the disc tray with the label side facing up.
3. Close the disc door. The unit will load and play the disc.
SETUP
SOURCE
TYPES OF DISCS YOUR DVD PLAYER WILL PLAY
Your system will play the following types of discs:
• DVD* disc - DVD discs which contain video.
• VCD disc - VCD discs which contain video.
• Audio disc - Audio CDs contain musical or sound content only.
*Note: This system is capable of playing most recordable DVD formats. However, due to the
variety of disc manufacturers and software, playback cannot be guaranteed.
TYPES OF FILES YOUR DVD PLAYER WILL PLAY
Your system will play the following types of files: MPEG, MPEG2, MP3, and JPEG.
LOADING AND PLAYING A DISC
Before you load a disc, make sure that it is compatible with the player. Insert the disc with the
label facing up.
Note: The following discs CANNOT be used with this player:
• MiniDisc
• Laserdisc
• Super Audio CD (SACD)
• Blu-ray Disc
Page 26

KODAK PICTURE CD OR JPEG IMAGE CD PLAYBACK
1. Place a Kodak Picture CD or JPEG image CD in the disc tray. The unit will
load the disc automatically.
2. Press STOP ( ) to enter the thumbnail mode to preview the pictures.
3. In the thumbnail mode, press the direction keys to select a picture, then press the
ENTER, OK or PLAY ( ) buttons to start the playback from the selected picture.
4. If playing a Kodak Picture CD, press the direction b uttons and then press ENTER or
OK to select Slide Show, Menu, PREV or NEXT at the bottom of the screen.
Slide Show: St arts slide show playback.
Menu: Enters the instruction menu for remote key function. In the menu, press
ENTER or OK to turn over to the next menu page and again to exit the
instruction menu.
PREV/NEXT: Turns over to the previous/next page.
Viewing Files
Play Modes
Press STOP ( ) to enter the thumbnail mode to preview the pictures.
Press PAUSE ( ) to pause a pla yback. Press it again or press PLAY ( ) to resume the
playback.
Press PLAY ( ) to start a playback or resume to the norm al playback.
Skip to the Previous/Next Picture
Press PREVIOUS ( )/ NEXT ( ) to skip to the previous/next picture
during playback.
Picture Rotation
Press LEFT ( ) / RIGHT ( ) to rotate the picture counterclockwise/ clockwise during
playback.
Zoom In / Out
During playback, press ZOOM repeatedly to zoom in b y 125%, 150% or 200%, or zoom
out by 75% or 50%. When the picture is a 50%, press ZOOM to return the picture to its
original size.
When the picture is zoomed in, use the direction keys t o move the picture.
-26-
PLAYBACK
Page 27

-27-
Signal system
PAL/NTSC
Panel size 9 inch
Frequency response
20Hz to 20KHz
Video output
1 Vp-p 75 Ohm unbalanced
Audio output
1.2 V (±0. 2V) RMS/10 kOhm
Dynamic range
≥85dB
Laser
Semiconductor laser, Wave length: 650 nm/795 nm
Power source
DC 9-12V
Power consumption
10 W
Operating temperature
SPECIFICATIONS
Compatible DISC
DVD/VCD/CD
Battery Type Li Polymer
0 ~ 35°C
Page 28

TROUBLESHOOTING
-28-
Soun d
Ther e is no
soun d.
● The volume is set to the lo west level.
● The sound is switched o ff.
● The disc is in fast forwa rd/revers e
play back.
● The sound is output thr ough the
conn ected earph one.
● Turn up t he volume.
● Pres s MUTE to switc h on the
soun d.
● Pres s
●
PLAY to resume th e normal
play back.
Pull o ut the earpho ne and the
soun d will output t hrough the built in spe akers.
The re mote
cont rol does
not
func tion.
● There is no battery in th e remote
cont rol.
● The battery is out of cha rge.
● The remote control is n't pointed t o the
remo te sensor.
● The remote control is o ut of its
oper ating area.
● The unit is shut down.
● Inst all a CR2025 li thium battery in
the re mote contro l.
● Repl ace the batte ry with a new one.
● Make s ure that the re mote control is
poin ted to the remo te control
sens or.
● Make s ure the remot e control is
with in the operat ing area.
● Swit ch off the unit and d isconnect i t
from t he AC o utlet. Then power on
the un it again.
Unab le to play
a disc
● This disc is placed in th e disc tray in a
wron g way.
● The unit isn't compat ible with the d isc.
● The disc is dirty.
● Chec k that the disc i s placed in the
disc t ray with its la bel side
upwa rds.
● Inse rt a compatib le disc.
See pa ge 25
● Clea n the disc.
No Pow er
Symp tom
Caus e(s)
Reme dy
Pict ure
Ther e is no
pict ure
disp layed on the
conn ected TV.
● Conn ect the AV OUT jack of this
unit a nd the AV IN jac k of a TV
secu rely with an AV cable .
● The TV is not conn ected to this u nit
secu rely with the AV cabl e.
● The adapter is not conn ected to the un it
secu rely or is not co nnected to the power
supp ly.
● Conn ect the adapt er to the DC input
jack s ecurely and t hen plug the
adap ter into an AC out let (for AC/DC
adap ter) or the veh icle DC accessory
sock et of a car (for ve hicle DC power
adap ter).
● The unit is turned off.
● Ma ke sure tha t the unit is turned o n.
If your DVD player does not seem to be functioning prop erly, check the items bel ow
before contacting Audiovox Technical Support.
Page 29

-29-
OWNER’S NOTES
Page 30

OWNER’S NOTES
-30-
Page 31

-31-
Page 32

© 2013 Audiovox Electronics Corp., 150 Marcus Blvd. Hauppauge, NY 11788
128-8951a
 Loading...