

Page 1
DS7321/DS7321PK
Portable DVD Player
Owner ’s Manual
Page 2

WARNINGS AND CAUTIONS
Notice
This Product incorporates copyright protection technology that is protected by method claims of
certain U.S. Patents and other intellectual property rights owned by Macrovision Corporation and
other rights owners. Use of this copyright protection technology must be authorized by Macrovision
Corporation, and is intended for home and other limited viewing uses only unless otherwise
authorized by Macrovision Corporation. Reverse engineering or disassembly is prohibited.
Notice
An LCD panel and/or video monitor may be installed in a motor vehicle and visible to the driver if the
LCD panel or video monitor is used for vehicle information, system control, rear or side observation
or navigation. If the LCD panel or video monitor is used for television reception, video or DVD play,
the LCD panel or video monitor must be installed so that these features will only function when the
vehicle is in "park" or when the vehicle's parking brake is applied.
An LCD panel or video monitor used for television reception, video or DVD play that operates when
the vehicle is in gear or when the parking brake is not applied must be installed to the rear of the
driver's seat where it will not be visible, directly or indirectly, to the operator of the motor vehicle.
Licensed under one or more of the following patents:
Patent Numbers: 5,583,936; 6,381,747; 6,516,132; 6,836,549; and 7,050,698.
- 2 -
Page 3

WARNINGS AND CAUTIONS
Placement
!
To prevent fire or electric shock, do not expose this appliance to rain or moisture.
!
Do not place the set on an unstable cart, stand, tripod, bracket or table to prevent it from falling.
!
Keep the unit away from strong magnets, heat sources, direct sunlight, or excessive dust.
!
If the unit is brought directly from a cold to a warm location, moisture may condense inside the unit.
When you move it from a cold to a warm location, wait for about one hour before operating the unit,
or remove the disc and leave the unit turned on until the moisture evaporates.
Installation
!
Ensure that the unit is installed and used in accordance with the instructions and illustrations
provided in this manual.
Objects and Liquids
!
Do not push objects of any kind into the unit through openings.
!
Do not spill, splash or spray liquid of any kind on or in the system (this may result in a fire or
electric shock).
!
Do not place anything heavy on the unit.
!
Do not place any open flame sources, such as lighted candles, on the unit.
Ventilation
!
To ensure proper ventilation and proper operation, never cover or block the slots and
openings with a cloth or other material.
Disassembly
!
Do not attempt to disassemble the case or replace the battery. There is a risk of electric shock
and/or exposure to Laser Radiation. Contact qualified service personnel if your system is in
need of repair.
Cleaning the Unit
!
When cleaning, make sure the system is unplugged from the power source.
!
Do not use liquid cleaners or aerosol cleaners.
!
Use a cloth lightly dampened with water for cleaning the exterior of the DVD Player system only.
- 3 -
Page 4
WARNINGS AND CAUTIONS
Headphones
!
Excessive sound pressure from headphones can cause hearing loss.
!
Connect earphones or headphones to the headphone jack with the volume set low and
increase it if required. When earphones or headphones are connected, no sound will be
emitted from the connected speaker system.
Disc
!
Do not use irregularly shaped discs such as heart or star-shaped discs as they may cause the unit
to malfunction.
!
Do not stick paper, tape or glue on the disc.
!
Do not expose the disc to direct sunlight or heat sources such as hot air ducts.
!
Do not touch the surface of the disc.
!
Handle the disc by its edge.
!
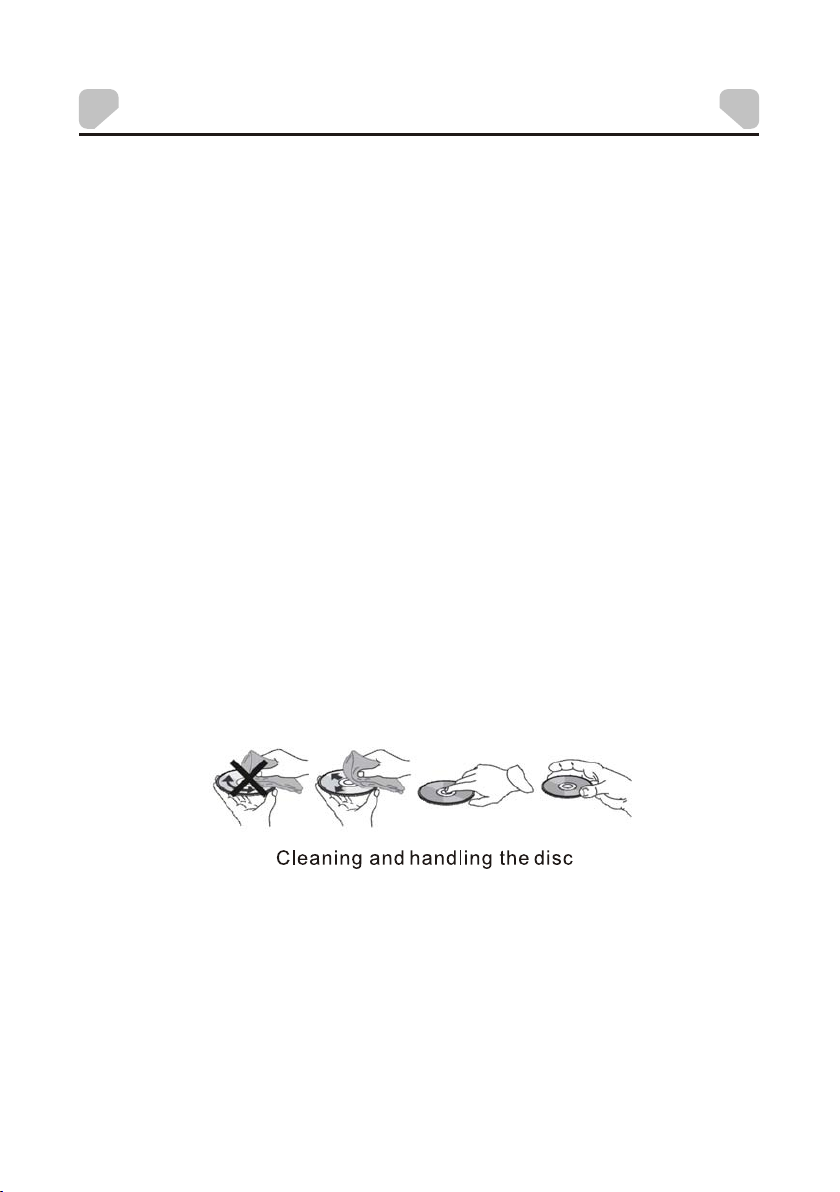
Clean the disc by wiping the disc from the center out with a cleaning cloth.
!
Remove the disc from the unit and store it in its case after playing.
!
Some playback operations of discs may be intentionally fixed by software producers. Since
this unit plays discs according to the disc contents the software producers designed, some
playback features may not be available. Also, refer to the instructions supplied with the discs.
- 4 -
Page 5

CONTENTS
Warnings and C autions...................... ............................. ......... ......2
Contents..... ............................. ............................. ........................5
Intr oduction. ............................. ........ ...................... ......... .............6
Vehicle Installa tion..... ............................. ............................. .........7
Charging the Batt ery ....... .................... ......... ............................. ....8
Controls and Indi cators... ............................. ............................. .....9
Remo te Control Op eration.. ............................. ............................. .11
Connecting to a TV... ......... .................... ......... ............................. .15
Syst em Setup... ............................. ............................. .................16
Play back..... ............................. ............................. ......... .............24
Spec ification s........ .................... ......... ............................. ............27
Troublesho oting........................ ............................. ......................28
Owne r’s Not es........................... ............................. .....................29
- 5 -
Page 6

INTRODUCTION
Thank you f or s electin g th e DS7321/ DS 7321PK Po rt able DVD Pl ay er. The ma in
feature s in clude a 7" Sw iv el Screen ( 16 :9 Aspect Ra ti o) Liquid C ry stal Disp la y (LCD)
monitor a nd a D VD Player.
The unit in co rporate s th e latest st at e-of-th e- art elect ro nics and is d esigned for u se in
hotels, o ffices, h om es or vehic les. The un it is constru cted to pro vi de years of r el iable,
trouble -f ree servi ce , is compac t so t hat you can t ak e it with you a ny where, an d is
designe d fo r quick and e as y install at ion.
Please re ad t he entire i ns tructio n ma nual supp li ed with thi s pr oduct pri or t o operati on .
The docum en tation wi ll a ssist you i n in stallin g th e system pr op erly to obt ai n the best
equipme nt p erforma nc e. Please s av e this manu al f or later us e.
Features
!
270-deg re e Rotatab le 7 " LCD Scree n
!
Two Opti on al Aspect Ra ti os 16:9 and 4 :3
!
Remote Co nt rol
!
3.5mm Hea dp hone Jack
!
Audio/Vi deo Outpu t Ja ck
!
Compati bl e with DVD, V CD , CD, CD-R, D VD -RW, JPE G, Kodak Pict ure CD, etc.
!
Support P la yback Con tr ol: Play, Pause, Stop , Fast Forwar d Playback, F ast Rever se
Playbac k, e tc.
!
2 Hour Play ba ck
!
Interna l Re chargea bl e Li-Poly me r Battery
!
Operate d wi th 9-12 VDC P ow er Supply
Package Contents
1. 1 X Instru ct ion Manua l
2. 1 X Remote C on trol
1 X L B
3. CR2025 ithium attery
4. 1 X AC/DC Ad apter
5. 1 X Vehicle D C Po wer Adapte r
6. 1 X Carry/ He adrest Ba g*
7. 2 X Headph on e*
8. 1 X Headph on e Splitte r*
* DS7321P K on ly
- 6 -
Page 7
VEHICLE INSTALLATION
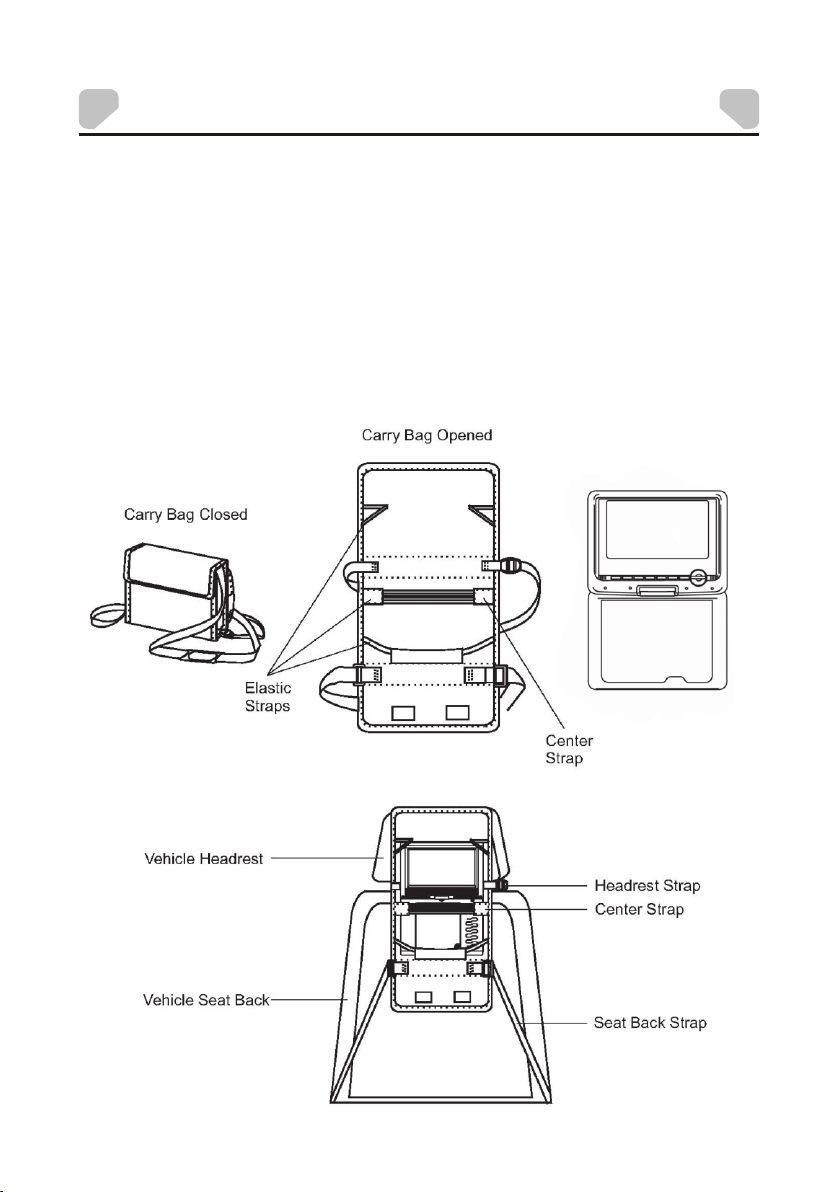
INSTALLING THE DVD PLAYER ON A SEAT BACK IN A CAR
(DS7321PK only)
1. Unfold the carry bag, and place the DVD Player on the bag beneath the elastic straps.
Ensure that the unit's corners are secured by the elastic straps. Ensure that the center strap
is across the face of the DVD Player.
2. Secure the upper portion of the carry bag to headrest support bars using the headrest strap.
Adjust the headrest strap until the bag is firmly secured.
3. Secure the lower portion of the carry bag to the vehicle seat back using the seat back strap.
Adjust the seat back strap until the bag is firmly secured.
- 7 -
Page 8

CHARGING THE BATTERY
The playe r is p owered by a l it hium-po ly mer batte ry. It has no me mory effe ct and thus i t
can be rech ar ged at any ti me r egardle ss o f whether i t is f ully or par ti ally disc ha rged.
The unit ca n be r echarge d wh en it is powe re d on or off . When the powe r is off, i t ta kes
about 3~4 hou rs t o fully cha rg e the batte ry. When the p ower is on, it ta kes
approxi ma tely ten ho ur s to charge t he b attery. When fully ch arged, the ba ttery can be
used for ab ou t two hours .
The unit ca n be c harged us in g the AC/DC Ada pt er or the Vehi cl e DC Power Ada pt er.
By AC /DC Ada pter:
Connect t he AC /DC adapt er t o the the unit, t he n plug the ad ap ter
12
into a 0 VAC outl et .
By Vehicle D C Po wer Adapter:
Plug one en d of t he dapt er into the jack on the u ni t,
then plug t he o ther end in to t he socket of a c ar.
Do not char ge t he DVD play er i n the vehic le w hen the veh ic le is not run ni ng.
While the u ni t is chargi ng , the red cha rg e indicat or w ill flash . Wh en the batt er y is fully
charged , th e red charg e in dicator w il l be steadi ly l it.
Vehicle DC Pow er A DC IN 9-12V
Use and Maintenance of the Rechargeable Battery
1.The wor ki ng temper at ure of the re ch argeabl e ba ttery is 32 ° F (0 ° C) to 95 °F (35 ° C) .
2. Always un pl ug the unit w he n it is not bei ng u sed or char ge d.
DC IN 9-12V j ac k on
vehicle D C ac cessory
3. If you do no t pl an to use the b at tery for an e xt ended per io d of time (on e we ek or
longer) , we r ecommen d th at you full y ch arge the ba tt ery. For l onger perio ds of
storage , pl ease rech ar ge the batt er y at least on ce e very two mo nt hs to maint ain the
battery i n op timum con di tion.
4. Once the b at tery is ful ly d ischarg ed , immedia te ly rechar ge t he batter y (regardle ss of
whether y ou p lan to use th e DV D player or n ot ) in order to m ax imize bat te ry life.
5. Rechar ge e ffici en cy will deg ra de when tem pe ratures d rop below 50 °F ( 10°C) or
exceed 95 ° F (3 5 °C).
6. The ba tt ery compa rt ment cont ains a temper ature senso r. If the temper ature excee ds
104 °F (40 °C) wh en chargi ng t he unit, th e po wer will tu rn o ff auto matically a nd the red
charge in di cator on th e si de of the uni t wi ll flash. I n th is case, di sc onnect th e power
adapter, w ai t for the uni t to c ool down, t he n reconne ct t he power ad ap ter.
7. Heat is pr od uced duri ng c harging . This is nor mal.
8. Do not sub je ct the batt er y to strong i mp acts.
9. Keep the b at tery away f ro m humidit y an d excessi ve h eat.
10. The b at tery is not u se r service able. Pleas e contact Au diovox in t he e vent the ba tt ery
will not ch ar ge.
- 8 -
Page 9
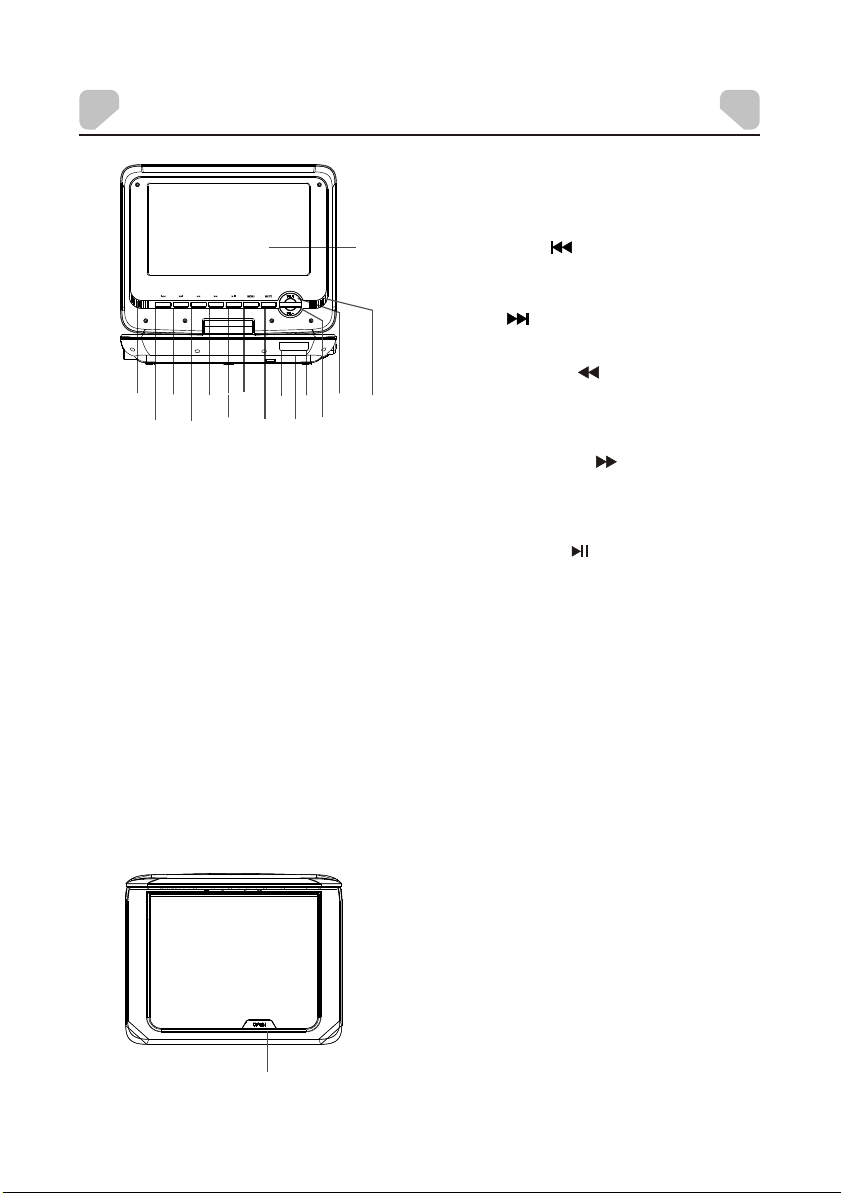
CONTROLS AND INDICATORS
1. DISPLAY SCREEN
2. SPEAKE R OU TPUT
1
3. PREVIO US ( ) BUTTO N
Press to sk ip t o the previ ou s
chapter /t rack.
4. NEXT ( ) BUTTO N
Press to sk ip t o the next ch ap ter/tra ck .
5. FAST RE WI ND ( ) B UTTON
2
6
4
7
5
3
12
10
8
9
11
14
13
Press rep ea tedly for f as t reverse
2
playbac k. The avai la ble speed s are 2X,
4X, 8X, 16X , an d 32X.
6. FAST FO RWA RD ( ) B UTTON
Press rep ea tedly for f as t forward
playbac k. The avai la ble speed s are 2X,
4X, 8X, 16X , an d 32X.
7. PLAY/ PAUSE ( ) BUTTO N
Press onc e to p ause play ba ck, then
press aga in t o continu e pl ayback.
8. MENU
Press to re tu rn to the roo t me nu when
playing a D VD .
9. MUTE
Press thi s bu tton to tem po rarily sw it ch
the sound o ff. Press i t again to swit ch
the sound o n.
10. RED LED C HA RGE INDIC ATOR
Flashes w he n the batte ry i s chargin g.
Steadil y li t when the ba tt ery is char ge d.
11. INFR AR ED REMOTE S EN SOR
12. GREEN L ED O N/OFF IND IC ATOR
Steadil y li t when the un it i s on.
15
13 VOL- BUT TON
Press to de cr ease the vo lu me.
14 + UT TON
. VOL B
Press to in cr ease the vo lu me.
15. OPEN BU TTON
Press to op en t he disc tra y co ver.
- 9 -
Page 10
CONTROLS AND INDICATORS
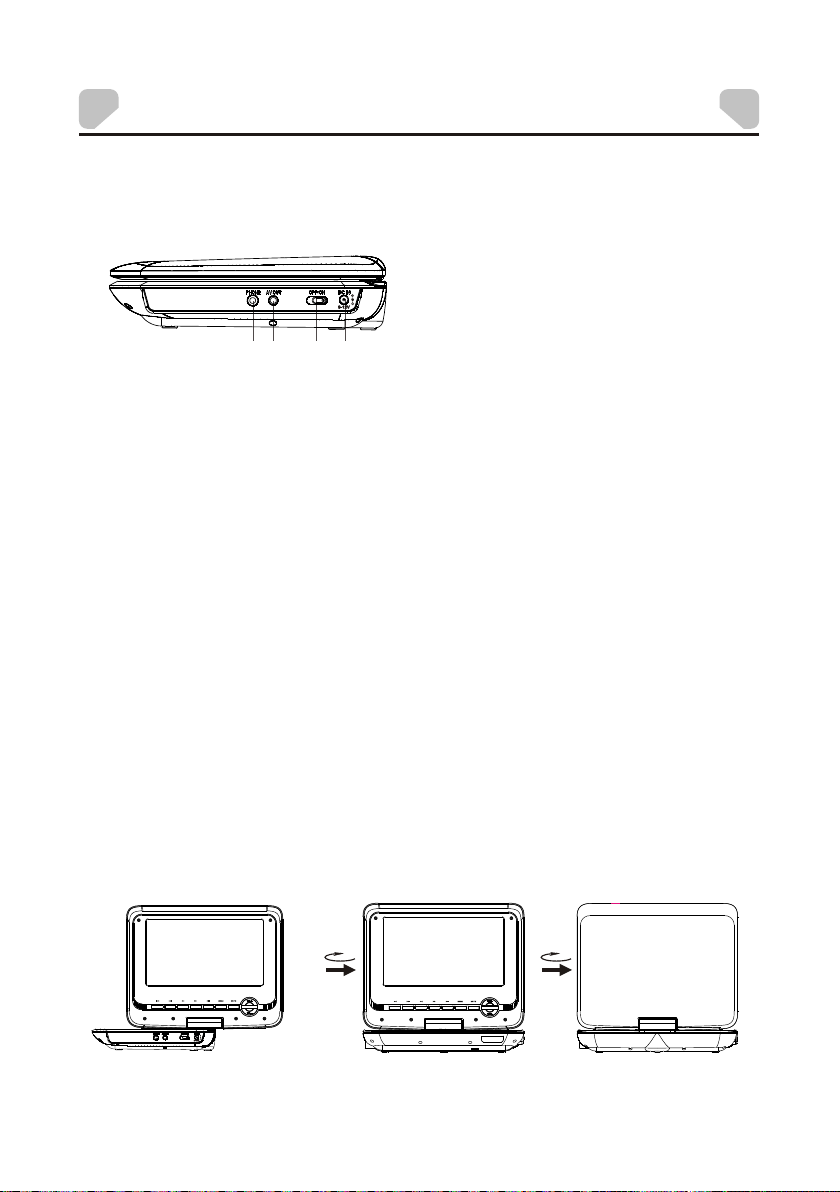
Side Vi ew
2
1
7″Swivel LCD Screen
1. 3.5mm HE AD PHONE JAC K
Note: When headp hones are con nected,
no sound wi ll b e emitted f ro m the
speaker s.
2. AV OUT JACK
3. ON/OFF S WI TCH
Slide the s wi tch to ON pos it ion to turn o n
4
3
the unit. S li de the swit ch t o OFF posit io n
to switch o ff the unit .
4. DC IN 9-12 V JA CK
The LCD scr ee n is connec te d to the main b od y of the play er v ia a rotata bl e hinge. The
screen ca n be r otated cl oc kwise hor iz ontally f ro m the begin ni ng positi on a nd
counter cl ockwise f ro m the endin g po sition by 2 70 d egrees. You c an o pen up the sc re en
and rotat e it t he same tim e.
Note: Do no t ro tate the sc re en beyond i ts m aximum ex te nt. Forci ng t he screen b eyond
its maxim um e xtent wil l da mage the un it .
Begin ning Po sit ion
Endin g Posit ion
- 10 -
Page 11

REMOTE CONTROL OPERATION
BATTERY INSTALLATION/REPLACEMENT
Remove th e ba ttery com pa rtment co ve r accordi ng t o
the diagr am o n the right .
1: Press th e ri dged area t o th e left.
2: At the same t im e, pull the b at tery tray o ut .
3: Remove t he o ld CR2025 b at tery. Re pl ace it with a
new CR202 5 li thium bat te ry on the tra y wi th the
positiv e si de facing u pw ard.
4: Replac e th e cover.
Note: Do no t ex pose the ba tt ery to exce ss ive heat.
REMOTE CONTROL FUNCTIONS
1. ANGLE
1
2
3
4
5
6
7
Press to sw it ch the view in g angles.
Note: Thi s functio n on ly works wi th
discs enc od ed with mul ti ple camer a
angles.
2. FUNCTI ON
Press to sw it ch betwee n th e 16:9 and
4:3 aspec t ra tios.
3. SETUP
Press to en te r/exit th e Se tup Menu.
4. REPEAT
Press to sw it ch the repe at m odes.
Note: For V CD 2.0 discs , th is functi on i s
invalid w he n the PBC fun ct ion is
activat ed .
5. TITL E
Press to re tu rn to the tit le m enu of a
DVD disc.
6. PREVIO US ( )/UP
Press to sk ip t o the previ ou s
chapter /t rack.
Press to na vi gate in an up d ir ection
when a menu i s di splayed o n th e
screen.
7. FAST RE WI ND ( ) /LEFT
Press rep ea tedly for f as t reverse
playbac k. The avai la ble speed s ar e 2X,
4X, 8X, 16X , an d 32X.
Press to na vi gate in a lef t di rection
when a menu i s di splayed o n th e
screen.
- 11 -
- 11 -
Page 12

10
REMOTE CONTROL OPERATION
8. SUBTIT LE
Press rep ea tedly to sw it ch/show t he
11
subtitl e( s) or turn off the subti tle
functio n.
12
Note: Thi s functio n on ly works
with disc s en coded wit h su btitles .
13
9. PLAY ( )
Press to st ar t a playbac k or r esume
normal pl ay back from f as t forward , fa st
reverse , sl ow-moti on , frame-b y- frame
8
9
playbac k, e tc.
10. DIGIT K EYS
The dig it k eys can be us ed t o input
numbers o r ma ke select io n of a track,
a chapter, e tc .
11. GOTO
During pl ay back, pre ss t o enter the
GOTO me nu . In the menu , use the
UP/DOWN d ir ection bu tt ons to sele ct
a menu item . Pr ess ENTER t o ed it.
Use the dig it k eys to inpu t a sp ecific
track, di sc t ime, trac k ti me, chapt er,
title, ch ap ter time or t it le time to go t o
directl y. Press it ag ain to exit the
GOTO me nu .
12. MUTE
Press thi s bu tton to tem po rarily sw it ch
the sound o ff. Press i t again to swit ch
the sound o n.
13. AUDIO
Press rep ea tedly to se le ct the
audio lan gu ages avai la ble on the di sc
(for DVD) .
Press rep ea tedly to sw it ch the
audio cha nn els avail ab le on the dis c
(for VCD) .
Note: Thi s functio n on ly works
with disc s en coded wit h di ffere nt audio
languag es .
- 12 -
Page 13

REMOTE CONTROL OPERATION
14. A-B REPE AT
Press to re pe at a specif ic s ection of a
disc.
Press thi s bu tton to mar k do wn the
startin g po int (A) and p re ss it again t o
mark down t he e nding poi nt ( B). The
unit will p la y back this s ec tion over a nd
14
over agai n. P ress this b ut ton a third
15
time to can ce l A-B repeat a nd r esume
16
normal pl ay back.
Note: Poi nt s A a nd B m ust be in the
17
same titl e/ t rack.
18
15. MENU
Press to re tu rn to the roo t me nu when
playing a D VD .
When play in g a disc enco de d with the
PBC funct io n, press to d is play the PB C
menu. Pre ss i t again to di sa ble the
PBC funct io n.
Note: A VCD 2.0 disc has a PB C
functio n wh ile DVD, VC D1 .1,
and CD-DA di sc s have no PBC
functio ns .
16. FAST FORWARD ( )/RIGHT
Press rep ea tedly for f as t forward
playbac k. The avai la ble speed s ar e
2X, 4X, 8X, 1 6X , and 32X.
Press to na vi gate in a rig ht d irectio n
when menu i s di splayed o n th e screen.
17. ENTER
Press to en te r a highlig ht ed item in a
menu or to co nf irm and exe cu te a
selecti on .
18. STEP
Press rep ea tedly to ad va nce the vid eo
frame by fr am e. Press Pl ay ( ) to
resume th e no rmal play ba ck.
Note: Ap plies to DVD, V CD, etc.
- 13 -
Page 14

REMOTE CONTROL OPERATION
19. NEXT ( )/DOWN
Press to sk ip t o the next ch ap ter/tra ck .
Press to na vi gate in a dow n di rection
when menu i s di splayed o n th e screen.
20. STO P ( )
Press onc e to p ause a play ba ck, then
press Pla y ( ) to continue pl ayback.
Press twi ce t o stop play ba ck.
21. PAUS E ( )
Press to te mp orarily p au se playba ck ;
press it ag ai n or press Pl ay ( ) to
resume pl ay back.
19
20
22. ZOOM
21
Press to zo om i n/out of a sc en e. The
availab le z oom ratio s ar e 2X, 3X, 4X,
1/2, 1/3, a nd 1 /4. In zoom ed -in mode,
the direc ti on keys can b e us ed to move
22
the zoomi ng c enter.
23
Note: Ap plies to DVD, V CD, etc.
23. OSD
Press rep ea tedly to di sp lay title
elapsed t im e, title re ma ining tim e,
24
chapter e la psed time o r ch apter
remaini ng t ime, or hid e th e display.
24. VOL+/ VO L-
Press VOL + to i ncrease t he
volume. P re ss VOL- to de cr ease the
volume.
- 14 -
Page 15

CONNECTING TO A TV
This player has an AV OUT jac k. You c an c on ne ct i t to a TV for viewing.
Use an AV cable (not supplied) to
connect the AV OU T jack to the video
input terminal, L/R channel audio input
terminals of a TV.
After the connection has been
correctly made, turn on the connected
TV and set it to AV mode. You c an t he n
view the video with the connected TV.
- 15 -
Page 16

SYSTEM SETUP
The System Setup menu allows you to personalize the DVD Player settings to your
preference. Once the initial settings are set, they are retained in the DVD player until
modified.
MENU OPERATION
1. Press th e SE TUP but to n on the remo te control to s how the Setup M enu.
2. Press th e LE FT ( ) or RIGH T ( ) button to s el ect the GEN ER AL, AUDIO, D OL BY,
VIDEO or PR EF ERENCE se tu p page. The submenu of t he selected p age appears .
3. Press th e UP ( ) or D OWN ( ) bu tton to selec t an item you des ire to set in the
submenu , th en press th e EN TER or RIGH T ( ) bu tton to ent er.
4. Press th e UP ( ) or D OWN ( ) button to s el ect an opti on , then pres s th e
ENTER
button to c on firm, or pr es s the LEFT ( ) bu tt on to cance l.
5. Press th e UP ( ) or DOWN ( ) button to c ontinue to se t other items i n the
submenu .
6. Press th e LE FT ( ) button to re turn to the upp er menu.
7. Press th e SE TUP but to n again to ex it the Setup Me nu.
GENERAL SETUP PAGE
There are s ix i tems in the G EN ERAL SETUP
PAGE. They are TV D ISPLAY, AN GLE
MARK, OSD L AN GUAGE, CL OS E
CAPTION S, S CREEN SAVER, and LAST
MEMORY.
TV DISPLAY
If the unit i s co nnected t o a co nventio na l TV set, s elect 4:3 PANSCAN or 4: 3
LETTERB OX . The 4:3 i ma ge will be di splayed in fu ll screen in it s native aspe ct ratio. If
the unit is c on nected to a w id e-scree n TV set, sel ect 16:9.
Options :
4:3 PANS CA N:
aspect ra ti o with some p art on the left a nd right cut off.
4:3 LETTE RB OX:
black ban ds o n the upper a nd l ower sect ions of the scr een.
16:9: The wide-scr een image wil l be displaye d in full scree n in its native
aspect ra ti o. The 4: 3 image will be s tretche d ou t horizon ta lly to fit
in the scre en .
The wide- sc reen imag e wi ll be displ ay ed on the scr ee n in its nati ve
The wide- sc reen imag e wi ll be displ ay ed in its nat iv e aspect ra ti o with
- 16 -
Page 17

SYSTEM SETUP
ANGLE MARK
This func ti on is avail ab le when a dis c is e ncoded wi th m ultiple c am era angle s.
Options :
ON: Enabl es t he Angle Mar k fu nction. W he n a disc with m ul tiple cam er a angles is
playing , an a ngle mark w il l display o n th e screen. You c an t hen view th e vi deo of
diffe re nt camera a ngles by pres sing the ANGL E button on the r emote contr ol.
OFF: Set th is i tem to OFF to h id e the angle m ar k.
OSD LANGUAGE (On-Screen Display Language)
This func ti on allows y ou t o set the lan gu age for the o n- screen di sp lay.
Options : En glish, Fr en ch, Spani sh
CLOSED CAPTIONS
This func ti on is avail ab le when a dis c is e ncoded wi th c losed cap ti ons.
Options :
ON: Enabl es t he Closed C ap tion func ti on. When a di sc e ncoded wi th c losed cap ti ons,
the close d ca ptions wi ll b e shown on th e sc reen.
OFF: Set th is i tem to OFF to h id e closed ca pt ions.
You ca n also press th e SUBTITLE bu tton on the rem ote contr ol t o show or hid e th e
closed ca pt ions.
SCREEN SAVER
When the pl ay er is not in us e fo r several m in utes (for e xa mple the di sc i s paused,
stopped e tc ) a running D VD l ogo will mo ve a cross the L CD s creen to pr ot ect the LCD
screen.
Options :
ON: Enabl es t he Screen S av er functi on . If the imag e re mains mot io nless on th e screen
for sever al m inutes, a s cr een saver w il l appear on t he s creen. You ca n pr ess any
key or butt on t o wake the sc re en up.
OFF: Disa bl es the Scre en S aver func ti on.
LAST MEMORY
During pl ay back or in a pa us ed status , th e Last Memo ry f unction w il l memoriz e th e last
playbac k ti me each tim e yo u open the di sc t ray. The next tim e yo u insert th e sa me disc
and close t he d isc tray to l oa d the disc, t he u nit will pl ay f rom the mem or ized poin t.
Options :
ON: Enabl es t he Last Mem or y functio n.
OFF: Disa bl es the Last M em ory funct io n.
- 17 -
Page 18

SYSTEM SETUP
AUDIO SETUP PAGE
There is on e it em in the AU DIO SETUP
PAGE - AN ALOG AUDIO .
ANALOG AU DI O
DOWNMIX
This func ti on only app li es to Dolby AC -3 e ncoded 5. 1- channel d is cs.
Options :
LT/RT: The 5 .1 -channe l audio is mixe d into the left c hannel and ri ght channel .
STEREO: T he 5.1-ch an nel audio i s mi xed into a st ereo signal .
- 18 -
Page 19

SYSTEM SETUP
DOLBY DIGITAL SETUP PAGE
There are t wo i tems in the D OL BY DIGI TAL
SETUP PAGE. The y are DUAL MONO and
DYMAMIC .
DUAL MONO
Note: Thi s fu nction on ly a pplies to t he D olby AC -3 enc od ed 2-chan ne l discs.
Options :
STEREO: T he p layer out pu ts the left -c hannel au di o and right -c hannel au di o via the
left and ri gh t speaker r es pective ly.
L-MONO: T he p layer out pu ts the left -c hannel au di o only via bo th t he left and r ight
speaker.
R- MONO: Th e pl ayer outp ut s the right -c hannel au di o only via bo th t he left and r ight
speaker.
MIX- MONO : Th e player ou tp uts the ave ra ge signal o f th e left-ch an nel and rig ht-channe l
audio via t he l eft speak er a nd the righ t sp eaker
DYNAMIC
When you wa tc h movies wi th a l arge dyna mi c at a low volu me , you can adj us t the
dynamic v al ue up to avoi d lo sing soun d de tails res ul ting from t he l ow volume .
Options :
Off to Full : Adj ust the sli de r bar to the de si red level .
- 19 -
Page 20

SYSTEM SETUP
VIDEO SETUP PAGE
There are t wo i tems in the V ID EO SETUP
PAGE. They are COLO R SETTING and
PANEL QUALI TY.
COLOR SETTING
The COLOR S ET TING menu i s us ed to set up th e pi cture qua li ty when con ne cted to an
externa l TV set.
Options :
SHARPNE SS : Adjusts th e ed ge enhanc em ent of the pi ct ure. Th ere are three o ptions:
HIGH, MED IU M, and LOW.
BRIGHTN ES S: Adjusts t he b lack leve l in t he pictur e. P ress LEFT ( ) o r RI GHT ( )
adjust th e va lue, then p re ss ENTER to c onfirm it.
CONTRAS T: Adjusts the l evel of the bri ghtest high lights in t he p icture. P re ss
LEFT ( ) or RIGHT ( ) t o adjust the va lue, then pre ss ENTER to
confirm i t.
GAMMA: Adj us ts the bala nc e between b ri ght and dar k ar eas in the pi ct ure.
There a re four optio ns: HIGH, MED IUM, LOW, an d NO NE.
HUE: Adjus ts t he level of t in t balance . Pr ess LEFT ( ) or R IG HT ( )
to adjust t he v alue, the n pr ess ENTER t o confirm it.
SATURATION: Adjus ts the level of c olor intens ity. Pre ss L EFT ( ) or RIGH T ( )
to adjust t he v alue, the n pr ess ENTER t o confirm it.
PANEL QU AL IT Y
The PANE L QUA LI TY menu i s us ed to set up th e picture qua lity of the LCD s creen.
Options :
SHARPNE SS : Adjusts th e ed ge enhanc em ent of the pi ct ure. Th ere are three o ptions:
HIGH, MED IU M, and LOW.
BRIGHTN ES S: Adjusts t he b lack leve l in t he pictur e. P ress LEFT ( ) o r RI GHT ( )
adjust th e va lue, then p re ss ENTER to c onfirm it.
CONTRAS T: Adjusts the l evel of the bri ghtest high lights in t he p icture. P re ss
LEFT ( ) or RIGHT ( ) t o adjust the va lue, then pre ss ENTER to
confirm i t.
HUE: Adjus ts t he level of t in t balance . Pr ess LEFT ( ) or R IG HT ( )
to adjust t he v alue, the n pr ess ENTER t o confirm it.
SATURATION: Adjus ts the level of c olor intens ity. Pre ss L EFT ( ) or RIGH T ( )
to adjust t he v alue, the n pr ess ENTER t o confirm it.
BACKLIG HT: Adj usts the le ve l of illumi na tion of the L CD s creen. Pr es s LEFT ( ) or
RIGHT ( ) to adju st the valu e, t hen press E NT ER to confi rm i t.
- 20 -
Page 21

SYSTEM SETUP
PREFERENCE PAGE
This item i s av ailable i f th ere is no dis c in t he
disc tray, t he disc tra y is open or the di sc in
the disc tr ay i s stopped .
There are e ig ht items in t he P REFEREN CE
PAGE. They are TV TYPE, PB C, AU DIO,
SUBTITL E, D ISC MENU, PARENTAL ,
PASSWO RD , and DEFAULT.
TV TYPE
This func ti on matche s vi deo outpu t of t he unit to th e br oadcast s ys tem of a conn ected
TV. The unit su pp orts both N at ional Televisi on S ystem Com mi ttee (NTS C) a nd Phase
Alterna ti ng Line (PAL ) televis io n broadca sting stand ards.
Options :
PAL: Sel ec t this mode i f the connect ed TV is a PAL sy st em. The v id eo signal o f a NTSC
disc will b e ou tput in PAL for ma t.
AUTO: S el ect this mo de i f the conne cted TV is mu lti-sys te m. The ou tp ut format o f video
signal wi ll b e in accord an ce with the v id eo signal o f th e disc.
NTSC: Sel ec t this mode i f th e connect ed TV is a NTSC s ystem. Th e video sig na l of a PAL
disc will b e ou tput in NTS C fo rmat.
Note: For b es t perform an ce, this se tt ing shoul d re main at NTS C.
PBC (Play Back Control)
This func ti on only wor ks w ith discs e nc oded with P BC f unction s uc h as VCD 2.0 di scs.
DVD, VCD1 .1 , and CD-DA di sc s have no PBC m en u.
Options :
ON: Activ at es the PBC fu nc tion.
OFF: Disa bl es the PBC fu nc tion.
- 21 -
Page 22

SYSTEM SETUP
AUDIO MENU
This item a ll ows a user to s el ect a prefe rr ed audio la ng uage. This functio n only applie s to
discs enc od ed with dif ferent au di o languag es .
Options : En glish, Fr en ch, Spani sh , Chinese , Ja panese, K or ean, Russ ian, and Th ai.
You ca n also change t he audio lang uage by press ing AUDIO on the r emote contr ol.
Note: If th e se lected la ng uage is not a va ilable fo r th e current ly p laying di sc , the disc' s
default s et ting is app li ed.
SUBTITLE MENU
This item a ll ows a user to s el ect a prefe rr ed subtit le l anguage . This func tion only app lies
to discs en co ded with su bt itles.
Options : En glish, Fr en ch, Spani sh , Chinese , Ja panese, K or ean, Russ ian, Thai , and Off .
You ca n also change t he subtitle l anguage by pr essing SUBT ITLE on the r em ote contr ol .
Note: If th e se lected la ng uage is not a va ilable fo r th e current ly p laying di sc , the disc' s
default s et ting is app li ed.
DISC MENU
This item a ll ows a user to s el ect a prefe rr ed disc men u la nguage.
Options : En glish, Fr en ch, Spani sh , Chinese , Ja panese, K or ean, Russ ian, and Th ai.
Note: If th e se lected la ng uage is not a va ilable fo r th e current ly p laying di sc , the disc' s
default s et ting is app li ed.
PARENTAL
This item a ll ows the use r to l imit the co nt ent of movi e pl ayback fr om K id Safe to Adu lt.
The lower t he v alue, the m or e strict th e co ntrol. Mo vi es rated hi gh er than the l evel set for
the paren ta l lock can no t be v iewed wit ho ut enteri ng t he correc t pa ssword.
Options :
1 KID SAFE
2 G
3 PG
4 PG – 13
5 PGR
6 R
7 NC17
8 Adult
Note: The r at ing level c an b e changed o nl y when the co rr ect passw or d is provid ed .
Note: Thi s fu nction on ly w orks with t ho se discs wi th p arental f un ction.
- 22 -
Page 23

SYSTEM SETUP
PASSWORD
This item a ll ows a user to a cc ess the Pas sw ord Setup P ag e.
Passwor d Se tup Page Op ti ons:
PASSWO RD M ODE: You can acti va te or disab le t he passwo rd f unction b y se tting it to
ON or OFF. You mu st key in the c or rect pass wo rd and pres s
ENTER to co nfirm befor e you can chang e the option. The defa ul t
passwor d is 3 308.
PASSWO RD : Access thi s item to reset t he password .
To chang e th e passwor d:
1. Enter th e ol d passwor d in t he OLD PAS SWORD row.
2. Enter th e ne w passwor d in t he NEW PAS SWORD row.
3. Enter th e ne w passwor d ag ain in the CO NF IRM PWD row.
Note: You may res et the pass wo rd if you for ge t the old pas sw ord by usin g th e default
passwor d: 3 308.
Note: The d ef ault pass wo rd is 3308. T his passw ord is always a ctive even af ter you
have sele ct ed your own p as sword and c ha nged it. To avoid the poss ibility of
others us in g the defau lt p assword t o se t the paren ta l level and c hange the
passwor d, r ecord thi s de fault pas sw ord in anot he r area and de le te it from
this manu al .
DEFAULT
This item a ll ows a user to r es tore all th e de fault set ti ngs excep t th e setting s in the
Passwor d Se tup Page an d th e PARENTAL item.
Options :
RESET: Re stores the de fault setti ngs.
- 23 -
Page 24

PLAYBACK
DVD BASICS
To get the optimum use out of the DVD Player, make sure you read this section completely.
DVD REGION CODE
The DVD player is preset to a region code at the factory depending on where the DVD player is sold.
A DVD from a different region cannot be played in this unit and the unit will display "WRONG
REGION”.
Region 1 - USA, Canada
Region 2 - Japan, Europe, South Africa, Middle East,
Greenland
Region 3 - S. Korea, Taiwan, Hong Kong, Parts of
South East Asia
Region 4 - Australia, New Zealand, Latin America
(including Mexico)
Region 5 - Eastern Europe, Russia, India, Africa
Region 6 - China
- 24 -
Page 25

PLAYBACK
TYPES OF DISCS YOUR DVD PLAYER WILL PLAY
Your system will play the following types of discs:
• DVD* disc - DVD discs which contain video.
• VCD disc - VCD discs which contain video.
• Audio disc - Audio CDs contain musical or sound content only.
*Note: This system is capable of playing most recordable DVD formats. However, due to the
variety of disc manufacturers and software, playback cannot be guaranteed.
TYPES OF FILES YOUR DVD PLAYER WILL PLAY
Your system will play the following types of files: MPEG, MPEG2, MP3, and JPEG.
LOADING AND PLAYING A DISC
Before you load a disc, make sure that it is compatible with the player. Insert the disc with the
label facing up.
Note: The following discs CANNOT be used with this player:
• MiniDisc
• Laserdisc
• Super Audio CD (SACD)
• Blu-ray Disc
To Load and Play a Disc:
1. Slide th e po wer switc h to t he ON posit io n.
2. Press th e OP EN button t o op en the disc d oo r. Place a
disc in the d is c tray with t he l abel side f ac ing up.
3. Close th e di sc door. The u nit will lo ad a nd play the d is c.
- 25 -
Page 26

PLAYBACK
KODAK PICTURE CD OR JPEG IMAGE CD PLAYBACK
1. Place a Ko da k Picture C D or J PEG image C D in t he disc tra y. The u ni t will
load the di sc a utomati ca lly.
2. Press ST OP ( ) t o enter the thu mbnail mode t o preview the p ictures .
3. In the thu mb nail mode , pr ess the dir ec tion keys t o se lect a pict ur e, then pre ss the
ENTER, OK o r PL AY ( ) bu ttons to st ar t the playb ac k from the se le cted pict ure.
4. If playi ng a K odak Pict ur e CD, press t he d irectio n bu ttons and t he n press ENT ER or
OK to selec t Sl ide Show, Me nu , PREV or NEX T at t he bottom o f th e screen.
Slide Sho w: S tarts sli de s how playb ac k.
Menu: Ent er s the instr uc tion menu f or remote key f unction. In t he menu, pres s
PREV/NE XT : Turns over t o th e previou s/ next page .
Viewing Files
Play Mode s
Press STO P ( ) to e nter the thum bnail mode to p review the pi ctures.
Press PAUS E ( ) to pause a p la yback. Pr es s it again or p re ss PLAY ( ) to resum e the
playbac k.
Press PLAY ( ) to star t a pl ayback or r esume to the no rmal playba ck.
Skip to the P re vious/N ex t Picture
Press PRE VI OUS ( )/ N EX T ( ) to ski p to t he previo us /next pic ture
during pl ay back.
Picture R ot ation
Press LEF T ( ) / RI GHT ( ) to rotate t he p icture co un tercloc kwise/ cloc kwise
during pl ay back.
ENTER or OK t o tu rn over to th e ne xt menu pag e an d again to ex it t he
instruc ti on menu.
Zoom In / Out
During pl ay back, pre ss Z OOM repea te dly to zoom i n by 1 25%, 150% o r 20 0%, or zoom
out by 75% or 5 0% . When the pi ct ure is a 50%, p re ss ZOOM to re tu rn the pict ure to its
origina l si ze.
When the pi ct ure is zoom ed i n, use the di re ction key s to m ove the pic tu re.
- 26 -
Page 27

SPECIFICATIONS
Compatible DISC
Signal system
Panel Size
Frequency response
Video output
Audio output
Dynamic range
Laser
Power source
Power consumption
Operating temperature
Battery type
DVD/VCD/CD
PAL/NTSC
7 inch
20 Hz to 20 kHz
1 Vp-p 75 Ohm unbalanced
1.2 V (±0.2 V) RMS/10 kOhm
≥85dB
Semiconductor laser, Wav el en gt h: 6 50 n m/ 79 5 nm
DC 9-12V
10W
0 ~ 35°C
Li Polymer
- 27 -
Page 28

TROUBLESHOOTING
If your DVD p la yer does no t se em to be func ti oning pro pe rly, che ck the items be low
before co nt acting Aud io vox Tec hnical Su pp ort.
Sympt om
No Powe r
Pictu re
There i s no
pictu re
displ ayed on
the
conne cted
TV.
Sound
There i s no
sound .
Unabl e to
play a di sc
The rem ote
contr ol does
not
funct ion.
Cause (s)
● The a dapte r is not co nnect ed to t he
unit se curel y or is n ot conn ected t o
the pow er supp ly.
● The u nit is tu rned off.
● The TV is not co nnect ed to thi s uni t
secur ely wit h the AV ca ble.
● The v olume i s set to th e lowes t lev el.
● The s ound is s witch ed off.
● The d isc is in f ast for ward/ rev erse
playb ack.
● The s ound is o utput t hroug h the
conne cted ea rph one.
● Thi s disc is p laced i n the dis c tra y in
the wro ng way.
● The u nit isn 't comp atibl e wit h the
disc.
● The d isc is di rty.
● The re is no ba ttery i n the rem ote
contr ol.
● The b atter y is out of c harge .
● The r emote c ontro l isn't p oin ted to
the rem ote sen sor.
● The r emote c ontro l is out of i ts
opera ting ar ea.
● The u nit is sh ut down .
Remed y
● Conne ct the ad apt er to the D C input
jack se curel y and t hen plu g the
adapt er into a n AC out let (fo r AC/DC
adapt er) or th e veh icle DC
acces sory so cke t of a car (f or
vehic le DC pow er ad ap ter ).
● Make su re the un it is t urned o n.
● Conne ct the AV OUT ja ck of thi s
unit an d the AV IN jack o f a TV
secur ely wit h an AV cab le.
● Turn up th e volum e.
● Press M UTE to sw itc h on the
sound .
PLAY to resum e the n ormal
● Press
playb ack.
Pull ou t the ear pho ne a nd th e
●
sound w ill out put t hroug h the bui lt in spea kers.
● Check t hat the d isc i s place d in the
disc tr ay with i ts la bel sid e upwar ds.
● Inser t a compa tib le disc .
See pag e 25.
● Clean t he disc .
● Insta ll a CR20 25 li th ium b atter y in
the rem ote con tro l.
● Repla ce the ba tte ry with a n ew one.
● Make su re that t he re mote co ntrol i s
point ed to the r emo te cont rol sen sor.
● Make su re the re mot e contr ol is
withi n the ope rat ing are a.
● Switc h off t he unit a nd disc onn ect it
from th e AC outle t. Th en powe r on
the uni t again .
- 28 -
Page 29

OWNER’S NOTES
- 29 -
Page 30

OWNER’S NOTES
- 30 -
Page 31

- 31 -
Page 32

© 2013 Audiovox Electronics Corp., 150 Marcus Blvd. Hauppauge, NY 11788
128-8952a
 Loading...