

Page 1

DPF1000
10.4" DIGITAL PICTURE FRAME
Page 2

A. Introduction
Thank you for selecting the DPF 1000 Digital Picture Frame. The
main features include a 10.4" Screen (4:3 Aspect Ratio) Liquid Crystal Display (LCD) monitor , a 3 in 1 card reader and a USB port. The
unit applies the latest state of the art electronics and is designed for
use with SD/MMC, MS memory cards and USB memory devices.
The unit is constructed to provide years of reliable, trouble-free service. Please read the entire instruction manual supplied with this product prior to operation. The documentation will assist you in obtaining
the best equipment performance. All manuals should be stored for
later use.
B. Cautions and Warnings
1. Placement
T o prevent fire or electric shock, do not expose this appliance to
rain or moisture. Do not place the set on an unstable cart, stand,
tripod, bracket or table to prevent it from falling. Keep the unit away
from strong magnets, heat sources, direct sunlight, and excessive dust.
2. Installation
Ensure that the DPF1000 is used in accordance with the
instructions and illustrations provided in this manual.
3. Object and Liquid
Do not push objects of any kind into the unit through openings; do
not spill or spray liquid of any kind on or in the system (this may
result in a fire or electric shock). Do not place anything heavy on
the unit. T o ensure proper ventilation and proper operation, never
cover or block the slots and openings with a cloth or other
material.
4. Disassembly
Do not attempt to disassemble the cabinet. There is a risk of electric shock. Contact qualified service personnel if your system is in
need of repair .
5.
Cleaning Unit
When cleaning, make sure the system is unplugged from the power
source. Do not use liquid cleaners or aerosol cleaners. Use a
cloth lightly dampened with water for cleaning the exterior of the
system only.
2
Page 3
C. Contents
1. 1 x DPF1000 10.4” Digital Picture Frame
2. 3 x Snap-On Frame Covers (White, Black and Wood Grain)
3. 1 x Remote Control w/Battery (CR2025)
4. 1 x USB Adapter Cable
5. 1 x AC to DC Power Supply
6. 1 x Instruction Manual
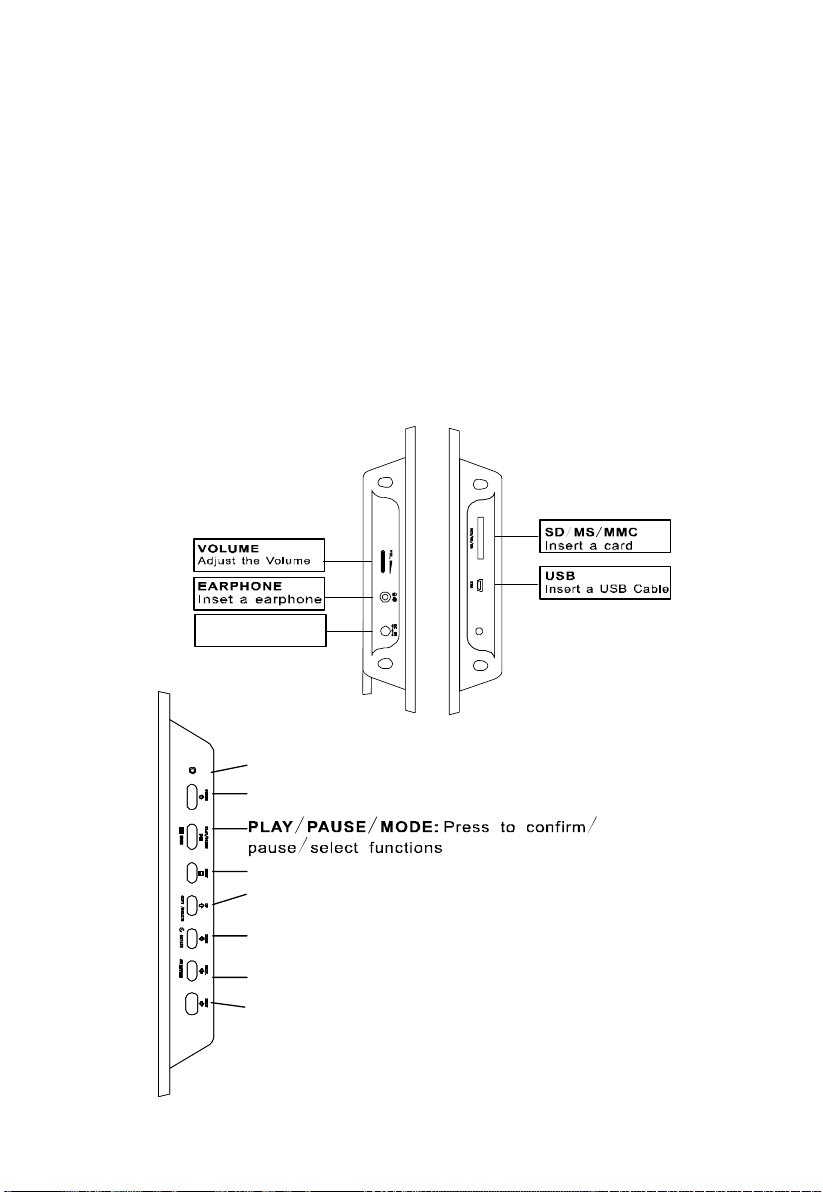
D. Controls and Indicators
Snap-On Frame Covers (White, Black and Wood Grain)
The snap-on frame covers are easily removed by hand. Align the IR
sensor with the IR sensor hole on the frame cover to ensure that
the Remote Control will operate.
Right and Left Side
DC 9V
Plug the AC adapter
T op Side
POWER :
POWER:
MENU:
UP COPY DELETE:
//
copy /delete a photo
DOWN ROTATE: /Press to
rotate a photo
PREV RETURN:
.
view the prev ious p hoto
NEXT:
next pho to
Power ON/O FFIndicator
LED
Press to access t he main
Press to
/
Press to scroll right or view the
unitPress to turn the on or o ff
MENU
scroll up or
scroll down or
scroll leftPress to or
3
Page 4
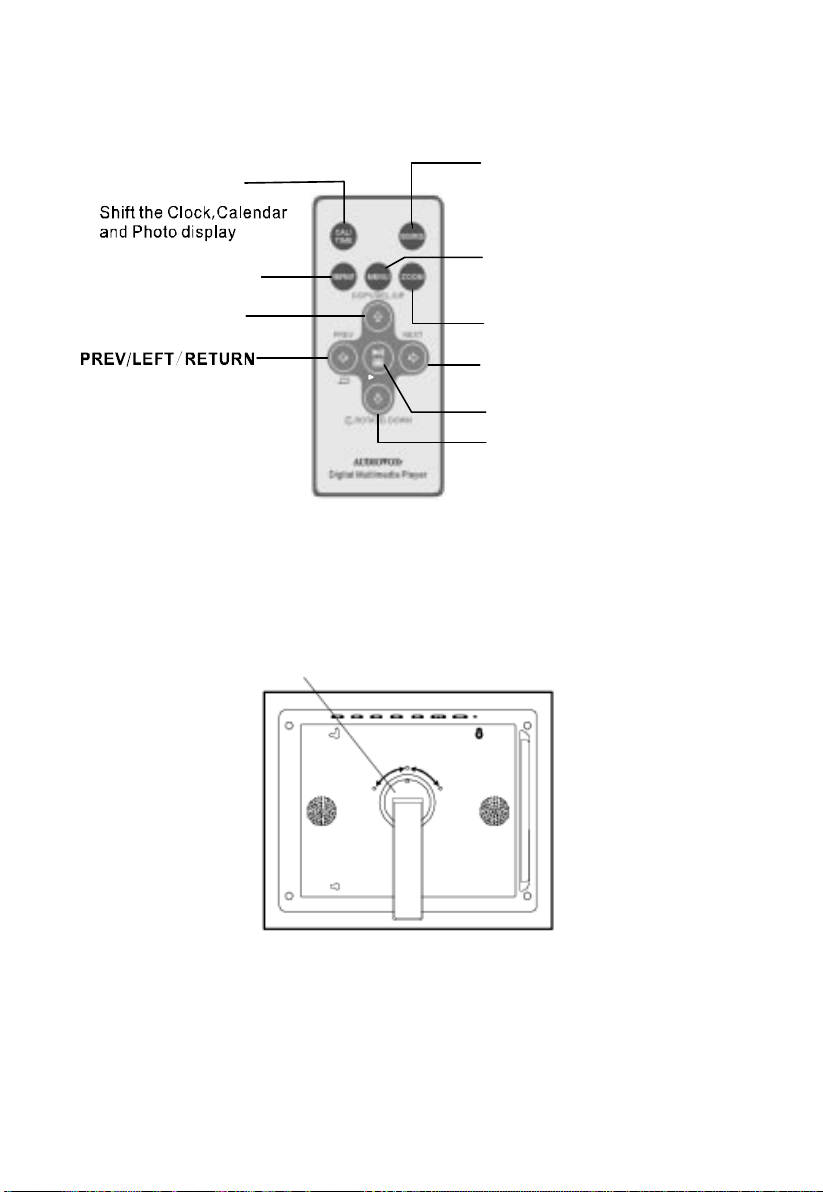
E. Remote Control Controls and Indicators
Remote Con trol
CAL/TIME
SOURCE
Press to select from
SD MS MMC
//
inputs
MENU
REPEAT
UP COPY DE L
//
Positioning Your Frame
Press to access
theMainMenu
ZOOM
Enlargean image
NEXT RIGHT
PLAY PAUSE MODE
DOWN RO TATE
or USB
/
//
/
Keep the frame away from strong magnets, heat sources,
direct sunlight, or excessive dust.
4
Page 5

F. SETUP
Press ‘MENU’ to display the Main Menu on the screen.
Main SETUP Menu Screen
1) Using the cursor buttons move the selection box to ‘SETTING and
press the ‘PLA Y’ button. The general setup page will be displayed
on the screen.
General SETUP Page
5
Page 6
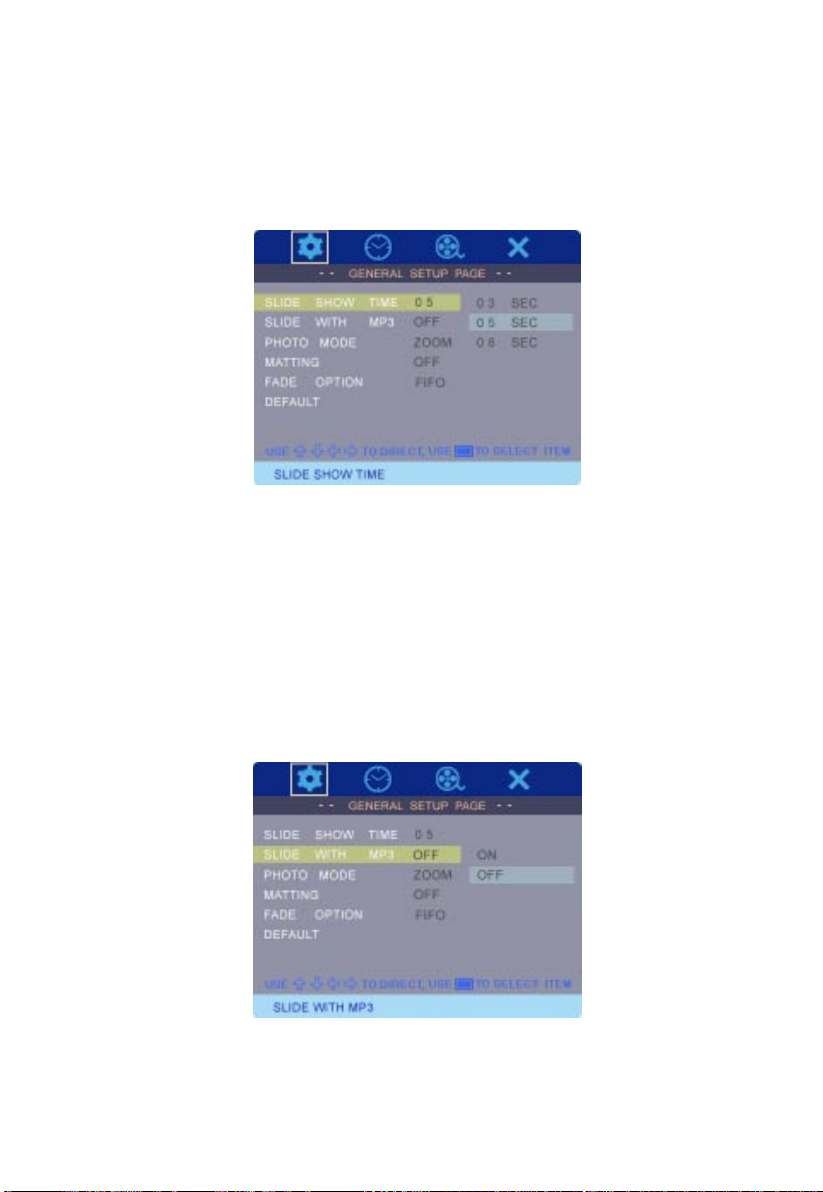
a).Select SLIDE SHOW TIME using the DOWN button and then
press the RIGHT button to enter the submenu. Select the slide
show display time for each photo (3, 5 or 8 seconds). The factory setting is five seconds. Press MODE to confirm the setting.
Press the LEFT button to return to the main menu.
SLIDE SHOW TIME
b).Select SLIDE WITH MP3 using the DOWN button and then press
the RIGHT button to enter the submenu. Select ON or OFF. The
ON setting will allow any MP3 file to be played while the slide
show is displayed. The factory setting is OFF. Press MODE to
confirm the setting. Press the LEFT button to return to the main
menu.
SLIDE WITH MP3
6
Page 7

c).Select PHOTO MODE using the DOWN button and then press
the RIGHT button to enter the submenu. Select NORMAL or
ZOOM. The ZOOM setting will enlarge the photo view when displayed. The factory setting is NORMAL. Press MODE to confirm
the setting. Press the LEFT button to return to the main menu.
PHOTO MODE
Note: When set to NORMAL,the entire photo will displayed on
the screen. If the photo format is not 4:3, then black bands will
appear on the screen. This is normal. Press the ZOOM button
(Remote Control) to enlarge the photo and use the LEFT and
RIGHT button to view the photo.
d).Select MA TTING using the DOWN button and then press RIGHT
button to enter the submenu. The matting feature displays a frame
around the displayed picture.
Mode 1 - Christmas
` Mode 2 - Photo Album (One Page)
Mode 3 - Flower Print
Mode 4 - Photo Album (Two Page)
Mode 5 - Vine/ Leaf
Mode 6 - Flowers
Mode 7 - Frame
Mode 8 - Flowers
Select the matting mode desired or OFF. The factory setting is
OFF. Press MODE to confirm the setting. Press the LEFT button to return to the main menu.
7
Page 8

MATTING
e).Select the FADE OPTION using the DOWN button and then
press the RIGHT button to enter the submenu. The fade option
controls the transition from one photo to another.
W T Wipe from top
WLT Wipe left top diagonal
TCH Top/Bottom Horizontal Center
TCV Left/ Right V ertical Center
WH Horizontal bars
WV V ertical bars
DTC Fade box
FIFO Morph to another picture
Press MODE to confirm the setting. Press the LEFT button to
return to the main menu.
FADE OPTION
8
Page 9

f). Select DEFAUL T using the DOWN button and then press RIGHT
button to enter the submenu. Select RESET. RESET will return
all of the features to the factory default settings. Press MODE to
confirm the setting. Press the LEFT button to return to the main
menu.
DEFAULT
g).Select the CLOCK SETUP P AGE using the RIGHT button. Press
MODE to access the submenu.
CLOCK SETUP PAGE
9
Page 10

h).Select CLOCK SETTING using the DOWN button and then press
the RIGHT button to enter the submenu. Select the hours, minutes or AM/PM display . Using the UP or DOWN buttons set the
hour to the correct time. Repeat for the minutes and AM/PM.
Press MODE to confirm the setting. Press the LEFT button to
return to the main menu.
CLOCK SETTING
Note: If the frame is unplugged and power is removed for more than
10 minutes, the clock and the calendar will have to be reset.
i). Select ALARM SETTING using the DOWN button and then press
the RIGHT button to enter the submenu. Select the hours, minutes on the display . Using the UP or DOWN buttons set the hour
to the correct time. Repeat for the minutes and AM/PM. Press
MODE to confirm the setting. Press the LEFT button to return to
the main menu.
ALARM SETTING
10
Page 11

j). Select DA TE SETTING using the DOWN button and then press
RIGHT button to enter the submenu. Set the month, day and
year using the UP and DOWN buttons. Press MODE to confirm
the setting. Press the LEFT button to return to the main menu.
DATE SETTING
k).Select ALARM MODE using the DOWN button and then press
the RIGHT button to enter the submenu. The alarm can be set to
ON or OFF. Press MODE to confirm the setting. Press the LEFT
button to return to the main menu.
ALARM MODE
11
Page 12

l).Select the VIDEO SETUP PAGE using the RIGHT button. Press
MODE to access the submenu.
VIDEO SETUP PAGE
m).Select BRIGHTNESS using the DOWN button and then press
the RIGHT button to enter the submenu. The BRIGHTNESS can
be changed using the LEFT or RIGHT buttons. The range is
adjustable from -20 to a +20. Press MODE to confirm the setting. Press the LEFT button to return to the main menu.
BRIGHTNESS SETTING
12
Page 13

n).Select CONTRAST using the DOWN button and then press the
RIGHT button to enter the submenu. The CONTRAST can be
changed using the LEFT or RIGHT buttons. The range is adjustable from -16 to a +16. Press MODE to confirm the setting.
Press the LEFT button to return to the main menu.
CONTRAST SETTING
o).Select SATURATION using the DOWN button and then press
the RIGHT button to enter the submenu. The SA TURATION can
be changed using the LEFT or RIGHT buttons. The range is
adjustable from -9 to a +9. Press MODE to confirm the setting.
Press the LEFT button to return to the main menu.
SATURATION SETTING
13
Page 14

p).Select HUE using the DOWN button and then press the RIGHT
button to enter the submenu. The HUE can be changed using
the LEFT or RIGHT buttons. The range is adjustable from -9 to
a +9. Press MODE to confirm the setting. Press the LEFT button to return to the main menu.
HUE SETTING
q).To EXIT the Set Up page, select the X icon using the RIGHT
button. Press MODE to confirm the setting and return to the
main menu.
EXIT the SET UP PAGE
14
Page 15

G. Selecting Photos Using the SD/MMC/MS Card or the USB
Memory Device
1.Insert the SD/MMC/MS Card into the SD/MMC/MS slot or
connect the USB adapter cable to the USB memory device.
2.Press the MENU button to display the main menu page. Using
the LEFT button highlight the PHOTO icon.
3.Press PLA Y/PAUSE/MODE once to enter Slide Show mode.
The photos transition display is based F ADE options settings.
4.Press PLA Y/PAUSE/MODE again to enter pause mode. The
frame displays a single image. You can use the PREV. and
NEXT button to select a photo.
5.Press PLAY/P AUSE/MODE two times to view photos as
thumbnails. The thumbnail images appear in a table. Use the
PREV. NEXT, UP and DOWN button to navigate through the
thumbnails.
Copying Photos to Your Frame
To copy photos from a SD/MMC/MS Card or a USB memory
device, set the frame to slide show mode. Select the photo and
press UP/COPY/DELETE button. The frame will prompt you if
you want to copy the photo. Select YES and press MODE. The
frame can copy approximately 20 photos to memory.
Note: You can rotate photos clockwise by pressing ROTATE button
when the photo is displayed on the screen in slide show
mode. Rotated photos are copied in the rotated position.
15
Page 16

Deleting Photos
To delete photos from your frame’s memory, disconnect the
SD/MMC/MS Card or a USB memory device from the frame.
Use the PREV. or the NEXT button to locate the photo you
wish to delete. When the desired photo appears, press the
UP/COPY/DELETE button. The frame will prompt if you want
to delete the photo. Select YES and press MODE button.The
frame deletes the photo from memory.
Note:The delete function only deletes photos from the frame’s
memory not from a card or a USB memory device.
H. Selecting Audio Files Using the SD/MMC/MS Card or the USB
Memory Device
1.Insert the SD/MMC/MS Card into the SD/MMC/MS slot or
connect the USB adapter cable to the USB memory device.
2.Press the MENU button to display the main menu page. Using
the LEFT button highlight the AUDIO icon.
3.Press PLA Y/PAUSE/MODE once to enter audio mode.The
audio tracks are displayed on the left side of the screen. Artist
information is displayed on the right of the screen when
available. Use the PREV., NEXT, UP or DOWN buttons to
select the desired track.
4.Press PLA Y/PAUSE/MODE to enter PLAY mode. Press PLAY/
P AUSE/MODE again to enter Pause mode.
16
Page 17

I. Calendar Function
1.Press the MENU button to display the main menu page. Using
the LEFT button highlight the CALENDAR icon.
2.Press PLA Y/PAUSE/MODE once to enter calendar display
mode.The month and the year will be displayed at the top of
the screen. Using the UP or DOWN buttons select the month
and the year . Using the PREV. or NEXT button, select the day.
Note:The date is set in F. Setup, Step J. The above procedure is
for reference to view dates in the future or in the past.
J. SPECIFICATIONS
Audio format : MP3
Photo format: JPEG
Panel size: 10.4 inch
Power source: DC 9V
Power consumption: 5 W
Operating temperature: 41~95°F, 5~35°C
Weight : 2.49lb 1.13Kg
Dimensions (W x H x D): 12.3 X 10 X 1.4inches
312.5 X 246 X 36mm
17
Page 18

90 DAY LIMITED WARRANTY
Applies to Audiovox Video Products
AUDIOVOX ELECTRONICS CORP. (the Company) warrants to the original retail purchaser of
this product that should this product or any part thereof, under normal use and conditions,
be proven defective in material or workmanship within 90 days from the date of original
purchase, such defect(s) will be repaired or replaced with reconditioned product (at the
Company's option) without charge for parts and repair labor. A game controller, if supplied,
is similarly warranted for ninety (90) days.
To obtain repair or replacement within the terms of this Warranty, the product is to be delivered
with proof of warranty coverage (e.g. dated bill of sale), specification of defect(s),
transportation prepaid, to the Company at the address shown below.
This Warranty does not extend to the elimination of externally generated static or noise, to
correction of antenna problems, to costs incurred for installation, removal or reinstallation of
the product, or to damage to digital memory/media devices, gaming devices, discs, speakers,
accessories, or electrical systems.
This Warranty does not apply to any product or part thereof which, in the opinion of the
Company, has suffered or been damaged through alteration, improper installation, mishandling, misuse, neglect, accident, or by removal or defacement of the factory serial number/
bar code label(s). THE EXTENT OF THE COMPANY'S LIABILITY UNDER THIS WARRANTY IS
LIMITED TO THE REPAIR OR REPLACEMENT PROVIDED ABOVE AND, IN NO EVENT, SHALL
THE COMPANY'S LIABILITY EXCEED THE PURCHASE PRICE PAID BY PURCHASER FOR THE
PRODUCT.
This Warranty is in lieu of all other express warranties or liabilities. ANY IMPLIED WARRANTIES, INCLUDING ANY IMPLIED WARRANTY OF MERCHANTABILITY, SHALL BE LIMITED TO
THE DURATION OF THIS WRITTEN WARRANTY. ANY ACTION FOR BREACH OF ANY
WARRANTY HEREUNDER INCLUDING ANY IMPLIED WARRANTY OF MERCHANTABILITY
MUST BE BROUGHT WITHIN A PERIOD OF 24 MONTHS FROM DATE OF ORIGINAL
PURCHASE. IN NO CASE SHALL THE COMPANY BE LIABLE FOR ANY CONSEQUENTIAL OR
INCIDENTAL DAMAGES FOR BREACH OF THIS OR ANY OTHER WARRANTY, EXPRESS OR
IMPLIED, WHATSOEVER. No person or representative is authorized to assume for the
Company any liability other than expressed herein in connection with the sale of this product.
Some states do not allow limitations on how long an implied warranty lasts or the exclusion
or limitation of incidental or consequential damage so the above limitations or exclusions may
not apply to you. This Warranty gives you specific legal rights and you may also have other
rights which vary from state to state.
U.S.A. : AUDIOVOX ELECTRONICS CORPORATION, 150 MARCUS BLVD, HAUPPAUGE, NEW YORK 11788
z 1-800-645-4994
CANADA : CALL 1-800-645-4994 FOR LOCATION OF WARRANTY STATION SERVING YOUR AREA
128-5556G
© 2007 Audiovox Electronics Corporation
Page 19

© 2007 Audiovox Electronics Corporation
128-8005
 Loading...