

Page 1
Operation Manual
PORTABLE DVD PLAYER
Model: D705PK
READ THESE INSTRUCTIONS THOROUGHLYPRIORTOCONNECTINGAND OPERATINGYOUR DVD PLAYER.
THE ILLUSTRATIONSAND GRAPHICS IN THE MANUAL ARE FOR REFERENCE ONLYAND SUBJECT TO CHANGE WITHOUT NOTICE.
PLEASE RETAINTHIS MANUAL IN CASE YOU NEED IT FOR FUTURE REFERENCE.
Page 2

This page intentionally left blank.
Page 3

Notice:
This Product incorporates copyright protection technology that is protected by method claims of certain U.S. Patents
and other intellectual property rights owned by Macrovision Corporation and other rights owners. Use of this copyright
protection technology must be authorized by Macrovision Corporation, and is intended for home and other limited
viewing uses only unless otherwise authorized by Macrovision Corporation. Reverse engineering or disassembly is
prohibited.
Notice:
AnLCD panel and/orvideomonitor may beinstalledin a motorvehicleand visible to thedriver if the LCDpanel or video
monitorisused for vehicle information, system control, rearorsideobservation or navigation. If the LCD panel orvideo
monitor is used for television reception, video or DVD play, the LCD panel or video monitor must be installed so that
thesefeatureswillonlyfunction whenthe vehicleis in"park" orwhenthevehicle'sparkingbrakeis applied.
AnLCD panelor videomonitor usedfortelevision reception,video orDVD playthatoperates whenthe vehicleisingear
or when the parking brake is not applied must be installed to the rear of the driver's seat where it will not be visible,
directlyorindirectly,totheoperatorof themotor vehicle.
Notice:
TheD705PKDVD Player contains a built-in battery.Toobtain the best performance fromyourDVDPlayer please refer
tothefollowingbatterycare instructions:
CHARGING THE D705PK
When charging the DVD Player the power switch should be set to off. The battery can only charge when the DVD
Player is off. The DVD Player can be charged using the AC to DC adaptor or the vehicle DC power adaptor. When
the battery is fully discharged the unit will require approximately 2~3 hours to fully recharge the battery. The battery
must be charged at least 8 hours prior to first use.
While the unit is charging, the LED indicator will be on. Once the unit is fully charged the LED will be off. When the
battery is fully charged, the unit will play for approximately 2 hours. You should charge the unit once a month to
ensure that the unit will be operational for 2 hours.
Do not charge the DVD Player in the vehicle when the vehicle is not running.
Note: If you do not plan to use the battery for an extended period of time (one week or longer), we recommend that
you fully charge the battery. For longer periods of storage, please recharge the battery at least once every two
months to maintain the battery in optimum condition.
Precautions Related to Battery Recharge:
1. Once the battery is fully discharged, immediately recharge the battery (regardless of whether you plan to use the
batteryornot)inorder tomaximize batterylife.
2.Rechargeefficiencywilldegrade whentemperaturesdropbelow50°F(10°C)or exceed95°F(35°C).
1
Page 4

Introduction
Thank you for selecting the D705PK portable DVD Player. The main features include a 7" Screen (16:9 Aspect Ratio) Liquid
CrystalDisplay (LCD)monitor anda DVD Player.Theunit applies the latest state-of-the-artelectronics andis designedfor usein
hotels, offices,homes or vehicles. The unit is constructed to provide years of reliable, trouble-free service, is compact so that
you can take it with you anywhere, and is designed for quick and easy installation. Please read the entire instruction manual
suppliedwith this product prior tooperation. Thedocumentation will assist you ininstalling the system properly toobtain the best
equipmentperformance.Pleasesave thismanualforlater use.
Cautions and Warnings
1. Placement
To prevent fire or electric shock, do not expose this appliance to rain or moisture. Do not place the set on an unstable cart,
stand,tripod, bracket or tableto prevent it from falling. Keep the unit away from strong magnets, heat sources, direct sunlight,
or excessive dust. If the unit is brought directly from a cold to a warm location, moisture may condense inside the unit. When
you move it from a coldto a warm location, wait for about one hourbefore operating the unit, or remove the disc andleave the
unitturnedonuntil themoistureevaporates.
2. Installation
EnsurethattheD705 isinstalledandused inaccordancewiththe instructionsandillustrationsprovided inthismanual.
3. Objects and Liquids
Donotpush objectsofany kind intotheunit throughopenings;do notspill,splash orsprayliquid ofanykind on orinthe system
(thismay resultin a fireor electricshock). Do not place anythingheavy on the unit. Donot placeany open flamesources, such
aslightedcandles,on theunit.
4. Ventilation
Toensureproperventilationand properoperation,nevercover orblocktheslots andopeningswitha clothorothermaterial.
5. Disassembly
Do not attempt to disassemble the case or replace the battery. There is a risk of electric shock and/or exposure to Laser
Radiation.Contactqualifiedservice personnelifyoursystem isinneedof repair.
6. Cleaning Unit
When cleaning, make sure the system is unplugged from the power source. Do not use liquid cleaners or aerosol cleaners.
Useaclothlightly dampenedwithwaterfor cleaningtheexteriorof theDVDPlayer systemonly.
7. Disc
Donot use irregularly shaped discssuch as heart or star-shapeddiscs asthey may causethe unitto malfunction. Donot stick
paper,tapeorglue onthe disc.Do notexpose thedisc todirect sunlight orheat sourcessuch ashot airducts. Donot touchthe
surface of the disc. Handle the disc by its edge. Clean the disc by wiping the disc from the center out with a cleaning cloth.
Remove the disc from the unit and store it in its case after playing. Some playback operations of discs may be intentionally
fixedby softwareproducers. Sincethis unitplays discsaccording tothe disccontents thesoftware producersdesigned, some
playbackfeaturesmaynot beavailable. Also, refertotheinstructionssuppliedwith thediscs.
Regional Coding
Both the DVD Player and disc are coded by region. These regional codes must match in order for the disc to play.If the
codes don't match, the disc won't play. This unit’s code is region 1. DVDs with other regional codes cannot be played in
this unit.
Contents
1. 1 x 7" LCD Monitor and DVD Player With Built-In Battery
2. 1 x AC to DC Adapter
3. 1 x Remote Control with Batteries (2 X 1.5 V, Size AAA)
4. 1 x Instruction Manual
5. 1 x Audio/Video Cable
6. 1 x DC Power Adapter
7. 1 x Headphone Splitter
8. 2 x Wired Headphones
9. 1 x Carry Bag
2
Page 5

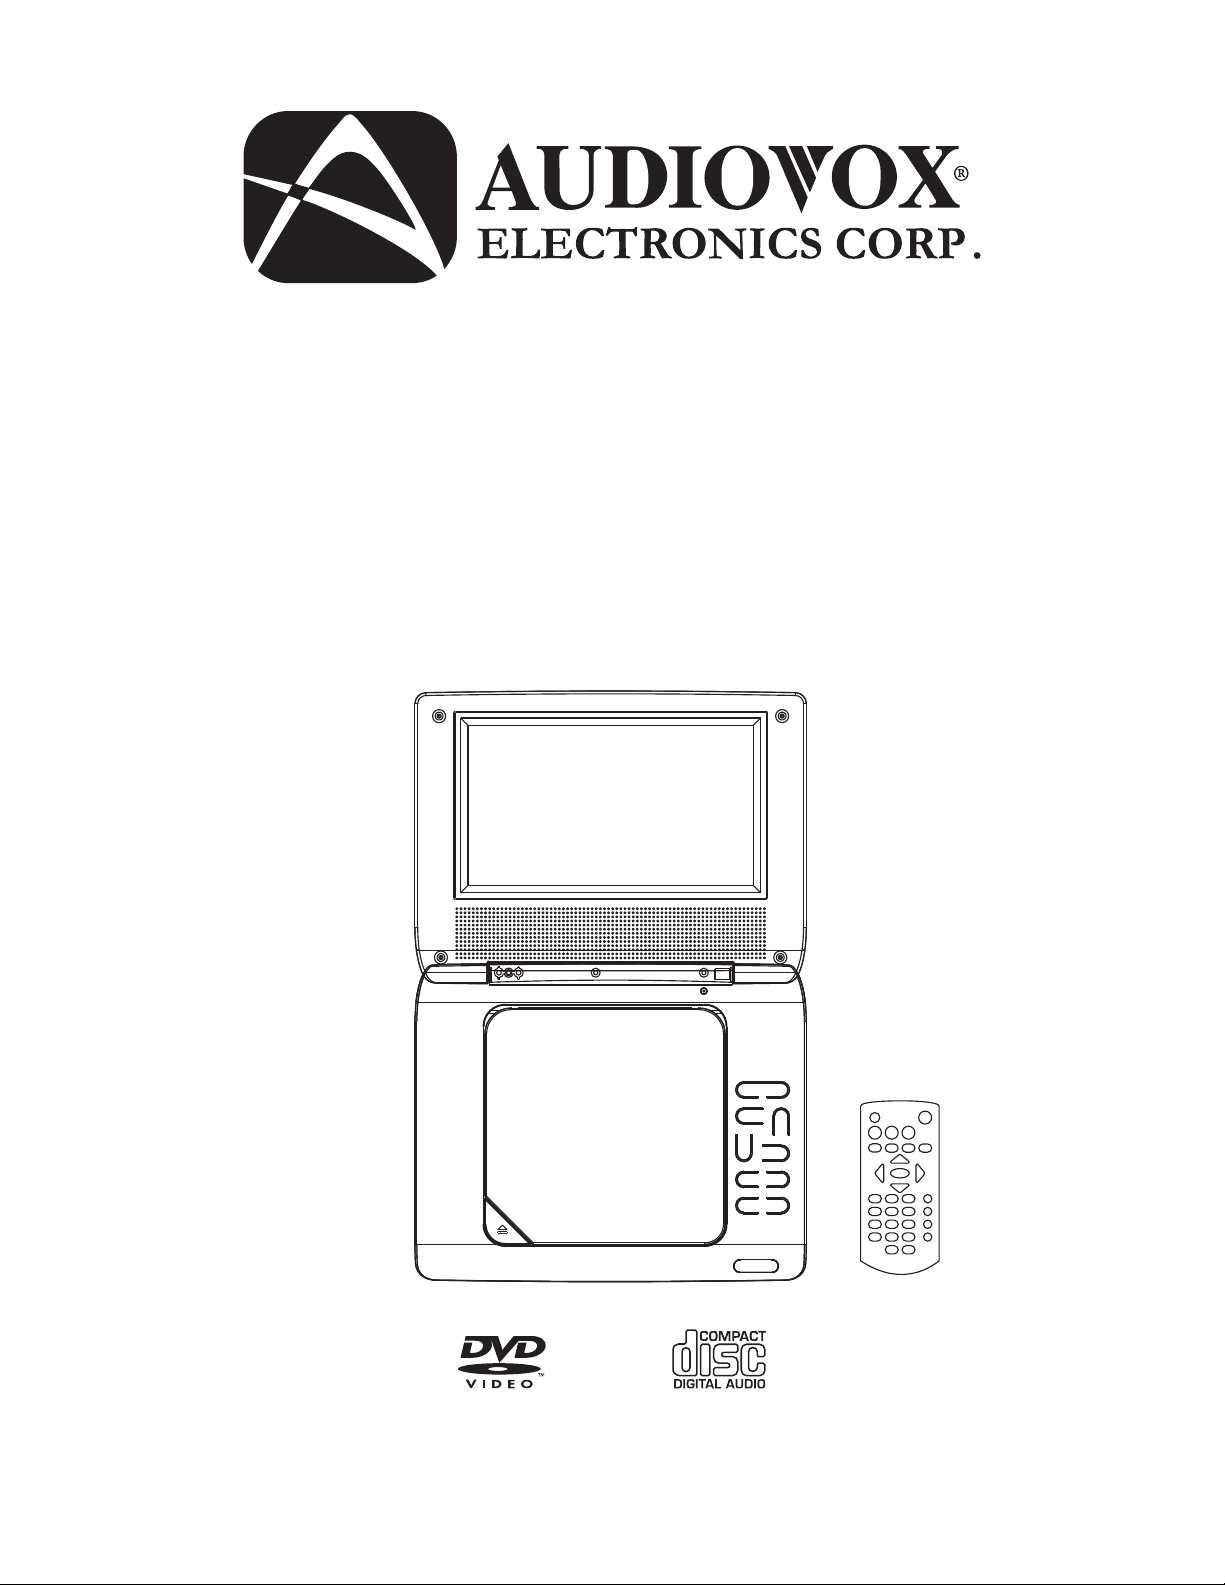
OVERVIEW OF THE DVD PLAYER:
1
2
3
4 567
9
11
13
15
8
10
12
14
16
1. LCD SCREEN
2. SPEAKERS
3. DISC COVER
4. DISC COVER OPEN BUTTON
5. CHARGE INDICATOR
6. REMOTE CONTROL SENSOR
7. POWER INDICATOR
8. OK BUTTON
9. NAVIGATION UP BUTTON
10. VOLUME+&NAVIGATION RIGHT BUTTON
11. VOLUME-&NAVIGATION LEFT BUTTON
12. NAVIGATION DOWN BUTTON
13. PREVIOUS & FAST BACKWARD BUTTON
14. NEXT & FAST FORWARD BUTTON
15. STOP & SOURCE BUTTON
16. PLAY/PAUSE BUTTON
17. POWER ON/OFF SWITCH
18. SD/MMC CARD SLOT
19. USB PORT
20. PHONES JACK
21. AUDIO/VIDEO OUT JACK
22. DC IN JACK
:
() ( )
<
()
()
p
()
u
()
t
()
q
9
() ( )
II
()
u
tt
uu
17 18 19 202122
23
* Rating label is located at the bottom of the unit.
REMOTE CONTROL UNIT
1. SCREEN ON/OFF BUTTON
1
2
3
4
5
6
7
820
9
10
11
12
13
14
15
16
17
18
19
2. TITLE BUTTON
3. PREVIOUS & FAST BACKWARD BUTTON
4. NEXT & FAST FORWARD BUTTON
5. NAVIGATION ( ,,,)BUTTONS
6. NUMERIC BUTTONS
7. PROGRAM/ANGLE BUTTON
8. VOLUME - BUTTON
9. MUTE BUTTON
10. SETUP BUTTON
11. MENU BUTTON
12. DISPLAY BUTTON
13. STOP & SOURCE BUTTON
14. OK PLAY/PAUSE BUTTON
15. SUBTITLE BUTTON
16. AUDIO BUTTON
17. SEARCH BUTTON
18. REPEAT BUTTON
19. ZOOM/SLOW BUTTON
20. VOLUME + BUTTON
() ( )
:
() ( )
<
()
()()
9
tpqp
u
tt
uu
II
3
Page 6

VEHICLE INSTALLATION:
INSTALLING THE DVD PLAYER ON A SEAT BACK IN A CAR
1. Unfold the carry bag, and place the DVD Player on the bag beneath the elastic straps. Ensure that the unit's corners are
secured by the elastic straps.
2. Secure the upper portion of the carry bag to headrest support bars using the headrest strap. Adjust the headrest strap
until the bag is firmly secured.
3. Secure the lower portion of the carry bag to the vehicle seat back using the seat back strap. Adjust the seat back strap until
the bag is firmly secured.
4
Page 7

CONNECTING THE DVD
PLAYER TO OTHER DEVICES
When connecting the DVD Player to a TV, ensure that the
DVD Player and other devices (TV set and/or amplifier) to
be connected to the DVD player are set to OFF.
Do not block ventilation holes of any of the equipment
and arrange them so that air can circulate freely.
Read through the instructions before connecting other
equipment.
Observe the color coding when connecting audio and
video cables, for instance connect yellow plug to the
yellow jack, the red plug to the red jack and so on. If the
A/V connected cable is only supplied, please link one end
of the A/V connected cable with A/V cable according to
the color coding, and connect the other end of the A/V
connected cable to the unit, finally connect the AV cable
with TV set
Note:
During DVD play, the TV volume may be at a lower level
than during TV broadcasts, etc. If this is the case, adjust
the volume to the desired level.
If the DVD/CD player is connected to the TV through a
video cassette recorder, the picture may not be played
back normally with some DVDs. If this is the case, do not
connect the player via the VCR.
Connecting to a stereo TV set
.
! After use, disconnect the vehicle power adaptor from both
the unit and vehicle DC accessory socket.
FUSE REPLACEMENT
FUSE
POSITIVE (+) CAP
Note: Don't throw out the positive (+) cap when replacing the
fuse.
OPERATION
PREPARATION
Power on the TV set and select video input mode.
Power on the audio system which is connected to the player
GETTING STARTED
1. Slide the POWER ON/OFF switch to turn on the player.
2. Press the disc cover OPEN key to open the disc cover,
and then place the disc onto the disc tray.
3. Close the disc tray and the playback starts automatically.
4. When the DVD menu screen appears, use the navigation
buttons to select a preferred chapter number, then press
the OK (PLAY/PAUSE) button to start playback.
()
u
II
AUDIOL
AUDIOR
AVAUDIO/VIDEO INPUT
VIDEOIN
A/V cable
S-VIDEO
YUVINPUT
TV SET
After connecting the DVD player to another device, plug the
AC ADAPTER to an applicable wall outlet and turn on the
player.
CONNECTING TO THE VEHICLE DC
ADAPTOR
The vehicle power adaptor is designed for use with vehicles
that have a 12V, negative ground electrical system.
To the vehicle DC accessory socket
CAUTIONS:
!
Use the unit only with the recommended vehicle power
adaptor, use with other vehicle powers adaptor could
damage the unit.
!
The recommended vehicle power adaptor is for use with
this unit only. Do not use it with other equipment.
In the interests of road traffic safety, do not operate the
!
unit or view video software while driving a vehicle.
Make sure the unit is fastened securely to prevent it from
!
moving around the vehicle in an accident.
ADJUSTING THE VOLUME
Press the VOLUME +/- button on the remote or press and
hold these two buttons on the unit to increase or reduce the
volume level.
MUTE
During playback, press the MUTE button to shut off the audio
output of the unit. Press it again to resume normal play.
SKIP AHEAD OR BACK
Press the PREVIOUS or NEXT button once during
9:
() ()
play to skip a chapter (DVD) or a track (CD) ahead or
backwards.
FAST FORWARD OR BACKWARD
During playback, press and hold the FAST FORWARD
or FAST BACKWARD button several times to scan the
()
tt
disc forward or backward at X2, X4, X8, X16, X32 normal
speed. Press the OK (PLAY/PAUSE) button to resume
()
u
II
normal play.
STOP PLAYBACK
Press the STOP button during playback to stop playback.
The player activates its resume function when STOP is
<
()
()
pressed in STOP mode. Press the PLAYbutton again,
playback resumes at the point it stopped previously. Open
the disc tray or press the STOP button one more time to
<
()
clear the resume function. Press and hold this button to make
change between DVD, C R and USB.
sAD,
SLOW-MOTION PLAY (DVD)
Press and hold the ZOOM/SLOW button on the remote
control during playback, the Disc will play at 1/2 normal
speed. Each time this button is pressed, the play speed
becomes slower at 1/4,1/8, and 1/16 speed.
REPEAT
Press the REPEATbutton during playback, it will repeat play
one chapter/title or repeat all (for DVD disc), or repeat play a
track or all tracks (CD), or repeat the sections between two
specific points (A-B).
5
()
uu
<
Page 8

SEARCH FOR A SCENE
1. Press SEARCH button several times during p
2. Input the desired number or time via the numeric buttons.
3. Press the OK (PLAY/PAUSE) button to confirm and
4.
ON SCREEN DISPLAY INFORMATION
When the player is in operation, press the DISPLAY button
on the remote control to display title elapsed time, title
remaining time, chapter elapsed time or chapter remaining
time.
CHANGING AUDIO SOUNDTRACK LANGUAGE (DVD)
The audio soundtrack language can be changed to a
different language from the one selected at the initial
settings. This function is only available on discs which
contain multiple audio soundtrack languages.
Press the AUDIO button to change the sound track language
during DVD disc play.
Note: When no soundtrack languages are recorded, the
AUDIO button not operate.
CHANGING SUBTITLE LANGUAGE (DVD ONLY)
Press the SUBTITLE button during playback to display
subtitle languages; the subtitle language shown on the
screen will change each time the button is pressed. When
the desired language appears, release the button to view the
subtitle in that language.
Note: This function only works on the DVDs recorded with
multi-language subtitles.
RETURN TO MAIN MENU AND PLAY THE TITLE
During playback, press MENU button to return to the root
menu and press TITLE button to play the title.
PROGRAM PLAY (UP TO 20 MEMORIES)
1. Press PROGRAM during playback to display the program
2.Selectlocation(s) tobememorized viathenavigation buttons
3.Tostart programmedplayback, scroll to STARTon the menu
4. To clear all programmed items, first press the PROGRAM
ZOOM PLAY
Press the ZOOM button continuously to zoom in the picture
by 2, 3, and 4 times. Scroll to view the enlarged picture using
the navigation buttons.
MULTI-ANGLE VIEWING (DVD ONLY)
Press and hold the ANGLE button during playback to select a
desired angle to view the scene.
Note: Only the DVDs shot with multi-angle scenes have this
function.
the lay
show different Search modes
the playback from the located scene starts.
The Search menu will automatically clear if no buttons are
pressed on the remote control or unit.
menu.
and then enter desired Chapter and Title numbers via the
numericbuttons.
Note:
Itis unnecessary to input the leading figure zero
Chapterand Title number
the unit digit key first and then another unit digit. Toprogram
another ten tracks select NEXT button. Up to 20 tracks
canbeprogrammed.
Example:Track3,press"3"
andthenpressthe OK(PLAY/PAUSE) button.
button to enter the program menu, it will highlight STOP on
themenu, press theOK (PLAY/PAUSE) buttononceto
confirm, then EXIT on the menu will be highlighted. Press
OK(PLAY/PAUSE)
numberis morethan the 10,press
, the
Track12,press"1"andthen "2"
Track21,press"2" andthen"1"
()uII
.
()
u
II
()
u
II
()
u
II
againtoexitthe programmenu.
to
.If the
JPEG PLAYBACK
Picture slide shows begin automatically after a CD containing
images is loaded into the DVD Player. JPEG images
contained in the folders are displayed on the LCD screen.
Use the navigation buttons to select the desired folder and
then press OK (PLAY/PAUSE) button to confirm. The
files in this folder are displayed and you can select your
favorite pictures using the up/down navigation buttons and
pressing OK (PLAY/PAUSE) button to start playback.
VIEWING JPEG FILES
1.
PLAY MODES
ress the REPEATbutton to change play mode.
P
During playback, press the STOP ( ) button to show
folders/files in the disc.
2. SKIP TO NEXT/PREVIOUS PICTURE
Press the NEXT ( ) button to skip to the next picture or the
PREVIOUS ( ) button return to the previous picture.
3.
PICTURE ROTATIONS
Press the RIGHT ( ) and LEFT ( ) navigation buttons to
rotate the picture clockwise and counterclockwise,
respectively.
4.
PICTURE FLIPS
Press the UP NAVIGATION ( ) button to flip the picture
vertically.
Press the DOWN NAVIGATION ( ) button to flip the picture
horizontally.
5.
PICTURE ZOOM IN/OUT
Press the ZOOM button continuously, the picture zooms in
and out. If the picture is enlarged, you may use the
navigation buttons to view blocked parts of the picture.
SCREEN ON/OFF
During playback, press the SCREEN ON/OFF button to turn
the LCD display on or off.
COLOR AND BRIGHTNESS ADJUSTMENT (FOR
THE LCD SCREEN)
Press SCREEN ON/OFF button on the remote control to
adjust the color intensity and brightness respectively via
navigation left/right button.
Press and hold this button for a moment to turn the LCD
display on or off.
EXTERNAL MEMORY MEDIA OPERATION (USB &
SD/MMC CARD)
To prepare the player for External Memory media operation:
1. Slide the POWER switch to the ON position.
2. Plug a USB device containing audio/video files into the
USB port or insert the SD/MMC card with the label side
facing up into the card slot. The USB or the SD/MMC card
will be detected and read after a few seconds. At the same
time, the LCD screen will show all its folders.
3. Press the NEXT ( ) or PREVIOUS ( ) button to skip
ahead or backwards. Press the REPEAT button to change
the play mode.
Note: Press and hold the STOP ( ) button to change
between DVD, CARD, and USB input.
CAUTION: To avoid electronic static discharge, don't touch
the USB port and card slot during playback.
:
9
ut
:9
()
u
II
()
u
II
<
p
q
<
6
Page 9

INITIAL SETTINGS
Initial settings allow you to personalize the DVD Player
settings to your preference. Once the initial settings are set,
they are retained in the DVD Player until modified.
ADJUSTING INITIAL SETTINGS
1. Press the SETUP button.
2. Use the navigation buttons to select the item you want to
modify
. Use the navigation buttons to perform changes.
Press OK (PLAY/PAUSE) button to confirm
3. the ( )
modifications.
4. Use the navigation buttons to switch to another setting on
the main setting page.
5. Press the SETUP button to exit main setting page.
1. GENERAL SETUP
General Setup Page
TV Display
LCD Mode 16:9
OSD Lang
Screen Saver
Exit Setup
1.1 TV DISPLAY
Wide
ENG
ON
- Used to select the TV output mode.
Options: Normal/Ps
Normal Lb
Wide
1.2 LCD MODE
- Used to select the LCD mode.
Options: 4:3
16:9
1.3 OSD LANGUAGE
- Used to select different On Screen
Display languages.
Options: English
French
Spanish
Italian
1.4 SCREEN SAVER
- When the DVD Player is not in used
for several minutes, a running DVD logo will move across the
LCD screen to protect the LCD screen.
Options: On: Screen saver is enabled.
Off: Screen saver is disabled.
1.5 EXIT SETUP
- Used to exit the setup menu.
2. AUDIO SETUP
Audio Setup Page
Downmix
Exit Setup
2.1 DOWNMIX
Options: Lt/Rt - Left/Right mix mode.
Stereo - Select this option if you don't have a 5.1
channel amplifier.
2.2 EXIT SETUP
- Used to exit the setup menu.
uII
3. VIDEO QUALITY SETUP
VideoSetup Page
Brightness
Contrast
Hue
Saturation
Exit Setup
3.1 BRIGHTNESS
3.2 CONTRAST
3.3 HUE
- Adjusts the hue of the screen.
3.4 SATURATION
00
00
00
00
- Adjusts the brightness of the screen.
- Adjusts the contrast of the screen.
- Adjusts the saturation color level of the
screen.
3.5 EXIT SETUP
- Used to exit the setup menu.
4. SYSTEM SETUP
Preference Page
TVType
Audio
Subtitle
Disc Menu
Parental
Password
Default
Exit Setup
Please follow the steps below to enter the System Page:
First, power on the unit when the disc tray is empty or the
disc door is opened, then press the SETUP button and enter
the System Page by pressing the NAVIGATION buttons. Or
during playback, press the STOP button twice, and then
press the SETUP button to enter the system setup page.
4.1 TV TYPE
Options: PAL, Multi, and NTSC
4.2 AUDIO
- Used to select the preferred audio language.
Options: English, French, German, Spanish, Portuguese,
Italian, Dutch
(DVD only - needs disc software support)
4.3 SUBTITLE
language.
Options: English, French, German, Spanish, Portuguese,
Italian, Dutch, Off
(DVD only - needs disc software support.)
4.4 DISC MENU
language.
Options: English, French, German, Spanish, Portuguese,
Italian, Dutch
(DVD only - needs disc software support.)
4.5 PARENTAL
DVDs that contain rating levels
Options: Kid Safe, G, PG, PG, PG-13, PGR, R, NC-17,
Adult
(DVD only - needs disc software support.)
4.6 PASSWORD -
Option: Change
Procedure to change the password:
1. Enter the old password in the Old Password row.
2. Enter the new password in the New Password row.
3. Enter the new password again in the Confirm Pwd row.
You may reset the password if you forget the old password by
using the default password: 3308
4.7 DEFAULT
settings.
Option: Reset
4.8 EXIT SETUP
NTSC
ENG
ENG
ENG
- Used to select the TV type.
- Used to select preferred the subtitle
- Used to select the preferred disc menu
- Used to select viewing rating levels of
Used to change the password.
- Used to restore all settings to factory
- Used to exit the setup menu.
7
Page 10

DISC HANDLING PRECAUTIONS
Hold the disc by the edge so the surface will not be soiled with fingerprints. Fingerprints, dirt, and scratches can
cause skipping and distortion.
Do not write on the label side with a ball-point pen or other writing utensils.
Do not apply benzine, thinner or other liquids that will damage the disc.
Be careful not to drop or bend the disc.
Install only one disc in the disc tray.
Do not try to close the disc tray when the disc is not installed properly.
Be sure to store the disc in its case when not in use.
WIRED HEADPHONES
Tolisten to the DVD audio output using the headphones, plug the headphone plug into the headphone jack. When the
headphones are plugged into the jack, the speakers are disabled.
CAUTION
Be sure to set the headphone volume to its lowest setting before plugging the headphones into the headphone jack to
avoid volume levels that could cause damage to hearing.
TROUBLESHOOTING
If your DVD player does not seem to be functioning properly, check the items below before you contact Audiovox T ech Support.
Symptom Check
Power does not turn on or
suddenly turns off.
No picture or sound
No picture
No sound
No picture and sound
Distorted video or sound
Make sure the AC adapter is securely plugged into anAC outlet.
Turn the power off and then back on.
Battery may require charging if connected to a TV.
Check that the A/V cables are securely connected.
Check that the disc is a DVD, DVD-RW or AUDIO CD.
Do not use a disc that has scratches or dirt.
Check that the label-side of the disc is facing up.
The pick-up lens of the DVD player may be dirty. Contact the service center for lens cleaning.
Check that the TV channel is set to VIDEO or AV if viewing with a TV.
Check that the LCD display is turned on.
Check that the display panel is open. If it is closed, audio will not be output to the speakers.
Check the volume setting. If set to zero, turn up volume level.
Check that the headphones are plugged into the PHONES socket.
Speakers cannot be used with the headphones.
Check that the AC Adapter is properly connected.
Use a disc without scratches or dents.
8
Page 11

Page 12

For Customer Service
VisitOurWebsiteAt
WWW.audiovox.com
Product Information, Photos,
FAQ’s Owner ’s Manuals
2010 Audiovox Electronics Corporation
128-8876
 Loading...