

Audiovox D7021 Owner's Manual
WID
For Sales Information Please Contact
RoadTrucker Inc
(www.RoadTrucker.com)
8312 Sidbury Rd.
Wilmington, NC 28411
(800) 507-0482 / (910) 686-4281
SCREEN
D7021
Portable DVD Player
Owner’s Manual
E

W ARNINGS AND CAUTIONS
For Sales Information Please Contact
RoadTrucker Inc
(www.RoadTrucker.com)
8312 Sidbury Rd.
Wilmington, NC 28411
(800) 507-0482 / (910) 686-4281
Notice
This Product incorporates copyright protection technology that is protected by method claims
of certain U.S. Patents and other intellectual property rights owned by Macrovision Corporation
and other rights owners. Use of this copyright protection technology must be authorized by
Macrovision Corporation, and is intended for home and other limited viewing uses only unless
otherwise authorized by Macrovision Corporation. Reverse engineering or disassembly is
prohibited.
Notice
An LCD panel and/or video monitor may be installed in a motor vehicle and visible to the driver
if the LCD panel or video monitor is used for vehicle information, system control, rear or side
observation or navigation. If the LCD panel or video monitor is used for television reception, video
or DVD play, the LCD panel or video monitor must be installed so that these features will only
function when the vehicle is in “park” or when the vehicle’s parking brake is applied.
An LCD panel or video monitor used for television reception, video or DVD play that operates
when the vehicle is in gear or when the parking brake is not applied must be installed to the rear
of the driver’s seat where it will not be visible, directly or indirectly, to the operator of the motor
vehicle.
Licensed under one or more of the following patents:
Patent Numbers: 5,583,936; 6,381,747; 6,516,132; 6,836,549; and 7,050,698.
2

W ARNINGS AND CAUTIONS
For Sales Information Please Contact
RoadTrucker Inc
(www.RoadTrucker.com)
8312 Sidbury Rd.
Wilmington, NC 28411
(800) 507-0482 / (910) 686-4281
Placement
• To prevent fi re or electric shock, do not expose this appliance to rain or moisture.
• Do not place the set on an unstable cart, stand, tripod, bracket or table to prevent it from falling.
• Keep the unit away from strong magnets, heat sources, direct sunlight, or excessive dust.
• If the unit is brought directly from a cold to a warm location, moisture may condense inside the
unit.
• When you move it from a cold to a warm location, wait for about one hour before operating the
unit, or remove the disc and leave the unit turned on until the moisture evaporates.
Installation
• Ensure that the unit is installed and used in accordance with the instructions and illustrations
provided in this manual.
Objects and Liquids
• Do not push objects of any kind into the unit through openings.
• Do not spill, splash or spray liquid of any kind on or in the system (this may result in a fi re or
electric shock).
• Do not place anything heavy on the unit.
• Do not place any open fl ame sources, such as lighted candles, on the unit.
Ventilation
• To ensure proper ventilation and proper operation, never cover or block the slots and openings
with a cloth or other material.
Disassembly
• Do not attempt to disassemble the case or replace the battery. There is a risk of electric shock
and/or exposure to Laser Radiation. Contact qualifi ed service personnel if your system is in
need of repair.
Cleaning the Unit
• When cleaning, make sure the system is unplugged from the power source.
• Do not use liquid cleaners or aerosol cleaners.
• Use a cloth lightly dampened with water for cleaning the exterior of the DVD Player system
only.
3

W ARNINGS AND CAUTIONS
For Sales Information Please Contact
RoadTrucker Inc
(www.RoadTrucker.com)
8312 Sidbury Rd.
Wilmington, NC 28411
(800) 507-0482 / (910) 686-4281
Headphones
• Excessive sound pressure from headphones can cause hearing loss.
• Connect earphones or headphones to the headphone jack with the volume set low and
increase it if required. When earphones or headphones are connected, no sound will be emitted
from the built-in speaker system.
Disc
• Do not use irregularly shaped discs such as heart or star-shaped discs as they may cause the
unit to malfunction.
• Do not stick paper, tape or glue on the disc.
• Do not expose the disc to direct sunlight or heat sources such as hot air ducts.
• Do not touch the surface of the disc.
• Handle the disc by its edge.
• Clean the disc by wiping the disc from the center out with a cleaning cloth.
• Remove the disc from the unit and store it in its case after playing.
Cleaning and handling the disc.
4

CONTENTS
For Sales Information Please Contact
RoadTrucker Inc
(www.RoadTrucker.com)
8312 Sidbury Rd.
Wilmington, NC 28411
(800) 507-0482 / (910) 686-4281
Warnings and Cautions ....................................................................................................................2
Contents ...........................................................................................................................................5
Introduction .......................................................................................................................................6
Charging the Battery.........................................................................................................................7
Controls and Indicators.....................................................................................................................8
Remote Control Operation..............................................................................................................10
Connecting to a TV .........................................................................................................................14
System Setup .................................................................................................................................15
Playback .........................................................................................................................................24
Specifi cations .................................................................................................................................29
Troubleshooting ..............................................................................................................................28
Owner’s Notes ................................................................................................................................30
5

INTRODUCTION
For Sales Information Please Contact
RoadTrucker Inc
(www.RoadTrucker.com)
8312 Sidbury Rd.
Wilmington, NC 28411
(800) 507-0482 / (910) 686-4281
Thank you for selecting the D7021 Portable DVD Player. The player features include a 7” Screen
(16:9 Aspect Ratio) Liquid Crystal Display (LCD) monitor and a DVD Player.
The player incorporates the latest state-of-the-art electronics and is designed for use in hotels,
offi ces, homes or vehicles. The player is constructed to provide years of reliable, trouble-free
service, is compact so that you can take it with you anywhere, and is designed for quick and easy
set up.
Please read the entire instruction manual supplied with this product prior to operation. The
documentation will assist you in setting up the system properly to obtain the best equipment
performance. Please save this manual for later use.
Features
• 7” LCD Screen
• Two Optional Aspect Ratios 16:9 and 4:3
• Remote Control
• 3.5 mm Headphone Jack
• Audio/Video Output Jack
• Compatible with DVD, VCD, CD, CD-R, DVD-RW, JPEG, Kodak Picture CD, etc.
• Support Playback Control: Play, Pause, Stop, Fast Forward Playback, Fast Reverse
Playback, etc.
• 2 Hour Playback
• Internal Rechargeable Li-Polymer Battery
• Operated with 9-12 VDC Power Supply
Package Contents
1. 1 X Instruction Manual
2. 1 X Remote Control
3. 1 X CR2025 Lithium Battery
4. 1 X AC/DC Power Adapter
5. 1 X Vehicle DC Power Adapter
6

CHARGING THE BATTERY
For Sales Information Please Contact
RoadTrucker Inc
(www.RoadTrucker.com)
8312 Sidbury Rd.
Wilmington, NC 28411
(800) 507-0482 / (910) 686-4281
The DVD player is powered by a lithium-polymer battery. It has no memory effect and thus it can
be recharged at any time regardless of whether it is fully or partially discharged.
The player can be recharged when it is powered on or off. When the power is off, it takes about
3 to 4 hours to fully charge the battery. When the power is on, it takes approximately ten hours to
charge the battery. When fully charged, the battery can be used for about two hours.
While the player is charging, the battery charge indicator will be illuminated red. When the battery
is fully charged, the battery charge indicator will be illuminated green.
To Charge the Battery
The player can be charged using the AC/DC Power Adapter or the Vehicle DC Power Adapter.
By AC/DC Power Adapter:
Connect the AC/DC Power Adapter to the DC IN 9-12V jack on the player, then plug the adapter
into a 120 VAC outlet.
By Vehicle DC Power Adapter:
Plug one end of the Vehicle DC Power Adapter into the DC IN 9-12V jack on the player, then plug
the other end into the vehicle DC accessory socket of a car.
Do not charge the DVD player in the vehicle when the vehicle is not running.
Use and Maintenance of the Rechargeable Battery
1. The working temperature of the rechargeable battery is 32 °F (0 °C) to 95 °F (35 °C).
2. Always unplug the player when it is not being used or charged.
3. If you do not plan to use the battery for an extended period of time (one week or longer), we
recommend that you fully charge the battery. For longer periods of storage, please recharge
the battery at least once every two months to maintain the battery in optimum condition.
4. Once the battery is fully discharged, immediately recharge the battery (regardless of whether
you plan to use the DVD player or not) in order to maximize battery life.
5. Recharge effi ciency will degrade when temperatures drop below 50 °F (10°C) or
exceed 95 °F (35 °C).
6. The battery compartment contains a temperature sensor. If the temperature exceeds 104
°F (40 °C) when charging the unit, the power will turn off automatically and the red charge
indicator on the side of the unit will fl ash. In this case, disconnect the power adapter, wait for
the unit to cool down, then reconnect the power adapter.
7. Heat is produced during charging. This is normal.
8. Do not subject the battery to strong impacts.
9. Keep the battery away from humidity and excessive heat.
10. The battery is not user serviceable. Please contact Audiovox in the event the battery will
not charge.
7

1
For Sales Information Please Contact
RoadTrucker Inc
(www.RoadTrucker.com)
8312 Sidbury Rd.
Wilmington, NC 28411
(800) 507-0482 / (910) 686-4281
17
Front View
2
Top View
16
CONTROLS AND INDICAT ORS
1. SPEAKER OUTPUT
2. 7” LCD DISPLAY SCREEN
3. BATTERY CHARGE INDICATOR
Steadily lit red when the battery is charging.
Steadily lit green when the battery is charged.
4. INFRARED REMOTE CONTROL SENSOR
Point the remote control to the infrared remote
control sensor.
5. ON/OFF INDICATOR
Steadily lit green when the player is on.
6. PLAY/PAUSE BUTTON
Press once to pause playback, then press
again to continue playback.
7. STOP BUTTON
1
5
4
3
10
11
12
13
14
15
Press once to pause a playback, then press
the PLAY/PAUSE button to continue playback.
Press twice to stop playback.
8. MUTE BUTTON
Press to temporarily switch the sound off.
Press again to switch the sound on.
9. MENU BUTTON
Press to return to the root menu when playing
6
a DVD.
7
8
10. SETUP BUTTON
9
Press to enter/exit the Setup Menu.
11. PREVIOUS (
Press to skip to the previous chapter/track
12. VOL+ BUTTON
Press to increase the volume.
13. NEXT ( ) BUTTON
Press to skip to the next chapter/track.
14. OK BUTTON
Press to confi rm and execute a selection.
15. VOL- BUTTON
Press to decrease the volume.
16. DISC TRAY COVER
17. OPEN BUTTON
Press to open the disc tray cover.
) BUTTON
8

CONTROLS AND INDICAT ORS
For Sales Information Please Contact
RoadTrucker Inc
(www.RoadTrucker.com)
8312 Sidbury Rd.
Wilmington, NC 28411
(800) 507-0482 / (910) 686-4281
Side View
1
18. 3.5mm HEADPHONE JACK
Note: When headphones are connected, no
sound will be emitted from the speakers.
19. AV OUT JACK
Connect the AV Cable to the AV OUT jack
on the main unit and to the AV IN jack on the
4
2
3
external unit.
20. ON/OFF SWITCH
Slide the switch to ON position to turn on the
unit. Slide the switch to OFF position to switch
off the unit.
21. DC IN 9-12V JACK
9
REMOTE CONTROL OPERATION
For Sales Information Please Contact
RoadTrucker Inc
(www.RoadTrucker.com)
8312 Sidbury Rd.
Wilmington, NC 28411
(800) 507-0482 / (910) 686-4281
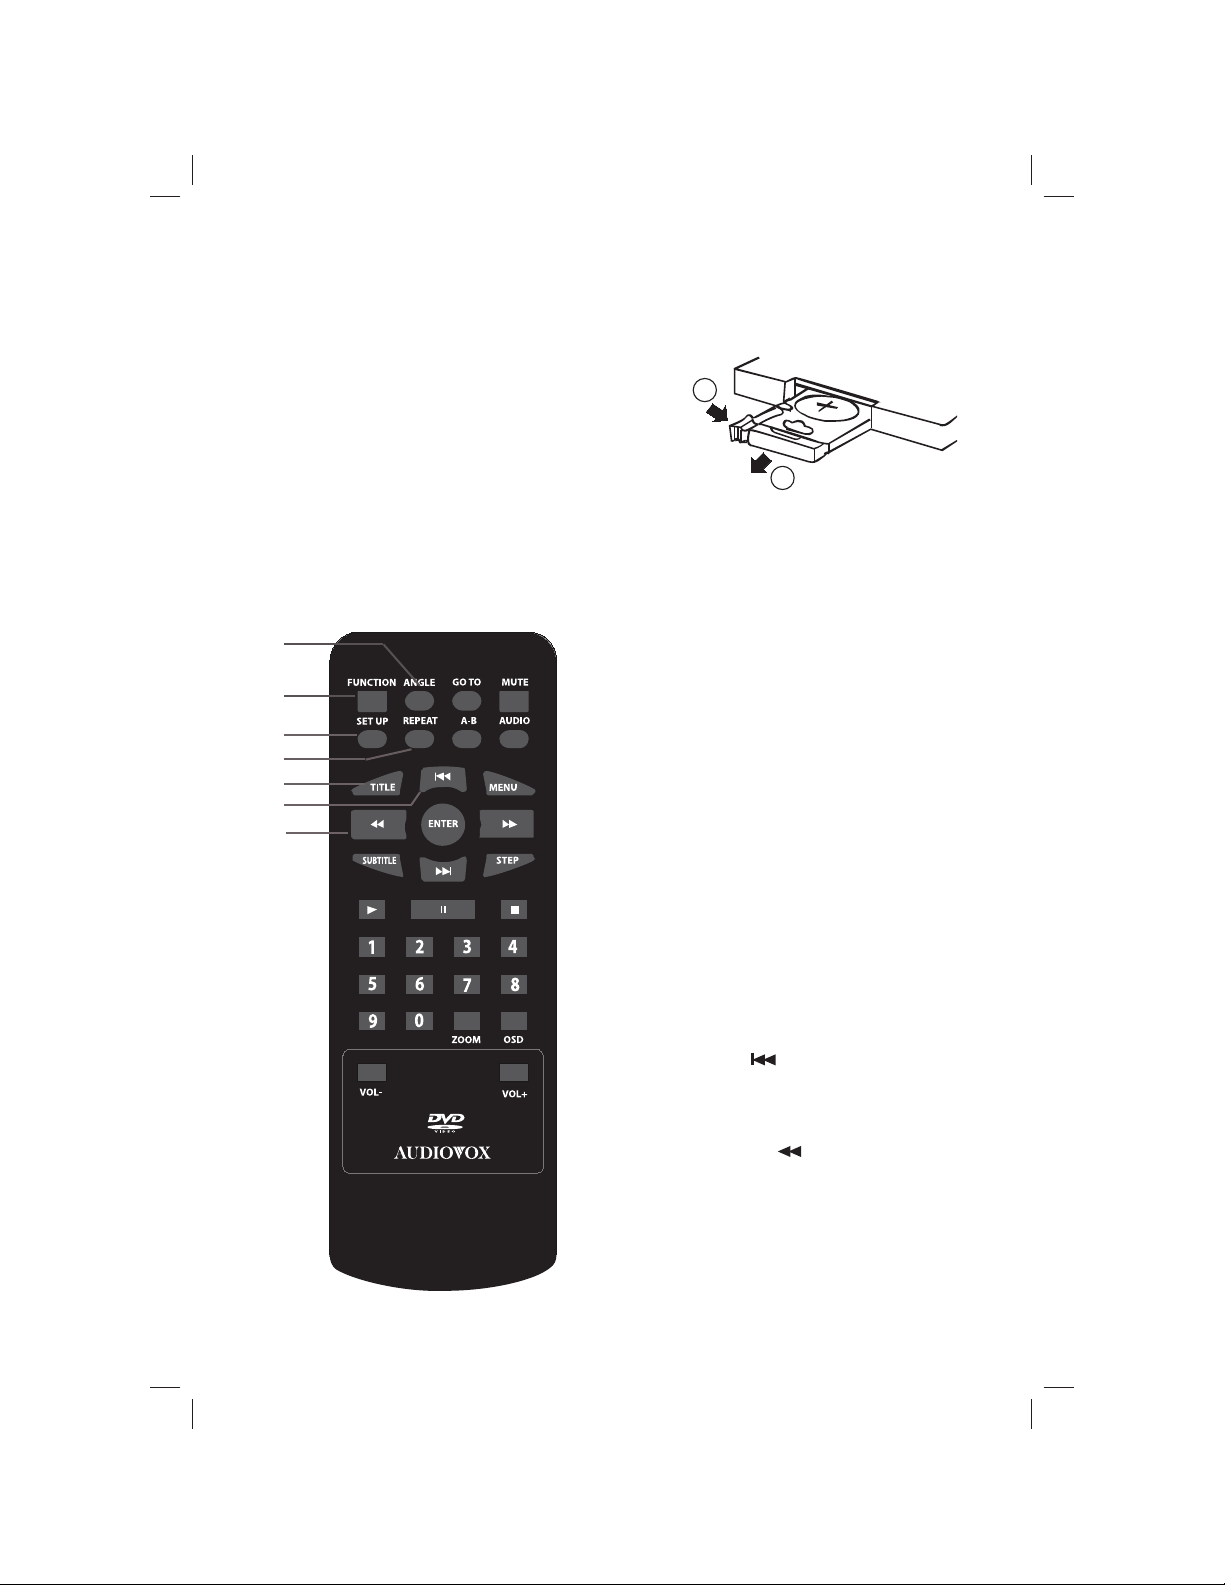
Battery Installation/Replacement
Remove the battery compartment cover according to the diagram below.
1. Press the ridged area to the left.
2. At the same time, pull the battery tray out.
3. Remove the old CR2025 battery. Replace it with
a new CR2025 lithium battery on the tray with the
positive side facing upward.
4. Replace the cover.
Note: Do not expose the battery to excessive heat.
1
Remote Control Functions
2
1
2
3
4
5
6
7
1. ANGLE
Press to switch the viewing angles.
Note: This function only works with discs
encoded with multiple camera
angles.
2. FUNCTION
Press to switch between the 16:9 and 4:3
aspect ratios.
3. SETUP
Press to enter/exit the Setup Menu.
4. REPEAT
Press to switch the repeat modes.
Note: For VCD 2.0 discs, this function is
invalid when the PBC function is
activated.
5. TITLE
Press to return to the title menu of a
DVD disc.
6. PREVIOUS ( )/UP
Press to skip to the previous chapter/track.
Press to navigate in the up direction when
a menu is displayed on the screen.
7. FAST REWIND ( )/LEFT
Press repeatedly for fast reverse playback.
The available speeds are 2X, 4X, 8X, 16X,
and 32X.
Press to navigate in the left direction when
a menu is displayed on the screen.
10
 Loading...