

Page 1

Owner’s
Operating
Instructions
ft>/1UD10r0X-
Ce//u/ar telephones
150 Marcus Blvd. Hauppauge, NY 11788
PRINTED IN JAPAN 5-89
CTX5000
CELLULAR
TELEPHONE
Page 2

TABLE OF CONTENTS
SYSTEM CONFIGURATION......................................6
HANDHELD PORTABLE USAGE
TO ATTACH / DETACH BATTERY PACK
PRECAUTIONS..........................................................10
GENERAL SPECIFICATIONS
FEATURES AND OPTIONS......................................11
BASIC OPERATION..................................................15
Turning the Unit on
To Store a Number in Memory
To Recall a Number from Memory
If You Want to Review the Prefix
Last Number Review
Display Own Telephone Number
Repertory Memory Scroll
Automatic Storing into the Vacant Memory Address
To Lock the Unit
Automatic LockfNAM Option)
To Unlock the Unit
Backlighting Control
Volume Control
MEMORY NAME TAG............................................. 18
To Enter Names using Alpha
To Store Name with Phone Number
To Recall from Memory with Name
ALPHA SEARCH
PLACING TELEPHONE CALLS
To Place a Call
If the Call Fails to Go Through
Automatic Redial (NAM Option)
Terminating a Call (Hanging Up)
To Receive Calls
To Place a Call with a Number in the Memory
To Mute Phone Conversation
Call in Progress Protection
CALL RESTR1CTI0N(NAM OPTION).....................23
To Set Mode of Call Restriction
To Exit Call Restriction Programming Mode
HANDS-FREE OPERATION(NAM OPTION)
END TO END SIGNALING ..................................... 24
Touch Tone™ from Memory
Link Dialing
Continuous DTMF from Keypad
SCRATCH PAD DIALING
SCRATCH PAD DIALING
WITHOUT KEYING TONES
.......................................................
............................
.............
..................................
..............................
..........
........................................
...............................
20
21
26
26
7
8
10
23
CALL TIME DISPLAY
To Display the Talk Time of the Last Call
To Display the Cumulative Talk Time
To Display the Number of Calls
To Clear the Timer
One Minute Beep(NAM Option)
A/B SYSTEM SELECTION
SYSTEM INHIBIT(NAM OPTION)..........................28
RADIO FREQUENCY(RF)
CHANNEL INDICATOR.....................................28
CALL IN ABSENCE INDICATOR
SAFETY TIMERiNAM OPTION)
CHARGING THE BATTERY IN ABSENCE
FUNCTION REVIEW
IMPORTANT SAFETY INFORMATION
WARNING ................................................................ 32
Touch Tone ' is a registered trade mark of AT&T.
............................................
.......................................
...........................
............................
............
................................................
................
26
27
29
30
31
31
30
Page 3

AUDIOVOX
CELLULAR CAR
TELEPHONE
A NEW GENERATION
AUDIOVOX introduces “Triple Play the latest
Cellular Car Telephone in the CTX Series. We call
the CTX5000 “Triple Play™” because of its
incredible three way versatility. You’ll call it
amazing. It’s a Car Phone and a Handheld Portable
Phone. Add the optional Transportable Pack 3WB50
and it’s a 3 watt Transportable Phone.
The CTX5000 has all of the full function features
one could ever want in a Cellular Telephone.
With the same high performance and reliability that
all AUDIOVOX’s Cellular Car Telephones are
renowned for. Wherever your travels’ take you, you
can take “Triple Play^^” along. “Triple Play™” can
be used as a Handheld Portable Cellular Telephone.
The entire Cellular electronics and Transceiver are
built right into the trimmed down Handset, allowing
“Triple Play ™” to be used in just about any
location, “Triple Play ™” has its own built-in
battery system that gives you eight hours of
standby time and approximately one hour of “Talk”
time, making it ideal for use at home, in the office,
dining out, in a taxi, walking down the street
vertually anywhere you are! “Triple Play^'^*’”s
compact, lightweight designs lets you slip it in a
Briefcase or Pocketbook, ready to make or receive
calls on the go.
On the road, “Triple Play™” is installed in a Car
or RV with any standard TNC Vehicle Antenna,
making it a complete 3 watt Cellular Car Telephone,
drawing its power from the vehicle’s own electrical
system. The Booster also features a built-in battery
recharge system that automatically recharges the
Handheld Portable’s battery once it is placed in the
Booster.
The additional accessory Elooster, CRX50, for another
Car or boat is also available as an option, allowing
“Triple Play™” to be used in multiple locations.
All utilizing the same convenient phone number.
“Triple Play^'''’” also gives you the option of using
small, rechargeable Battery Pack BTR40 (smaller
than half a pack of cigarettes) to extend the life of
the phone's portable time.
For additional convenience, the Handheld Portable
Battery and a spare Battery Pack can be charged on
your optional Desk Top Charger DTC30.
AUDIOVOX loaded “Triple Play^”^” with
full-function features including : Duplex Hands-free
Operation, Pre-set and On-Hook Dialing,
Last-Number Redial, Easy-to-Read high tech
Graphics on the Keypad and an enlarged Liquid
Crystal Display. The Call-in-Absence feature
indicates that you missed a call or there is a
message in the Call Box.
Should this feature be accidentally left on for an
extended period of time, the Safety Timer
automatically shuts the phone off.
Page 4
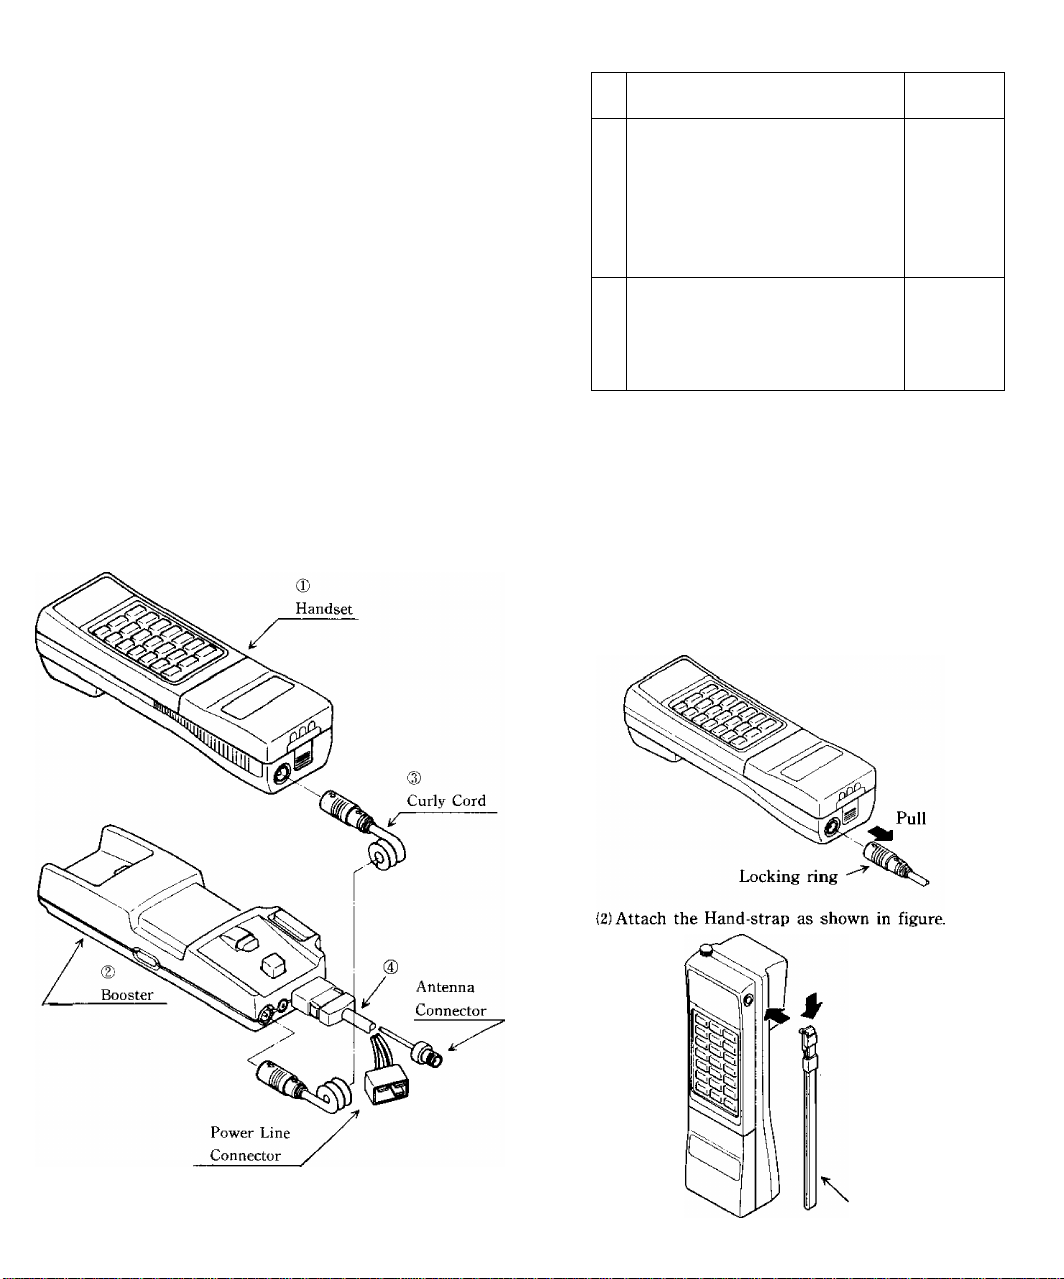
SYSTEM CONFIGURATION
CTX5000 Cellular Car Telephone is composed of
two parts, one is CTX4500 Handset and the other is
CRX50 Booster
The Handset can be used alone as a Handheld
Portable Cellular Telephone, and further can
become a full output Car Telephone by simply
connecting it to CRX50 by the specially designed
Curly Cord.
CRX50 is a cradle type booster which amplifies the
Handset RF output power up to 3 watts for the
normal Car Telephone requirement.
These Operating Instructions describe the feature
and how to use CTX5000 Cellular Car Telephone.
{System configuration and the equipment list are
shown in Figure 1. and Table 1. respectively.)
Table 1, List of Equipment
No. Name of the Equipment
1 CTX4500 Handset
1-1 Handheld Portable Unit with
Battery Pack (BTR40)
1-2 Battery Charger (Desk Top,
DTC30)
1-3 AC Adaptor (AC120V-DC12V) -do-
2 CRX50 Booster
2-1 Booster Unit
2-2 Curly Cord
2-3
Antenna and Power Cables
Remarks
0)
Page 9
HANDHELD PORTABLE
USAGE
When you use the CTX4500 Handset as a Stand ~
alone Handheld Portable Cellular, follow these
procedures:
(UUplug the Curly Cord from the Handset by sliding
the Locking Ring away from unit to release the
connector.
Figure 1. System Configuration
6
Hand-strap
Page 5
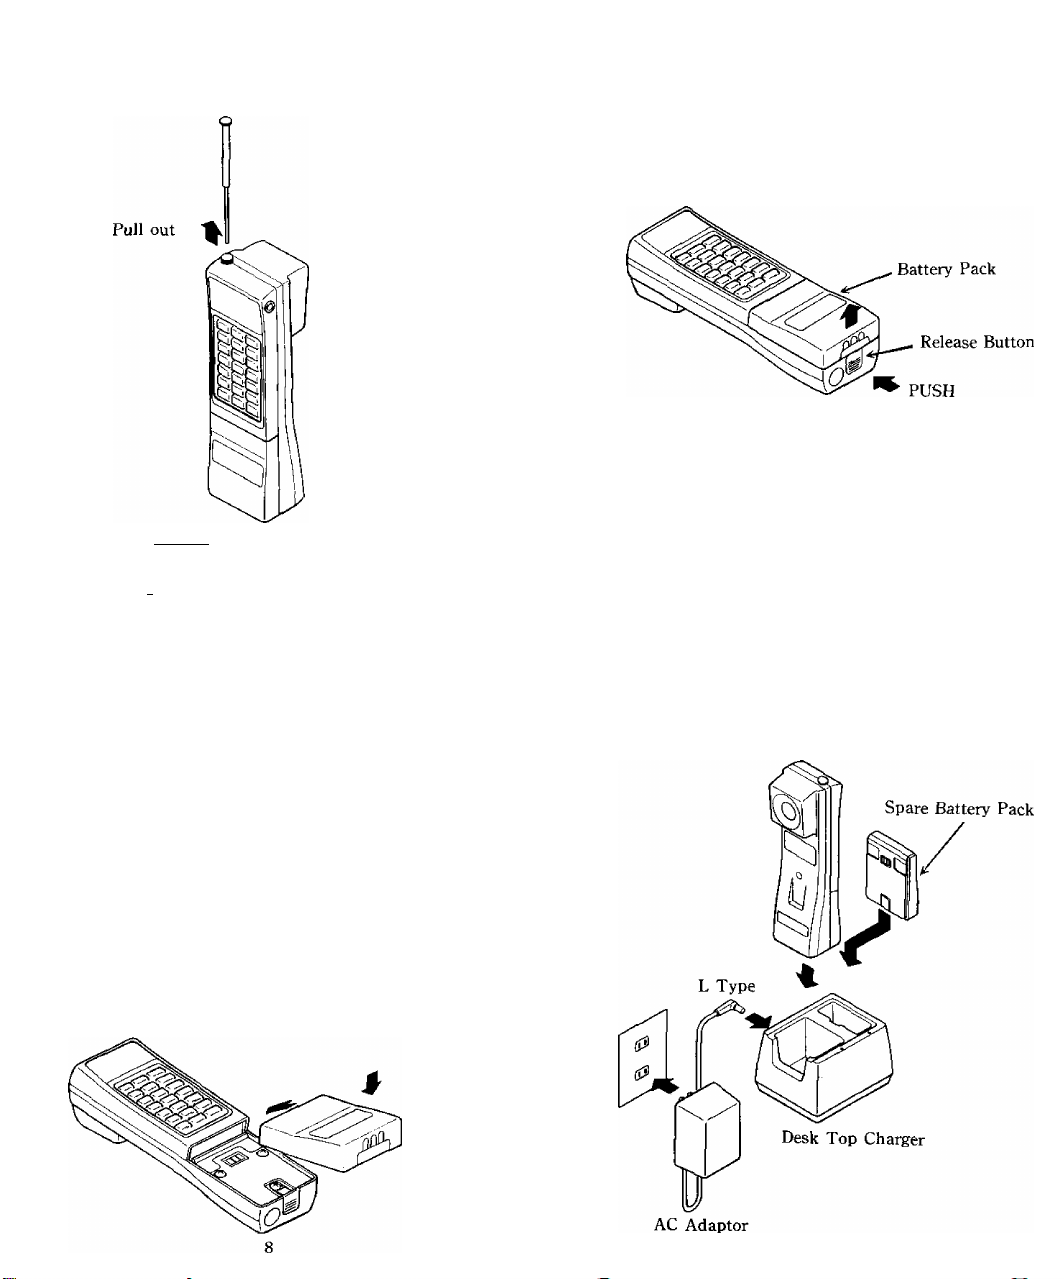
(3) Pull out the Retractable Whip Antenna to its full
length, (Antenna should be restored after using.)
To detach Battery Pack
(DPush Release Button on the bottom of the unit.
(2} The bottom end of the Battery Pack will come off
from the body.
(3) Remove the Battery Pack from the body.
To recharge Battery Pack and
Handheld Portable Unit
(4) Press the | PWR | key of the Keypad for about one
second to turn the unit on. To turn the unit off,
press the [ key again for about one second.
TO ATTACH / DETACH
BATTERY PACK
CTX4500 containes a Detachable Battery Pack
(BTR40). Fully charged Battery Pack offers
approximately 60 minutes Talk Time or 8 hours
standby.
Carry a fully charged spare Battery Pack for longer
operation.
To attach Battery Pack
(1) Slide the Battery Pack in the unit along the
guide,
(2) Push the lower end of the Battery Pack until it is
locked.
Desk Top Battery Charger (DTC30) can recharge
spare Battery Pack and the Handheld Portable Unit
at the same time. DC Voltage is supplied by the
separate AC Adaptor, and it takes approximately
eight hours for full charge.
LED(Light Emitting Diode) indicates the charging
conditions. (Lights Green when DC Voltage is
supplied and changes to Red while Battery or the
Unit is being recharged, upon completion returns
to Green again.)
Page 6

PRECAUTIONS
Your Handheld Portable Telephone is a high quality
piece of equipment you should take the following
operation precaution:
1. Don’t use this equipment in an extreme
environment where high temperature or high
humidity exist.
2. Don’t abuse the equipment. Avoid striking, shaking
or shocking. When not using the unit, lay down the
unit to avoid possible damage due to instability.
3. Don’t expose this equipment to rain or spilled
beverages.
4. Charge the battery fully before your first use of the
unit.
5. When the battery becomes discharged, two beep
tones will be heard every 10 seconds, and the
display will show [Discharged! - Replace the
discharged battery with a fully charged one, and
recharge the discharged battery.
6. To ensure long battery life, don’t discharge
completely. Remove Battery Pack from the unit
when it is not expected to be used for a long period.
Recharging at least once every month is
recommended.
GENERAL
SPECIFICATIONS
(subject to change without notice)
Frequency Range
Number of RF Channels
Channel Spacing
Duplex Spacing
Frequency Stability
RF Output Power
Receiver Sensitivity
Modulation / Demodulation
Conducted Spurious
: 824 to 849MHz, Transmit
869 to 894MHz, Receive
: 832, Full Duplex
: 30KHz
: 45MHz
: ± 2.5PPM
:0.6W ERP With Power
Control
(Handheld Unit only)
3W With Power Control
{With Booster Unit)
: - 116dBm (12dB SINAD)
; Voice PM(With Compander)
Data FM
: Max. — 60dBc
10
Operating Temperature :
Telephone Use : - 30 °C to + 60 °C
(Without Battery)
- 20 ° C to + 60 ° C
(Handheld Unit)
Battery Charge
Supply Voltage
Current Drain
Operating Time
(Handheld)
Weight
: 0 ° C to + 45 ' C
: 7.2V
(Handheld, NiCd Battery
1.2V X 6, 600mAH)
13.7V ± 20%
(Booster, Negative Ground)
: In Use
Approx. 600mA
(Handheld)
Approx. 2A
(With Booster)
Standby
Approx. 60mA
(Handheld)
Approx. 0.3A
(With Booster)
; Talk Approx. 60min. or
Standby Approx. 8 Hours
Size
: Handheld Unit
Approx.
27(H) X 56(W) X 200(D)mm
1.1(H) X 2.2(W) X 7.9(D)inch
With Booster
Approx.
78(H) X 60(W) X 200(D)mm
311(H) X 2.4(W) X 7.9(D)inch
: Handheld Unit
Approx. 500gr(17.7oz)
With Booster Unit
Approx. 1kg (2.21b)
FEATURES AND OPTIONS
• Push Button Dialing
• Backlit Keypad and Display with ON / OFF
Control
• Large Size Dot-matrix LCD Display
Status / Function Indicator
15 Digit Dial Number
Received Signal Strength Indicator
• (Electronic) Volume Control
• Pre-set Dialing up to 16 Digits (32 Digits: NAM
OPTION)
• Extended Readability (Prefix Review)
• Last Digit Clear
• Digit Display Clear
11
Page 7

• On-Hook Dialing
• Repertory Dialing: 16/80 Digit 99 Memories
• Repertory Memory Scroll
• Automatic Storing into the Vacant Memory
Address
• Memory Name Tag
• Alpha Search
• Link Dialing
• Last Number Redial
• Automatic RediaUNAM OPTION)
• Last Number Review
• Mute or Hold Button
• Scratch-pad Dialing (with / without Keying Tone)
• End to End Signaling
• Touch Tone™ from Memory
• Continuous DTMF from Keypad
Call in Progress Protection
• Cali Restriction (NAM OPTION)
• Call Time Display (Five Functions)
* • Hands-free Operation (NAM OPTION)
• Call in Absence Indicator
Safety Timer (NAM OPTION)
• Display Own Telephone Number
• Multiple A / B System Selection
• System Inhibit(NAM OPTION)
• RF Channel Indicator
• Electronic Lock
• Automatic Lock (NAM OPTION)
• Function Review
Notes 1. * - Only when Handset is using the
Booster.
12
Page 8

U)
I
IN USE]indicator lights when a call is in
progress.
I NO SVC] (no service) indicator lights when the
unit is in a non-coverage area.
(3) I ROAM I indicator lights when the unit is out of
the home area.
('D [LOC^ indicator lights when the unit is locked.
(5) SIGNAL STRENGTH INDICATOR: The number
of shaded blocks indicates the Received Signal
Strength, iri is also used as a POWER ON
indicator which lights when the unit is turned on.
(6) 15 CHARACTER FUNCTIONAL
ALPHA-NUMERIC DISPLAY:
First 5 characters usually indicate current function
and status conditions.
The remaining 10 characters usually show the last
10 digits of the dialed number.
(7) I PWRI key is used to turn on / off the unit, only
when the unit is used as a Handheld Portable.
I MUTE I key mutes the transmit audio and, in case
of CTX5000, changes the receive audio from the
handset to the speaker — also functions as a Hold
key.
(9) I VOL] key is used to control Loudspeaker and
Earpiece audio level as well as that of the Alert
Tone electrically.
(10) DIGIT KEYS to enter a telephone number.
(11) I SND I (send) key for originating or receiving a
call.
I RCL I (recall) key recall telephone numbers from
memory,
{13} I END I key terminates a call.
(Ill i STO l(store) key stores number on the repertory
dialing list in memory.
(15) i FUNCI (function) key shifts the digit keys to
the functional key.
i) [CLR I (clear) key clears the digit(s) from the
memory.
T Built-in Loudspeaker of the Booster Unit
POWER switch of the Booster Unit is used to
turn on / off the Car Telephone.
3)Mic Jack for the Hands - free Microphone
BASIC OPERATION
Turning the Unit On
With the ignition key at “ON” or “ACCESSORY”, press
the I POWEFTI switch. The indicator will light (all
indicators will light momentarily and will show your
telephone number, and a tone will be heard).
# Signal Strength Indicator
This enables you to know the Signal Strength in
your area. The number of shaded blocks
indicates it with four blocks the maximum level.
The display will vary as your car moves. If the
signal is not strong enough to originate a call,
I NO SVCJI sign will appear on the readout.
To Store a Number in Memory
L Press I CLR |, then enter telephone number.
2. Press i STO I, then enter the memory address (01
through 99)
Example:
Press [ STO I, key [T|then [^, the displayed
number is stored into memory address 15.
Note: A Number of more than 16 digits can be
stored only into memory address 91
through 99.
To Recall a Number from Memory
Press [ RCL I, then enter the memory address (01
through 99),
Example:
Press [RCE \, key [Hthen [^ , the number
stored in memory address 15 will be
displayed.
If You Want to Review the Prefix
(Number longer than 10 digits)
After pressing | RCL [, hold down the second digit of
the memory address.
Note: When a set of linked numbers is recalled,
you can review only the last linked number
by this feature.
To review Link 1 to Link 5, use | FUNC I,
r^Qthen [X](X is 1 to 5.)
14
15
Page 9

Last Number Review
Press I RCL I, key [^then fo] again, the last number
in the display returns.
Display Own Telephone Number
From
0:
S:
0:
01 to 10
From 11 to 20
From 21 to 30
You can see your own telephone number on the
readout. Press | RCL I, key then again.
Repertory Memory Scroll
This feature will be useful in finding a certain
telephone number by scrolling the repertory memory
from one of the designated starting addresses.
1. Press i RCL I, key then [#]
[~X] is the digit to assign the starting address as
follows.
X
0 01
1
2 21
8
9
2. Press [#] or Q
[#]' Scroll upward (with roll back to 01)
Q: Scroll downward (with roll up to 99)
Memory address and the last seven digits of the
stored number will be displa3^ed on the readout
as follows.
Example: ¡3 jl |-| 11 2 j 3 1 4 [ 5 | 6 [ f|
Address No Tel! No" ^
Note: In this scroll feature, any vacant memory
address will be skipped.
Starting address
11
81
91
Automatic Storing into A Vacant Memory Address
From
From
From
81 to 90
91 to 99
01 to 99
0:
ffl:
4. Press [5]
The the memory address and the last seven
digits of the stored telephone number will be
displayed on the readout as follows.
Example: |Y1 r["Tl I2|3l4l5l6|f|
If there is no vacant address in the assigned
area, telephone number will not be stored in the
memory.
To Lock the Unit
Press I FUNCl, then the numeral
The I LOCl^ indicator lights. The unit will remain
locked until unlocked.
|T]
(LOCK).
Automatic Lock(NAM OPTION)
If you request it, your NAM can be changed and
your unit will automatically go into lock condition
when your ignition is turned “off”. When the key is
turned “on”, the unlock code is required to operate
the phone.
To Unlock the Unit
Enter the three digit unlock code. The indicator will
go out when three digits are the same as the
resistered code in NAM.
This feature allows automatic storing into a
vacant repertory memory address. This eliminates the
possibility problem of writing over a previously
stored number.
1. Enter a telephone number.
2. Press [ST^
3, Enter the memory address in which you want to
store a number.
to
Backlighting Control
LCD display and the keypad will be backlit
automatically after the Switch On.
If needed, backlighting can be turned off pressing
I
RCL I, key then .
17
Page 10

Even if'the unit is in the Backlighting-OFF mode,
for the duration of 10 seconds after any key
operation and when a call is received, backlighting
will be turned on again automatically.
To return to the Backlighting-ON mode, press
key
RCL then
i
again.
Volume Control
The audio level of the loudspeaker, earpiece and the
alert tone can be adjusted by the Volume Control
Button [vOL| .
• Loudspeaker; Leave the Handheld in the Booster.
To increase-Keep pressing | VOlTI until you get the
desired sound level.
To decrease-Keep pressing [VOL \ until you get
the desired sound level,
Sound level will be displayed on the readout
digitally during the level adjustment and the sample
tone will indicate the sound level when you are not
engaged in a telephone conversation. Display format
is as follows.
SPKI I j (1 to 10)
• Earpiece: Lift the Handheld Portable Unit or
Handheld only, perform the same procedure as
above.
In this case, the display format is as follows.
H.S [ I i (1 to 9)
• Ring Tone; Press | RCL~|, key j^then
Then adjust the ringing tone level in the same
manner as above. Your telephone will ring at the
new leuels.
In this case, the display format of the readout is
as follows,
ALT PT~j (1 to 5)
MEMORY NAME TAG
This feature permits you to tag an identifying name
(in 5 letters) to each telephone number in the
memory address. The name will be displayed each
time you recall a number from memory address.
To Enter Names using Alpha
1. Press [FUi^. then | VOL]. | Alpha | will appear in
the display to show Alpha Mode is active.
2. Press digit keys repeatedly until the letter you
wish appears. The following table shows which
character is assigned with each digit key.
18
KEY
1
2 (ABC)
3 (DEE)
4 (CHI)
5 QKL)
6 (MNO)
7 (PRS)
8 (TUV)
9 (WXY)
0 0
#
3. When the letter you wish is displayed, press
ASSIGNED ALPHA CHARACTERS
E
K L
Q
u
-
F 3
R
V
1
2
5
6
S
8
(Blank)
A B c
D
G H I 4
J
M N 0
P
T
w X Y Z
I VOL I to move to the next space.
4. Go back to step 2, and repeat the same
procedures until the complete five character
name is displayed.
5. When an entry error is made, press | CLR
momentarily to erase the last character. If you
press [CLR] more than a second, all characters in
the display will be erased,
6. To exit Alpha Mode, press I FUNCI, then I VOL I.
To Store Name with Phone Number
1. Enter the phone number.
2- Press [ FUNCl, then | VOL ] to set Alpha Mode.
3. Enter the name you wish, (Refer to “To Enter
Alpha Letters”)
4. Press I STO j, then enter the memory address (01
through 90), to store the number with the name
into memory.
Note; If you enter the phone number after
entering the name, the name will be erased.
Example; To store the phone number 123 — 4567
with the name JOHN, into memory
address 15.
1. Enter the phone number;
1FUN^ [volI
3, Enter the Name;
1 5 il VOL
1 2 3 4 5 6 7
] 11
VOL 1
a)
!4|t4l|VOL| t6i|6||VOL|
(H)
4. Store the Number; j STOj
19
1
(0)
Page 11

To Recall from Memory with Name
Recalling from the repertory memory is identical to
standard repertory recall. When the number is
recalled, the display will show the Alpha Name Tag
as well as the stored phone number.
PLACING TELEPHONE
CALLS
To Place a Call
ALPHA SEARCH
This feature permits you to find a phone number
stored in the memory by the first character of the
Alpha Name Tag. This search can retrieve all
entries beginning with the assinged initial letter.
1- Press \ FUNG |, then | VOL | to set the Alpha Mode.
2, Enter the initial letter, by which you wish to
search the phone number. Then press | V0L| .
3. Press [R^, then PvOlI
the first entry whose Name Tag begins with the
assigned initial letter, and which is stored in the
lowest memory address. Display shows Name
Tag, Memory Address and Phone Number.
4. Press [ttlor [¥|.
rSj: Scroll memory address upward.
Rl: Scroll memory address downward.
Example;
Operation
I
FUNG
I I
VOL]
C _L
[5] rVOL]
RCL VOL
(T I'P
0 5 ~ 7|6 5
1 5 - 9|8
i
[1
9 9 “ 8|7
0)l - 4|5
[9 9| - 8(7 6
The display will show
Display
A
J
1
J
4|5l
6
J
J
7 6 ^¡5|4 3
J
6 543 2
J
6 7 8 9 0
J
20
1
h
a
P
—
N
0 H
7 8
9 0
AcKt
4 3 2 1 1
mIe
A
I
0
I
5 4 3 2
S
M
H N
M
1. Enter the telephone number with the Handheld
on or off the Booster. The last 15 digits of
the dialed number are displayed on the readout.
Note: After 120 sec., display will return to the 10
digit display mode.
2. If a dialing error is made, press | CLR |, then
enter the telephone number again. Pressing
momentarily (less than approx. 0.5 sec.) clears the
last digit.
3. Press ISNP I. The | IN USE | indicator will light.
You may lift the Handheld from the Booster
before or after called party answers to proceed
with your conversation.
Note; If assigned in NAM, the telephone number
can be pre-set up to 32 digits. However, in
this case, it is necessary to confirm with
system operator whether such service is
available or not.
1
CLR |
If the Call Fails to Go Through
1. If you hear the “reorder” signal, press | END |,
then if there were no dialing errors, press | SND|
for redial.(Digit key re-dialing is not necessary.)
2. If the “intercept” signal is heard, hang up, then
redial the correct number.
Automatic Redial(NAM OPTION)
If selected, your unit will automatically make five
attempts to reach the cell site when the first try is
not successful. The |
but the speaker will be muted for twenty seconds.
This is done so you to do not hear the reorder
signals out of the speaker. If you wish to terminate
the automatic redial, press [iENDI .
IN USE | indicator will stay on,
Termnating a Call (Hanging Up)
Press I END), or replace the Handheld in the
Booster. The
If Hands-free is activated in NAM, you have to
press I END | key to terminate a call.
1
IN USE | indicator will go out.
21
Page 12

To Receive Calls
CALL RESTRICTION
1, When the telephone rings, lift the Handheld to
answer. | IN USE 1 indicator will light.
2. If the Handheld is out of the Booster when
ringing starts, press | SND \ to answer a call.
To Place a Call with a Number in the Memory
1. Press fRCL \, then enter the memory address (01
through 99). The last ten digits of the number
will appear on the readout. If the number is
longer than 10 digits, hold down the second digit
of the memory address (after pressing [ RCL|) to
see the prefix.
Note: See Recall a Number from Memory and
Want to Review the Prefix for more details.
2. Press I SND |. The | IN USE ] indicator will light as
a call is placed. You may lift the Handheld from
the Booster either before or after the called party
answers to proceed with your conversation.
To Mute Phone Conversation
1- Press I MUTE]. The | Mute | will appear on the
readout. The transmit audio will be muted
and the receive audio will be heard from the
loudspeaker. You may converse privately with a
passenger during a call with the handset either
“on-hook” or “off-hook”.
2, To return to normal conversation;
When not in the Hands-free Mode.
if “off-hook”, press the | MUTE | key.
if “on-hook”, lift the Handheld from the
Booster.
When in the Hands-free Mode,
Press the
from the Booster,
3. Mute is reset when call is terminated.
1
MUTE | key, or lift the Handheld
Call in Progress Protection (when handset is using Booster)
Phone conversation will continue after ignition is
turned off until call is terminated.
22
(NAM OPTION)
This feature permits you to impose various kinds of
restrictions on Outgoing Calls.
To Set Mode of Call Restriction
Enter three digit Securit^Code (assigned by NAM),
then press
The following key operation is needed to activate
one of the restriction modes;
1
FUNC
1
, key [J] then
|T]: Only telephone numbers having 11 digits
or less accepted. Operator assisted
dialing is prohibited.
[2]: Only telephone numbers having 7 digits
or less is accepted. Operator assisted
dialing is prohibited,
|~^; Operator assisted dialing (0 Origination)
is prohibited.
[4~[: No phone calls can be placed except for
repertory dialing from memory address
01 to 09.
; No restriction.
[7]
.
To Exit Call Restriction Programming
Mode
Press I FUNC I, then | CLR 1.
Note: (1) When in mode 4, number storage into the
memory will not be permitted.
(2) In the restriction mode, a short beep tone
will be heard to inform you of the wrong
operation, and the word | RestricteTI will be
shown on the readout.
HANDS-FREE OPERATION
(NAM OPTION)
(when Handset is Using Booster)
This feature permits you to engage in conversation
without lifting the Handheld Portable Unit.
(P After receiving a calUpress | SND | to answer),
conduct the conversation via the hands-free
external microphone and the loudspeaker in the
Booster Unit.
Speak a little louder than you would when using the
handset.
It is preferable to turn-off the radio or stereo and
close the car windows.
23
Page 13

(2) To originate a call, enter the telephone number,
then press | SND |. The microphone will be turned
on, ready for conversation when your party
answers.
After a call is completed. Press | EN^ to
terminate a call.
Note: (1) When this option is activated, as the unit
always operates in Hands-free Mode, you
should press | END | to terminate a call.
(2) Even if this option is installed, you can
of course engage the conversation via
the Handheld, but you have to press
I END I to terminate a call.
(31 When you hear feedback on a bad RF
Channel, adjust the hands-free loop
attenuation as follows.
1) Press I FUNC |, key 0 then .
Hands-free loop attenuation will be
increased by 6 dB,
2) To return to the normal condition,
press I FUNC I, key 0 then [T].
END TO END SIGNALING
This feature permits you to utilize some attractive
ways of using the phone, such as accessing
discounted long distance network, signal pager, or
banking by phone etc..
For these purpose the signalling should be in
DTMF (Touch Tone™). The following two features
will make in more easier to place call in DTMF.
Touch Tone ™ from Memory
DTMF signalling by repertory dialer is available
even while engaged in a telephone conversation.
1- Press I RCL I I RCL |, then enter the repertory
memory address.
The last ten digits of the number will appear on
the readout.
2. Press
I
SND |. Then DTMF signalling will be
placed and the DTMF tone can be monitored
through the loudspeaker.
Note: Continuous DTMF from keypad can be
manually dialed as well to access
answering machines when engaged in a
telephone call.
Link Dialing
This feature permits you to pre-set from repertory
memory or key pad up to five numbers before
originating a call. With this feature, the first
number is sent in digital form to the cell site. Then
up to four other numbers can be sent with DTMF
signalling by simply pressing | SND [ for each
additional number.
Note: (1) Each number to be linked may be recalled
from memory or entered by key pad,
(2) Each number to be linked should be within
16 digits including linking mark “ = ” at
the end.
(3) Linked number can be stored in the
memory. However, numbers of more than 16
digits should be stored into memory
address 91 through 99,
Example: To access the Discounted Long Distance
Call, you should call Long Distance Service Office
first, and enter your ID number, then the telephone
number to be placed.
1. Recall the Telephone Number of the Long
Distance Service Office.
rr I |7|4|6|3|4|7|9|
2. Press I FUNC |, then .
Linking Mark “ = ” will be added after the number
placed before.
rnyj^TiTT]7T^^
3, Recall you ID number.
rrr 16|71H4181^2]
4. Press iFUNCl, then [^.
mU7|l|4j¥[5l2H
5. Recall the telephone number to be called.
fTÍ2|3|4|5|6l7|8ÍTról
6. Press I SND i. The [ IN USE | indicator will light as
the call is placed, | Link 1 [will appear in display.
7. After you received an answer from the Long
Distance Service Office, press | SND | again. The
DTMF signal will be placed and the DTMF tone
of your ID number can be monitored through the
loudspeaker. | Link 2] will appear in display.
8. If your ID number is accepted, the Long Distance
Service Office will answer again, so press | SND |.
Then the long distance call will be placed and
the DTMF tone can be monitored through the
loudspeaker.
24
25
Page 14

I Link 3 [will appear in display.
Note: If a set of linked numbers has been stored
in memory address 91 through 99, press
I RCLI then memory address (91 through 99),
then ! SND I,
[ Link 1 [will appear in display, and the first
linked number will be called.
Following procedures are the same as step 7 and
onward of the example above.
SCRATCH-PAD DIALING
This feature permits you, while engaged in a
conversation, to enter a number to be re-dialed (or
store a number in memory).
SCRATCH PAD DIALING
WITHOUT KEYING TONES
This feature permits you to activate scratch-pad
memory without annoying key tones over the
circuit.
1- Press I FUNC |, | MUTE | then enter a telephone
number. The Microphone circuit will remain
active, but the tones will not be heard.
2. If necessary, press | STO |, then enter the memory
address.
3. To exit the Scratch pad Mode, press | FUNC |,
I MUTeI again.
CALL TIME DISPLAY
This feature automatically records the elapsed time
per conversation.
The talk time of the last call, cumulative talk time,
and the number of calls can be displayed on the
readout.
The timers can also be cleared if necessary.
With beep tones you can be notified of the
approximate talk time (NAM Option).
To Display the Talk Time of the Last Call
1- Press I RCL I, key F^then [TJ.
The talk time of the last call will be displayed
on the readout for 5 seconds.
26
While in a conversation, the talk time of a call in
progress will be displayed, and updated each
second.
The display format is as follows.
11m251---1 min and 25 sec
To Display the Cumulative Talk Time
1. Press I RCL I, key then [2].
The cumulative talk time will be displayed on
the readout in minute format for 5 seconds.
118m I- -18 min
To Display the Number of Calls
1- Press [ RCL I, key then .
The number of calls will be displayed on the
readout for 5 seconds.
The display format is as follows,
I 86c |- ■ ■ Received or placed 86 calls.
To Clear the Timer
1- Press I CLRI, then enter the three digit code
specially assigned.(NAM Option)
2. Press i STO I, key then [T].
The timers will be cleared, and the count for the
cumulative talk time and the number of calls will
start from zero.
One Minute Beep (NAM OPTION)
During conversation, you can be notified of talk
time roughly by tones for the first five
minutes.(every one minute you can hear a short
monotone signal).
A / B SYSTEM SELECTION
This feature permits you to select the system you
wish to use. The system that you are registered
with is the preferred system, and your home system.
1. Standard Mode
When you turn the unit on, the unit remembers
the last position of the A / B selector, and will
start to scan the radio frequency channel of that
selection.
27
Page 15

If you want to confirm the current mode, press
I FUNC I, key then . Status indicator shows
the Current mode. To return the unit to the
standard mode, press [fUNC] key then
again. Status indicator shows STD 1. The unit
will scan the preferred system channels. If unable
to find an acceptable preferred channel, the unit
switches to scan the non-preferred channels.
2. Preferred System Only Mode
Press I RJNCI, key then Q], Status indicator
shows 1PRFI. The unit will scan the preferred
system only and prevents switching over to the
non-preferred system,
3. Non-preferred System Only Mode
Press I FUNC |, key then . Status indicator
shows 1 N-PRF j. The unit will scan the
non-preferred system only,
4. Home Only Mode
Press pFUNC |, key then [2]. Status indicator
shows I Homel. You can place or receive calls
only within your home area.
Note: (1) The [ ROAM | indicator lights as follows.
Lights continuously;
When the unit in the preferred
system in another city.
Flashes; When the unit is in the
non-preferred system.
(2) The 1 NO SVCl indicator flashes when the
mobile unit is requesting service but not
in the requested service area.
SYSTEM INHIBIT
(NAM OPTION)
This feature permits you to select (by NAM Option),
any interfering system, or Roam System you do not
want to use, even when in that service area.
[no SVClindicator flashes, if your A / B switch is
selected to any system that is inhibited.
RADIO FREQUENCY (RF)
L Press [RCL I, key then , The RF channel
number in which your unit is operating will be
displayed on the top line of the readout. RSSI
(decimal format) and SAT frequency will be
displayed on the bottom line. The display format
is as follows;
C12
|R 1 8 7
C123
......
RF channel Number
R187
......
RSSI value
S6030-'-- SAT Frequency
2. When on a call, the display will update when a
handoff occurs.
3. The display will remain in the display until you
manually reset it by pressing any key.
S
3
6 0 3 0
CALL IN ABSENCE
INDICATOR
(when Handset is using Booster)
This feature indicates to you that a call came in while
you were out of your car.
1, Before leaving the car, with the ignition switch on,
press [FUNC I, then. The display shows | Call].
Turn off the ignition switch, but leave the car
tel phone power switch ON. If necessary, lock the
unit.
2, When a call is received, the unit indicates it by
flashing the [CALL | display on the readout.
3. This mode is deactivated:
1) When the ignition switch is again turned to “on”
or “accessory".
2) After 8 hours, or
3) By pressing I FUhTc I, then again.
4. The 1 CALlI indication will remain in the display
until you manually reset it by pressing any key in
the Handheld Portable Unit or by lifting it from the
Booster Unit.
Note: The 8 hour timer can be changed with the
Safety Timer feature.
CHANNEL INDICATOR
If necessary, you can see the RF channel number in
which your unit is operating.
28
29
Page 16

SAFETY TIMER
FUNCTION REVIEW
(NAM OPTION)
(when Handset is Using Booster)
Call in Absence Indicator feature will be disabled at
the preset time by NAM. The programmable time
range is from 1 to 31 hours. {Originally set to 8
hours.)
CHARGING THE BATTERY
IN ABSENCE
With this feature you can charge the battery
equipped with your Handheld Portable Unit, even if
you turn off the ignition switch.
1. Before leaving the car, with the ignition switch
on. Press [FUN^, then [5]. (The display shows
I
Charq |.)
Turn off the ignition switch, but leave the
telephone power switch ON. The display changes
to fChargingl, then your unit works only for
charging the battery.
2. To prevent discharging the car battery, this mode
will be automatically deactivated when the
charging is completed or when the ignition
switch is turned to ON or Accessory position.
3. To deactivate the Charging Mode manually, press
I RJNCI then again.
This feature tells you which numbered keys to use
for different FUNC / RCL key functions.
To review the function menu:
Press [FUNC I for about one second.
Scroll the menu up or down, using the [§
{^key respectively.
The display information will appear as follows.
1-3 ]
4 ]
5 ]
6 ]
FUNCTION
Lock
Call in Absence Indicator
Battery Charge in Absence
A / B System Selection
Hands-free Adjustment
Call Timer
RF Channel Indication
Backlighting Control
Alert Volume Control
DTMF Tone Mute
Alpha Mode
Call Restriction Mode
DISPLAY
[Lock ]
* [Ca M ]
+ [Ch a r g]
[ABs y s ]
>)= [HF 1 [FUNC
[Timer]
[RF CH]
[Light]
[Alert]
[Tone ]
[A 1 P h a ]
[R e s t r J
Note; (1) + = Only when Handset is using
[FUNC
[FUNC
[FUNC
[FUNC
[RCL
[RCL ^
[RCL *
[RCL Y
[FUNC :
[FUNC
[XYZ FUNC#7]
Booster.
(2) XYZ = security code
1 ]
3 1
5 ]
0 0-4]
7 1-2]
MUTE ]
VOL J
IMPORTANT SAFETY
INFORMATION
or
Please read and follow these cautions carefully:
TURN OFF your unit in an explosive atmosphere
(near a fuel pump, blasting area, etc.).
DO NOT operate your unit when someone is within
two feet (0.6 meters) of your antenna when using
Booster.
DO NOT dial when your vehicle is moving in those
states where this action is illegal (this is not a
prudent practice, even where it is legal).
DO NOT permit untrained personnel to operate the
unit.
30
31
Page 17

WARNING
The following offenses can punished by fine,
imprisonment, or both:
• Using obscene, indecent, or profane language.
• Using the unit to give off false distress calls.
• Wiretapping or otherwise intercepting a
telephone call, unless that person has first
obtained the consent of the parties participating
in the call.
• Making anonymous calls to annoy, harass, or
molest other people.
• Charging to an account without authorization to
avoid payment for service.
• Refusing to yield a party line when informed that
it is needed for an emergency call (It is also
unlawful to take over a party line by stating
falsely that it is needed for an emergency).
CAUTION
MEMO
Prolonged use may result in increased temperatures in
the Cradle Booster unit.
32
33
Page 18

MEMO
Special Registration
Feature Kit
MULTIPLE CITY
REGISTRATION
Some cellular users find it beneficial to register their
phone in multiple cities, rather than rely on “roam”.
The multiple city registration feature permits you
to reprogram from the handset, the different phone
numbers for the cities in which you are registered.
Each programmed telephone number will be
designated as your home system.
Press and enter the new system ID number
(5 digits) followed by the corresponding telephone
number (10 digits). You must register your phone
with the carrier in order to get both the ID # and
your phone # .
Press fFDNC 1 then . Your new telephone number
will be displayed on the readout. (Holding down
[dl, to display your new system ID number. )
Note: 1.
System ID number and telephone number
can not be programmed during a call.
Calls are placed or received using only
2.
the programmed telephone number, in
use at the time of call.
FUNCTION REVIEW
(ADDITIONAL)
DISPLAY FUNCTION
[ID ] [ (ID ) FUNC 6 ] Multiple City Registration
34
 Loading...