

Page 1
PROTOCOL
INTERFACE
ADAPTER
and XM
DIRECT
CNP2000UCA
"Compatible
Satellite Ready Car Stereos"
with
Select
2
TUNER
Installation
Guide
Page 2
Table
of
Contents
Table
Introduction &Installation Overview 3
Troubleshooting
of
Contents 2
I
nsta
Ilation
Installation Planning 4
Antenna Installation 4
Cable
Tools
Installation Procedure 6
Completing Activation 8
XM
Satellite
XM
Radio
No
Sou
Advisory
Antenna
Updating
Basics
Routing 5
Required 6
Radio
10
nd 10
Message
.....
t.
•••••••••••••••••••••••••••••••••••••••••••••••••••••••••••••••••••••••••••••••••
Operation 9
10
10
10
10
4
9
Wa
No
Signal
Off
Air
Loading
No
Info
I'CH
__
n••••••••••••••••••••••••••••••••••••••••••••••••••••••••••••••••••••••••••••••••••••••••••••••••••••••
Other Symptoms
rra
nty
10
11
11
11
11
11
12
Page 3
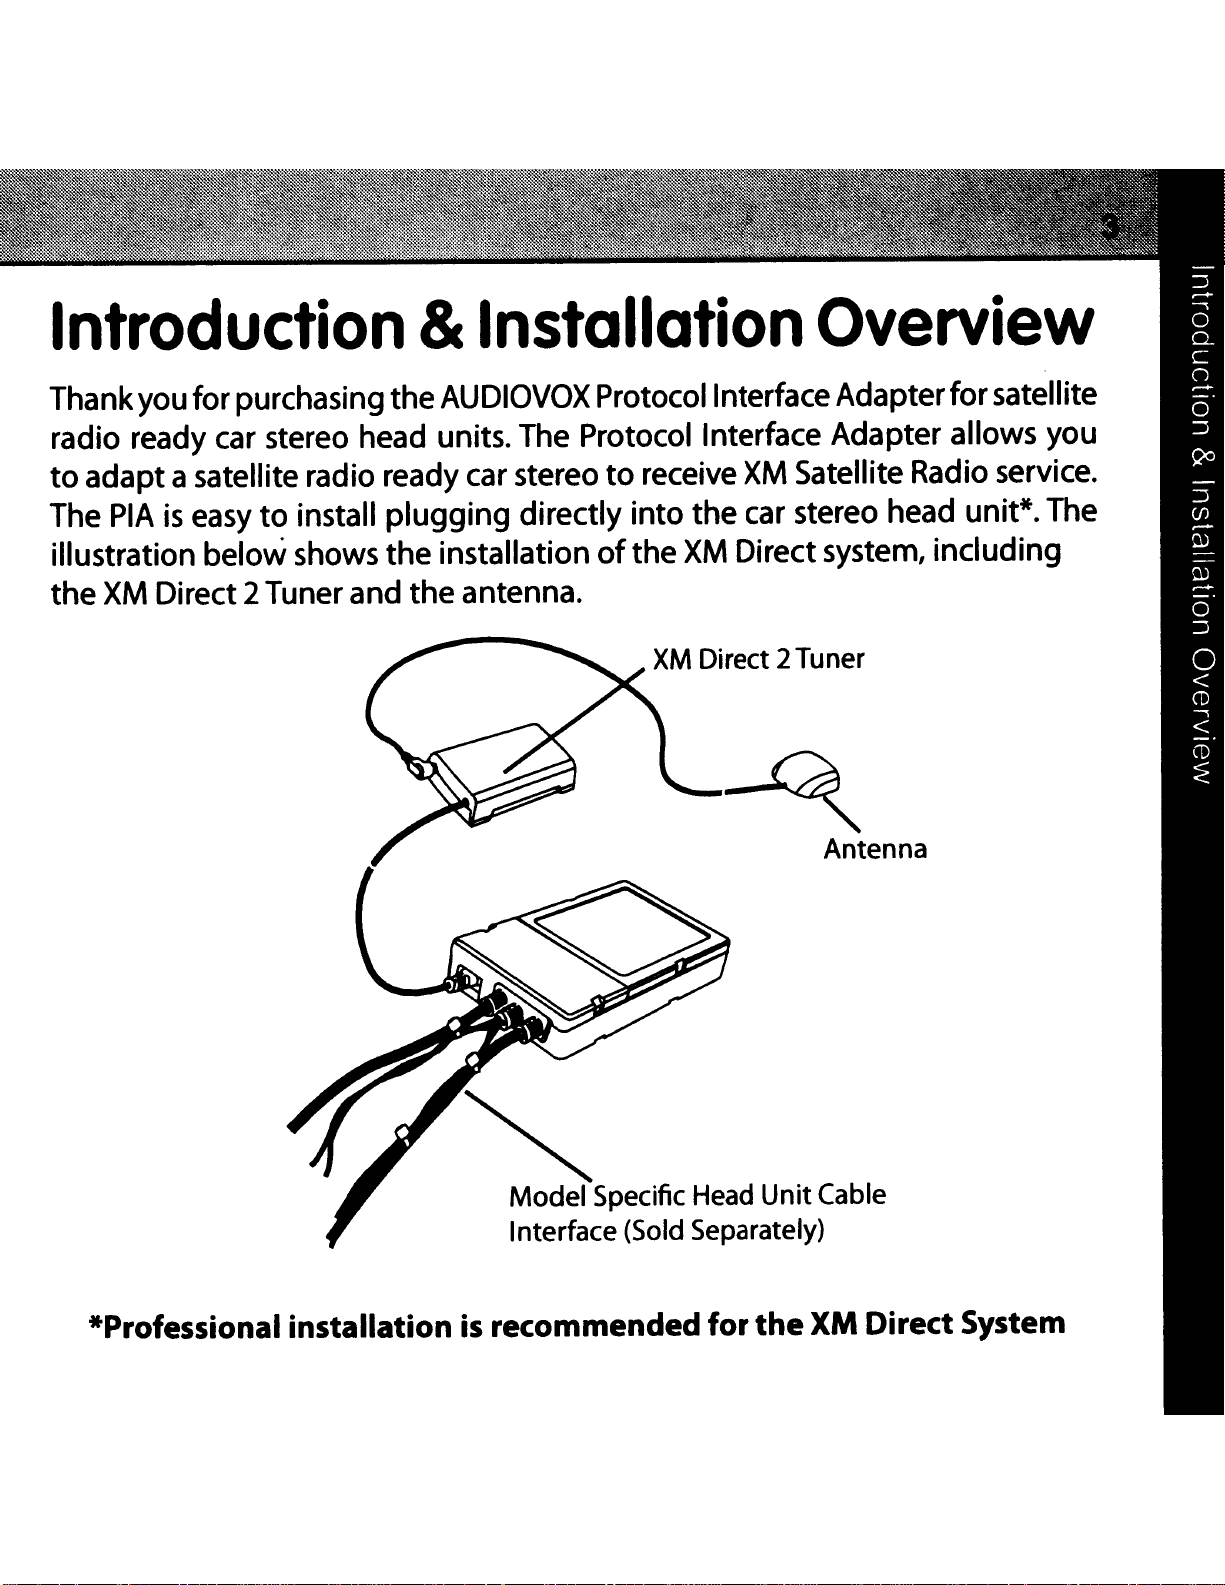
Introduction&InstallationOverview
Thankyouforpurchasing
radio ready car stereo head units. The Protocol Interface Adapter allows you
to
adaptasatellite radio ready car stereo
The
the
PIAiseasy
illustration below shows
XM
Direct2Tunerand
to
install
the
AUDIOVOX Protocol Interface Adapter
to
plugging
the
installation
the
antenna.
directly
of
receive
into
the
XM
XM
XM
Satellite Radio service.
the
car stereo head unit*.The
Direct system, including
Direct 2Tuner
for
satellite
~
Antenna
~
Model Specific
Interface
*Professional installation is recommended
(Sold
Head
Separately)
for
Unit
the
Cable
XM DirectSystem
Page 4
Installation
Basics
Note:
When choosing a location
to
interfere
tices should be observed when
movementorrattlingafterinstallation.When routing
passages andanyobstructionsthatcould kink, crimp, twist,orchafe thecables.
Components should be secured in place
stick foam tape, screws and nuts, cable ties etc. All
methods are
Cables shouldalso besecured in place
not
to
be taken
into
thejacketofthe
I.nstallation
Before installation, your
protocol downloaded.
programming
with
at
the
crimp any
not
to
route cables on
any
discretionofthe
of
of
of
the
the
cables when installing them. And special care should
cable.
Planning
PIA
musthave
Please
your
to
PIA.
mount
vehicles existing systems. Good installation prac-
mounting
or
near sharpedges
see
an authorized dealer for
the components, care must be taken
componentstoavoid anyvibration,
with
installer.
to
avoid movement.
the
proper radio model
the
cablesavoid blocked
methods such
mounting
Care
that
could eventually
as
Velcro, double
hardware and
should betaken
not
cut
The
PIA
should
Theantenna should be locatedinan
location. Check this
Prior
stalled.Typical locationsare the glove box
Antenna
to
installation, locate
!nstal!atio[f
1.
Best receptionisachieved
surface
of
surface area and a
of
be
the
located
prior
vehicle
within
to
installation.
the
roofin
minimum
2-3 feetofthe radio
area where
with
areatoinsure
theantenna
thecenterofan area
of
6"from a
duetothe
the
cablewill reach thetuner
the
XM Direct 2 Tuner shall be in-
or
the
centerconsole.
mounted
with
window
or
cable lengths.
on
the
metal
atleast 12"x12"
sun roof.
Page 5
2.
If
the vehicle
the antenna off-center.
3.
If
the vehicle
has
roof
roof
does
racks or skid ribs,itmay be necessary
not
provide sufficient metal surface
to
area
mount
then
the antenna can be mounted on the metal
rear window.
(autIDn:
(autiDn:
4.
If
an appropriate antenna
contact your local distributor installation department
guidance.
DO
NOT
COMPARTMENT.
partmenteither on
dow
must be avoided.
Mounting
sult in severe degradation in reception.
INSTALL
deckarea
the
ANTENNA
Mounting
the
front
of
the
vehicle may interfere
antenna on a non-metallic surface will also re-
mounting
INSIDE
theantenna in the passenger comdash board or on the rear
location cannot be identified,
trunk
VEHICLE
lid at least 4"from the
PASSENGER
win-
with
reception and
for
additional
Cable
1.
Routing
Once you have
to route the cable
passages and any obstructions
the cable.
use
a rubber
If
mounted
from
the cable will come in contact
grommet
the
this location
to
prevent damage.
antenna in
to
that
could kink, crimp,
the
correct location, plan
the receiver, avoiding blocked
with
twist
a rough metal opening,
or chafe
how
Page 6
2.
For antenna
the
mounting
cablecan be routed
locationsatthe
down
alongthe
frontormiddleofthe
door
jam
and
into
the
roof,
car.
In
some
grommetinthe
lockwires.
not
seal
3.
Use
whenever possible.
Tools
The antenna contains a powerful magnet thatwill secureitto
undernormal
mount
Required
the
Installation
Step
1
cars,
trytoforceitthrough.Instead, route
near
pre-existing
antenna.
the
If
the
the
lowest
driving
cable maybe
door
cable does
conditions. No additional tools should be needed
jam
partofthe
wiring
brought
which carries
not
fit
trunk
channels created
into
easily
to
P!o(ednre
the
vehicle
the
power
through
the
cable undertheweather
reduce possible water leaks.
by
the
vehiclemanufacturer
through
window
this grommet,
the
and power
do
a metal
roof
to
Remove
the
Important:
car stereo head
Depending
have
head
also have
to
unit
on
remove
before the head
to
remove screws
unit
from your dash board.
how
your head
partorall
unit
was installed you may
of
your dashboard
unit
can
be
pulled out.
to
complete this step.
to
remove the
You
may
Page 7

Step
2
Connect the cable
unit
(Cable sold separately).
installation
Step
3
Start yourcar and
properlyconnected. When you
Preview"on your head
speakers.
troubleshooting section
Step
4
Mount
the radio and will
to
If
not, check
and secure
into
the
PIA.
Read
yourspecific head unit.
turn
not
the
on
your
unit
LCD,
to
make sure all connections are correct
of
this installation guide.
PIA
in
a suitable location
vibrate
or
Plug
unit
tune
the
otherend
yourcable installation manual
to
confirm
to
XM
channell,
and hear
rattle after installation.
that
of
that
the
channel
that
will
the
cable
XM
you should
through
not
into
the head
for
proper
Directsystem
see
uXM
your car
or
refer
interfere
to
with
is
the
Page 8

StepS
Return the car stereo head
be careful
get
kinked
Note:
Step
6
If
you had removed the dash board during installation please returnitback
to
its original location.
with
If
please screw those back in.
Completing
Now
will need
that
your
to
cables
by
the
you had removed screws
that
head unit.
Activation
XM
Direct system
be activated. Details on
unit
you
back
just
has
to
its original location in the dash board,
installed
to
pull
been installed your
how
so
that
the
to
operate your head
they
car stereo head
do
not
unplug or
unit
XM
Universal Tuner
unitinXM
out
modeare listed
XM
Preview Channel,
can also
at 1-800-967-2346. Once you have activated your
XM
antenna
go
on
the following page. Tune your car stereo head
channell
on-lineatXMradio.com
on
the
outsideofyour car
and
follow
or
call
has
instructions
the
toll free
an unobstructed view
tuner
unit
for
activation.
XM
activation number
box make sure
of
the
to
You
the
sky.
the
Page 9

XM
Satellite
Radio
Operation
Please
mobile video receiver manual for instructions
radio
XM
To
refer
service.
Radio
1.
2.
cancel
lD
During
"CHANNEL
Press
and
the
the
to the
XM
the
XM
Satellite
0."
"Seek
Radio
XM
Radio
"XM
tuner control features" section
Radio
- (down)" button.
ID
numberisindicated for
ID
display,
reception,
"RADIO
press
press
the
on
the
10"
Seek
of
your
operating your
Seek
is
indicated for 2
10
button to select achannel.
button to select
seconds.
cassette,
XM
satellite
seconds
CO
or
Page 10

Troubleshooting
No
Sound
• Adjust
• Make sure
the
Advisory
When a
indicated
the
tuner
Message
problem
on
the
volume control
that
are securely plugged in.
occurs
displayofthe
ANTENNA
The antennaisnot
the
• Check
connectionofthe
UPDATING
Radioisbeing updated
• Wait
function
• Contact XM
until
the
normally.
of
the head unit.
all
of
the
cables between
with
connected properly.
encryption code updates. Channels 0 and 1 should
to
subscribe.
with
You
the
XM
Direct system, an error message will be
head unit.
antenna
latest encryption code.
have
not
subscribed
the
to
PIA
the
and the head
XM
tuner.
to
XM
service.
unit
and
NO
SIGNAL
XM
signalisbeing blocked from reaching the
• The message should disappear
obstructed area such
make sure your antenna
with
a clear viewofthe
as
an
indoor
is
mounted
sky.
as
soon
garage.Ifthe
as
outsideand
XM
antenna.
you move
out
of
an
problem persists,
on
top
of
the car
Page 11

Troubleshf)oting (Cont)
OFF
The channel currently selected has stopped broadcasting.
AIR
• Automatically switches
to
valid channel. No actionisrequired.
LOADING
The receiverisreading
• Wait until the
NO
INFO
No informationisavailable
• No action
"CH
The channel
will automatically switch
--"
• No action
to
is
be
is
required.
tunedisvoid
required.
XM
the
channel information.
tuner
completes receiving the information.
to
display.
due
to
to
a valid channel.
a channel lineup change. The
tuner
OTHER
Should any problem persist afteryou have made
Audiovox for help at 1-800-645-4994 on any business day, between 9 A.M.
and
SYMPTOMS
5:30P.M.,
EST
and ask forTechnical Support.
the
following
checks, call
Page 12

~AUDIO"'O~
~
Ri.F:CTRON1CS
CORP.
12MONTHLIMITEDWARRANTY I I
PROGRAMMABLEINTERFACEADAPTERCNP2000UCA
AUDIOVOX
original retail purchaser
conditions, be proven defective in material orworkmanship
from the date
with
for parts and repair labor.
To
is
fication
or
ThisWarranty does
ornoise,
uct, or
not
systems or
neworreconditioned product (at the Company's option)
obtain repair or replacement
to
bedelivered
the
Company
to
apply
ELECTRONICS
of
original purchase, such defect(s} will be repaired or replaced
with
of
defect(s}, transportation prepaid,
at
to
costs incurred forinstallation, removal or reinstallationoftheprod-
damage
to
malfunction
to
damage caused by poor installation
proofofwarranty
the
address shown below.
not
extend
to
speakers, accessories or electrical systems.Warranty does
CORPORATION
of
this product
within
to
theeliminationofexternallygenerated static
of
satellite transmissions, repeater signals or audio
the
(the Company) warrants
that
coverage
should under normal
termsofthisWarranty,
(e.g.
dated billofsale),
to
an
approved warranty station
of
included components
within
without
12
the
to
the
use
and
months
charge
product
speci-
as
such
receiver docking station.
This Warranty does
that
misuse, neglect, accident, or by removal or defacement
number/barcode label(s}.
magnetic roof
has
been damagedthrough alteration, improperinstallation, mishandling,
not
mount
apply
antenna, programmable interface adapter or
to
any product in the opinion
of
the Company
of
the factory serial
Page 13

WARRANTY(Cant)
THE
TOTHE
THE
FOR
This
WARRANTIES,
SHALL
ACTION
WITHIN
THE
AGES
EXTENT
REPAIR
COMPANY'S
THE
OF
THE
OR
REPLACEMENT
LIABILITY
PRODUCT.
COMPANY'S
Warrantyisin lieu
INCLUDING
BE
LIMITED
FOR
24
BREACH
MONTHS
COMPANY
FOR
BREACH
BE
TO
LIABLE
OF
of
all
THE
OF
FROM
THIS
LIABILITY
PROVIDED
EXCEED
other
ANY
express
IMPLIED
DURATION
ANY
FOR
WARRANTY
DATE
OF
ANY
OR
ANY
UNDER
THE
PURCHASE
warranties or liabilities.
WARRANTY
OF
ORIGINAL
CONSEQUENTIAL
OTHER
WHATSOEVER.Noperson or representative
Company any liabilityotherthan
of
this product.
expressed
THIS
ABOVE
THIS
WRITTEN
HEREUNDER
PURCHASE.INNO
WARRANT'(,
is
authorized to
WARRANTYISLIMITED
AND,INNO
PRICE
PAID
EVENT,
BY
PURCHASER
ANY
OF
MERCHANTABILITY,
WARRANTY.
MUST
BE
BROUGHT
CASE
OR
INCIDENTAL
EXPRESS
OR
IMPLIED,
assume
SHALL
IMPLIED
SHALL.
for the
herein in connection with the
ANY
DAM-
sale
Some
theexclusion orlimitation
states
do notallow limitations
of
incidental orconsequential damage
on
limitationsorexclusions may notapplyto
and
you
legal rights
U.s.A.:
CANADA:
may
AUDIOVOX
HAUPPAUGE,
CALL
1-800-645-4994
SERVING
also
have
ELECTRONICS
NEW
YOUR
YORK11788
AREA
other rights which vary from state to state.
CORPORATION,
FOR
howlong
you.
an
implied warranty
This
Warranty gives you specific
•1-800-645-4994
LOCATION
OF
so
150
MARCUS
WARRANTY
lasts
or
theabove
BLVD.,
STATION
128-8054
Page 14

PRODUCT
REGISTRATION
Thankyou for purchasing
qualityand reliability
service or have a question,
Contact
PRODUCT
In
will serve
PURCHASE
Registering On-Line will allow
safety notification
Click On Product Registration and Fill Out
usatwww.audiovox.com
PROTECTION:
case
of
an insurance loss such
as
proof
of
REGISTRATION:
is
an
Audiovox product.
of
all our electronic products
our
customer service staff stands ready
as
fire, flood or theft, your registration
purchase.
us
to
contactyou in
required under
the
We
pride ourselves on the
butifyou ever need
to
help.
the
unlikelyevent a
Federal Consumer Safety Act.
the
Brief Questionnaire.
For
additional information: call 1-800-645-4994
or
visit audiovox.com.
For more information
visit www.xmradio.com
"XMXand
XM
Logo
are
about
or
registered
XM
Satellite Radio service,
call 1-800-967-2346.
trademarks
of
SlRUJS
XM
Radio
~
AUDIOTOXN
CORPORATION
inc
128-8771
Page 15

1.
Locate
XM
Direct
2
Mini-USB
port
on
module.
2.
3.
4.
5.
Attach
Locate
Attach
Program
www.audiovox.com/xmdirect
XM
USB
other
Direct
XM
2.0
end
Direct
port
of
2
USB
programming
on
XM
2
your
Direct
module
computer
cable.
2
programming
per
latest
website
cable.
instructions.
Page 16

Page 17

CONTENTS
INCLUDE:
Interface
Adapter
XM
Direct
Vehicle Tuner
CONNECTION
Choose the
Advent
Alpine
Clarion
Speak with 0 Soles Representative for derolfs.
2
proper
CABLE
XM
Connection Cable for your car stereo.
Eclipse
Jensen
JVC
Magnetic
Antenna
Mount
REQUIRED
Programming
Coble-
Kenwood
Panasonic
Sony
 Loading...