

Page 1
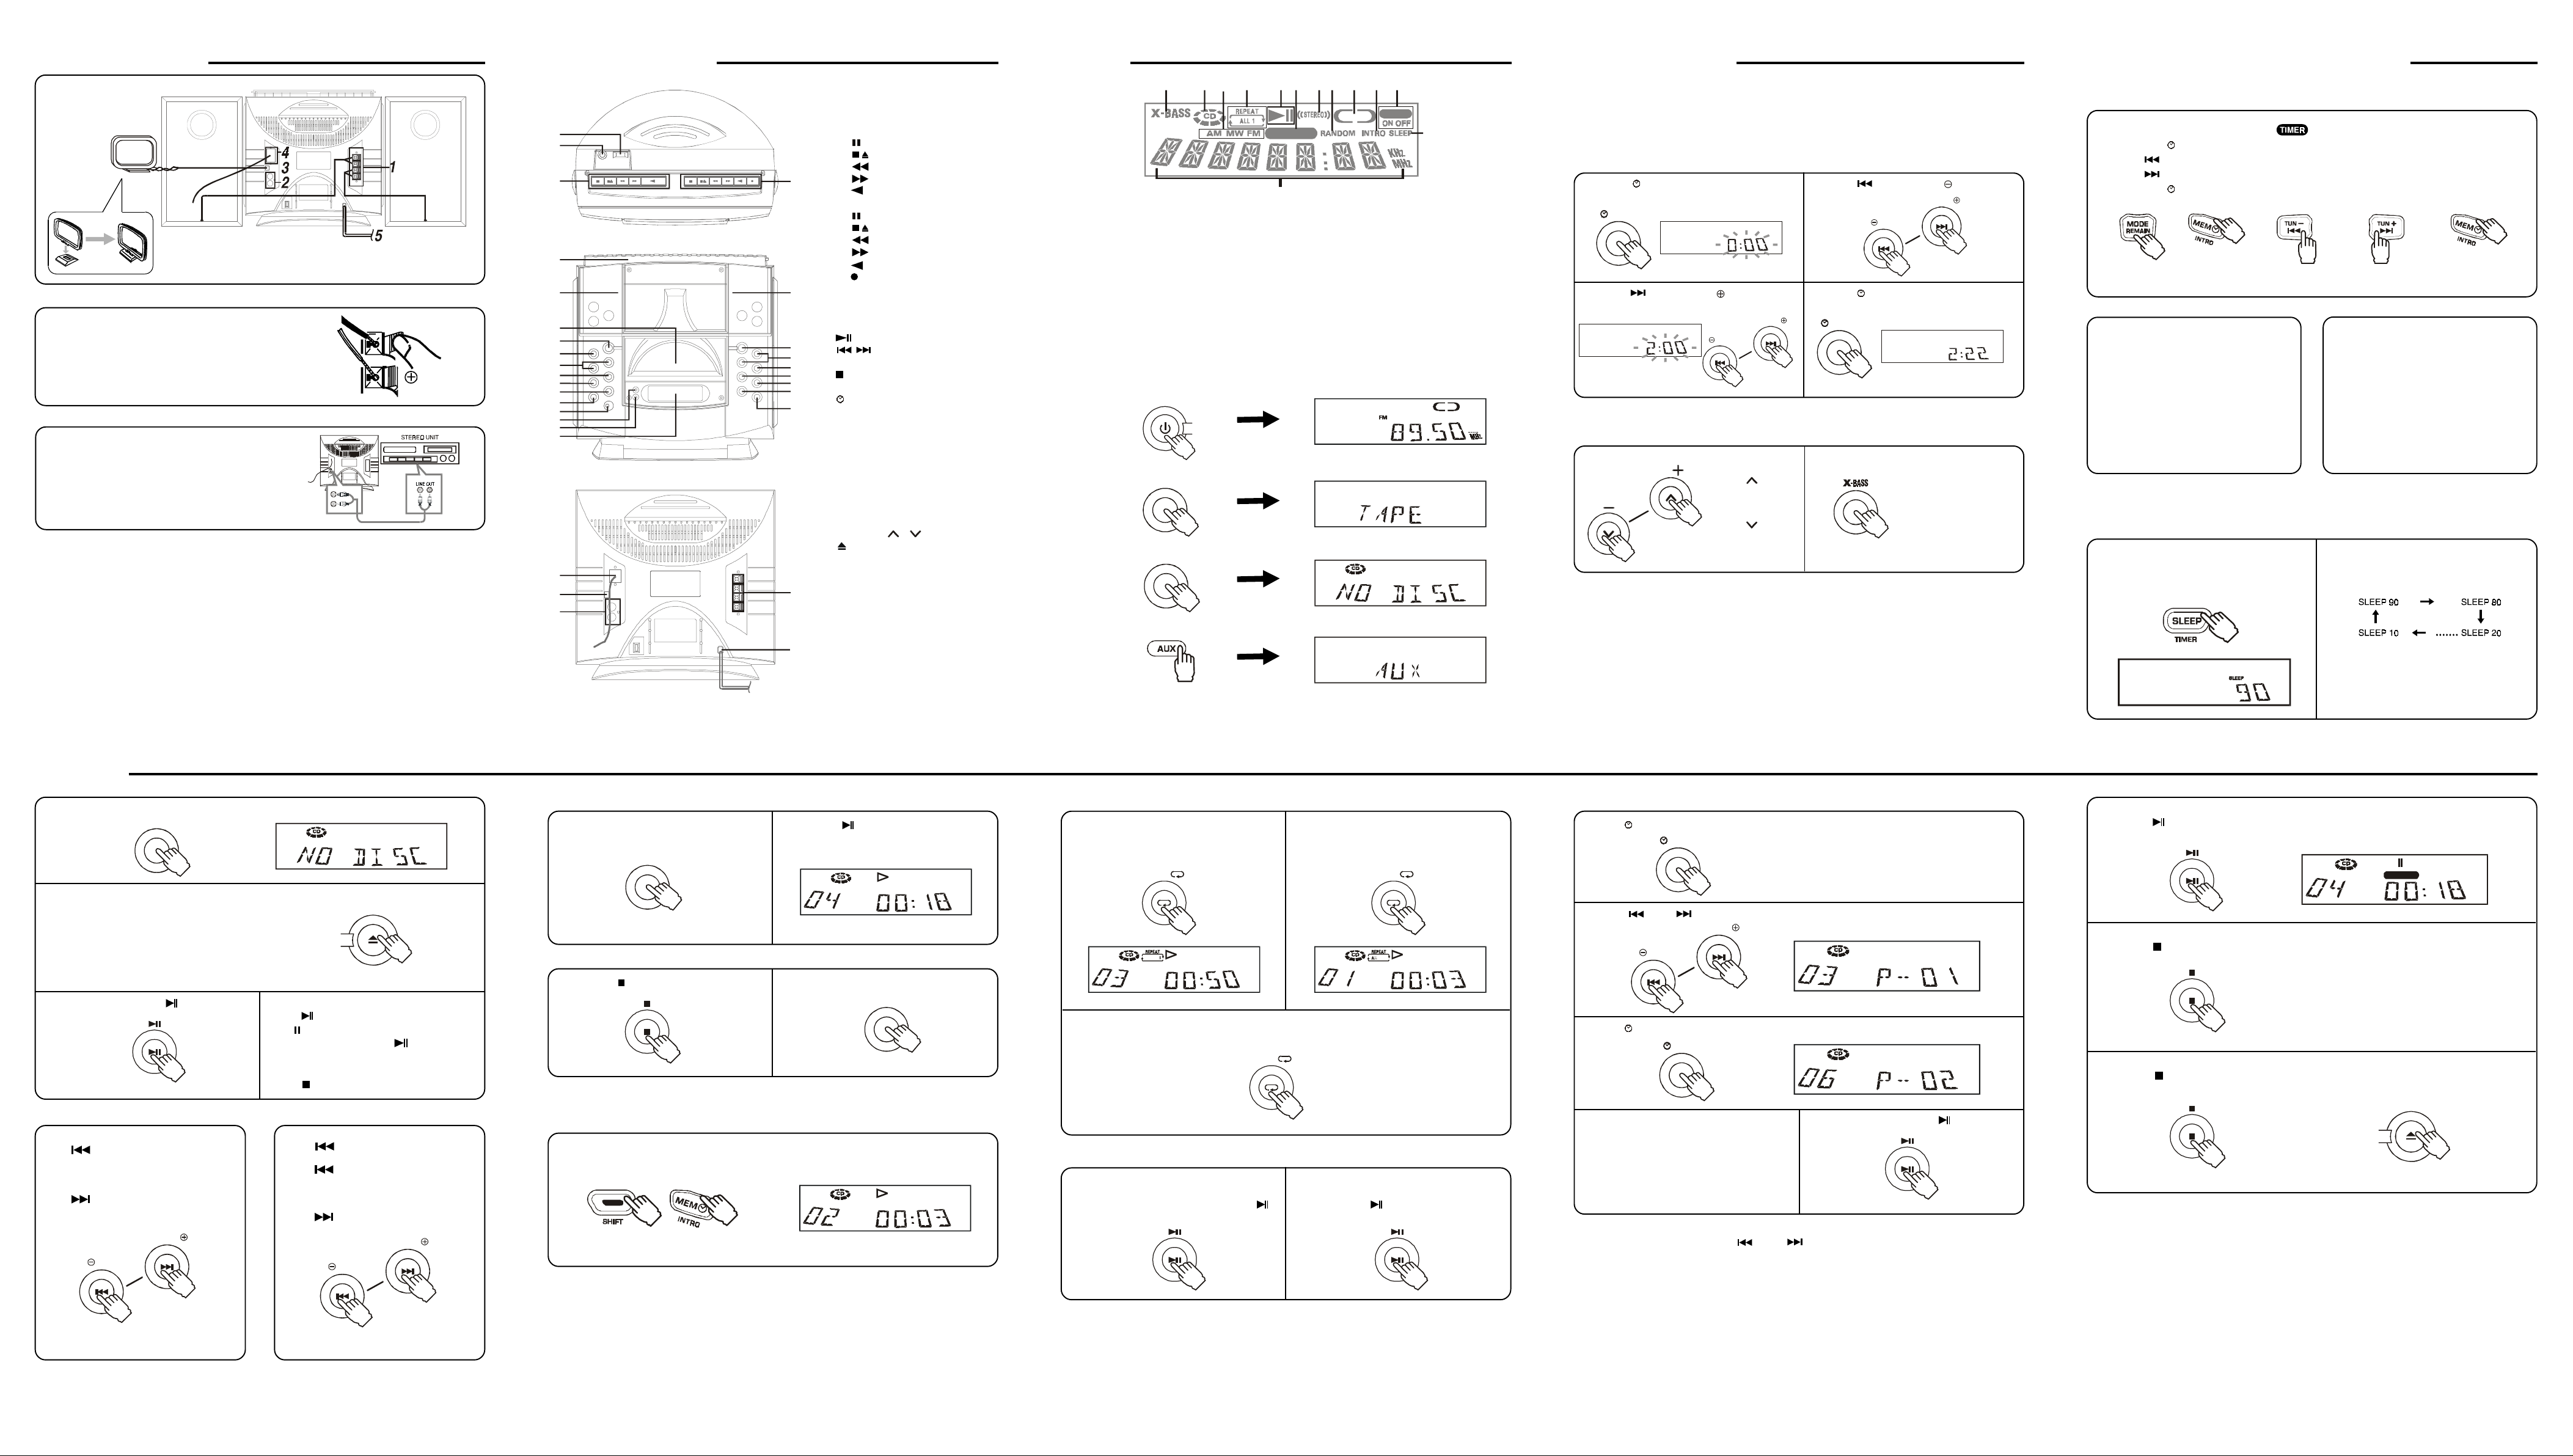
SYSTEM CONNECTIONS
MW/AM
LOOP
ANTENNA
1. SPEAKER CORD CONNECTION
Connect the right speaker to the R terminal, and
the left to the L terminal.
Connect the wires with the printed white lines to the
red (+) terminals and the plain-black wires to the black
(-) terminals.
WARNING:
Connecting speakers other than the speakers
supplied with the unit may damage the unit.
2. CONNECTION WITH OTHER OPTIONAL EQUIPMENT
To listen to or record audio signals from external
units through this unit.
Connect the red plug to the R jack, and the white
plug to the L jack to the AUX jack.
LISTENING TO THE CONNECTED EQUIPMENT
1. Press the FUNCTION button to AUX.
2. Play the external source.
3. MW/AM LOOP ANTENNA CONNECTION
Do not connect to an outside antenna.
Connect the supplied MW/AM loop antenna to
receive better MW/AM broadcast signal.
4. FM ANTENNA WIRE
Do not connect to an outside antenna.
5. POWER CORD CONNECTION
Before use, check that the rated voltage of your
unit matches your local voltage.
Connect the AC cord to an AC outlet.
The ST ANDBY indicator will light up and the cloc k
will be displayed.
Caution:
• Be sure the AC power cord is disconnected
and all functions are off before making connections.
• To prevent electrical shock, match wide
blade of plug to wide slot, fully insert. (FOR
N. America)
The AC cord to an AC outlet
PARTS IDENTIFICATION
1
2
3
5
6
7
8
9
10
11
12
13
14
15
16
17
18
27
28
29
1. MODE selector (BEAT CUT/FM
MODE/DUBBING)
2. PHONES jack
3. Cassette Deck A operation buttons
PAUSE button
STOP/EJECT button
F.FWD button
4
REW button
PLAY button
4. Cassette Deck B operation buttons
PAUSE button
STOP/EJECT button
F.FWD button
REW button
PLAY button
REC button
5. Cassette knob cover
26
6. Cassette Deck A door
7. CD door
8. POWER/STANDBY button
9. CD PLAY/PAUSE button
25
10. / SKIP/TUNING buttons (UP/
24
23
22
20
19
21
DOWN)
11. CD STOP button
12. PRESET/REPEAT button
13. MEMORY button
14. RANDOM button
15. REMOTE SENSOR
16. STANDBY indictor
17. X-BASS indicator
18. DISPLAY window
19. TUNER button
20. CD button
21. TAPE button
22. BAND button
23. X-BASS button
24. VOLUME ( / )
25. OPEN/CLOSE button
26. Cassette Deck B door
27. FM 75 ohm antena terminal
28. AM/MW antenna socket
31
29. AUX IN jack
30. AC cord
31. Speaker terminals
30
DISPLAY
123 768 10911
1. X-BASS indicator
2. CD function indicator
3. BAND FM/MW(AM) indicator
4. REPEAT mode indicators
5. PLAY / PAUSE indicators
6. MEMORY indicator
7. FM STEREO indicator
8. CD RANDOM indicator
POWER INDICATOR
While the AC cord is connected and the unit is on stand-by, power will be consumed and only the
clock display will be lit.
• Press the POWER button to turn on the unit. After a short period of time the display will show:
• Press the TAPE button. After a short period of time the display will show:
• Press the CD button. After a short period of time the display will show:
• Press the AUX button (on remote control only). After a short period of time the display will show:
• After using the unit press the POWER button until the display shows the time (at standby mode).
POWER ON
STANDBY
TAPE
CD
54
TUNER
MEMORY
TIMER
12
13
9. TUNER function Indicator
10. INTRODUCTION indicator
11. TIMER ON/OFF indicators
12. SLEEP indicator
13. CLOCK/CD TIMING/TAPE/A UX/TUNER FREQUENCY/CD TRACK/PRESET STATION
NUMBER indicators
TUNER
TURNING ON THE UNIT
TO TURN ON THE UNIT
Press POWER button, the display will illuminate. Select the desired function and the corresponding
function indicator will show in the display.
TO TURN OFF THE UNIT
Press the POWER button to enter STANDBY. The display illumination will fade and only the clock
display will be shown.
CLOCK SETTING - in standby mode
1. Press MEMORY button the Hour and
Minutes will flash.
MEMORY
3. Press SKIP/TUNING ( UP ) button to
set minutes.
DOWN
Note: If a button is not pressed for 10 seconds the clock set mode will be exited automatically.
2. Press SKIP/TUNING ( DOWN ) but-
ton to set hour.
DOWN
4. Press MEMORY button to set hour and
minutes, start the clock.
UPSKIP/TUNING
MEMORY
UPSKIP/TUNING
ADJUSTING THE SOUND
To adjust the volume For loud deep bass
VOL
WHEN RECORDING
Adjustments to the VOLUME control or the X-BASS control will not affect the recording.
FOR PRIVATE LISTENING
Connect a headphone (ø3.5mm stereo mini-plug) to the PHONES jack.
When the headphone is connected, speakers are automatically disconnected.
Press button
to increase the
volume.
Press button
to decrease the
volume.
Press X-BASS button
to increased the low
frequency sound level.
TIMER OPERATION (for r emote contr ol only)
The power can be turned on and off automatically at a preset time so that you can wake up to tape
music, CD, radio or AUX. Make sure the clock is set the correct before the timer setting.
TIMER SETTING - at standby mode
1. Press MODE/REMAIN button until ON/OFF is in the display.
2. Press MEM button in clock mode. Hour and minutes will flash.
3. Press TUN + buttons to set correct hour.
4. Press TUN - buttons to set the correct minutes.
5. Press MEM button to store the ON/OFF time. It will return to normal mode.
➊➋ ➌ ➍ ➎
PLAY TIMER RECORD TIMER
1. Set the time of the timer-on and timer-off.
2. Select the desired program source with
the FUNCTION.
TUNER: Select a band and station.
TAPE: Insert the cassette tape.
CD: Insert a disc.
3. Press TIMER.
TIMER appears in the display.
4. Press POWER to standby mode.
5. For cassette playback, press PLAY.
At the timer-on time, the system turns on
automatically.
Cancel the timer function
Press the SHIFT and TIMER button until the timer indicator turn off.
SLEEP SETTING (for remote control only)
When the sleep timer is used, the power is automatically turned off after the specified time passes.
1. Press the SLEEP button while the power
is on. "SLEEP 90" lights in the display.
Note: SLEEP time can only be adjust in
TUNER, TAPE, CD and AUX modes.
The system will record a radio broadcast
at a preset time.
1. Set the time of the timer-on and timer-off.
2. Set to TUNER.
3. Select a band and station.
4. Insert the cassette tape for recording.
5. Press TIMER.
TIMER appears in the display.
6. Press POWER to standby mode.
7. Press REC (record) which also engages
PLAY.
2. Press SLEEP button repeatedly to select
the length of remaining time until the unit
turns off.
It changes the indicator in the following way:
The sleep timer is set and the SLEEP indicator lights in the display. Let go when required
sleep time (in minutes) is shown.
To cancel the sleep timer, press the SLEEP
button once and "SLEEP" will go out in the
display.
CD SECTION
CD PLAYING
1. Press the CD button.
2. Press the OPEN/CLOSE button to open CD door. Place
a disc in the CD tray with the label face front and then
press the OPEN/CLOSE button to close CD door. The
total number of tracks will show on the display.
NOTES:
• Do not push the CD door to close it.
• CD door cannot open while power is off.
3. To start playing, press PLAY/PAUSE
button.
To move backward at high speed
Keep SKIP button pressed during play
and release at the desired point.
To move forward at high speed
Keep SKIP button pressed during play
and release at the desired point.
DOWN
CD
UPSKIP/TU NING
OPEN/CLOSE
TO INTERRUPT PLAYBACK
Press PLAY/PAUSE button.
The indicator will light up.
To resume playback, press PLAY/PAUSE
button again.
TO STOP PLAYBACK
Press STOP button.
Searching for the beginning of a trackLocating a particular point in a track
To find a previous track
Press SKIP button once to return to
the beginning of the current track.
Press SKIP button repeatedly to skip
tracks backward one by one.
To skip tracks
Press SKIP button repeatedly to skip
track(s) forward one by one.
UPSKIP/TU NING
DOWN
RANDOM PLAY
This function will allow a single track or all the tracks on the disc to be played repeatedly.
1. Press the RANDOM button, the word
"RANDOM" will appear on the display.
RANDOM
2. Press the PLAY/PAUSE button to start
play.
RANDOM
TO CANCEL RANDOM PLAYBACK
1. Press the STOP button to stop random
playing.
2. Press the RANDOM button to deactivate r andom playback.
RANDOM
INTRODUCTION PLAY - - at CD stop mode (for remote control only)
Press the SHIFT & INTRO button, the word "INTRO" will appear on the display.
INTRO
TO CANCEL INTRODUCTION PLAY
Press the STOP button to stop introduction play.
REPEAT PLAY
This function will allow a single track or all the tracks on the disc to be played repeatedly.
TO REPEAT THE SAME TRACK
Press the REPEAT button to repeat the current track. The "REPEAT 1" indicator light up.
PRESET/ PRESET/
TO REPEAT THE WHOLE DISC
Press the REPEAT button until the "REPEAT
ALL" indicator light up.
TO CANCEL REPEAT PLAY
Press REPEAT button until the REPEAT indicator turn off.
PRESET/
DURING STOP MODE
The REPEAT operations can also be set in the
stop mode. The player will start playing from
Track 1 of the currently selected disc after
PLAY/PAUSE button is pressed.
DURING PAUSE MODE
The REPEAT operations can also be set from
paused playback point. The pla yer will start playing again after PLAY/PAUSE button is
pressed.
PROGRAMMING PLAYBACK --- in the stop mode
Up to 20 tracks can be programmed to play in any order using this function.
1. Press MEMORY button (in stop mode).
MEMORY
2. Press SKIP button to select the desired track.
UPSKIP/TU NING
DOWN
3. Press MEMORY button again to store this track in memor y.
MEMORY
4. To program additional tracks,
5. To start playback, press the PLAY/PAUSE
button.
repeat step 2 to 3.
NOTE:
During programme playback, the SKIP buttons can only be used for the selected
tracks.
STOPPING AND CANCELLING PROGRAMMED PLAYBACK
To stop programmed play for a moment:
• Press the PLAY/PAUSE button and "II" will be displayed.
Press this button again to resume playing.
To stop programed playback:
• Press the STOP button.
To erase the whole programme:
• Press the STOP button or select another
function.
or
Open the disc tray by pressing the OPEN/
CLOSE button.
MEMORY
OPEN/CLOSE
FORWARDBACKWARD
Keep it pressed
BACKWARD
FORWARD
Press it once
NOTE :
The CD player may skip if the loud speakers are situated close to the player and if high volume or bass
levels are used.
Page 2
TUNER SECTION
e
t
d.
T ape to be played
T ape to be record
e
t
d.
TUNING INTO A STATION MANUALLY
1. Press the TUNER button.
TUNER
2. Press BAND button to select the desired
band.
BAND
FOR BETTER RECEPTION
FM
Fully unwind the wire antenna. Then extend
the wire antenna and place it in the position
that sounds best.
TIMER
TUNER
MEMORY
3. Press the TUNING button to
select a station.
DOWN
MW/AM
Connect the loop aerial (provided) to
the AM (MW) ANT . snap terminal. Set
the MW/AM loop antenna to a direction for the better reception
UPSKIP/TU NING
PRESETTING STATION
The unit can store stations (FM 16 stations and AM 16 stations).They can be tuned in to by selecting
their preset numbers. It is possible to store stations of any band in order of your choice.
Manual memory presetting
This function allows you to manually preset stations into any desired memory.
1. Press the TUNER button. 2. Press the BAND button to select the desired
band and press SKIP button tune a
TUNER
3. Press the MEMORY button until the
memory indicator blinks.
MEMORY MEMORY
station.
BAND
4. Press the MEMORY button to record.
DOWN
UPSKIP/TUNING
Then, repeat steps 2 to 4.
TUNING INTO A PRESET STATION
1. Press the TUNER button .
TUNER BAND
2. Press the BAND button to
select a band.
3. Press the PRESET buttons
to select the preset number.
PRESET/
REMOTE CONTROL
1. POWER/STANDBY button
2. CD button
3. TAPE button
4. STOP button
5. SKIP/TUNING buttons
6. MEM /INTRO (introduction) button
7. MODE/REMAIN button
8. SLEEP/TIMER button
9. VOLUME +/- buttons
10. SHIFT button
11. BAND/RANDOM button
12. X-BASS button
13. PLAY/PAUSE button
14. REPEAT/PRESET button
15. TUNER button
16. AUX button
USING THE REMOTE CONTROL CORRECTLY
• Point the Remote Control at the REMOTE SENSOR located on the unit.
• When there is a strong ambient light source, the performance of the infrared REMOTE SENSOR
may be degraded, causing unreliable operation.
• The recommended effective distance for remote operation is about 6 metres (19 feet).
TO CHANGE REMOTE BATTERY
1. Open the battery door. 2. Insert one CR2025 (3V)
size battery.
Take out the PVC sheet before
operating the
Remote Control.
ATTENTION
SPECIFICATIONS
GENERAL
Output power: 5 W x 2 (10% THD)
Power consumption: 42 W
Power source: AC ~ 120V 60 Hz (U.S.A. and Canada)
AC ~ 220V 50 Hz (China)
AC ~ 230V 50 Hz (Europe and Hong Kong)
AC ~ 240V 50 Hz (Australia)
AC ~ 110/120V - 220/240V 50/60Hz (other countries)
Specifications subject to change without notice.
VERTICAL CD HOME SYSTEM
OPERATION INSTRUCTION
TO SEARCH FOR A STATION AUTOMATICALLY
Press the TUNING button UP or DOWN for 1 to 2 seconds, and a station is searched for
automatically. After tuning in to a station, the search stops.
The search may not stop at a station with a very weak signal.
TO RECEIVE THE FM BROADCAST IN STEREO
Set the MODE selector to FM STEREO.
When the FM stereo broadcast is received, the "STEREO" indicator show in the display.
IF THE FM STEREO BROADCAST SIGNAL IS WEAK
Set the MODE switch to FM MONO (at top of the unit).
Background noise will be reduced but the signal reproduced will be MONO. To restore stereo, set
MODE switch to FM STEREO.
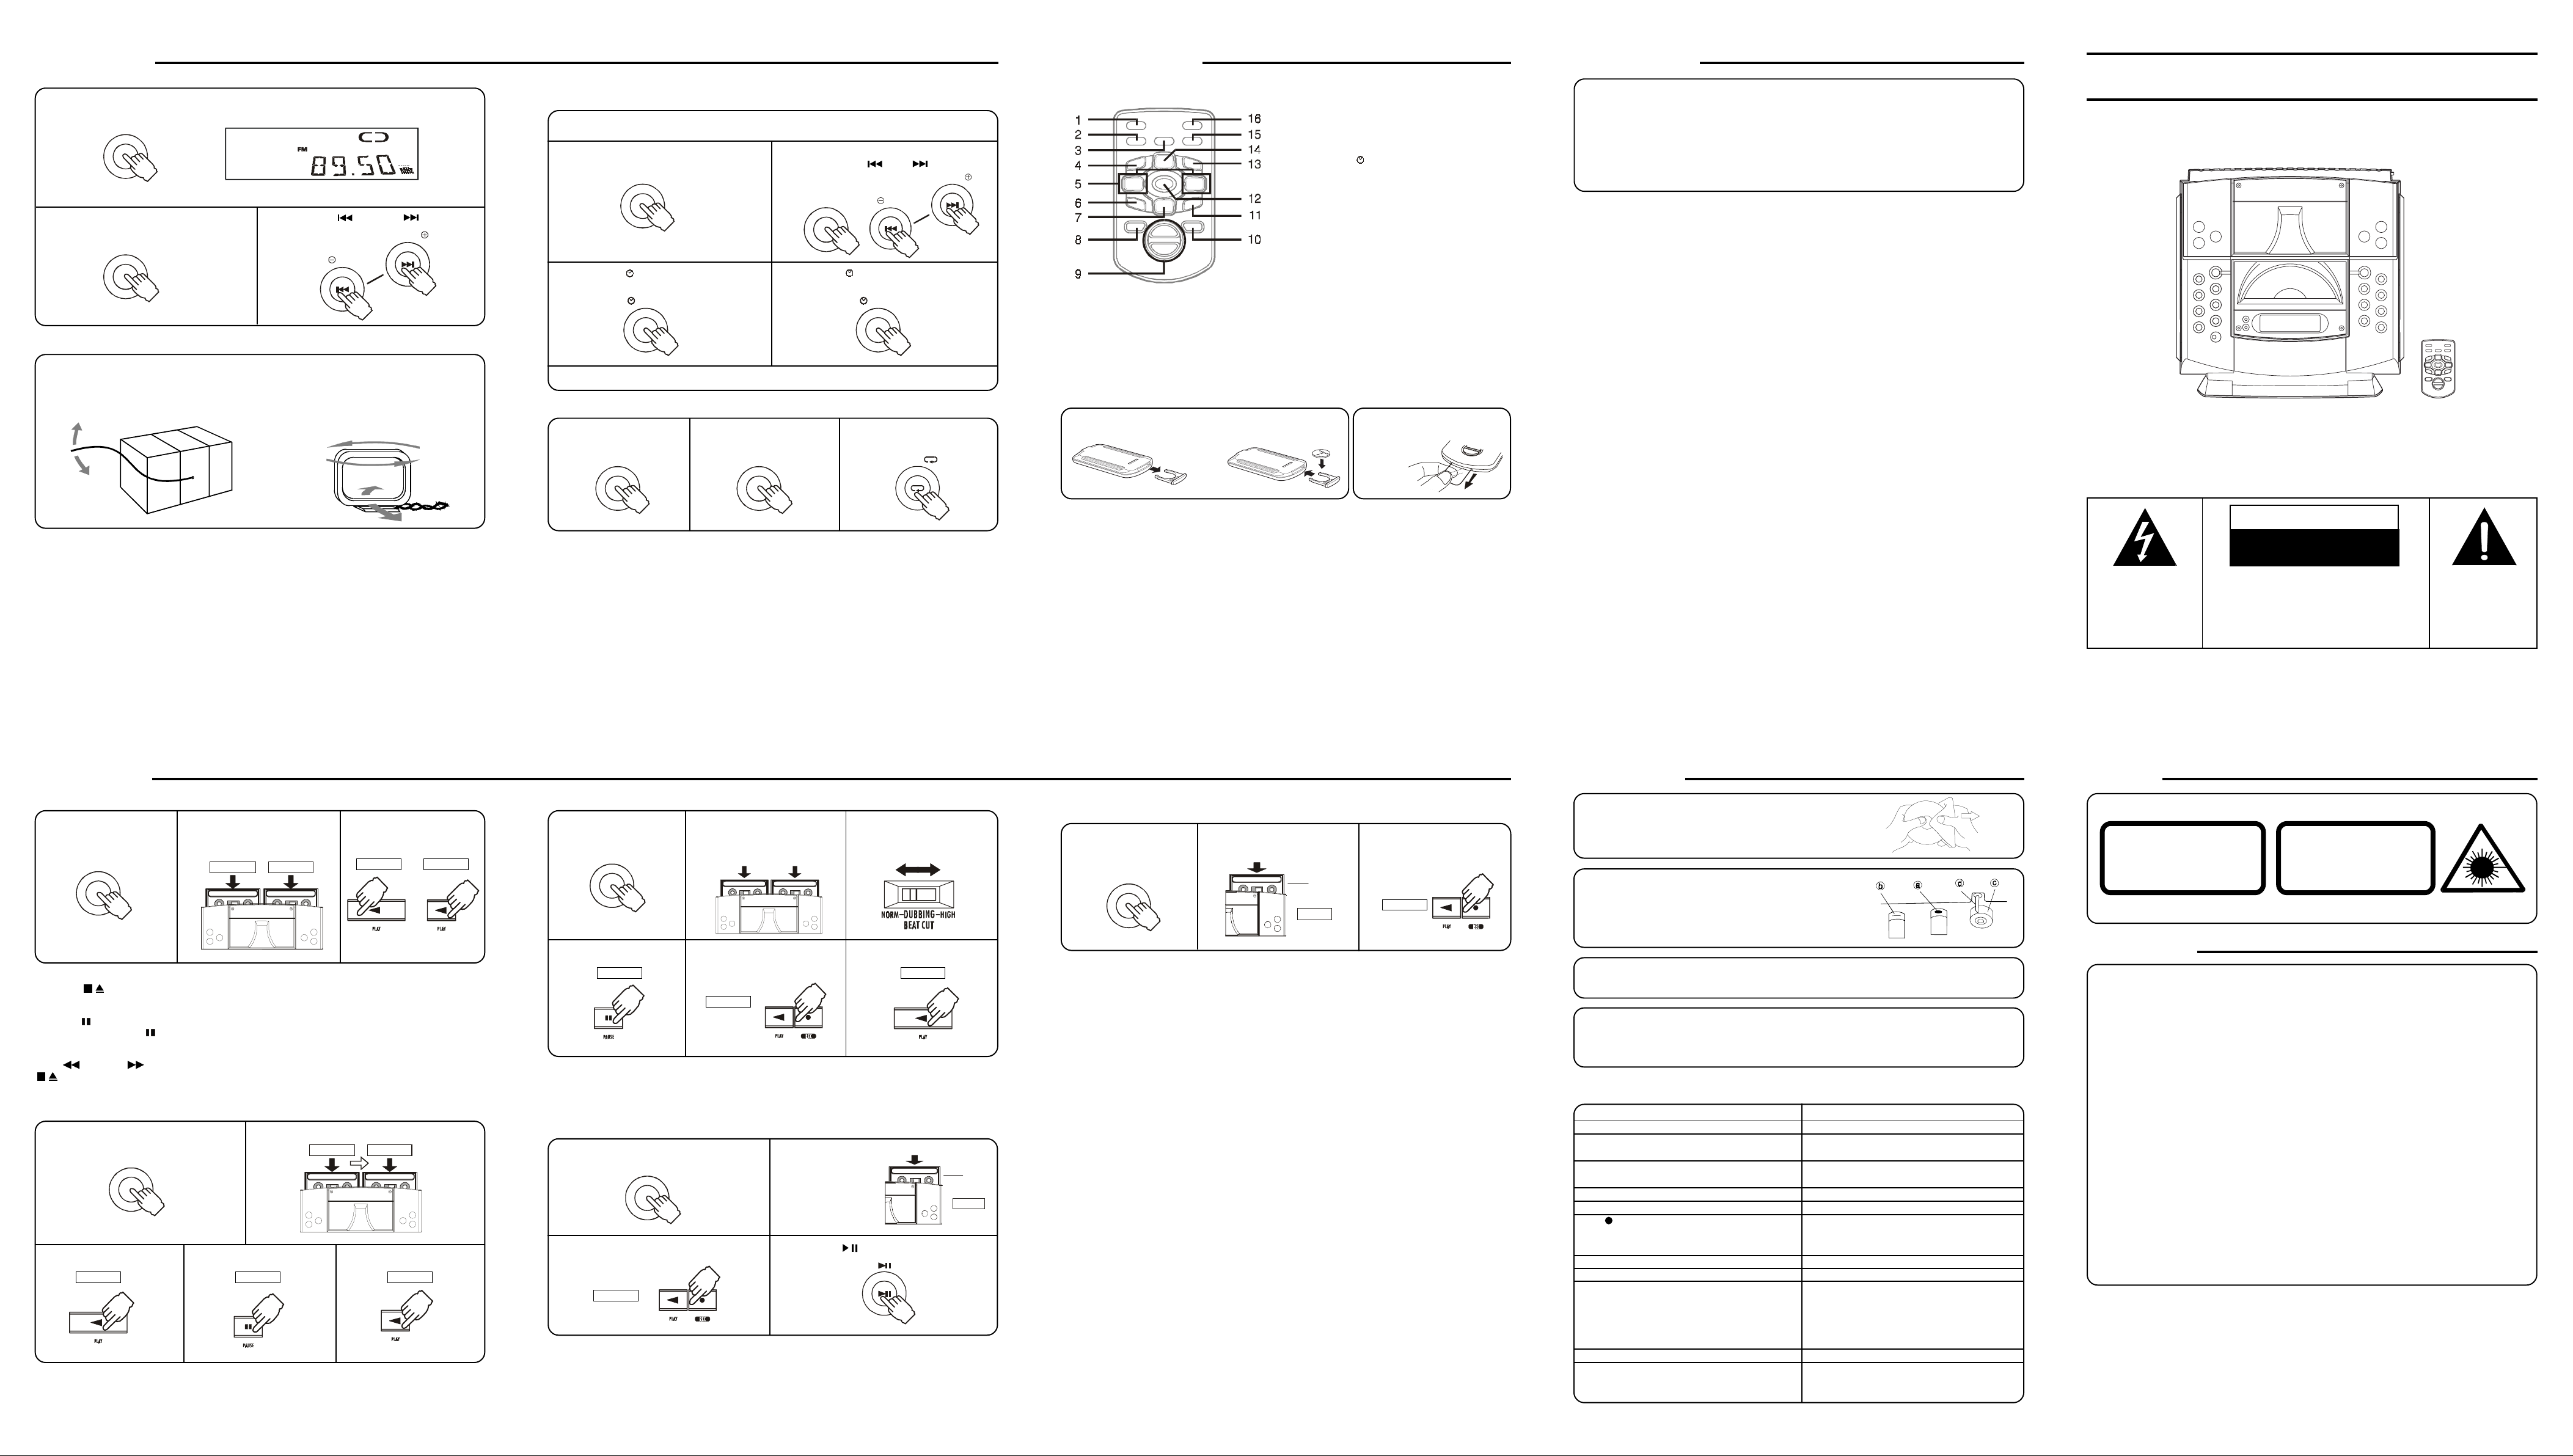
TAPE SECTION
TAPE A OR TAPE B PLAYBACK
Use only normal (type I) tapes for playback.
1. Press the TAPE button. 2. Press the STOP/EJECT but-
TAPE
TO STOP PLAY BACK
Press the STOP/EJECT button.
TO INTERRUPT PLAYBACK
Press the PAUSE button.
T o resume pla y , press the P A USE button again.
TO FAST WIND OR REWIND
Press F.FWD or REW button. Press the
STOP/EJECT button to stop winding at the
desired position.
CONTINUOUS PLAYBACK --- FROM DECK A TO DECK B
1. Press the TAPE button. 2. Insert a cassette in each deck.
TAPE
3. Press the PLAY button. 4. Press the PAUSE button.
As soon as the tape in Deck A reaches its end and stops, the pause mode for Deck B is released and
playback starts automatically.
ton and insert the cassette into
the Deck A or Deck B.
DECK BDECK A
WHEN THE T APE REACHES ITS END
During fast wind or regular play, the tape will stop
automatically when its end is reached.
WHEN BOTH DECK A AND DECK B ARE SET
THE PLAYBACK MODE
Deck A will playback, no sound will come from
Deck B.
Played
first
3. Press the PLAY button.
DECK A DECK B
DECK BDECK A
5. Press the PLAY button.
DECK BDECK BDECK A
OR
Played
next
NOTE
The contents (preset channel number, frequency and frequency band) which have been stored
in memory will appear in the display in numerical order, irrespective of the frequency bands.
DUBBING ---- FROM DECK A TO DECK B
Use only normal (type I) tapes for recording and playback.
1. Press the TAPE button.
TAPE
4. Press the PAUSE button.6.Press the PLAY button.5. Press the RECORD button
DECK B
To STOP DUBBING
Press the STOP/EJECT buttons of Deck A and Deck B.
Note:
Do not change the dubbing speed when dubbing is in progress.
RECORDING ---- DECK B ONLY
RECORDING FROM THE CD PLAYER
1. Press the CD button.
CD
3. Press the RECORD button which also
engages the PLAY button.
DECK B
TO STOP RECORDING
Press the STOP/EJECT button of Deck B.
TO INTERRUPT RECORDING
Press the PAUSE button of Deck B.
To resume recording, press the PAUSE button again.
2. Insert the recorded tape into
Deck A and the blank tape into
Deck B.
which also engages the PLAY
button.
DECK B
2. Insert a tape into
the cassette compartment.
4. Press the PLAY/PAUSE button of the
CD player.
TO ERASE A RECORDED TAPE
1. Press the FUNCTION button to TAPE.
2. Insert a tape with the side you want to erase
facing you.
3. Press the RECORD button to start erasing.
3. Select the NORMAL/HIGH
DUBBING switch to the required position.
DECK A
This sid
you wan
to recor
DECK B
BATTERY REPLACEMENT
When batteries become weak, the operating distance of the Remote Control is greatly reduced and
you will need to replace the batteries.
NOTE:
If the Remote Control is not to be used for a long time, remove the battery to avoid damage caused by
battery leakage corrosion.
RECORDING ---- DECK B ONLY
Use only normal (type I) tapes for recording.
RECORDING FROM THE BUILT-IN TUNER
1. Press the TUNER button
and tune into a desired
station.
TUNER
Note:
If a whistle is heard (beat), it may be reduced by sliding the BEAT CUT switch on the left top of the unit
to BEAT CUT 2 position.
2. Insert a tape into the cassette
compartment.
This sid
you wan
to recor
DECK B
3. Press the RECORD button
which also engages the
PLAY button.
DECK B
MAINTENANCE
CLEANING CD
If the CD skips or cannot be played, the disc may need cleaning. Before playing,wipe the disc from the center out with a
cleaning cloth. After playing,store the disc in its case.
CLEANING THE T APE HEADS
To maintain optimum sound quality, clean the playbac k/record
heads (a), erase head (b), pinch rollers (c), and capstans (d)
regularly (every 10 hours of use), using a cotton swab lightly
moistened with cleaning fluid or denatured alcohol.
CLEANING THE UNIT
Do not use volatile chemicals on this unit. Clean by lightly wiping with a soft cloth.
IMPORTANT NOTE
• If an abnormal display indication or an operating problem occurs, disconnect the AC power
cord. Wait at least 5 seconds, then reconnect the AC power cord.
TROUBLE SHOOTING GUIDE
PROBLEMS
No power supply.
The cassette cannot be inserted.
The tape gets caught in the tape transport
mechanism.
Tape r unning is unstable.
There is excessive noise during tape playback.
The REC cannot be pressed.
No recording or poor recording.
The previous recording cannot be erased.
CD play does not begin.
The CD produces no sound.
The CD sound jumps.
ITEMS TO CHECK
• Is the power cord unplugged or loose?
• Is the cassette facing the wrong direction
when you try to insert it?
• Is the pinchroller or capstan dir ty?
• Is there excessive slack in the tape?
• Is there excessive slack in the tape?
• Is the head dir ty?
• Is a cassette inser ted?
• Is the erase prevention tab on the cassette
broken off?
• Are the heads dir ty?
• Is the erase head dir ty?
• Is the CD upside down?
• Is the CD or lens excessively dirty?
• Is the disc holder closed properly?
• Is the function selector set to CD?
• Is the pause mode on?
• Is there condensation inside the unit?
• Is the lens or CD excessively dirty?
• Is the unit subject to excessive vibration?
• Are there any bad scratches on the CD?
WARNING
RISK OF ELECTRIC SHOCK
DO NOT OPEN
The lightning flash and
arrowhead within the
triangle is a warning
sign alerting you of
"dangerous voltage"
inside the product.
WARNING: TO REDUCE THE RISK OF
ELECTRIC SHOCK, DO NOT REMOVE
COVER (OR BACK) NO USER-SERVICEABLE P A RTS INSIDE. REFER SER VICING
TO QUALIFIED SERVICE PERSONNEL.
WARNING: TO REDUCE THE RISK OF FIRE OR ELECTRIC SHOCK, DO NO T EXPOSE
THIS APPLIANCE TO RAIN OR MOISTURE.
WARNING
CLASS 1 LASER PRODUCT
CLASS 1 LASER PRODUCT
APPAREIL Á LASER DE CLASSE 1
PRODUIT LASER DE CLASSE 1
This product contains a low power laser device.
INVISIBLE LASER RADIATION
WHEN OPEN AND INTERLOCKS
AVOID EXPOSURE TO BEAM
CAUTION
DEFEATED.
PRECAUTIONS
ON PLACEMENT
• Do not use the unit in places which are
extremely hot, cold, dusty, or humid.
• Place the unit on a flat, even surface.
• Do not restrict the air flow through the
ventilation slots by placing the unit on the
soft furnishings, by covering the unit with
a cloth or by placing the unit on a carpet.
ON SAFETY
• When connecting and disconnecting the
AC cord, grip the plug and not the cord
itself. Pulling the cord may damage it and
create hazard.
• Disconnect from the AC mains when the
unit is not going to be used for some time.
ON AC VOLTAGE
• Before use, check that the rated voltage of your unit matches your local voltage.
Should any trouble occur, disconnect the AC power cord and refer servicing to
qualified personnel.
FCC INFORMATION
This device complies with part 15 of FCC
Rules. Operations are subject to the following two conditions:
(1 ) This device may not cause harmful inter-
ference, and
(2 ) This device must accept any interference
received, including interference that may
cause undesirable operations.
ON CONDENSATION
• When left in a heated room where it is warm
and damp, water droplets or condensation may form inside the CD player.
• When there is condensation inside the unit,
the unit may not function normally.
• Let it stand in a heated room for 3 hours to
allow the condensation to dry out.
VENTILATION WARNING
• The normal ventilation of the product shall
not be impeded for intended use.
The exclamation point
within the triangle is a
warning sign alerting
you of important instructions accompanying the product.
811-227191-011
Page 3

RACCORDEMENT DE LA CHAÎNE
ANTENNE
CADRE
AM/MW
1. CONNEXION DES FILS D’ENCEINTES
Raccordez l’enceinte droite à la borne R (droite) et
l’enceinte gauche à la borne L (gauche).
Raccordez les fils rouges aux bornes rouges (+) et les
fils noirs aux bornes noires (-).
AVERTISSEMENT:
Le raccordement d’enceintes autres que celles fournies
avec l’appareil risque de l’endommager
2. CONNEXION AVEC UN APPAREIL AUXILIAIRE
Pour écouter ou enregistrer des signaux audio prov enant
d’un appareil auxiliaire raccordé à cet appareil.
Raccordez la fiche rouge à la prise R (droite) et la fiche
blanche à la prise L (gauche) sur la prise AUX.
UTILISATION DE L’APPAREIL AUXILIAIRE
1. Pressez la touche de FONCTION jusqu’à AUX.
2. Mettez l’appareil auxiliaire en mode de lecture.
3. RACCORDEMENT DE L’ANTENNE CADRE
AM/MW
Ne faites pas de raccordement à une antenne
extérieure.
Raccordez l’antenne cadre AM/MW fournie pour
améliorer la réception des émissions AM/MW.
4. ANTENNE FILAIRE FM
Ne la raccordez pas à une antenne extérieure.
5. BRANCHEMENT DU CORDON D’ALIMENTATION
Avant d’utiliser l’appareil, vérifiez si la tension indiquée
pour l’appareil correspond à votre tension locale.
Branchez le cordon CA dans une prise de courant CA.
L’indicateur ST ANDBY (disponibilité) s’allume et l’heure
est affichée.
Cordon CA à brancher dans une prise CA
Mise en garde:
• Veillez à débrancher le cordon CA et à mettre
toutes les fonctions hors service avant
d’effectuer les raccordements.
• Pour éviter le risque d’un choc électrique,
faites correspondre la broche large de la
fiche avec la fente large de la prise et
enfoncez la fiche à fond. (POUR L’Amérique
du Nord).
IDENTIFICATION DES COMMANDES
1
2
3
5
6
7
8
9
10
11
12
13
14
15
16
17
18
27
28
29
1. Sélecteur de MODE (SÉLECTEUR
INTERFÉRENCES/MODE FM/
COPIE)
2. Prise pour CASQUE D’ÉCOUTE
3. Commandes de fonctionnement de la
platine A du magnétocassette
Touche PAUSE
4
Touche ARRÊT/ÉJECTION
Touche AVANCE RAPIDE
Touche REMBOBINAGE
Touche de LECTURE
4. Commandes de fonctionnement de la
platine B du magnétocassette
Touche PAUSE
Touche ARRÊT/ÉJECTION
Touche AVANCE RAPIDE
Touche REMBOBINAGE
26
Touche de LECTURE
Touche ENREGISTREMENT
5. Bouton du couvercle pour cassette
6. Porte de la platine A
7. Porte du lecteur de CD
25
8. Touche ALIMENTATION/
24
23
22
20
19
21
DISPONIBILITÉ
9. Touche LECTURE/PAUSE pour
CD
10. SAUT/SYNTONISATION (ORDRE
CROISSANT/DÉCROISSANT)
/
11. Touche ARRÊT pour CD
12. PRÉRÉGLAGE/RÉPÉTITION
13. Touche MÉMOIRE
14. LECTURE ALÉATOIRE
15. CAPTEUR DE TÉLÉCOMMANDE
16. Indicateur DISPONIBILITÉ
17. Indicateur AMPLIFICATION DES
GRAVES
18. Fenêtre D’AFFICHAGE
19. Touche SYNTONISATEUR
20. Touche CD
21. Touche MAGNÉTOCASSETTE
22. Touche BANDES
23. Touche AMPLIFICATION DES
31
GRAVES
24. VOLUME +/- ( / )
25. OUVERTURE/FERMETURE
26. Porte platine B du magnétocassette
27. Antenne filaire FM
30
28. Prise pour antenne AM/MW
29. Pr ise d’entrée AUX IN
30. Cordon CA
31. Bornes d’enceintes
AFFICHAGE
123 768 10911
1. Indicateur AMPLIFICATION DES
GRAVES
2. Indicateur de fonction de CD
3. Indicateur de BANDES FM/AM(MW)
4. Indicateurs mode de RÉPÉTITION
5. Indicateurs LECTURE/PAUSE
6. Indicateur de MÉMOIRE
7. Indicateur FM STÉRÉO
8. Indicateur LECTURE ALÉATOIRE pour CD
INDICATEUR D’ALIMENTATION
Il y a une consommation de courant quand le cordon CA est branché et que l’appareil est en mode de
disponibilité, et seul l’affichage de l’horloge est allumé.
• Pressez la touche POWER (alimentation) pour Après quelques instants l’affichage indique:
mettre l’appareil en circuit.
• Pressez la touche TAPE (magnétocassette). Après quelques instants l’affichage indique:
• Pressez la touche CD (lecteur de CD). Après quelques instants l’affichage indique:
• Pressez la touche AUX (élément auxiliaire) Après quelques instants l’affichage indique:
(télécommande seulement).
• Quand vous cessez d’utiliser l’appareil, pressez la touche POWER jusqu’à ce que l’affichage indique
l’heure (en mode de disponibilité).
POWER ON
STANDBY
TAPE
CD
54
TUNER
MEMORY
TIMER
12
13
9. Indicateur fonction de SYNTONISATEUR
10. Indicateur INTRODUCTION
11. Indicateurs MINUTERIE EN CIRCUIT/HORS
CIRCUIT
12. Indicateur ARRÊT DIFFÉRÉ
13. Indicateurs HORLOGE/MINUTERIE CD/
MAGNÉTOCASSETTE/AUX/FRÉQUENCES
DE SYNTONISATION/PLAGE DE CD/
NUMÉRO DE PRÉRÉGLAGE DE STATION
TUNER
MISE EN CIRCUIT DE L’APPAREIL
MISE EN CIRCUIT DE L’APPAREIL
Pressez la touche POWER, l’affichage s’allume. Choisissez la fonction désirée et l’indicateur de
fonction correspondant s’allume.
MISE HORS CIRCUIT DE L’APPAREIL
Pressez la touche POWER pour mettre l’appareil en mode STANDBY (disponibilité). L’affichage s’éteint
et seul l’affichage de l’heure apparaît.
RÉGLAGE DE L’HORLOGE - appareil en mode de disponibilité
1. Pressez la touche MEMORY (mémoire)
et les heures et minutes clignotent.
MEMORY
3. Pressez la touche SKIP/TUNING (
UP ) pour régler les minutes.
DOWN
Remarque: Si aucune touche n’est pressée pendant 10 secondes, le réglage de l’heure est annulé
automatiquement.
2. Pressez la touche SKIP/TUNING (
DOWN ) pour régler l’heure.
DOWN
4. Pressez la touche MEMORY pour mettre
l’heure et les minutes en mémoire et mettre
UPSKIP/TUNING
l’horloge en service.
MEMORY
UPSKIP/TUNING
RÉGLAGE DU SON
Réglage du volume Pour accentuer les graves
VOL
LORS DE L’ENREGISTREMENT
Le réglage de la commande de VOLUME ou X-BASS n’affecte pas le signal enregistré.
ÉCOUTE PRIVÉE
Branchez un casque d’écoute (à mini-prise stéréo ø3, 5 mm) dans la prise PHONES.
Quand un casque d’écoute est branché, les haut-parleurs sont automatiquement mis hors service.
Pressez la touche
pour augmenter
le volume.
Pressez la touche
pour diminuer le
volume.
Pressez la touche XBASS (amplification des
graves) pour augmenter
le niveau des basses
fréquences.
FONCTIONNEMENT DE LA MINUTERIE (télécommande seulement)
L’appareil peut être mis en circuit et hors circuit automatiquement à une heure déterminée ce qui
permet de se réveiller en écoutant le magnétocassette, le lecteur de CD, la radio ou un élément
auxiliaire. Assurez-vous que l’horloge soit réglée correctement avant de régler la minuterie.
RÉGLAGE DE LA MINUTERIE - l’appareil étant en mode de disponibilité
1. Pressez la touche MODE/REMAIN jusqu’à ce que ON/OFF (en service/hors service)
soit affiché.
2. Pressez la touche MEM en mode de réglage de l’heure. Les heures et minutes clignotent.
3. Pressez les touches TUN +
4. Pressez les touches TUN -
pour régler l’heure désirée.
pour régler les minutes désirées.
5. Pressez la touche MEM pour mettre en mémoire l’heure de mise en service et hors service
de la minuterie. L’affichage retourne ensuite au mode normal.
➊➋ ➌ ➍ ➎
LECTURE AVEC MINUTERIE
1. Réglez l’heure de la mise en service et hors service de
la minuterie.
2. Choisissez la source sonore désirée avec la touche
de FONCTION.
SYNTONISATEUR : choisissez une bande et une
station.
MAGNÉTOCASSETTE : insérez une cassette.
LECTEUR DE CD : insérez un disque compact..
3. Pressez la touche TIMER.
TIMER est affiché.
4. Pressez POWER pour mettre l’appareil en mode
STANDBY.
5. Pour lecture d’une cassette, pressez la touche PLAY.
À l’heure réglée pour la mise en marche de la minuterie,
l’appareil se met en circuit automatiquement.
Annulation de la fonction de minuterie
Pressez la touche SHIFT & TIMER jusqu’à ce que l’indicateur de minuterie s’éteigne.
ARRÊT DIFFÉRÉ (télécommande seulement)
Quand l’appareil est en mode d’arrêt différé, la mise hors circuit est automatique quand la durée
spécifiée est écoulée.
1. Pressez la touche SLEEP (arrêt différé) quand
l’appareil est en circuit. SLEEP 90 s’allume dans
la fenêtre d’affichage.
Remarque : L’ARRÊT DIFFÉRÉ se règle quand
l’appareil est en mode de TUNER, TAPE, CD et
AUX.
ENREGISTREMENT AVEC MINUTERIE
L’appareil peut enregistrer une émission de
radio à une heure déterminée.
1. Réglez l’heure de la mise en service et
hors service de la minuterie.
2. Réglez l’appareil à la fonction TUNER.
3. Choisissez une bande et une station.
4. Insérez une cassette pour l’enregistrement.
5. Pressez TIMER.
TIMER est affiché.
6. Pressez POWER pour mettre l’appareil en
mode STANDBY.
7. Pressez REC (enregistrement) ce qui
enclenche aussi la touche PLAY.
2. Pressez et maintenez enfoncée la touche SLEEP
pour choisir la durée avant l’arrêt de l’appareil.
L’indicateur change de la façon suivante :
Quand la minuterie de l’arrêt différé est réglée,
l’indicateur SLEEP s’allume dans la fenêtre
d’affichage. Relâchez la touche SLEEP lorsque
la durée désirée (en minutes) est affichée.
Pour annuler l’arrêt différé, pressez la touche
SLEEP une fois et l’indicateur SLEEP disparaît
de l’affichage.
LECTEUR DE CD
LECTURE D’UN CD
1. Pressez la touche CD.
CD
2. Pressez la touche OPEN/CLOSE pour ouvrir la porte du
lecteur de CD. Placez un disque sur la platine, l’étiquette
vers le haut, puis pressez la touche OPEN/CLOSE pour
fermer la porte. Le nombre total de plages est affiché.
REMARQUES:
• Ne poussez pas la porte du lecteur pour la fermer.
• La porte ne peut s’ouvrir si l’appareil est hors circuit.
3. Pour commencer la lecture, pressez la
touche PLAY/PAUSE .
Marche arrière rapide
Maintenez la touche SKIP enfoncée
durant la lecture et relâchez-la à l’endroit
désiré.
Marche avant rapide
Maintenez la touche SKIP enfoncée
durant la lecture et relâchez-la à l’endroit
désiré.
DOWN
UPSKIP/TU NING
INTERRUPTION DE LA LECTURE
Pressez la touche PLAY/PAUSE .
L’indicateur s’allume.
Pour reprendre la lecture, pressez de nouveau
la touche PLAY/PAUSE .
ARRÊT DE LA LECTURE
Pressez la touche STOP .
Recherche du début d’une plageRecherche d’un endroit spécifique sur une plage
Recherche d’une plage précédente
Pressez la touche SKIP une fois pour
retourner au début de la plage en cours.
Pressez la touche SKIP de façon
répétée pour reculer de plage en plage.
Saut de plages
Pressez la touche SKIP de façon
répétée pour avancer de plage en plage.
OPEN/CLOSE
DOWN
LECTURE ALÉATOIRE
Avec cette fonction la lecture de chaque plage est choisie au hasard.
1. Pressez la touche RANDOM et le mot RANDOM est affiché.
RANDOM
2. Pressez la touche PLAY/PAUSE pour
commencer la lecture.
RANDOM
LECTURE RÉPÉTÉE
Cette fonction permet de répéter indéfiniment une seule plage ou toutes les plages du disque.
RÉPÉTITION DE LA MÊME PLAGE
Pressez la touche REPEAT pour répéter la
plage en cours. L’indicateur REPEA T 1 s’allume.
PRESET PRESET
RÉPÉTITION DE TOUT LE DISQUE
Pressez la touche REPEAT jusqu’à ce que
l’indicateur REPEAT ALL s’allume.
LECTURE PROGRAMMÉE — lecteur de CD en mode d’arrêt
Cette fonction permet de programmer jusqu’à 20 plages pour en effectuer la lecture dans l’ordre désiré.
1. Pressez la touche MEMORY (en mode d’arrêt).
MEMORY
2. Pressez la touche SKIP ou pour choisir la plage désirée.
UPSKIP/TU NIN G
ARRPÊT ET ANNULATION DE LA LECTURE PROGRAMMÉE
Arrêt momentané de la lecture programmée :
• Pressez la touche PLAY/PAUSE est affiché. Pressez de nouveau cette touche pour
reprendre la lecture.
MEMORY
Arrêt de la programmation:
ANNULATION DE LA LECTURE ALÉATOIRE
1. Pressez la touche STOP pour cesser la
lecture aléatoire.
2. Pressez la touche RANDOM pour désactiver
la lecture aléatoire
RANDOM
LECTURE INTRO - - lecteur de CD en mode d’arrêt (télécommande seulement)
Pressez les touches SHIFT et INTRO; le mot INTRO est affiché.
ANNULATION DE LA LECTURE RÉPÉTÉE
Pressez la touche REPEAT jusqu’à ce que l’indicateur REPEAT s’éteigne.
PRESET
EN MODE D’ARRÊT
EN MODE DE PAUSE
DOWN
3. Pressez de nouveau la touche MEMORY pour mettre cette plage en mémoire.
MEMORY
4. Pour programmer des plages supplémentaires,
5. Pour commencer la lecture, pressez la tou-
che PLA Y/PAUSE .
• Pressez la touche STOP .
Effacement de la programmation:
• Pressez la touche STOP et réglez l’appareil
à une autre fonction.
ou
Ouvrez la platine du disque en pressant la
touche OPEN/CLOSE.
OPEN/CLOSE
répétez les étapes 2 à 3.
Les fonctions de RÉPÉTITION peuvent aussi
s’effectuer quand l’appareil est en mode d’arrêt.
INTRO
La lecture commence à partir de la plage no 1
du disque en cours après une pression de la
touche PLAY/PAUSE .
UPSKIP/TU NIN G
ANNULATION DE LA LECTURE INTRO
Pressez la touche STOP pour cesser la lecture intro.
Les fonctions de RÉPÉTITION peuvent aussi
s’effectuer quand l’appareil est en mode de
pause. La lecture est reprise après une
pression de la touche PLAY/PAUSE .
REMARQUE:
Lorsque le mode de programmation est en service, les touches SKIP ou s’appliquent
seulement aux plages programmées.
MARCHE AV ANTMARCHE ARRIÈRE
Maintenez la touche enfoncée
MARCHE ARRIÈRE
Pressez la touche une fois
MARCHE AV ANT
REMARQUE :
Le lecteur de CD peut produire des sons hachés si les enceintes acoustiques sont placées trop près du
lecteur ou bien si le volume ou le niveau des graves est élevé.
Page 4

SYNTONISATEUR
r.
Bande enregistrée Bande vierge
r.
SYNTONISATION MANUELLE D’UNE STATION
1. Pressez la touche TUNER (syntonisateur).
TUNER
2. Pressez la touche BAND (bandes)
pour choisir la bande désirée.
BAND
AMÉLIORATION DE LA RÉCEPTION
FM
Déroulez complètement l’antenne filaire et
placez-la dans la position qui procure la
meilleure réception.
TIMER
TUNER
MEMORY
3. Pressez la touche TUNING ou pour
choisir une station.
DOWN
AM/MW
Raccordez l’antenne cadre (fournie)
à la borne à déclic AM (MW) ANT.
Orientez l’antenne cadre AM de façon
à obtenir la meilleure réception.
UPSKIP/TU NING
PRÉRÉGLAGE DE STATIONS
Vous pouvez mettre en mémoire 16 stations FM et 16 stations AM). Vous pouvez ensuite les syntoniser
en choisissant leurs numéros de préréglage. Il est possible de mettre les stations en mémoire dans
n’importe quel ordre et dans la bande de votre choix.
Préréglage manuel
Cette fonction permet de prérégler manuellement les stations dans l’ordre désiré.
1. Pressez la touche TUNER. 2. Pressez la touche BAND pour choisir la
TUNER
3. Pressez la touche MEMORY (mémoire)
jusqu’à ce que l’indicateur de mémoire
clignote.
MEMORY MEMORY
bande désirée, puis pressez la touche SKIP
(saut)
syntoniserune station.
4. Pressez la touche MEMORY pour mettre
la station en mémoire.
BAND
ou pour
DOWN
UPSKIP/TUNING
Puis répétez les étapes 2 à 4.
SYNTONISATION D’UNE STATION PRÉRÉGLÉE
1. Pressez la touche TUNER. 2. Pressez la touche BAND
pour choisir la bande
désirée.
TUNER BAND PRES ET
3. Pressez la touche PRESET
(préréglage) pour choisir le
numéro de préréglage.
TÉLÉCOMMANDE
1. ALIMENTATION/DISPONIBILITÉ
2. Touche CD
3. Touche MAGNÉTOCASSETTE
4. Touche ARRÊT
5. Touche SAUT/SYNTONISATION
6. Touche MÉMOIRE /INTRODUCTION
7. Touches MODE/DURÉE RESTANTE
8. Touche ARRÊT DIFFÉRÉ/MINUTERIE
9. Touche VOLUME
10. Touche ALTERNANCE
11. BANDES/LECTURE ALÉATOIRE
12. AMPLIFICATION DES GRAVES
13. Touche LECTURE/PAUSE
14. Touche RÉPÉTITION/PRÉRÉGLAGE
15. Touche SYNTONISATEUR
16. Touches AUX.
UTILISATION CORRECTE DE LA TÉLÉCOMMANDE
• Pointez la télécommande vers le CAPTEUR DE TÉLÉCOMMANDE situé sur l’appareil.
• Si l’éclairage ambiant est élevé, le rendement du CAPTEUR DE TÉLÉCOMMANDE à infrarouge peut
baisser et entraîner un mauvais fonctionnement.
• La distance efficace conseillée pour le fonctionnement de la télécommande est d’environ 6 mètres (19 pi).
POSE DE LA PILE
1. Ouvrez le compartiment
de la pile.
2. Insérez une pile CR2025
(3V).
Retirez la feuille de PVC avant
díutiliser la
tÈlÈcommande.
ATTENTION
FICHE TECHNIQUE
D’ORDRE GÉNÉRAL
Puissance de sortie: 5 W x 2 (DHT 10%)
Consommation de courant: 42 W
Source d’alimentation: CA ~ 120 V 60 Hz (Canada et É.-U.)
CA ~ 220 V 50 Hz (Chine)
CA ~ 230 V 50 Hz (Europe et Hong Kong)
CA ~ 240 V 50 Hz (Australie)
CA ~ 110/120 V - 220/240 V 50/60 Hz (Autres pays)
Les caractéristiques peuvent changer sans préavis.
CHAÎNE VERTICALE À LECTEUR DE CD
INSTRUCTIONS DE FONCTIONNEMENT
RECHERCHE AUTOMATIQUE D’UNE STATION
Pressez la touche TUNING UP (sens croissant) ou DOWN (sens décroissant) pendant 1 à 2 secondes,
et la recherche d’une station commence automatiquement. La recherche cesse dès qu’une station est
syntonisée. Il peut ne pas y avoir d’arrêt sur une station dont le signal est très faible.
RÉCEPTION D’UNE ÉMISSION FM STÉRÉO
Réglez le sélecteur de MODE à FM STEREO.
Si une émission FM stéréo est captée, l’indicateur STEREO s’allume.
MAGNÉTOCASSETTE
LECTURE SUR PLATINE A OU B
Utilisez seulement des cassettes normales (type I ) pour la lecture.
1. Pressez la touche TAPE
(magnétocassette).
TAPE
ARRÊT DE LA LECTURE
Pressez la touche STOP/EJECT .
INTERRUPTION DE LA LECTURE
Pressez la touche PAUSE .
Pour reprendre la lecture, pressez de nouveau la
touche PAUSE .
AVANCE OU REMBOBINAGE RAPIDES
Pressez la touche F.FWD (avance rapide) ou REW
(rembobinage) . Pressez la touche STOP/
EJECT pour cesser le défilement à l’endroit désiré.
LECTURE CONSÉCUTIVE — DE LA PLATINE A À LA PLATINE B
1. Pressez la touche TAPE. 2. Insérez une cassette dans chaque platine.
TAPE
3. Pressez la touche PLAY. 4. Pressez la touche PAUSE. 5. Pressez la touche PLAY.
Dès que la cassette dans la platine A arrive en fin de bande et s’arrête, le mode de pause pour la platine
B est dégagé et la lecture commence automatiquement.
2. Pressez la touche STOP/
EJECT (arrêt/éjection) et
insérez une cassette dans
laplatine A ou la platine B.
PLATINE A
PLATINE B
EN FIN DE BANDE
Durant le défilement rapide ou la lecture normale,
la cassette s’arrête automatiquement en fin de
bande.
SI LA PLATINE A ET LA PLATINE B SONT
RÉGLÉES AU MODE DE LECTURE
La platine A effectue la lecture et aucun son ne
provient de la platine B.
La lecture
se fait en
premier
3. Pressez la touche PLAY
(lecture).
PLATINE A PLATINE B
PLATINE BPLATINE A
PLATINE BPLATINE BPLATINE A
OU
La lecture
se fait en
second
REMARQUE:
Les données mises en mémoire (numéro de préréglage, fréquence et bande de fréquences) sont
affichées dans l’ordre numérique, sans tenir compte des bandes de fréquences.
COPIE — DE LA PLATINE A À LA PLATINE B
Utilisez seulement des cassettes normales (type I) pour l’enregistrement et la lecture.
1. Pressez la touche TAPE. 3. Poussez le commutateur de
TAPE
4. Pressez la touche PA USE.6.Pressez la touche PLAY.5. Pressez la touche RECORD
PLATINE B
ARRÊT DE LA COPIE
Pressez les touches STOP/EJECT de la platine A et de la platine B.
Remarque:
Ne changez pas la vitesse de copie en cours de copie.
ENREGISTREMENT —— PLATINE B SEULEMENT
ENREGISTREMENT PROVENANT DU LECTEUR DE CD
1. Pressez la touche CD.
CD
3. Pressez la touche RECORD ce qui
enclenche aussi la touche PLAY.
PLATINE B
ARRÊT DE L’ENREGISTREMENT
Pressez la touche STOP/EJECT de la platine B.
INTERRUPTION DE L’ENREGISTREMENT
Pressez la touche PAUSE de la platine B.
Pour reprendre l’enregistrement, pressez de nouveau
la touche PAUSE.
2. Insérez la bande enregistrée
dans la platine A et la bande
vierge dans la platine B.
(enregistrement) ce qui
enclenche aussi la touche PLAY.
PLATINE B
2. Insérez une cassette dans le
compartiment pour
cassette.
4. Pressez la touche PLAY/PAUSE sur le
lecteur de CD.
EFFACEMENT D’UNE BANDE ENREGISTRÉE
1. Pressez la touche de FONCTION à TAPE.
2. Insérez une cassette, le côté que vous désirez
effacer face à vous.
3. Pressez la touche RECORD pour commencer
l’effacement.
copie à NORMAL (vitesse
normale) ou HIGH (vitesse
élevée) suivant la vitesse
désirée.
PLATINE A
Le côté à
enregistre
PLATINE B
REMPLACEMENT DE LA PILE
Quand la pile s’affaiblit, la distance de fonctionnement de la télécommande baisse considérablement et
il faut remplacer la pile.
REMARQUE:
Si vous n’allez pas utiliser la télécommande pendant une longue période de temps, retirez la pile pour
éviter toute corrosion en cas de fuite de la pile.
ENREGISTREMENT —— PLATINE B SEULEMENT
Utilisez seulement des cassettes normales (type I) pour l’enregistrement.
ENREGISTREMENT PROVENANT DU SYNTONISATEUR INTÉGRÉ
1. Pressez la touche
TUNER et syntonisez la
station désirée.
TAPE
Remarque :
Si un sifflement (interférences) se fait entendre, vous pouvez le réduire à l’aide de l’interrupteur
d’interférences; cette fonction se sélectionne en pressant la touche DUBBING, l’appareil étant en mode
TUNER (syntonisateur).
2. Insérez une cassette dans le
compartiment pour cassette.
Le côté à
enregistre
PLATINE B
3. Pressez la touche
RECORD ce qui enclenche
aussi la touche PLAY.
PLATINE B
ENTRETIEN
NETTOYAGE DES CD
Si un CD produit des sons hachés ou si la lecture n’est pas possible,
il faut peut-être nettoyer le disque. Avant d’en effectuer la lecture,
essuyez le disque en allant du centre vers le bord, avec un chiffon.
Après son utilisation, rangez le disque dans son étui.
NETTOYAGE DES TÊTES DU MAGNÉTOCASSETTE
Pour conserver une qualité de son optimale, nettoyez les têtes
de lecture/enregistrement (a), la tête d’effacement (b), les galets
de pression (c) et les cabestans (d) à intervalles réguliers (après
environ 10 heures d’utilisation). Utilisez un coton-tige légèrement
humecté avec un liquide de nettoyage ou de l’alcool dénaturé.
NETTOYAGE DE L’APPAREIL
N’utilisez pas de produits chimiques volatils sur cet appareil. Essuyez-le avec un chiffon doux.
REMARQUE IMPORTANTE
• Si des indications anormales sont affichées ou si un problème de fonctionnement se produit,
débranchez le cordon d’alimentation CA, attendez au moins 5 secondes, puis branchez de
nouveau le cordon d’alimentation CA.
GUIDE DE DÉPANNAGE
PROBLÈMES
Pas d’alimentation.
Impossible d’insérer une cassette.
La bande se bloque dans le mécanisme
d’entraînement.
Défilement irrégulier de la bande.
Bruit excessif durant la lecture d’une cassette.
Impossible d’abaisser la touche REC
(enregistrement) .
Impossible d’enregistrer ou enregistrement de
mauvaise qualité.
Impossible d’effacer un enregistrement précédent.
La lecture du CD ne commence pas.
Aucun son ne provient du lecteur de CD.
Le lecteur de CD produit des sons hachés.
VÉRIFICATIONS
• Cordon débranché ou mal enfoncé?
• Cassette posée à l’envers?
• Galet de pression ou cabestan sales?
• Bande trop détendue?
• Bande trop détendue?
• Tête sale?
• Y a-t-il une cassette dans le compartiment?
• Languette de protection contre l’effacement
retirée?
• Têtes sales?
• Tête d’effacement sale?
• CD placé à l’envers?
• CD ou lentille du capteur très sales?
• Compartiment du disque fermé correctement?
• Sélecteur de fonction réglé à CD?
• Mode de pause en service?
• Condensation à l’intérieur de l’appareil?
• Lentille du capteur ou CD très sales?
• Appareil soumis à des vibrations excessives?
• Égratignures sur le CD?
AVERTISSEMENT
RISQUE DE CHOC ÉLECTRIQUE
NE P AS OUVRIR
Le symbole de l’éclair et
d’une flèche à l’intérieur
d’un triangle signale qu’il
y a une « tension
dangereus e » à l’intérieur
de l’appareil.
AVER TISSEMENT : POUR RÉDUIRE LE RISQUE
DE CHOCS ÉLECTRIQUES, NE PAS RETIRER
LE COUVERCLE (NI LE DOS). A UCUNE PIÈCE
NÉCESSIT ANT L ’ENTRETIEN P AR L’UTILISA TEUR
À L’INTÉRIEUR. POUR RÉPARATION,
S’ADRESSER À UN RÉP ARA TEUR QU ALIFIÉ.
AVERTISSEMENT : POUR RÉDUIRE LE RISQUE D’INCENDIE OU DE CHOCS
ÉLECTRIQUES, NE PAS EXPOSER CET APP AREIL À LA PLUIE OU À L’HUMIDITÉ.
AVERTISSEMENT
APPAREIL À LASER DE CLASSE 1
MISE EN GARDE
APPAREIL Á LASER DE CLASSE 1
PRODUIT LASER DE CLASSE 1
Cet appareil contient un dispositif au laser de faible puissance.
RADIATIONS LASER INVISIBLES SI
L’APPAREIL EST OUVERT ET SI LE
DISPOSITIF DE VERROUILLAGE
EST NEUTRALISÉ. ÉVITER
L’EXPOSITION AU FAISCEAU.
MISES EN GARDE
EMPLACEMENT
• N’utilisez pas cet appareil dans les endroits
extrêmement chauds, froids, poussiéreux
ou humides.
• Placez l’appareil sur une surface plate et de
niveau.
• Laissez l’air circuler librement dans les
fentesd’aération de l’appareil. Ne le placez
pas sur des surfaces molles, ne le couvrez
pas avec du tissu et ne le placez pas sur un
tapis.
SÉCURITÉ
• Lorsque vous branchez et débranchez
lecordon CA, tenez la fiche et non le cordon.
Le tirage du cordon peut l’endommager et
créer un risque.
• Débranchez le cordon d’alimentation CA si
vous n’allez pas utiliser l’appareil pendant
une certaine durée de temps.
TENSION CA
• Avant d’utiliser l’appareil, vérifiez si la tension indiquée pour l’appareil correspond à
votre tension locale.
En cas de problème, débranchez le cordon d’alimentation CA et faites réparer l’appareil
par un personnel qualifié.
RENSEIGNEMENT FCC
Cet appareil est en conformité avec la section
15 des règles de la FCC. Son fonctionnement
est soumis aux deux conditions suivantes:
(1)Cet appareil ne doit pas causer
d’interférences gênantes, et
(2)Cet appareil doit supporter toute
interférence reçue, y compris celles qui
pourraient causer son mauvais
fonctionnement.
CONDENSATION
• Si l’appareil est laissé dans une pièce
chaude et humide, des gouttelettes d’eau
ou de la condensation peuvent se former à
l’intérieur du lecteur de CD.
• De la condensation à l’intérieur de l’appareil
peut dérégler son fonctionnement normal.
• Laissez l’appareil pendant 3 heures dans
une pièce chauffée pour éliminer la condensation.
AVERTISSEMENT AU SUJET DE LA
VENTILATION
• Il ne faut pas empêcher la ventilation
normale de l’appareil dont le but est
spécifique.
Le point d’exclamation à
l’intérieur d’un triangle
signale qu’il y a des
instructions importantes
qui accompagnent
l’appareil.
811-227191-020
Page 5

CONEXIONES DEL SISTEMACONEXIONES DEL SISTEMA
CONEXIONES DEL SISTEMA
CONEXIONES DEL SISTEMACONEXIONES DEL SISTEMA
ANTENA DE
CUADRO
AM/MW
El cable de alimentación de CA se conecta al enchufe
de CA ubicado en la pared.
1. CONEXIÓN DE LOS CABLES DE LOS PARLANTES
Conecte el parlante derecho a la terminal con la letra R, y el parlante
izquierdo a la terminal con la letra L.
Conecte los cables que tienen una línea blanca a las terminales de
color rojo con el símbolo (+) y los cables negros a las terminales de color
negro con el símbolo (-).
ADVERTENCIA:
Si conecta a este aparato parlantes distintos a los que se proporcionan
junto con este equipo, es posible que dañe este aparato de sonido.
2. CONEXIÓN A OTROS EQUIPOS OPCIONALES
En caso que usted desee utilizar este aparato para escuchar o grabar
señales de audio provenientes de una unidad externa, conecte el
enchufe macho de color rojo al enchufe hembra con la letra “R” y el
enchufe macho de color blanco al enchufe hembra con la letra “L”,
ubicados en la sección AUX del equipo.
P ARA PODER ESCUCHAR EL EQUIPO QUE SE HA AGREGADO
1. Presione el botón FUNCTION hasta llegar a la opción AUX.
2. Haga sonar la unidad externa.
ENCH UF E
LINE O UT
3. CONEXIÓN DE LA ANTENA DE CUADRO PARA BANDAS AM Y MW.
No conecte a antena exterior.
Para obtener una mejor señal de transmisión de las bandas AM y MW , conecte la antena de cuadro par a bandas
AM y MW que viene incluida con el equipo.
4. ANTENA DE CABLE PARA LA BANDA FM.
No conecte a antena exterior.
5. CONEXIÓN DEL CABLE DE ALIMENTACIÓN
Antes de usar este aparato, asegúrese de que el promedio de voltaje de esta unidad sea el mismo que el de su
voltaje local.
Conecte el cable de alimentación de CA al enchufe de CA ubicado en la pared.
El indicador STANDBY se encenderá y en el visualizador del equipo aparecerá el reloj.
Cuidado:
• Antes de realizar cualquier conexión, asegúrese de que el cable de alimentación de CA esté desconectado
y que todas las funciones estén apagadas.
• Para evitar sufrir descargas eléctricas, inserte completamente la pata ancha del enchufe macho a la
ranura ancha correspondiente del enchufe de la pared. (Para Norteamérica).
IDENTIFICACIÓN DE LAS PIDENTIFICACIÓN DE LAS P
IDENTIFICACIÓN DE LAS P
IDENTIFICACIÓN DE LAS PIDENTIFICACIÓN DE LAS P
1
2
3
5
6
7
8
9
10
11
12
13
14
15
16
17
18
27
28
29
ARAR
TES DEL EQUIPOTES DEL EQUIPO
AR
TES DEL EQUIPO
ARAR
TES DEL EQUIPOTES DEL EQUIPO
1. Selector de modalidad MODE (BEAT
CUT/FM MODE/ DUBBING)
2. Entrada para audífonos PHONES
3. Botones de operación del casete de
la pletina A
Botón PAUSE
Botón
4
26
25
24
23
22
20
19
31
30
21
Botón
Botón REW
Botón PLAY
4. Botones de operación del casete de
la pletina B
Botón PAUSE
Botón STOP/EJECT
Botón F.FWD
Botón REW
Botón PLAY
Botón REC
5. Cubierta de las perillas de la casetera
6. Tapa del casete de la pletina A
7. Tapa del reproductor de CDs
8. Botón de encendido y suspensión
POWER/STANDBY
9. Botón de reproducción y pausa del
disco CD PLAY/PAUSE
10. Botones de salto y sintonización SKIP/
TUNING y (hacia abajo y
hacia arriba)
11. Botón de detención del disco CD
STOP
12. Botón PRESET/REPEAT
13. Botón MEMORY
14. Botón RANDOM
15. SENSOR REMOTO
16. Indicador STANDBY
17. Indicador X-BASS
18. Ventana del visualizador
19. Botón TUNER
20. Botón CD
21. Botón TAPE
22. Botón BAND
23. Botón X-BASS
24. Botón VOLUME +/- ( / )
25. Botón OPEN/CLOSE
26. Tapa del casete de la pletina B
27. Cable de la antena FM
28. Enchufe para la antena AM/MW
29. Enchufe hembra AUX IN
30. Cable de alimentación de CA
31. Terminales de los parlantes
STOP/EJECT
F.FWD
PANTALLA DEL VISUALIZADOR
123 768 10911
1. Indicador X-BASS
2. Indicador de función CD
3. Indicador de banda FM/ MW (AM)
4. Indicadores de la modalidad REPEAT
5. Indicadores PLAY/PAUSE
6. Indicador MEMORY
7. Indicador F M STEREO
8. Indicador CD RANDOM
INDICADOR POWER
Al conectar el cable de alimentación de CA, la unidad queda bajo la modalidad de suspensión stand-by.
En esta etapa, el equipo ya está consumiendo corriente y solamente aparecerá la hora en el visualizador
del equipo.
• Presione el botón POWER para encender la unidad. Luego de un período breve de tiempo, en el
• Presione el botón TAPE. Luego de un período breve de tiempo, en el
• Presione el botón CD. Luego de un período breve de tiempo, en el
• Presione el botón AUX (sólo con el control remoto). Luego de un período breve de tiempo, en el
• Luego de usar el equipo, presione POWER hasta que en el visualizador aparezca sólo la hora y el
equipo vuelva nuevamente a la modalidad stand-by.
POWER ON
STANDBY
TAPE
CD
54
TUNER
MEMORY
TIMER
12
13
9. Indicador de función TUNER
10. Indicador INTRODUCTION
11. Indicadores TIMER ON/OFF
12. Indicador SLEEP
13. Indicadores CLOCK/ CD TIMING/ TAPE/ AUX/
TUNER FREQUENCY/ CD TRACK/PRESET
STATION NUMBER
visualizor aparecerá:
TUNER
visualizor aparecerá:
visualizor aparecerá:
visualizor aparecerá:
AL ENCENDER LA UNIDAD
PARA ENCENDER LA UNIDAD
Presione el botón POWER y el visualizador se encenderá. Seleccione la función que desee operar y el
indicador de la función correspondiente aparecerá en la pantalla del visualizador.
PARA APAGAR LA UNIDAD
Presione el botón POWER para entrar nuevamente a la modalidad STANDBY. La luz del visualizador se
apagará y sólo quedará en pantalla la sección del reloj.
PROGRAMACIÓN DEL RELOJ (en la modalidad standby)
1. Presione el botón MEMORY y la hora y
los minutos comenzarán a pestañear.
MEMORY
3. Presione El botón
ARRIBA) para ingresar los minutos.
Nota: Usted saldrá automáticamente de la modalidad de programación del reloj, si transcurridos 10
segundos no presiona ningún botón.
SKIP/TUNING (
DOWN
2. Presione el botón SKIP/TUNING
ABAJO) para ingresar la hora.
(
DOWN
4. Presione el botón MEMORY para dejar
registrada la hora y los minutos y para
UPSKIP/TUNING
echar a andar el reloj.
MEMORY
UPSKIP/TUNING
AJUSTE DEL SONIDO
Para ajustar el volumen. Para oír fuerte e intensamente los tonos bajos
VOL
AL GRABAR
Los ajustes que haga a los controles VOLUME y X-BASS no producirán ningún efecto en la nueva
grabación.
PARA ESCUCHAR EN PRIVADO
Conecte los audífonos (minienchufe estéreo de 3,5 mm de diámetro) al enchufe PHONES.
Al conectar los audífonos, los parlantes quedan desconectados automáticamente
Presione el botón
para subir el
volumen.
Presione el botón
para bajar el
volumen.
Presione el botón XBASS para incrementar
el nivel sonido de las
frecuencias graves.
OPERACIÓN DEL TEMPORIZADOR (sólo con el control remoto)
Usted puede programar el equipo para que se encienda o apague automáticamente a una hora preestablecida.
Usted podrá despertarse oyendo la música correspondiente a la función programada (tape, CD, radio o AUX).
Asegúrese de que el reloj tenga la hora correcta antes de programar el temporizador.
PROGRAMACIÓN DEL TEMPORIZADOR (en modalidad standby)
1. Presione el botón MODE/REMAIN hasta que en el visualizador aparezca ON/OFF.
2. Mientras esté en la modalidad de reloj, presione el botón MEM
a pestañear.
3. Presione los botones
4. Presione los botones TUN - para ingresar los minutos correctos.
5 Presione el botón MEM para almacenar esta información en la memoria. El equipo regresará a
su modalidad normal.
TUN + para ingresar la hora correcta.
. La hora y los minutos comenzarán
➊➋ ➌ ➍ ➎
TEMPORIZADOR PARA REPRODUCCIÓN
1. Programe la hora de encendido y apagado del
equipo.
2. Seleccione la fuente de la programación
deseada, utilizando el botón FUNCTION.
TUNER: seleccione una banda y una estación.
TAPE: inser te una cinta.
CD: Inserte un disco.
3. Presione TIMER El indicador TIMER aparece
en pantalla.
4. Presione el botón POWER para dejar el equipo
en la modalidad standby.
5. En caso de querer reproducir una cinta, deje
presionado el botón PLAY.
A la hora indicada de encendido, el equipo se
encenderá automáticamente.
Para cancelar la función del temporizador
Presione el botón SHIFT & TIMER hasta que el indicador del temporizador se apague.
Programación para dormir SLEEP (operable sólo con el control remoto)
Al utilizar esta modalidad de programación del temporizador, el equipo se apaga automáticamente una
vez llegada la hora especificada.
1. Presione el botón SLEEP mientras el equipo
esté encendido. El indicador “SLEEP 90”
aparecerá en la pantalla.
Nota: Este tipo de programación es oper
able sólo en las modalidades TUNER, TAPE,
CD o AUX.
TEMPORIZADOR PARA GRABACIÓN
El equipo grabará una transmisión radial a la
hora programada.
1. Programe la hora de encendido y apagado
del equipo.
2. Lleve el equipo a la función TUNER.
3. Seleccione una banda y una estación de radio.
4. Introduzca la cinta en la que vaya a grabar.
5. Presione TIMER. El indicador TIMER aparece
en pantalla.
6. Presione POWER para dejar el equipo en la
modalidad standby.
7. Deje presionado el botón de grabación REC,
el que a su vez activará el botón PLAY.
2. Presione y mantenga presionado el botón SLEEP
para seleccionar el tiempo restante antes de que
el equipo se apague.
El indicador varía de acuerdo con la
secuencia siguiente:
El temporizador para dormir queda programado
y el indicador SLEEP aparece en el visualizador.
Suelte el botón SLEEP cuando el tiempo que
usted desee aparezca en la pantalla (dicho
tiempo está medido en minutos).
Para cancelar esta función, presione una vez el
botón SLEEP y el indicador SLEEP desaparecerá
de la pantalla.
SECCIÓN DEL CD
REPRODUCCIÓN DEL CD
1. Presione el botón CD.
2. Presione el botón OPEN/CLOSE para abrir la tapa del
reproductor de CD. Coloque un disco en la bandeja, con la
parte escrita mirando hacia arriba. Vuelva a presionar OPEN/
CLOSE para cerrar la bandeja. En el visualizador aparecerá el
número total de pistas del disco.
NOTAS:
• No empuje la bandeja de discos para cerrarla.
• No se puede abrir la bandeja de discos, si el equipo está apagado.
3. Para iniciar la reproducción, presione el
botón PLAY/PAUSE.
¿Cómo ubicar un punto específico dentro de
una pista?
Para retroceder a alta velocidad
Durante la reproducción, mantenga
presionado el botón SKIP y suéltelo a la
altura de la pista que usted desee oír.
Para avanzar a alta velocidad
Durante la reproducción, mantenga
presionado el botón SKIP y suéltelo a la
altura de la pista que usted desee oír.
DOWN
CD
PARA INTERRUMPIR LA REPRODUCCIÓN
Presione el botón PLAY/PAUSE.
El indicador se encenderá.
Para reanudar la reproducción, presione
nuevamente el botón PLAY/PAUSE
PARA DETENER LA REPRODUCCIÓN
Presione el botón STOP.
Para ir al comienzo de una pista
Para hallar una pista anterior
Presione una vez el botón SKIP para
devolverse al inicio de la pista actual.
Presione repetidas veces el botón SKIP
para retroceder a través de las pistas, yendo
de una en una a la vez.
Para saltar pistas
Presione repetidas veces el botón SKIP
para avanzar a través de las pistas, yendo
UPSKIP/TU NING
de una en una a la vez.
DOWN
OPEN/CLOSE
REPRODUCCIÓN AL AZAR
Esta función le permitirá oír la reproducción de las pistas siguiendo un orden aleatorio.
1. Presione el botón RANDOM. El indicador
RANDOM aparecerá en pantalla.
RANDOM
PARA CANCELAR LA REPRODUCCIÓN AL AZAR
1. Presione el botón STOP para detener la
reproducción al azar.
REPRODUCCIÓN DE LA INTRODUCCIÓN (operable en la modalidad de detención del
reproductor de CD y sólo por medio del control remoto)
Presione el botón SHIFT&INTRO. La palabra INTRO aparecerá en la pantalla del visualizador.
UPSKIP/TU NIN G
PARA CANCELAR LA REPRODUCCIÓN DE LA INTRODUCCIÓN
Presione el botón STOP para detener esta modalidad de reproducción.
2. Presione el botón PLAY/PAUSE para
iniciar la reproducción aleatoria.
RANDOM
2. Presione el botón RANDOM para desactivar
esta función.
RANDOM
INTRO
REPRODUCCIÓN REPETIDA
Esta función le permite tocar una o todas las pistas del disco reiteradamente.
PARA REPETIR LA MISMA PISTA
Presione el botón REPEA T para repetir la pista
actual. El indicador “REPEA T 1” se encenderá.
PRESET PRESET
PARA CANCELAR LA REPRODUCCIÓN REPETIDA
Presione el botón REPEAT hasta que el indicador REPEAT se apague.
PRESET
MIENTRAS ESTÉ EN MODALIDAD DE DETENCIÓN
Las operaciones de la función de repetición
también se pueden activar mientras el equipo
está en modalidad de detención. La reproducción
se iniciará a partir de la primera pista del disco
actualmente seleccionado y una vez que haya
presionado el botón PLAY/PAUSE.
PARA REPETIR TODO EL DISCO
Presione el botón REPEAT hasta que el
indicador“REPEAT ALL” aparezca en pantalla.
MIENTRAS ESTÉ EN MODALIDAD DE PAUSA
Las operaciones de la función de repetición
también se pueden activar mientras el equipo
está en modalidad de pausa. La reproducción
se reiniciará una vez que haya presionado el
botón PLAY /PAUSE.
PROGRAMACIÓN DE LA REPRODUCCIÓN (en modalidad de detención)
Con esta función, usted puede programar la reproducción de hasta 20 pistas, siguiendo el orden que
usted desee.
1. Presione el botón MEMORY (mientras está en la modalidad de detención).
MEMORY
2. Presione el botón SKIP para seleccionar la pista deseada.
DOWN
3. Presione nuevamente el botón MEMORY para dejar registrada esta pista en la memoria.
MEMORY
4. Para programar otras pistas,
UPSKIP/TU NIN G
5. Para iniciar la reproducción, presione el botón
PLA Y/PAUSE.
repita los pasos 2 y 3.
NOTA:
Cuando esta programación está activada, los botones SKIP sólo se pueden usar para buscar
las pistas seleccionadas.
¿CÓMO DETENER Y CANCELAR LA REPRODUCCIÓN PROGRAMADA?
Para detener por un momento la reproducción programada:
• Presione el botón PLAY/PAUSE y el indicador "II" aparecerá en la pantalla del visualizador.
Presione nuevamente este botón para reanudar la reproducción.
MEMORY
Para detener la reproducción programada:
• Presione el botón STOP.
Para borrar el programa completo:
• Presione el botón STOP y lleve el equipo a
una función diferente.
O
Abra la bandeja para discos, presionando el
botón OPEN/CLOSE.
OPEN/CLOSE
HACIA DELANTEHACIA A TRÁS
Mantenga apretado
NOTA:
El reproductor de CD puede saltar ciertas partes de una pista, si los parlantes están ubicados muy
cerca del equipo o si se sube mucho el volumen de la unidad o el nivel de los tonos bajos.
HACIA A TRÁS
HACIA DELANTE
Mantenga apretado
Page 6

SECCIÓN DE LA RADIO
a
Cinta que se va
Cinta donde se
a
PARA SINTONIZAR MANUALMENTE UNA ESTACIÓN
1. Presione el botón TUNER.
TUNER
2. Presione el botón BAND para seleccionar
la banda que desea oír.
BAND
PARA OBTENER UNA MEJOR RECEPCIÓN
DE LA BANDA FM
Desenrolle completamente la antena de cable.
Luego, extiéndala y póngala en la posición
que le brinde el mejor sonido.
3. Presione el botón TUNING para
TIMER
TUNER
MEMORY
seleccionar una estación.
DOWN
DE LA BANDA AM/MW
Conecte la antena de cuadro (que viene
incluida con el equipo) a la terminal AM
(MW) ANT y ubíquela en el lugar que le
brinde el mejor sonido posible.
UPSKIP/TUN ING
PARA PROGRAMAR UNA ESTACIÓN
Esta unidad puede almacenar hasta 16 estaciones en las bandas AM y FM. Para localizar dichas
estaciones, usted deberá seleccionar el número de programación pertinente. Usted podrá almacenar en
la memoria estaciones de cualquier banda y en el orden que usted desee.
Programación manual de la memoria
Esta función le permite programar manualmente estaciones da radio en los canales que usted elija.
1. Presione el botón TUNER. 2. Presione el botón BAND para elegir la banda
TUNER
3. Presione el botón MEMORY hasta que el
indicador MEMORY empiece a pestañear
en la pantalla.
MEMORY MEMORY
que usted desee y luego presione los
botones
estación.
BAND
4. Presione el botón MEMORY para dejar
registrada su selección.
SKIP para sintonizar una
DOWN
UPSKIP/TUNING
Luego, repita los pasos 2 al 4.
PARA SINTONIZAR UNA ESTACIÓN YA PROGRAMADA
1. Presione el botón TUNER.
TUNER BAND
2. Presione el botón BAND
para seleccionar una
banda.
3. Presione el botón PRESET
para seleccionar el número
de programación.
PRESET
CONTROL REMOTOCONTROL REMOTO
CONTROL REMOTO
CONTROL REMOTOCONTROL REMOTO
1. Botón POWER/STANDBY
2. Botón CD
3 . Botón TAPE
4. Botón STOP
5. Botones SKIP/TUNING
6. Botón MEMORY / INTRO
(introducción)
7. Botones MODE/REMAIN
8. Botón SLEEP/TIMER
9. Botón VOLUME
10. Botón SHIFT
11. Botón BAND/RANDOM
12. Botón X-BASS
13 . Botón PLA Y/PAUSE
14. Botón REPEAT/PRESET
15. Botón TUNER
16. Botón AUX
USO CORRECTO DEL CONTROL REMOTO
• Dirija el control remoto hacia el sensor remoto ubicado en el equipo.
• Al estar en presencia de una fuente de luz ambiental muy potente, el funcionamiento del sensor
remoto infrarrojo puede verse alterado y provocar de esta manera operaciones poco fidedignas.
• La distancia recomendada para operar el control remoto es de 6 metros (19 pies).
PARA INSTALAR LAS BATERÍAS
1. Abra la tapa del
compartimento para pilas.
2. Introduzca una pila de
tamaño CR2025 (3V).
Retire la l·mina de PVC antes de
hacer funcionar el control remoto.
ATENCI”N
ESPECIFICACIONESESPECIFICACIONES
ESPECIFICACIONES
ESPECIFICACIONESESPECIFICACIONES
GENERALES
Potencia de salida: 5 W x 2 (10% THD)
Consumo de corriente: 42 W
Toma de corriente: CA ~120V 60 Hz (USA y Canadá)
Especificaciones sujetas a cambio sin previo aviso.
CA ~220V 50 Hz (China)
CA ~230V 50 Hz (Europa y Hong Kong)
CA ~240V 50 Hz (Australia)
CA ~110/120V – 220/240V 50/60 Hz (otros países)
EQUIPO PARA CD DE DISEÑO VERTICAL
INSTRUCCIONES DE OPERA CIÓN
PARA BUSCAR AUTOMÁTICAMENTE UNA ESTACIÓN
Presione uno de los botones TUNING (ascendente y descendente) durante uno o dos segundos, y el
equipo buscará automáticamente una estación. Una vez sintonizada una estación, la búsqueda se
detiene.
Es posible que la función de búsqueda no reconozca estaciones de radio con señales muy débiles.
PARA RECIBIR LA TRANSMISIÓN FM EN MODALIDAD ESTÉREO
Lleve el selector de modalidad MODE a la posición FM STEREO.
Al recibir una transmisión en modalidad FM estéreo, el indicador “STEREO” aparecerá en la pantalla.
CUANDO LA SEÑAL DE TRANSMISIÓN FM ESTÉREO ES DÉBIL
Lleve el selector de modalidad MODE a la posición FM MONO (en la parte superior del equipo).
El ruido de fondo disminuirá, pero la señal que se reproducirá será monoaural. Para reanudar la
reproducción en la modalidad estéreo, lleve el interruptor MODE a la posición FM STEREO.
SECCIÓN DEL TOCACASETESSECCIÓN DEL TOCACASETES
SECCIÓN DEL TOCACASETES
SECCIÓN DEL TOCACASETESSECCIÓN DEL TOCACASETES
REPRODUCCIÓN DE LA CASETERA A Y B
Utilice solamente cintas normales (tipo I) al reproducir cintas en el equipo.
1. Presione el botón TAPE.
TAPE
PARA DETENER LA REPRODUCCIÓN
Presione el botón STOP/EJECT.
PARA INTERRUMPIR LA REPRODUCCIÓN
Presione el botón PAUSE.
Para reanudar la reproducción vuelva a presionar
el botón P AUSE.
PARA ADELANTAR O RETROCEDER RÁPIDO
Presione el botón F.FWD o REW. Presione
el botón STOP/EJECT para detenerse a la
altura de la cinta que usted desee.
REPRODUCCIÓN CONTINUA (DESDE LA CASETERA A HACIA LA CASETERA B)
1. Presione el botón TAPE. 2. Introduzca un casete en cada casetera.
TAPE
3. Presione el botón PLAY. 4. Presione el botón PAUSE. 5. Presione el botón PLAY.
Apenas se acabe la cinta de la casetera A y la reproducción de dicha casetera se detenga, la modalidad
de pausa de la casetera B será desactivada y automáticamente se iniciará la reproducción de dicha
cinta.
2. Presione el botón STOP/
EJECT e introduzca la casete
en la casetera A ó B.
CASETERA BCASETERA A
CUANDO LA CINTA SE TERMINA
Ya sea bajo la modalidad de avance rápido o de
reproducción, la cinta se detendrá automáticamente
una vez que se acabe
CUANDO AMBAS CASETERAS ESTÁN EN LA
MODALIDAD DE REPRODUCCIÓN
La casetera A llevará a cabo la reproducción de la
cinta, mientras que de la casetera B no se
escuchará sonido alguno.
Toca en
primer
lugar
3. Presione el botón PLAY.
CASTERA A CASTERA B
O
CASETERA BCASETERA A
CASETERA BCASETERA BCASETERA A
Continúa
con
NOTA:
Los contenidos almacenados en la memoria (número de canal programado, frecuencia y banda de
frecuencia) aparecerán en la pantalla en orden numérico, independientemente de cual sea la banda de
frecuencia.
GRABACIÓN DESDE LA CASETERA A HACIA LA CASETERA B
Use sólo cintas normales (tipo I) al reproducir o grabar cintas en este equipo.
1. Presione el botón T APE.
TAPE
4. Presione el botón P AUSE. 6. Presione el botón PLAY.5. Presione el botón RECORD, el
CASETERA B
PARA DETENER LA GRABACIÓN
Presione el botón STOP/EJECT de la casetera A y de la casetera B.
Nota:
No cambie la velocidad de grabación mientras se esté copiando la cinta.
GRABACIÓN (utilizando sólo la casetera B)
PARA GRABAR DESDE EL REPRODUCTOR DE CD
1. Presione el botón CD.
CD
3. Presione el botón RECORD, el que a
su vez activará el botón PLAY.
CASETERA B
PARA DETENER LA GRABACIÓN
Presione el botón STOP/EJECT de la casetera B.
PARA INTERRUMPIR LA GRABACIÓN
Presione el botón PAUSE de la casetera B.
Para reanudar la reproducción, presione nuevamente
el botón PAUSE.
2. Coloque la cinta a partir de la cual
vaya a grabar en la casetera A y la
cinta en blanco en la casetera B.
a reproducir
que a su vez activará el botón
PLAY.
CASETERA B
grabará
2. Ponga una cinta en
la casetera.
4. Presione el botón PLAY/PAUSE del
reproductor de CD.
PARA BORRAR UNA CINTA GRABADA
1. Lleve el botón FUNCTION a la posición TAPE.
2. Ponga la cinta en la casetera, con el lado que
desea borrar de frente hacia usted.
3. Presione el botón RECORD para comenzar
a borrar.
3. Elija la velocidad de grabación
que desee con el control
NORMAL/HIGH DUBBING
(velocidad normal y alta).
CASTERA A
Usted quiere
grabar en este
lado de la cint
CASETERA B
CAMBIO DE LAS PILAS
Cuando las pilas se empiezan a agotar, la distancia de operación del control remoto disminuye
enormemente, por lo que es preciso que cambie las pilas.
NOTA:
En caso que no vaya a usar el control remoto por un período prolongado, retire las pilas para evitar así
el daño causado por la corrosión del derrame de la pila.
GRABACIÓN (utilizando sólo la casetera B)
Utilice sólo cintas normales (tipo I) al grabar.
PARA GRABAR DESDE LA RADIO DEL EQUIPO
1. Presione el botón TUNER
y sintonice una estación
de radio.
TUNER
Nota:
Si se oyera un silbido (golpe), éste puede suprimirse seleccionando la opción de Beat Cut, función que
se activa al presionar el botón DUBBING mientras está en la modalidad de radio (Tuner).
2. Ponga una cinta en la casetera.
usted quiere
grabar en este
lado de la cint
CASTERA B
3. Presione el botón RECORD,
el que a su vez activará el
botón PLA Y.
CASETERA B
MANTENIMIENTOMANTENIMIENTO
MANTENIMIENTO
MANTENIMIENTOMANTENIMIENTO
LIMPIEZA DE LOS DISCOS COMPACTOS
Si el disco salta partes de un tema o no suena al tocarlo, es
posible que necesite limpieza. Antes de tocar un disco, límpielo
desde el centro hacia los bordes con un paño. Una vez que ya
haya escuchado el disco, guárdelo en su caja.
LIMPIEZA DE LOS CABEZALES
Para mantener una calidad óptima del sonido, limpie regularmente
(cada 10 horas) los cabezales de reproducción y grabación, los
cabezales de borrado, los rodillos de apriete y los cabrestantes
(capstans). Para esto, utilice un hisopo de algodón humedecido
con líquido de limpieza o alcohol desnaturalizado.
LIMPIEZA DEL EQUIPO
No utilice químicos volátiles para limpiar este equipo. Límpielo frotando cuidadosamente su superficie
con un paño suave.
NOTA IMPORTANTE
• En caso que en la pantalla apareciera una indicación que no es común o que se produjera un
problema al operar el equipo, desconecte el cable de alimentación de CA. Espere al menos 5
segundos y vuelva a conectar el cable.
GUÍA PGUÍA P
GUÍA P
GUÍA PGUÍA P
Problema
No hay suministro de corriente.
No se puede poner la cinta.
La cinta se atasca en el mecanismo de la
casetera.
La velocidad a la que pasa la cinta es irregular.
Ruido excesivo al reproducir una cinta.
No se puede presionar el botón REC.
No se puede grabar o apenas se oye al grabar.
No se puede borrar una grabación anterior.
No se inicia la reproducción del disco.
El reproductor de CD no suena.
El sonido del CD es irregular.
ARA RESOLARA RESOL
ARA RESOL
ARA RESOLARA RESOL
VER PROBLEMASVER PROBLEMAS
VER PROBLEMAS
VER PROBLEMASVER PROBLEMAS
Partes que revisar
• Está desenchufado el cable o está suelto?
• Está el casete en una posición incorrecta al
tratar de introducirlo en la casetera?
• Está sucio el cabrestante o el rodillo de apriete?
• Está la cinta demasiado tensa?
• Está la cinta demasiado tensa?
• Están sucios los cabezales?
• Hay una cinta en la casetera?
• Están rotas las lengüetas de prevención
contra grabación del casete?
• Están sucios los cabezales?
• Está sucio el cabezal de borrado?
• Tiene el disco puesto al revés?
• Está el disco o el lector láser demasiado sucio?
• Está bien cerrado el compartimento para discos?
• Tiene el selector de función en la posición de CD?
• Tiene activada la modalidad de pausa?
• Ha habido condensación al interior de la unidad?
• Están los lentes o el disco demasiado sucios?
• Está el equipo expuesto a demasiada vibración?
• Tiene el disco rayones de consideración?
PRECAUCIÓN
RIESGO DE GOLPE ELÉCTRICO
NO ABRIR
El rayo con punta de flecha
ubicado dentro del
triángulo equilátero
pretende alertar al usuario
de la presencia de “voltaje
peligroso” sin aislación al
interior del producto.
PRECAUCIÓN: PARA REDUCIR EL RIESGO DE
SUFRIR UNA DESCARGA ELÉCTRICA, NO RETIRE LA CUBIERT A NI LA PARTE POSTERIOR DEL
EQUIPO. NO HAY PIEZAS DE REPUESTO PARA
EL USUARIO DENTRO DEL APARATO. PARA
CUALQUIER TIPO DE CONSUL TA, ACUDA A PERSONAL DE SERVICIO CALIFICADO.
ADVERTENCIA: PARA REDUCIR EL RIESGO DE INCENDIO O DE DESCARGA
ELÉCTRICA, NO EXPONGA ESTE APARATO A LA LLUVIA NI A LA
HUMEDAD.
ADVERTENCIAS
PRODUCTO CON LÁSER CLASE 1
CLASS 1 LASER PRODUCT
APPAREIL Á LASER DE CLASSE 1
PRODUIT LASER DE CLASSE 1
Este producto contiene un dispositivo láser de baja potencia.
RADIACIÓN LÁSER INVISIBLE
CUANDO LA UNIDAD ESTÁ
ABIERTA. EVITE LA EXPOSICIÓN
CUIDADO
A ESTOS RAYOS.
PRECAUCIONES
EN CUANTO A LA UBICACIÓN
• No haga uso de la unidad en lugares con
mucho calor, frío, polvo o humedad.
• Coloque la unidad sobre una superficie plana
y pareja.
• No ponga este aparato en lugares con poca
ventilación. No lo cubra con un paño ni lo
coloque sobre la alfombra, impidiendo de esta
forma el flujo de aire a través de la unidad.
EN CUANTO A LA SEGURIDAD
• Cada vez que vaya a conectar y desconectar
el cable de CA, cerciórese de tirar el enchufe
y no el cable mismo, ya que éste se puede
dañar y por ende se crea una situación de
riesgo.
• ·Cuando no vaya a usar la unidad por un
período largo de tiempo, desconecte el cable
de alimentación de CA.
EN CUANTO AL VOLTAJE DE CA
• Antes de usar el equipo, asegúrese de que
el voltaje local sea el mismo que el voltaje
promedio de esta unidad.
Si ocurriera algún problema, desconecte el cable de alimentación de CA y derive el
equipo a personal calificado.
INFORMACIÓN DE LA FCC
Este aparato cumple con la Parte 15 de las
Normas de la FCC. Las operaciones están
sujetas a las dos condiciones siguientes:
(1)Este aparato no puede provocar
interferencia perjudicial, y
(2)Este aparato debe tolerar cualquier
interferencia recibida, incluido aquel tipo de
interferencia que puede provocar
operaciones no deseadas.
EN CUANTO A LA CONDENSACIÓN
• Si deja la unidad en un lugar caluroso y
húmedo, es posible que en el interior del
reproductor de CD se formen pequeñas
gotas o que se forme condensación.
• Si existe condensación en el interior del
aparato, es posible que la unidad no funcione
de manera normal.
• Deje la unidad por unas 3 horas en una
habitación temperada para permitir que se
evapore la condensación que haya en el
interior de la unidad.
ADVERTENCIA EN CU ANTO A LA VENTILACIÓN
• No debe obstruir intencionalmente la
ventilación normal del equipo.
El signo de exclamación
dentro del triángulo equilátero
pretende alertar al usuario de
la presencia de importantes
instrucciones de operación y
mantenimiento (reparación) en
los folletos que acompañan
este producto.
811-227191-031
 Loading...