

Page 1
TUNING
TUNING
MEMORY
TUNER
FM
STEREO
MHz
DISPLAY
MEMORY
TUNING
TUNING
MEMORY
VOL
Follow the advice below for safe and appropriate operations.
ON PLACEMENT
• Do not use the unit in places which are
extremely hot, cold, dusty or humid.
• Place the unit on a flat and even surface.
• Do not restrict the air flow of the unit by
placing it in a place with poor air flow, by
covering it with a cloth, or by placing it on
a carpet.
ON SAFETY
• When connecting and disconnecting the
AC cord, grip the plug and not the cord
itself. Pulling the cord may damage it and
create a hazard.
• When you are not going to use the unit
for a long period of time, disconnect the
AC power cord.
ON AC VOLTAGE
• Before use, check that the rated voltage
of your unit matches your local voltage.
VENTILATION W ARNING
• The normal ventilation of the product shall
not be impeded for intended use.
ON CONDENSATION
• When left in a heated room where it is
warm and damp, water droplets or
condensation may form inside the CD
player.
• When there is condensation inside the
unit, the unit may not function normally.
• Let it stand for 1 to 2 hours before turning
the power on, or gradually heat the room
up and dry the unit before use.
AUX JACK
• To listen to audio
signals from external
unit through this unit:
Connect the red plug
to the R jack, and the
white plug to the L jack
of the AUX in
connector.
L
AUX
IN
R
(on left side
of the unit)
FCC INFORMATION (For USA ONLY)
This equipment has been tested and found
to comply with the limits for a Class B digital
device, pursuant to Part 15 of the FCC Rules.
These limits are designed to provide
reasonable protection against harmful
interference in a residential installation. This
equipment generates, uses, and can radiate
radio frequency energy and, if not installed
and used in accordance with the instructions,
may cause harmful interference to radio
communications. However, there is no
guarantee that interference will not occur in
a particular installation. If this equipment does
cause harmful interference to radio or
television reception, which can be determined
by turning the equipment off and on, the
user is encouraged to try to correct the
interference by one or more of the following
measures:
- Reorient or relocate the receiving
antenna.
- Increase the separation between the
equipment and receiver.
- Connect the equipment into an outlet
that is on a circuit different from the one
the receiver is connected.
- Consult the dealer or an experienced
radio/TV technician for help.
You are cautioned that any changes or
modifications not expressly approved in this
manual could void your authority to operate
this equipment.
Should any trouble occur, disconnect the
AC power cord and refer servicing to
qualified personnel.
-1-
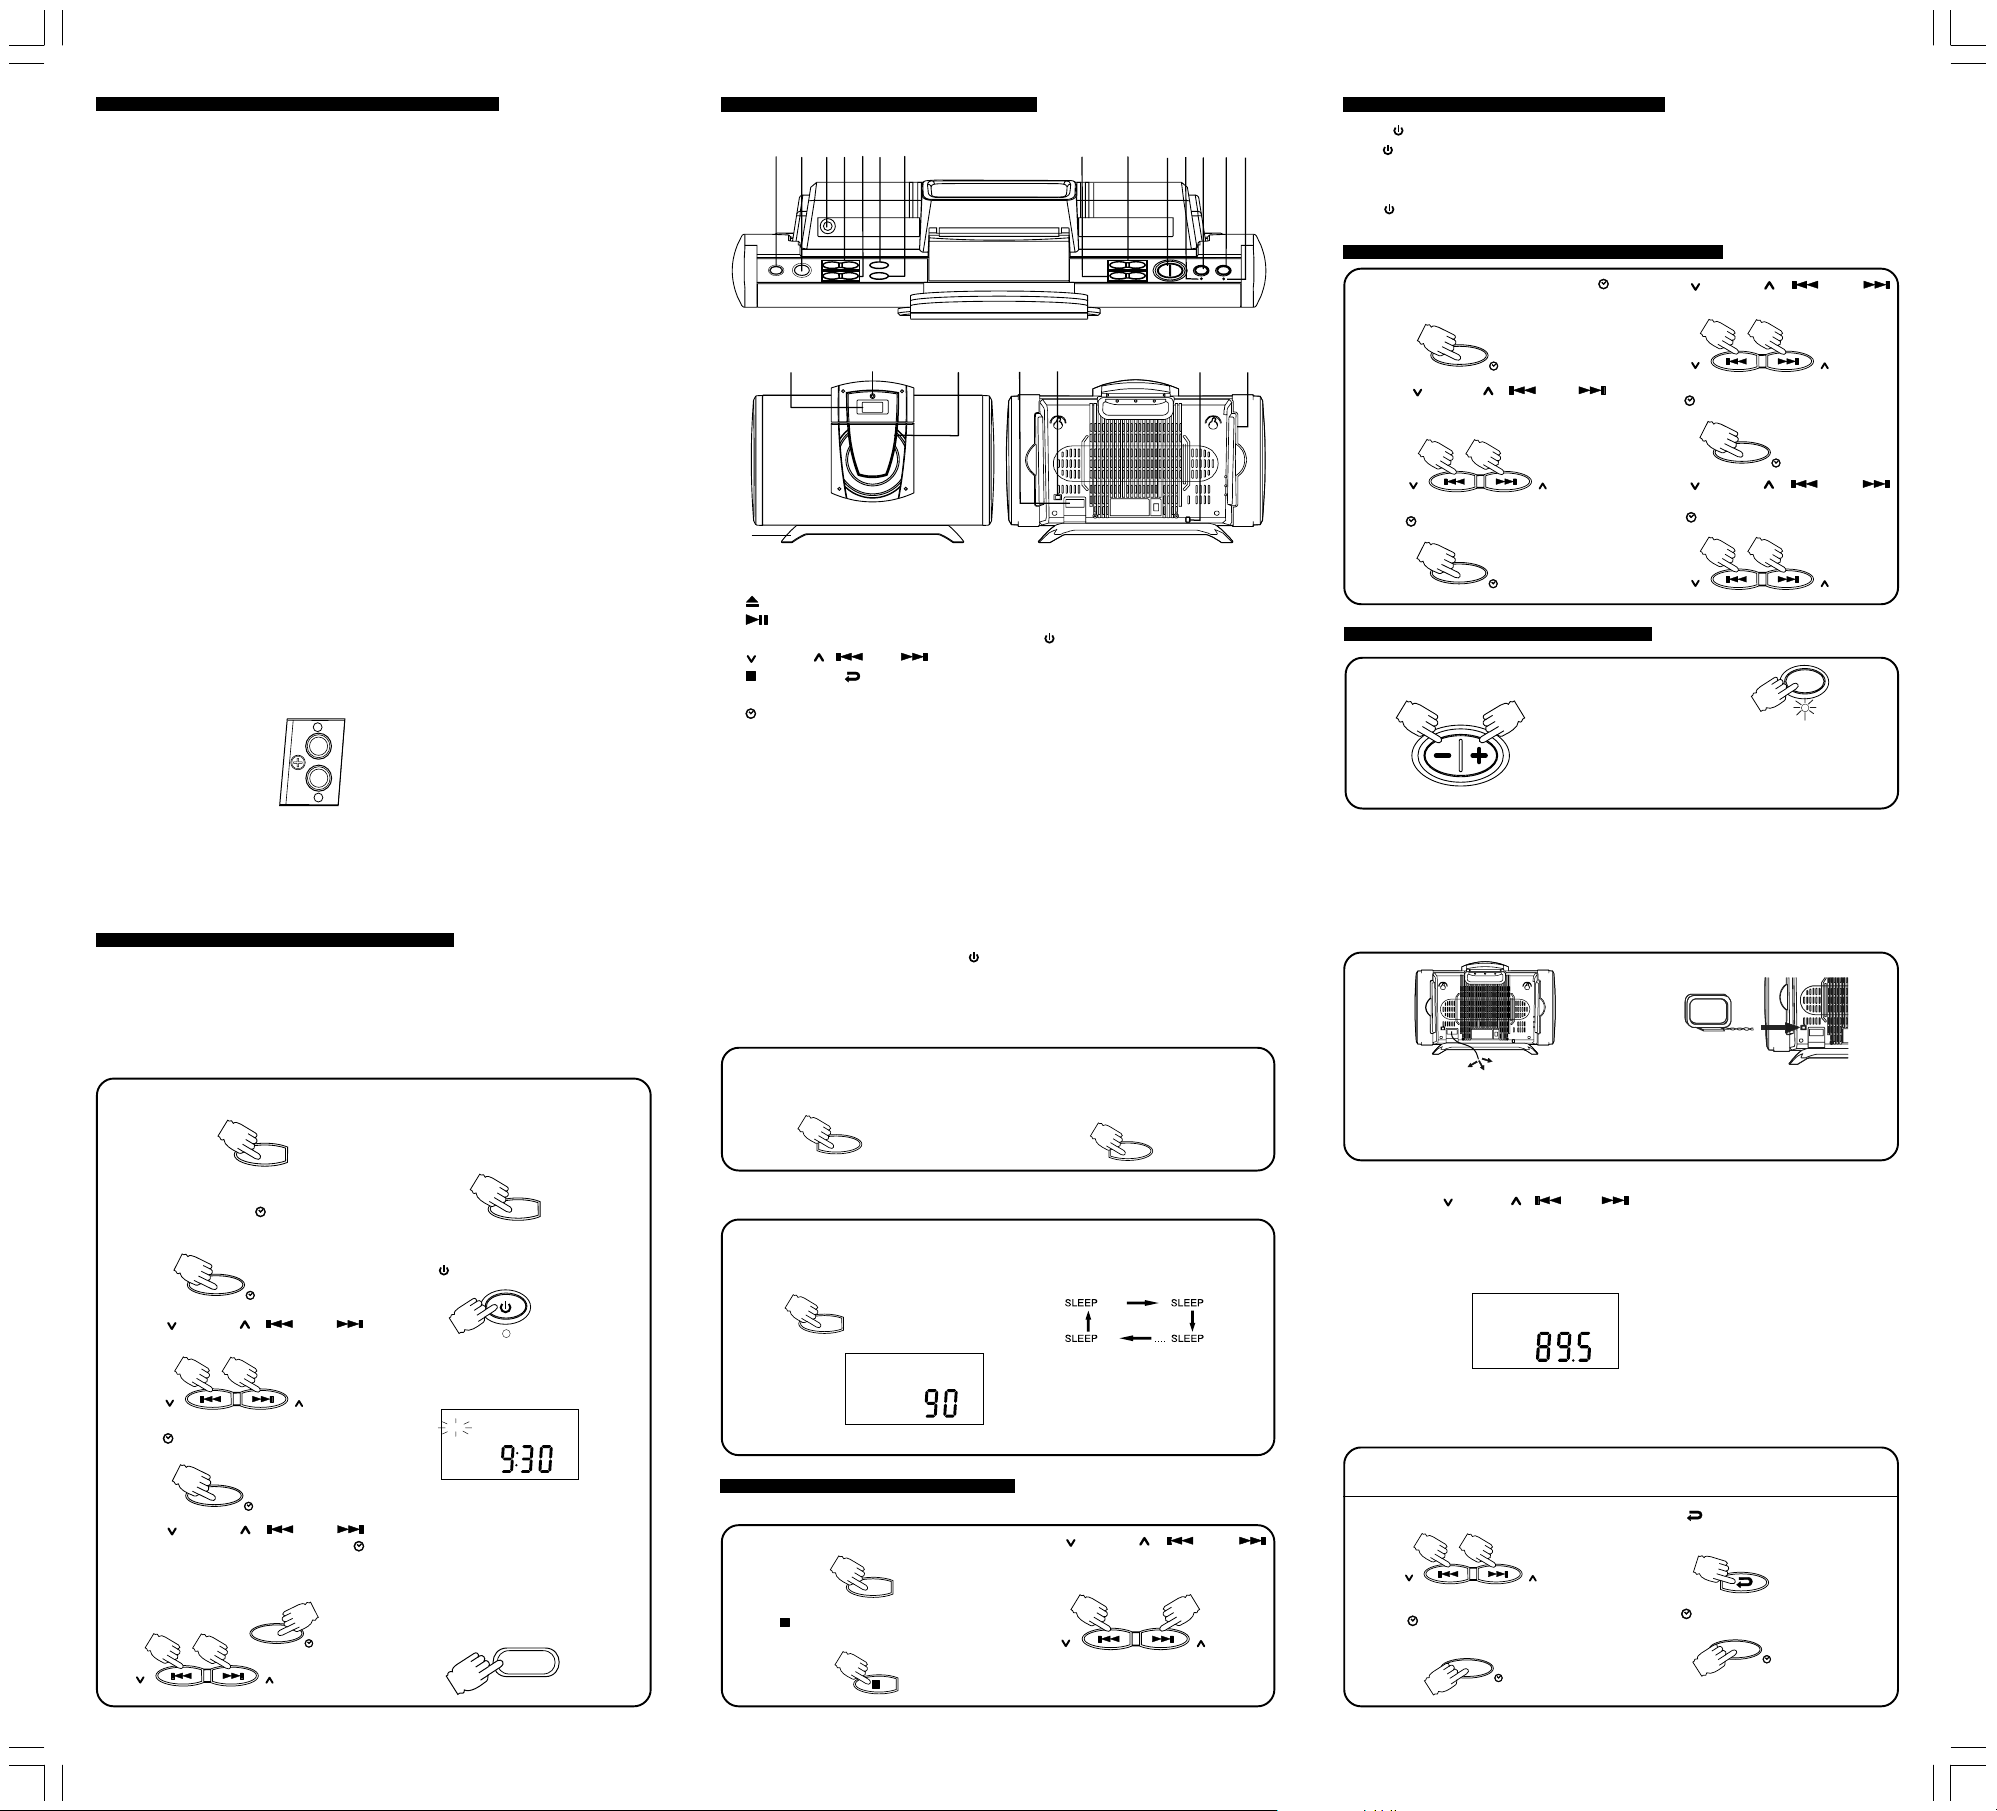
PRECAUTIONS
2456
1
15
3
7
16
22
1. CD DOOR OPEN/CLOSE button
PLAY/PAUSE button
2.
3. PHONES jack
TUNING / SKIP button
4.
STOP/BAND / REPEA T/PRESET
5.
button
MEMORY button
6.
7. RANDOM button
8. SLEEP/TIMER/DISPLAY button
9. FUNCTION (CD/TUNER/AUX)/INTRO
button
10. VOLUME (-/+) controls
P ARTS IDENTIFICATION
8
17
19 20
18
9
10
11
12
13
14
21
11. X-BASS indicator
12. X-BASS button
POWER button
13.
14. POWER ON indicator
15. LCD display
16. Remote sensor
17. CD door
18. FM Antenna wire
19. AM Loop Antenna
20. AC cord
21. AUX IN jack
22. Stand (optional)
-2- -3-
PRESS POWER BUTTON
POWER button, the POWER ON indicator will light up. Select the desired function by
Press
pressing FUNCTION button and the corresponding function indicator will be shown on the display.
TO TURN OFF THE UNIT
Press
POWER button to STANDBY, the POWER ON indicator will go out and only clock
display will be shown.
1. In standby mode, press and hold
MEMORY button until the time blinks on the
display.
2. Press
TUNING / SKIP
buttons to set 12 Hour or 24 Hour
timer format.
3. Press MEMORY button, the hour blinks.
To adjust volume
FOR PRIVATE LISTENING
Connect the headphone (Ø3.5 mm stereo mini-plug) to the PHONES jack.
When headphones are connected, the speakers are automatically disconnected.
TURNING ON THE UNIT
CLOCK SETTING
4. Press
5. Press
6. Press
TUNING / SKIP
buttons to set correct hour.
TUNING
MEMORY button, the MINUTE
blinks.
TUNING / SKIP
buttons to set correct minutes, and then
press
MEMORY button to start the
clock.
TUNING
TUNING
MEMORY
TUNING
ADJUSTING THE SOUND
To select x-bass
X
-BASS
X-BASS is designed specifically to boost the
low frequency sound to obtain a more powerful
bass.
Note: Press X-BASS button, the indicator of
X-BASS will light up.
TIMER OPERA TION
TIMER PLAY
The power can be turned on automatically at a preset time so that you can wake up CD or
RADIO function.
Make sure the clock is correct before TIMER PLAY. Please refer to CLOCK setting procedures.
Note: The unit must be in 'STANDBY' mode to set the timer.
1. Press and hold TIMER button until the
"TIMER" indicator blinks on the display.
SLEEP/TIMER
2. While "TIMER" indictor blinks on the
display, press and hold
about 3 seconds until hour blinks on the
display.
TUNING / SKIP
buttons to set hour.
TUNING
MEMORY button. The minute will
blink.
TUNING / SKIP
buttons to set minutes and press
MEMORY button to confirm, finally
"TIMER" indicator will stop blinking after
several seconds.
TUNING
3. Press
4. Press
5. Press
MEMORY button
MEMORY
TUNING
MEMORY
MEMORY
TUNING
6. Turn on the unit to select the desired
program source by pressing FUNCTION
button.
TUNER: select a BAND and a station
CD: Insert a disc
FUNCTION
7. Set volume level and X-Bass, and then
POWER button to standby mode.
press
POWER
ON
8. When the preset time reaches, the system
will turn on automatically and "TIMER"
indicator will blink on the display.
TIMER
AM
9. If you want to snooze a few more minutes.
You can press SNOOZE button (on the
Remote Control), the system will go to
standby mode ("SNOOZE" indicator
appear on the display) and then turn on
again 5 minutes later.
You can repeat this function as many as you
desired within 60 minutes from the preset
automatically PLAY timer.
SNOOZE
-4- -5-
NOTE:
1. If you want to exit snooze mode, press
POWER button to turn on the system.
2. The preset auto play timer function will be active every day if it is not cancelled.
To cancel timer play function, press and hold TIMER button about 3 seconds until "TIMER"
indicator disappears on the display.
DISPLAY FUNCTION
1. In standby mode, press DISPLAY button
and you can check the auto play timer if it
has been set.
DISPLAY
2. In power on mode, press DISPLAY button
repeatedly and you also can check
system status, clock and auto play timer
if they have been set.
SLEEP SETTING
When the sleep timer is used, the power is automatically turned off after the specified time passes.
1. Press SLEEP button while the power is on.
"SLEEP 90" appears on the display.
Note: SLEEP can be adjusted in TUNER,
CD and AUX modes.
SLEEP/TIMER
2. Press SLEEP button repeatedly to select the
length of remaining time until the unit turns
off.
It changes the indicator in the following way:
90
10
If the sleep timer is set, the word "SLEEP" will
SLEEP
be shown on the display.
To cancel the sleep timer, press SLEEP button
once and "SLEEP" disappears on the display.
80
70
NOTE: Once the sleep time reaches, the power will be turned off atuomatically.
LISTENING TO THE RADIO
TUNING IN T O A STATION MANU ALLY
1. Press FUNCTION button to TUNER.
FUNCTION
2. Press STOP/B AND button to select your
desired band (FM/AM).
BAND
3.Press TUNING / SKIP
buttons to select a station.
TUNING
TUNING
FOR BETTER RECEPTION
FM
Fully unwind the wire antenna. Then extend
the wire antenna and place it in the position
that sounds best.
NOTE: DO NOT CONNECT TO AN OUTSIDE
ANTENNA.
AM
Connect the loop aerial (provided) to the "AM
LOOP ANTENNA" snap terminals at the back
of the unit.
TO SEARCH FOR A ST ATION AUTOMATICALL Y
Press and hold
searching for a station for automatically. After tuning in to a station, the search stops.
The search may not stop at a station with a very weak signal.
TO RECEIVE THE FM BR OADCAST IN STEREO
When the reception is good, the "STEREO" indicator will appear on the display.
PRESETTING STATION
Y ou ma y tuned in to a stored station directly by entering the preset number . It is possible to store
stations of any band in your choice order.
Manual memory presetting
This feature allows you to manually preset stations to any desired channel.
1. Set to the desired band and station.
2. Press MEMORY button, the MEMORY
indicator blinks.
TUNING / SKIP button for 1 to 2 seconds, and the tuner starts
3.Press
4. Press
REPEAT/PRESET button to
select a channel number for the preset
station.
PRESET
MEMORY button to memorize the
station.
MEMORY
5. Repeat steps 1 to 4 for the next preset.
-6-
Page 2
PLAY/
PAUSE
CD REPEAT
MEMORY
TUNING INTO A PRESET STATION
Press REPEAT/PRESET button to select a preset number.
TUNER
FM
MEMORY
T
E
S
E
R
P
NOTE: If no button is pressed again within 10 seconds, the preset mode will be exited
automatically.
MHz
CD PLA YBA CK
1.Press FUNCTION button to CD.
FUNCTION
2. Press
NOTE:
• Do not push the CD door to close it.
• CD door cannot open when power is off.
OPEN/CLOSE button to open
CD door. Place a disc in the CD tray with
the label face front and then press
OPEN/CLOSE button to close it. The
total number of tracks will be shown on
the display.
CD DOOR
OPEN/CLOSE
Locating a particular point in a track
To move backward at high speed
Keep SKIP
playback and release at the desired point.
To mo ve forward at high speed
Keep SKIP
playback and release at the desired point.
TUNING
NOTE: The CD player may skip if high volume or x-bass levels are used.
button pressed during
button pressed dur ing
TUNING
Keep it pressed
3.To start playing, press PLAY/
PAUSE button.
PLAY/
PAUSE
TO INTERRUPT PLAYBACK
PLA Y/PAUSE button.
Press
The track time will blink.
T o resume playback, press
button again.
PLAY/PAUSE
TO STOP PLAYBACK
Press
STOP button.
BAND
Searching for the beginning of a track
To find a previous track
Press SKIP
the beginning of the current track.
Press SKIP
tracks backward one by one.
To skip tracks
Press SKIP
track(s) forward one by one.
TUNING
button once to return to
button repeatedly to skip
button repeatedly to skip
Press it once
TUNING
-7- -8-
PROGRAMMING TRACKS - in the CD stop mode
1. Press MEMORY button.
MEMORY
CD
2. Press
TUNING / SKIP
buttons to select your desired track.
TUNING
CD
MEMORY
TUNING
MEMORY
To chec k the program
In stop mode, press
disc, track and program numbers will appear on
the display.
Press
MEMORY button again to view the
other programmed selections.
These displays do not appear on the display
during playback.
MEMORY button. The
3. Press
4.Repeat steps 2 and 3 to program
To play the pr ogrammed trac ks
Press
To stop pr ogrammed play
Press
the playback of programmed tracks, you can
first press
To c lear the memory content
Press
door or press
press
REPEAT PLAY
This function will allow a single track or all tracks on the disc to be pla yed repeatedly.
TO REPEA T THE SAME TRA CK
REPEAT/PRESET b utton once during playbac k, the repeat one indicator will blink.
Press
T
E
S
E
R
P
MEMORY button again.
CD
additional tracks. After y ou finish program
procedure, the memory indicator will blink
on the display. Press PLAY/PAUSE
button to start playback and memory
indicator will appear on the display.
MEMORY
PLAY/PAUSE button.
STOP button. If you want to recover
MEMORY button and then press
PLAY button again.
STOP button and then open the CD
MEMORY button and then
STOP button in stop mode.
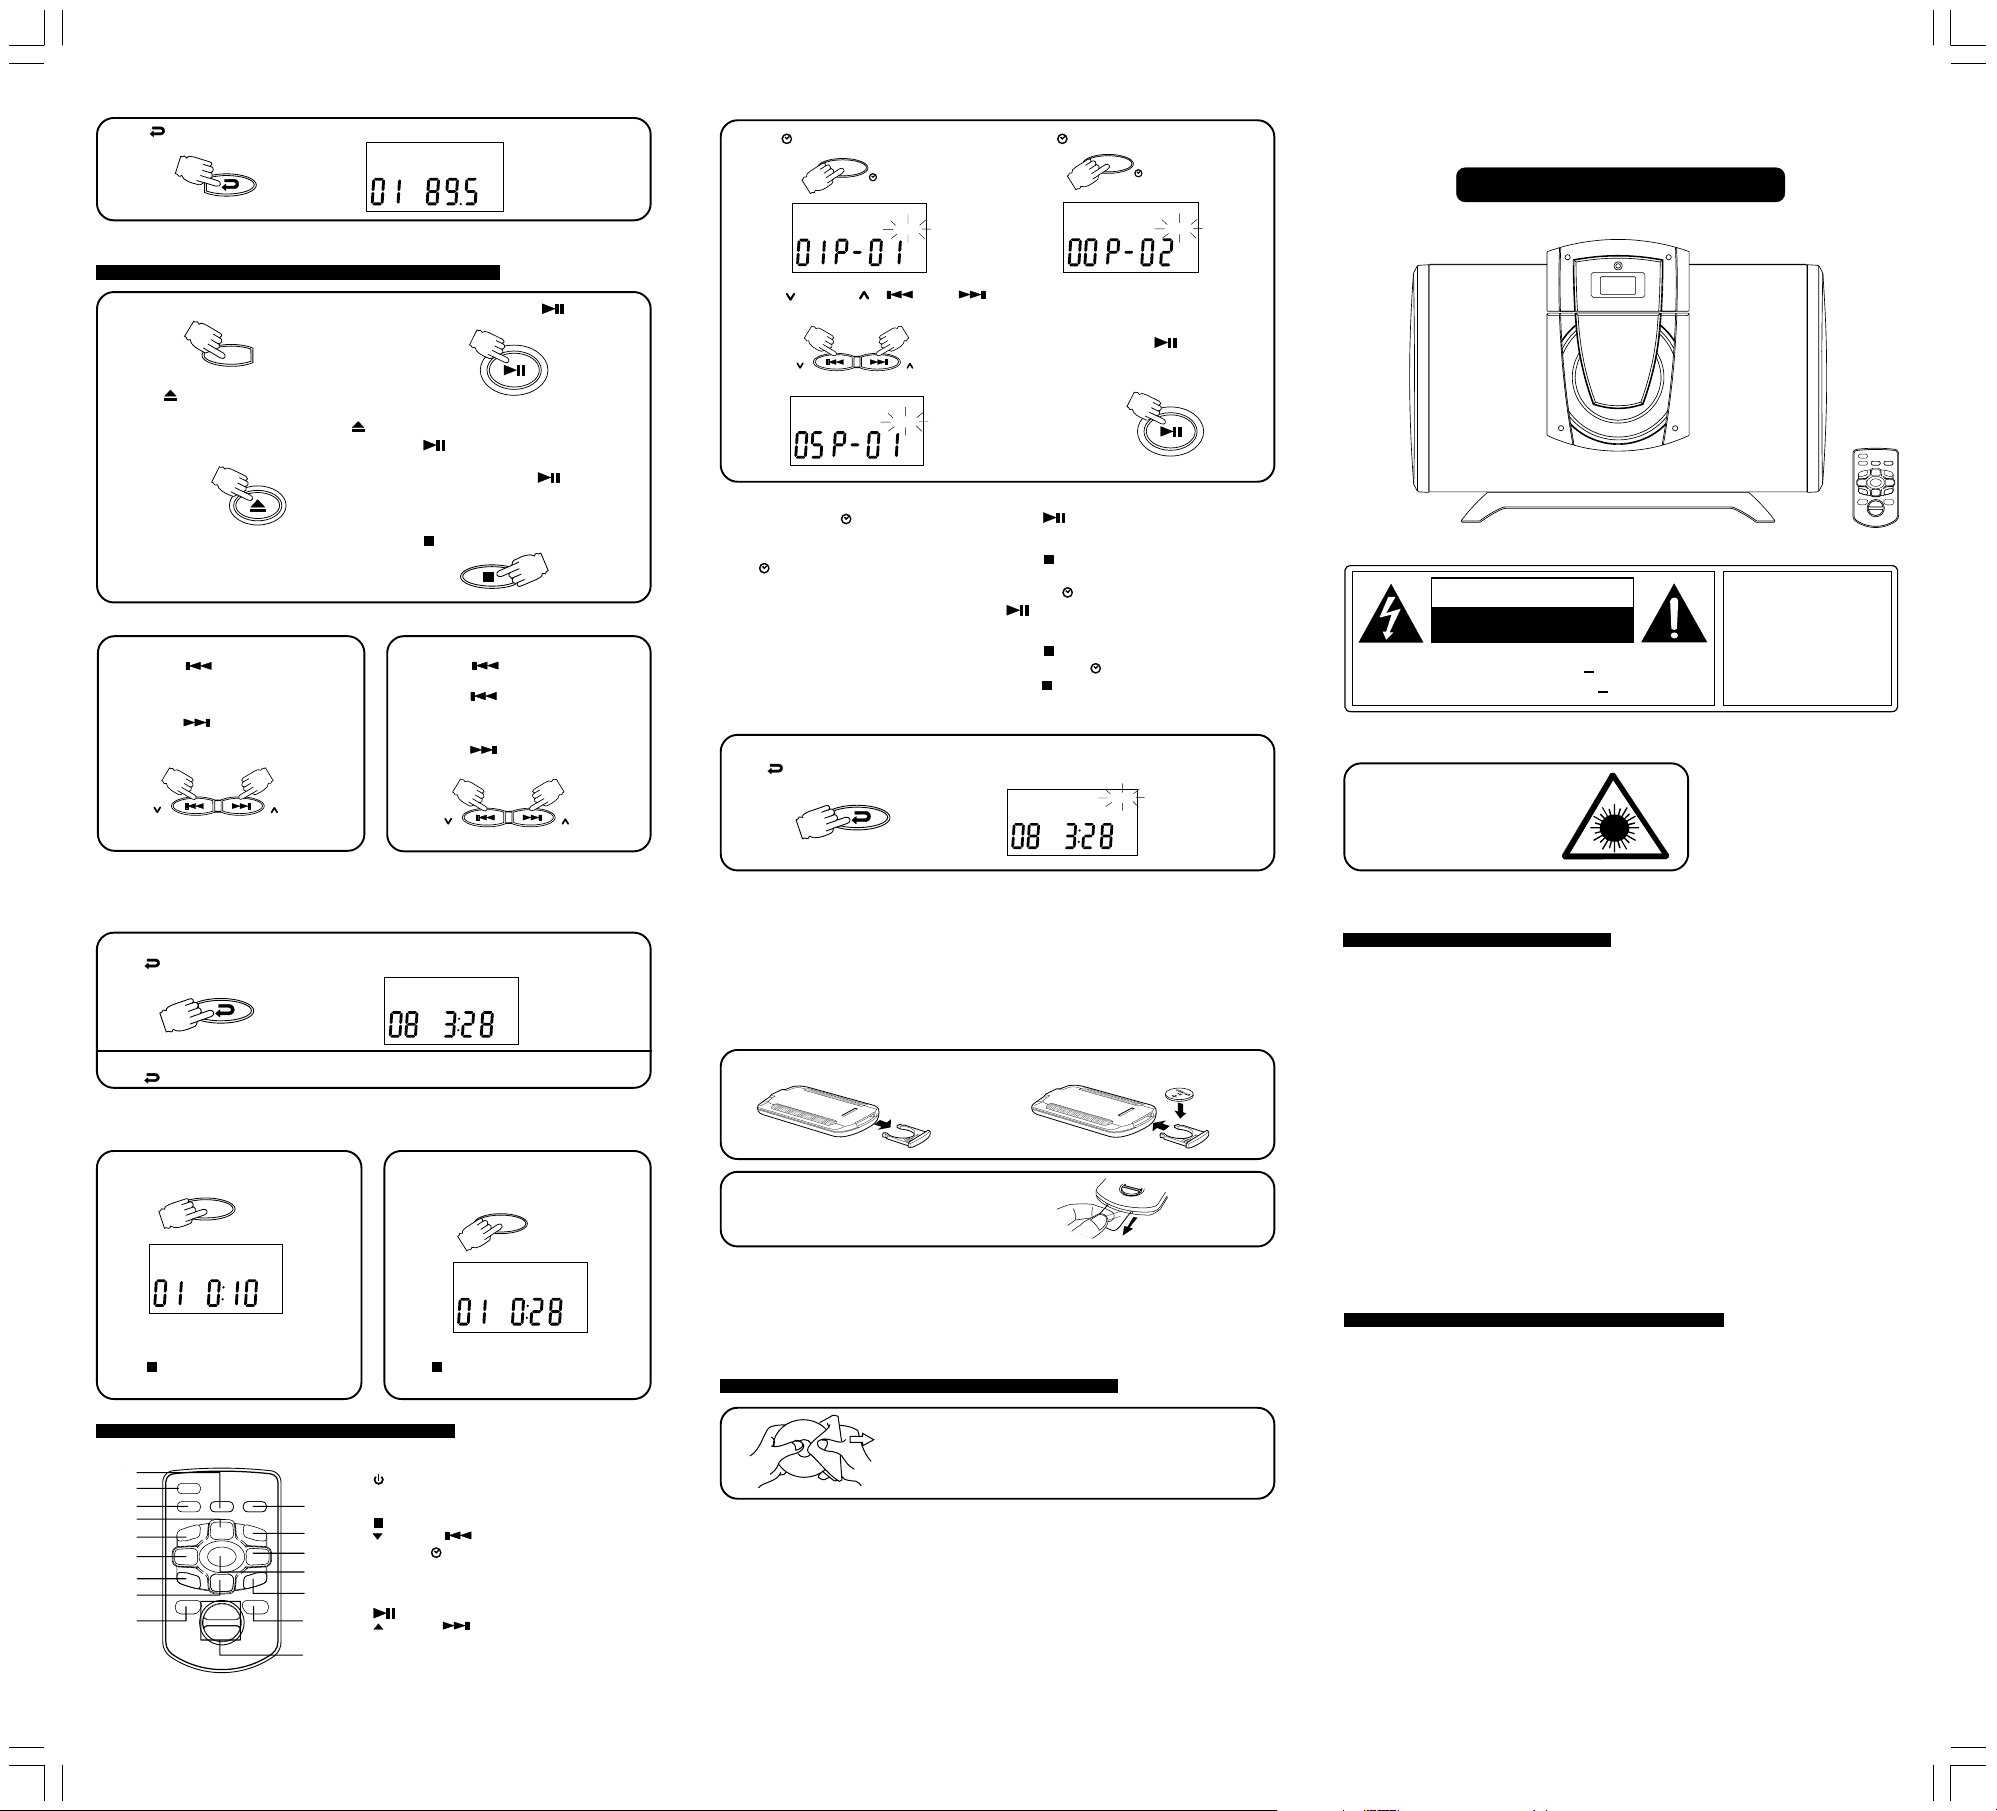
VERTICAL CD MICRO SYSTEM
WITH RADIO
OPERA TING INSTRUCTIONS
CAUTION
RISK OF ELECTRIC SHOCK
DO NOT EXPOSETHIS UNIT TO RAIN OR MOISTURE
WARNING
RISQUE DE CHOC ÉLECTRIQUE NE PAS OUVRIR
AVIS
WARNING: TO REDUCE THE RISK OF FIRE OR ELECTRIC SHOCK, DO NOT EXPOSE THIS
APPLIANCE TO RAIN OR MOISTURE.
CAUTION
INVISIBLE LASER RADIA TION
WHEN OPEN AND INTERLOCKS
DEFEATED.
AVOID EXPOSURE TO BEAM
DO NOT OPEN
SHOCK HAZARD DO NOT OPEN
CLASS 1 LASER PRODUCT
APPAREIL À LASER DE CLASSE 1
PRODUCTO LASER DE CLASE 1
PRODUTO LASER CLASSE 1
PRODUKT DER LASERKLASSE 1
KLASSE 1 LASER PRODUCT
APARELHO LASER DE CLASSE 1
This product contains a low
power laser device.
TO REPEA T THE WHOLE DISC
REPEAT/PRESET button a second time to repeat all tracks, the repeat all indicator
Press
will be shown on the display.
TO CANCEL REPEA T PLAY
PRESET/REPEAT button until REPEAT indicator disappears.
Press
INTRODUCTION PLA Y
This function allows the first 10 seconds of each
track of the disc to be played.
Press INTRO button.
INTRO appears on the display.
INTRO
CD
INTRO
To cancel introduction play.
Press
STOP or INTRO button so that
INTRO on the display goes out.
1
2
310
4
5
6
7
8
915
USING THE REMOTE CONTROL CORRECTLY
• Point the Remote Control at the REMOTE SENSOR located on the unit.
CD REPEAT
T
E
S
E
R
P
• When there is a strong ambient light source, the performance of the infrared REMOTE SENSOR
may be degraded, causing unreliable operation.
• The recommended effective distance for remote operation is about 4 meters (13 f eet).
TO CHANGE REMOTE B ATTERY
PROBLEMS
CD
System does not turn on
Disc in place but unit won't play
1. Open the battery door. 2. Insert one CR2025 (3V) size battery.
RANDOM PLAY
All the tracks on the disc can be played in
random order.
Press RANDOM button.
RANDOM appears on the display and the
disc will play automatically.
CD
To cancel random play.
Press
STOP or RANDOM button so that
RANDOM on the display goes out.
REMOTE CONTROL
1. DISPLAY button
2. STANDBY / ON button
3. FUNCTION (TUNER/CD/AUX) button
4. PRESET/REPEAT b utton
5. STOP/BAND button
11
6. TUNING / SKIP/SEARCH buttons
12
7. MEMORY button
8. RANDOM button
13
9. SLEEP button
14
10. SNOOZE button
11. PLAY/PAUSE button
12. TUNING/ SKIP/SEARCH buttons
13. X-BASS button
16
14. INTRO button
15. TIMER button
16. VOLUME +\- controls
-9-
RANDOM
RANDOM
ATTENTION
T ake out the PVC sheet bef ore operating the
Remote Control.
BA TTER Y REPLA CEMENT
When battery become weak, the operating distance of the Remote Control is greatly reduced
and you will need to replace the battery.
NOTE:
If the Remote Control is not to be used for a long time, remove the battery to avoid damage
caused by battery leakage corrosion.
MAINTENANCE
CLEANING CD
If the CD skips or will not play, the disc may need cleaning.
Before playing, wipe the disc from the center out with a cleaning
cloth. After playing, store the disc in its case.
CLEANING THE UNIT
Do not use volatile chemicals on this unit. Clean by lightly wiping with a soft cloth.
IMPORT ANT NO TICE:
• Should the CD door be opened before the reading of the CD is completed, a jamming noise may occur.
This can be resolved by closing the CD door and then press TUNER button temporarily to RADIO.
• If an abnormal display indication or an operating problem occurs, disconnect the AC power cord. W ait at
least 5 seconds, then reconnect the AC power cord.
• Before transporting the unit, remove the disc from the CD tray.
-10-
Disc skips
RADIO
Poor FM reception
Poor AM reception
Power consumption: 40 W
Power source: AC ~ 120V 60 Hz (USA and Canada)
AC ~ 220V 50 Hz (China)
AC ~ 230V 50 Hz (Europe and Hong Kong)
AC ~ 240V 50 Hz (Australia)
AC ~ 110-120V/220-240V 50/60Hz (Others)
Specifications subject to changed without notice.
Printed in China
TROUBLE SHOOTING GUIDE
ITEMS TO CHECK
• Make sure AC power plug is secure in the outlet, and
outlet has power.
• Make sure FUNCTION button is set to CD.
• Make sure disc label is facing up.
• Make sure disc is clean.
• Pause mode is activated.
• Disc may be damaged or dirty; check disc.
• Make sure the unit is on a secure spot. Vibration or jarring
can cause the disc to skip.
• Make sure FM antenna wire is unwound.
• Electr ical interference in your home can cause poor
reception. Move the unit away from sources of
interference (especially those with motors and
transformers).
• Set the AM loop antenna to a direction for the better
reception.
SPECIFICATIONS
811-330391-081
 Loading...