

Page 1
TO CHECK WHAT HAS BEEN PROGRAMMED
1.Press the PROGRAM button.
2.Press the PLAY/PAUSE button.
3.Press the SKIP + button.
OR
• Press the PROGRAM button.
TO CLEAR THE PROGRAM
• Set the FUNCTION switch to
TAPE/POWER OFF or
TUNER
TAPE PLAYBACK
1.Set the
FUNCTION
switch to
TAPE/
POWER OFF.
3.Press the
PLAY button.
PLAY
2.Insert the cassette tape.
MICRO CD SYSTEM
OPERATING INSTRUCTIONS
OR
• Open the CD door (during
stop mode).
OR
• Press the STOP button.
4.Prepare the source to be recorded and play it.
Recording from a CD Recording from the radio
(Refer to Compact Disc Playback)
5.Press the PAUSE button.
TO STOP RECORDING
Press the STOP/EJECT button.
TO INTERRUPT RECORDING
Press the PAUSE button.
To resume recording, press the
PAUSE button again.
(Refer to listening to the Radio)
2)75-
TO ERASE A RECORDED TAPE
1. Set the FUNCTION switch to
TAPE/POWER OFF.
2. Insert a tape with the side you
want to erase facing you.
3. Press the RECORD button to
start erasing.
MAINTENANCE
CLEANING CD
If the CD skips or will not play, the disc
may need cleaning. Before playing, wipe
the disc from the center out with a
cleaning cloth. After playing, store the
disc in its case.
CLEANING THE TAPE HEADS
Clean the head with a cotton bud slightly
moistened with cleaning fluid or
denatured alcohol.
TO STOP PLAYBACK
Press the STOP/EJECT
button.
TO INTERRUPT PLAYBACK
Press the PAUSE button.
To resume play, press the
PAUSE button again.
TO FAST WIND
Press the REWIND or F.FWD
button. Press the STOP/EJECT
button to stop winding at the desired
position.
WHEN THE TAPE REACHES ITS
END
During fast wind or regular play, the
tape will stop automatically when its
end is reached .
RECORDING
• USE ONLY NORMAL (TYPE I) TAPES FOR RECORDING.
1.Insert a cassette tape.
2.Press the
PAUSE button.
3.Press the
RECORD
button.
CLEANING THE UNIT
Do not use volatile chemicals on this unit. Clean by lightly wiping with a soft cloth.
IMPORTANT NOTICE:
• Should the CD door be opened before the reading of the CD is completed, a
jamming noise may occur. This can be resolved by closing the CD door and
then setting the FUNCTION switch temporarily to TAPE/POWER OFF.
• If an abnormal display indication or an operating problem occurs, disconnect
the AC power cord. Wait at least 5 seconds, then reconnect the AC power
cord.
• Before transporting the unit, take out the disc from the CD tray.
2)75 -
PLAY
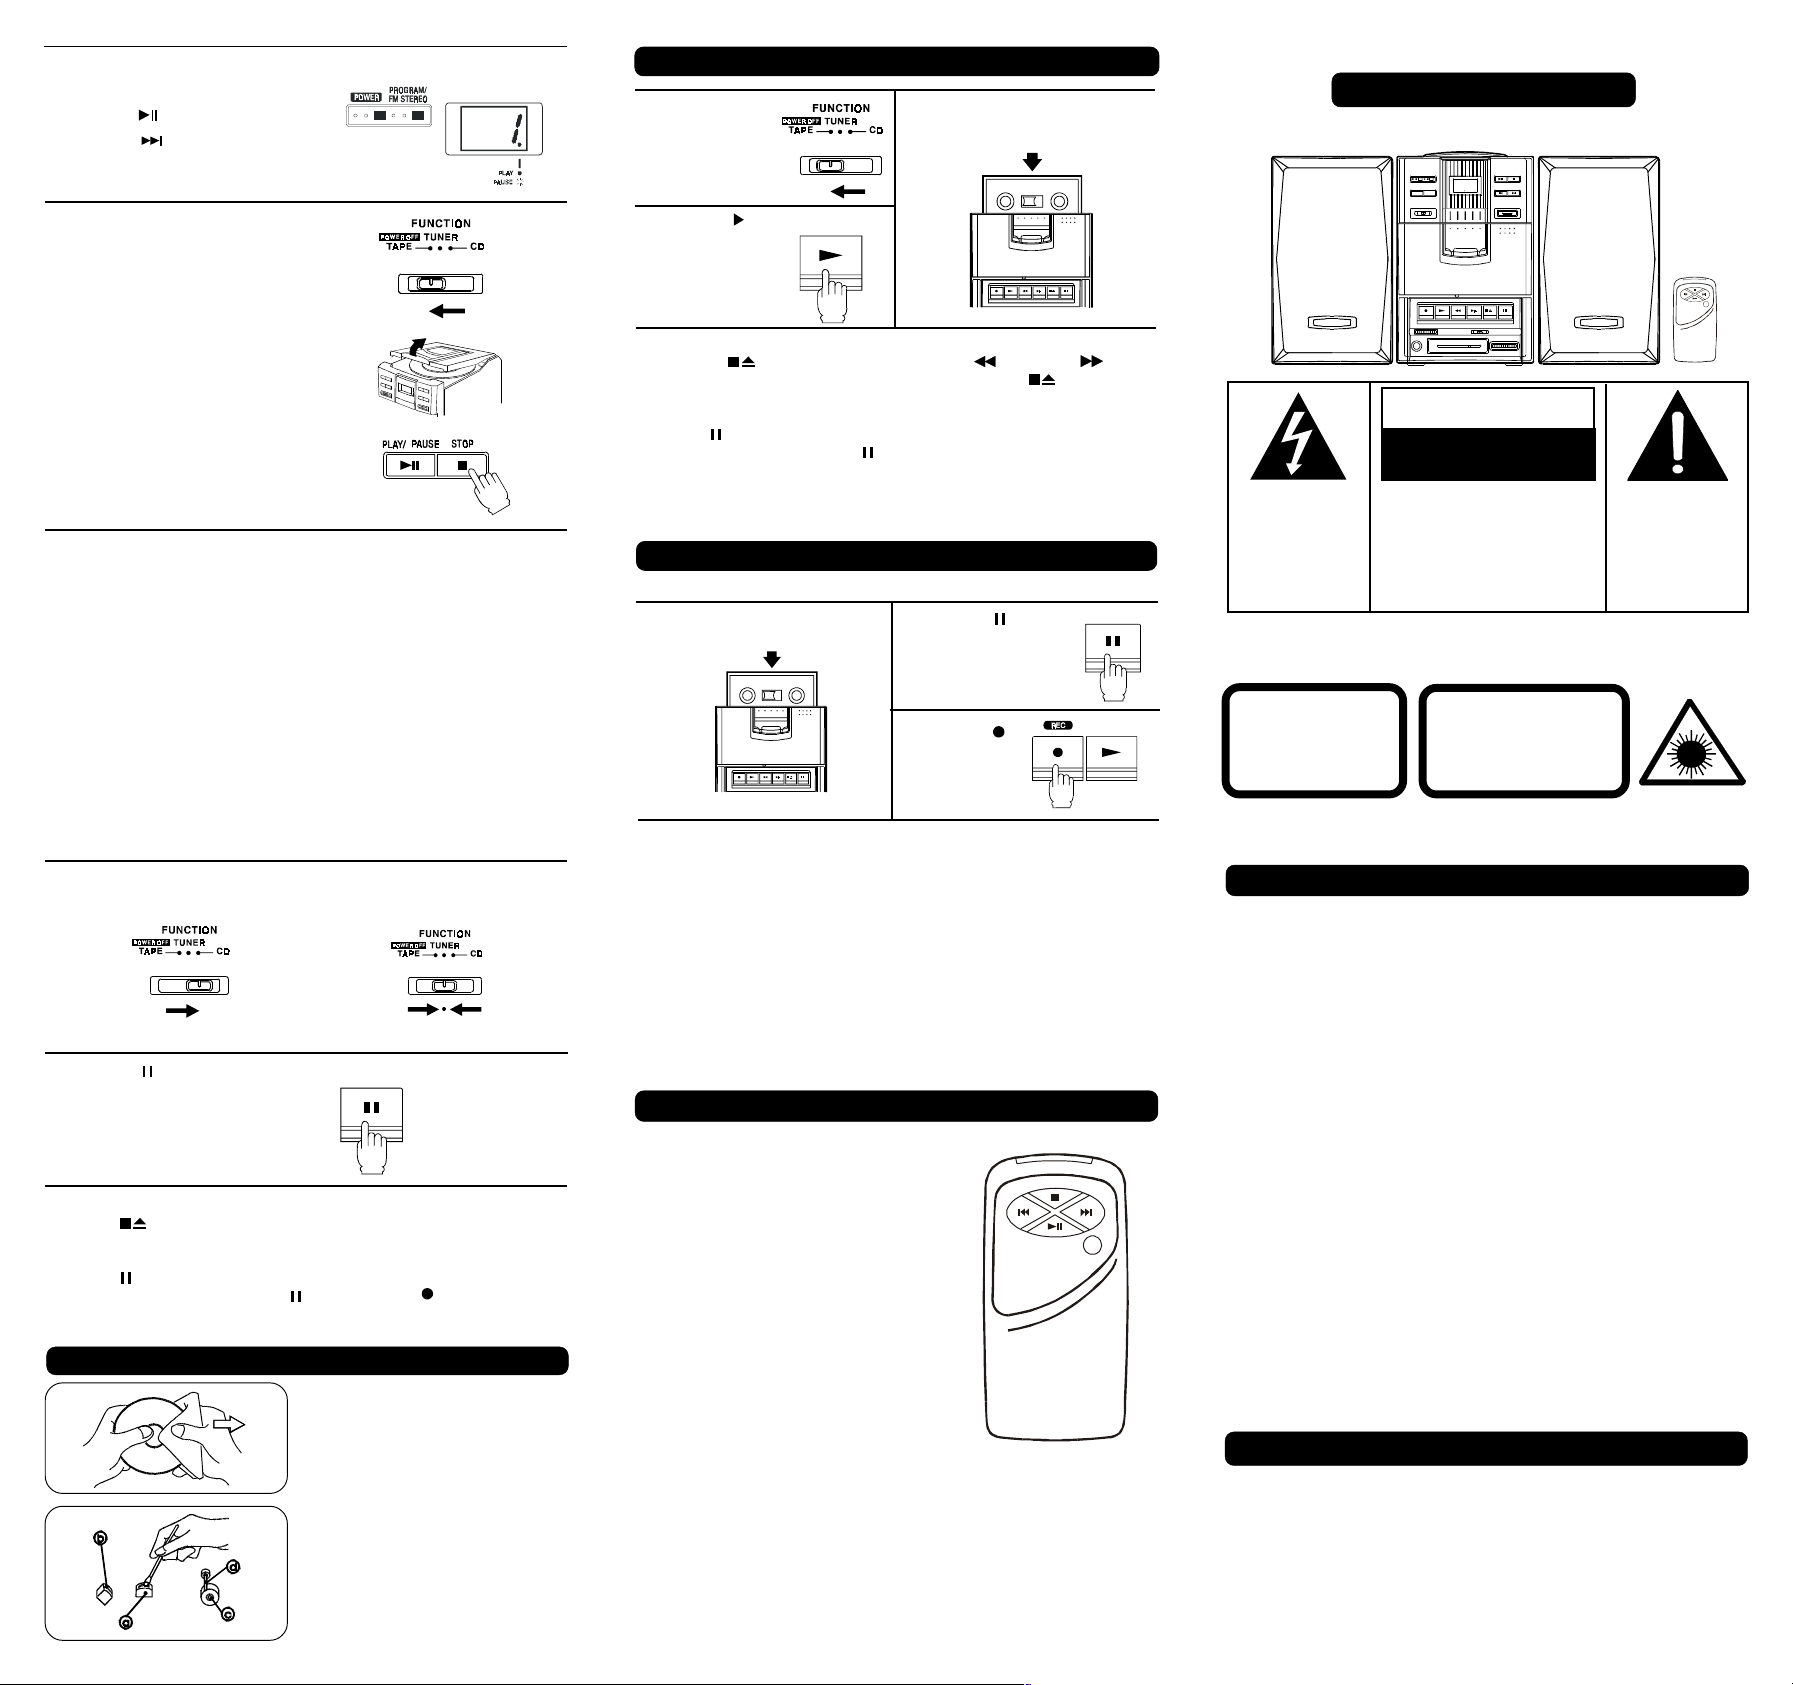
REMOTE CONTROL FOR CD (OPTIONAL)
INSTALLING BATTERIES
Install two R03 (AAA or SUM-4) size batteries
into the battery compartment of the Remote
Control.
BATTERY REPLACEMENT
When batteries become weak, the operating
distance of the Remote Control is greatly reduced
and you will need to replace the batteries.
USING THE REMOTE CONTROL CORRECTLY
• Point the Remote Control at the REMOTE
SENSOR. Press the button required.
• When there is a strong ambient light source,
the performance of the infrared REMOTE
SENSOR may be degraded, causing unreliable
operation.
WARNING
• If the Remote Control is not to be used for a
long time, remove the batteries to prevent
possible damage through battery leakage.
• Do not mix different types of battery, or old
batteries with new ones.
WARNING
RISK OF ELECTRIC SHOCK
DO NOT OPEN
The lightning flash
and arrowhead within
the triangle is a
warning sign alerting
you of "dangerous
voltage" inside the
product.
WARNING: TO REDUCE THE RISK OF FIRE OR ELECTRIC SHOCK, DO
NOT EXPOSE THIS APPLIANCE TO RAIN OR MOISTURE.
WARNING: TO REDUCE THE RISK
OF ELECTRIC SHOCK, DO NOT
REMOVE COVER (OR BACK) NO
USER-SERVICEABLE PARTS
INSIDE. REFER SERVICING TO
QUALIFIED SERVICE
PERSONNEL.
CLASS 1 LASER PRODUCT
CLASS 1
LASER
PRODUCT
This product contains a low power laser device.
CAUTION
INVISIBLE LASER RADIATION
WHEN OPEN AND INTERLOCKS
DEFEATED.
AVOID EXPOSURE TO BEAM.
TROUBLE SHOOTING GUIDE
PROBLEMS
CD
System does not turn on
Disc in place but unit won't play
Disc skips
RADIO
Poor FM reception
Poor AM(MW) reception
TAPE
Distorted or noisy recording
Record button won't depress
ITEMS TO CHECK
• Make sure AC power plug is secure in the
outlet, and outlet has power.
• Make sure FUNCTION switch is set to CD.
• Make sure disc label is facing up.
• Make sure disc is clean.
• Pause mode is activated.
• Disc may be damaged or dirty; check disc.
• Make sure the unit is on a secure spot.
Vibration or jarring can cause the disc to
skip.
• Make sure FM antenna wire is unwind.
• Electrical interference in your home can
cause poor reception. Move the unit away
from sources of interference (especially
those with motors and transformers).
• Reposition or turn the unit for better
reception.
• Tape heads are dirty; clean them.
• Tape is damaged. Try another tape.
• Tabs on edge of cassette may be missing
or broken. If you want to record on that
cassette cover the holes with removable
tape.
SPECIFICATIONS
GENERAL
Power consumption: 16 W
Power source: AC 120V ~ 60Hz
Specifications subject to change without notice.
The exclamation point
within the triangle is a
warning sign alerting
you of important
instructions
accompanying the
product.
811-630391-090 Printed in China
Page 2

PRECAUTIONS
Follow the advice below for safe and appropriate operations.
ON PLACEMENT
• Do not use the unit in places which
are extremely hot, cold, dusty, or
humid.
• Place the unit on a flat and even
surface.
• Do not restrict the air flow of the
unit by placing it in a place with
poor air flow, by covering it with a
cloth, or by placing it on a carpet.
ON SAFETY
• When connecting and
disconnecting the AC cord, grip
the plug and not the cord itself.
Pulling the cord may damage it
and create hazard.
• When you are not going to use the
unit for a long period of time,
disconnect the AC power cord.
FCC INFORMATION
This device complies with Part 15 of FCC Rules. Operations are subject to
the following two conditions:
(1) This device may not cause harmful interference, and
(2) This device must accept any interference received, including interference
that may cause undesirable operations.
Should any trouble occur, disconnect the AC power cord and refer
servicing to qualified personnel.
ON AC VOLTAGE
• Before use, check that the rated
voltage of your unit matches your
local voltage.
ON CONDENSATION
• When left in a heated room where
it is warm and damp, water
droplets or condensation may
form inside the CD player.
• When there is condensation
inside the unit, the unit may not
function normally.
• Let it stand for 1 to 2 hours before
turning the power on, or gradually
heat the room up and dry the unit
before use.
PARTS IDENTIFICATION
1. FM STEREO/PROGRAM
indicator
2. POWER indicator
3. REMOTE SENSOR
4. CD PLAY/PAUSE indicator
5. FUNCTION selector
6. Cassette door
7. Cassette operation buttons
RECORD
PLAY
REWIND
F.FWD (Fast Forward)
STOP/EJECT
PAUSE
8. VOLUME control
9. PHONES jack
10 . CD door
11. CD PLAY/PAUSE button
12 . CD STOP button
13. Forward Skip +
14. Reverse Skip -
15.PROGRAM button
16 . BAND selector (AM/FM)
17 . TUNING control
18 . Dial scale
19 . AC cord
20. FM antenna wire
21.Speaker terminals
'
SYSTEM CONNECTIONS
IMPORTANT
Switch off the power before connecting speakers and other equipment.
SPEAKER CORD CONNECTION
Connect the wires with the printed
white lines to the red (+) terminals
and the plain-black wires to the
black (-) terminals.
Warning:
Connecting speakers other than
the speakers supplied with the
unit, may damage the unit.
USING HOUSE CURRENT
Before use, check that the rated
voltage of your unit matches your
local voltage.
Caution: To prevent electrical
shock, match wide blade of
plug to wide slot, fully insert.
SPEAKER TERMINALS
IMPEDANCE : 8 OHM (Ω)
RIGHT
SPEAKER
BOX
1
2
LEFT
SPEAKER
BOX
AC cord to an
AC outlet
POWER INDICATOR
While the AC cord is connected:
• The POWER indicator will light up when the FUNCTION switch is set to CD
or TUNER.
• When the FUNCTION switch is set to TAPE/POWER OFF, the POWER
indicator will be switched off.
After using the unit, set the FUNCTION switch to TAPE/POWER OFF.
ADJUSTING THE SOUND
TO ADJUST THE VOLUME
Adjust the VOLUME control to obtain the desired volume level.
WHEN RECORDING
The VOLUME control may be adjusted with no effect on the recorded signal.
FOR PRIVATE LISTENING
Connect headphones (ø3.5mm stereo mini-plug) to the PHONES jack.
When the headphones is connected, speakers are automatically
disconnected.
LISTENING TO THE RADIO
1.Set the FUNCTION switch to
TUNER.
3.Tune into the desired station.
TUNING
FOR BETTER RECEPTION
FM
Fully unwind the wire antenna. Then
extend the wire antenna and place
it in the position that sounds best.
NOTE: DO NOT CONNECT TO AN
OUTSIDE ANTENNA.
TO RECEIVE THE FM BROADCAST IN STEREO
Set the BAND selector to FM STEREO.
When the FM stereo broadcast is received, FM STEREO indicator lights up.
IF THE FM BROADCAST SIGNAL IS WEAK
Set the BAND selector to FM position to turn off the FM STEREO indicator
and background noises becomes mono.
AFTER LISTENING
Set the FUNCTION switch to TAPE/POWER OFF.
2. Slide the BAND selector to
choose AM(MW) or FM.
4. Adjust the desired sound.
VOLUME
AM(MW)
Repositioning the unit to get better
AM(MW) reception.
COMPACT DISC PLAYBACK
1. Set the FUNCTION switch to
CD. " " is shown in the
display.
2. Open the CD door. Place a
disc in the center with the label
side up and then close the CD
door gently. The total number
of tracks will show in the
display.
2
1
3
3.Press the PLAY/PAUSE button. The PLAY/PAUSE indicator will light
up. Adjust the VOLUME.
TO INTERRUPT PLAYBACK
Press the PLAY/PAUSE button. The PLAY/PAUSE indicator will blink.
To resume playback, press the PLAY/PAUSE button again.
TO STOP PLAYBACK
Press the STOP button.
COMPACT DISC PLAYBACK (continued)
TO SEARCH THROUGH TRACKS
• Search function is possible only in playback mode.
• Keep press either one of the ( / ) SKIP
buttons according to the desired direction, and
release at the desired point.
TO SKIP TO THE BEGINNING OF A TRACK
• Press either one of the ( / ) SKIP buttons
according to the desired direction, each press
skips one track.
• Playback resumes from the selected track.
OU
Keep it pressed during play
OU
Each press skips one track
COMPACT DISC PROGRAMMABLE PLAYBACK
1. Press the PROGRAM button.
2. Press the - SKIP +
buttons until the desired track
appears on the CD display.
4. Press steps 2 and 3 until all the
desired tracks are programmed
(up to 16 tracks).
NOTE :
Programming can only be done when the unit is in the stop mode.
PROGRAM /
PROGRAM
OU
3. Press the PROGRAM button.
PROGRAM /
PROGRAM
5. Press the PLAY / PAUSE
button.
Page 3

VÉRIFICATION DE LA PROGRAMMATION
1.Pressez la touche PROGRAM.
2.Pressez la touche PLAY/PAUSE.
3.Pressez la touche + SKIP.
Ou
• Pressez la touche PROGRAM deux
fois.
ANNULATION DE LA PR OGRAMMATION
• Réglez le sélecteur de
FONCTION à TAPE/POWER
OFF ou à TUNER
LECTURE D’UNE CASSETTE
1.Réglez le
sélecteur de
FONCTION à
TAPE/
POWER OFF.
3.Pressez la
touche
PLAY
(lecture) .
PLAY
MICRO-CHAÎNE À LECTEUR POUR CD
INSTRUCTIONS DE FONCTIONNEMENT
2.Introduisez une cassette.
OU
• Ouvrez le couvercle du lecteur
de CD (le lecteur étant en mode
d’arrêt).
OU
• Pressez la touche STOP.
4.Préparez la source à enregistrer et effectuez-en la lecture.
Enregistrement d’un CD
(Reportez-vous à Lecture d’un disque
compact)
5.Pressez la touche PAUSE .
ARRÊT DE L ’ENREGISTREMENT
Pressez la touche STOP/EJECT
INTERRUPTION DE L ’ENREGISTREMENT
Pressez la touche PAUSE
Pour reprendre l’enregistrement, pressez
de nouveau la touche PAUSE
.
.
Enregistrement provenant de
la radio
(Reportez-vous à Fonctionnement de
EFFACEMENT D’UNE CASSETTE
.
ENREGISTRÉE
1. Réglez le sélecteur de FONCTION à
TAPE/POWER OFF.
2. Introduisez une cassette, le côté que
vous désirez effacer face à vous.
3.
Pressez la touche RECORD
pour commencer l’effacement.
la radio)
2)75-
ENTRETIEN
NETTOYAGE DES DISQUES COMPACTS
Si un CD produit des sons hachés ou si la
lecture n’est pas possible, il faut
peut-être nettoyer le disque. Avant d’en
effectuer la lecture, essuyez le disque en
allant du centre vers le bord avec un chiffon.
Après son utilisation, rangez le disque dans
son étui.
NETTOYAGE DES TÊTES DU
MAGNÉTOCASSETTE
Nettoyez les têtes avec un coton-tige
légèrement humecté avec un liquide de
nettoyage ou de l’alcool dénaturé.
ARRÊT DE LA LECTURE
Pressez la touche STOP/EJECT
.
INTERRUPTION DE LA LECTURE
Pressez la touche PAUSE .
Pour reprendre la lecture, pressez
de nouveau la touche PAUSE .
DÉFILEMENT RAPIDE
Pressez la touche REWIND
(rembobinage) ou F.FWD (avance
rapide) . Pressez la touche STOP/
EJECT pour cesser le défilement
à l’endroit désiré.
EN FIN DE BANDE
En mode de défilement rapide ou de
lecture normale, la cassette s’arrête
automatiquement en fin de bande.
ENREGISTREMENT
• UTILISEZ SEULEMENT DES CASSETTES NORMALES (TYPE I) POUR
L’ENREGISTREMENT.
1.Introduisez une cassette.
2.Pressez la
touche PAUSE
.
3.Pressez la
touche
RECORD
(enregistrement)
.
NETTO Y AGE DE L ’APP AREIL
N’utilisez pas de produits chimiques volatils sur cet appareil. Nettoyez-le en
l’essuyant légèrement avec un chiffon doux.
REMARQUE IMPORT ANTE:
• Si le couvercle du lecteur de CD est ouvert avant la fin de la lecture d’un CD, un bruit
de crissement peut se produire. Pour l’enrayer, fermez le couvercle du lecteur et réglez
le sélecteur de FONCTION temporairement à TAPE/POWER OFF.
• Si une indication anormale est affichée ou si un problème de fonctionnement se produit,
débranchez le cordon d’alimentation CA. Attendez au moins 5 secondes, puis
rebranchez le cordon CA.
• Avant de transporter l’appareil, retirez le CD du lecteur.
2)75 -
PLAY
TÉLÉCOMMANDE (en option)
POSE DES PILES
Posez deux piles 1,5 V, R03 (AAA ou SUM-4)
dans le compartiment des piles sur la
télécommande.
REMPLACEMENT DES PILES
Quand les piles s’affaiblissent, la distance de
fonctionnement de la télécommande baisse
considérablement et il faut remplacer les piles.
UTILISATION CORRECTE DE LA
TÉLÉCOMMANDE
• Pointez la télécommande vers le CAPTEUR
DE TÉLÉCOMMANDE situé sur le côté
gauche de l’affichage. Pressez la touche
désirée. Les fonctions des touches sont
identiques à celles des touches sur l’appareil.
• Si l’éclairage ambiant est élevé, le rendement
du CAPTEUR à infrarouge peut baisser et
entraîner un mauvais fonctionnement.
REMARQUES
• Si vous n’allez pas utiliser la télécommande
pendant une longue période de temps, retirez
les piles pour éviter le risque
d’endommagement en cas de fuite.
• Ne mélangez pas différents types de piles, ni
des piles neuves avec des piles usées.
AVERTISSEMENT
RISQUE DE CHOC ÉLECTRIQUE
NE PAS OUVRIR
Le symbole de l'éclair
à l'intérieur d'un
triangle a pour but
d'avertir l'utilisateur
d'une «tension
dangereuse» à
l'intérieur de
l'appareil.
AVERTISSEMENT: POUR RÉDUIRE LE RISQUE D'INCENDIE OU DE CHOCS
ÉLECTRIQUES, NE PAS EXPOSER CET APPAREIL À LA PLUIE OU À L'HUMIDITÉ.
APPAREIL À
LASER DE
CLASSE 1
Cet appareil contient un dispositif au laser de faible puissance.
AVERTISSEMENT: POUR RÉDUIRE
LE RISQUE DE CHOCS
ÉLECTRIQUES, NE PAS RETIRER LE
COUVERCLE (OU LE DOS). AUCUNE
PIÈCE NÉCESSITANT L'ENTRETIEN
PAR L'UTILISATEUR À L'INTÉRIEUR.
POUR RÉPARATION, S'ADRESSER À
UN RÉPARATEUR QUALIFIÉ.
MISE EN GARDE
RADIATIONS LASER INVISIBLES, SI
L'APPAREIL EST OUVERT ET SI LE
DISPOSITIF DE VERROUILLAGE EST
NEUTRALISÉ. ÉVITER L'EXPOSITION
AU FAISCEAU.
GUIDE DE DÉP ANNAGE
PROBLÈMES
LECTEUR DE CD
Le lecteur ne se met pas en
marche
Le disque est en place mais la
lecture ne s’effectue pas
Le disque produit des sons
hachés
RADIO
Mauvaise réception FM
Mauvaise réception AM(MW)
MAGNÉTOCASSETTE
Enregistrement déformé ou
bruyant
La touche d’enregistrement ne
s’abaisse pas
VÉRIFICATIONS
• Cordon CA bien fixé dans la prise?
Prise alimentée de courant?
• Sélecteur de FONCTION réglé à CD?
• Étiquette du disque face vers le haut?
• Disque propre?
• Lecteur en mode de pause?
• Disque endommagé ou sale?
• Appareil sur une surface stable?
Des vibrations ou des secousses peuvent
entraîner des sons hachés.
• Antenne filaire FM bien déroulée?
• Des interférences électriques chez vous
peuvent causer une mauvaise réception.
Déplacez l’appareil à distance des sources
d’interférences (spécialement moteurs et
transformateurs).
• Replacez ou tournez l’appareil pour
améliorer la réception.
• Les têtes sont sales; nettoyez-les.
• Bande endommagée? Utilisez une autre
bande.
• Languettes sur le bord de la cassette
retirées ou cassées? Pour faire un
enregistrement sur cette cassette,
recouvrez les orifices avec du ruban
amovible.
CARACTÉRISTIQUES D’ORDRE GÉNÉRAL
Consommation de courant:16 W
Source d'alimentation: CA 120 V ~ 60 Hz
Les caractéristiques peuvent changer sans préavis.
811-630391-100 Imprimé en Chine
Le point d'exclamation
à l'intérieur d'un
triangle a pour but
d'attirer l'attention
sur des instructions
importantes qui
accompagnent
l'appareil.
Page 4

CONSIGNES DE SÉCURITÉ
Suivez les conseils ci-dessous pour un fonctionnement correct et sans danger
EMPLACEMENT
• N'utilisez pas cet appareil dans les
endroits extrêmement chauds,
froids, poussiéreux ou humides.
• Placez l'appareil sur une surface
plate et de niveau.
• Laissez l'air circuler librement autour
de l'appareil. Ne le couvrez pas avec
du tissu et ne le placez pas sur un
tapis.
SÉCURITÉ
• Lorque vous branchez et débranchez
le cordon CA, tenez la fiche et non
le cordon. Le tirage du cordon peut
l'endommager et créer un risque.
• Débranchez le cordon d'alimentation
CA si vous n'allez pas utiliser
l'appareil pendant une longue période
de temps.
TENSION CA
• Avant d'utiliser l'appareil, vérifiez si
la tension indiquée pour l'appareil
correspond à votre tension locale.
CONDENSATION
• Si l'appareil est laissé dans une
pièce chauffée, où il fait chaud et
humide, des gouttelettes d'eau ou
de la condensation peuvent se
former à l'intérieur du lecteur de CD.
• S'il y a de la condensation à l'intérieur
de l'appareil, ceci peut affecter son
fonctionnement normal.
• Avant de faire fonctionner l'appareil,
laissez-le dans une piéce chauffée
de 1 à 2 heures, ou chauffez
graduellement la pièce pour que la
condensation se dissipe.
RENSEIGNEMENT FCC
L'appareil est en conformité avec le
chapitre 15 des règles de la FCC. Son
fonctionnement est soumis aux deux
conditions suivantes:
(1) Cet appareil ne doit pas causer
d'interférences gênantes, et
(2) Cet appareil doit supporter toute
interférence reçue, y compris celles
qui pourraient causer son mauvais
fonctionnement.
En cas de problème, débranchez le
cordon d'alimentation CA et faites
réparer l'appareil par un personnel
qualifié.
IDENTIFICA TION DES COMMANDES
1. Indicateur FM stéréo/
PROGRAMMATION
2. Indicateur D’ALIMENTATION
3. CAPTEUR DE
TÉLÉCOMMANDE (en option)
4. Indicateur LECTURE/PAUSE
pour CD
5. Sélecteur de FONCTION
6. Porte du compartiment de
cassette
7. Touches de fonctionnement
du magnétocassette
ENREGISTREMENT
LECTURE
REMBOBINAGE
AVANCE RAPIDE
ARRÊT/ÉJECTION
PAUSE
8. Commande de VOLUME
9. Prise pour CASQUE
D’ÉCOUTE
10 . Couvercle du lecteur de CD
11. Touche LECTURE/
PAUSE pour CD
12. Touche ARRÊT pour CD
13. Saut/recherche AVANT
14. Saut/recherche
ARRIÈRE
15. Touche de
PROGRAMMATION
16 . Sélecteur de BANDES
17. Commande de
SYNTONISATION
18. Échelle de syntonisation
19 . Cordon CA
20 . Antenne filaire FM
21. Bornes d’enceintes
acoustiques
'
RACCORDEMENTS DE LA CHAÎNE
IMPORT ANT
Mettez l’appareil hors circuit avant de raccorder les enceintes acoustiques
ou tout autre appareil auxiliaire.
RACCORDEMENT DES FILS DES
ENCEINTES ACOUSTIQUES
BORNES DES ENCEINTES ACOUSTIQUES
IMPÉDANCE : 8 OHM (Ω)
Raccordez les fils avec les lignes
blanches imprimées aux bornes
rouges (+) et les fils noirs unis aux
bornes noires (-).
Avertissement:
Le raccordement d’enceintes
acoustiques autres que celles
fournies avec l’appareil, peut
endommager l’appareil.
UTILISATION DU COURANT
RIGHT
SPEAKER
BOX
LEFT
SPEAKER
BOX
1
DOMESTIQUE
Avant d’utiliser l’appareil, vérifiez si
la tension indiquée pour l’appareil
correspond à votre tension locale.
Cordon Ca à
2
brancher dans
une prise CA
INDICATEUR D'ALIMENTATION
Quand le cordon CA est branché:
• L’indicateur d’alimentation (POWER) s’allume quand le sélecteur de
FONCTION est réglé à CD ou TUNER (syntonisateur).
• Quand le sélecteur de FONCTION est réglé à TAPE/POWER OFF
(magnétocassette/hors circuit), l’indicateur d’alimentation est éteint.
Après avoir utilisé l’appareil, réglez le sélecteur de FONCTION à TAPE/
POWER OFF.
RÉGLAGE DU SON
RÉGLAGE DU VOLUME
Réglez la commande de VOLUME au niveau désiré.
LORS D’UN ENREGISTREMENT
Le réglage de la commande de VOLUME n’a aucun effet sur le signal
enregistré.
ÉCOUTE PERSONNELLE
Branchez un casque d’écoute (à mini-fiche stéréo ∅ 3,5 mm) dans la prise
PHONES.
Si un casque d’écoute est branché, les enceintes acoustiques sont mises
hors circuit automatiquement.
FONCTIONNEMENT DE LA RADIO
1. Réglez le
sélecteur de
FONCTION à
TUNER
(syntonisateur).
3. Syntonisez la station désirée.
TUNING
AMÉLIORATION DE LA RÉCEPTION
FM
Déroulez complètement l’antenne
filaire et placez-la dans la position
qui procure la meilleure réception.
REMARQUE: Ne la raccordez pas a
une antenne exterieure.
RÉCEPTION D'UNE ÉMISSION FM STÉRÉO
Réglez le sélecteur de BANDES à FM STEREO.
Lorsque l'émission FM stéréo est captée, l'indicateur FM STEREO s'allume.
SI LE SIGNAL DE L'ÉMISSION EST FAIBLE
Réglez le sélecteur de BANDES à FM pour faire disparaître l'indicateur FM
STEREO; ceci réduit le bruit de fond mais le signal reproduit est monaural.
UNE FOIS L’ÉCOUTE TERMINÉE
Réglez le sélecteur de FONCTION à TAPE/POWER OFF (magnétocassette/
hors circuit).
2. Réglez le sélecteur de BANDES
à AM(MW) ou FM.
4. Réglez le volume au niveau
désiré.
VOLUME
AM(MW)
Tournez l’appareil de façon à
améliorer la réception AM(MW).
LECTURE D’UN DISQUE COMP ACT
1. Réglez le sélecteur de
FONCTION à CD. " " apparaît
sur l’affichage.
2. Ouvrez le couvercle du lecteur
de CD. Placez un disque au
centre, l’étiquette vers le haut,
puis fermez délicatement le
couvercle. Le nombre total de
plages apparaît sur
l’affichage.
!
3.Pressez la touche PLAY/PAUSE (lecture/pause) pour commencer
la lecture. L’indicateur PLAY/PAUSE s’allume. Réglez le VOLUME.
INTERRUPTION DE LA LECTURE
Pressez la touche PLAY/PAUSE. L’indicateur PLAY/PAUSE clignote.
Pressez de nouveau la touche pour reprendre la lecture.
ARRÊT DE LA LECTURE:
Pressez la touche STOP (arrêt).
LECTURE D’UN DISQUE COMP ACT (suite)
RECHERCHE DE PLAGES
• La fonction de recherche s’effectue seulement en
mode de lecture.
• Maintenez pressée l’une ou l’autre des touches
SKIP (saut) / selon l’emplacement de la
plage et relâchez la touche à l’endroit désiré.
Maintenez la touche pressée
OU
durant la lecture
POUR ALLER AU DÉBUT D’UNE PLAGE
• Pressez l’une ou l’autre des touches SKIP
(saut) / selon l’emplacement de la plage;
chaque pression fait sauter une plage.
• La lecture reprend à partir de la plage désirée.
OU
Chaque pression fait sauter
une plage
PROGRAMMA TION DE PLA GES
1. Pressez la touche PROGRAM (programmation).
2. Pressez l’une ou l’autre des
touches - SKIP + jusqu’à
ce que le numéro de la plage
désirée apparaisse sur l’affichage.
4. Répétez les étapes 2 et 3 pour
programmer d’autres plages
(jusqu’à 16 plages).
REMARQUE:
La programmation s’effectue seulement quand l’appareil est en mode d’arrêt.
OU
PROGRAM /
PROGRAM
3. Pressez la touche PROGRAM.
PROGRAM /
PROGRAM
5. Pressez la touche PLAY/
PAUSE pour commencer la
lecture programmée.
Page 5

PARA REVISAR LA PROGRAMACIÓN
1.Presione el botón PROGRAM.
2.Presione el botón PLAY/PAUSE .
3.Presione el botón SKIP +.
O bien,
• Presione el botón PROGRAM.
P ARA BORRAR LA PROGRAMACIÓN
• Coloque el interruptor
FUNCTION en la posición
TAPE/POWER OFF o TUNER.
REPRODUCCIÓN DE CASETES
1.Coloque el
interruptor
FUNCTION
en la posición
TAPE/
POWER OFF.
3.Presione el
botón
PLAY.
PLAY
MICROAPARA TO CON REPRODUCT OR DE CD
INSTRUCCIONES DE OPERACIÓN
2.Introduzca el casete.
O bien,
• Abra la tapa del compartimiento
para CD (mientras esté en la
modalidad de detención).
O bien,
• Presione el botón STOP.
4.Prepare la fuente a partir de la cual va a grabar y luego inicie su reproducción.
Para grabar a partir de un CD Para grabar a partir de la radio
(Remítase a la sección Reproducción
de Discos Compactos)
5.Presione el botón PAUSE .
PARA DETENER LA GRABACIÓN
Presione el botón STOP/EJECT .
P ARA INTERR UMPIR LA
GRABACIÓN
Presione el botón PAUSE .
Para reanudar la reproducción, presione
nuevamente el botón PAUSE
.
(Remítase a la sección Para
Escuchar la Radio)
2)7 5-
P ARA BORRAR UNA CINT A
GRABADA
1. Coloque el interruptor FUNCTION en
la posición TAPE/POWER OFF.
2. Introduzca el casete con el lado que
usted quiere borrar mirando hacia
fuera.
3. Presione el botón
comenzar a borrar la cinta.
RECORD para
MANTENCIÓN
LIMPIEZA DEL CD
Si el disco salta partes de una pista o
no funciona, puede que esto se deba
a que el disco necesita una limpieza.
Antes de tocar el disco, límpielo desde
el centro hacia fuera con un paño.
Después de escuchar el disco,
guárdelo en su caja.
LIMPIEZA DE LOS CABEZALES
Limpie los cabezales con un hisopo
de algodón ligeramente humedecido
con líquido de limpieza o con alcohol
industrial.
P ARA DETENER LA REPRODUCCIÓN
Presione el botón STOP/EJECT
PARA INTERRUMPIR LA
REPRODUCCIÓN
Presione el botón PAUSE
Para reanudar la reproducción, presione
nuevamente el botón PAUSE
.
.
P ARA AV ANZAR RÁPIDO HA CIA ATRÁS
O HACIA ADELANTE
.
Presione el botón
. Presione el botón STOP/EJECT
para detener el avance en el punto de la
cinta que usted desea.
CUANDO LA CINT A SE ACAB A
Ya sea que la cinta esté en la modalidad
de reproducción normal o de avance rápido,
una vez que se llegue al final de la cinta,
ésta se detendrá automáticamente.
REWIND o F.FWD
GRABACIÓN
• AL GRABAR USE SÓLO CINTAS NORMALES (TIPO I)
1.Inserte una cinta de casete.
2.Presione el
PAUS E
botón .
3.Presione el
PLAY
botón
RECORD .
LIMPIEZA DE LA UNIDAD
No utilice productos químicos volátiles en esta unidad. Límpiela con un paño
suave.
AVISO IMPORTANTE
• Si se abre la puerta del CD antes de que se complete la lectura este, se puede
producir un sonido de atascamiento. Esto se resuelve cerrando la puerta
y apagando la unidad (seleccionar TAPE/POWER - OFF) por un momento.
• Si se presenta un problema de funcionamiento o si aparece una indicación
anormal en el display, desconecte el cable de alimentación. Espere por lo
memos 5 segundos. Luego vuelva a conectar el cable.
• Antes de transportar la unidad, retire el disco de la bandeja de CD.
CONTROL REMOT O P ARA EL CD (OPCIONAL)
INSTALACIÓN DE LAS PILAS
Coloque dos pilas tamaño R03 (AAA o SUM-4) en
el compartimiento para pilas del control remoto.
CAMBIO DE PILAS
Cuando las pilas se van debilitando, la distancia
de operación del control remoto disminuye
enormemente, por lo que será necesario que
usted cambie las pilas.
CÓMO USAR CORRECT AMENTE EL CONTROL
REMOTO
• Tome el control remoto de manera que apunte
directo hacia el SENSOR REMOTO y presione
el botón pertinente para la operación que
usted desea realizar.
• Es posible que el funcionamiento del SENSOR
REMOTO infrarrojo se vea afectado ante la
presencia de una fuente de luz ambiental muy
potente, lo que podría provocar una operación
poco fiable del aparato.
ADVERTENCIA
• En caso que no vaya a usar el control remoto por un período prolongado
de tiempo, retire las pilas para evitar posibles daños, producto del
derrame de las pilas.
• No mezcle distintos tipos de pilas, ni tampoco pilas antiguas con pilas
nuevas.
ADVERTENCIA
RIESGO DE DESCARGA
ELÉCTRICA
NO ABRIR
El rayo con punta de
flecha ubicado
dentro del triángulo
equilátero pretende
alertar al usuario de
la presencia de
“voltaje peligroso” al
interior del
producto.
PRECAUCIÓN: PARA REDUCIR EL RIESGO DE INCENDIO O DESCARGA ELÉCTRICA, NO
EXPONGA ESTE APARATO A LA LLUVIA NI A LA HUMEDAD.
PRODUCTO
CON LÁSER
CLASE 1
Este aparato contiene un dispositivo láser de baja potencia.
PRECAUCIÓN: PARA REDUCIR EL
RIESGO DE DESCARGA ELÉCTRICA, NO
RETIRE LA CUBIERTA NI LA PARTE POSTERIOR DEL EQUIPO. NO HAY PIEZAS
ÚTILES PARA EL USU ARIO DENTRO DEL
APARATO. PARA CUALQUIER TIPO DE
CONSULTA, ACUDA A PERSONAL DE
SERVICIO CALIFICADO.
ADVERTENCIA
EXPOSICIÓN A RADIACIÓN LÁSER
INVISIBLE CUANDO LA UNIDAD ESTÁ
ABIERT A. EVITE LA EXPOSICIÓN A
ESTOS RA Y OS.
GUÍA P ARA LA LOCALIZACIÓN DE FALLAS
PROBLEMAS
CD
El equipo no enciende.
El disco está en su lugar, pero la
unidad no funciona.
El disco salta partes de una pista.
RADIO
Baja recepción FM.
Baja recepción AM(MW).
TOCACASETE
Grabación con ruidos o
distorsionada.
No se puede presionar el botón
de grabación.
REVISAR
• Asegúrese de que el enchufe de CA del aparato
esté bien puesto en el enchufe de la pared, y
de que este último esté operando
adecuadamente.
• Asegúrese de que el interruptor FUNCTION
esté ubicado en CD.
• Asegúrese de que la etiqueta del disco esté
mirando hacia arriba.
• Asegúrese de que el disco esté limpio.
• Asegúrese de que la modalidad de pausa no
esté activada.
• Revise el disco, ya que es posible que esté
dañado o sucio.
• Asegúrese de que la unidad esté ubicada en
un lugar seguro, ya que la vibración o las
sacudidas pueden hacer que el disco salte
partes de una pista en reproducción.
• Asegúrese de que el cable de la antena FM
esté desenrollado.
• La interferencia eléctrica de su hogar puede
causar una baja recepción de la unidad, por lo
que debe ubicarla lejos de estas fuentes de
interferencia (en especial de aquéllas que usan
transformadores o motores).
• Cambie la unidad de lugar o gírela un poco
para obtener una mejor recepción.
• Los cabezales del casete están sucios.
Límpielos.
• La cinta está dañada. Pruebe con otra cinta.
• Las lengüetas de protección ubicadas en el
borde del casete están rotas o se han salido.
Si usted desea grabar utilizando este casete,
cubra estos huecos con cinta adhesiva que
luego pueda despegar.
ESPECIFICACIONES
GENERALES
Salida de corriente: 16W
Alimentación de corriente: CA 120V ~ 60 Hz
Especificaciones sujetas a cambio sin previo aviso.
811-630391-110 Impreso en China
El signo de exclamación
dentro del triángulo
equilátero pretende alertar
al usuario de la presencia
de importantes
instrucciones en los
folletos que acompañan
este producto.
Page 6

PRECAUCIONES
Siga los consejos que se indican a continuación para poder operar la unidad de manera apropiada y segura.
EN CUANTO A LA UBICACIÓN
• No haga uso de la unidad en lugares con mucho
calor, frío, polvo o humedad.
• Coloque la unidad sobre una superficie plana
y pareja.
• No ponga este aparato en lugares con poca
ventilación. No lo cubra con un paño ni lo
coloque sobre la alfombra, impidiendo de esta
forma el flujo de aire a través de la unidad.
EN CUANTO A LA SEGURIDAD
• Cada vez que vaya a conectar y desconectar
el cable de CA, cerciórese de tirar el enchufe
y no el cable mismo, ya que éste se puede
dañar y por ende se crea una situación de
riesgo.
• Cuando no vaya a usar la unidad por un período
largo de tiempo, desconecte el cable de
alimentación de CA.
EN CUANTO A LA CONDENSACIÓN
• Si deja la unidad en un lugar caluroso y húmedo,
es posible que en el interior del reproductor de
CD se formen pequeñas gotas o que se forme
condensación.
• Si existe condensación en el interior del aparato,
es posible que la unidad no funcione de manera
normal.
• Deje que la unidad esté en reposo por 1 ó 2
horas antes de encenderla, o bien,
gradualmente, entibie la habitación y seque la
unidad antes de usarla.
INFORMACIÓN DE LA FCC
Este aparato cumple con la Parte 15 de las Normas
de la FCC. Las operaciones están sujetas a las dos
condiciones siguientes:
(1) Este aparato no puede provocar
interferencia perjudicial, y
(2) Este aparato debe tolerar cualquier
interferencia recibida, incluido aquel tipo de
interferencia que puede provocar
operaciones no deseadas.
Si llegara a presentarse cualquier problema,
desconecte el cable de alimentación de CA y
derive el equipo a personal calificado.
IDENTIFICACIÓN DE LAS PIEZAS
1. Indicador PROGRAM/FM
STEREO
2. Indicador POWER
3. Sensor de distancia REMOTE
SENSOR
4. Indicador CD PLAY/PAUSE
5. Selector de función
(FUNCTION)
6. Tapa del compartimiento para
casetes
7. Botones para operar el
tocacasete
RECORD [grabación]
PLAY [reproducción]
REW [rebobinado]
F.FWD [avance rápido]
STOP/EJECT
[detención/expulsión]
PAUSE [pausa]
8. Control de volumen (VOLUME)
9. Entrada para audífonos
(PHONES)
10. Tapa del compartimiento para
CD
11 . Botón CD PLAY/PAUSE
12 . Botón CD STOP
13. Salto hacia adelante +
14. Salto hacia atrás -
15. Botón PROGRAM
16. Selector de banda BAND (AM/
FM)
17. Control de sintonización
TUNING
18 . Escala del dial
19 . Cable de CA
20 . Cable de la antena FM
21 . Terminales del parlante
'
CONEXIONES DEL EQUIPO
IMPORT ANTE
Desconecte el equipo antes de conectar los parlantes y los demás accesorios.
CONEXIÓN DEL CABLE DE LOS
P ARLANTES
Conecte los cables que tienen una línea
blanca, a las terminales de color rojo (+) y
los cables que son enteros de color negro,
a las terminales de color negro (-).
Advertencia: Usted puede dañar la unidad,
si conecta otros parlantes que no sean
los que vienen incluidos con este aparato.
AL USAR LA CORRIENTE DE SU HOGAR
Antes de usar la unidad, asegúrese de
que el voltaje de la unidad sea el mismo
que el voltaje local.
Cuidado: Para evitar descargas eléctricas,
inserte completamente la pata ancha del
enchufe macho en la ranura ancha
correspondiente del enchufe de la pared.
INDICADOR POWER
Mientras el cable de CA esté conectado:
• El indicador POWER se encenderá cuando el interruptor FUNCTION esté ubicado en
CD o TUNER.
• Cuando el interruptor FUNCTION esté ubicado en T APE/PO WER OFF, el indicador
POWER se apagará.
Luego de usar la unidad, lleve el interruptor FUNCTION a la posición TAPE/POWER
OFF.
SPEAKER TERMINALS
IMPEDANCE : 8 OHM (Ω)
RIGHT
SPEAKER
BOX
LEFT
SPEAKER
BOX
1
2
Tto an AC
outlet
CÓMO AJUSTAR EL SONIDO
PARA AJUSTAR EL VOLUMEN
Ajuste el control de volumen para obtener el nivel de volumen deseado.
AL GRABAR
Aun cuando usted ajuste el control de volumen, es posible que esto no
cause ningún efecto en la señal de grabación.
PARA ESCUCHAR EN FORMA PRIVADA
Conecte los audífonos (con minienchufe estéreo de 3,5mm) a la entrada de
audífonos PHONES. Una vez que se conectan los audífonos, los parlantes
se desconectan automáticamente.
PARA ESCUCHAR LA RADIO
1. Coloque el interruptor
FUNCTION en la posición
TUNER.
3. Seleccione la estación de radio
que desea oír.
PARA UNA MEJOR RECEPCIÓN
FM
Desenrolle completamente el cable
de la antena y luego extiéndalo y
póngalo en la posición que le brinde
el mejor sonido.
NOTA: NO CONECTAR A LA
ANTENA EXTERIOR.
PARA RECIBIR TRANSMISIONES FM CON SONIDO ESTÉREO
Lleve el selector de banda BAND a FM STEREO.
Al recibir una transmisión en FM estéreo, el indicador FM STEREO se encenderá.
CUANDO LA SEÑAL FM ES DÉBIL
Lleve el selector de banda a la posición FM para apagar el indicador FM
STEREO y el ruido de fondo se volverá monoaural.
LUEGO DE ESCUCHAR
Lleve el interruptor FUNCTION a la posición TAPE/POWER OFF.
TUNING
2. Deslice el selector de banda
BAND para escoger entre
AM(MW) o FM.
4. Ajuste al nivel de volumen
deseado.
AM(MW)
Mueva la unidad hacia otro lugar, si
desea obtener una mejor recepción
de AM(MW).
VOLUME
REPRODUCCIÓN DE DISCOS COMPACTOS
1. Coloque el interruptor
FUNCTION en la posición CD.
En el visualizador aparecerá
" ".
2. Abra la tapa del compartimiento
para CD. Ponga un disco en el
centro, con la etiqueta mirando
hacia arriba, y luego cierre
suavemente la tapa del
reproductor de CD. En el
visualizador aparecerá el
número total de pistas.
!
3.Presione el botón PLAY/PAUSE . El indicador PLAY/PAUSE se
encenderá. Ajuste el volumen.
PARA INTERRUMPIR LA REPRODUCCIÓN
Presione el botón PLAY/PAUSE . El indicador PLAY/PAUSE comenzará
a pestañear. Para reanudar la reproducción, presione nuevamente el
botón PLAY/PAUSE .
P ARA DETENER LA REPRODUCCIÓN
Presione el botón STOP.
REPRODUCCIÓN DE DISCOS COMPACTOS (CONTINUACIÓN)
CÓMO BUSCAR UN PUNTO DE UNA PIST A
• La función de búsqueda solo se puede utilizar en el
modo de reproducción.
• Mantenga presionada cualquiera de las dos teclas
/ ) SKIP dependiendo de la dirección en la
(
que desea ir y libérela en el punto deseado.
P ARA IR HAST A EL COMIENZO DE UNA PIST A
Mantenga la tecla presionada
O
durante la reproducción
• Pulse cualquiera de las teclas ( / ) SKIP,
según la dirección en la que desea ir. Cada vez que
presione la tecla, saltará una pista.
Se iniciará la reproducción de la pista deseada.
•
Cada vez que presione la tecla,
O
saltará una pista
REPRODUCCIÓN D PROGRAMABLE DEL CD
1. Presione el botón PROGRAM.
2. Presione los botones de salto
- SKIP + hasta que la pista que
desea escuchar aparezca en el
visualizador del CD.
4. Siga los pasos 2 y 3 hasta que
haya programado todas las pistas
que usted desea oír (16 pistas
como máximo)
NOTA:
Sólo se puede efectuar la programación mientras la unidad está en la modalidad
de detención.
PROGRAM /
OR
PROGRAM
3. Presione el botón PROGRAM.
PROGRAM /
PROGRAM
5. Presione el botón PLAY/PAUSE
.
 Loading...