

Page 1
;*'
~
t
,".~
WARNING: TO REDUCE THE RISK OF FIRE OR ELECTRIC SHOCK, DO
NOT EXPOSE THIS APPLIANCE TO RAIN OR MOISTURE.
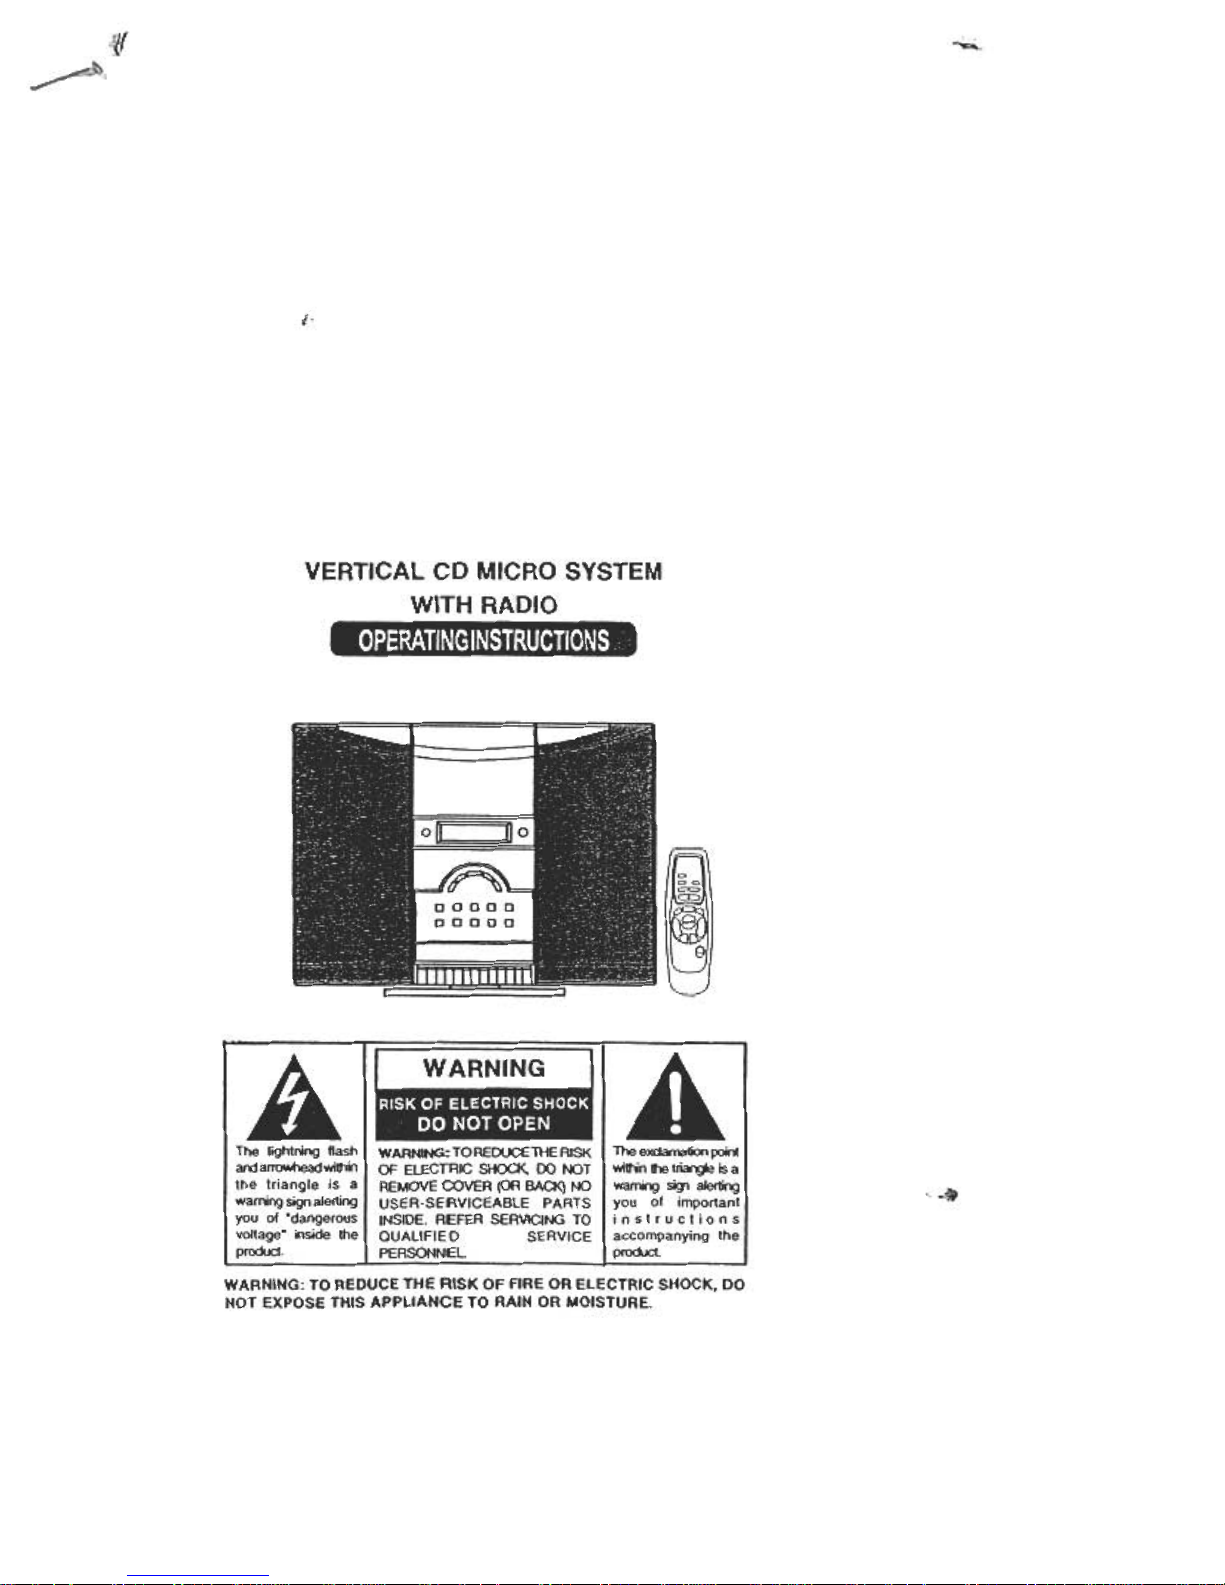
VERTICAL CD MICRO SYSTEM
WITH RADIO
Page 2
~
Ik
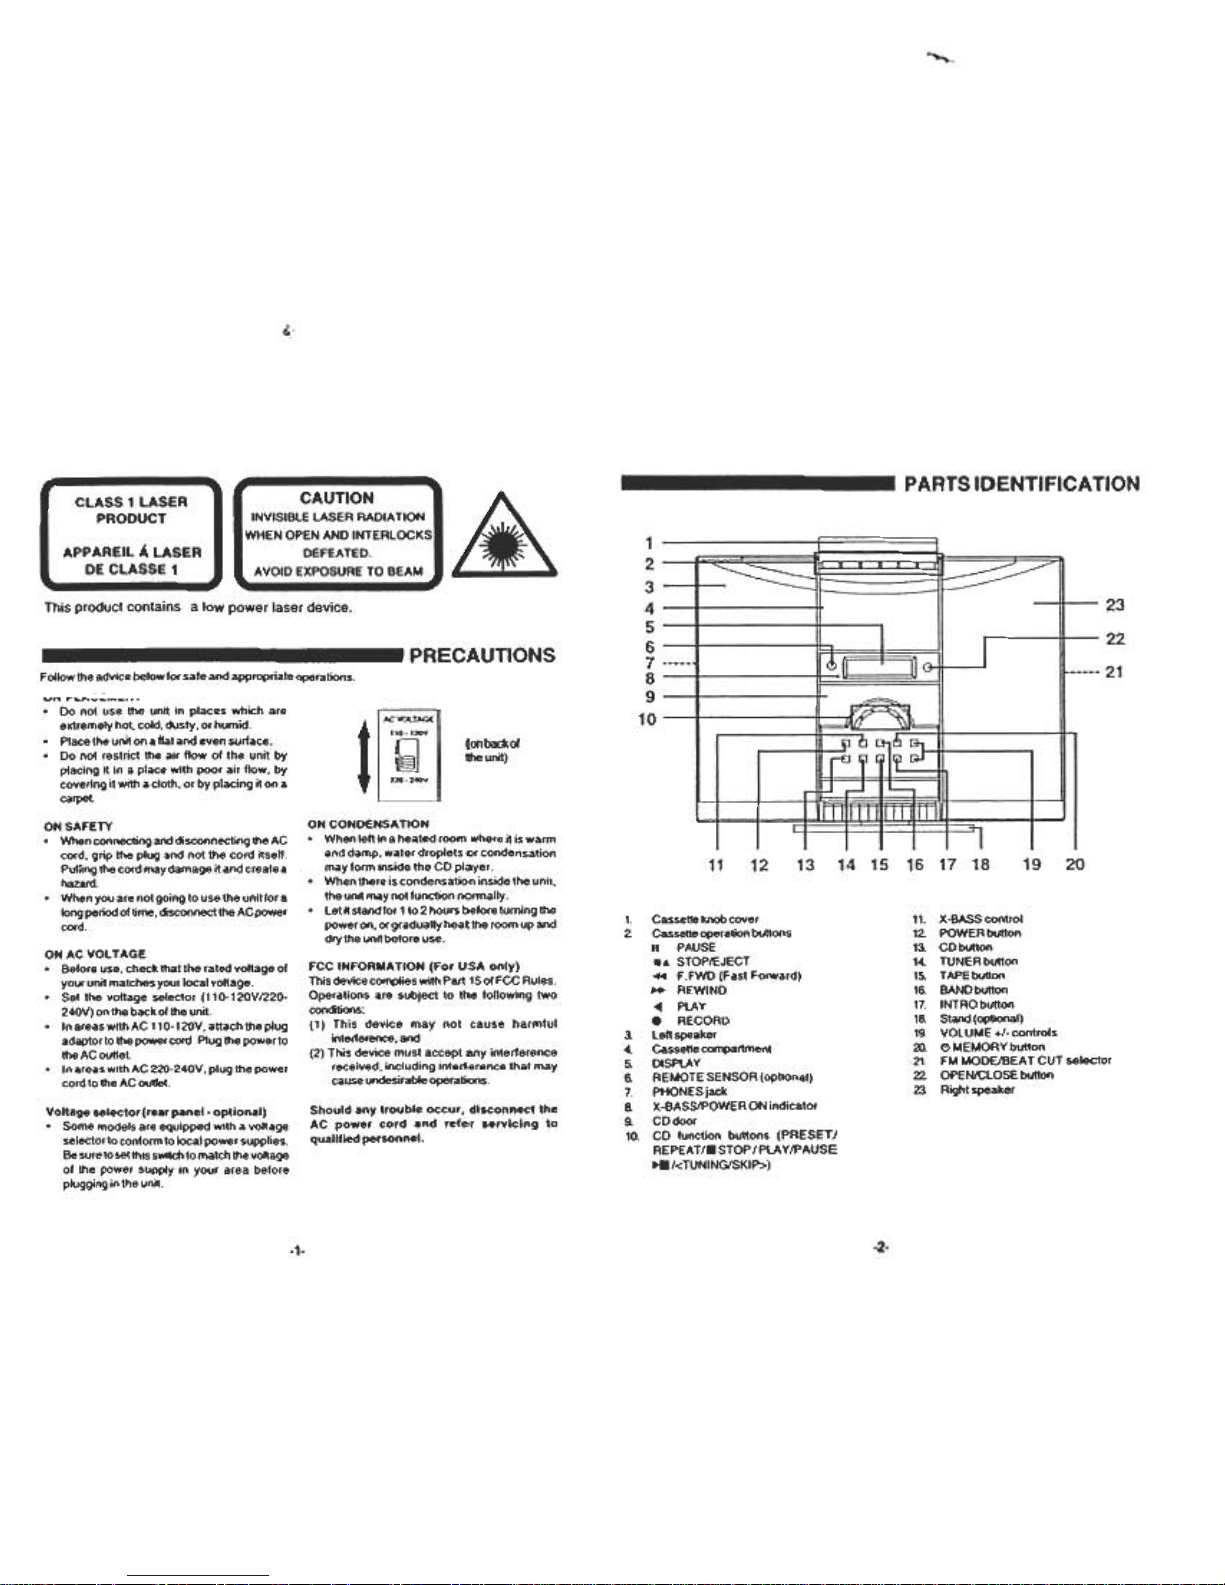
PARTS IDENTIFICATION
This product contains a low power laser device.
11. X-BASScontrol
12. POWER button
13. CDbutton
14. TUNERbutton
1~ TAPEbutton
16. BANDbulton
17. INTRObutton
18. Stand (optional)
19. VOLUME +1- controls
2). e MEMORY button
21. FM MODE/BEAT CUT selector
22. OPEN/CLOSE button
Zl Right speaker
,. Cassette knob cover
2. Cassette operation buttons
II PAUSE
..STOP/EJECT
F .FWD (Fasl Forward)
-REWIND
~ PlAY
.RECORD
a leflspeaker
4. Cassette~r1ment
~ DISPlAY
Ii REMOTE SENSOR (optional)
7. PHONESjack
a X-BASS/PDWER ON indicator
9. CDdoor
10. CD function buttons (PRESETI
REPEAT/.STOP/PlAY/PAUSE
~ I<TUNING/SKIP»
PRECAUTIONS
Follow the advice below for safe and appropoiate operations.
-2-
.1.
un ..0.# .
.Do not use the unit in places which are
extremely hot, cold, dusty. or humid-
.Place the unit on a llatand even surface.
.Do not restrict the air now of the unit by
placing it in a place with poor air now, by
covering it with a cloth, or by placing it on a
carpet
OH SAFETY
.When connecting and disconnecting the AC
cord, grip the plug and not the cord itse".
Pul;ing the cord may damage it and create a
hazard.
.Whenyouarenotgoingtousetheunitfora
kJng period of time. disconnect the AC power
cord.
OH AC VOLTAGE
.Before use, check that the rated voltage of
your unit matches your local vo"age .
.Set the vo"age selector (110-120V/220-
240V) on the back 01 the unit-
.Inareaswi1hAC110-120V,al1achtheplug
adaptor to the power cord Plugthepowerto
the AC ou1let.
.In areas with AC220-240V,plug the power
cord to 1he AC ou11et
Voltage selector (rear panel- optional)
.Some models are equipped with a vo"age
selector to conform to local power supplies.
Be sure to set this switd1to match the vo"age
of the power supply In your area before
plugging in the unit.
~ WLTAGE (on back 01
t j]- the unit)
ON CONOENSATION
.When left in a heated room where it is warm
and damp. water droplets or condensation
may form inside the CD player
.When there is condensation inside the unit.
the unit may not function normally.
.let it stand for 1 to2hoursbeforeturningthe
power on. or gradually heat the room up and
dry the unit before use.
FCC INFORMATION (For USA only)
This device complies with Part 1501 FCC Rules.
Operations are subjec1 to the following two
conIitions:
(1) This device may not cause harmful
intelference, and
(2) This device must accept any interference
received. including interference that may
cause undesirable operations
Should any trouble occur, disconnect the
AC power cord and refer servicing to
qualIfied personnel.
Page 3
~
ii:
TURNING ON THE UNIT
TIMER OPERATION (for remote only)
PRESS THE POWER BUTTON
Press the POWER button, the POWER ON indicator light up Select the desired function and the
corresponding function indicator will light up -
TO TURN OFF THE UNIT
Pressthe POWER button to ST ANOBY, the POWER ON indicator will turn off and only clock display
will be shown.
CLOCK SETTING
PLAY TIMER
,. Set Ihetime o'thetimer-onandtimer-o".
2. Selectlhedesiredprogramsourcewithlhe
FUNCTION.
TUNER: Select a band and station.
TAPE: Insert the cassette tape
CO.lnsert a disc.
3. Press TIMER.
TIMER appearn in the display.
4. PressPOWERtostandbymode.
5. For cassette playback, press PlAY.
At the timer-on time, the system turns on
automatically.
NOTE: If a lxJIton is ~ IJIe5sed lor 10 secorKIs ~ ck)d\ set mode will be exited automaticalá.
ADJUSTING THE SOUND
Cancel the timer function
Press the limerbutton untilthelimer function is turned 011
SLEEP SETTING (for remote only)
When the sleep timer is used, the power is automatically turned 011 alter the specified time passes.
WHEN RECORDING
Adjustments to the VOlUME or X-BASS control
will not affect the recording
FOR PRIVATE USTENING
Connect the headphone (035 mm stereo mini-
plug) to the PHONES jack.
When headphones are connected, the speakers
are automatK:aHy disconnected.
-3-
-4-
The powercan be turned on and off automatically at a preset time so that you can wake up tape musO:.
CD or radio Make sure the clock is correct before timer selling.
TIMER SETTING -in standby mode
RECORD TIMER
The system will record a radio broadcast at
a preset lime.
1. Set the time otthe limer-on andlimer-o".
2. Set to TUNER.
a Select a band andstation.
4. Insert the cassette tape for recording
5. Press TIMER
TIMER appears in the display
a Press POWER to standby mode.
7. Press REC (record) which also engages
PLAY.
Page 4

/,
LISTENING TO THE RADIO
TUNING INTO A STATION MANUAllY
~.
I. PresstheTUNERbuttoQ 3. Presslhe<TUNINGISKIP>buttonsloselect
TUNER aslalion.
~
2. Press IheBAND bullon10 selecllhedesired
-.BANO
PRESEmNG ST A T1ON
They can be tuned in to by selecting their preset numbers II is possible to store stations of any band in
orderofvourchoice.
y
FOR BETTER RECEPTION
TUNING INTO A PRESET STATION
Press the PRESET/REPEAT button to select a preset number .
TO SEARCH FOR A STATION
AUTOMA TICALL y
Pressthe <TUNING/SKIP Of TUNING/SKIP>
button for 1 to 2 seconds, and a station is
searched for automatically After tuning in a
station, u.e search stops
The search may not stop at a station with a
very weak signal
IF THE FM STEREO BROADCAST
SIGNAL IS WEAK
Set the FM MODE selector to MONO.
Background noise will be reduced butlhe
signal reproduced will be mono.
To restore stereo reception, set the FM
MODE selector to STEREO
TO RECEIVE THE FM BROADCAST IN
STEREO
Setlhe FM MOOE selecotrto STEREO.
When receiving FM broadcasts in stereo, The
word "STEREO" illuminate
NOTE
If a bunon is not pressed for 10 seconds the preset mode will be exited automatically.
-5-
-t~)
Page 5

~
"
CDPLAYBACK
PROGRAMMING TRACKS -In the CD stop mode
3. To start playing. press the .-1 PLAYI
PAUSE button.
PLAY ~AUSE
TO INTERRUPT PLA YBACK
Press the~1 PlAY/PAUSE button.
The ~ and track time will blink
To resume playback. press the ~I PLAY/
PAUSE button again
TO STOP PLAYBACK
Press IheSTOP. bul1on
)Cating .particular point in. track
To move backward at high speed
Keep the SKIP -4-4 button pressed during
play and release at the desired point.
To move forward at high speed
Keep the SKIP- button pressed during
play and release at the desired point.
To play the programmed tracks
Press the .-1 PlAY/f¥\IJSE 1xJtkJn.
To stop programmed play
Press the .STOP button.
To clear u.e memory content
Press the .STOP button and OPEN the GO door
or set 10 other M1dion.
To checj( the program
While in the st~ mode, press the e MEMORY
button. The cisc. track and program ntMTi>ers wii
appeMonthe~
Press the 0 MEMORY button again to view the
-P'~ seIedions.
These <ispiays 00 not awear t1Jfing ~
pia~
Keep it pressed
)TE
le CD player may skip if the loud speakers are situated close to the player and if high volume or
:laSS levels are used.
.7.
-S-
~),
1. PresstheCDbulton.
CD
~
2. Press the OPEN/CLOSE button to open
CD door .Place a disc in the CD tray with
the label face front and then press the
OPEN/CLOSE button to close CD door.
The total number of tracks will show on
the lisplay.
OPEN/CLOSE
Page 6

0;.-
i"c"'
TAPE PLAYBACK
IEPEAT PLAY
his lunclion wiN allow a single tracks or an the tracks on the cjsc to be plaYed repeatedy
TO REPEAT THE SAME TRACK
Press the PRESET/REPEAT button until
REPEAT indicator blink.
TO REPEAT THE WHOlE DISC
Press the PRESET/REPEAT button until
REPEAT indicator light up.
')
I ~~ -'{;t:~B I. -~- -/1'
n , n I.
~ U , U 1.i!B
TO CANCEL REPEAT PLAY
Press the PRESET/REPEAT button until REPEAT indicalorswitched on.
INTRODUCTION PLAY. 81 CD stop mode RANDOM PLAY
This furdion allows the tirst 1 O seconds of each AH the tracks on the disc can be played in random
track of the disc 10 be played. Ofder
Press the RANOOM button
RANDOM appears in the display and press
the~.PLA Y/PAUSE button to start play.
-.
LJ
TO STOP PLAYBACK
Press the.~ STOP/EJECT button.
TO INTERRUPT PLAYBACK
Press IheI I PAUSE button
To resume play, presslhe IIPAUSEbuttonagain.
TO FAST WIND OR REWIND
Press the -REWIND or F .FWD -bul!on. Press the .~ STOP/EJECT bul!on to stop winding
at the desired position.
WHEN THE TAPE REACHES ITS END
During fast wind or regular play ,the tape will stop automatically when its end is reached.
rr-~~i! 8
To cancel random play.
Press the. STOP or RANDOM button SO
that RANDOM in the display goes out
-10-
-9-
~
Page 7

t:
IF SQUEALING SOUNOS (BEA nNG) ARE
HEARD WHEN RECORDING AM/MW
PROGRAMS
Try moving the FM MODE/BEAT CUT
selector (on the right side of the unit) to a
different position to reduce the noise
TO ERASE A RECORDED TAPE
,. PressthePOWERbulton
2. Slide the FUNCTION selector to TAPE.
3. Insert a tape with the side you want to erase
lacing you.
4. Press the. RECORD button to start
erasing
TO STOP RECOROING
Press the.~ STOP/EJECT button.
TO INTERRUPT RECOROING
PressthellPAUSEbullon.
Toresumerecording,pressthellPAUSEbullon
again.
NOTE
If you wish to record on a pre-recorded tape. U1at
has its record inhibit tab removed, you must first
cover U1e hole with sealing tape otherwise the
record button is locked and carV1Ot be depressed.
Q;;.~
-11-
"-
~"'-0:.,.."'~.
Page 8

x
"
REMOTE CONTROL (optional)
MAINTENANCE
3
4
5
.
~
"11!
'
CLEANING THE UNIT
Do not use volatile chemicals on this unit Clean by lightly wiping with a soft cloth
IMPORTANT NOTICE:
.Should the CO door be opened before the rea<ing of the GO is completed, a jamming noise mayoccur .
This can be resolved by closing the GO door and then press the TAPE orTUNER button temporarily
toTAPE/RAOIO.
..an abnormal display indicationor an operating problem occurs, <isconnectthe AG powerCOfd. Wait
at least 5 seconds, then reconnect the AG powercord.
.Before transporting the unit, take out the disclrom the GO tray.
TO INSTALL BATTERIES
1. Open the battery door
2. Insert two R03 (AM or SUM-4 ) size batteries.
BATTERY REPLACEMENT
When battelies become weak, the <Jpefating <istance 01 the Remote Control is greaUy reduced and you
will need to replace the batteries.
NOTE:
II the Remote Control is notlo be used lor a kJng time. removethe batteries to avoid damage caused by
battery leakage corrosion.
00 not mix diflerent types of batteries. or old batteries with new ones
"":';:iIi)
-12-
.13-
, ~\ \ 1. X-BASS control
2. SLEEP ~
17 :1 MODE. REMAIN button
16 4. MEMORY.CLOCKbutton
15 !i TUNER button
14 ii CD button
7. REPEAT/PRESETlxJtton
13 a... SKlp.TUNING- buttons
12 9. .STOPlxJtton
11 10- POWEFVSTANDBY button
11. BANDlxJtton
10 12. ~PlAY/PPjJSElxJtton
13. VOLUME +1- controls
14 TAPE lxJtton
1!i RANDOMlxJtton
16 INTRO button
17. TlMERbutton
USING THE REMOTE CONTROL CORRECTlY
Point the Remote Control at the REMOTE SENSOR
~edontheunil
When there is a strong ambient light source, 1he
performance of the infrared REMOTE SENSOR may be
degraded, calJSi1g unreliable ~tion.
The recorm1ended effective cistaro::e lor remote operation
is about 4 meters (13 feet).
Page 9

~
iE~'
PRO8l£MS
CD
System aJeS not lum on
Disc in place but unit won1 play
Disc skips
I TROUBLE SHOOTING GUIDE
ITEMS TO CHECK
.Make sure AC power plug is secure in the outlet. and
ouUethaspower.
.Make sure FUNCTION selectorissetloCO.
.Make sure disc label is facing up.
.Make sure disc is dean.
.Pause mode is activated.
.Disc may be damaged ordil1y;check disc.
.Make suretheunilison a securespot. ViJrationorianW'9
can cause the disc to skip.
RADIO
PoorFMreceplior
Poor AM/MW reception
TAPE
[)istO(ted ...noisy recorling
Record button W(O1, rEfKess
,
~
,
"
fi
~
~
~
i
~
~
:ii
1
!
-,
;,;
"
'0
~.
~
~.
"
~c
.MakesureFMantennawireisunwound
.Electrical interference in your home can cause poor
feCq)tion MoIIe tt-.lO1iI awayfromsoun:es 01 neltl!rero;e
(especiany those with motors and transformelS).
.Settt-. AMIMWklopantenna loa direction Iortt-. better
feCq)tion.
.Tape heads are dirty; cleanl11em.
.Tape is darnaged. Tryanolhertape.
.T absonedgeolcasselle may be missing or broken If you
want to record on that cassette cover lI1e holes with
removablelape.
SPECIFICATIONS
Powerconsumption: 40 W
Power source: AC 120 V -60 Hz (USA and Canada)
AC 11 0/120V -220/240V -50/60Hz (Others)
AC 220V -50 Hz (Hong Kong and China)
AC 230V -50 Hz ( Europe)
AC 240V -50 Hz ( Australia)
Specifications subject to changed without notice.
~
-14-
 Loading...