

Page 1
CLASS 1 LASER
PRODUCT
APPAREIL Á LASER
DE CLASSE 1
CAUTION
INVISIBLE LASER RADIATION
WHEN OPEN AND INTERLOCKS
DEFEATED.
AVOID EXPOSURE TO BEAM
This product contains a low power laser device.
Follow the advice below for safe and appropriate operations.
ON PLACEMENT
• Do not use the unit in places which are
extremely hot, cold, dusty, or humid.
• Place the unit on a flat and even surface.
• Do not restrict the air flow of the unit by
placing it in a place with poor air flow, by
covering it with a cloth, or by placing it on a
carpet.
ON SAFETY
• When connecting and disconnecting the AC
cord, grip the plug and not the cord itself.
Pulling the cord may damage it and create a
hazard.
• When you are not going to use the unit for a
long period of time, disconnect the AC power
cord.
ON AC VOLTAGE
Caution: To prevent electrical shock, match
wide blade of plug to wide slit, fully insert.
• Before use, check that the rated voltage of
your unit matches your local voltage.
• Set the voltage selector (110-120V/220240V) on the back of the unit.
• In areas with AC 110-120V, attach the plug
adaptor to the power cord. Plug the power to
the AC outlet.
• In areas with AC 220-240V, plug the power
cord to the AC outlet.
Voltage selector (rear panel - optional)
• Some models are equipped with a voltage
selector to conform to local power supplies.
Be sure to set this switch to match the voltage
of the power supply in your area before
plugging in the unit.
ON CONDENSATION
• When left in a heated room where it is warm
and damp, water droplets or condensation
may form inside the CD player.
• When there is condensation inside the unit,
the unit may not function normally.
• Let it stand for 1 to 2 hours before turning the
power on, or gradually heat the room up and
dry the unit before use.
FCC INFORMATION (For USA only)
This device complies with Part 15 of FCC Rules.
Operations are subject to the following two
conditions:
(1) This device may not cause harmful
interference, and
(2) This device must accept any interference
received, including interference that may
cause undesirable operations.
Should any trouble occur, disconnect the
AC power cord and refer servicing to
qualified personnel.
-1-
PRECAUTIONS
AC VOLTAGE
110 - 120V
220 - 240V
(on back of
the unit)
!
"
#
$
%
&
'
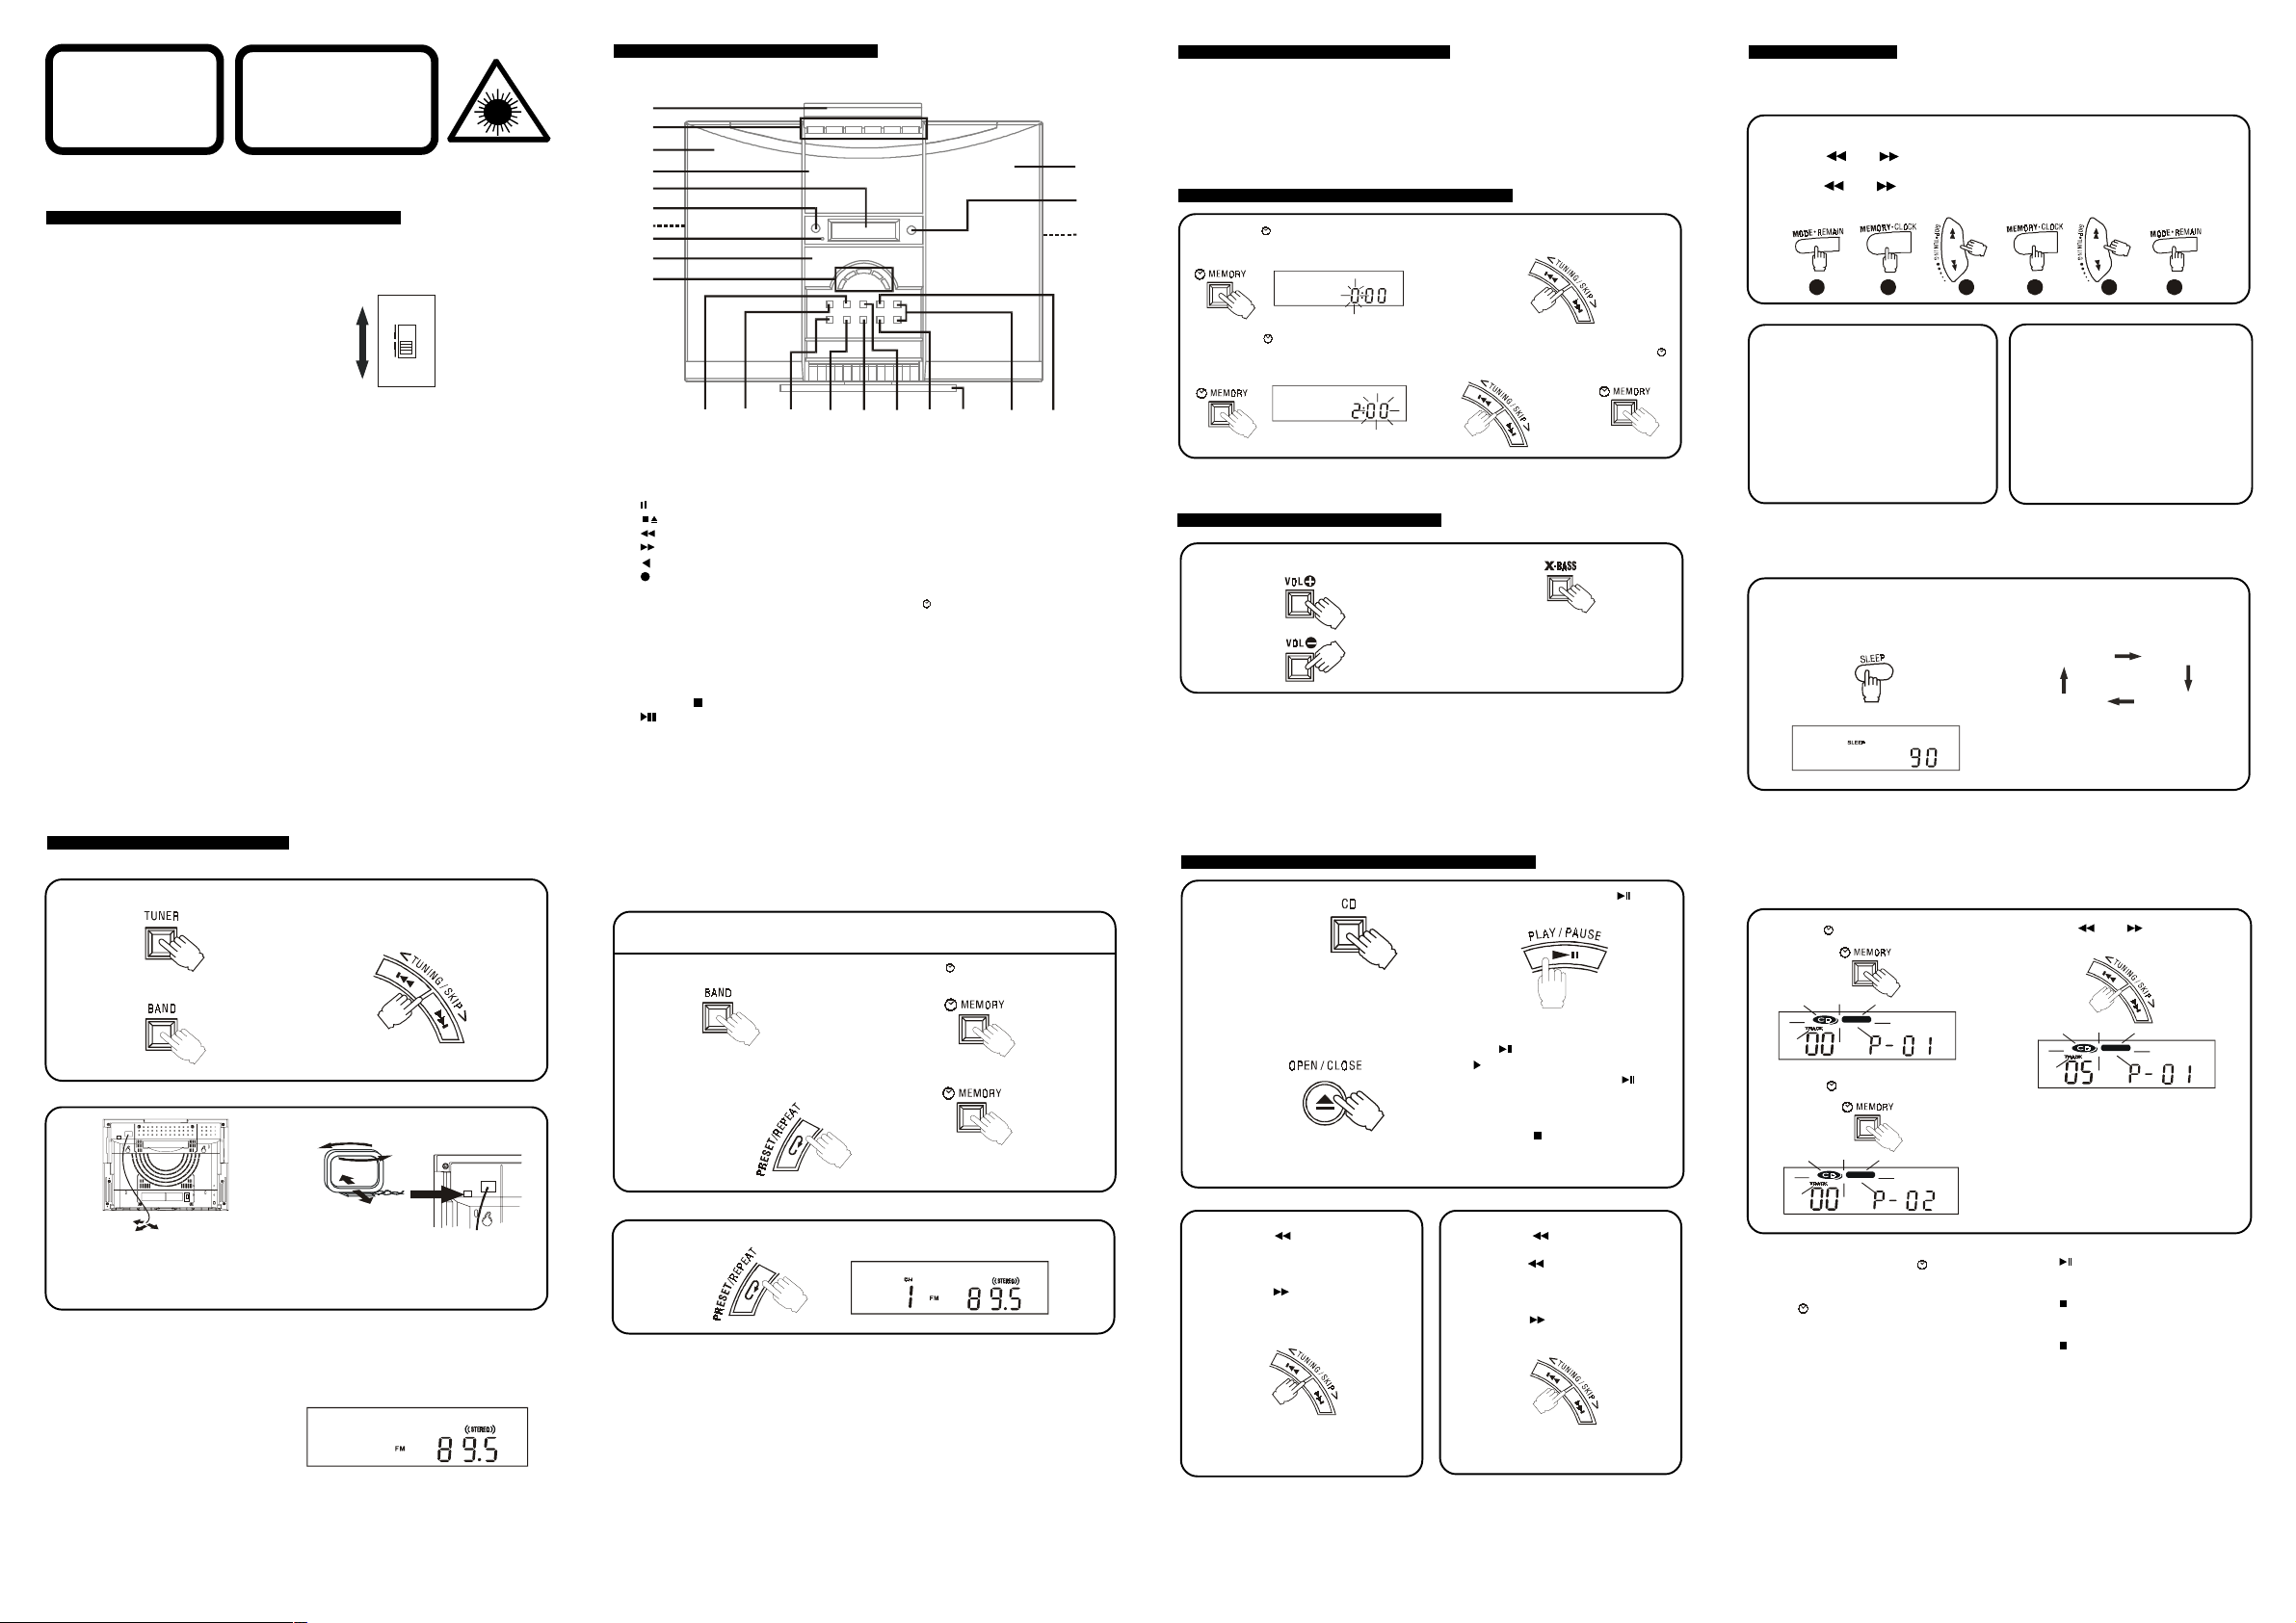
! #" $ % & '
1. Cassette knob cover
2. Cassette operation buttons
PAUSE
STOP/EJECT
F.FWD (Fast Forward)
REWIND
PLAY
RECORD
3. Left speaker
4. Cassette compartment
5. DISPLAY
6 . REMOTE SENSOR (optional)
7 . PHONES jack
8 . X-BASS/POWER ON indicator
9 . CD door
10. CD function buttons (PRESET/
REPEAT/ STOP / PLAY/PAUSE
/<TUNING/SKIP>)
PARTS IDENTIFICATION
11. X-BASS control
12 . POWER button
13 . CD button
14 . TUNER button
15 . TAPE button
16 . BAND button
17 . INTRO button
18 . Stand (optional)
19 . VOLUME +/- controls
20. MEMORY button
21. FM MODE/BEAT CUT selector
22 . OPEN/CLOSE button
23 . Right speaker
-2-
!
PRESS THE POWER BUTTON
Press the POWER button, the POWER ON indicator light up. Select the desired function and the
corresponding function indicator will light up.
TO TURN OFF THE UNIT
Press the POWER button to STANDBY, the POWER ON indicator will turn off and only clock display
will be shown.
CLOCK SETTING
TURNING ON THE UNIT
1. Press the MEMORY button in clock
mode. HOUR blink.
3. Press the MEMORY button in clock
mode. MINUTES blink.
NOTE: If a button is not pressed for 10 seconds the clock set mode will be e xited automatically .
2 . Press the < TUNING/SKIP> buttons to
set correct hour.
4 . Press the < TUNING/SKIP> buttons to
set correct minutes and press the
MEMORY button to start the clock.
AND
ADJUSTING THE SOUND
To adjust volume To select x-bass
X-BASS is designed specifically to
boost the low frequency sound to
obtain a more powerful bass.
Note: Press the X-BASS button, the
green indicator of X-BASS will light up.
WHEN RECORDING
Adjustments to the VOLUME or X-BASS control
will not affect the recording.
FOR PRIVATE LISTENING
Connect the headphone (Ø3.5 mm stereo miniplug) to the PHONES jack.
When headphones are connected, the speakers
are automatically disconnected.
-3-
The power can be turned on and off automatically at a preset time so that you can wake up tape music,
TIMER OPERATION (for remote only)
CD or radio. Make sure the clock is correct before timer setting.
TIMER SETTING - in standby mode
1 . Press the MODE•REMIAN button until TIMER ON/OFF is in the display.
2 . Press the MEMORY•CLOCK button in clock mode. Hours blink.
3 . Press the
4 . Press the MEMORY•CLOCK button to make minutes blink.
5 . Press the SKIP buttons to set correct minutes.
6 . Press the MODE•REMAIN button to store the ON/OFF time. It will return to normal mode.
PLAY TIMER
1 . Set the time of the timer-on and timer-off.
2. Select the desired program source with the
FUNCTION.
TUNER: Select a band and station.
TAPE: Insert the cassette tape.
CD: Insert a disc.
3. Press TIMER.
TIMER appears in the display.
4 . Press POWER to standby mode.
5 . For cassette playback, press PLAY.
At the timer-on time, the system turns on
automatically.
Cancel the timer function
Press the timer button until the timer function is turned off.
SLEEP SETTING (for remote only)
When the sleep timer is used, the power is automatically turned off after the specified time passes.
1 . Press the SLEEP button while the power is
on. "SLEEP 90" lights in the display.
Note: SLEEP can only be adjusted in
TUNER, TAPE and CD modes.
SKIP buttons to set correct hour.
UP
DOWN
UP
DOWN
$ "!#
RECORD TIMER
The system will record a radio broadcast at
a preset time.
1 . Set the time of the timer-on and timer-off.
2 . Set to TUNER.
3. Select a band and station.
4 . Insert the cassette tape for recording.
5. Press TIMER.
TIMER appears in the display.
6 . Press POWER to standby mode.
7 . Press REC (record) which also engages
PLAY.
2 . Press and hold the SLEEP button to select
the length of remaining time until the unit
turns off.
It changes the indicator in the following way:
SLEEP 90
SLEEP 10
The sleep timer is set and the word "SLEEP" is
shown on the display.
To cancel the sleep timer, press the SLEEP
button once and "SLEEP" will go out in the
display.
SLEEP 80
...... SLEEP 20
-4-
TUNING INTO A STATION MANUALLY
1. Press the TUNER button.
2. Press the BAND button to select the desired
band.
FOR BETTER RECEPTION
FM
Fully unwind the wire antenna. Then extend
the wire antenna and place it in the position
that sounds best.
NOTE: DO NOT CONNECT TO AN
OUTSIDE ANTENNA.
TO SEARCH FOR A STATION
AUTOMATICALLY
Press the <TUNING/SKIP or TUNING/SKIP>
button for 1 to 2 seconds, and a station is
searched for automatically. After tuning in a
station, the search stops.
The search may not stop at a station with a
very weak signal.
IF THE FM STEREO BROADCAST
SIGNAL IS WEAK
Set the FM MODE selector to MONO.
Background noise will be reduced but the
signal reproduced will be mono.
To restore stereo reception, set the FM
MODE selector to STEREO.
LISTENING TO THE RADIO
3. Press the <TUNING/SKIP> buttons to select
a station.
AM/MW
Connect the loop aerial (provided) to the "AM/
MW LOOP ANTENNA" snap terminals at the
back of the unit.
TO RECEIVE THE FM BROADCAST IN
STEREO
Set the FM MODE selecotr to STEREO.
When receiving FM broadcasts in stereo, The
word "STEREO" illuminate.
MHz
PRESETTING STATION
They can be tuned in to by selecting their preset numbers. It is possible to store stations of any band in
order of your choice.
Manual memory presetting
This feature allows you to manually preset stations to any desired channel.
1. Set to the desired band and station.
3. Press the PRESET/REPEAT button to select
a channel number for the preset station.
Note: If the button is
not pressed for
a few seconds
...........
TUNING INTO A PRESET STATION
Press the PRESET/REPEAT button to select a preset number.
NOTE
If a button is not pressed for 10 seconds the preset mode will be exited automatically.
2. Press the MEMORY button until the
MEMORY indicator blinks.
4. Memorize the station.
5. Repeat steps 1 to 4 for the next preset.
MHz
CD PLAYBACK
1. Press the CD button. 3. To start playing, press the PLAY/
2. Press the OPEN/CLOSE button to open
CD door. Place a disc in the CD tray with
the label face front and then press the
OPEN/CLOSE button to close CD door.
The total number of tracks will show on
the display.
NOTES:
• Do not push the CD door to close it.
• CD door cannot open while power is off.
Locating a particular point in a track
To move backward at high speed
Keep the SKIP button pressed during
play and release at the desired point.
To move forward at high speed
Keep the SKIP button pressed during
play and release at the desired point.
Keep it pressed
NOTE
The CD player may skip if the loud speakers are situated close to the player and if high volume or
x-bass levels are used.
PAUSE button.
TO INTERRUPT PLAYBACK
Press the PLAY/PAUSE button.
The and track time will blink.
To resume playback, press the PLAY/
PAUSE button again.
TO STOP PLAYBACK
Press the STOP button.
Searching for the beginning of a track
To find a previous track
Press the SKIP button once to return to
the beginning of the current track.
Press theSKIP button repeatedly to skip
tracks backward one by one.
To skip tracks
Press the SKIP button repeatedly to skip
track(s) forward one by one.
Press it once
PROGRAMMING TRACKS - in the CD stop mode
1. Press the MEMORY button.
MEMORY
3. Press the MEMORY button again.
MEMORY
To chec k the program
While in the stop mode, press the MEMORY
button. The disc, track and program numbers will
appear on the display .
Press the MEMORY button again to view the
other programmed selections.
These displays do not appear during programmed
play .
2. Press the SKIP buttons to select
the desired tracks.
MEMORY
4. To program additional tracks.
repeat step 2 to 3.
To play the programmed trac ks
Press the PLAY/ P AUSE b utton.
To stop programmed pla y
Press the STOP button.
To clear the memory content
Press the STOP button and OPEN the CD door
or set to other function.
-5-
-6-
-7-
-8-
Page 2
REPEAT PLAY
This function will allow a single tracks or all the tracks on the disc to be played repeatedly .
TO REPEAT THE WHOLE DISC
Press the PRESET/REPEAT button until
REPEAT indicator light up.
TO REPEAT THE SAME TRACK
Press the PRESET/REPEAT button until
REPEAT indicator blink.
TAPE PLAYBACK
USABLE T APE - Use only normal (type I) tapes f or playback.
1. Press the TAPE button.
3. Press the PLAY button.
2. Insert the cassette tape.
TAPE PLAYBACK
RECORDING
USABLE T APE - Use only normal (type I) tapes for recording.
1. Insert a cassette tape.
4. Play the source to be recorded.
VERTICAL CD MICRO SYSTEM
WITH RADIO
OPERATING INSTRUCTIONS
Recording from the radio
(Refer to listening to the Radio)
TO CANCEL REPEAT PLAY
Press the PRESET/REPEAT button until REPEAT indicator switched off.
INTRODUCTION PLAY - at CD stop mode
This function allows the first 10 seconds of each
track of the disc to be played.
Press the INTRO button.
INTRO appears in the display.
To cancel introduction play.
Press the STOP or INTRO button so that
INTRO in the display goes out.
RANDOM PLAY
All the tracks on the disc can be played in random
order.
Press the RANDOM button.
RANDOM appears in the display and press
the PLAY/PAUSE button to start play.
To cancel random play.
Press the STOP or RANDOM button so
that RANDOM in the display goes out.
-9-
REMOTE CONTROL (optional)
!
"
#
$
%
&
'
TO INSTALL BA TTERIES
1. Open the battery door.
BATTERY REPLACEMENT
When batteries become weak, the operating distance of the Remote Control is greatly reduced and you
will need to replace the batteries.
NOTE:
If the Remote Control is not to be used for a long time, remove the batteries to avoid damage caused by
battery leakage corrosion.
Do not mix different types of batteries, or old batteries with new ones.
1. X-BASS control
2. SLEEP button
%
3. MODE • REMAIN button
$
4. MEMORY • CLOCK button
#
5. TUNER button
6. CD button
"
7. REPEAT/PRESET button
8. SKIP • TUNING buttons
!
9. STOP button
10 . POWER/STANDBY button
11 . BAND button
12. PLAY/P A USE button
13 . VOLUME +\- controls
14. TAPE button
15 . RANDOM button
16 . INTRO button
17 . TIMER button
USING THE REMOTE CONTROL CORRECTLY
• Point the Remote Control at the REMOTE SENSOR
located on the unit.
• When there is a strong ambient light source, the
performance of the infrared REMOTE SENSOR may be
degraded, causing unreliable operation.
• The recommended effective distance for remote operation
is about 4 meters (13 feet).
2. Insert two R03 (AAA or SUM-4) size batteries.
+
+
TO STOP PLAYBACK
Press the STOP/EJECT button.
TO INTERRUPT PLAYBACK
Press the PAUSE button.
To resume play, press the PAUSE button again.
TO FAST WIND OR REWIND
Press the REWIND or F.FWD button. Press the STOP/EJECT button to stop winding
at the desired position.
WHEN THE TAPE REACHES ITS END
During fast wind or regular play, the tape will stop automatically when its end is reached.
-10-
MAINTENANCE
CLEANING CD
If the CD skips or will not play, the disc may need cleaning.
Before playing, wipe the disc from the center out with a
cleaning cloth. After playing, store the disc in its case.
c
d
CLEANING THE UNIT
Do not use volatile chemicals on this unit. Clean by lightly wiping with a soft cloth.
IMPORTANT NOTICE:
• Should the CD door be opened before the reading of the CD is completed, a jamming noise may occur.
This can be resolved by closing the CD door and then press the TAPE or TUNER button temporarily
to TAPE/RADIO.
• If an abnormal display indication or an operating problem occurs, disconnect the AC power cord. Wait
at least 5 seconds, then reconnect the AC power cord.
• Before transporting the unit, take out the disc from the CD tray.
a
CLEANING THE TAPE HEADS
Clean the head with a cotton bud slightly moistened with
cleaning fluid or denatured alcohol.
b
2. Press the PAUSE button.
3. Press the RECORD button.
TO STOP RECORDING
Press the STOP/EJECT button.
TO INTERRUPT RECORDING
Press the PAUSE button.
To resume recording, press the PAUSE button
again.
NOTE
If you wish to record on a pre-recorded tape, that
has its record inhibit tab removed, you must first
cover the hole with sealing tape otherwise the
record button is locked and cannot be depressed.
Recording from a CD
(Refer to Compact Disc Playback)
5. Press the PAUSE button.
IF SQUEALING SOUNDS (BEATING) ARE
HEARD WHEN RECORDING AM/MW
PROGRAMS
Try moving the FM MODE/BEAT CUT
selector (on the right side of the unit) to a
different position to reduce the noise.
TO ERASE A RECORDED TAPE
1 . Press the POWER button.
2 . Slide the FUNCTION selector to TAPE.
3. Insert a tape with the side you want to erase
facing you.
4. Press the RECORD button to start
erasing.
-11-
TROUBLE SHOOTING GUIDE
PROBLEMS
CD
System does not turn on
Disc in place but unit won't play
Disc skips
RADIO
Poor FM reception
Poor AM/MW reception
TAPE
Distorted or noisy recording
Record button won't depress
ITEMS TO CHECK
• Make sure AC power plug is secure in the outlet, and
outlet has power.
• Make sure FUNCTION selector is set to CD.
• Make sure disc label is facing up.
• Make sure disc is clean.
• Pause mode is activated.
• Disc may be damaged or dirty; check disc.
• Make sure the unit is on a secure spot. Vibration or jarring
can cause the disc to skip.
• Make sure FM antenna wire is unwound.
• Electrical interference in your home can cause poor
reception. Move the unit away from sources of interference
(especially those with motors and transformers).
• Set the AM/MW loop antenna to a direction for the better
reception.
• Tape heads are dirty; clean them.
• Tape is damaged. Try another tape.
• Tabs on edge of cassette may be missing or broken. If you
want to record on that cassette cover the holes with
removable tape.
SPECIFICATIONS
Power consumption: 40 W
Power source: AC 120 V ~ 60 Hz (USA and Canada)
Specifications subject to changed without notice.
AC 110/120V - 220/240V ~ 50/60Hz (Others)
AC 220V ~ 50 Hz (Hong Kong and China)
AC 230V ~ 50 Hz ( Europe)
AC 240V ~ 50 Hz ( Australia)
WARNING
RISK OF ELECTRIC SHOCK
DO NOT OPEN
The lightning flash
and arrowhead within
the triangle is a
warning sign alerting
you of "dangerous
voltage" inside the
product.
WARNING: TO REDUCE THE RISK
OF ELECTRIC SHOCK, DO NOT
REMOVE COVER (OR BACK) NO
USER-SERVICEABLE PARTS
INSIDE. REFER SERVICING TO
QUALIFIED SERVICE
PERSONNEL.
WARNING: TO REDUCE THE RISK OF FIRE OR ELECTRIC SHOCK, DO
NOT EXPOSE THIS APPLIANCE TO RAIN OR MOISTURE.
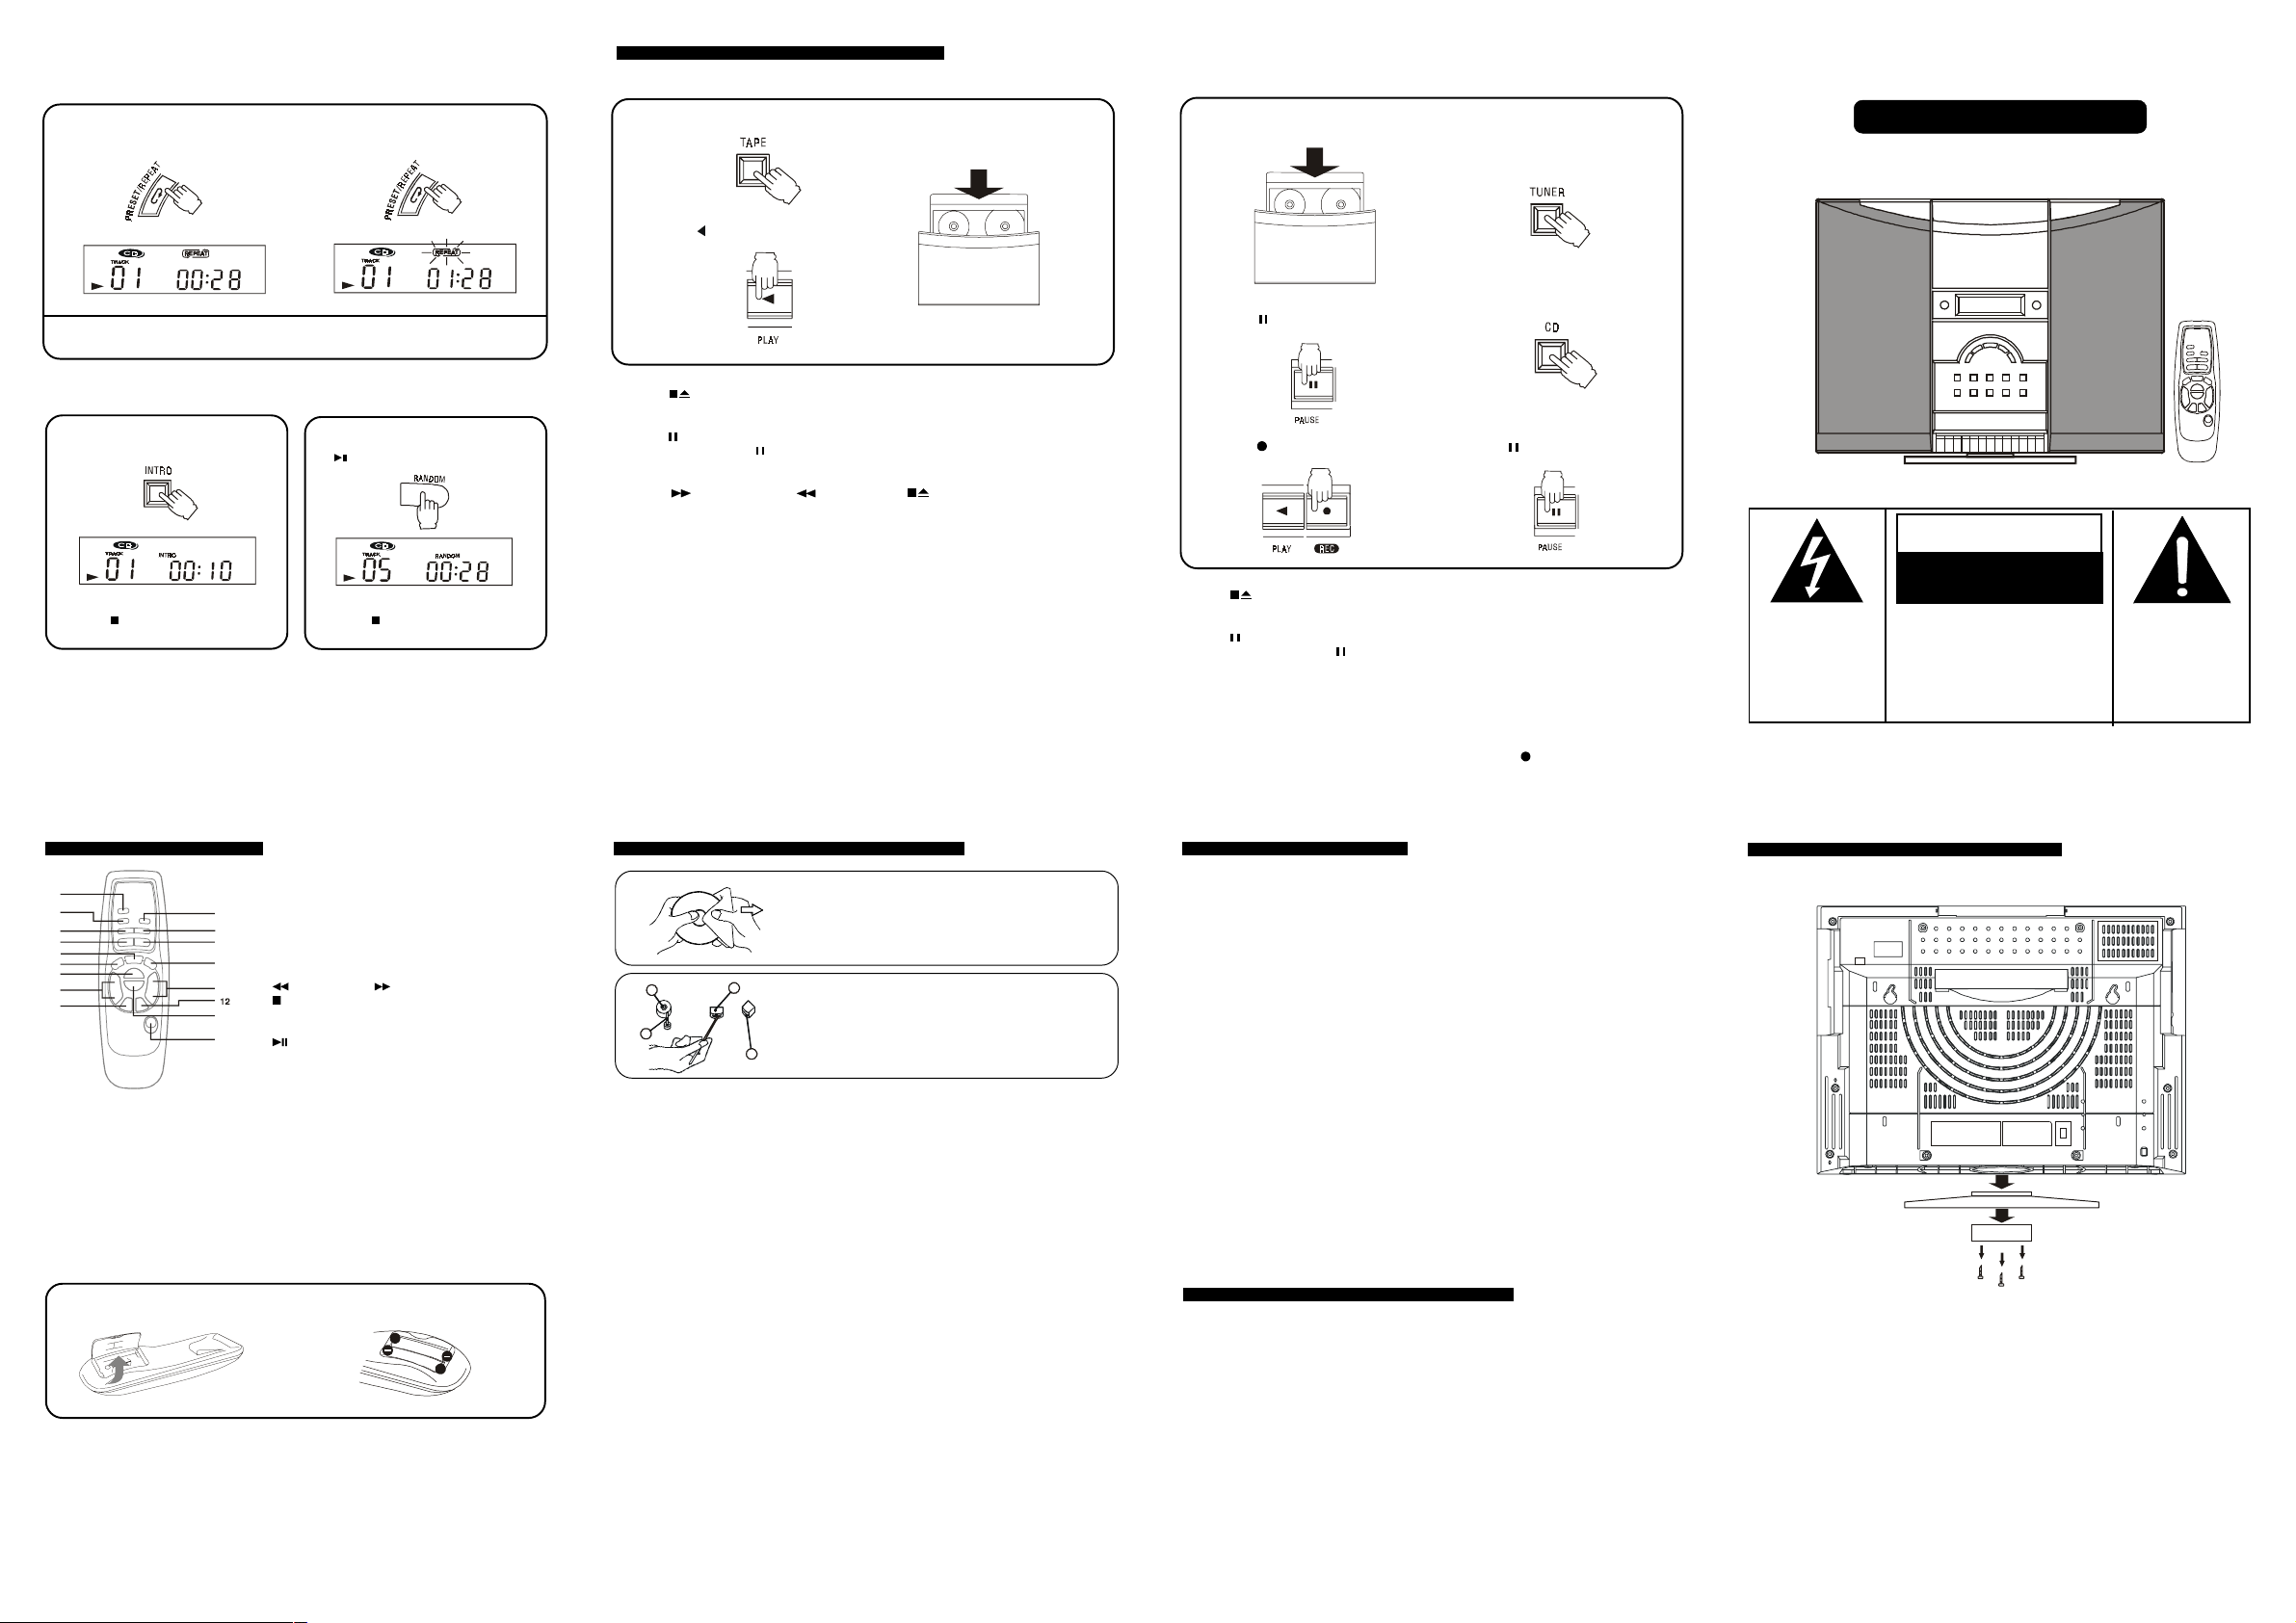
REMOVE THE STAND
The exclamation point
within the triangle is a
warning sign alerting
you of important
instructions
accompanying the
product.
STAND ASSEMBLY
-12-
-13-
-14-
811-131291-012 Printed in China
Page 3

APPAREIL À
LASER DE
CLASSE 1
MISE EN GARDE
RADIATIONS LASER INVISIBLES, SI
L'APPAREIL EST OUVERT ET SI LE
DISPOSITIF DE VERROUILLAGE EST
NEUTRALISÉ. ÉVITER L'EXPOSITION
AU FAISCEAU.
Cet appareil contient un dispositif au laser de faible puissance.
CONSIGNES DE SÉCURITÉ
Suivez les conseils ci-dessous pour un fonctionnement correct et sans danger
EMPLACEMENT
• N'utilisez pas cet appareil dans les endroits
extrêmement chauds, froids, poussiéreux
ou humides.
• Placez l'appareil sur une surface plate et de
niveau.
• Laissez l'air circuler librement autour de
l'appareil. Ne le couvrez pas avec du tissu et
ne le placez pas sur un tapis.
SÉCURITÉ
• Lorque vous branchez et débranchez le
cordon CA, tenez la fiche et non le cordon. Le
tirage du cordon peut l'endommager et créer
un risque.
• Débranchez le cordon d'alimentation CA si
vous n'allez pas utiliser l'appareil pendant
une longue période de temps.
TENSION CA
Attention: Pour éviter tout choc électrique,
faites correspondre la broche large de la fiche
avec la fente large de la prise et inérez la fiche
à fond.
• Avant d'utiliser l'appareil, vérifiez si la
tension indiquée pour l'appareil correspond
à votre tension locale.
• Réglez le sélecteur de tension (110-120V/
220-240V) sur l'arrière de l'appareil.
• Là où le courant CA est de 110-120V,
raccordez l'adaptateur de fiche au cordon
d'alimentation et branchez dans une prise
CA.
• Là où le courant CA est de 220-240V, branchez
le cordon d'alimentation dans une prise CA.
Sélecteur de tension (panneau arrière - en
option)
• Certains modèles comportent un sélecteur
de tension à régler selon l'alimentation de
courant locale. Assurez-vous de régler ce
sélecteur à la tension de la source
d'alimentation locale avant de brancher
l'appareil.
AC VOLTAGE
110 - 120V
CONDENSATION
• Si l'appareil est laissé dans une pièce
chauffée, où il fait chaud et humide, des
gouttelettes d'eau ou de la condensation
peuvent se former à l'intérieur du lecteur de
CD.
• S'il y a de la condensation à l'intérieur de
l'appareil, ceci peut affecter son
fonctionnement normal.
• Avant de faire fonctionner l'appareil, laissezle dans une piéce chauffée de 1 à 2 heures, ou
chauffez graduellement la pièce pour que la
condensation se dissipe.
RENSEIGNEMENT FCC
L'appareil est en conformité avec le chapitre 15
des règles de la FCC. Son fonctionnement est
soumis aux deux conditions suivantes:
(1) Cet appareil ne doit pas causer
d'interférences gênantes, et
(2) Cet appareil doit supporter toute interférence
reçue, y compris celles qui pourraient
causer son mauvais fonctionnement.
En cas de problème, débranchez le cordon
d'alimentation CA et faites réparer l'appareil
par un personnel qualifié.
220 - 240V
-1-
(sur l'arrière
de l'appareil)
IDENTIFICATION DES COMMANDES
!
"
#
$
%
&
'
! #" $ % & '
1. Couvercle pour touches de cassette
2. Commandes du magnétocassette
PAUSE
STOP/EJECT (arrêt/éjection)
F.FWD (avance rapide)
REWIND (rembobinage)
PLAY (lecture)
RECORD (enregistrement)
3. Enceinte acoustique gauche
4 . Compartiment pour cassette
5. AFFICHAGE
6 . CAPTEUR DE TÉLÉCOMMANDE
(en option)
7 . Prise pour CASQUE D'ÉCOUTE
8. Indicateur X-BASS (amplification
des graves) / POWER ON (en
circuit)
9 . Porte pour lecteur de CD
PRESSEZ LA TOUCHE POWER (alimentation)
Pressez la touche POWER, l'indicateur POWER ON s'allume. Choisissez la fonction désirée et
l'indicateur de la fonction correspondant s'allume.
MISE HORS CIRCUIT DE L'APPAREIL
Pressez la touche POWER pour passer au mode STANDBY (disponibilité); l'indicateur POWER ON
s'éteint et seul l'affichage de l'horloge est apparent.
MISE EN CIRCUIT DE L'APPAREIL
10. Touches pour CD (PRÉRÉGLAGE/
RÉPÉTITION/ ARRÊT/LECTURE/
PAUSE /<SYNTONISATION/
SAUT>)
11 . X-BASS (amplification des graves)
12 . Touche D'ALIMENTATION
13 . Touche lecteur de CD
14 . Touche de SYNTONISATION
15 . Touche de MAGNÉTOSCOPE
16 . Touche de BANDE
17 . Touche INTRO
18 . Support (en option)
19 . VOLUME décroissant -/croissant +
20 . Touche de MÉMOIRE
21 . Sélecteur FM/INTERFÉRENCES
22 . Touche OUVERTURE/FERMETURE
23 . Enceinte acoustique droite
-2-
!
RÉGLAGE DE L'HORLOGE
1. Pressez la touche MEMORY
(mémoire) en mode pour réglar l'heure.
Les HEURES clignotent.
3 . Pressez la touche MEMORY en mode
pour régler l'heure. Les MINUTES
clignotent.
REMARQUE: Si vous ne pressez aucune touche pendant 10 secondes, le mode de réglage de l'horloge est
annulé automatiquement.
2. Pressez les touches <TUNING/SKIP
(syntonisation/saut)> pour régler
l'heure exacte.
4. Pressez les touches <TUNING/SKIP
(syntonisation/saut)> pour régler les
minutes exactes et pressez la touche
MEMORY pour mettre l'horloge en mode
de marche.
ET
RÉGLAGE DU SON
Réglage du volume Amplification des graves
La fonction X-BASS est destinée à
amplifier les basses fréquences pour
accentuer les graves.
Remarque: pressez la touche X-BASS
et l'indicateur vert X-BASS s'allume.
LORS D'UN ENREGISTREMENT
Les réglages de VOLUME ou de X-BASS n'affectent
pas l'enregistrement.
FONCTIONNEMENT DE LA MINUTERIE
Vous pouvez mettre l'appareil en/hors circuit automatiquement à une heure préréglée pour vous
réveiller au son d'une cassette, d'un disque compact ou de la radio. Assurez-vous que l'horloge soit
réglée correctement avant d'effectuer le réglage de la minuterie.
ÉCOUTE PERSONNELLE
Branchez un casque d'écoute (à mini-fiche stéréo
Ø3,5mm) dans la prise PHONES (casque
d'écoute).
Si un casque d'écoute est branché, les haut-parleurs
sont mis hors service automatiquement.
(seulement avec la télécommande)
-3-
RÉGLAGE DE LA MINUTERIE - en mode de disponibilité
1. Pressez MODE•REMAIN jusqu'à ce que TIMER ON/OFF (minuterie en service/hors
service) soit affiché.
2 . Pressez la touche MEMORY•CLOCK en mode pour régler l'heure. Les heures clignotent.
3 . Pressez les touches SKIP pour régler l'heure désirée.
4 . Pressez la touche MEMORY•CLOCK pour que les minutes clignotent.
5 . Pressez les touches SKIP pour régler les minutes désirées.
6. Pressez MODE•REMAIN pour mettre en mémoire les heures EN SERVICE/HORS
SERVICE de la minuterie. Le mode normal se remet en service.
UP
DOWN
UP
DOWN
$ "!#
LECTURE AVEC MINUTERIE
1. Réglez l'heure de la mise en service et hors
service de la minuterie.
2. Choisissez la source sonore désirée avec la
touche de FONCTION.
TUNER: choisissez une bande et une station.
TAPE: insérez une cassette.
CD: insérez un disque compact.
3. Pressez la touche TIMER (minuterie).
TIMER apparaît sur l'affichage.
4. Pressez la touche POWER pour obtenir le
mode STANDBY (disponibilité).
5. Pour la lecture de cassette, pressez PLAY
(lecture).
À l'heure réglée pour la mise en marche,
l'appareil se met en marche automatiquement.
Annulation de la fonction de minuterie
Pressez la touche TIMER jusqu'à ce que l'indicateur TIMER disparaisse de l'affichage.
RÉGLAGE DE L'ARRÊT DIFFÉRÉ (seulement avec la télécommande)
En mode d'arrêt différé, l'appareil se met automatiquement hors circuit une fois que la durée spécifiée
est écoulée.
1 . Pressez la touche SLEEP, l'appareil étant
en circuit. SLEEP 90 s'allume sur l'affichage.
Remarque: L'arrêt différé fonctionne sur
les modes TUNER (syntonisateur), TAPE
(magnétocassette) et CD (lecteur de CD).
ENREGISTREMENT AVEC MINUTERIE
L a chaîne enregistre une émission de radio à
l'heure préréglée.
1. Réglez l'heure de la mise en service et hors
service de la minuterie.
2. Réglez le sélecteur à TUNER
(syntonisateur).
3. Choisissez la bande et la station désirées.
4. Insérez une cassette destinée à
l'enregistrement.
5. Pressez la touche TIMER.
TIMER apparaît sur l'affichage.
6. Pressez la touche POWER pour obtenir le
mode STANDBY (disponibilité).
7. Pressez REC (enregistrement) qui
enclenche aussi la touche PLAY (lecture).
2 . Pressez et maintenez enfoncée la touche
SLEEP pour choisir la durée de temps
restant avant la mise hors circuit de
l'appareil.
L'affichage change comme suit:
SLEEP 90
SLEEP 10
La minuterie d'arrêt différé est réglée et
l'indicateur SLEEP s'allume sur l'affichage.
Pour annuler l'arrêt différé, pressez la touche
SLEEP une fois et l'indicateur SLEEP disparaît
de l'affichage.
SLEEP 80
...... SLEEP 20
-4-
UTILISATION DE LA RADIO
SYNTONISATION MANUELLE D'UNE STATION
1. Pressez la touche TUNER.
2. Pressez la touche BAND pour choisir la
bande désirée.
AMÉLIORATION DE LA RÉCEPTION
FM
Déroulez complètement l'antenne filaire puis
étendez-la et placez-la dans la position qui
procure la meilleure réception.
REMARQUE: NE LA RACCORDEZ PAS À
UNE ANTENNE EXTÉRIEURE.
RECHERCHE AUTOMATIQUE D'UNE
STATION
Pressez la touche <TUNING/SKIP> pendant
1 ou 2 secondes pour la recherche
automatique d'une station. Quand une station
est syntonisée, la recherche cesse. L'appareil
peut ne pas s'arrêter sur une station dont le
signal est très faible.
SI LE SIGNAL DE L'ÉMISSION FM
STÉRÉO EST FAIBLE
Réglez le sélecteur FM MODE à MONO. Le
bruit de fond sers réduit mais le signal
reproduit sera monaural.
Pour rétablir la réception stéréo, réglez le
sélecteur FM MODE à STEREO.
3. Pressez les touches <TUNING/SKIP> pour
choisir une station.
AM/MW
Raccordez l'antenne cadre (fournie) aux
bornes à déclic AM/MW LOOP ANTENNA
sur l'arrière de l'appareil.
RÉCEPTION D'UNE ÉMISSION FM STÉRÉO
Réglez le sélecteur FM MODE à STEREO.
Lorsque l'émission FM stéréo est captée,
l'indicateur STEREO s'allume.
MHz
PRÉRÉGLAGE DE STATIONS
Peu importe la bande, dans l'ordre de votre choix. Pour les syntoniser, choisissez leurs numéros
préréglés.
Préréglage manuel de la mémoire
Cette fonction vous permet de prérégler manuellement les stations en leur attribuant le
numéro désiré.
1. Choisissez la bande et la station désirées.
3. Pressez la touche PRESET/REPEAT
(préréglage/répétition) pour choisir le
numéro correspondant à la station préréglée.
SYNTONISATION D'UNE STATION PRÉRÉGLÉE
Pressez la touche PRESET/REPEAT pour obtenir le numéro préréglé.
REMARQUE:
Si aucune touche n'est pressée pendant 10 secondes, le mode de préréglage est annulé automatiquement.
2. Pressez MEMORY jusqu'à ce que
l'indicateur MEMORY clignote.
4. Pressez MEMORY pour mettre le
préréglage en mémoire.
5. Répétez les étapes 1 à 4 pour effectuer le
préréglage suivant.
MHz
LECTURE D'UN CD
1. Pressez la touche CD. 3. Pour commencer la lecture, pressez la
2. Pressez la touche OPEN/CLOSE
(ouverture/fermeture) pour ouvrir la
porte du lecteur de CD. Placez un disque
sur le plateau, l'étiquette vers le haut, et
pressez la touche OPEN/CLOSE pour
fermer le lecteur. Le nombre total de
plages est affiché.
REMARQUES:
• Ne poussez pas la porte du lecteur de CD
pour la fermer.
• Il n'est pas possible d'ouvrir le tiroir du
lecteur de CD si l'appareil est hors circuit.
Pour repérer un endroit précis sur une plage
Saut en arrière à vitesse élevée
Maintenez la touche SKIP pressée durant
la lecture et relâchez-la à l'endroit désiré.
Saut en avant à vitesse élevée
Maintenez la touche SKIP pressée durant
la lecture et relâchez-la à l'endroit désiré.
Gardez la touche pressée
REMARQUE
Le lecteur de CD peut produire des sons hachés si les enceintes acoustiques sont proches du lecteur
et si le volume est à un niveau élevé ou si les graves sont amplifiées.
touche PLAY/PAUSE (lecture/pause).
INTERRUPTION DE LA LECTURE
Pressez la touche PLAY/PAUSE.
L'indicateur et la durée de la plage
clignotent.
Pour reprendre la lecture, pressez de
nouveau la touche PLAY/PAUSE.
ARRÊT DE LA LECTURE
Pressez la touche STOP (arrêt).
Recherche du début d'une plage
Pour plage précédente
Pressez la touche SKIP une fois pour
retourner au début de la plage en cours.
Pressez la touche SKIP de façon répétée
pour reculer de plage en plage.
Saut de plages
Pressez la touche SKIP de façon répétée
pour avancer de plage en plage.
Pressez la touche une fois
PROGRAMMATION DES PLAGES --- lecteur de CD en mode d'arrêt
1. Pressez la touche MEMORY.
MEMORY
3. Pressez de nouveau la touche
MEMORY.
MEMORY
Vérification du programme
Le lecteur étant en mode d'arrêt, pressez la
touche MEMORY. Le disque, la plage et le
numéro de programmation apparaissent sur
l'affichage.
Pressez de nouveau la touche MEMORY pour
afficher la programmation des autres plages.
Ces affichages n'apparaissent pas durant la
lecture programmée.
2. Pressez la touche SKIP ou pour
choisir la plage désirée.
MEMORY
4. Pour programmer des plages
supplémentaires.
répétez les étapes 2 à 3.
Lecture des plages programmées
Pressez la touche PLAY/PAUSE (lecture/
pause).
Arrêt de la lecture programmée
Pressez la touche STOP (arrêt).
Effacement du contenu de la mémoire
Pressez la touche STOP et OUVREZ le lecteur
de CD ou réglez le sélecteur à une autre fonction.
-5-
-6-
-7-
-8-
Page 4

LECTURE RÉPÉTÉE
Cette fonction permet la répétition continue d'une même plage ou de toutes les plages.
RÉPÉTITION DE TOUT LE DISQUE
Pressez la touche PRESET/REPEAT jusqu'à
ce que l'indicateur REPEAT s'allume sur
l'affichage.
RÉPÉTITION DE LA MÊME PLAGE
Pressez la touche PRESET/REPEAT jusqu'à
ce que l'indicateur REPEAT clignote sur
l'affichage.
LECTURE D'UNE CASSETTE
LECTURE D'UNE CASSETTE
BANDE UTILISABLE - utilisez seulement des cassettes normales ( TYPE I) pour la lecture.
1. Pressez la touche TAPE
(magnétocassette).
2. Insérez une cassette.
ENREGISTREMENT
BANDE UTILISABLE - utilisez seulement des cassettes normales (type I) pour l'enregistrement.
1. Introduisez une cassette.
4. Effectuez la lecture de la source à
enregistrer
Enregistrement provenant de la radio
MICRO-CHAÎNE VERTICALE
À RADIO ET LECTEUR DE CD
INSTRUCTIONS DE FONCTIONNEMENT
ANNULATION DE LA LECTURE RÉPÉTÉE
Pressez la touche PRESET/REPEAT jusqu'à ce que l'indicateur REPEAT disparaisse de l'affichage.
LECTURE INTRODUCTION - lecteur de CD
en mode d'arrêt
Cette fonction permet d'écouter les 10 premières
secondes de chaque plage du disque.
Pressez la touche INTRO.
INTRO apparaît sur l'affichage.
Annulation de la lecture introduction
Pressez la touche STOP ou INTRO pour
que l'indicateur INTRO disparaisse de
l'affichage.
LECTURE ALÉATOIRE
La lecture de toutes les plages ou disque s'effectue
au hasard.
Pressez la touche RANDOM.
RANDOM apparaît sur l'affichage; pressez
la touche PLAY/PAUSE pour commencer
la lecture.
Annulation de la lecture aléatoire
Pressez la touche STOP ou RANDOM
pour que l'indicateur RANDOM disparaisse
de l'affichage.
-9-
3. Pressez PLAY (lecture).
POUR CESSER LA LECTURE
Pressez la touche STOP/EJECT (arrêt/éjection).
INTERRUPTION DE LA LECTURE
Pressez la touche PAUSE.
Pour reprendre la lecture, pressez de nouveau la touche PAUSE.
DÉFILEMENT RAPIDE
Pressez REWIND (rembobinage) ou F.FWD (avance rapide). Pressez la touche STOP/
EJECT pour cesser l'enroulement à l'endroit désiré.
EN FIN DE BANDE
En mode de défilement rapide ou de lecture normale, la cassette s'arrête automatiquement en fin de
bande.
-10-
2. Pressez la touche PAUSE.
3. Pressez la touche RECORD
(enregistrement).
POUR CESSER L'ENREGISTREMENT
Pressez la touche STOP/EJECT.
INTERRUPTION D'UN ENREGISTREMENT
Pressez la touche PAUSE.
Pour reprendre l'enregistrement, pressez de
nouveau la touche PAUSE.
REMARQUE
Si vous désirez effectuer l'enregistrement sur
une cassette comportant déjà un enregistrement
et dont la languette de protection a été retirée,
recouvrez l'emplacement de la languette avec du
ruban collant sinon la touche d'enregistrement se
bloque et ne peut ètre abaissée.
(Reportez-vous à la section
Utilisation de la radio)
Enregistrement provenant d'un CD
(Reportez-vous à la section Lecture
d'un disque compact)
5. Pressez la touche PAUSE.
SI UN SIFFLEMENT AIGU
(INTERFÉRENCES) SE PRODUIT LORS DE
L'ENREGISTREMENT D'ÉMISSIONS AM/
MW
Réglez le sélecteur FM MODE/BEAT CUT
(sur le côté droit de l'appareil) à une autre
position pour réduire les interférences.
EFFFACEMENT D'UNE CASSETTE
ENREGISTRÉE
1. Pressez la touche POWER.
2. Réglez le sélecteur de FONCTION à TAPE.
3. Introduisez une cassette en plaçant le côté
que vous désirez effacer face à vous.
4. Pressez RECORD pour commencer
l'effacement.
-11-
AVERTISSEMENT
RISQUE DE CHOC ÉLECTRIQUE
NE PAS OUVRIR
Le symbole de l'éclair
à l'intérieur d'un
triangle a pour but
d'avertir l'utilisateur
d'une «tension
dangereuse» à
l'intérieur de
l'appareil.
AVERTISSEMENT: POUR RÉDUIRE
LE RISQUE DE CHOCS
ÉLECTRIQUES, NE PAS RETIRER LE
COUVERCLE (OU LE DOS). AUCUNE
PIÈCE NÉCESSITANT L'ENTRETIEN
PAR L'UTILISATEUR À L'INTÉRIEUR.
POUR RÉPARATION, S'ADRESSER À
UN RÉPARATEUR QUALIFIÉ.
AVERTISSEMENT: POUR RÉDUIRE LE RISQUE D'INCENDIE OU DE CHOCS
ÉLECTRIQUES, NE PAS EXPOSER CET APPAREIL À LA PLUIE OU À L'HUMIDITÉ.
Le point d'exclamation
à l'intérieur d'un
triangle a pour but
d'attirer l'attention
sur des instructions
importantes qui
accompagnent
l'appareil.
TÉLÉCOMMANDE (en option)
!
"
#
$
%
&
'
POSE DES PILES
1. Ouvrez le compartiment des piles.
REMPLACEMENT DES PILES
Quand les piles s'affaiblissent, la distance de fonctionnement de la télécommande baisse considérablement
et il faut remplacer les piles.
REMARQUE
Si vous n'allez pas utiliser la télécommande pendant une longue période de temps, retirez les piles pour
éviter l'endommagement en cas de fuite des piles.
Ne mélangez pas différents types de piles, ni des piles neuves avec des piles usées.
1. X-BASS (amplification des graves)
2. SLEEP (arrêt différé)
%
3. Touche MODE • REMAIN
$
4. MEMORY • CLOCK (mémoire/horloge)
#
5. TUNER (syntonisation)
6. Touche pour CD (lecteur de CD)
"
7. REPEAT/PRESET (lecture répétée/préréglage)
8. SKIP • TUNING (saut/syntonisation)
!
9. Touche STOP
10 . Touche POWER/ST ANDBY (alimentation/disponibilité)
11 . Touche BAND (bandes)
12. PLAY/P A USE ( lecture/pause)
13 . Touche VOLUME +\14 . TAPE (magnétocassette)
15. RANDOM (lecture aléatoire)
16 . INTRO (introduction)
17. TIMER (minuterie)
UTILISATION CORRECTE DE LA TÉLÉCOMMANDE
• Pointez la télécommande vers le CAPTEUR DE
TÉLÉCOMMANDE situé sur l'appareil.
• Si l'éclairage ambiant est élevé, le rendement du
CAPTEUR à infrarouge peut baisser et entraîner un
mauvais fonctionnement.
• La distance efficace conseillée pour le fonctionnement de
la télécommande est d'environ 4 mètres (13 pieds).
2. Insérez deux piles R03 (AAA ou SUM-4).
+
+
ENTRETIEN
NETTOYAGE DES DISQUES COMPACTS
Si un CD produit des sons hachés ou si la lecture n'est pas
possible, il faut peut-être nettoyer le disque. Avant d'en effectuer
la lecture, essuyez le disque, en allant du centre vers le bord,
avec un chiffon. Après son utilisation, rangez le disque dans
son étui.
c
d
NETTOYAGE DE L'APPAREIL
N'utilisez pas de produits chimiques volatils sur cet appareil. Nettoyez-le en l'essuyant légèrement avec
un chiffon doux.
REMARQUE IMPORTANTE
• Si le couvercle du lecteur de CD est ouvert avant la fin de la lecture d'un CD, un bruit de coincement peut
se produire; fermez le couvercle du lecteur de CD puis pressez la touche TAPE ou TUNER
temporairement jusqu'à TAPE/RADIO.
• Si une indication anormale est affichée ou si un problème de fonctionnement se produit, débranchez le
cordon d'alimentation CA. Attendez au moins 5 secondes, puis rebranchez le cordon.
• Avant de transporter l'appareil, retirez le disque du tiroir.
a
NETTOYAGE DES TÊTES DU MAGNÉTOCASSETTE
Nettoyez les têtes avec un coton-tige légèrement humecté
avec un liquide de nettoyage ou de l'alcool dénaturé.
b
GUIDE DE DÉPANNAGE
PROBLÉMES
LECTEUR DE CD
L'appareil ne se met pas en marche
Un disque est en place mais la lecture
ne s'effectue pas
Le disque produit des sons hachés
RADIO
Mauvaise réception FM
Mauvaise réception AM/MW
MAGNÉTOCASSETTE
Enregistrement déformé ou bruyant
Impossible d'abaisser la touche
d'enregistrement
À VÉRIFIER
• Fiche CA bien enfoncée dans la prise? Prise alimentée
de courant?
• Sélecteur de FONCTION réglé à CD?
• Disque placé, l'étiquette vers le haut?
• Disque propre?
• Mode de pause mis en service?
• Disque endommagé ou sale? Le vérifier.
• Appareil sur une surface stable? Des vibrations ou des
chocs peuvent provoquer des sons hachés.
• Antenne FM déroulée?
• Des interférences électriques sur les lieux peuvent
causer une mauvaise réception. Éloigner l'appareil des
sources d'interférences (spécialement moteurs et
transformateurs).
• Orienter l'antenne cadre AM/MW de façon à améliorer
la réception.
• Têtes sales? Les nettoyer.
• Cassette endommagée? Essayer une autre cassette.
• Languettes sur les bord de la cassette retirées ou
cassées? Si c'est le cas, pour enregistrer sur cette
cassette, recouvrir les orifices avec du ruban pouvant
être retiré.
FICHE TECHNIQUE
Consommation de courant: 40 W
Source d'alimentation: CA 120 V ~ 60 Hz (Canada et É.-U.)
Les caractéristiques peuvent changer sans préavis.
CA 110/120V - 220/240V ~ 50/60Hz (Autres pays)
CA 220V ~ 50 Hz (Hong Kong et Chine)
CA 230V ~ 50 Hz ( Europe)
CA 240V ~ 50 Hz ( Australie)
RETIREZ LE SUPPORT
SUPPORT (en option)
-12-
-13-
-14-
811-131291-022 Imprimé en Chine
Page 5

PRODUCTO
LÁSER DE
CLASE 1
PRECAUCION
Existe una radiación láser
invisible cuando se abre la o
se anula los interbloqueos.
Este producto contiene un bajo poder de láser.
SOBRE LA UBICACIÓN
• No use el equipo en lugares extremadamente
calurosos, fríos, polvorientos o húmedos.
• Ubique el equipo sobre una superficie plana
o nivelada.
• No restrinja el flujo de aire en el equipo,
ubicándole en un lugar pobre de aire,
cubriéndolo con un paño o poniéndolo sobre
una alfombra.
SOBRE LA SEGURIDAD
• Cuando conecte o desconecte el cable de
energia AC, tome el enchufe y no el cordón
mismo, tirando el cable podría dañarlo y
producir un riesgo.
• Cuando usted no va usar el equipo por un
largo periodo de tiempo, desenchufe el cordón
del suministro eléctrico.
SOBRE EL VOLTAJE AC
• Antes de usar el equipo asegúrese de revisar
el voltaje de su equipo con el voltaje local.
• Sitúe el selector de voltaje (110-120V/220240V) en la parte posterior de la unidad.
• En áreas con AC 110-120V, conecte el
enchufe del adaptador al cordon de poder.
Conecte le poder al suministro AC.
• En aáreas con AC 220-240V, conecte el
cordon de poder al suministro en la pared.
Selector de voltaje (parte posterioropcional)
• Algunos modelos están equipados con un
selector de voltaje para conformidad del
poder provisto de la localidad.
Asegúrese de situar ese switch para igualar
el voltaje de poder provisto en su área antes
de conectar la unidad.
SOBRE LA CONDENSACION
• Cuando es dejado en una habitación calurosa,
• Cuando hay condensación en el interior del
• Déjeto reposar por 1 a 2 horas antes de
INFORMACION FCC (Solo para USA)
Este producto cumple con la parte 15 del
Reglamento FCC. Estas operaciones están
sujetas a las dos siguientes condiciones:
(1) Este aparato no causa daño a las
(2) Este aparato puede aceptar cualquler
SI OCURRE CUALQUIER PROBLEMA,
DESCONECTE EL CABLE DE ENERGIA Y
SOLICITE AL PERSONAL DE SERVICIO
TECNICO CALIFICADO.
-1-
PRECAUCIONES
AC VOLTAGE
110 - 120V
(on back of
220 - 240V
donde esta tibio y húmedo, se pueden formar
gotas de agua o condensación en el interior
del reproductor del CD.
aparato, puede que este no funcione
normalmente.
encenderlo, o caliente gradualmente la
habitación y seque el equipo antes de usarlo.
interferencias.
interferencia recibida, incluyendo
interferencias que pueden ser causadas por
operaciones indeseadas.
the unit)
!
"
#
$
%
&
'
! #" $ % & '
1 . Cubierta de las teclas del cassette
2. Botones de operación del cassette
PAUSA
STOP/EJECT
F.FWD (avance rápido)
REWIND ( rebobinado)
PLAY (reproducción)
RECORD (grabación)
3. Parlante izquierdo
4 . Compartimento de cassette
5. PANEL
6 . SENSOR REMOTO
7 . Conexión de FONOS
8. Indicador X-BASS / POWER ON
(poder encendido)
9 . Puerta del CD
10. Botones de función del CD
(PREFIJADO/REPETICION /
STOP / PLAY/PAUSA /
<SINTONIZADOR/SALTO>)
IDENTIFICACION DE PARTES
!
11 . Control X-BASS
12 . Botón POWER (encendido)
13 . Botón CD
14 . Botón TUNER (radio)
15 . Botón TAPE (cassette)
16 . Botón BANDA
17 . Botón INTRO (introducción)
18 . Stand (opcional)
19. Control VOLUMEN - / +
20. Botón MEMORY
21. Selector MODO FM/BEAT
CUT(corte)
22 . Botón CERRAR/ABRIR
23 . Parlante derecho
-2-
ENCENDIDO DE LA UNIDAD
PRESIONE EL BOTON POWER
Presione el botón POWER, el indicador POWER ON se encenderá. Seleccione la función la función
deseada y el indicador de la función correpondiente se iluminará.
PARA APAGAR LA UNIDAD
Presione el botón POWER a STANDBY, el indicador POWER ON se apagará y solo la hora será
mostrada en el panel.
FIJANDO EL RELOJ
1. Presione el botón MEMORY en el
modo reloj. HOUR destellará.
3. Presione el botón MEMORY en el
modo reloj. MINUTES destellara.
NOTA: Si el botón no es presionado por 10 segundos lo fijado en el reloj se desv anecerá automáticamente.
2. Presione los botones < TUNING/SKIP >
para fijar la hora correcta.
4 . Presione los botones < TUNING/SKIP>
para fijar los minutos correctos y
presione el botón MEMORY para que
el reloj comience.
Y
AJUSTANDO EL SONIDO
Para ajustar el volumen Para seleccionar el X-Bass
Presione el botón X-BASS esta
diseñado específicamente para alzar
la baja del nivel del sonido y así obtener
mayor poder de bajos.
NOTA: Presione el botón X-BASS, el
indicador verde del X-BASS se
iluminará.
CUANDO ESTE GRABANDO
Ajustando los controles de VOLUMEN o X-BASS
no afectará la grabación
PARA ESCUCHAR EN PRIVADO
Conecte los audífonos (Ø3.5mm miniplug stereo)
a la conexión de fonos.
Cuando los audífonos son conectados, los
parlantes se desconectarán automáticamente.
-3-
El poder puede ser encendido y apagado automáticamente en el tiempo fijado, así usted puede despertar
con música del cassette, CD o radio: asegúrese de que el reloj este en la hora correcta antes de fijar
el despertador.
FIJANDO EL TIMER - en modo standby
1 . Presione el botón MODE•REMAIN hasta que TIMER ON/OFF este en el panel.
2 . Presione el botón MEMORY•CLOCK en el modo clock. La hora destellara.
3 . Presione los botones
4 . Presione el botón MEMORY•CLOCK para hacer que los minutos destellen.
5 . Presione los botones SKIP para fijar los minutos correctos.
6 . Presione el botón MODE•REMAIN para almacenar la hora de ENCENDIDO/APAGADO.
Este retornara al modo normal.
OPERACIÓN DEL TIMER (solo para el control remoto)
SKIP para fijar la hora correcta.
UP
DOWN
UP
DOWN
$ "!#
FUNCIONAMIENTO DEL TIMER
1. Fije la hora de encendido y apagado.
2. Seleccione la fuente del programa deseado
con FUNCTION.
TUNER: Seleccione la banda y estación.
TAPE: Inserte una cinta de cassette.
CD: Inserte un disco.
3. Presione TIMER.
TIMER aparecerá en el panel.
4. Presione POWER al modo standby.
5. Para la reproducción de cassette, presione
PLAY. Con la hora del timer encendido, el
sistema se encenderá automáticamente.
Para cancelar la función del timer
Presione el botón timer hasta que la función timer este apagada.
FIJANDO EL APAGADO AUTOMATICO (solo para el control remoto)
Cuando el timer de apagado es usado, el poder es automáticamente desconectado después de pasada
la hora especificada.
1. Presione el botón SLEEP mientras el poder
esta encendido. Se ilumina "SLEEP 90" en
el panel.
NOTA: SLEEP también puede ser ajustado
en los modos TUNER, TAPE o CD.
TIMER DE GRABACION
El sistema podrá grabar de una radioemisora
en la hora fijada.
1. Fije la hora de encendido y apagado.
2. Sitúe a TUNER.
3. Seleccione una banda y estación.
4. Inserte una cinta de cassette para la
grabación.
5. Presione TIMER.
TIMER aparecerá en panel.
6. Presione POWER en el modo standby.
7. Presione REC (grabador) el cual también
engancha PLAY.
2. Mantenga presionado el botón SLEEP para
seleccionar el tiempo de duración restante
hasta que la unidad se apague.
Esto cambia el indicador de la siguiente
manera:
SLEEP 90
SLEEP 10
Una vez que la hora de apagado es fijado, la
palabra "SLEEP" aparecerá en el panel.
Para cancelar la hora de apagado, presione una
vez el botón SLEEP y "SLEEP" desaparecerá
del panel.
SLEEP 80
...... SLEEP 20
-4-
SINTONICE UNA ESTACION MANUALMENTE
1. Presione el botón TUNER.
2. Presione el botón BAND la seleccionar la
Banda deseada.
PARA UNA MEJOR RECEPCION
FM
Desenvolver totalmente el cable de la antena.
Extenderlo y situarlo donde mejor se escuche
el sonido.
NOTA: NO CONECTE A UNA ANTENA
EXTERNA.
PARA BUSCAR UNA ESTACION
AUTOMATICAMENTE
Presione el botón <TUNING/SKIP ó
TUNING/SKIP> por uno o dos segundo, y
una estación será buscada automáticamente.
Después de sintonizar una estación, el
buscador se detendrá.
El buscador puede no detenerse en una
estación si la señal es muy débil.
SI LA SEÑAL DE LA RADIOEMISORA
FM STEREO ES MUY DEBIL
Sitúe el selector FM MODE a MONO.
El ruido en el fondo se reducirá pero la señal
se reproducirá en mono. Para restaurar la
recepción stereo, sitúe el selector FM MODE
a STEREO.
ESCUCHANDO LA RADIO
3. Presione los botones <TUNING/SKIP> para
seleccionar una estación.
AM/MW
Conecte la antena circular aerea (provista) al
terminal "MW/AM LOOP ANTENNA" en la
parte posterior de la unidad.
PARA RECIBIR LA RADIOEMISORA FM EN
STEREO
Sitúe el selector FM MODE a STEREO.
Cuando este recibiendo la radioemisora FM en
stereo:
MHz
FIJANDO UNA ESTACION
Estas pueden ser sintonizadas seleccionando sus números prefijados. Es posible almacenar estaciones
de cualquier banda en el orden que usted elija.
Fijando memorias manualmente
Esta característica le permite fijar estaciones manualmente en cualquier canal deseado.
1. Fije la banda y estación deseada.
3. Presione el botón PRESET/REPEAT para
seleccionar un numero de canal para la
estación fijada.
SINTONIZANDO UNA ESTACION FIJADA
Presione el botón PRESET/REPEAT para seleccionar el número a fijar.
NOTA
Si el botón no es presionado por 10 segundos el modo de fijación se desconectara automáticamente.
2. Presione el botón MEMORY hasta que
destelle el indicador MEMORY.
4. Memoriza la estación.
5. Repita los pasos del 1 al 4 para la siguiente.
MHz
REPRODUCCION DEL CD
1. Presione el botón CD. 3. Para empezar reproduciendo, presione
2. Presione el botón OPEN/CLOSE para
abrir la puerta del CD. Sitúe un disco en
la bandeja de CD con la etiqueta o
impreso mirando hacia el frente y
después presione el botón OPEN/CLOSE
para cerrar la puerta del CD.
El número de pistas será mostrado en el
panel.
NOTAS:
• NO EMPUJE LA PUERTA DEL CD PARA
CERRARLO.
• LA TAPA DEL REPRODUCTOR DE
DISCOS COMPACTOS NO SE PUEDE
ABRIR SI EL EQUIPO NO ESTß
ENCENDIDO.
Localizando un punto particular en una pista
Para adelantar a alta velocidad
Mantener el botón SKIP presionado
durante el funcionamiento y suelte este en el
punto deseado.
Para retroceder a alta velocidad
Mantener el botón SKIP presionado
durante el funcionamiento y suelte este
en el punto deseado.
Mantenga este presionado
NOTA
El reproductor de CD puede saltar si los parlantes están situados en forma cerrada al reproductor
y si esta siendo usado un alto nivel de volumen o x-bass.
el botón PLAY/PAUSE.
PARA INTERRUMPIR LA
REPRODUCCION
Presione el botón PLAY/PAUSE.
El y el tiempo de pista destellarán.
Para reanudar la reproducción, presione
nuevamente el botón PLAY/PAUSE.
PARA DETENER LA REPRODUCCION
Presione el botón STOP .
Buscando el comienzo de una pista
Para encontrar una pista previa
Presione una vez el botón SKIP para
regresar al comienzo de la pista actual.
Presione repetidamente el botón SKIP
para saltar hacia atrás las pistas, una por
una.
Para saltar pistas
Presione repetidamente el botón SKIP
para saltar pista(s) hacia delante una por
una.
Presione este una vez
PROGRAMANDO PISTAS - con el CD en el modo stop
1. Presione el botón MEMORY.
MEMORY
3. Presione nuevamente el botón
MEMORY.
MEMORY
Para revisar el programa
Mientras este en el modo stop, presione el botón
MEMORY. Los números de disco, pista y
programa aparecerán en el panel.
Presione nuevamente el botón MEMORY para
ver las otras selecciones programadas.
Esta displays no aparecen durante reproducción
del programa.
2. Presione los botones SKIP para
seleccionar las pistas deseadas.
4. Para programar pistas adicionales.
Para reproducir las pistas programadas
Presione el botón PLAY /P AUSE.
Para detener la reproducción del programa
Presione el botón STOP .
Para limpiar el contenido de la memoria
Presione el botón STOP y ABRA (OPEN) la puerta
del CD o fije a otra función.
MEMORY
Repita pasos del 2 al 3.
-5-
-6-
-7-
-8-
Page 6

FUNCION DE REPETICION
Esta función permitirá que una pista o todas las pistas se reproduzcan repetidamente.
PARA REPETIR IN DISCO ENTEREO
Presione el botón PRESET/REPEAT hasta el
indicador REPEAT se ilumine.
PARA REPETIR LA MISMA PISTA
Presione el botón PRESET/REPEAT hasta
que el indicador REPEAT parpadee.
REPRODUCCION DE CINTA
REPRODUCCION DE CINTA
LA CINT A QUE SE PUEDE USAR - Use solo cinta normal (tipo I) para la reproducción.
1. Presione el botón TAPE.
3. Presione el botón PLAY.
2. Inserte una cinta de cassette.
GRABACION
CINT A QUE SE PUEDE USAR - Use solo cinta normal (tipo I) para grabación.
1. Inserte una cinta de cassette.
4. Haga funcionar la fuente de donde será la
grabación.
Grabando desde la radio
(Se refiere a escuchando la radio)
MICRO SISTEMA CD VERTICAL
CON RADIO
INSTRUCCIONES DE OPERACIÓN
PARA CANCELAR LA FUNCION DE REPETICION
Presione el botón PRESET/REPEAT hasta que el indicador REPEAT se apague.
INTRODUCCION DE LA REPRODUCCION con el modo stop en el CD
Esta función permite que los 10 primeros segundos
de cada pista del disco sean reproducidos.
Presione el botón INTRO.
INTRO aparece en el panel.
Para cancelar la función de introducción
Presione el botón STOP o INTRO de este
modo INTRO en el panel desaparecerá.
REPRODUCCION ALEATORIA (RANDOM)
Todas las pistas en un disco pueden ser
reproducidas en orden aleatorio.
Presione el botón RANDOM.
RANDOM aparecerá en el panel y presione
el botón PLAY/PAUSE para empezar con
la reproducción.
Para cancelar la reproducción aleatoria
Presione el botón STOP o RANDOM de
este modo RANDOM desaparecerá del
panel.
-9-
CONTROL REMOTO (opcional)
!
"
#
$
%
&
'
PARA INSTALACION DE LAS BATERIAS
1. Abra la puerta de las baterías.
REEMPLAZO DE BATERIAS
Cuando las baterías empiecen a debilitarse y la operación a distancia del control remoto es muy reducida,
usted necesitará reemplazar las baterías por unas nuevas.
NOTA:
Si el control remoto no va a usarse por largo periodo de tiempo, retire estas para evitar un derrame
causado por el luido corrosivo de a batería.
No mezcle diferentes tipos de baterías, o viejas con nuevas.
1. Control X-BASS
2. Botón de AP AGADO A UT OMATICO
%
3. Botón MODO•REMAIN
$
4. Botón MEMORIA • RELOJ
#
5. Botón RADIO
6. Botón CD
"
7. Botón REPETICION/PREFIJADO
8. Botones SKIP • TUNING
!
9. Botón STOP
10 . Botón de ENCENDIDO/STANDBY
11 . Botón de BANDA
12 . Botón PLAY/P AUSE
13 . Controles de +/- VOLUMEN
14 . Botón CASETERA
15 . Botón RANDOM (aleatoria)
16 . Botón INTRO (introducción)
17 . Botón TIMER (cronómetro)
USANDO CORRECTAMENTE EL CONTROL REMOTO
• Dirija el control remoto al SENSOR REMOTO localizado
en la unidad.
• Cuando hay una fuerte fuente de luz en el ambiente, el
desempeño del infrarrojo del SENSOR REMOTO puede
degradarse, causando irregular operación.
• Lo recomendado es mantener una distancia del control
remoto de 4 metros (13 pies).
2. Inserte dos baterías R03 (AAA o SUM-4).
+
+
PARA DETENER LA REPRODUCCION
Presione el botón STOP/EJECT.
PARA INTERRUMPIR LA REPRODUCCION
Presione el botón PAUSE.
Para reanudar el funcionamiento, presione nuevamente el botón PAUSE.
PARA AVANCE RAPIDO Y REBOBINADO
Presione el botón REWIND o F.FWD . Presione el botón STOP/EJECT para detener
el giro en la posición deseada.
CUANDO LA CINTA LLEGUE A SU FIN
Durante el avance rápido o reprodcción regular, la cinta de detendrá automáticamente cuando llegue
esta a su fin.
-10-
MANTENCION
LIMPIEZA DEL CD
Si el CD salta o no funciona, el disco puede necesitar una
limpieza, antes de reproducirlo, frote el disco desde el centro
hacia fuera con un paño limpio. Después de reproducirlo,
guárdelo el disco en su estuche.
c
d
LIMPIEZA DE LA UNIDAD
No use químicos volátiles en la unidad. Limpie frotando suavemente con un paño suave.
AVISO IMPORTANTE
• Si la puerta del CD es abierta antes de que sea leído completamente el CD, podrá ocurrir que se escuche
un ruido de interferencia. Esto lo puede solucionar cerrando la puerta del CD y presionando el boton
TAPE ó TUNER temporalente a TAPE/RADIO.
• Si una indicación anormal aparece en el panel o un problema de operación ocurre, desonecte el cordon
de poder AC. Espere a lo menos 5 segundos, después vuelva a conectar el cordon de poder AC.
• Antes de transportar la unidad, retire el disco desde la bandja de disco.
a
LIMPIEZA DE LOS CABEZALES
Limpie el cabezal con un isópo de algodón ligeramente
humedecido con un liquido limpiador o alcohol desnaturalizado.
b
2. Presione el botón PAUSE.
3. Presione el botón RECORD.
PARA DETENER LA GRABACION
Presione el botón STOP/EJECT.
PARA INTERRUMPIR LA GRABACION
Presione el botón PAUSE.
Para reanudar la grabación, presione
nuevamente el botón PAUSE.
NOTA
Si usted desea grabar en una cinta pre-grabada,
donde ya los protectores de grabación han sido
removidos, usted debe primero cubrir los
agujeros con cinta adhesiva de otra manera el
botón record estará bloqueado y no podrá ser
relevado.
Grabando desde el CD
(Se refiere a reproducir el Compact Disc)
5. Presione el botón PAUSE.
SI ESCUCHA RUIDOS (SILBIDOS)
CUANDO ESTE GRABANDO DEL
PROGRAMA AM/MW
Trate de mover el selector FM MODE/BEAT
CUT (al lado derecho de la unidad)a una
posición diferente para reducir el ruido.
PARA BORRAR UNA CINTA GRABADA
1 . Presione el botón POWER.
2 . Deslice el selector FUNCTION a TAPE.
3 . Inserte un cassette con el lado que desea
grabar mirando hacia usted.
4. Presione el botón RECORD para
empezar el borrado.
-11-
GUIA DE POSIBLES PROBLEMAS
PROBLEMAS
CD
El sistema no enciendo
El disco en su lugar pero no reproduce
El disco salta
RADIO
Recepción pobre del FM
Recepción pobre del AM/MW
CASSETTE
Distorsión y ruidos en la grabación
El botón RECORD no se desprende
ITEMS PARA REVISAR
• Asegúrese de que el cordon de poder AC esta seguro en
el suministro en la pared, y de que este tenga poder.
• Asegúrese de que el selector FUNCTION este en CD.
• Asegúrese de que la etiqueta del disco este mirando
hacia arriba.
• Asegúrese de que el disco este limpio.
• El modo pausa esta activado.
• El disco puede estar dañado o sucio; revise el disco.
• Asegúrese de que la unidad este en un lugar seguro. Las
vibraciones o sacudidas puedan causar el salto del disco.
• Asegúrese de que el cable antena FM este desenrollada.
• La interferencia eléctrica en su hogar puede causar una
pobre recepción, mueva la unidad lejos de estas fuentes
de interferencia (especialmente de esos con motores y
transformadores).
• Sitúe la antena de cuadro AM/MW a la dirección donde
obtenga mejor recepción.
• Los cabezales están sucios, límpielos.
• La cinta esta dañada, trate con otra.
• Los protectores de grabación pueden que falten o este
rotos, si usted desea grabar en este cassette cubra los
agujeros con cinta adhesiva.
ESPECIFICACIONES
Poder de consumo: 40 W
Fuente de poder: AC 120 V ~ 60 Hz (USA y Canadá)
Específicaciones sujetas a cambio sin previo aviso.
AC 110/120V - 220/240V ~ 50/60Hz (Otros)
AC 220V ~ 50 Hz (Hong Kong y China)
AC 230V ~ 50 Hz ( Europa)
AC 240V ~ 50 Hz ( Australia)
PRECAUCION
RIESGO DE GOLPE ELECTRICO
NO ABRIR
El símbolo de rayo
relampagueando con
punta de flecha dentro del
triángulo equilátero esta
tratando de alertar de la
presencia de un "voltaje
peligroso" en el interior
del aparato.
PRECAUCION: PARA REDUCIR EL
RIESGO DE GOLPE ELECTRICO, NO
SAQUE LA CUBIERTA (O TAPA) NO
HAY REPUESTOS UTILES PARA EL
USUARIO EN SU INTERIOR. SOLICITE
MANTENCION AL PERSONAL DEL
SERVICIO TECNICO CALIFICADO.
ADVERTENCIA: PARA PREVENIR EL RIESGO DE GOLPE ELECTRICO,
NO EXPONGA ESTE APARATO A LA LLUVIA O HUMEDAD.
ENSAMBLAJE DELA BASE
Retirar la base
El punto de exclamación
dentro del triángulo
equilátero esta tratando
de alertar al usuarlo de la
presencia de importantes
que acompañan al
aparato.
-12-
-13-
-14-
811-131291-032 Impreso en China
 Loading...