

Page 1
- E1 -
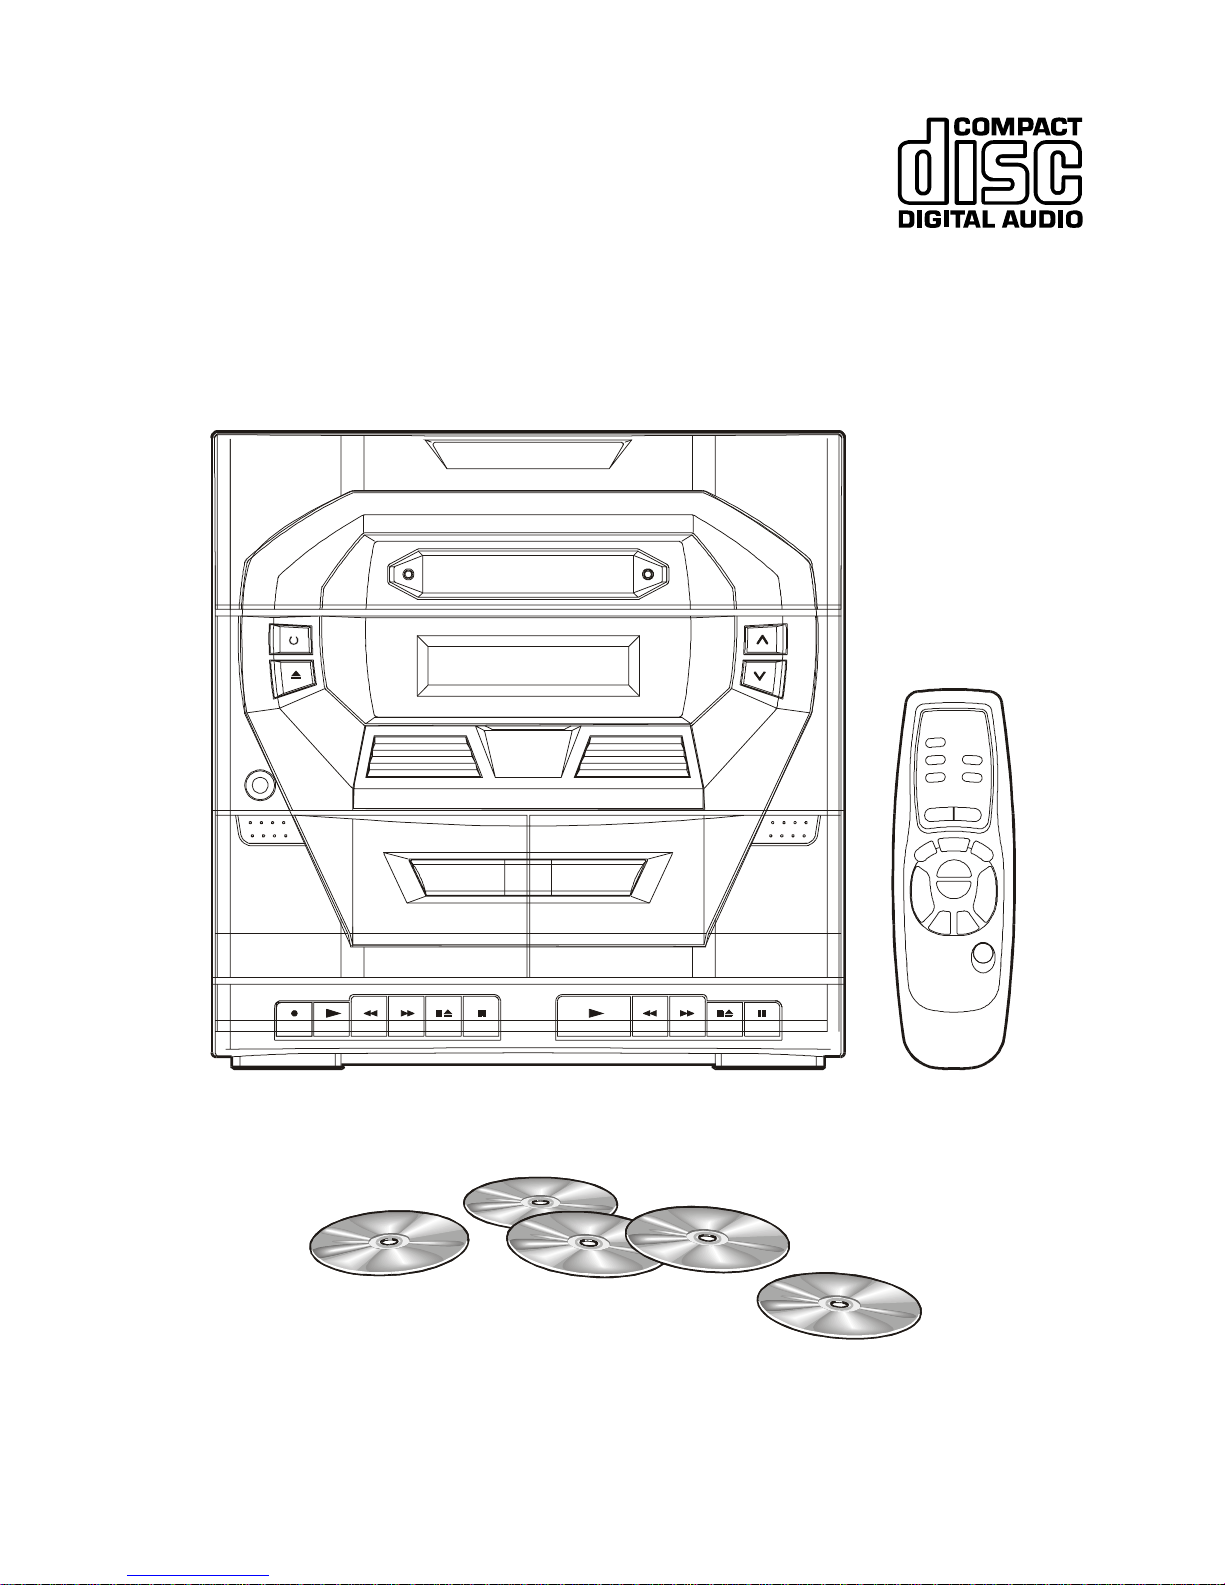
5 CD
HOME STEREO SYSTEM
OPERATING INSTRUCTION
Page 2
- E2 -
To reduce the risk of fire or electric shock, do not expose EXPLANATION OF GRAPHICAL SYMBOLS:
this appliance to rain or moisture.
RISK OF ELECTRIC SHOCK
DO NOT OPEN
"WARNING: TO REDUCE THE RISK OF ELECTRIC
SHOCK, DO NOT REMOVE COVER (OR BACK). NO
USER-SERVICEABLE PARTS INSIDE. REFER
SERVICING TO QUALIFIED SERVICE PERSONNEL."
W ARNING:
TO PREVENT ELECTRIC SHOCK HAZARD, DO NOT EXPOSE THIS
APPLIANCE TO RAIN OR MOISTURE.
CAUTION
INVISIBLE LASER RADIATION WHEN
OPEN AND INTERLOCKS DEFEATED.
AVOID EXPOSURE TO BEAM
CLASS 1 LASER PRODUCT
This product contains a low power laser device.
CLASS 1 LASER PRODUCT
APPAREIL Á LASER DE CLASSE 1
PRODUCTO LASER DE CLASE 1
PRODUTO LASER CLASSE 1
The lightning flash with arrowhead symbol, within
an equilateral triangle, is intended to alert the user
to the presence of uninsulated "dangerous
voltage" within the product's enclosure that may
be of sufficient magnitude to constitute a electric
shock to persons.
The exclamation point with an equilateral
triangle is intended to alert the user to presence
of important operating and maintenance
(servicing) instructions in the literature
accompanying the appliance.
PRECAUTION
Follow the advice below f or safe and appropriate operation.
ON PLACEMENT
• Do not use the unit in places which are extremely
hot, cold, dusty, or humid.
• Place the unit on a flat and even surface.
• Do not restrict the air flow through the ventilation
slots by placing the unit on soft furnishings, by
covering the unit with a cloth or by placing the
unit on a carpet.
ON AC VOL TA GE
• Before using the unit, check that the rated voltage of your unit matches your local voltage.
ON SAFETY
• When connecting and disconnecting the AC cord,
grip the plug and not the cord itself. Pulling the
cord may damage it and create hazard.
• When you are not going to use the unit for a long
period of time, disconnect the AC power cord.
ON CONDENSATION
• When left in a heated room where it is warm and
damp, water droplets or condensation may from
inside the CD player.
• When there is condensation inside the unit, the
unit may not function normally.
• Let it stand in a heated room for 1 to 2 hours to
allow the condensation to dry out.
FCC INFORMATION (For USA only)
This device complies with Part 15 of FCC Rules.
Operations are subject to the following two
conditions:
1.This device may not cause harmful interference,
and
2.This device must accept any interference
received, including interference that may cause
undesirable operations.
Should any trouble occur, disconnect the AC
power cord and refer servicing to qualified
personnel.
WARNING
WARNING
Page 3
- E3 -
SYSTEM CONNECTIONS
IMPORTANT
Switch off the power before connecting speakers and
other equipment.
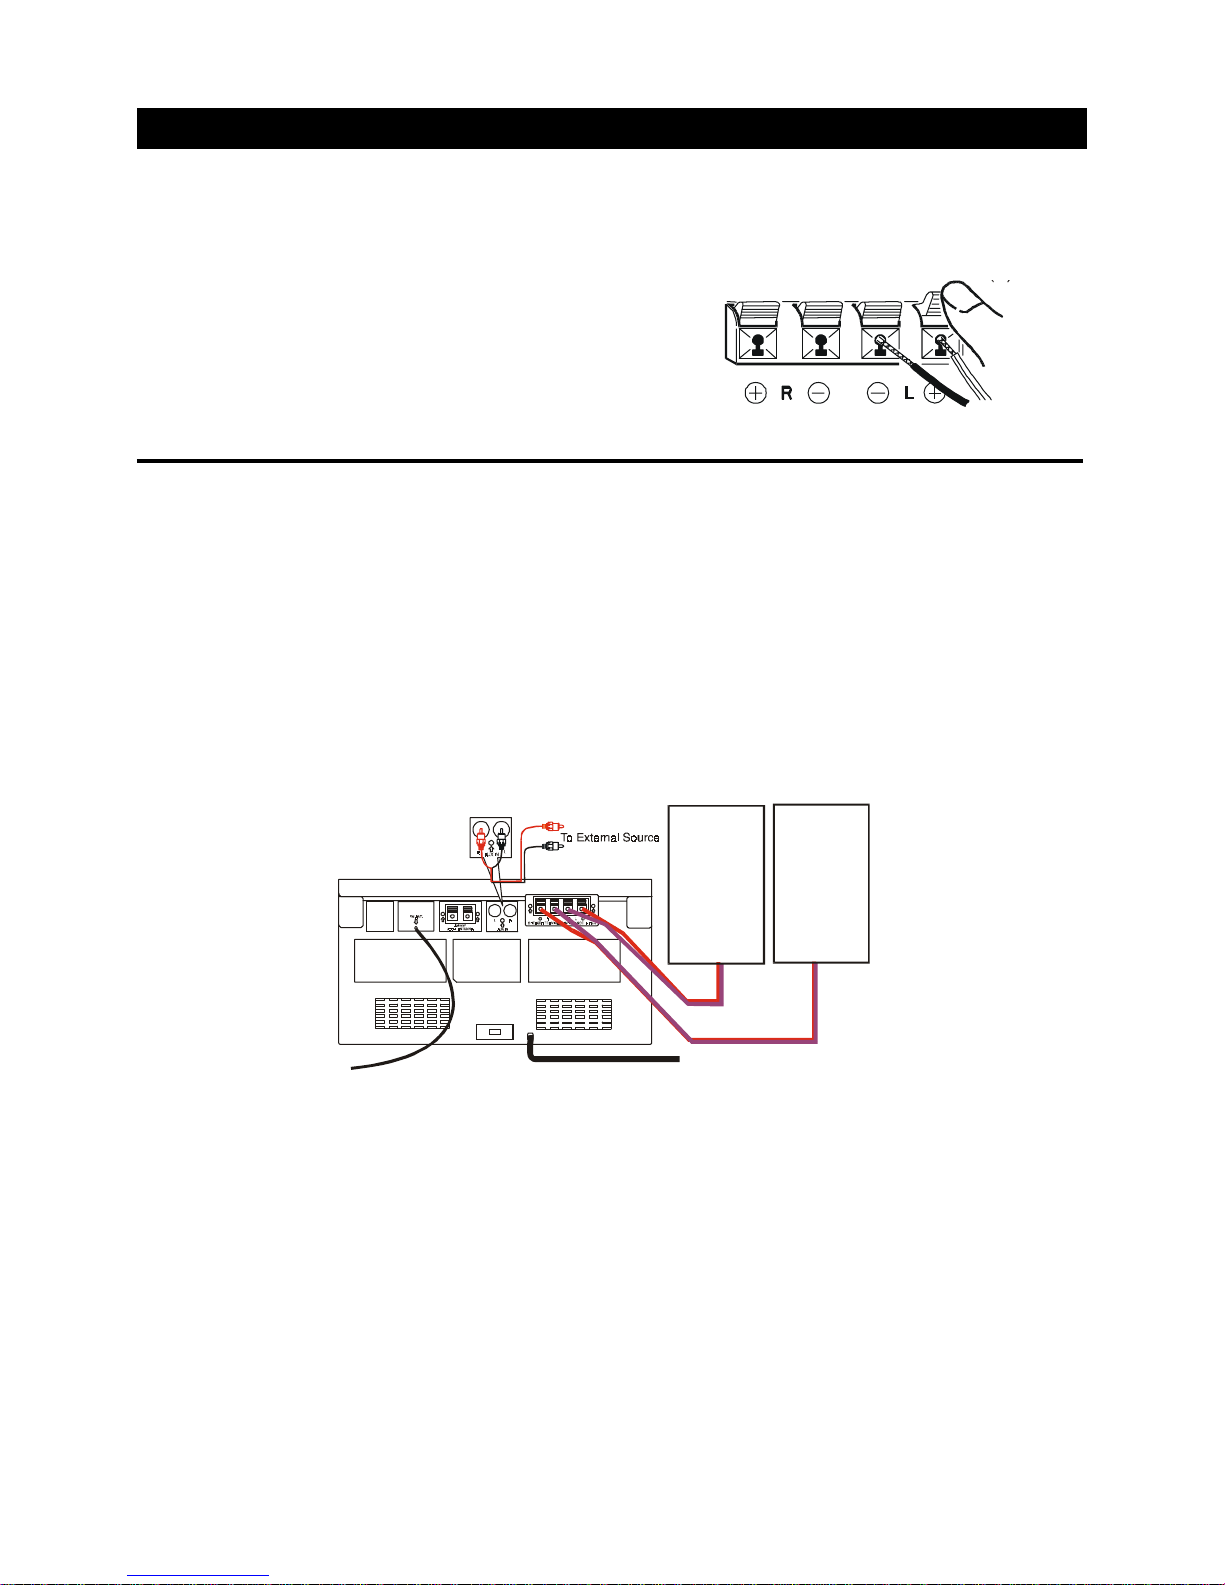
SPEAKER CORD CONNECTION
Connect the wires with the printed red lines to the red
(+) terminals and the plain-black wires to the black (-)
terminals.
NOTE : Connecting speakers other than the speakers
supplied with the unit, may damage the unit.
POWER CORD CONNECTION
1. Make sure that all the components and speakers are connected correctly.
2. Check that the rated voltage of your unit matches your local voltage.
CAUTION
• Be sure the AC power cord is disconnected and all functions are off before making connections.
• When you are not going to use the unit for a long period of time, disconnect the AC power cord.
SPEAKER CONNECTIONS
Connect Speaker wires (Left & Right) from the Speaker to the amplifier's Speaker terminals.
NOTE : Ensure in each case that the striped (+) wire is connected to the (+) terminal of the speaker output and
the non-striped wire (-) is connected to the (-) terminal of the speaker output. Also ensure that the correct
orientation for left and right main speakers is observed.
TO TURN ON THE UNIT
Press the POWER button. The display will light up. Select the desired function and the corresponding function
indicator will light up.
AFTER USE
Press the POWER button. The display light will fade and only the clock display will be shown.
CONNECTION WITH OTHER OPTIONAL EQUIPMENT
To listen to or record audio signals from external units through this unit:
Connect the white plug to the L jack, and the red plug to the R jack of the AUX IN connector.
LISTENING TO THE CONNECTED EQUIPMENT
1. Press the FUNCTION button to AUX.
2. Play the external source.
NOTE : If the external equipment is a television and this audio system is close to it, you may experience
interference if the tuner function is selected while the television is working.
AC Cord to an AC outlet
SPEAKER TERMINALS IMPEDANCE: 8 ohm (Ω)
CONNECTI NG
SPEAKERS
OTHER THAN
THE SPEAK ERS SUPPL IED W I TH
THE UNIT , MAY DAMAGE THE UNIT.
LEFT
SPEAKER
BOX
RIGHT
SPEAKER
BOX
Page 4
- E4 -
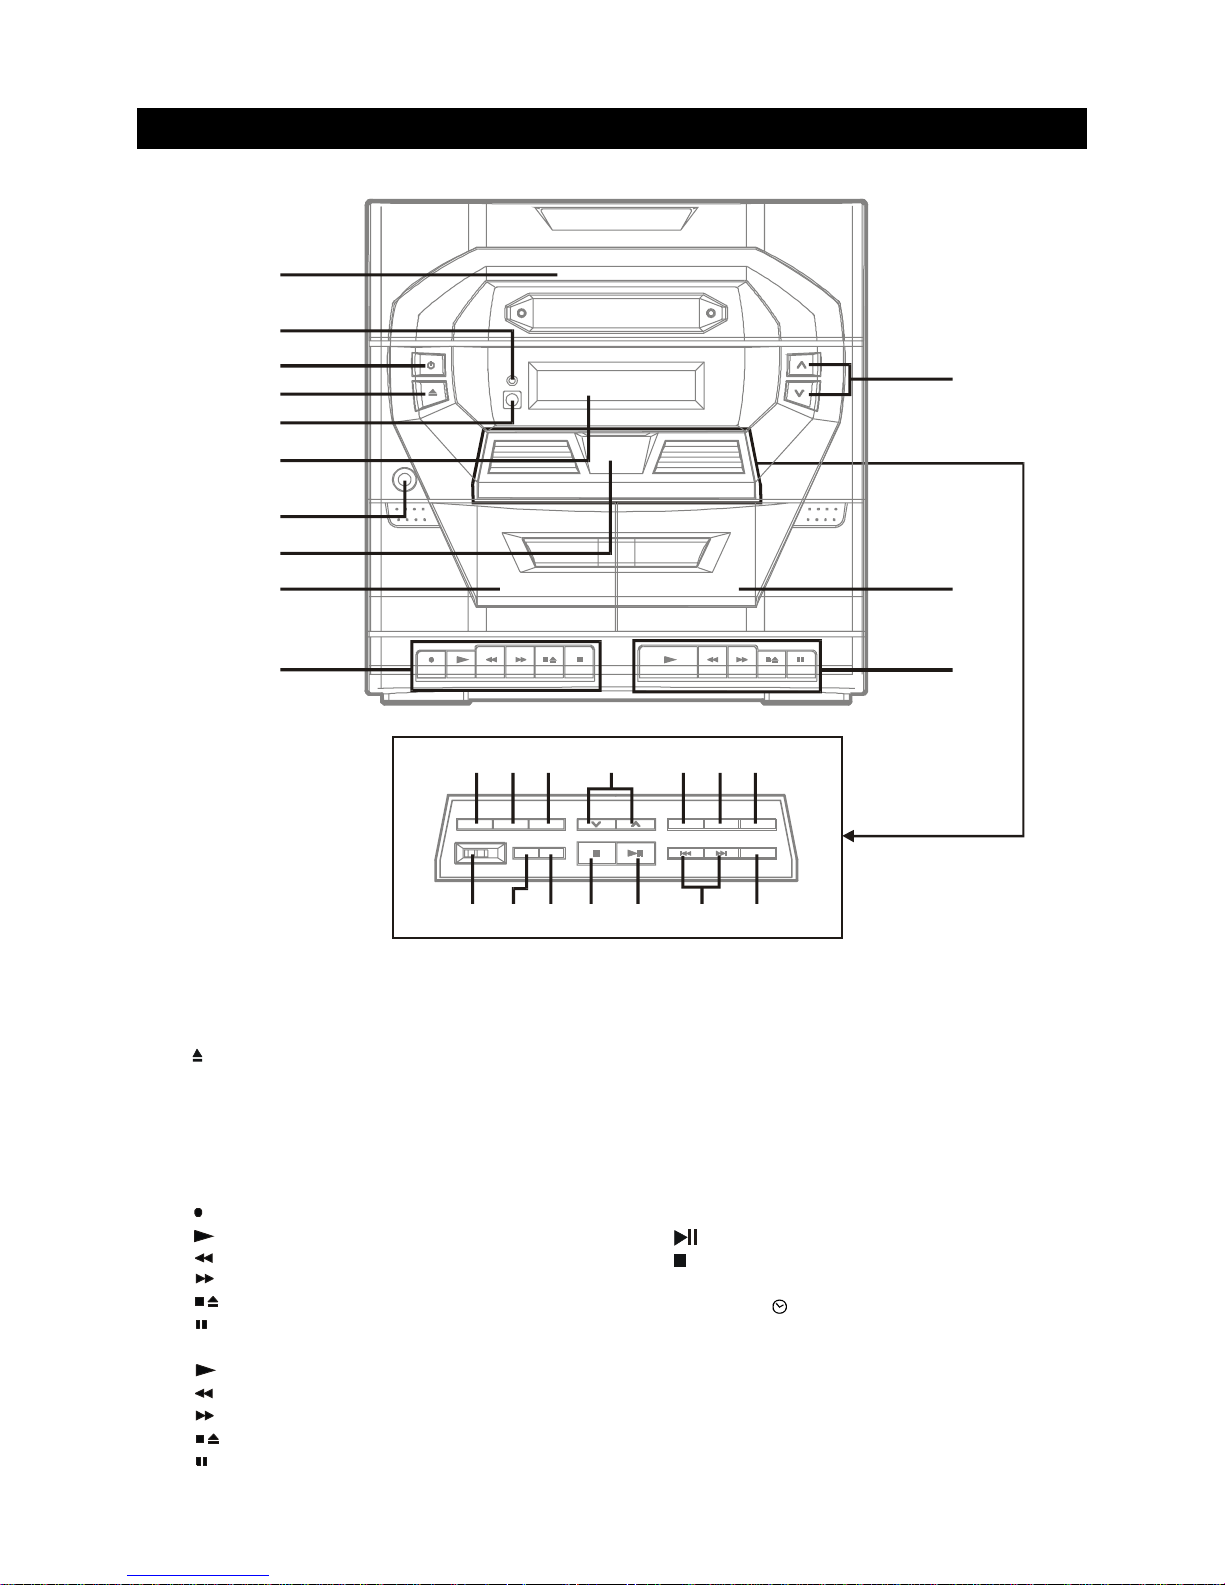
PARTS IDENTIFICATIONS
12) Cassette holder (Deck B)
13) VOLUME control buttons
14) X-BASS button
15) STEREO WIDE button
16) REPEAT button
17) RANDOM / TUNING buttons
18) BAND button
19) FUNCTION button
20) DISC SKIP button
21) SLEEP button
22) SKIP/PRESET/MIN/HOUR buttons
23)
PLAY / PAUSE button
24)
STOP button
25) TIMER button
26) MEMORY/ CLOCK button
27) MODE selector (BEAT CUT / FM MODE /
DUBBING)
1) CD door
2) STEREO WIDE indicator
3) POWER button
4) OPEN / CLOSE button
5) REMOTE SENSOR
6) DISPLAY window
7) PHONES jack
8) FUNCTION KEY door
9) Cassette holder (Deck A)
10) Cassette operation controls (Deck A)
RECORD button
PLAY button
REWIND button
F.FWD (fast foward) button
STOP / EJECT button
PAUSE button
11) Cassette operation controls (Deck B)
PLAY button
REWIND button
F.FWD (fast forward)
STOP / EJECT button
PAUSE button
2223242526 2127
19 201817161514
Function Key Door control panel
3
4
5
6
7
8
9
10
1
2
11
12
13
Page 5
- E5 -
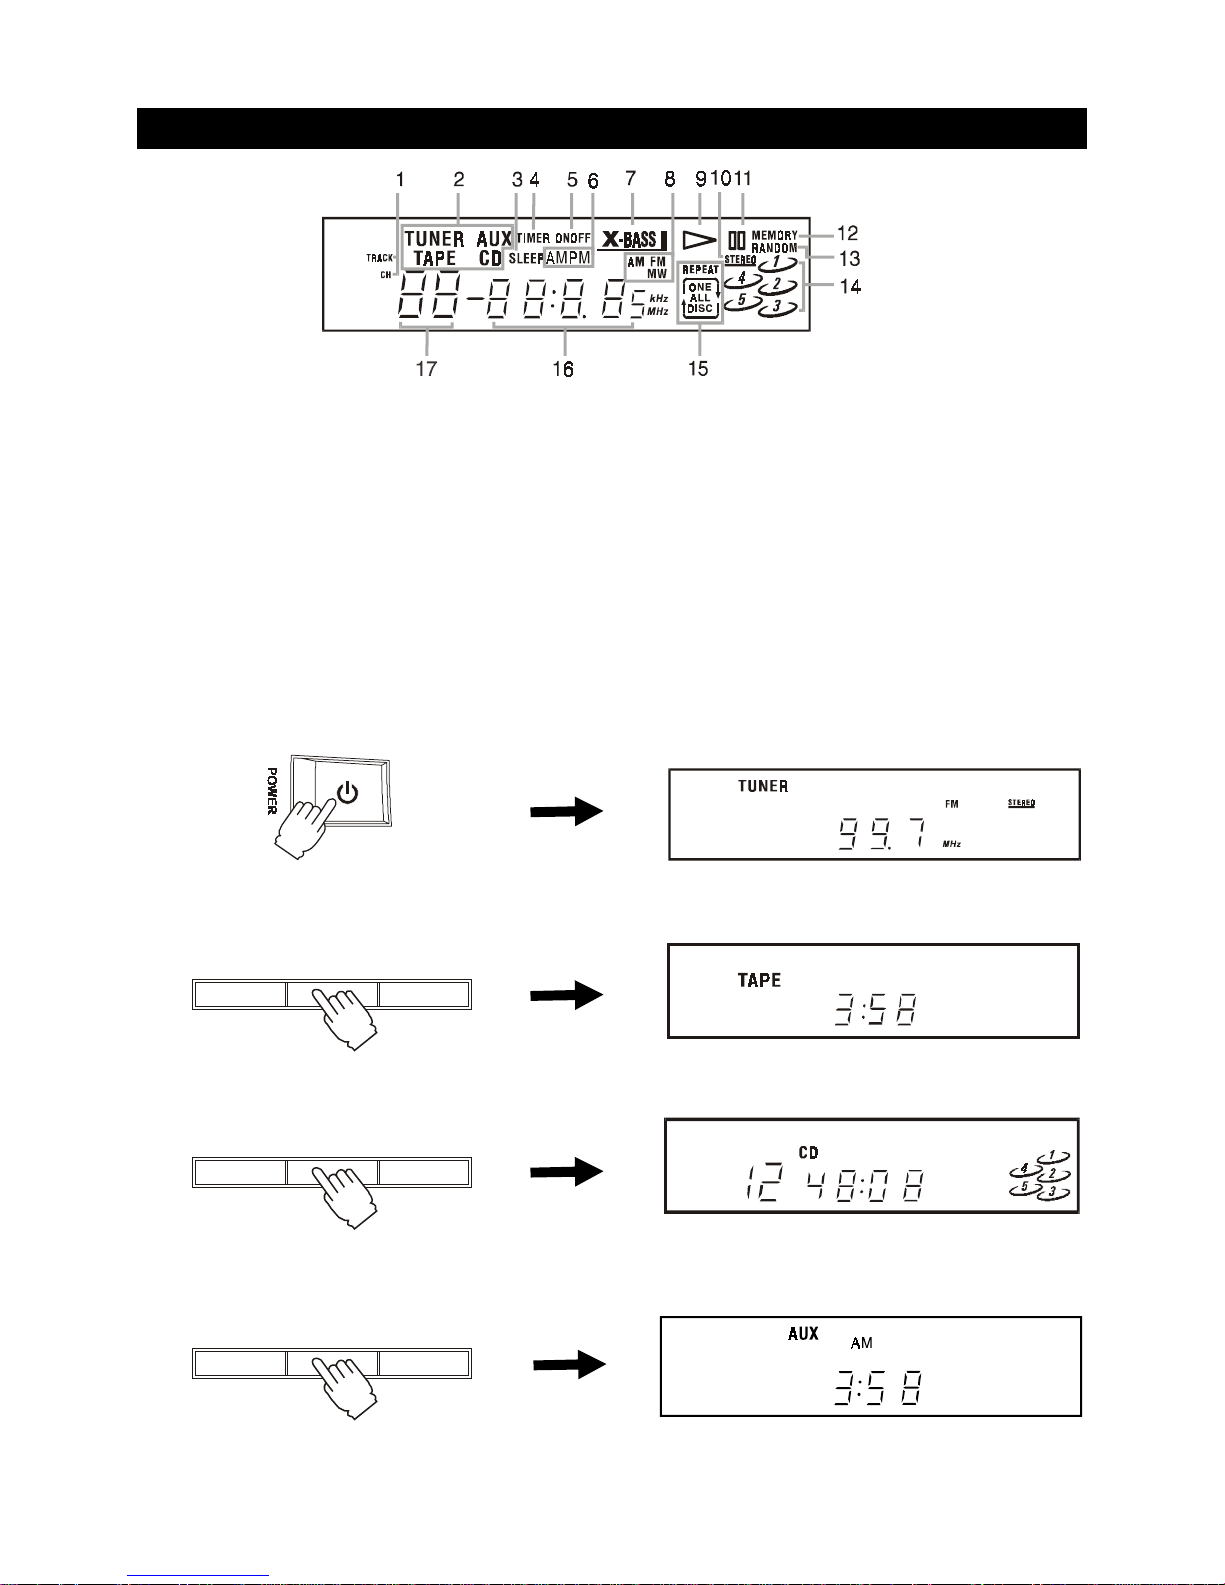
DISPLAY
1. TRACK and CHANNEL indicators.
2. FUNCTION indicators.
3. SLEEP indicator.
4. TIMER indicator.
5. ON/OFF indicators.
6. AM/PM indicators.
7. X-Bass indicator.
8. Band FM/MW(AM)indicators.
9. Playback Indicator.
10. STEREO indicator
11. P ause indicator.
12. MEMORY indicator.
13. RANDOM indicator.
14. Indicators to show which disc holder of the disc tray
is occupied. If a certain disc holder is empty, the corresponding number indicator will be off.
15. REPEAT mode indicators.
16. CLOCK/CD TIMING/BROADCAST ST ATION display.
17. Track number.
POWER INDICATOR
While the AC cord is connected and the unit is on stand-by, power will be consumed and only the clock display will
be lit.
• Press the POWER button to turn on the unit. After a short period of time the display will show:
will resume the same mode as you power off the
unit last time for example
• Press the FUNCTION button to TAPE After a short period of time the display will show:
• Press FUNCTION button to CD After a short period of time the display will show:
• Press the FUNCTION button to AUX A short period of time is needed for track shuf-
fling, and the display will show:
• The numbers showing in the display depend on the time, the selected frequency or the compact disc. CD num-
bers will only be displayed if a compact.
TRACK
AM
BAND FUNCTION DISC SKIP
BAND FUNCTION DISC SKIP
BAND FUNCTION DISC SKIP
Page 6
- E6 -
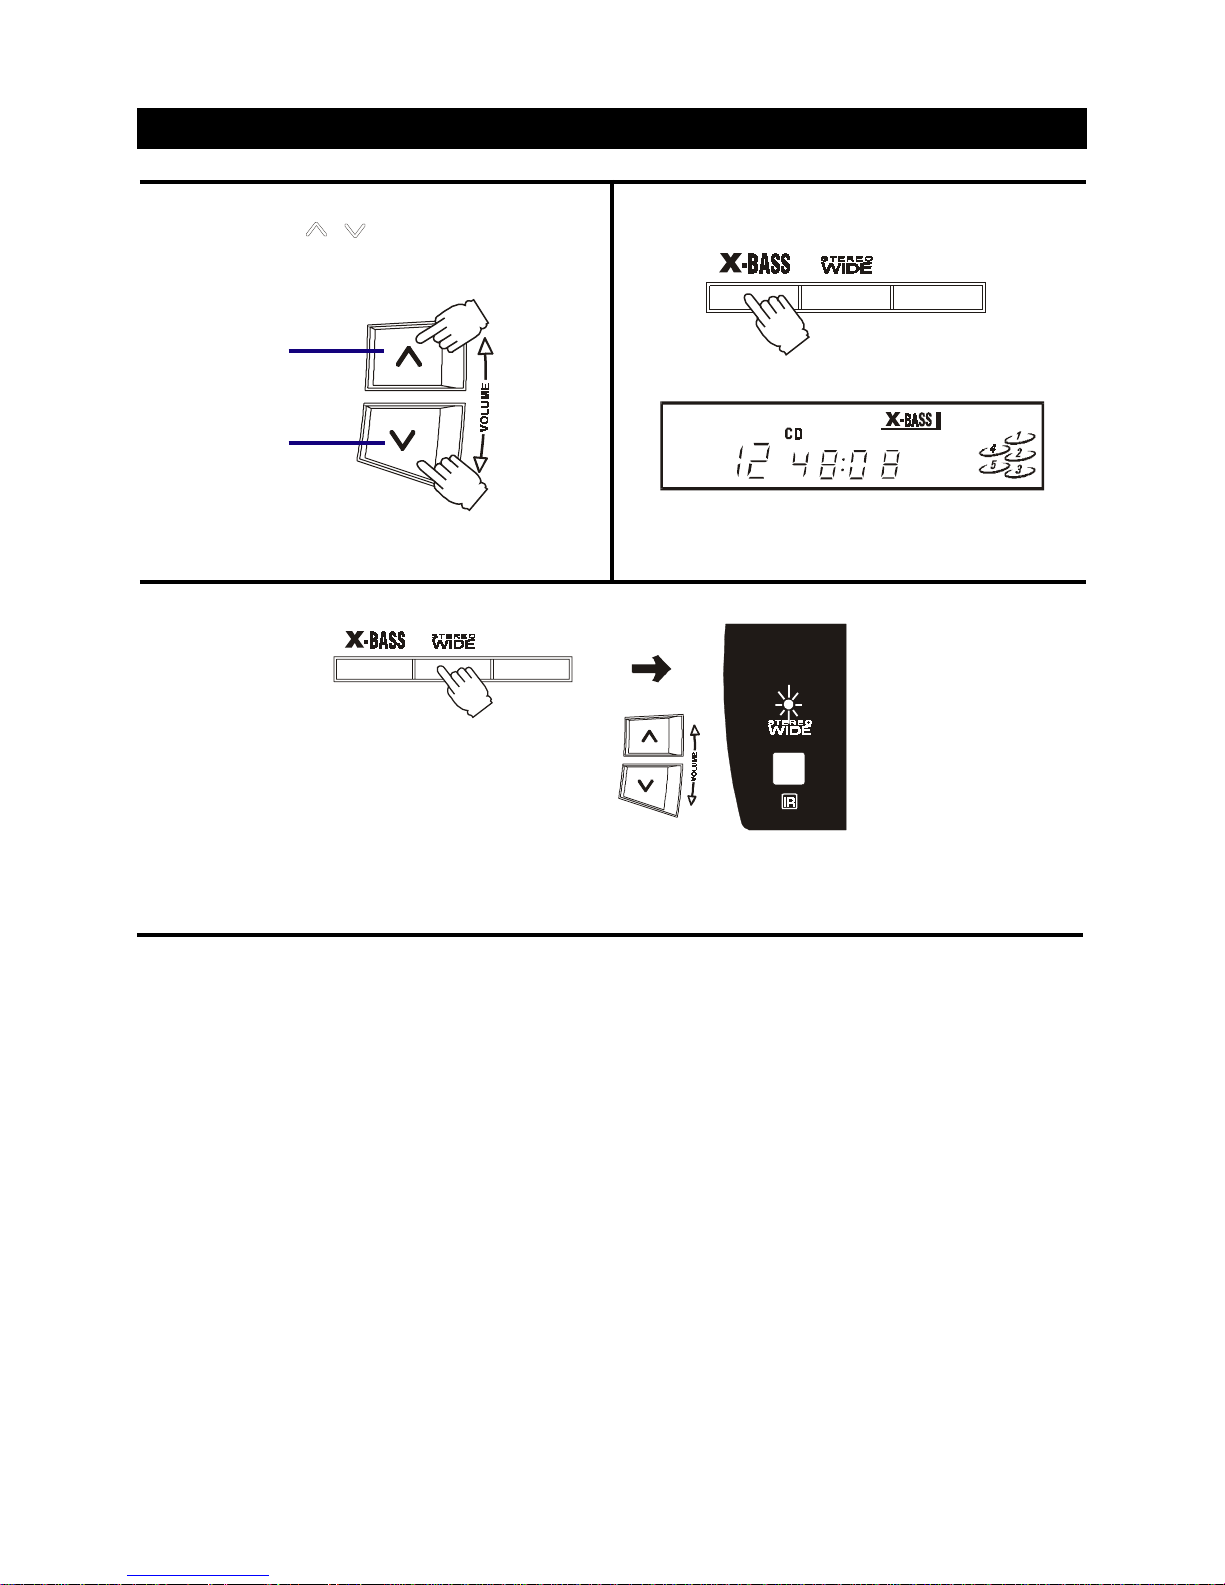
TO USE THE X-BASS
Press the X-BASS button to adjust the bass.
ADJUSTING THE SOUND
X-BASS is designed specifically to boost the low
frequency sound to obtain a more powerful bass.
TO ADJUST THE VOLUME
Press the V OLUME
/ b uttons to adjust the sound.
The display will show:
To increase
the volume
press here.
To decrease
the volume
press here.
STEREO WIDE creates the feeling that the sound is being spread to the left and right, beyond the actual position of the
speakers. When listening to the sound in stereo, press the STEREO WIDE button to get more dynamic sound.
WHEN RECORDING
The VOLUME, X-BASS and STEREO WIDE controls
switch on may be adjusted with no eff ect on the recorded
signal.
FOR PERSONAL LISTENING
Connect headphones (ø 3.5mm stereo mini plug) to the
PHONES jack.
Adjust the V OLUME control, X-BASS and STEREO WIDE
controls for the desired listening lev el. When headphones
are connected, the speakers are automatically
disconnected.
TRACK
REPEAT
REPEAT
Page 7
- E7 -
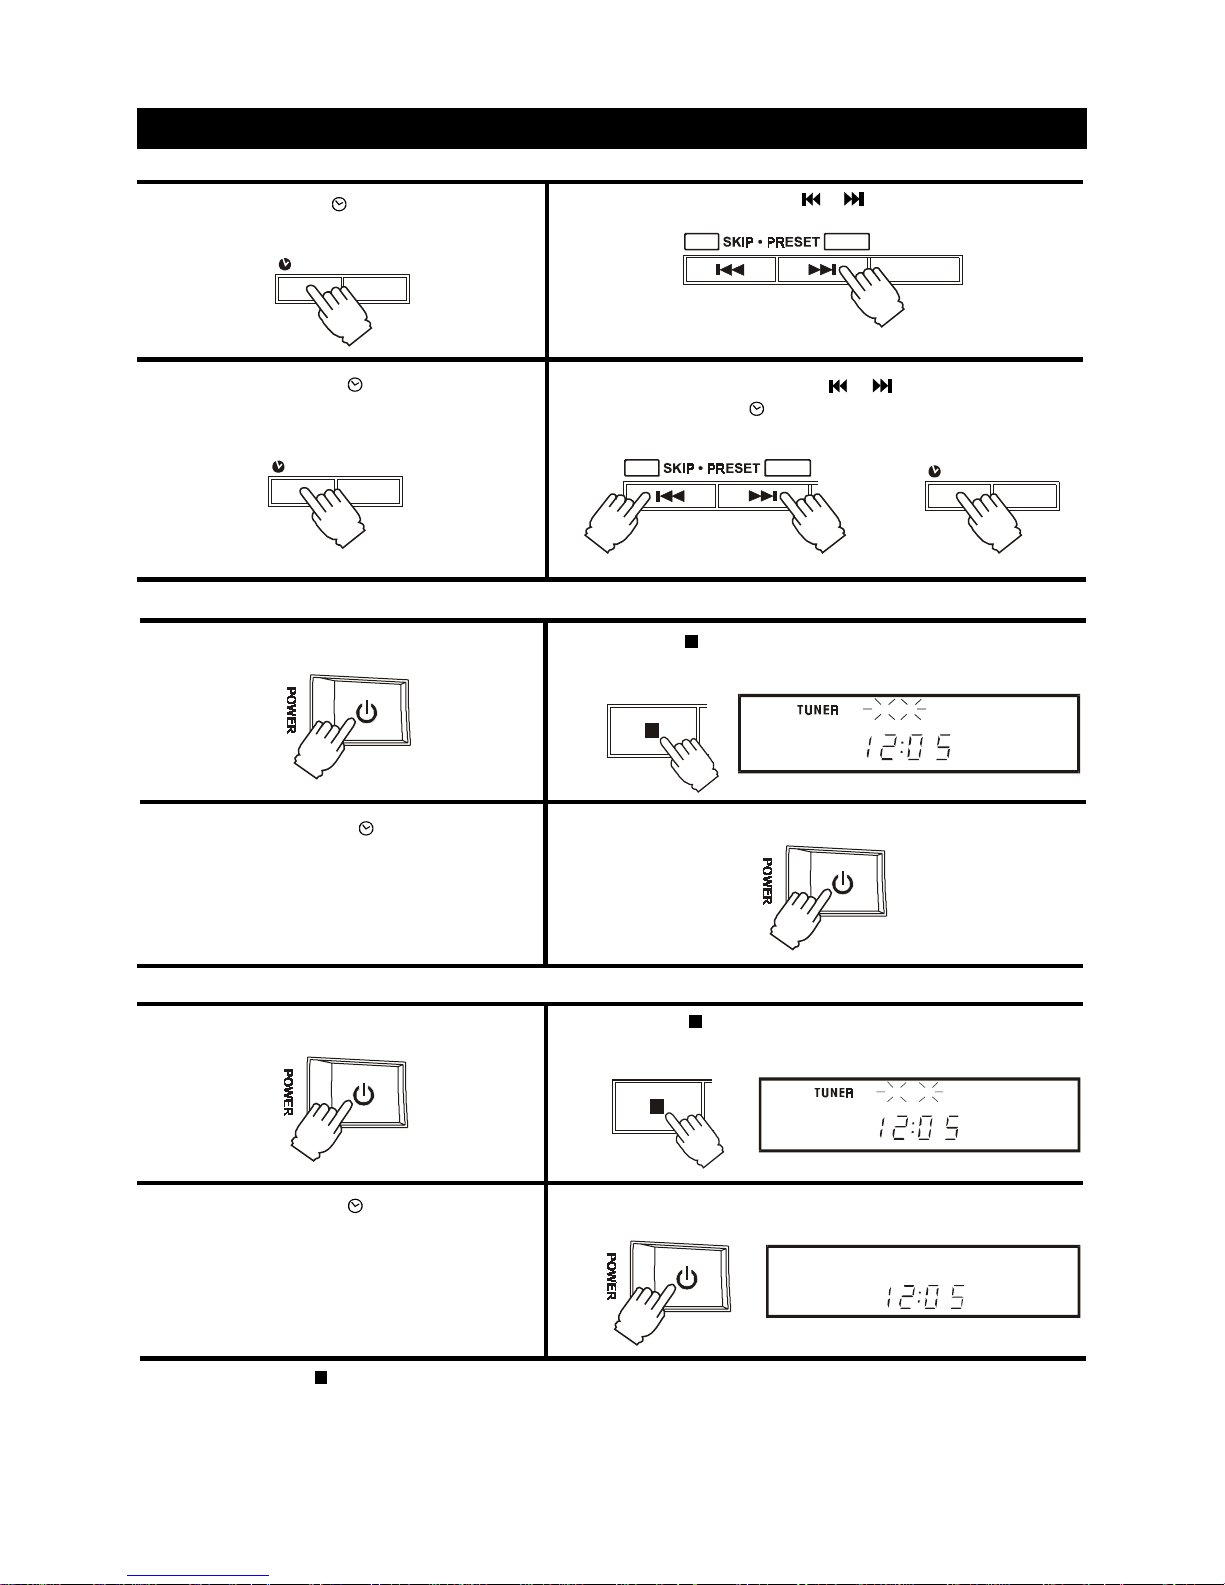
1. Press the MEMORY/ CLOCK button in clock
mode. Hours flash.
2. Press the HOUR button (
or ) repeatedly to set current
hour.
T o set the current time (Select POWER STANDBY mode)
3. Press the
MEMORY/ CLOCK button to
make the correct minutes flash.
4. Press the MINUTE buttons (
or ) to set the minutes and
press
MEMORY/ CLOCK button again to start the clock.
SETTING THE CLOCK
To set the timer off (time to turn off)
1. Press the POWER button to turn ON the unit.
2. Press the
STOP button until the "TIMER OFF" indicator
shows on the display (tuner of CD stop modes)
2. Press the STOP button until the "TIMER ON" indicator
shows on the display (tuner of CD stop modes)
1. Press the POWER button to turn ON the unit.
4. Press the POWER button to turn OFF the unit.
3. Press the
MEMORY/ CLOCK button in
clock mode.
3. Press the MEMORY/ CLOCK button in
clock mode.
4. Press the POWER button to turn OFF the unit.
NOTE : 1) Press the
STOP button to vie w the local time , time to turn on and time to turn off step by step, the previous
display will be retrieved after 12 seconds.
2) The timer will work if the TIMER key is pressed so that "TIMER" lights up in the display. Cancel the timer by
pressing the key so that "TIMER" goes out.
3) Suddenly OFF when playing, the TIMER OFF function are activated. Press the STOP button until the 'TIMER
OFF' indicator show on the display.
repeat the steps of
the setting the current time
repeat the steps of
the setting of current time
To set the timer on (time to turn on)
AM
MEMORY
TIMERCLOCK
MEMORY
TIMERCLOCK
MEMORY
TIMERCLOCK
SLEEP
MIN
HOUR
AND
AM
ONTIMER
AM
OFFTIMER
STOP
STOP
MIN HOUR
Page 8

- E8 -
1. Press the SLEEP button while the power is on.
"SLEEP 90" lights in the display.
NOTE:
SLEEP can only be adjusted in TUNER, T APE and A UX
modes.
2.Press and hold the SLEEP button to select the length
of remaining time until the unit turns off.
It changes the indicator in the following way:
SLEEP 90 SLEEP 80
SLEEP 10 ........SLEEP 20
The Sleep Timer is set and the SLEEP indicator lights
in the display. Let go when required sleep time (in
minutes) is shown.
To cancel the sleep timer, press the SLEEP button
once and "SLEEP" will go out in the display.
SETTING THE SLEEP TIMER
SLEEP
SLEEP
Page 9
- E9 -
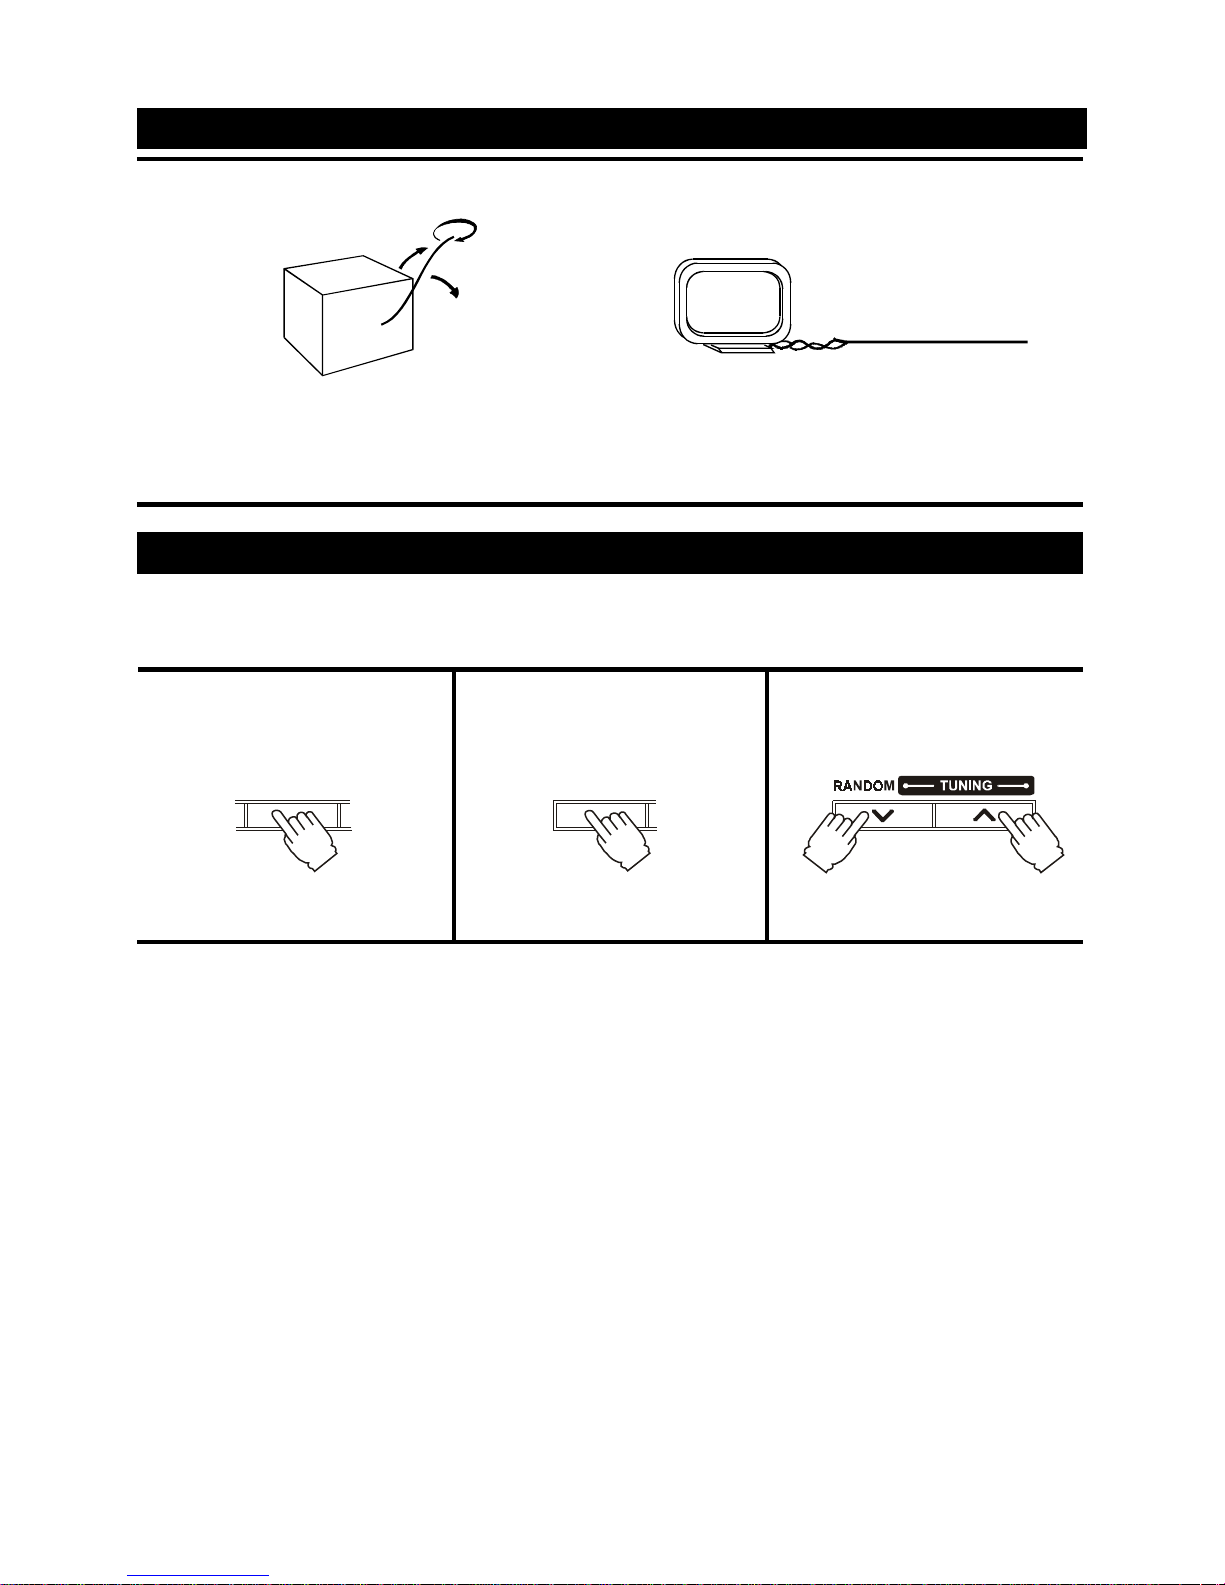
FOR BETTER RECEPTION
FM
Fully unwind the wire antenna. Then extend the wire
antenna and place it in the position that sounds best.
NOTE: Do not connect to outside antenna.
AM/MW
Connect the loop aerial (provided) to the 'AM/MW
LOOP ANTENNA' snap terminals at the back of the
unit. Position the aerial for the best reception.
MANUAL TUNING
The system can store a total of 40 stations. (Each band has a maxim um of 20 av ailab le preset stations). Presetting allows
you to tune into a station directly. Stations are assigned preset numbers, beginning from 1 in consecutive order for each
band (AM/MW and FM).
TO RECEIVE THE FM BROADCAST IN STEREO
Set the MODE selector to FM STEREO.
When the FM stereo broadcast is received, FM STEREO indicator lights up.
IF THE FM STEREO BROADCAST SIGNAL IS WEAK
Set the MODE selector to FM MONO.
Background noise will be reduced but the signal reproduced will be mono.
TO SEARCH FOR A STATION QUICKLY
Hold the TUNING UP or DOWN b utton and station searching starts automatically . When a station is found, searching stops
automatically .
However, it may not stop if the signal is weak. In this case, search for the station manually.
Note:
The last station tuned in will be recalled, even after changing the tuning band or the function, or after turning the power off .
After use:
Press the POWER button.
1. Press the FUNCTION button to
TUNER, the "TUNER" appears on
the display.
3. Tune into a station. "STEREO" will
appear when an FM broadcast is
in stereo.
2. Press the BAND button to select
the desired band.
FUNCTION
BAND
Page 10

- E10 -
PRESET TUNING
1. Press the FUNCTION button to
TUNER.
2. Press the BAND button to select
the a band.
3. Press the PRESET buttons to
preset number.
TUNING INTO A PRESET STATION
The contents (preset channel number, frequency and frequency band) which have been stored in memory will
appear on the display in numerical order, irrespective of the frequency bands.
1. Press the FUNCTION button to
TUNER.
2. Press the BAND button to select
a band .
3. Tune into a station.
4. Press the MEMORY/ CLOCK
button.
5. Use the UP/DOWN buttons to
select the pre-set number.
6. Press the MEMORY/ CLOCK
button to store the station to the
pre-set number.
FUNCTION
FUNC TION BAND
BAND
MEMORY
TIMERCLOCK
MEMORY
TIMERCLOCK
MIN HOUR
MIN HOUR
Page 11

- E11 -
1. Press the FUNCTION button to CD.
2. Press the OPEN/CLOSE button to open the disc tray.
7. Press the PLAY/PAUSE button to start playback
and the "
" will be displayed.
8. To stop playing:
(a) for a moment only, press PLAY/PAUSE button
and ' ' will be displayed. Press this button again
to resume playing.
(b) Press the STOP button.
6. Press the DISC SKIP button to select the desired disc. Press either one of the / (SKIP) buttons to select the
desired track.
The selected disc symbol will flash.
COMPACT DISC PLAYBACK
3. Place the first disc onto the disc holder, with the label
side up.
WARNING:
• Before transporting the unit, take out all discs
from CD tray.
4. Press the DISC SKIP button to revolve the tray clockwise.
Place other disc(s) on the disc holder(s).
5. Press the OPEN/CLOSE button to close the tray.
It takes a short while for your player to check the discs.
TRACK
TRACK
BAND FUNCTION DISC SKIP
DI SC SKIP
DI SC SKIP
MIN HOUR
STOP PLAY / PAUSE
TRACK
Page 12

- E12 -
Notes: 1. During playback, disc tray can be opened to change/add disc and the current disc playback will not be
interrupted but DISC SKIP button will become invalid.
2. The
/ SKIP buttons can only be used to choose a track of the current disc. To choose a track of
another disc, DISC SKIP button should be pressed to get to the desired disc first.
3. Before transporting the unit, take out all discs from the CD tray.
To Locate a Particular Point in a Track
• To move forward at high speed, keep forward
SEARCH button pressed and release it at the desired
point.
• T o mov e backw ard at high speed, keep backward
SEARCH button pressed and release it at the desired
point.
• On forward search the track is rapidly scanned, then
the next track and so on to the next disc. The first
track on the ne xt disc will be played normally, to carry
on scanning release and press the SEARCH button.
LOCATING A PARTICULAR POINT IN A TRACK
To Locate a Track in Sequence
• To locate the beginning of the current or the
preceding track, press
reverse SKIP button.
• T o locate the beginning of the succeeding track, press
forward SKIP button.
• A short per iod of time will be needed for the disc to
read the information of the desired track before
playback can begin.
Reverse Forward
search search
Reverse Forward
skip skip
Press it once
Note: Searching and skipping can be done during playback and pause stage but are effective for the currently
selected disc only.
Use DISC SKIP button to choose another disc.
Keep it pressed
COMPACT DISC PLAYBACK (CONTINUED)
MIN HOUR
MIN HOUR
Page 13

- E13 -
Notes: 1. The random function shuffles all the tracks of all discs in the disc tray and randomly selects one track to
play each time.
2. The player will skip to a new randomly selected track and start playing if
SKIP button is pressed
during random playback.
1. Press the DISC SKIP button to select a disc.
2. Press the RANDOM button, the word "RANDOM"
will appear on the display.
1. Press the STOP button to stop random playing.
During normal playback the random function cannot be activated, it can only be switched "ON" from the STOP
mode.
2. Press the RANDOM button to deactivate
random playback.
3. Press
PLAY/PAUSE button. Some abnormal symbols will be shown on the display and a short period of time is
needed for track shuffling, before playback can be started.
IN PLAYBACK MODE
SHUFFLE PLAY - PLAYING IN A RANDOM ORDER IN STOP MODE
COMPACT DISC PLAYBACK (CONTINUED)
Notes:
During random playback, the RANDOM playback function cannot be cancelled. Random play cancellation can only
be done in stop mode.
T o cancel random pla yback
TRACK
TRACK
RANDOM
STOP PLAY / PAUSE
STOP PLAY / PAUSE
BAND FUNCTION DISC SKIP
Page 14

- E14 -
REPEAT PLA YBACK
DURING PLAYBACK MODE
To Repeat the Current Track
• Press the REPEAT button until REPEAT ONE appears on the display and the currently playing track
will be played repeatedly until the STOP button is
pressed.
• SKIP and SEARCH can still be used during this function. SKIP will go to the start of the next track, Reverse Skip will go to the start of the present track,
on the second press it will then go to the start of the
previous track. SEARCH will search through the
tracks normally.
COMPACT DISC PLAYBACK (CONTINUED)
DURING STOP MODE
The REPEAT operations can also be done in the stop
mode. The player will start playing from Track 1 of the
currently selected disc after PLAY/PAUSE button is
pressed.
The REPEAT operations can be done from the pausing
point. The player will start playing again after
PLAY/
PAUSE button is pressed.
DURING PAUSE MODE
To Repeat the Whole Disc
• Press the REPEAT button until REPEAT ONE DISC
appears on the display and the current disc will be
played repeatedly starting from the currently playing
point.
• Press the
/ SKIP buttons with repeat-one-disc
function on, one can still search through the whole
disc, and the CD player will then start playing from
the selected point.
To Repeat All Disc
• Press the REPEAT button until REPEAT ALL DISC
appears on the display.
• Press the
/ SKIP buttons can make the player
start playing from the newly selected point of the
currently playing disc.
• Press DISC SKIP button can make the player start
playing from the first track of the newly selected disc.
The
/ SKIP buttons can be used to choose a
particular track on this selected disc, the CD player
will then start playing from that point.
To Cancel Repeat Play
• Press the REPEAT button until the word "REPEAT"
disappears from the display.
TRACK
TRACK
REPEAT
DISC
ALL
TRACK
REPEAT
DISC
ONE
TRACK
REPEAT
ONE
STOP PLAY / PAUSE
STOP PLAY / PAUSE
REPEAT
REPEAT
REPEAT
REPEAT
Page 15

- E15 -
1. Press the MEMORY/ CLOCK button (in stop mode).
2. Press the DISC SKIP button to select the desired disc
(the disc symbol (
) shows which disc is selected).
3. Press the
/ SKIP buttons to select the desired
track.
5. To add additional tracks,
Repeat steps 2 to 4.
4. Press the MEMORY/ CLOCK button again to store
this track in memory.
6. To start playback, press the
PLAY/PAUSE button.
COMPACT DISC PROGRAMMED PLAYBACK
A program of up to 32 tracks from all the available discs in the disc tray can be played in a preset order.
NOTE: 1. The same track can be selected more than once in the same program.
2. With program on, the
/ SKIP buttons function can only be used for the selected tracks.
3. With program on, repeat play cannot be done for ALL DISCS.
TO CHECK THE PROGRAM
After setting the program, press the MEMORY/
CLOCK button repeatedly to check the order. This will not work
when the disc is playing.
TRACK
MEMORY
TRACK
MEMORY
TRACK
MEMORY
TRACK
MEMORY
MEMORY
TIMERCLOCK
MEMORY
TIMERCLOCK
MIN HOUR
BAND FUNCTION DISC SKIP
STOP PLAY / PAUSE
Page 16

- E16 -
To stop programmed play for a moment:
• Press the PLAY/PAUSE button and " " will be displayed.
Press this button again to resume playing.
Also
By pressing the FUNCTION button to select other functions.
To add additional tracks during program playback:
• Press the
STOP button once, press the MEMORY/ CLOCK b utton until the track indication is "--" and then
repeat steps 2 to 4 (Compact Disc Programmed Playback) on page E15.
To erase the whole program:
• Press the
STOP until the word "MEMORY" disappears from the display. The display will then
show the information of the current disc.
or
Open the disc tray by pressing the OPEN/CLOSE button.
STOPPING AND CANCELLING PROGRAMMED PLAYBACK
TRACK
TRACK
STOP PLAY / PAUSE
STOP PLAY / PAUSE
STOP PLAY / PAUSE
BAND FUNCTION DISC SKIP
Page 17

- E17 -
TAPE OPERATION
TAPE A OR TAPE B PLAYBACK
Usable tapes - use only normal (type I) tapes for playback
You can playback only the front sides of the tapes in Tapes A and B.
1. Press the FUNCTION button to
TAPE.
2. Press the STOP/EJECT button
and load a cassette into the
cassette compartment of
Deck A or Deck B.
3. Press the PLAY button to begin
playback.
T o stop pla yback
Press the STOP /EJECT button.
To interrupt playback
Press the PAUSE button.
To resume play, press the PAUSE button again.
To fast wind or Rewind
Press the REWIND or F.FWD button. Press the STOP/
EJECT button to stop winding at the desired position.
When the tape reaches its end
During fast wind or regular play, the tape will
stop automatically when its end is reached.
When both Deck A and Deck B are in the
playback mode
Deck B will playback and no sound will come
from Deck A.
1. Press the FUNCTION button to TAPE.
CONTINUOUS PLAYBACK ---- FROM DECK B TO DECK A
2. Insert a cassette in each deck.
3. Press the PLAY button.
4. Press the PAUSE button.
5. Press the PLAY button.
OR
DECK A
DECK B
DECK B DECK A DECK A
* As soon as the tape in Deck B reaches its end and stops, the pause mode for Deck A is released and playback
starts automatically.
BAND FUNCTION DISC SKIP
BAND FUNCTION DISC SKIP
DECK A DECK B
Played
next
Played
first
DECK A DECK B
Page 18

- E18 -
2. If you want to record on a tape side after you hav e
removed the erase protection
tab, place a piece of strong
plastic tape over that side's
erase-protection hole.
Notes:
1) Be sure you cover only the hole originally covered
by the erase-protection tab.
2) Removing the erase-protection tabs does not prevent a bulk eraser from erasing a casstte tape.
Preventing accidental erasure
1. Cassette tapes have two erase-protection tabs-one for
each side. To protect a recording from being accidentally
recorded over or erased, use a
screwdriver to re move one or both
of the cassette
tape's erase-pro tection tabs.
TAPE CARE TIPS
RECORDING ---- DECK A ONLY
To stop dubbing
Press the STOP/EJECT buttons of Deck A and Deck B.
Note : Do not change the dubbing speed when dubbing is in progress.
Use only normal (type I) tapes for recording.
RECORDING FROM THE BUILT-IN TUNER
Note: If a whistling noise is heard whilst recording from an AM (MW) station, move the AM (MW) loop antenna to a
position where noise is no longer heard from the unit.
If a whistle is heard (beat) it may be reduced by Beat cut is selected. The Beat cut function by press the DUBBING
button in tuner mode.
2. Insert a tape into the cassette
compartment.
3. Press the RECORD button which
also engages the PLAY button.
1. Press the FUNCTION button to
TUNER and tune into a desired
station. (see page E9)
DECK A
DUBBING ---- FROM DECK B TO DECK A
Use only normal (type I) tapes for recording and playback.
2. Insert the recorded tape into Deck B
and the blank tape into Deck A.
1. Press the FUNCTION button to
TAPE.
4. Press the PAUSE button.6. Press the PLAY button.
5. Press the RECORD button which
also engages the PLAY button.
DECK B
DECK A
DECK A
3. Select the NORMAL/HIGH DUBBING switch to the suitable location.
FUNC TION
FUNCTION
FM S T. FM MO NOBEAT CUT
DECK A DECK B
Ta pe to be
recorde d
Ta pe to be
played
This side
you want
to record
DECK A
Page 19
- E19 -
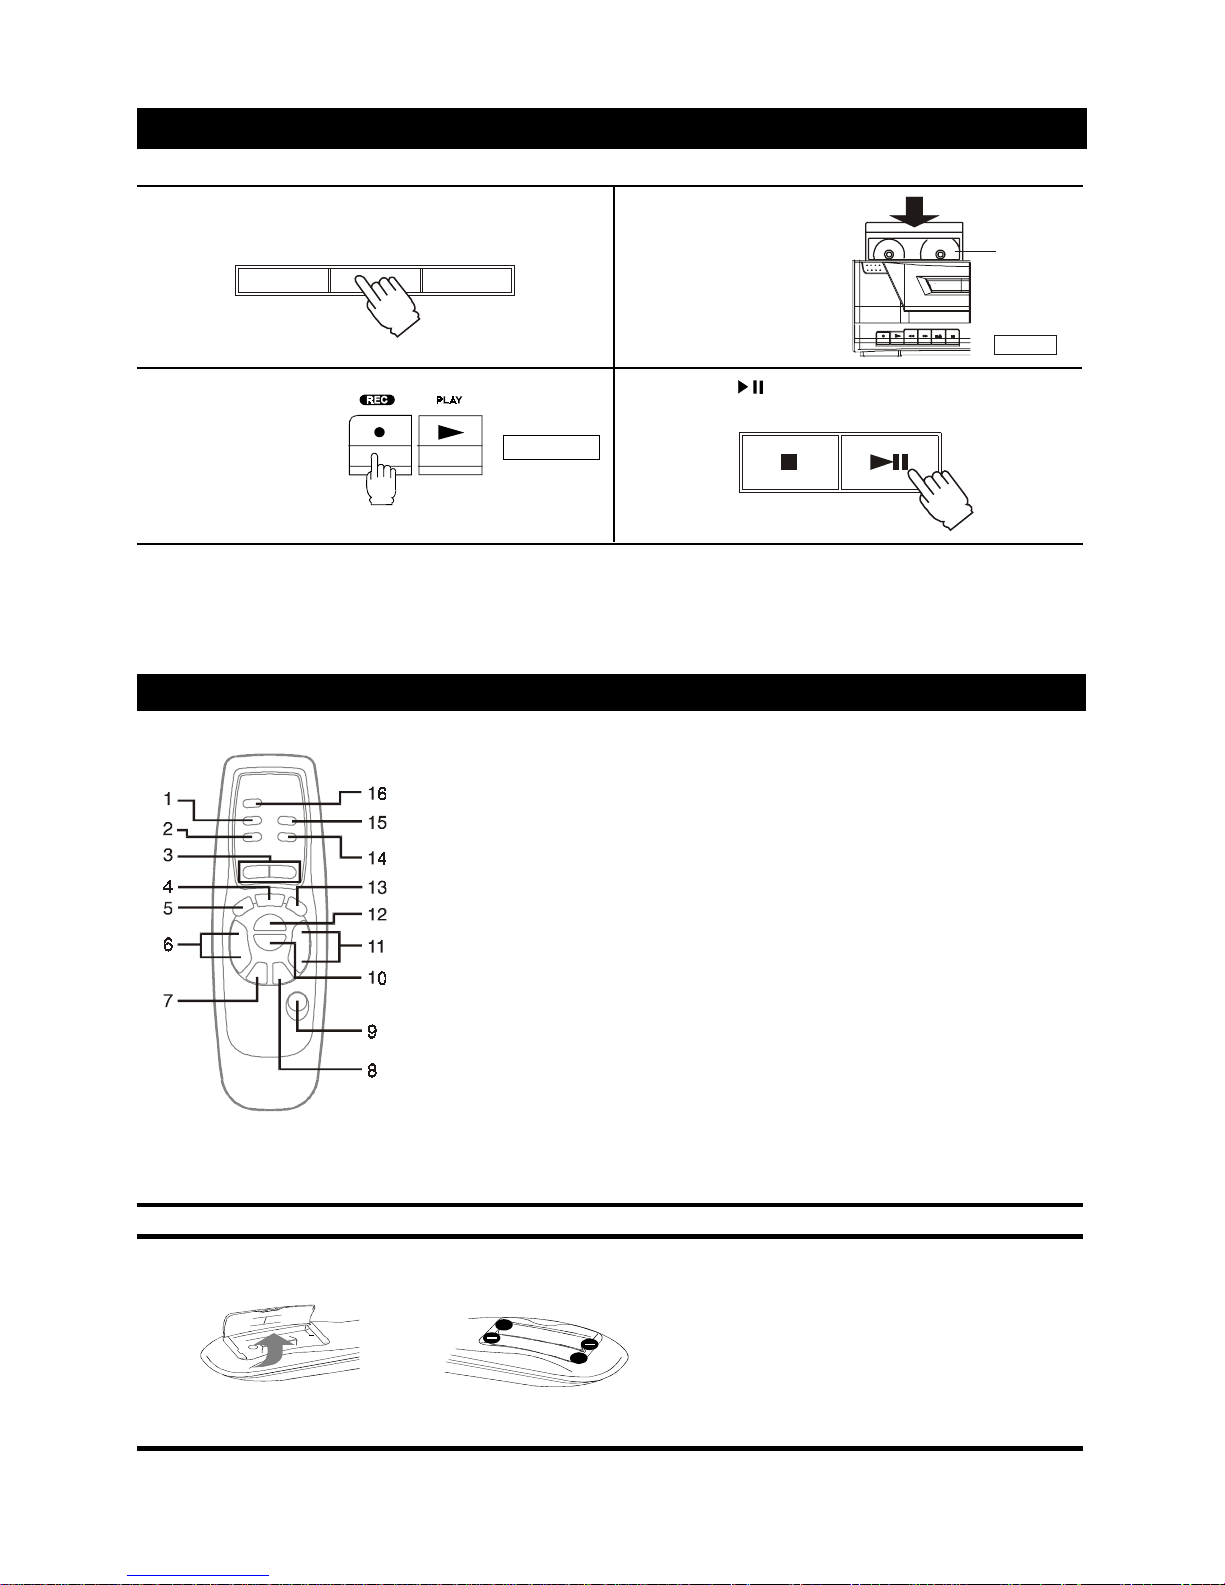
REMOTE CONTROL
1) SLEEP button
2) MEMORY button
3) TUNING/RANDOM buttons
4) FUNCTION button
5) X-BASS button
6) SKIP/PRESET/MIN/HOUR buttons
7) STOP button
8) PLAY/PAUSE button
USING THE REMOTE CONTROL CORRECTLY
• Point the Remote Control at the REMOTE SENSOR located on the unit.
• When there is a strong ambient light source, the performance of the infrared
REMOTE SENSOR ma y be degraded, causing unreliable operation.
• The recommended effective distance for remote operation is about 6 meters
(19 feet).
9) POWER button
10) DISC SKIP button
11) V OLUME b utton
12) OPEN/CLOSE button
13) STEREO WIDE button
14) BAND button
15) TIMER button
16) REPEAT button
TO INSTALL BA TTERIES
2. Insert a tape into the
cassette compartment.
4. Press the
PLAY/PAUSE button of the CD player.
RECORDING ---- DECK A ONLY
TO ERASE A RECORDED TAPE
1. Press the FUNCTION button to TAPE.
2. Inser t a tape with the side you want to erase
facing you.
3. Press the RECORD button to star t erasing.
RECORDING FROM THE CD PLAYER
1. Press the FUNCTION button to CD.
3. Press the RECORD
button which also
engages the PLAY
button.
TO ST OP RECORDING
Press the STOP/EJECT button of Deck A.
TO INTERRUPT RECORDING
Press the PAUSE button of Deck A.
To resume recording, press the PAUSE button again.
DECK A
REMOTE CONTROL
1. Open the battery door.
+
+
2. Insert two R03 (AAA or UM-4)
size batteries.
BA TTERY REPLACEMENT
When batteries become weak, the operating
distance of the Remote Control is greatly
reduced and you will need to replace the
batteries.
NOTE:
If the Remote Control is not going to be used
for a long time, remove the batteries to avoid
damage caused by battery leakage corrosion.
BAND FUNCTION DISC SKIP
STOP PLAY / PAUSE
This side
you want
to record
DECK A
Page 20

- E20 -
MAINTENANCE
CLEANING CD
If the CD skips or will not play, the disc may need cleaning.
Before playing, wipe the disc from the centre out with a cleaning
cloth. After playing, store the disc in its case.
CLEANING THE T APE HEADS
T o maintain optimum sound quality, clean the playback/record heads
(a) , erase head (b), pinch roller (c) , and capstans (d) regularly (
every 10 hours of use). Use a cotton swab lightly moistened with
cleaning fluid or denatured alcohol.
CLEANING THE UNIT
Do not use volatile chemicals on this unit. Clean by
lightly wiping with a soft cloth.
IMPORTANT NOTE
Before transporting the unit, take out all discs from the CD tray.
TROUBLESHOOTING GUIDE
CAUSE (AND REMEDY)
• Press the VOLUME UP button.
• The headphones are connected. Disconnect them.
• Reset the unit by pressing the Power/Standby switch.
• Suddenly OFF when playing, the TIMER OFF function are
activted. Press the STOP button until the 'TIMER OFF'
indicator show on the display.
• Check the speaker connections of the inoperative channel.
• Check the speaker cord connection and speaker location.
• Check that the speakers are connected the correct way
round.
• The TV or VCR is too close to the stereo system. Separate
the stereo system from the TV or VCR.
• Adjust the antenna wire.
• Set the MODE switch to FM MONO, the FM STEREO light
will go out.
• Press the FUNCTION button to select CD mode and press
the DISC SKIP button. The door will close.
• The disc's are not placed correctly.
• Dirty disc.
• The disc is inserted upside down.
• The player is in the pause mode.
• Moisture condensation
• CD disc is dirty or scratched.
• No cassette in the cassette holder.
• The tab is removed from the cassette.
• The tape is wound completely.
• Dirty head.
• Magnetic build-up on the record/playback head.
• Contamination of the capstans or pinch rollers.
b
c
c
d
d
a
a
DECK A
DECK B
SYMPTOM
GENERAL
No sound.
No sound from one channel or unbalanced left and
right volume.
Reversed left and right sound.
Lack of bass sound or apparently imprecise physical
location of musical instruments.
Severe hum or noise.
RADIO RECEPTION
The FM STEREO indicator flashes.
Severe hum or noise.
The stereo FM program cannot be received in stereo.
CD PLAYER OPERA TION
CD door does not close due to power off or other
functions are selected without closing it first.
Play does not start.
Distorted playback or sound loss during CD playback.
CASSETTE DECK OPERATION
Recording cannot be made.
Recording or playback cannot be made or there is a
decrease in sound level.
Excessive wow or flutter, or sound dropout.
Page 21

- E21 -
SPECIFICATIONS
TUNER SECTION
Frequency range FM 87.5 - 108 MHz
MW 522 - 1611 kHz 9kHz (other countries)
AM 530 - 1710 kHz 10 kHz (U.S.A & Canada)
Antenna FM: antenna wire
AM/MW: loop antenna
AMPLIFIER SECTION
Output power 2W x 2 (10% THD)
Frequency Response 80Hz to 16kHz, ±3dB
Power consumption 16 W
Power requirements AC ~ 100V 50/60Hz [Japan]
AC ~ 110/120V - 220/240V 50/60Hz [other countries]
AC ~ 120V 60Hz [USA and Canada]
AC ~ 220V 50Hz [Hong Kong and China]
AC ~ 230/240V 50Hz [Europe]
AC ~ 240V 50Hz [Australia]
COMPACT DISC PLAYER SECTION
Channels 2 channels
S/N ratio 60dB
Wow & Flutter undetectable
Sampling frequency 44.1 kHz
Quantization 1 bit linear/ch
Pick up light source Semiconductor laser
Pick up wave length 790nm
CASSETTE SECTION
Track format 4 tracks, 2 channels
Frequency response Normal tape: 80 - 10,000 Hz
Signal to noise ratio 40 dB (Normal tape)
Wow and flutter 0.35% (WRMS)
Tape speed 4.8cm/sec.
Rewind time 120 sec (C-60)
Fast forward time 120 sec (C-60)
Recording system AC bias
Erasing system Magnet erase
Motor DC motor x 1
Heads Record/playback head x 1 (Deck A)
Erasure head x 1 (Deck A)
Playback head x 1 (Deck B)
COMMON SECTION
Main unit
Dimensions (WxDxH) 288mm x 403mm x 290mm
Weight 5.2 kg
SPEAKER SECTION
Speakers
Dimensions (WxDxH) (220mm x 185mm x 290mm) x 2
Weight 1.61 kg x 2
Specifications and external appearance are subject to change without advance notice due to continuous
product improvement.
Page 22

PRINTED IN CHINA
811-277891-010
 Loading...