

Page 1
--
CD MICRO SYSTEM
0;'
:0;
f
,1 WARNING: TO REDUCE THE RISK OF FIRE OR ELECTRIC SHOCK, DO NOT EXPOSE THIS
°i APPLIANCE TO RAIN OR MOISTURE.
Page 2
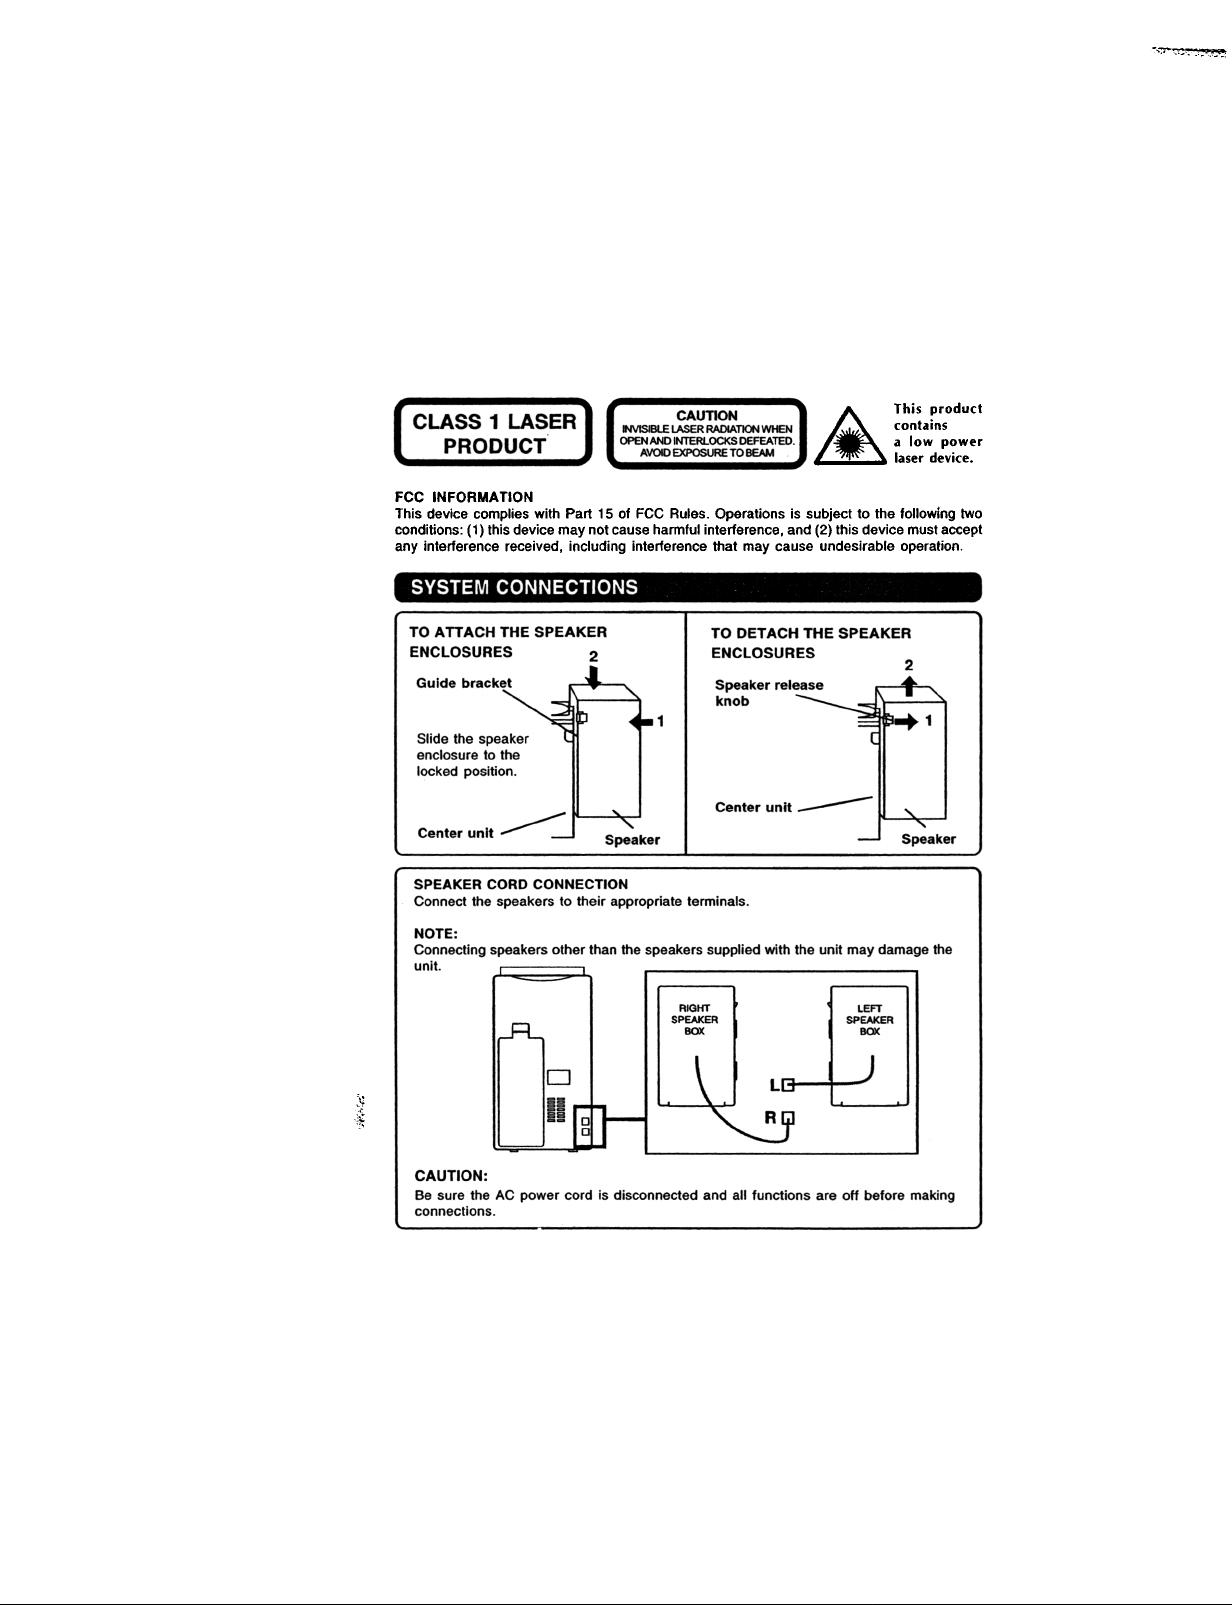
.&:.This product contains a low power
laser device.
FCC INFORMATION
This device complies with Part 15 of FCC Rules. Operations is subject to the following two
conditions: (1) this device may not cause harmful interference, and (2) this device must accept
any interference received, including interference that may cause undesirable operation.
-,."..~
~
Page 3
".=-,:C',"~:'~ !
ON PLACEMENT
.Do not use the unit in places which are
extremely hot, cold, dusty, or humid.
.Place the unit on a flat and even surface.Do not restrict the air flow of the unit by
placing it in a place with poor air flow, by
covering it with a cloth, or by placing it on
a carpet
ON AC VOLTAGE
.Before use, check that the rated voltage of
your unit matches your local voltage.
ON SAFETY
.When connecting and disconnecting the AC
cord, grip the plug and not the cord itself.
Pulling the cord may damage it and create
hazard.
.When you are not going to use the unit for
a long period of time, disconnect the AC
power cord.
Should any trouble occur, disconnect the AC
power cord and refer servicing to qualified
personnel.
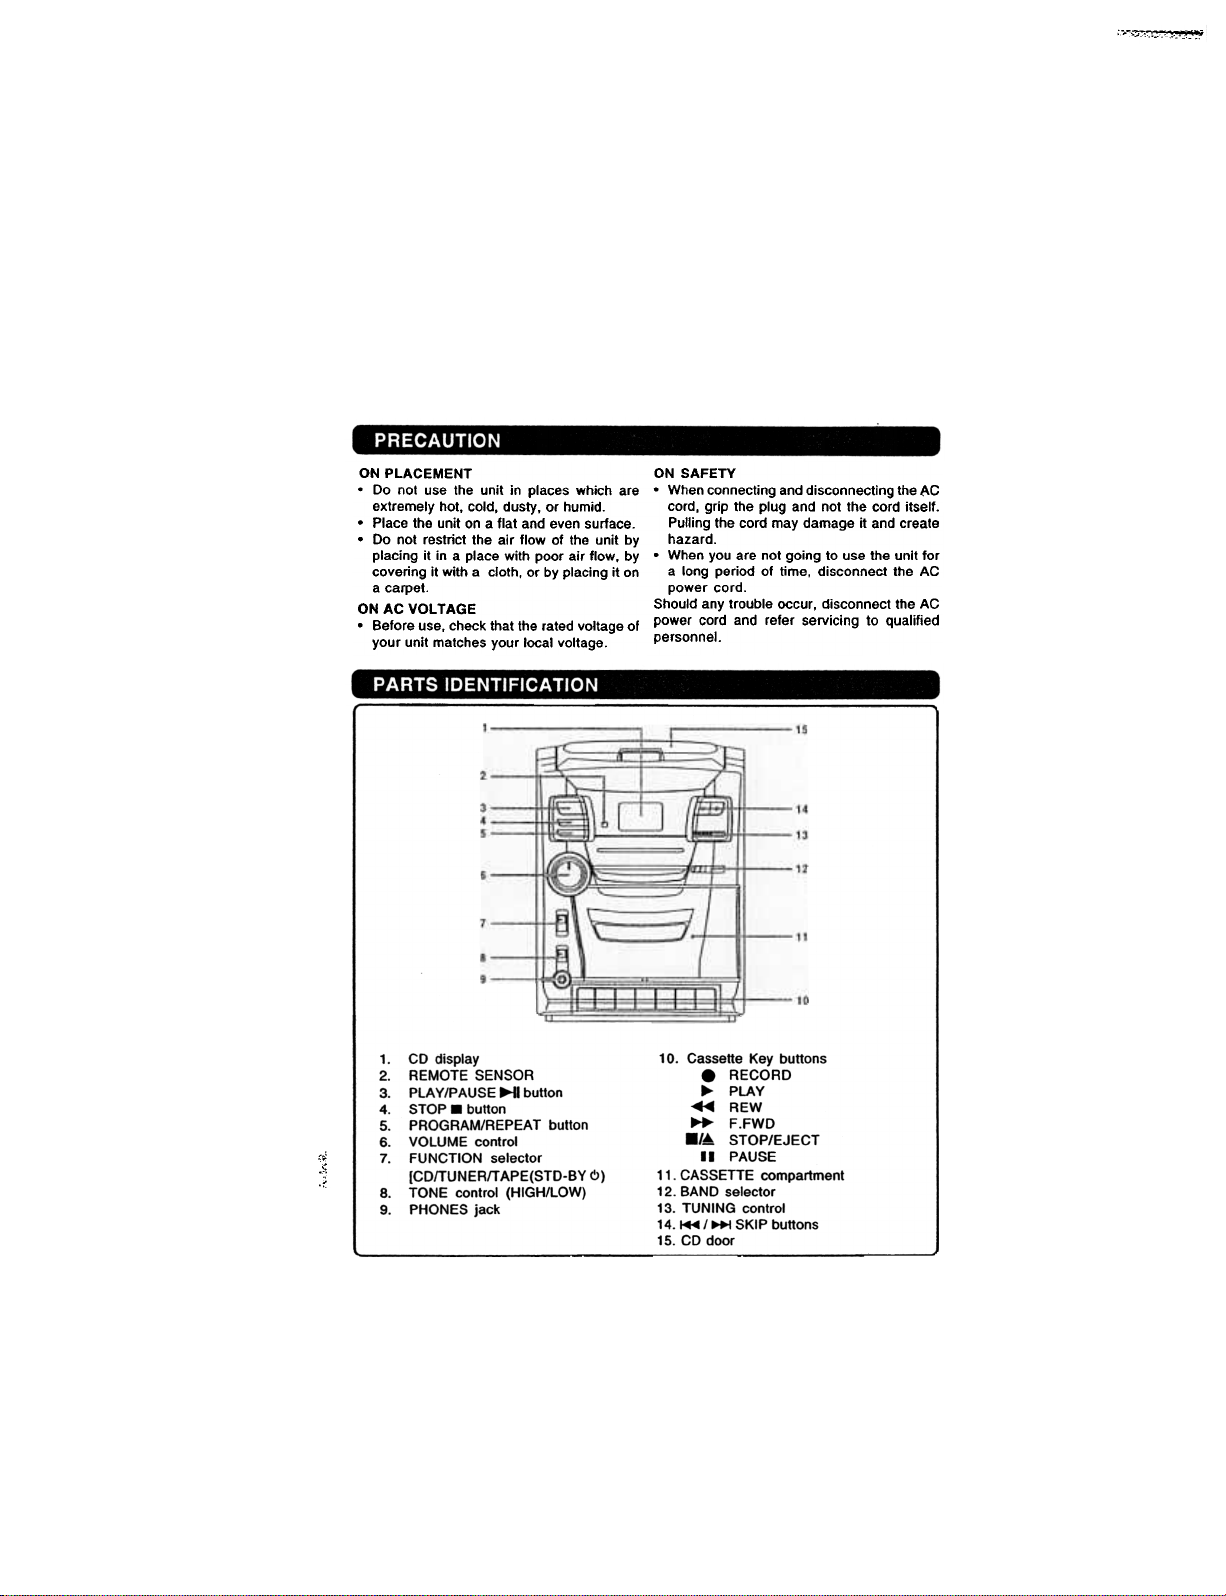
1. CD display
2. REMOTE SENSOR
3. PLAY/PAUSE..u button
4. STOP. button
5. PROGRAM/REPEAT button
"
"
.:;
6. VOLUME control
7. FUNCTION selector
;:
[CD/TUNER/TAPE(STD-BY 6)
8. TONE control (HIGH/LOW)
9. PHONES jack
10. Cassette Key buttons
.RECORD
...PLAY
~ REW
F.FWD
.,A STOP/EJECT
II PAUSE
11 .CASSETTE compartment
12. BAND selector
13. TUNING control
14. ~/~ SKIP buttons
15. CD door
Page 4
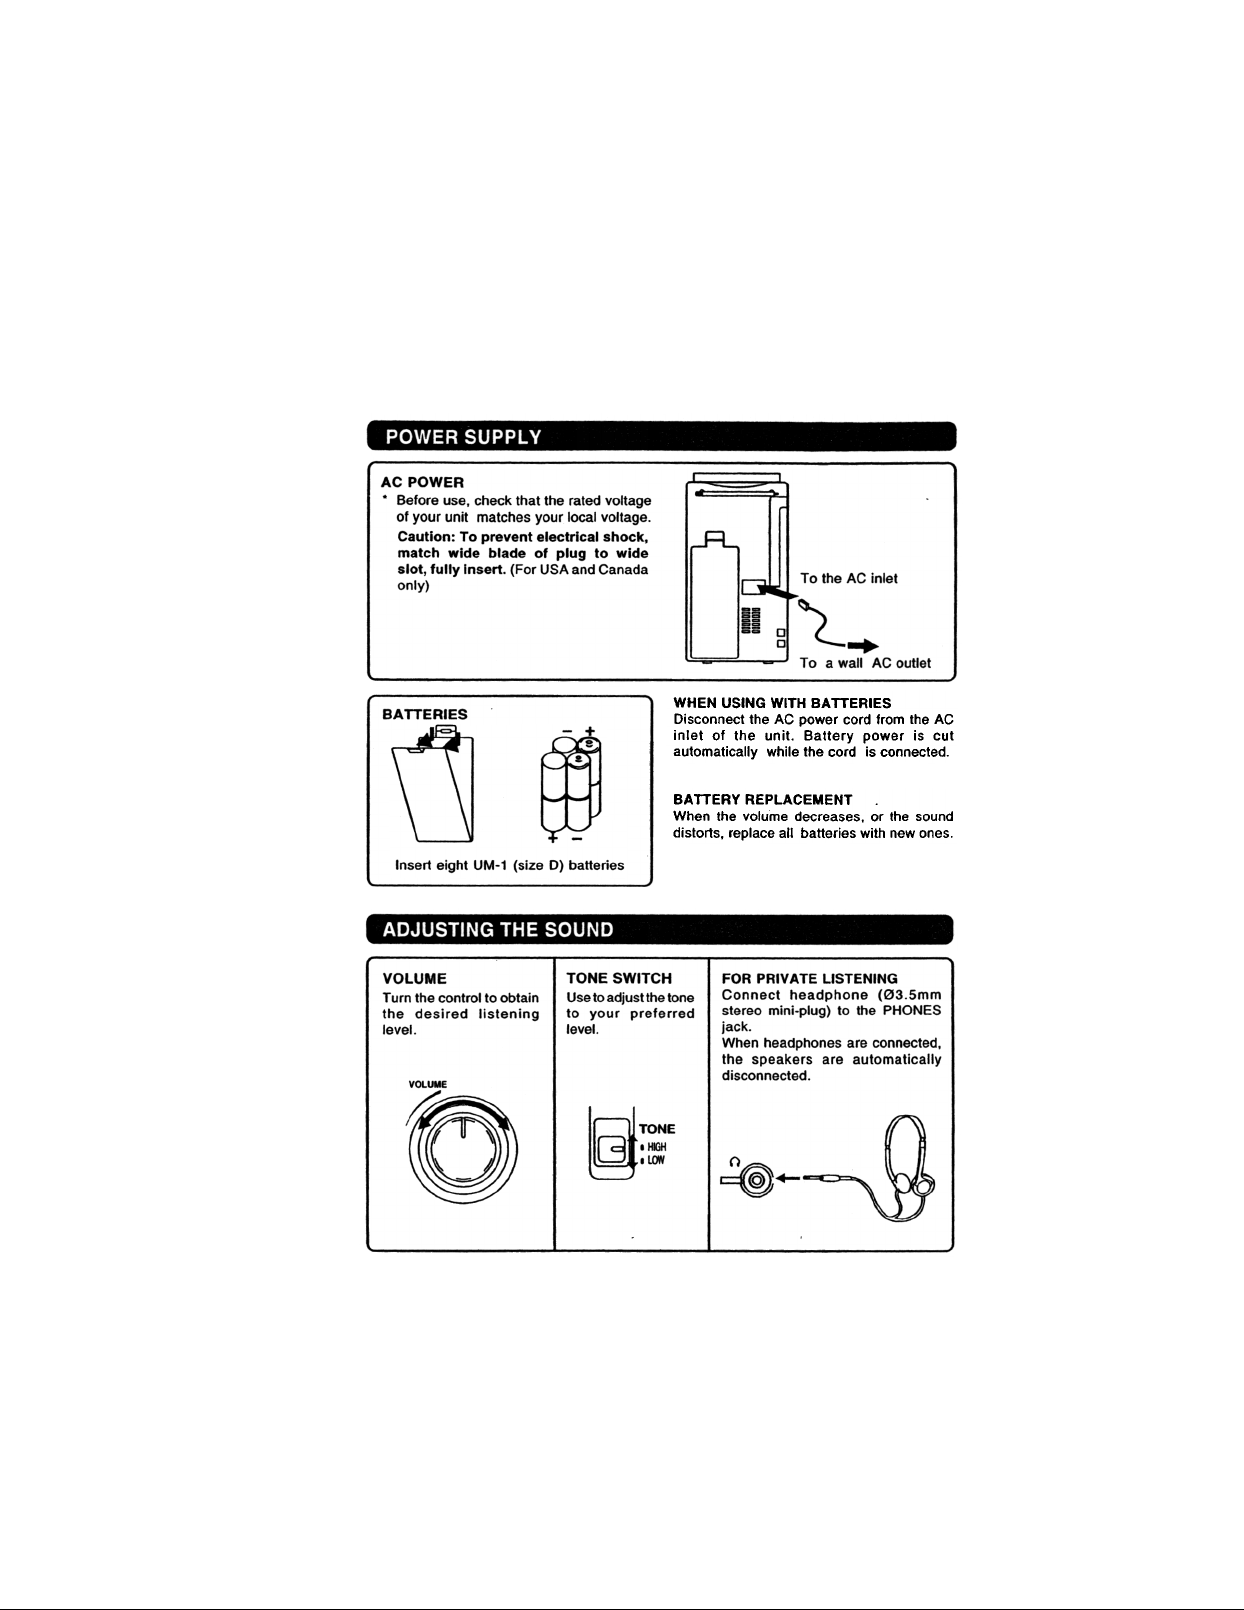
BATTERIES
WHEN USING WITH BATTERIES
Disconnect the AC power cord from the AC
inlet of the unit. Battery power is cut
automatically while the cord is connected.
BATTERY REPLACEMENT
When the volume decreases, or the sound
distorts, replace all batteries with new ones.
Page 5

",,=~I
~.
TO RECEIVE THE FU BROADCAST IN STEREO
Set the BAND selector to FM ST. When the FM STEREO broadcast is received. the FM
STEREO indicator lights up.
IF THE FU STEREO BROADCAST SIGNAL IS WEAK
Set the BAND selector to FM and background noise will be reduced but the broadcast becomes
monaural.
AFTER LISTENING
Set the FUNCTION selector to TAPE/STD-BY <!> .
4
Page 6

5
Page 7

6
Page 8

1. Sella TAPE
2. Insert the cassette.
(Exposed side down)
3. Press the ~ PLAY
button.
FUNCTION
CD
.
I~
tTAPE
STD-8V
1!)
TO STOP PLAYBACK
Press the STOP I EJECT button.
TO INTERRUPT PLAYBACK
Press the" PAUSE button.
To resume play, press the" PAUSE
button again.
PLAY
TO FAST WIND
Press Ihe ~ REWIND or ~ F.FWD button.
Press Ihe ./~ STOP I EJECT button 10 slOp
winding allhe desired posllion.
Page 9

.USE ONLY NORMAL (TYPE I) TAPES FOR RECORDING.
TO STOP RECORDING
Press the .,~ STOP/EJECT button.
TO INTERRUPT RECORDING
Press the II PAUSE button.
To resume recording, press the II PAUSE
button again.
TO ERASE A RECORDED TAPE
1. Set the FUNCTION selector to TAPE.
2. Insert a tape with the side yoU want to erase
facing yoU.
3. Press the. RECORD button to start
erasing.
8
Page 10

"
,~:
-,
'.'
.STOP
~~ SKIP
HI PLAY/PAUSE
PROGRAM
REPEAT
ONE/All
INSTALLING BATTERIES
Install two 1.5V , RO3 (AAA or SUM-4) size batteries into the battery compartment of the Remote
Controller.
BATTERY REPLACEMENT
When batteries become weak, the operating distance of the Remote Controller will be greatiy
reduced and the batteries will need to be repiaced.
USING THE REMOTE CONTROLLER CORRECTLY
Point the Remote Controller at the REMOTE SENSOR located to the right of the CD dispiay
window. Press the button required. The functions of the buttons are is the same as those
on the main unit.
When there is a strong ambient light source, the performance of the infrared
REMOTE SENSOR may be degraded, causing unreiiable operation.
NOTE
If the Remote Controller is not to be used for a iong lime, remove the batteries to prevent
possibie damage due to battery ieakage.
Do not mix different Iypes of battery, or oid batteries with new ones.
9
Page 11

~
IMPORTANT NOTE:
If an abnormal display indication or an operating
problem occurs, disconnect the AC power cord
and remove the batteries. Wait at leastSseconds,
then reconnect the AC power cord or reinstall
the batteries.
CLEANING CD
If the CD skips or cannot be played, the disc
may need cleaning. Before playing, wipe the
disc from the center out with a cleaning cloth.
After playing, store the disc in its case.
CLEANING THE TAPE HEADS
To maintain optimum sound quality, clean the
playback/record heads (a), erasure head
(b), pinch rollers (c), and capstans (d)
regularly (every 10 hours of use), using a
cotton swab lightly moistened with cleaning
fluid or denatured alcohol.
CLEANING THE UNIT ,
Do not use volatile chemicals on this unit.
Clean by lightly wiping with a soft cloth.
PROBLEM
No power supply
The cassette cannot be inserted. I Is the cassette facing the wrong direction when you
The t does not run. Is the II PAUSE button on?
The tape gets caught in the tape Is the pinchroller or capstan dirty?
tra~port mechanism. Is there excessive slack in the tape?
Tape runn;nQ is~table. Is there excessive slack in-~e taoe?
I nere is excessive noise, the SOUnd Are the heads dIrty? ---
i ~~ive~s o~ !!,ere are breaks in the sound
i The. REG button cannot be pressed. Is a cassette inserted?
I Recording cannot be done. Are the heads dirty?
The previous recording cannot be erased Is the erasure head dirty?
CD play does not Degin.
The GD roduces no sound. Is there condensation inside the unit?
The GD sound jumps.
ITEM TO CHECK
Is the power cord unplugged or loose?
Are batteries installed?
Are the batte~s properlv alianed?
try to insert it?
IS eraser prevention tab of the cassette broken off?
Is the GD upside down? i
IS the GD or lens excessively dirty? ,
Is the disc holder closed property?
Is the function selector set to GD?
Is the pause mode on?
lis the lens or GD excessively dirty?
Is the unit subject to excessive vibration?
Ar~ere any bad scratches on ~ GD?
Page 12

CASSETTE SECTION
Track format:
Signal to noise radio
Recording system:
Erasing system:
Tape speed:
F.F. & REW time:
Frequency response:
Motor
CD SECTION
Channels:
SIN ratio:
Quantization:
Pick up light source:
Pick up wave length:
Rotation Speed:
RADIO SECTION
Frequency range:
Antenna:
SPEAKER SECTION
Cabinet type:
Speakers:
Impedance:
Allowable max. input:
Dimensions(W x H x D):
Weight (approx.):
GENERAL
Power output:
Power consumption:
Unit dimensions(W x H x D):
Unit weight (approx.):
Accessories:
4 track stereo 2 channels
40 dB (Normal tape)
AC bias
Magnetic erase
4,75 cm I sec.
110 sec. (C-60 tape)
125 -8,000 Hz (normal tape)
DC motor x 1
2 channels
60dB
1 bits linear/ch
Semiconductor laser
790 nm
Approx. 500 -200 rpm/CLV
FM: 88- 108 MHz
AM: 530 -1700 kHz
FM: Telescopic antenna
AM: Built-in ferrite bar
Bass reflex type
102 mm (4 in.) cone type speaker
8 ohms
3W
(152 x 231 x 163 mm) x 2
0.74 kg x 2
10% T.H.D. 1.2W + 1.2W
15W
AC -120V 60Hz
DC 12V (8 x .D. size or UM-1 batteries)
183 x 208 x 236 mm(W x D x H)
2.4 kg (not included batteries)
AC power cord
Specifications subject to change without notice.
;~
',:
,-
ii;
tii
"
j"
Printed in China
811-8682~70
 Loading...