

Page 1
Mobile Version 1.0
User Guide
Page 2

Installation Process
1. Make sure vehicle is in open view of the sky.
2. Plug device into OBDII port.
3. Start the vehicle– you should see the LEDs light up on the front of the device.
4. If for any reason you do NOT see the LEDs light up, with the device installed and engine
running, unplug the device and repeat steps 2 and 3.
5. Once you see the LEDs flashing – please leave the device plugged in for at least 5 minutes.
6. If your device has a SOLID Cellular light after 5 minutes - the SYNC process is complete.
If not, please POWER CYCLE (Instructions below) to restart SYNC process.
7. Once the SYNC process is complete – log into your Car Connection 2.0 MOIBLE APP
or WEBSITE to review location, vehicle and account information.
NOTE: Data may not appear on your account until you go for a drive.
Please follow these steps and the SYNC guide (next
page) in order to connect to Network & GPS – this
process may take up to 15 Minutes:
For more information, including FAQs, please visit www.CarConnection20.com
For technical assistance, please call 1-800-300-4550
HOW TO POWER CYCLE
1.
Un-plug device from OBDII port – for ~15 seconds
2.
Start your vehicle’s engine
3.
Plug device into OBDII port – with ENGINE RUNNING
4.
Wait approximately 5-10 minutes –
with ENGINE RUNNING
NOTE: Reference SYNC Guide for more information.
5.
Turn off vehicle/engine
Page 3
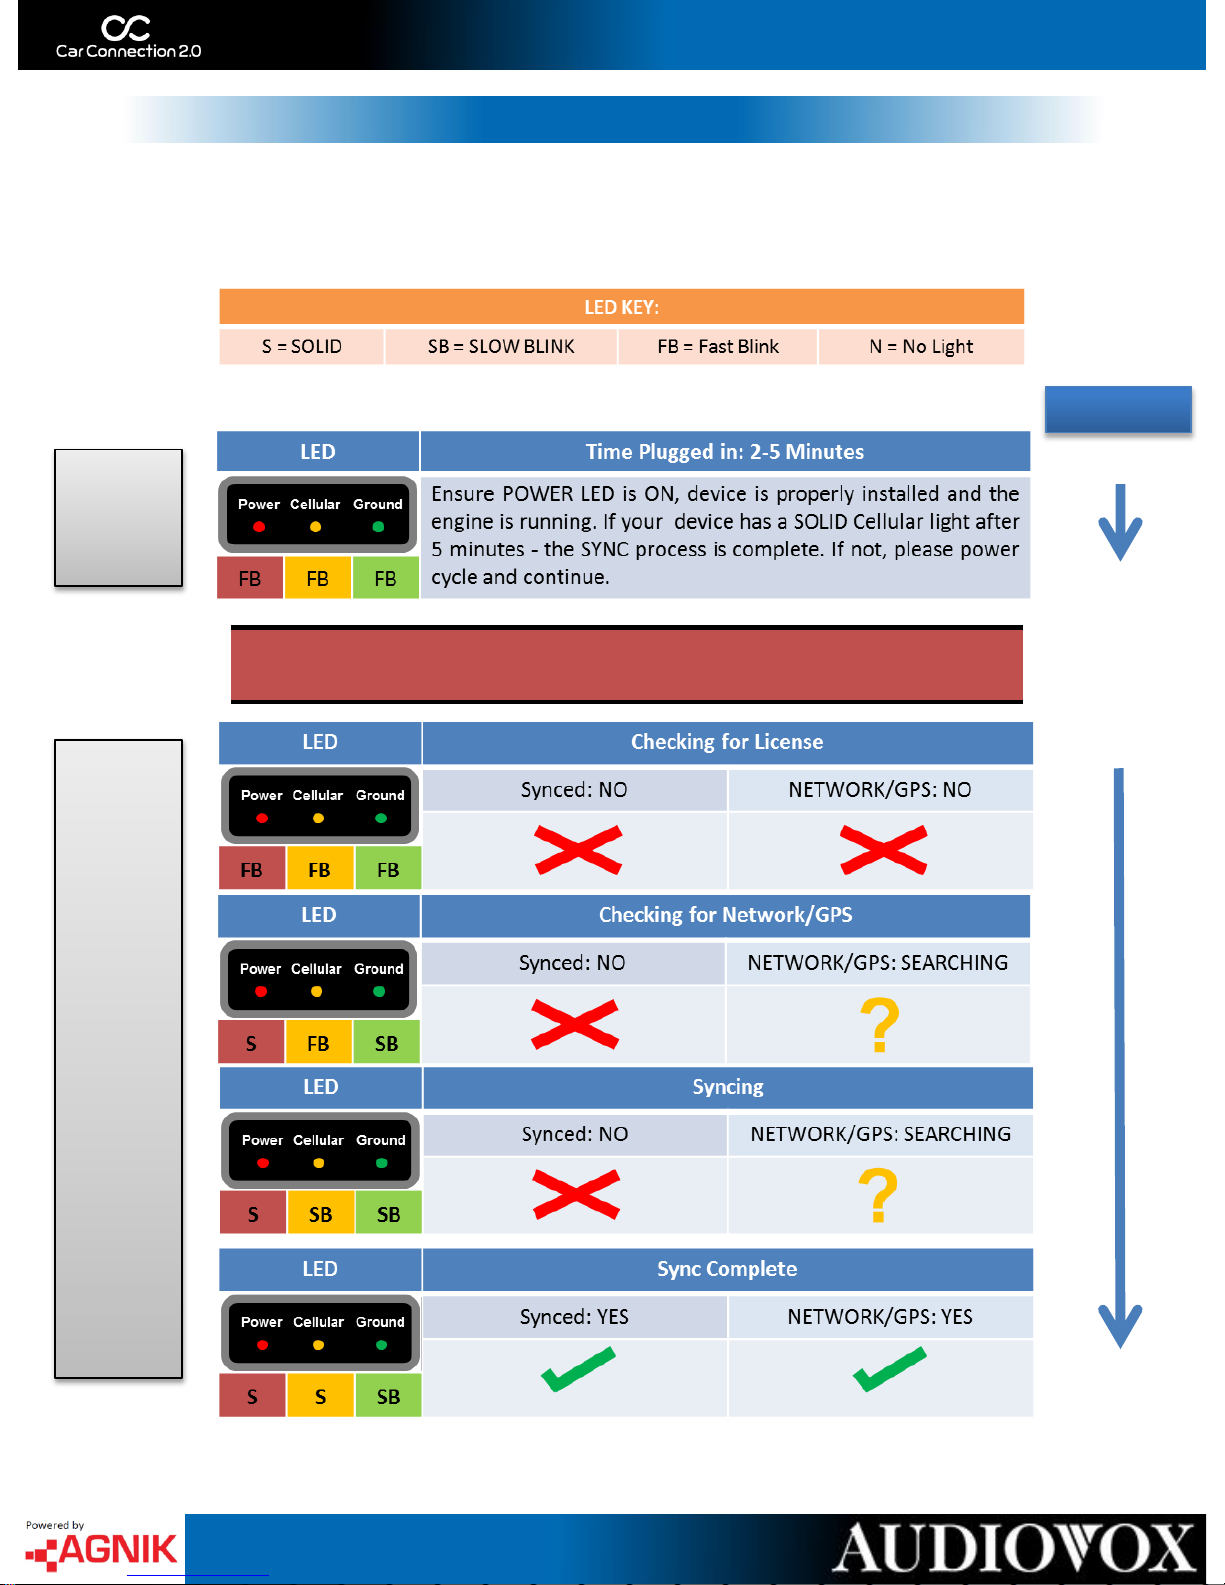
Syncing your Car Connection 2.0 device is a two step process. First you must plug the device into
your OBDII Port. After the installation, start your engine and follow the steps below to Sync your
device. If you are having connection issues – make sure your vehicle has a clear view of the sky.
Syncing Your Device
00:00
~5:00
POWER CYCLE TO RESTART SYNCING PROCESS
~10:00
STEP
1
STEP
2
Minutes
For more information, including FAQs, please visit www.CarConnection20.com
For technical assistance, please call 1-800-300-4550
00:00
Page 4

Downloading the CC 2.0 App
The Car Connection 2.0 application is available for all
Android and iOS powered devices. Please navigate to the
Google Play or App Store and search for “CarConnection 2.0”
(No space between car and connection). Once you have found
the correct application, download and install onto your device.
When it has finished installing, please open the application and
continue by logging in with your Car Connection 2.0 username
and password that you previously created.
Page 5
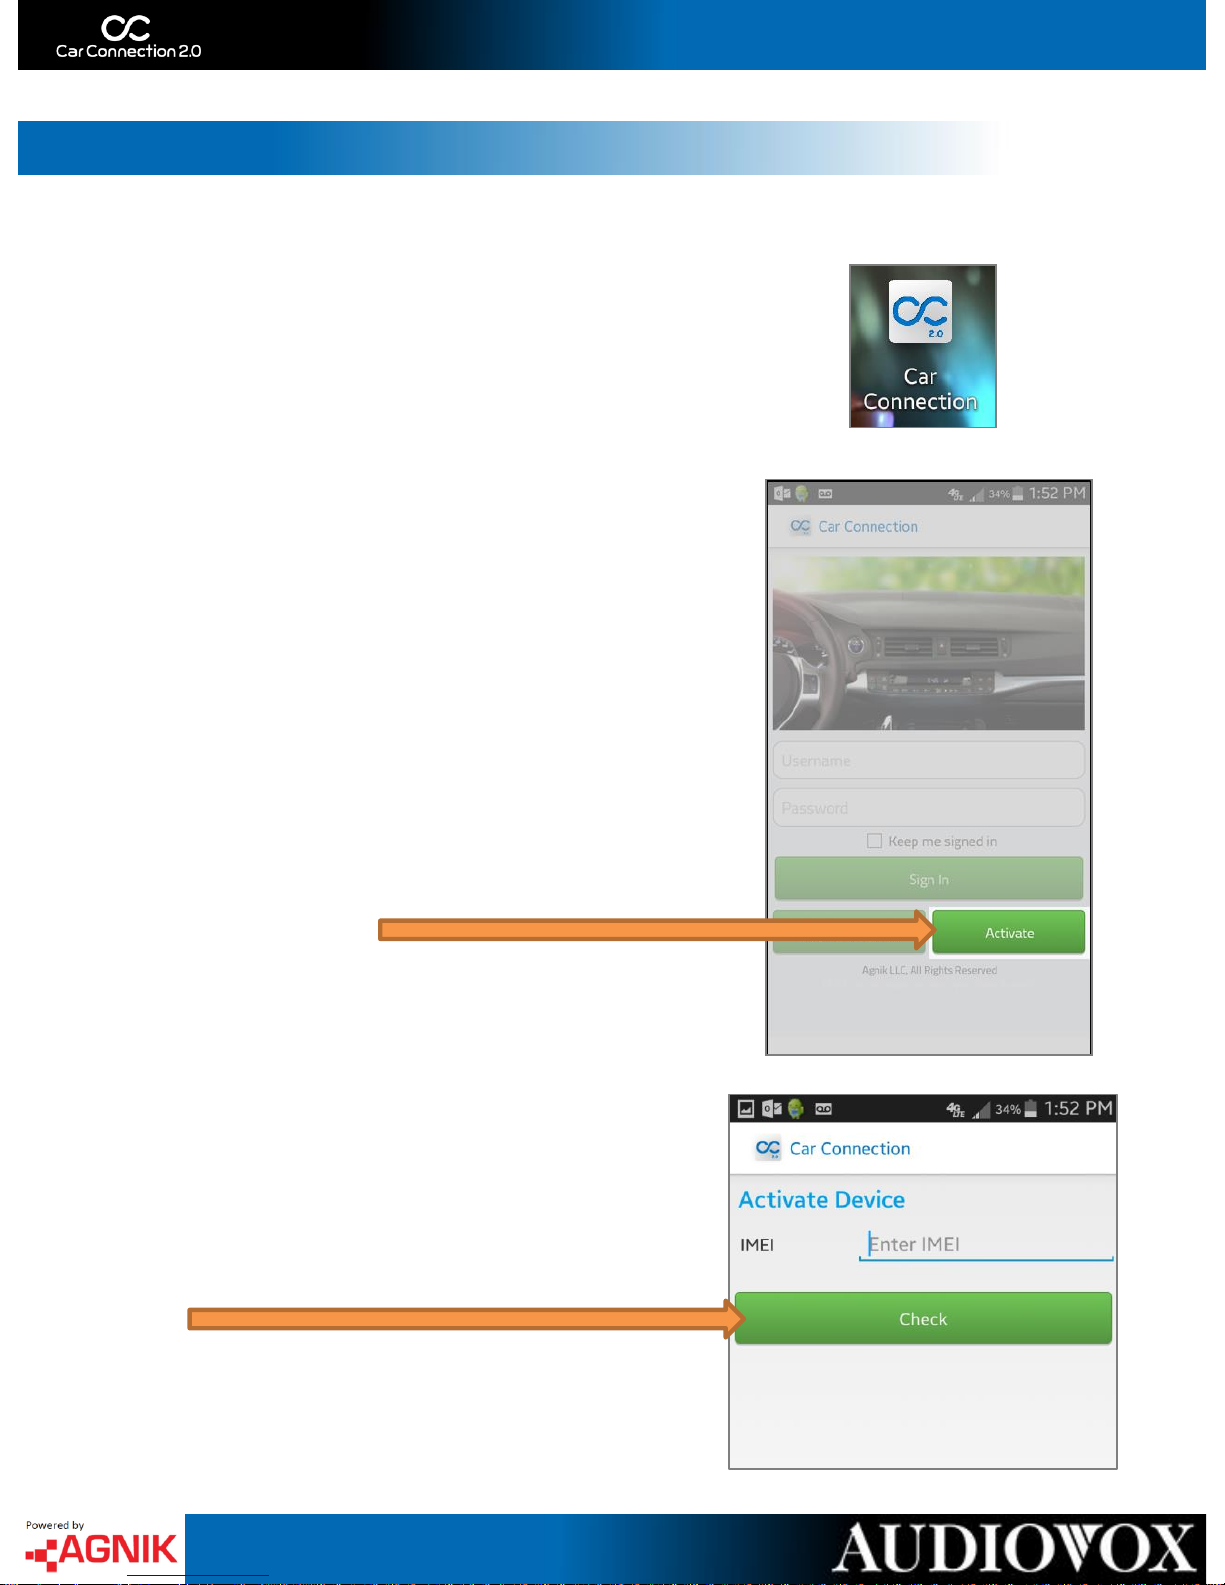
Activate your Device
1. Open the Car Connection 2.0 App
2. Touch ‘Activate’ to start your
Device Activation
3. Enter Device IMEI and Click
‘Check’ to continue
4
Page 6
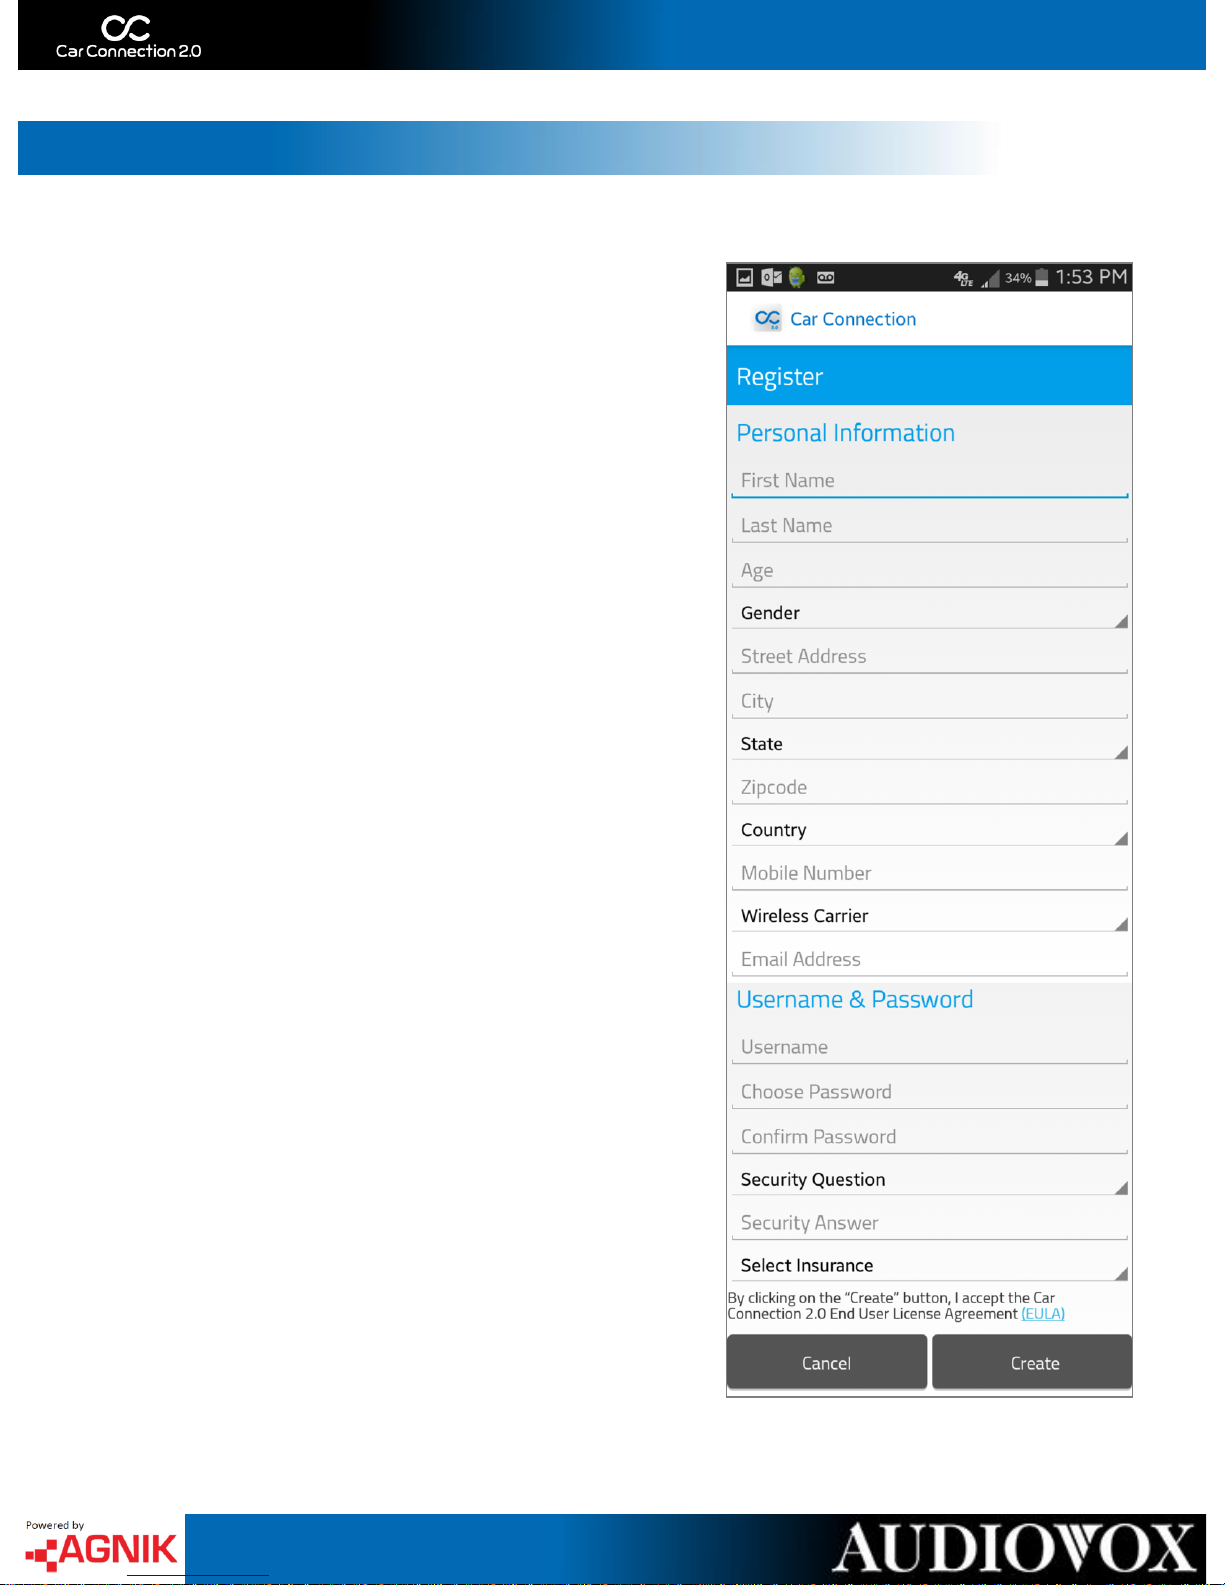
Activating your Device
4. Register your account:
*Please note that you cannot change your username
after creation*
*Password must include at least one letter, one capital
letter, one special character, one number and be at
least 8 characters long*
*Insurance selection is optional*
Page 7
Activating your Device
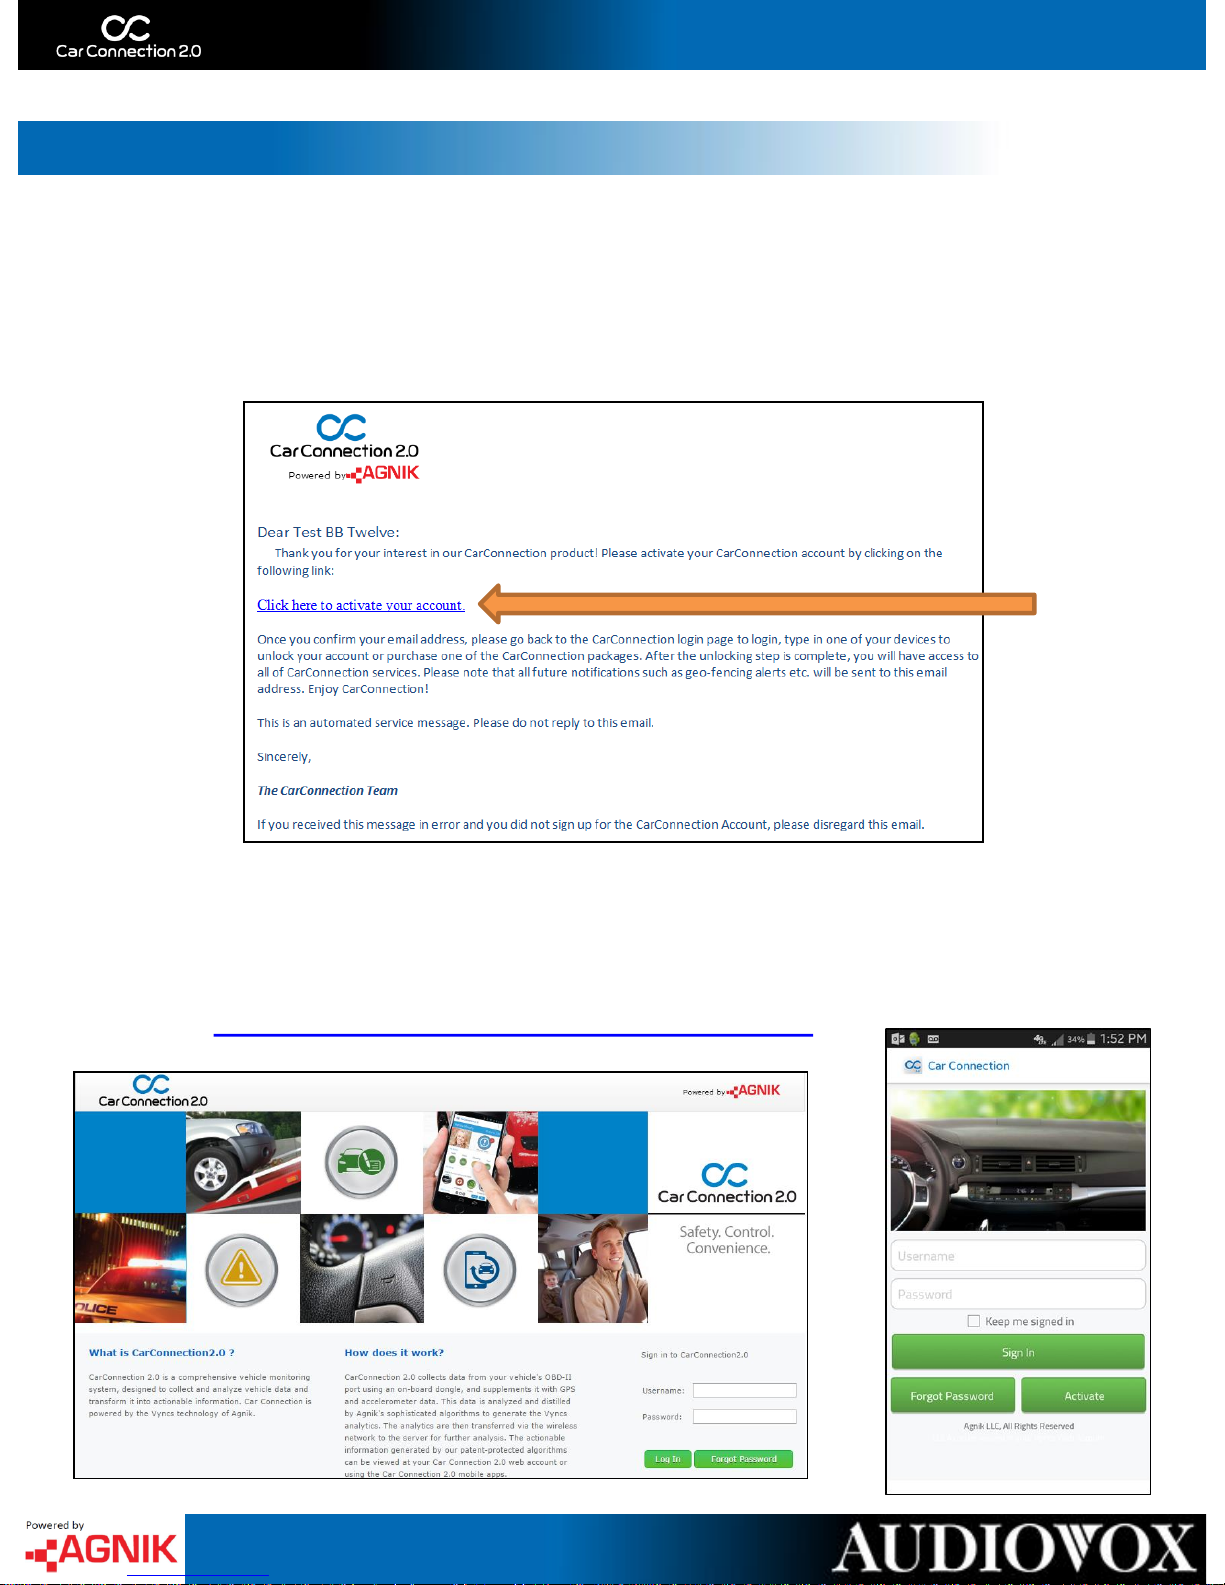
5. Completing the form will send a registration email to the
associated account. Log in to that email account and follow the
‘Registration Link’
6. After clicking the link you will be redirected to the Car Connection
2.0 Log In page – Log In on your Mobile Device or on the web
using your previously created Username and Password
• http://www.carconnection20.com/login/
6
Page 8
Activating your Device
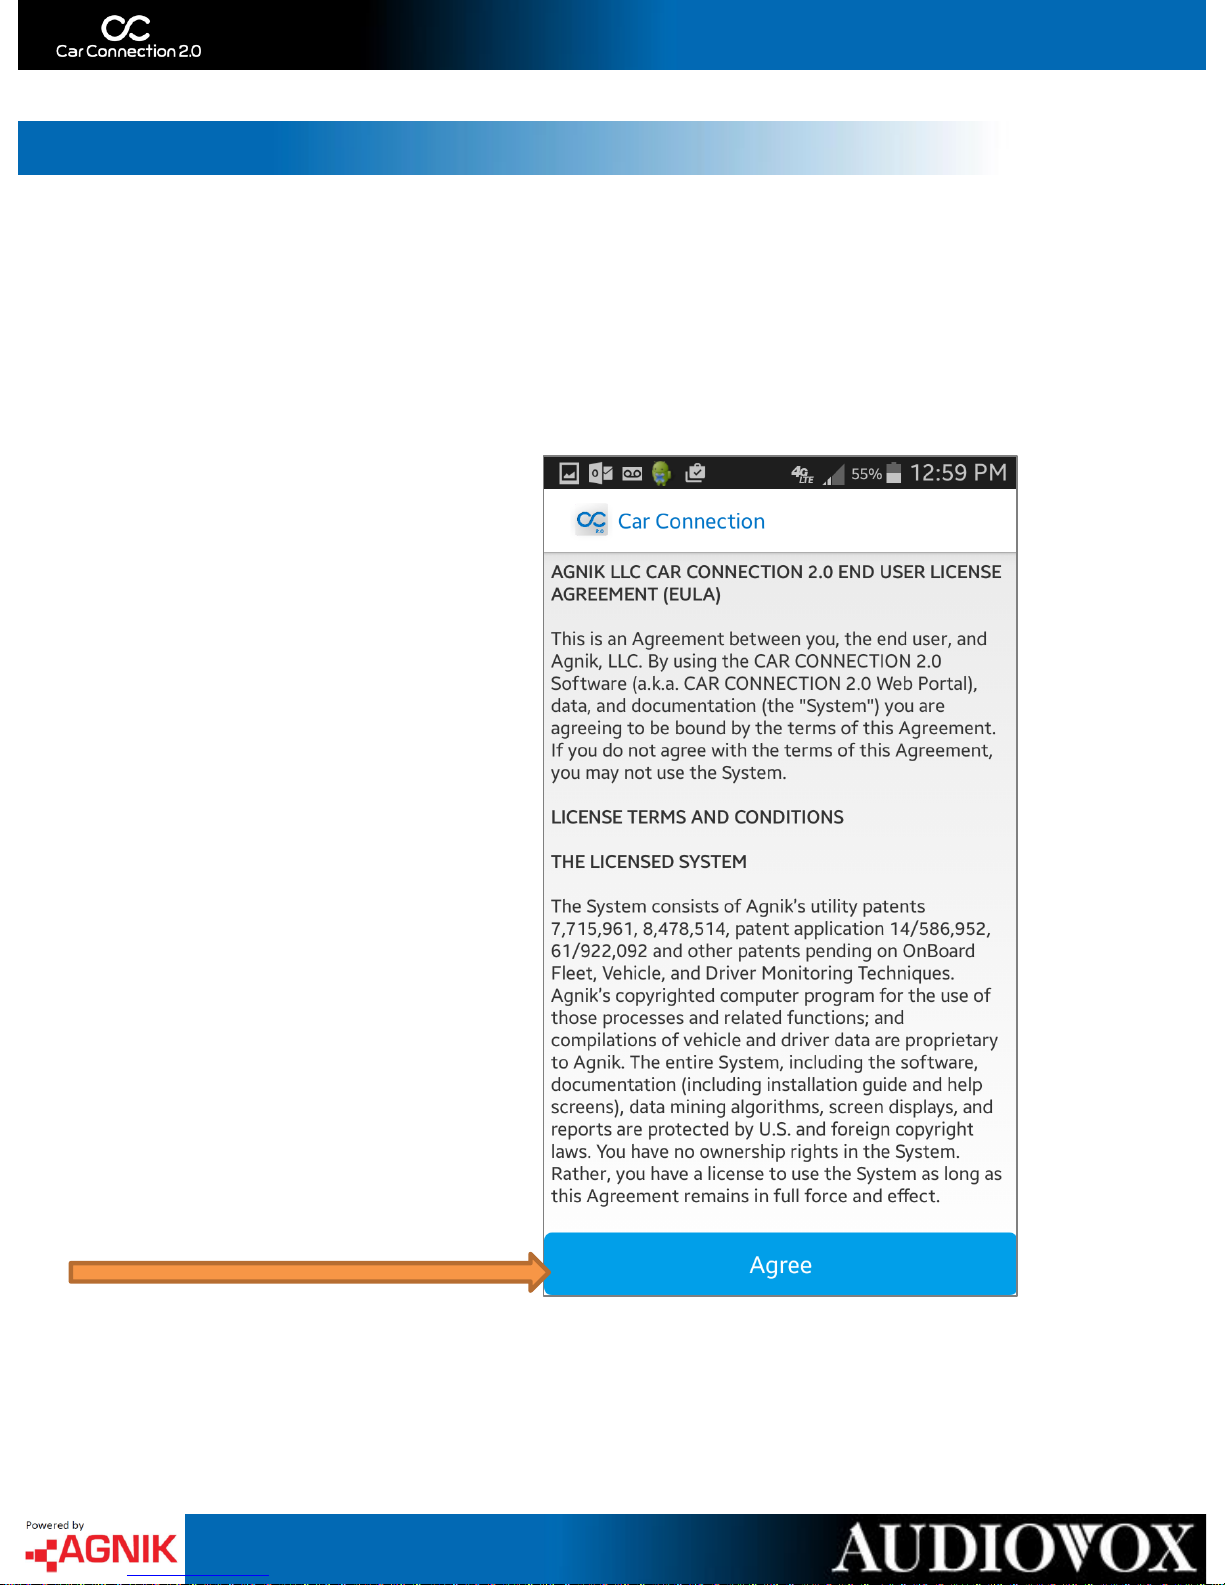
7. Please review the End User License Agreement and click
“Agree” to continue.
Page 9
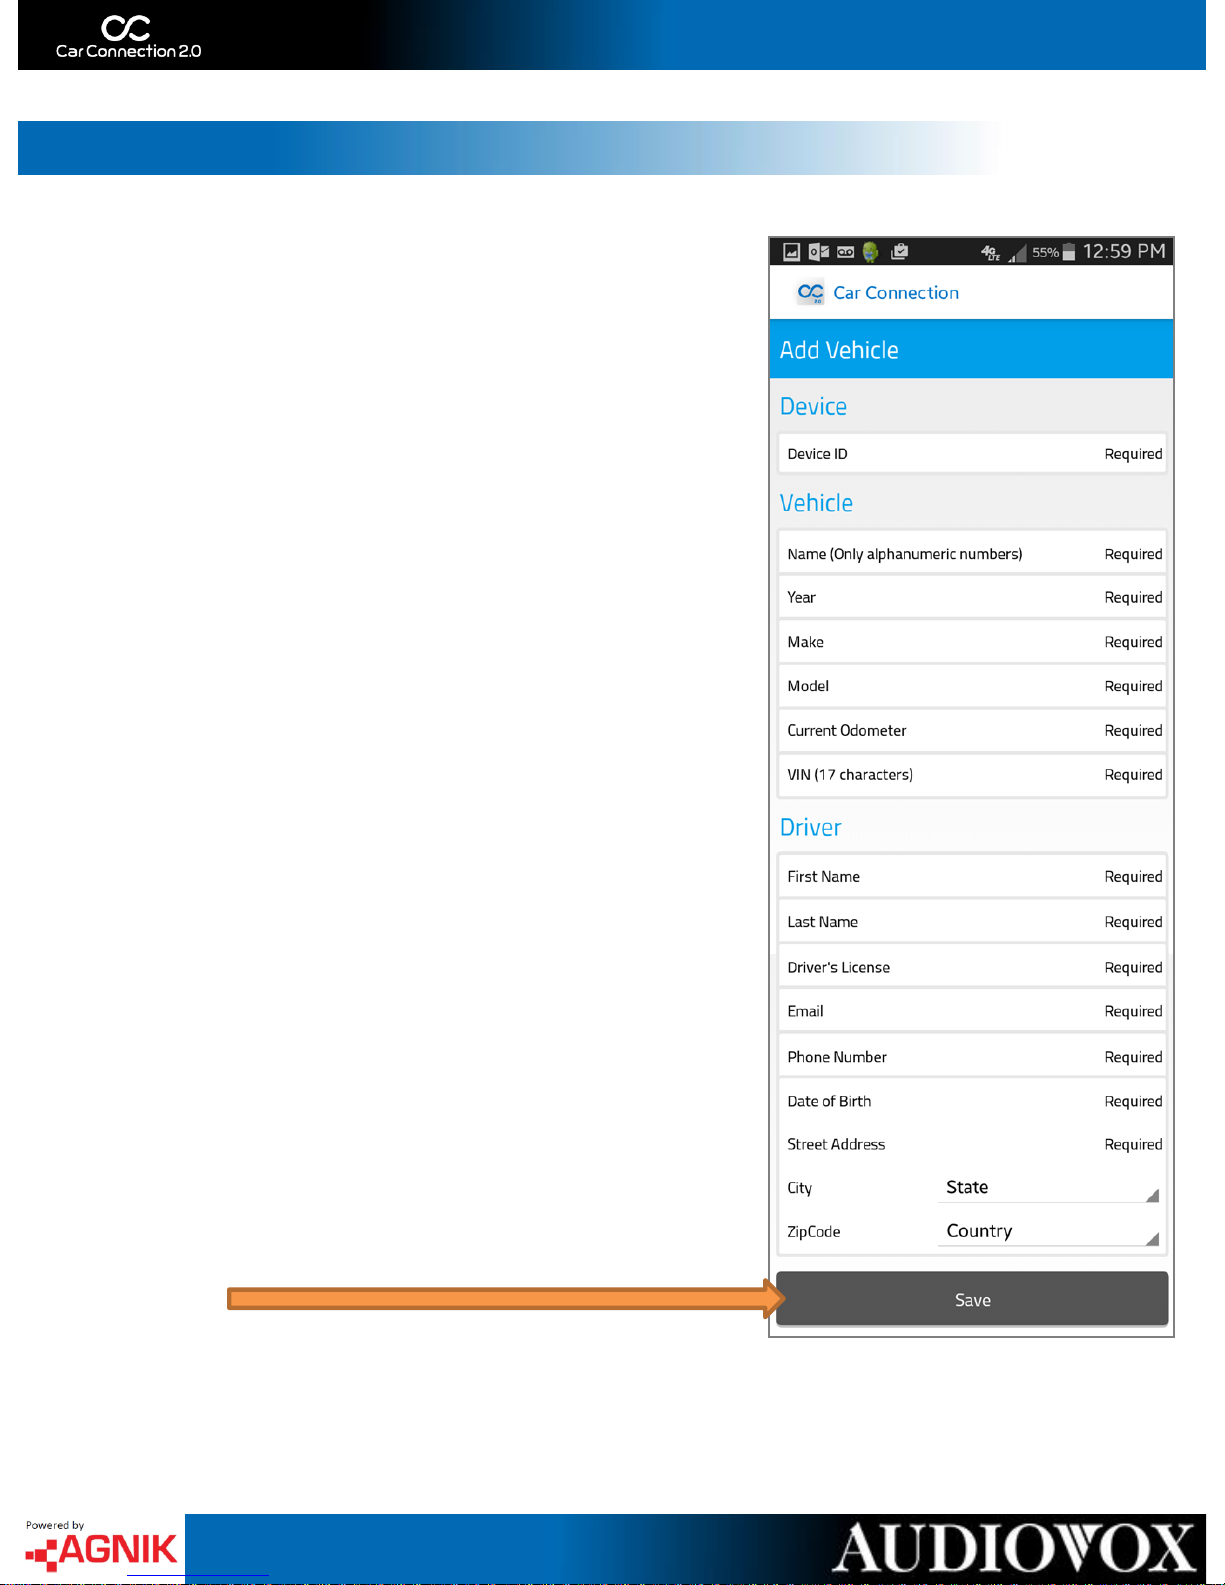
8. Once you log into the mobile app
for the first time – you will be
asked to enter Vehicle and Driver
information. This vehicle and driver
will be associated with your device.
9. Once you are finished touch ‘Save’
to continue.
Activating your Device
10. Finally, power the device to associate it with your account.
Page 10
Your Dashboard
Page 11
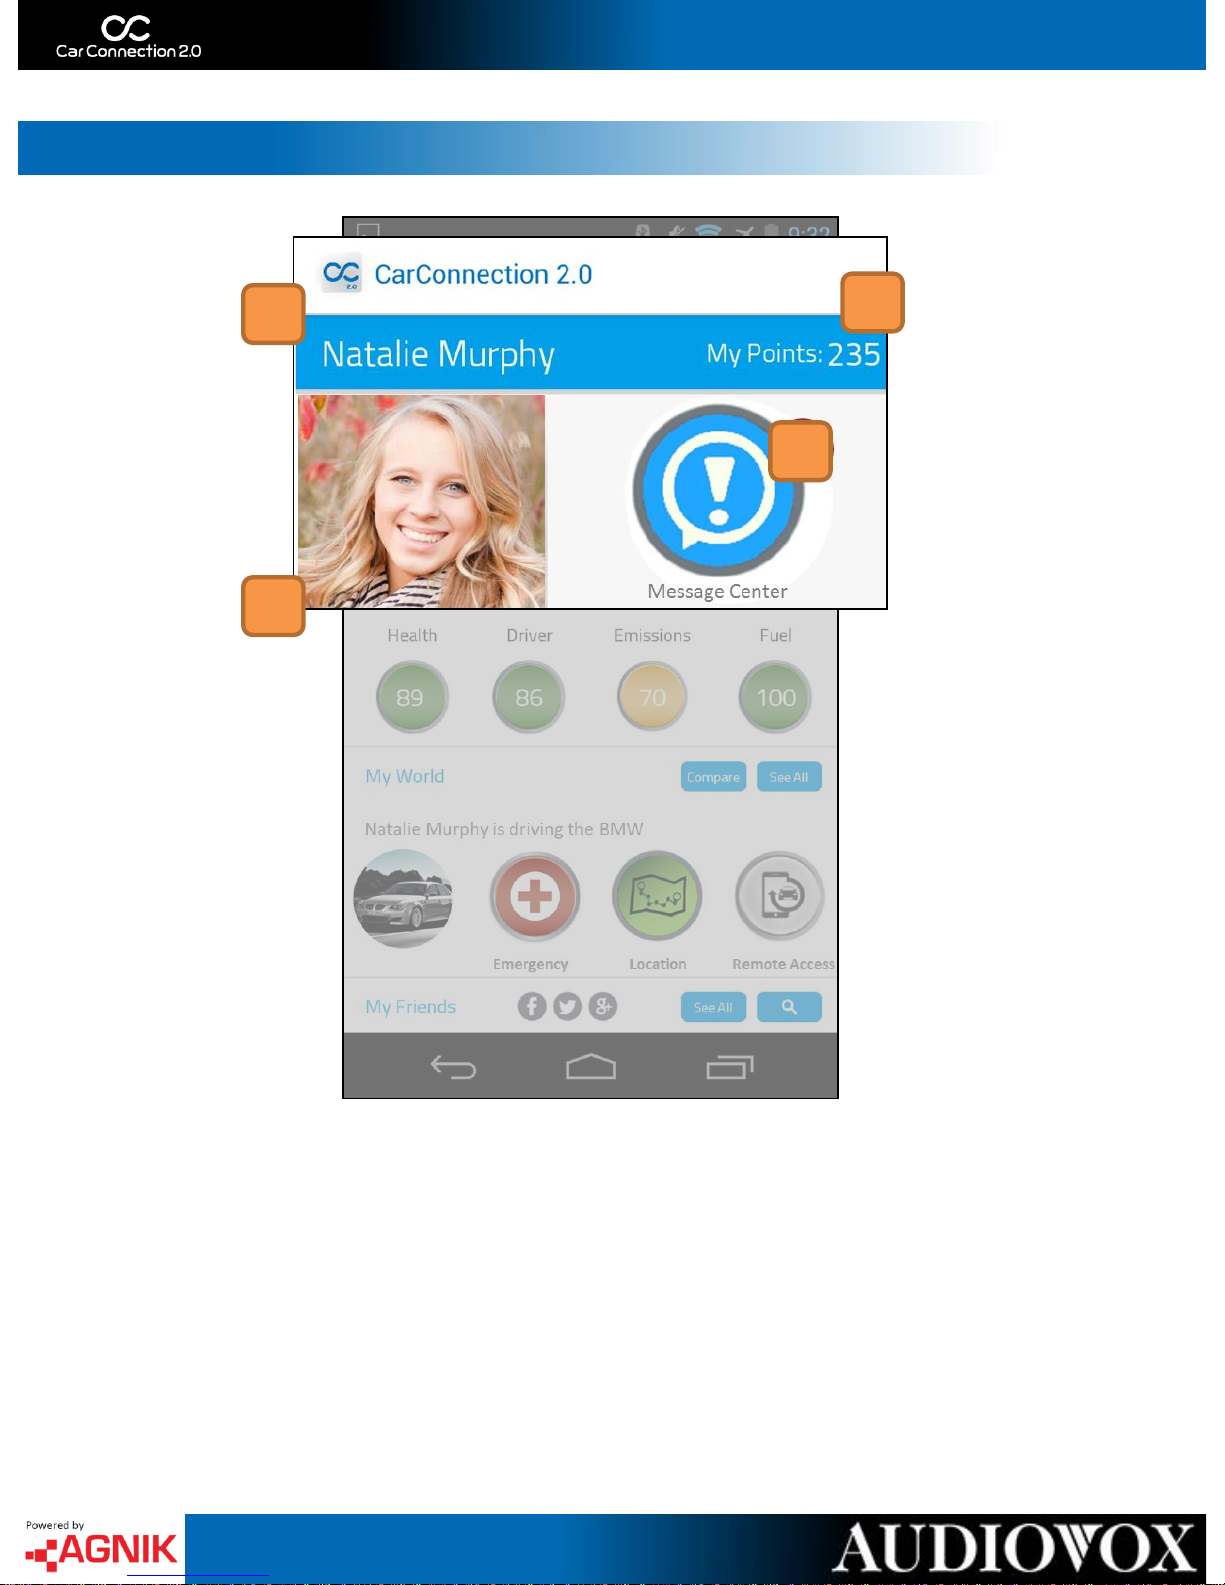
Your Dashboard
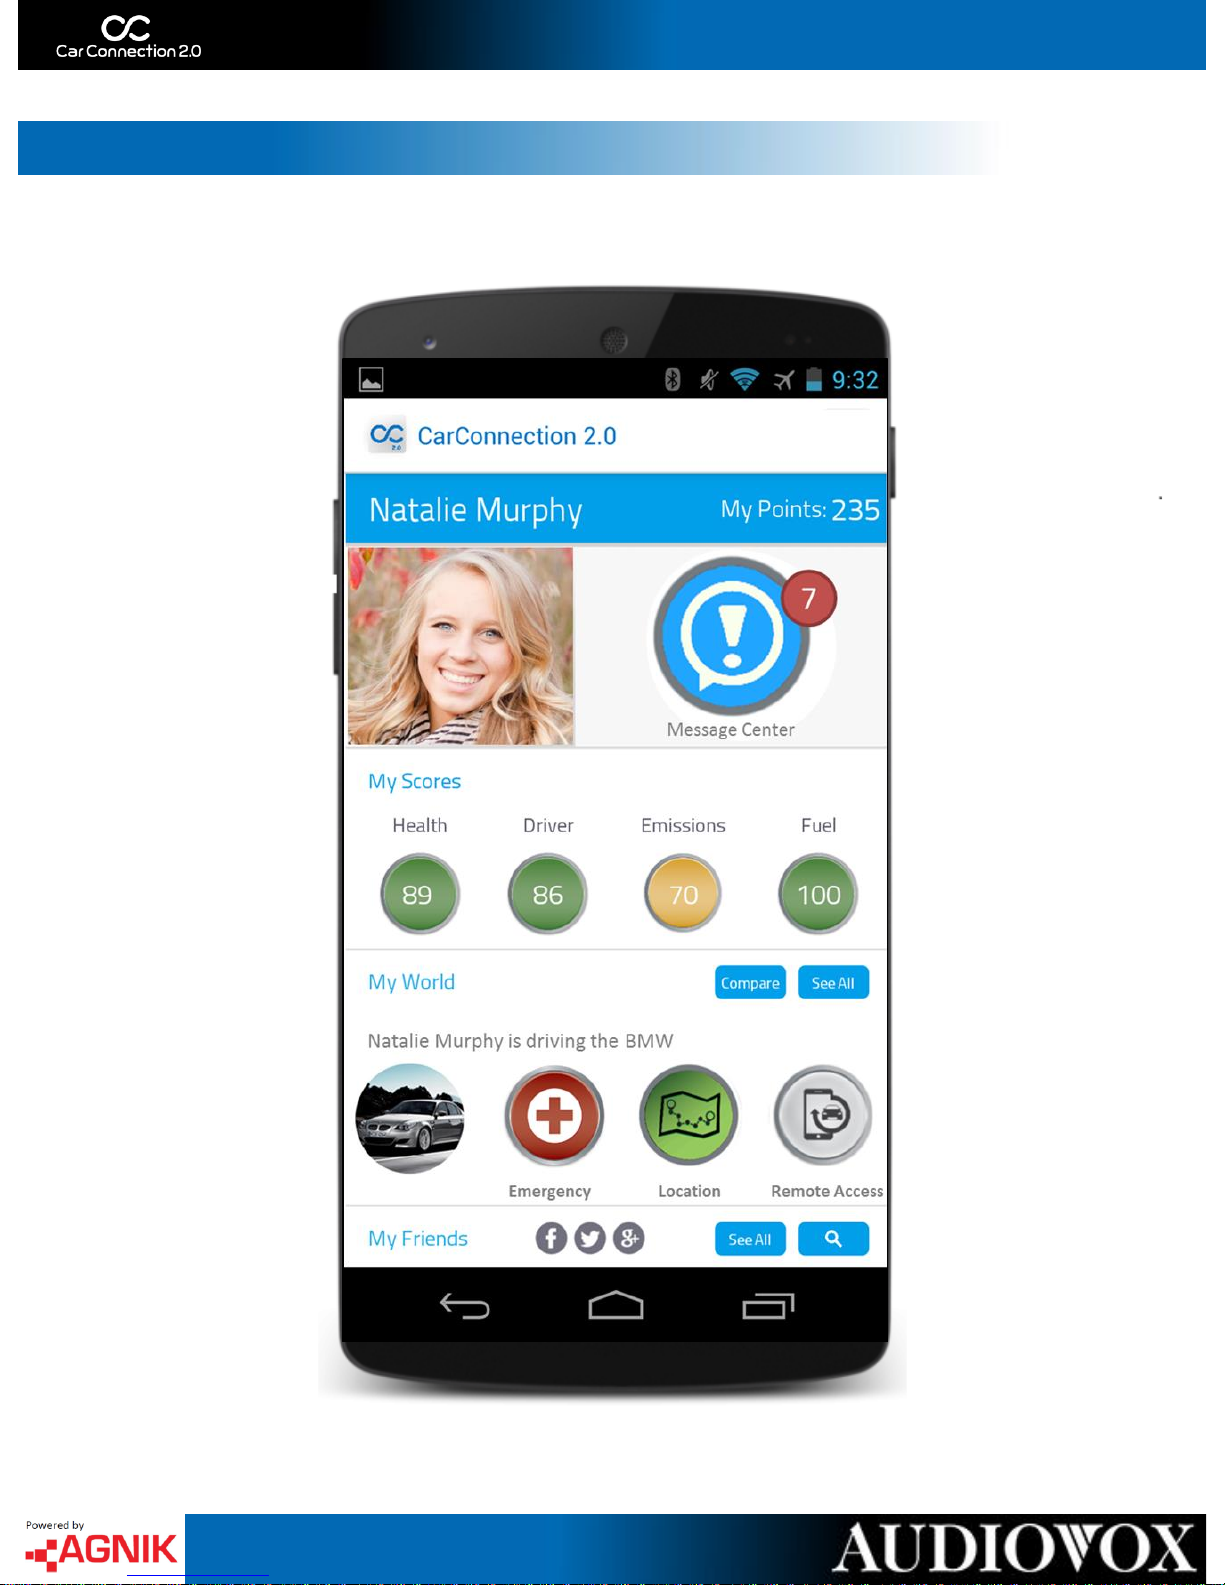
1. Profile Name
Name of account holder.
2. My Points
Touching here will open the My Points section.
Here you can review your points, where they
came from and how you can use them.
3. Profile Picture
This is the profile picture. By clicking the picture
you can choose a picture from you phone or
upload one from the internet.
4. Message Center
Touching here will open the Message Center.
You can easily see if you have messages by
looking at the Notification Bubble.
1
3
4
2
10
Page 12
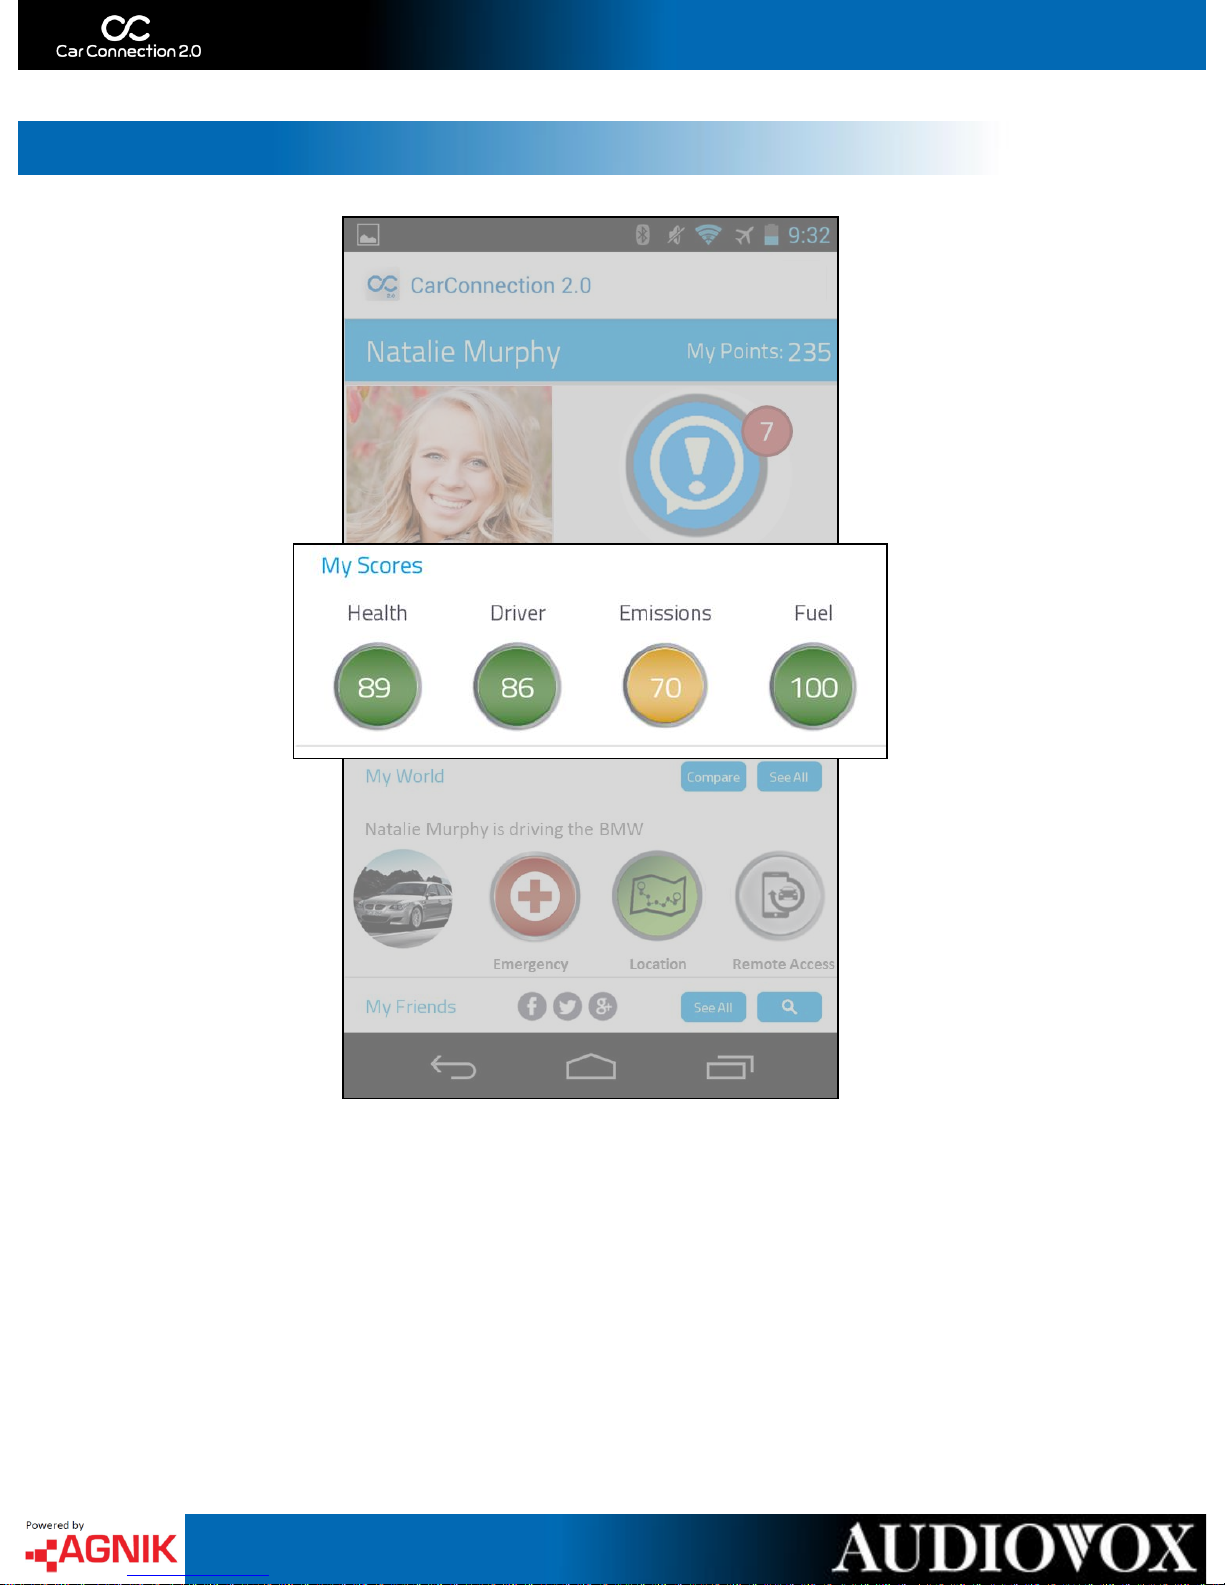
Your Dashboard
This is the My Scores section of the Dashboard. My Scores are broken
into four sections; Health, Driver, Emissions and Fuel. Each of these scores
are affected by your daily driving habits. My Scores are affected by all
vehicles associated with your profile. My Scores can range from 0 – 100 and
will change color based on severity - Green (Good), Yellow (Possible Issues)
and Red (Needs Immediate attention). Each score is a button, by pressing a
score you will be directed to the corresponding Tab in the My Vehicle section.
Page 13
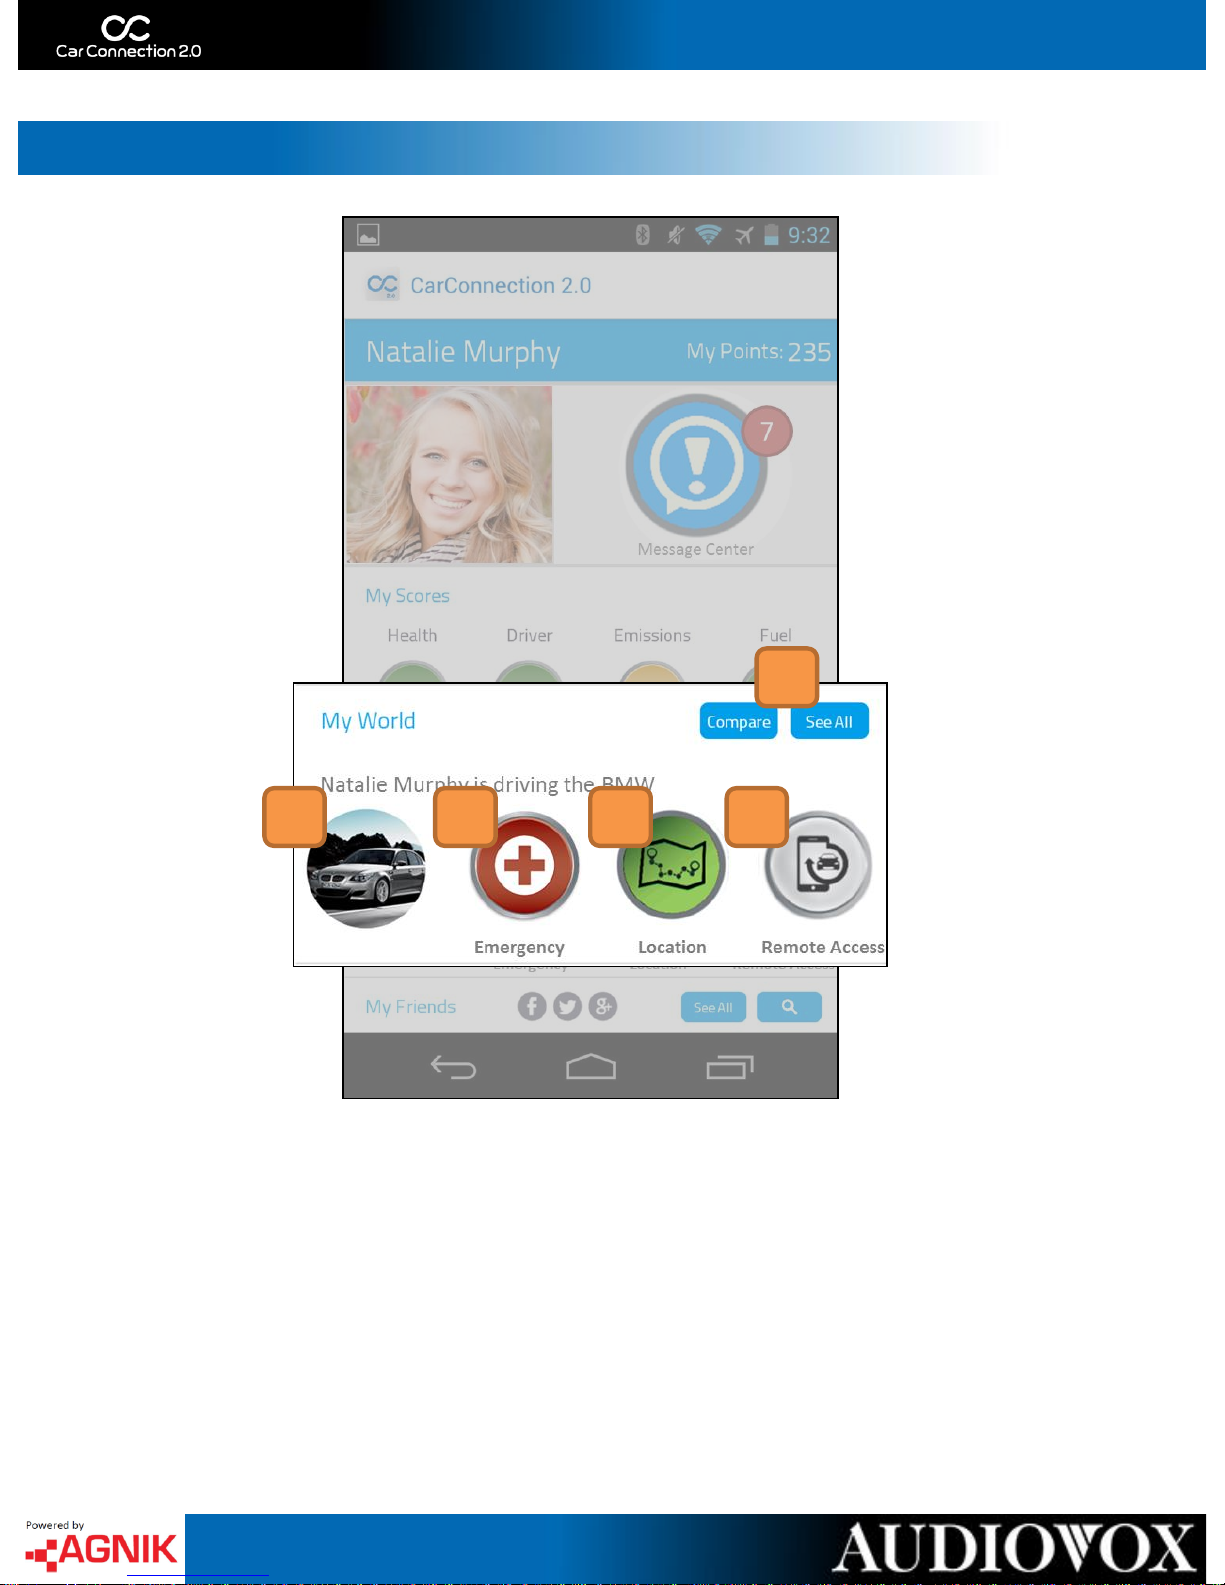
Your Dashboard
1. Compare / See All
WORDs ABOUT THIS BUTTON.
2. Vehicle Picture
This is the vehicle picture. Clicking here will allow
you to choose a picture from you phone or upload
one from the internet.
3. Emergency
Touching here will open the Roadside Assistance
and Emergency Call section of the app.
4. Locate Now - Map
Touching here will open to a map of the selected
vehicles most recent location.
5. Optional Remote Access*
Touching here will take you to the Remote Access
section. From here you can unlock or even start
your vehicle.
* Existing remote access hardware required *
1
3 2 4 5
Page 14

Your Dashboard
1. Social Media Connection
Touch the corresponding icon to post on your
scores or location on your favorite social media
sites.
2. See All Friends
Touching here will allow you to view all your
friends.
3. Friend Search
Touch here to open the friend search. You can
search for friends by their name.
1 3 2
13
Page 15

My Points
3
2
1. Information Button
Touching here will provide details and information
about the My Points section.
2. My Points Breakdown
There are five areas where you can earn points;
My Health, My Driving, My Fuel, My Emissions
and My Friends.
3. Recent Points
In the recent points section you can view a log of
all the points you have gained, when you gained
them and why.
1
Page 16

My Points
My Points are calculated as a daily percent of your Vehicle
Health, Driving, Fuel Economy and Emissions Scores. At the end of
each day you win 10% of each category that is a good (above 80)
score.
For example; if at the end of the day you have a vehicle health
score of 100, a Driving score of 93, a Fuel Economy Score of 82
and an Emission Score of 77 then you would win 10 Vehicle Health
points, 9 Driving Points, 8 Fuel Economy Points and 0 Emission
points.
You also win a percent of your Friends’ total score each day. At
the end of each day you win 5% of each friends’ score that has a
total score above 80.
15
Page 17

Message Center: Vehicle
1
2
1. Message Dropdown
Touch the corresponding section to view
detailed messages. If there are messages
pending you will see a red circle with an
exclamation point.
2. Message Description
Here you will se detailed descriptions of the
message or messages in the specific section.
You can also see the date and time the message
was sent.
If there are no messages a Green Check Mark
will show.
Page 18
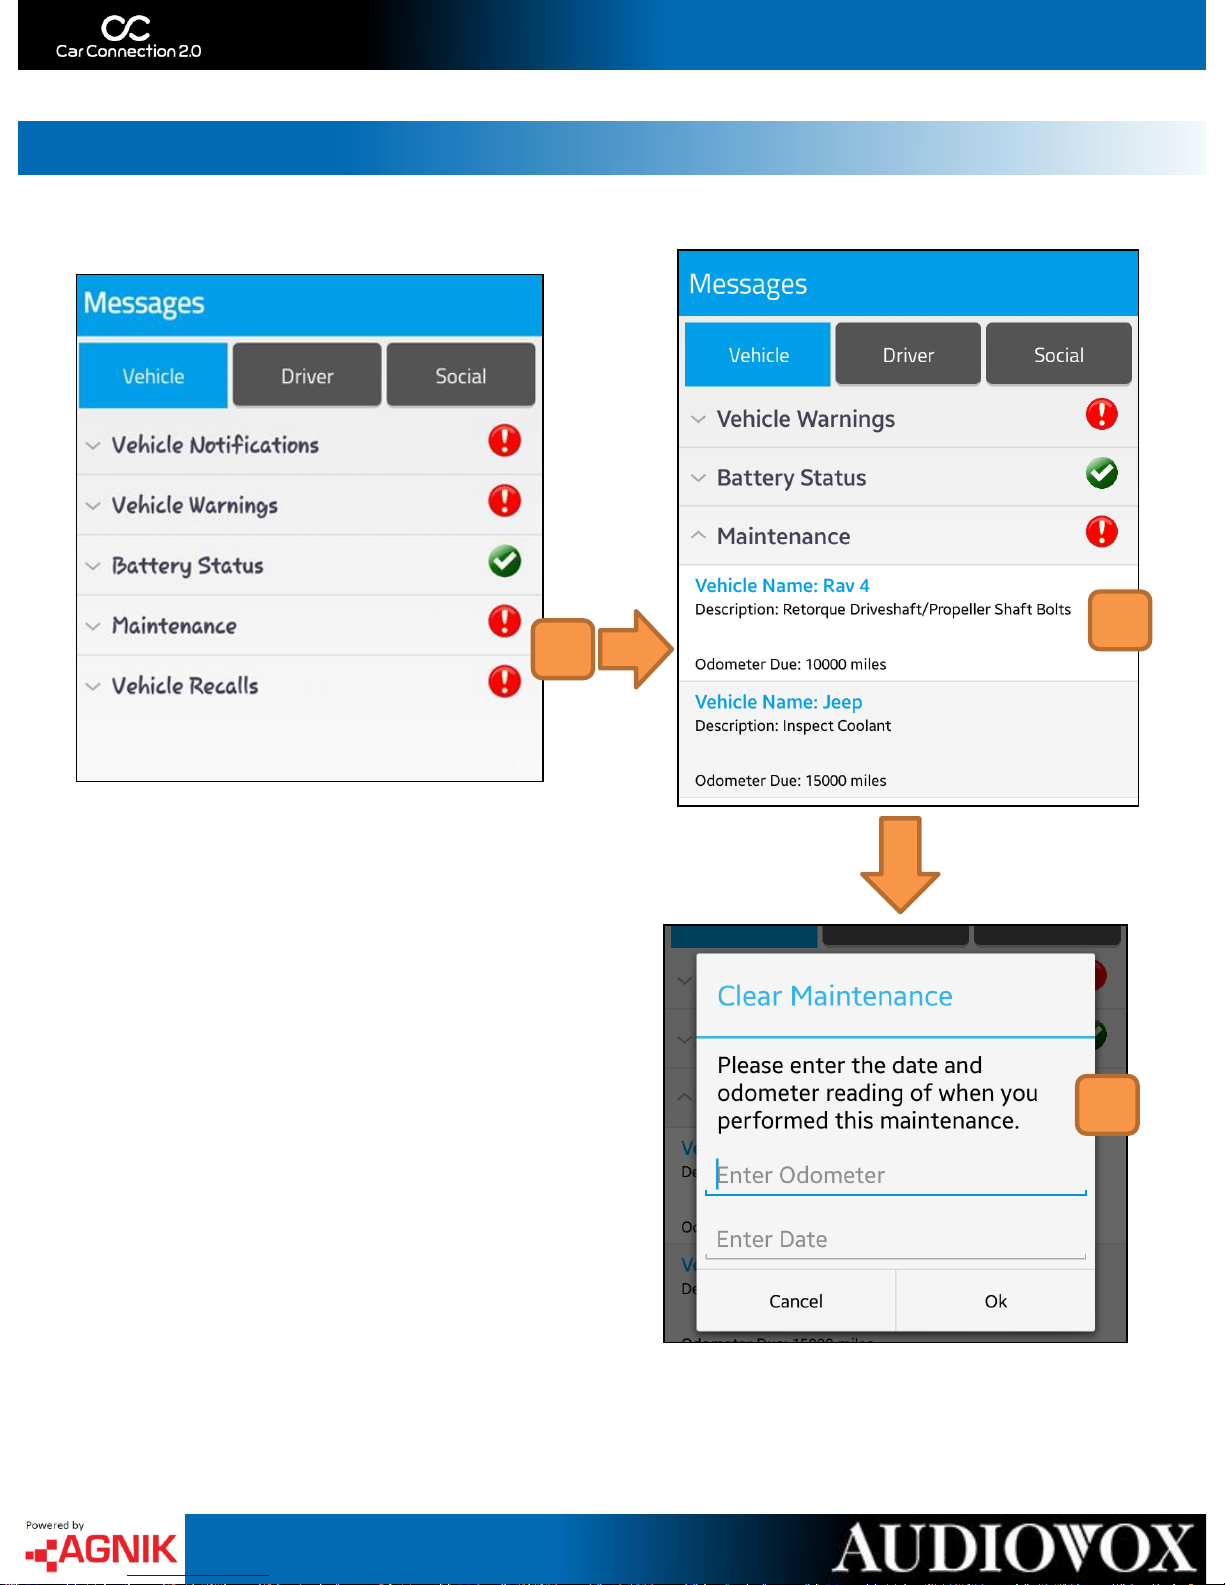
Message Center: Clearing Messages
1
2
1. Tap Maintenance or Vehicle
Recalls to View Messages
The drop down will show all Maintenance and
Recall messages for all vehicles in your account.
2. Tap the Message You want to Clear
A Clear Maintenance/Recall message will pop up.
3. Clear Maintenance/Recalls
In order to clear your maintenance and recall
messages you will need to enter the Odometer
reading and date from when the action was
preformed.
3
17
Page 19

Message Center: Driver
1
3
2
1. My Driving Scores Graph
This graph will display and compare all drivers
associated with the account.
2. Time Interval
Touch the corresponding time interval to see
how your driver score changes.
3. Notification Log
Scroll through the log in order to see all driving
infractions, a description of the infraction and
time/date they occurred.
18
Page 20

Message Center: Social
This is the Social section of the Message Center. Here you will see Nudges
from your friends. If a friend has a better Health, Driver, Emission or Fuel
score they can Nudge you in that category. You can also Nudge your friends!
Nudging give both you and your friends points.
To Nudge friends navigate to the Dashboard and tap ‘See All’ to view your
friends – tap a specific friend to see if you can Nudge them for their lower
Health, Driver, Emissions or Fuel score.
Name: Rob Mahrle
Page 21

My Vehicle – Summary
1
3
2
4
5
1. Vehicle Summary
View make, model, odometer,
current fuel score and date range
of summary.
2. Health Status
View health score, number of
warnings and if your check engine
light is on (MIL).
3. General Statistics
View fuel economy (mpg), fuel
consumption and distance driven.
4. Miles Graph
Touch here to see Miles Driven
History compared to all vehicles in
the account. You can change the
interval between 10 and 30 days.
5. Emissions
View whether or not your vehicle
will pass an emissions test and
view your CO2 emissions in
pounds.
4
20
Page 22

My Vehicle – Health
1
3
2
1. Vehicle Health Overview
View vehicle health information – odometer
reading and current health score.
2. Warning
If your check engine light is on, you can read the
engine codes here. Detailed descriptions of the
issue and possible causes will be listed.
NOTE: You can remove existing
maintenance/recall messages from the
Message Center on the Dashboard.
3. System Check Up
Here you can view the status of all your vehicles
systems. If there is a problem detected – tap
the corresponding system to get more
information.
4. Recall
Scroll through the log in order to see all of your
vehicles recalls. Tap a specific recall to see more
information.
4
21
Page 23

My Vehicle – Health
1
3
2
1. Details
In the details section you can view the
maintenance milestones set for your vehicle.
These milestones are based on your vehicle’s
odometer.
2. Battery
Tap Battery to view ignition ON/OFF voltage.
You can use this information to determine
health of battery.
3. Battery Status
Touch the (i) to see more information about the
status of your battery.
22
Page 24

My Vehicle – Driver
1
2
1. Driver Overview
View driver information – total trips (start and
stop), total idle time, number of notifications,
driver score, total cost of all trips and distance
driven.
2. Trips Section
This section is a break down of each Trip in
chronological order. A trip is started when the
vehicle is turned on and ends when the vehicle
is turned off. To view more trips, scroll down.
3. Trip Map
Touch the blue arrow to see the trip map and
more details. On the map you will see your
(S) – Start and (E) – End points. You can also see
the distance traveled, trip cost, Trip
Performance Index (0-100) and the number of
notification on that trip.
Touching the map will open the Trip Details
section.
3
Page 25

My Vehicle – Trip Details: Summary
1
3
2
1. Map Key
Various Icons you will see on the map and their
meaning.
2. Trip Trajectory
On the map you will see a Start and End point .
You can see the trajectory of the vehicle by
following the numbered pins. Pin #1 is the first
GPS point after the Engine On pin.
3. Trip Summary
View trip details : Start time, end time, fuel
consumed, idle time and max speed.
24
Page 26

My Vehicle – Trip Details: Notifications
1
3
2
4
1. Information Button
Touching here will provide details and
information about the Trip Details: Notifications
section.
2. Map Key
Various Icons you will see on the map and their
meaning.
3. Flag Details
Touch a flag to see the date and time it took
place.
4. Notification Log
View notifications that occurred during this trip.
You can scroll down to see more.
25
Page 27

My Vehicle – Trip Details: TPI
1
2
1. Map Key
Various Icons you will see on the map and their
meaning.
2. Trip Performance Index Details
Your trip performance index is based on the
driving habits during a trip. This is rated on a scale
0-100. View your performance for; Cornering,
Breaking, Acceleration, Rapid Maneuvering,
Idling and Speeding.
26
Page 28

My Vehicle – Emissions
1
3
2
1. Emissions Overview
View emissions information – odometer reading
and emissions score.
2. Emissions Scores
Here you can view your Greenhouse Score
(1-10) and CO2 Emissions in pounds (lbs.).
3. Carbon Footprint
Touch here to view your Carbon Footprint graph.
This will show your CO2 Emissions (lbs.) over
time.
27
Page 29

My Vehicle – Fuel
1
2
1. Fuel Overview
View fuel information – odometer reading and
fuel score.
2. Fuel Performance
In the Fuel tab you can review average mpg,
potential savings and savings tips. Based on your
driving habits Car Connection 2.0 can predict
potential fuel savings from reducing idling,
speeding and other high g events.
28
Page 30

My Vehicle – Location
This is the Location section of My Vehicle. This will show the most recent
GPS location of your vehicle. From this screen you can Add, Edit and Delete
Geo-Fences. Geo-fences are digital boundaries set by you - notifications can
be tied to a Geo-fence. If notifications are assigned, you will be notified via
email when a vehicle enters or exits a specific Geo-fence.
29
Page 31

My Vehicle – Location: Geo-Fencing
To create a Geo-fence in the Car Connection 2.0 application, navigate to the
Locations tab in the My Vehicle section. Start by touching ‘Add Geofence’.
Tap the screen to make
the first point of your
geo-fence.
Continue creating points
of your geo-fence.
When you are ready to close
your geo-fence, connect the
first and last point.
Once these points are connected you will be
prompted to name your geo-fence, set your
permissions (Geo-fence On/Off) and
notification preferences
(Email & Text, Email Only, Text Only).
Once your geo-fence is
saved you can view, edit
or delete it from the
location tab.
Permissions:
Allowed
(Green)
Disallowed
(Red)
30
Page 32

My Vehicle – Location: Geo-Fencing
Editing and deleting existing geo-fences is a simple two step process. To edit
a geo-fence, touch ‘Edit Geofence’ and then tap the geo-fence you would like
to edit. To delete geo-fences, touch ‘Delete Geofence’ and tap the geo-fence
you would like to delete.
Edit Geo-Fence
Delete Geo-Fence
31
Page 33
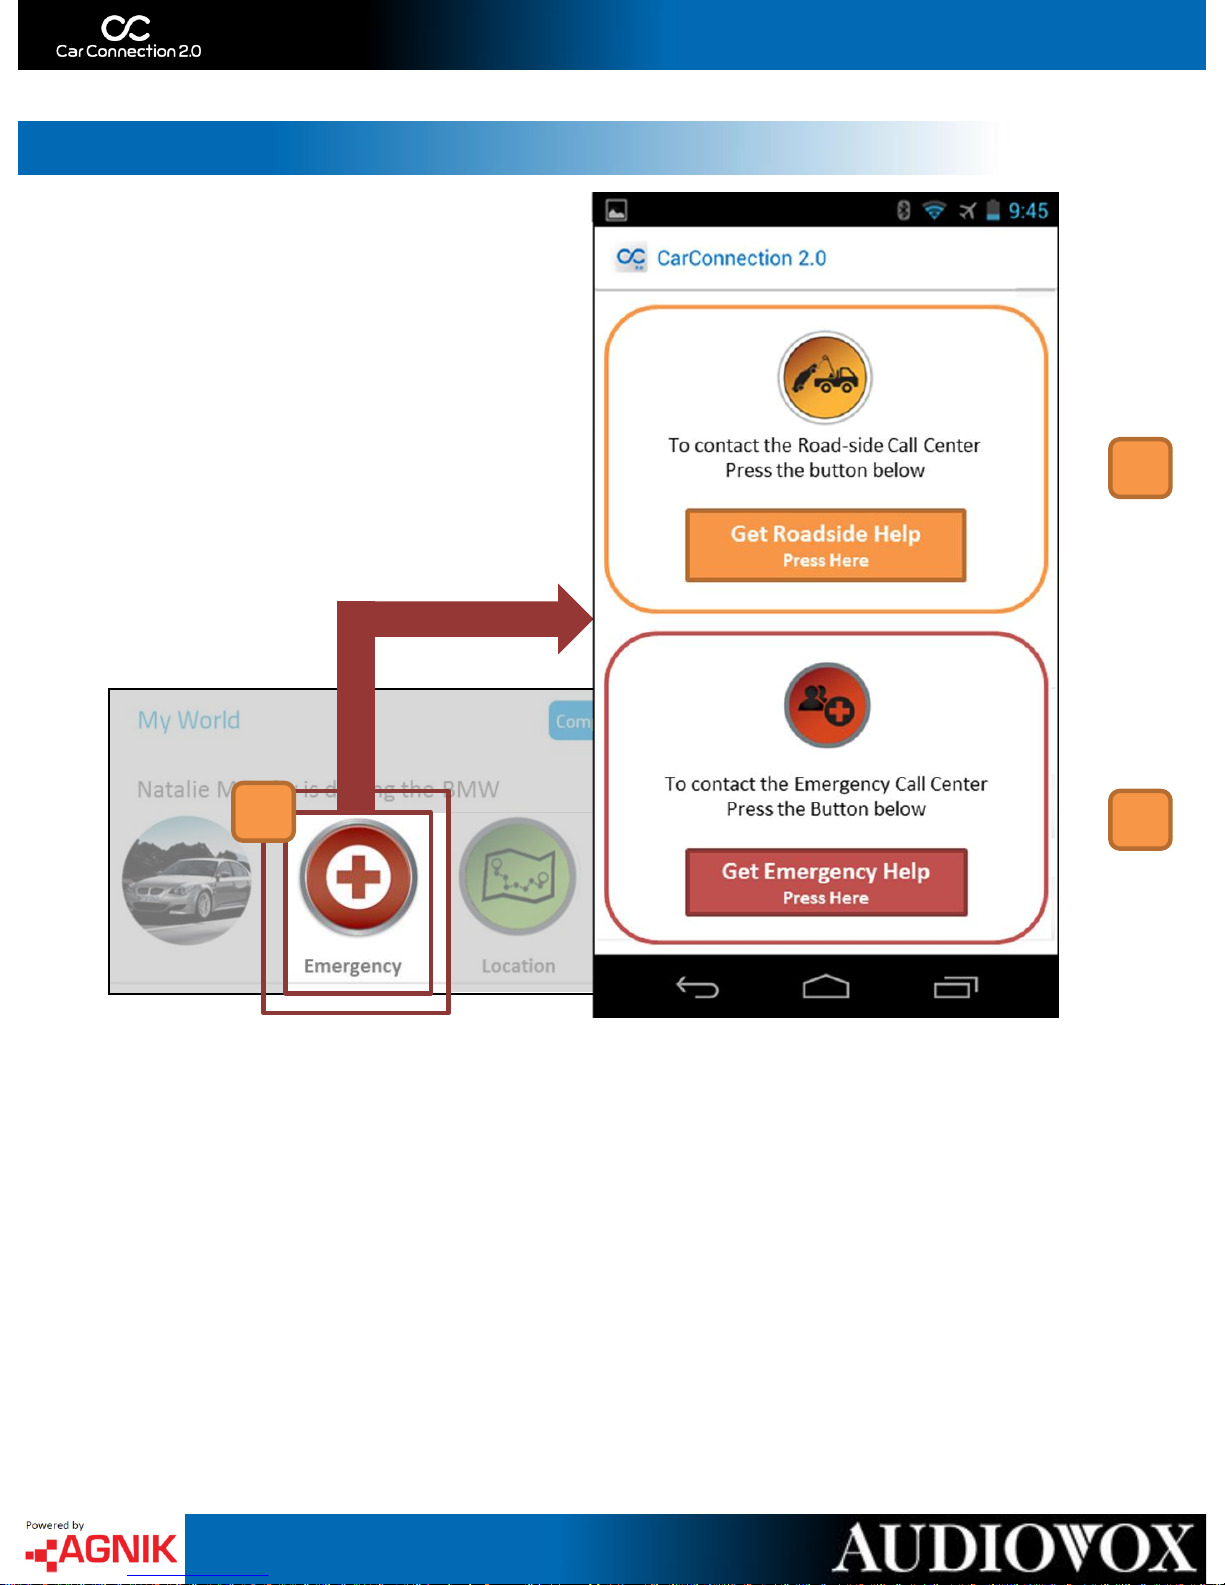
Dashboard
1
Roadside Assistance – E-Call
3
2
From your application you are able to request Roadside assistance or
Emergency Help [1]. Roadside Help includes up to 2 gallons of gas and/or 5 miles
of towing* [2]. You can also request Emergency Help our Emergency Help call
center – they will put you in contact with local authorities or request them on
your behalf [3].
* Local towing charges will apply after 5 miles *
32
Page 34

1
Optional Remote Access
Once properly set up, you are able to use your application to access your
remote start kit* by pressing the ‘Remote Access’ button [1]. From here you can
start/stop your vehicle, lock/unlock the doors, pop your trunk, activate panic
siren or even access auxiliary options* [2].
* Existing remote access equipment required *
* Existing Kit must also have these features *
2
Page 35

Distracted Driving – Zoomsafer
Zoomsafer is a mobile application downloaded to your teenager’s
smartphone (or your own!). This application blocks the use of their
smartphone while driving, unless a hands free/Bluetooth device is present.
While they are driving Zoomsafer enters “Safe Mode” – this silences alerts and
notifications – blocks the ability to email, browse and launch applications*. While
driving, texts and calls are blocked automatically and are available to
view/respond when the vehicle is parked*. Zoomsafer’s “Safe Mode” can be
overridden for 3 “White List” contacts and Emergency calls (911). Any time the
phone is used in “Safe Mode” or “Passenger Mode” is engaged while the vehicle
is in motion – a predetermined (family member) is contacted via text or email.
* Due to iOS limitations – texts/calls and internet/emails are only deterred – blocking these
functions are only available on Android.*
How do I get Zoomsafer on my smartphone?
1. Register and Activate your Car Connection 2.0 account
2. Once logged in – navigate to the ‘Settings’ section of the website
3. Near the bottom will be a Distracted Driving – Zoomsafer section
4. Check off ‘Notify Zoomsafer’ and then ‘Submit’
5. Zoomsafer will send a ‘Welcome Email’ - providing instructions to download
the Zoomsafer app (Google Play or App Store)
6. Enter your Car Connection 2.0 registered email – Zoomsafer will send you an
‘Access Code’
7. Find your ‘Access Code’ in the email from Zoomsafer
8. Using your ‘Access Code’ register for Zoomsafer via the App
Page 36

Your Device
1.625 ”
2.5 ”
0.875 ”
LED
Function
Proper
Activation
Blinking Slowly Blinking Rapidly
RED
Power Solid Light N/A N/A
YELLOW
Cellular Solid Light
No GPS or Wireless
Connection
NO Wireless
Connection
GREEN
OBD Blinking Light
Proper Activation
N/A
For more information, including FAQs, please visit www.CarConnection20.com
For technical assistance, please call 1-800-300-4550
The Device LED’s will rapidly blink during license verification. In all other instances they will flash as follows:
Page 37

Car Connection 2.0 plugs directly into the vehicles OBDII port
under the dash which is located within 3 feet of the driver’s
seat – NO tools are required to access.
For certain applications, the Car Connection 2.0 module may
interfere with driver’s knees or the customer may want to
hide the module. For those instances a “Y-harness” may be
purchased as an additional accessory from the online store:
www.shopvoxx.com
For customer or technical support please call Audiovox Car Connection 2.0 support:
1-800-300-4550
9 AM – 6 PM (EST - Eastern)
Monday – Friday
© 2013 Audiovox Electronics Corp. All Rights Reserved.
** requires the Zoomsafer app to be downloaded Support on Android 2.3.3 and iOS 6.01
Android is a trademark of Google Inc. Use of this trademark is subject to Google Permissions.
This device complies with Part 15 of the FCC Rules. Operation is subject to the following two conditions: (1) This device may
not cause harmful interference, and (2) this device must accept any interference received, including interference that may
cause undesired operation.
This equipment has been tested and found to comply with the limits for a Class B digital device, pursuant to Part 15 of the
FCC Rules. These limits are designed to provide reasonable protection against harmful interference in a residential
installation. This equipment generates, uses and can radiate radio frequency energy and, if not installed and used in
accordance with the instructions, may cause harmful interference to radio communications. However, there is no guarantee
that interference will not occur in a particular installation. If this equipment does cause harmful interference to radio or
television reception, which can be determined by turning the equipment off and on, the user is encouraged to try to correct
the interference by one of the following measures:
- Reorient or relocate the receiving antenna.
- Increase the separation between the equipment and receiver.
- Connect the equipment into an outlet on a circuit different from that to which the receiver is connected.
- Consult the dealer or an experienced radio/TV technician for help.
FCC Caution: Any changes or modifications not expressly approved by the party responsible for compliance could void the
user's authority to operate this equipment. This transmitter must not be co-located or operating in conjunction with any other
antenna or transmitter.
Radiation Exposure Statement:
This equipment complies with FCC radiation exposure limits set forth for an uncontrolled environment. This equipment
should be installed and operated with minimum distance 20cm between the radiator & your body.
Installation & Support
 Loading...