

Page 1
BT-HP1
OWNERS MANUAL
Page 2

2
Bluetooth® is a trade mark of Bluetooth Special Interest Group (SIG) Inc.
WARNING! Never disassemble or adjust the unit.
WARNING! To prevent injury from shock or re, never expose this unit to moisture or
water.
1. This device complies with Part 15 of the FCC Rules. Operation is subject to the following
two conditions: (1) this device may not cause harmful interference, and (2) this device must
accept any interference received, including interference that may cause undesired operation.
2. Changes or modications not expressly approved by the party responsible for compliance
could void the user’s authority to operate the equipment.
Page 3

3
INTRODUCTION
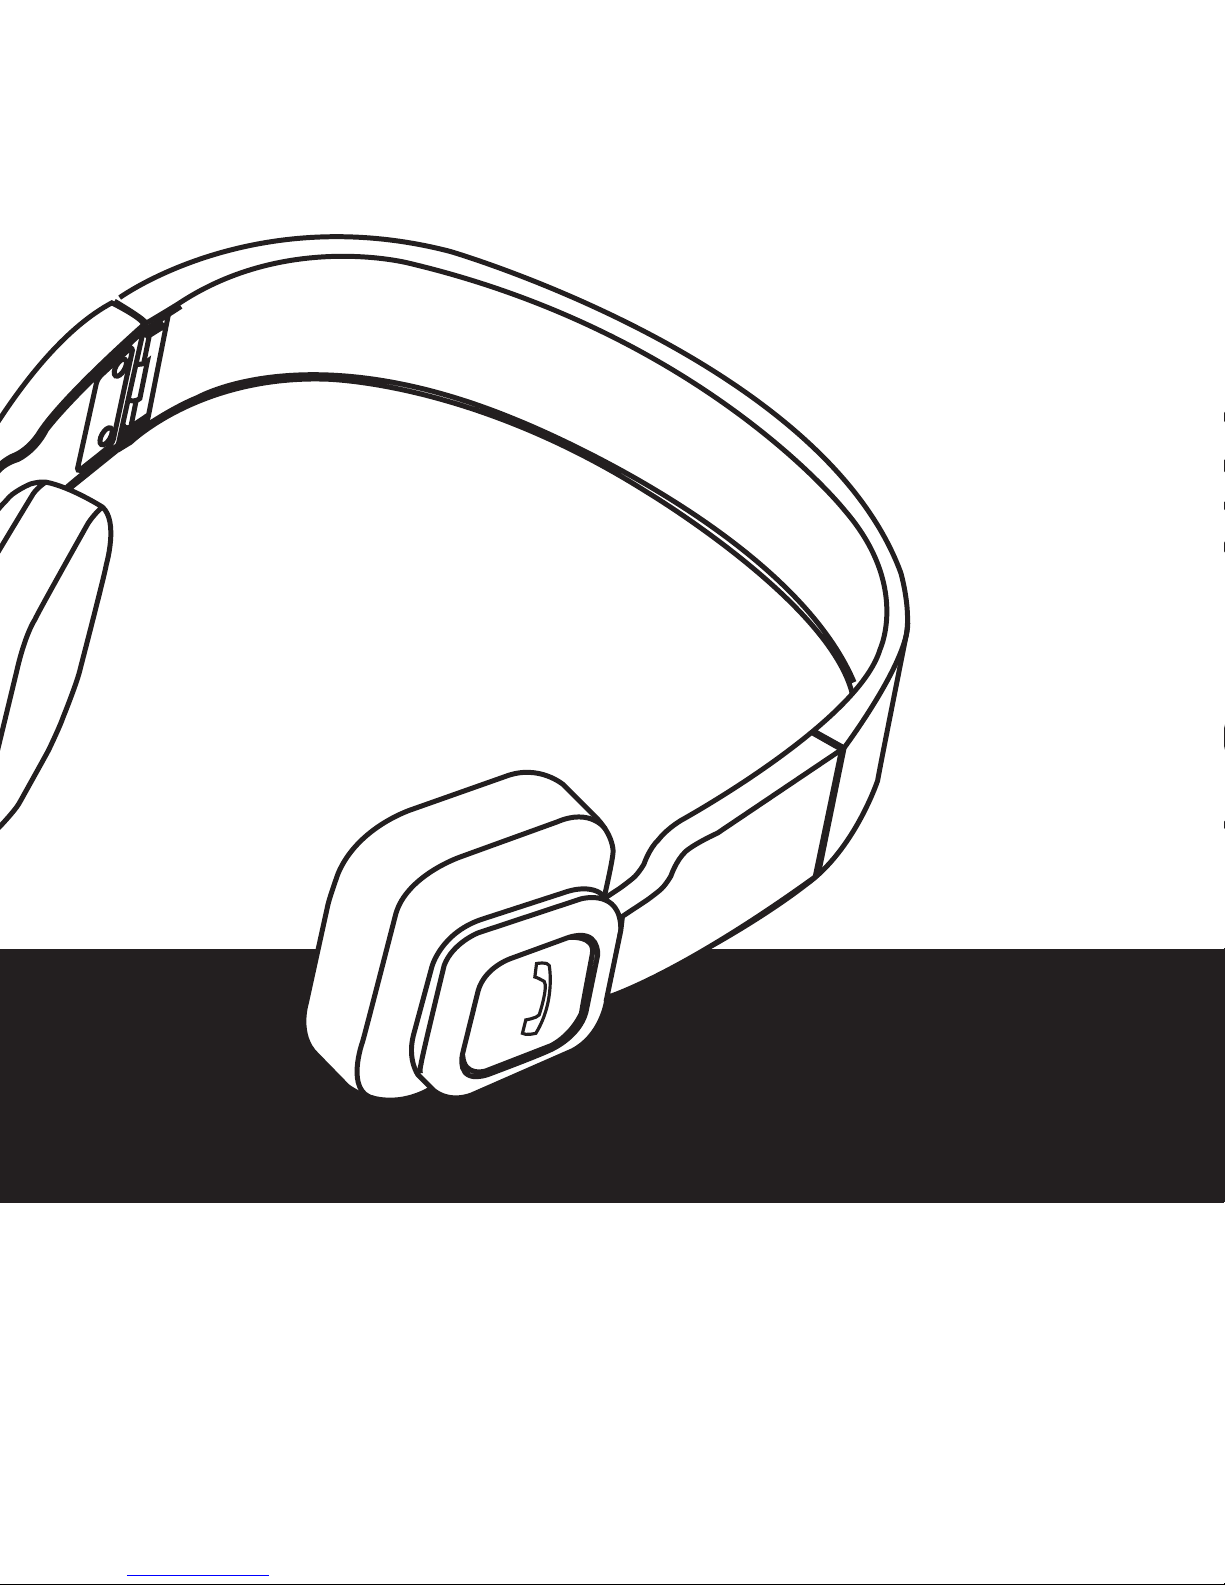
The BT-HP1 is a Bluetooth® stereo headset. The stereo headset is foldable and the retractable design
makes the stereo headset is very easy to take with you. The stereo headset supports the following
Bluetooth® proles:
HSP —— Headset Prole
HFP —— Hands-free Prole
A2DP—— Advanced Audio Distribution Prole
AVRCP——Audio/Video Remote Control Prole
Please read this user manual carefully before use.
The BT-HP1 provides the following features:
1) When paired with a Bluetooth® cell phone or PDA supporting Hands-free Prole you can:
• Answer a call, end a call, and reject a call
• Redial last number
• Voice dial if supported by your cell phone
• Adjust the volume
• Transfer a call between the headset and your Bluetooth® cell phone
• Microphone mute
2) When paired with a Bluetooth® music device or Bluetooth® transmitter supporting Advanced
Audio Distribution Prole you can:.
• Enjoy music wirelessly
• Adjust the volume
• Pause/play using remote control
• Select the previous/next track using remote control
3) Switch easily between a phone call and music. Incoming calls will not be lost while you listen to
music.
4) Every time the headset is turned on, it will connect to last connected device automatically.
Note: Even though the paired device and the headset support the same
Bluetooth®
proles, functions
may vary due to dierent manufacturers or specication dierences between devices.
Page 4
4
CONTROLS AND INDICATORS
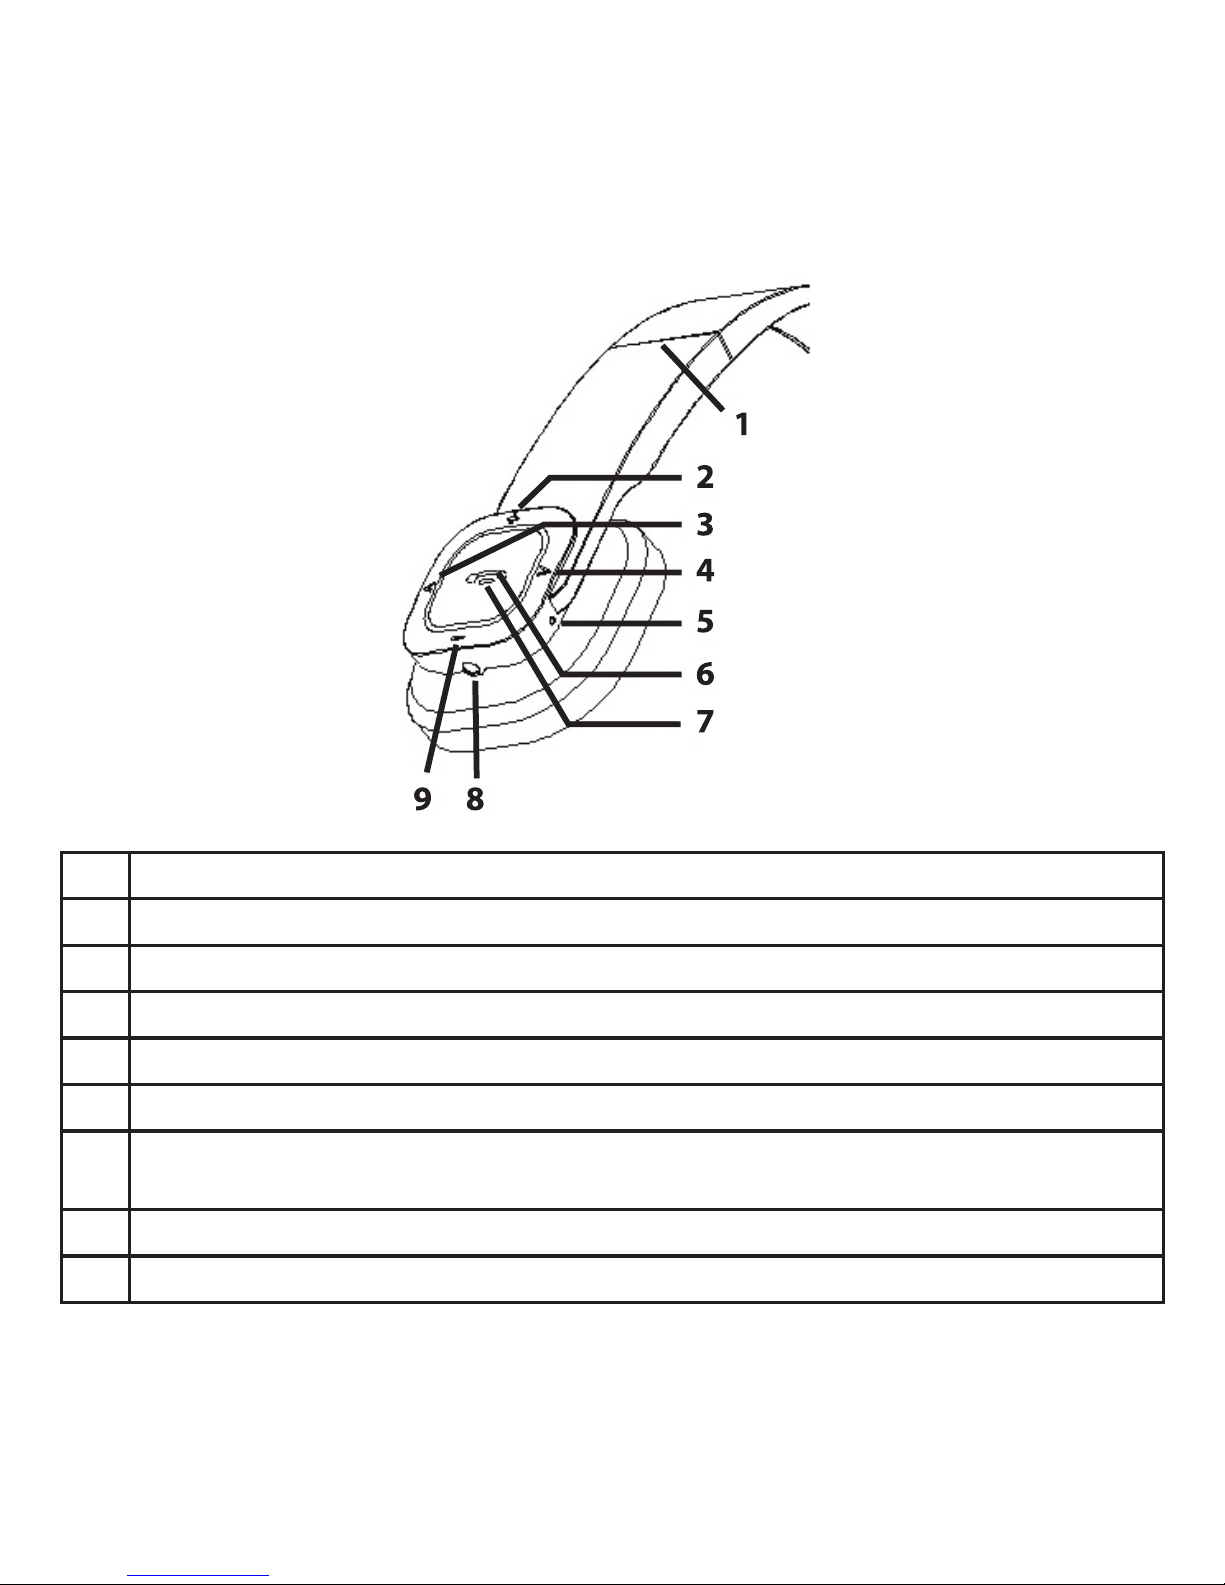
1 Foldable and retractable headband
2 + button: Volume up
3 ﹤ button: Previous track
4 ﹥ button: Next track
5 Built-in microphone
6 LED indicator
7 Multi-Function Button (MFB): Power on/power o/answer a call/end a call/reject a call/
microphone mute/call transfer/redial last number/voice dial/pause/play
8 Charging jack
9 – button: Volume down
Page 5

5
OPERATION
Charging the headset
The stereo headset comes with a built-in rechargeable battery. Prior to using the stereo headset it is
recommended to charge the battery fully for the rst time. The charging time is about three hours.
When the stereo headset battery is low, the red LED ashes twice and the headset emits three tones
every 20 seconds. Please recharge the headset battery.
Using the USB cable
Connect the USB cable to a computer USB port and the 2.5mm plug to the charging jack of the
headset. The red LED is on while charging. The charging time is about three hours to charge the
battery fully. When charging cycle is completed, the red LED will turn o.
Note: The USB cable can vary based on dierent countries or areas and actual demands.
The battery is recyclable
WARNING! Do not expose the battery to excessive heat or re. Follow applicable regulations when
disposing of the battery.
Page 6

6
Turning the stereo headset on and o
Function Action LED indicator
Power on Press and hold MFB button for
3 to 5 seconds until blue LED
ashes
Blue LED ashes every second
Power o Press and hold MFB button for
3 to 5 seconds until red LED
ashes
Red LED ashes once for 1
second
Note: In order to save the battery charge, the stereo headset will turn o automatically after ve
minutes if no devices are connected to the stereo headset.
Enter pairing mode
Function Action LED indicator
Entering pairing mode Ensure the headset is turned
o. Press and hold MFB
button for 6 to 7 seconds
until LED ashes red and blue
alternately
LED ashes red and blue
alternately
Note: Pairing mode will last two minutes. If no devices can be connected after two minutes, the stereo
headset will return to standby mode automatically.
Page 7

7
Pairing the stereo headset with a Bluetooth® cell phone
Prior to using the headset for the rst time, you have to pair it with a Bluetooth® capable cell phone.
The pairing procedures can dier between cell phone models and manufacturers. Please refer to
your cell phone user’s manual for further information. The general pairing procedures are as follows:
1. Place the stereo headset and Bluetooth® cell phone approximately three feet apart without
physical obstructions such as walls etc.
2. Enter the headset’s pairing mode (please refer to Entering pairing mode).
3. Activate your cell phone’s Bluetooth® function and set your cell phone to search for Bluetooth®
devices.
4. Select BT-HP1 from the list of devices shown on the cell phone.
5. If and when prompted enter password or PIN “0000”.
6. If prompted by your cell phone to connect, accept the prompt “Yes” (this will vary among cell
phone models).
7. Once the stereo headphones and the cell phone have paired, the blue LED ashes twice or
three times every 4 seconds.
Note: If the pairing process fails, turn o the headset rst and repeat steps 1 through 6 above.
After pairing is successful, the headset and the cell phone will remember each other, and will not
require pairing again. The headset can remember up to 8 paired devices. When the number of
paired devices exceeds 8, the rst one will be removed and replaced.
Every time the headset is turned on, it will connect to last connected device automatically. If you
want to pair it with another device, please turn o the Bluetooth® function of the last connected
devices rst. Pair the headset with the new device according to steps 1 through 6 above.
Page 8

8
Pairing the stereo headset with a Bluetooth® audio device
You can connect the stereo headset to a Bluetooth® audio device transmitter to listen to music
wirelessly. Perform the following steps to pair the device to the stereo headset:
1. Place the stereo headset and Bluetooth® audio device transmitter approximately three feet
apart without physical obstructions such as walls etc.
2. Enter the headset’s pairing mode (please refer to Entering pairing mode).
3. Activate your audio device transmitter Bluetooth® function and set your audio device
transmitter to search for Bluetooth® devices and send a pairing request.
4. When the stereo headset requests a password the Bluetooth® audio device transmitter will
respond with “0000”automatically.
5. Once the stereo headphones and the Bluetooth® audio device have paired, the blue LED
ashes twice every 4 seconds.
Note: The pairing password of the stereo headset is “0000”. The stereo headset can only pair with a
Bluetooth®
transmitter whose pairing password is “0000”. If the pairing process still fails after several
attempts, refer to the
Bluetooth®
audio device transmitter documentation or further information.
Multi-Pairing the stereo headset
The stereo headset can connect with a maximum of two devices simultaneously. One device is a
Bluetooth® cell phone supporting HFP prole, while the other device is a Bluetooth® audio device
supporting A2DP prole. If you want to multi-pair, perform the following:
1. First, pair the stereo headset with a Bluetooth® audio device transmitter (refer to Pairing the
stereo headset with a Bluetooth® audio device).
2. Turn o the Bluetooth® transmitter.
3. Pair and connect the headset with a Bluetooth® cell phone (refer to Pairing the stereo headset
with a Bluetooth® cell phone ”).
4. Turn on the Bluetooth® transmitter, it will connect to the headset automatically.
Note: After a successful multi-pairing, the paired devices will remember each other. Unless pairing
information is deleted because of a new pairing, they will no longer need to pair next time. If the
pairing information is deleted, please connect the cell phone with the stereo headset rst and
then turn on the Bluetooth® transmitter at which time multi-pairing can be performed. For the cell
phones which support the HSP and A2DP at the same time, pairing with stereo headset may occur
simultaneously. In this situation, the Bluetooth® audio device transmitter may not connect to the
headset. 3.
Page 9

9
Re-connecting with a Bluetooth® device
a) Automatic connecting
Every time the stereo headset is turned on, it will connect to last connected device automatically.
b) Manual connecting
When the headset doesn’t connect to a device supporting HFP, press the MFB button twice and the
stereo headset will connect to last connected HFP device.
When the headset doesn’t connect to a device supporting A2DP, quickly press MFB button once and
the stereo headset will connect to last connected A2DP device.
Note: Before connecting to a
Bluetooth®
device, please turn on the Bluetooth device’s Bluetooth
function. On some
Bluetooth®
devices, such as Nokia cell phones for example, you have to allow
automatic connecting in the cell phone’s settings. Please refer to your cell phone’s documentation for
further information.
Wearing the headset
The headband of the headset is foldable and retractable. Adjust the stereo headset to t your head
comfortably. Each side of the stereo headset is marked. Place the stereo headset on the appropriate
side according to the right/left mark on the ear pieces.
Page 10

10
Stereo Headset Phone Functions
Function Action
Cancel a call Quickly press the MFB button.
Answer a call Quickly press the MFB button.
Reject a call Press and hold MFB button for 2 seconds. Release MFB
button and a tone is heard.
End a call Quickly press the MFB button.
Volume up Touch and hold the + button. The volume will increase
to a maximum level.
Volume down Touch and hold the - button. The volume will decrease
to a minimum level.
Call transfer (stereo headset to mobile
phone)
Press and hold MFB button for 2 seconds. Release MFB
button when a tone is heard.
Call transfer (mobile phone to headset) Press and hold MFB button for 2 seconds. Release MFB
button when a tone is heard.
Muting the microphone Quickly press the MFB button twice.
Cancel mute Quickly press the MFB button twice.
Voice dial Press and hold MFB button for 2 seconds. Release MFB
button when a tone is heard.
Redial last number Quickly press the MFB button twice.
Lock/unlock the buttons Press and hold MFB and + button for 2 seconds.
Release the buttons when a tone is heard.
Clear pairing list while stereo headset is
charging
Press and hold MFB button. Then press and hold
the - button for 5 seconds. Release the button when a
tone is heard. The LED will ash red once.
Page 11

11
Stereo Headset Phone Function (Three Way Call)
Function Action
End current call and answer a new incoming
call
Quickly press the MFB button once.
Keep current call and answer a new incoming
call
Quickly press the MFB button twice.
Call transfer (Pick up another call while on a
call)
Quickly press the MFB button twice.
Note: Not all cell phones support all functions listed above. Please refer to your cell phone’s
documentation manual for further information. Certain functions and indication tones maybe vary
with dierent models of cell phones. When the volume is adjusted to the maximum or minimum
settings you will hear a tone. When pressing the answer button on some cell phones, the call will be
transferred to the cell phone. In this case you have to switch the call to the headset manually.
Stereo Headset Phone Music Playback Function
Once the stereo headset is paired to a Bluetooth® cell phone or Bluetooth® transmitter supporting
the A2DP prole you can listen to enjoy music on the headset.
Function Action
Volume up Touch the + button. Touch and hold the +
button the volume will increase to maximum.
Volume down Touch the - button. Touch and hold the - button
the volume will decrease to minimum.
Pause Quickly press the MFB button.
Play Quickly press the MFB button.
Previous track Touch the ﹤ button.
Next track Touch the ﹥ button.
Page 12

12
Note: When playing music on some cell phones, the music will be transmitted to the cell phone’s
speaker instead of the headset. You have to select “transmit the sound via Bluetooth” in the settings
menu and then choose “BT-HP1” as speaker device. The music will then be transmitted to the headset.
Please refer to your cell phone’s documentation further information. If you want to remote control
previous/next track, pause/play, the stereo headset requires your Bluetooth® cell phone or Bluetooth®
transmitter to be paired with the headset and support AVRCP prole. Please refer to your cell phone’s
documentation further information.
Stereo Headset LED Status Indicator
When the stereo headset is connected to a Bluetooth® device the LED will provide the following
status indications on the headset.
LED Indicator Headset Status
LED ashes red and blue alternately Pairing mode
Blue LED ashes once every 3 seconds Not connected to a Bluetooth® device
Blue LED ashes twice every 5 seconds Connected to a HFP device or A2DP device
Blue LED ashes 3 times every 5 seconds Connected simultaneously to a HFP device and
A2DP device
Blue LED ashes twice or 3 times every 5
seconds
Calling in process
Blue LED ashes twice every 4 seconds Incoming call
Blue LED ashes once every 5 seconds Call in process
Red LED ashes twice every 20 seconds Battery charge is low
Page 13

13
Stereo Headset Status Tones
When the stereo headset is connected to a Bluetooth® device the LED will provide the following
status indications on the headset.
Tone Headset Status
Two short tones Entering pairing mode
Two tones every 5 seconds Two tones every 5 second during a call
indicates the microphone is muted
Three tones every 20 seconds Battery charge is low
CARE AND MAINTENANCE
The following recommendations will ensure you get the maximum use and enjoyment from your
stereo headset.
• Do not expose the headset to liquid, moisture or high humidity to avoid damaging internal
circuitry.
• Don’t use abrasive cleaning solvents to clean the headset.
• Do not expose the headset to extremely high or low temperature as this can destroy the battery
or distort certain plastic parts.
• Don’t attempt to disassemble the headset.
Page 14

14
SPECIFICATIONS
Bluetooth® specication Bluetooth® V2.1+EDR
Bluetooth® proles HSP, HFP, A2DP and AVRCP
Operating distance 30 Feet (10 meters), Class II
Operating time Music: Up to 10 hours
Talk: Up to 11 hours
Standby time 200 hours
Charging input DC 5A 130mA
Charging time Approximately 3 hours
Dimensions 6.22 x 6.14 x 2.16 inches (158×156×55mm)
Weight 3.63 ounces (103 grams)
Page 15

15
AUDIOVOX ELECTRONICS CORP. (the Company) warrants to the original retail purchaser of this product that should this product or any
part thereof, under normal use and conditions, be proven defective in material or workmanship within 12 months from the date of original
purchase, such defect(s) will be repaired or replaced with reconditioned product (at the Company’s option) without charge for parts and repair
labor. A game controller, if supplied, is similarly warranted for ninety (90) days.
To obtain repair or replacement within the terms of this Warranty, the product is to be delivered with proof of warranty coverage (e.g. dated
bill of sale), specication of defect(s), transportation prepaid, to the Company at the address shown below.
This Warranty does not extend to the elimination of externally generated static or noise, to correction of antenna problems, to costs incurred
for installation, removal or reinstallation of the product, or to damage to digital memory/media devices, gaming devices, discs, speakers,
accessories, or vehicle electrical systems.
Th is Wa rr a nt y do e s not ap ply to a ny p ro duc t or pa r t the re o f whi ch , in th e o pi n io n of the Com pa ny, h a s suf fe r ed or been
da ma ged th rou gh al ter ati on, imp ro per in sta lla ti o n, misha nd l in g , mis us e, neg lec t, ac cid ent , or by rem ov a l or d ef a ce m en t
of t h e fac to ry s e ri a l num be r/bar c o de la be l(s). THE E X TE N T OF TH E C OMP ANY ’S LI A BI LIT Y U ND E R THI S W AR R AN T Y
IS LIM ITE D TO THE REP AIR OR REPL ACE MEN T PR OVI DE D ABO VE A ND, IN NO EVENT , SHALL THE COM PAN Y’S
LI AB ILITY E X CE E D T HE PU R CH A SE PR ICE PA ID BY PURC HA S ER FO R T H E P RO D UC T.
Th is Wa rr ant y i s i n l ie u o f al l oth er ex p re s s warra nt ies o r l i ab i li t ie s . ANY IM P LI ED W AR R AN T IE S , I NC L UD I NG AN Y IM PL IE D W AR R AN T Y OF M ER C HA N TA B IL ITY , SH ALL BE L IM I TE D TO T HE DUR ATI ON O F THI S WRI TT E N WAR RA N TY .
AN Y AC TIO N FO R BR E AC H OF A NY W ARR ANT Y HE R EU NDE R IN C LU D IN G AN Y IM P LI E D W ARRAN TY O F ME R CH ANT AB IL ITY MU S T BE B RO U GH T WIT HIN A P ER IOD O F 24 M ONT HS F R OM D ATE O F OR IGI NAL P UR C HA S E. I N N O CA SE
SH AL L TH E CO MPA NY BE L IAB LE F O R AN Y CO N SE Q UE N TI AL O R I NC IDE NTA L DA M AG E S FO R BR E AC H OF T H IS O R
AN Y OTH ER WAR RAN TY. No per son or r ep res ent ati ve i s aut ho riz ed t o ass um e fo r t h e Com pa ny any l i ab i li t y other th a n
ex pr essed h e re i n i n c on n ec t io n w ith th e s al e of th i s p ro d uc t .
Some states do not allow limitations on how long an implied warranty lasts or the exclusion or limitation of incidental or consequential damage so the above limitations or exclusions may not apply to you. This Warranty gives you specic legal rights and you may also have other
rights which vary from state to state.
12 MONTH LIMITED WARRANTY
Applies to Audiovox Mobile Video Products
128-5495F
Audiovox Electronics Corporation, 150 Marcus Blvd., Hauppauge, New York 11788
1-800-645-4994
Page 16

128-9135
 Loading...