

Page 1
- 1 -
User's Manual
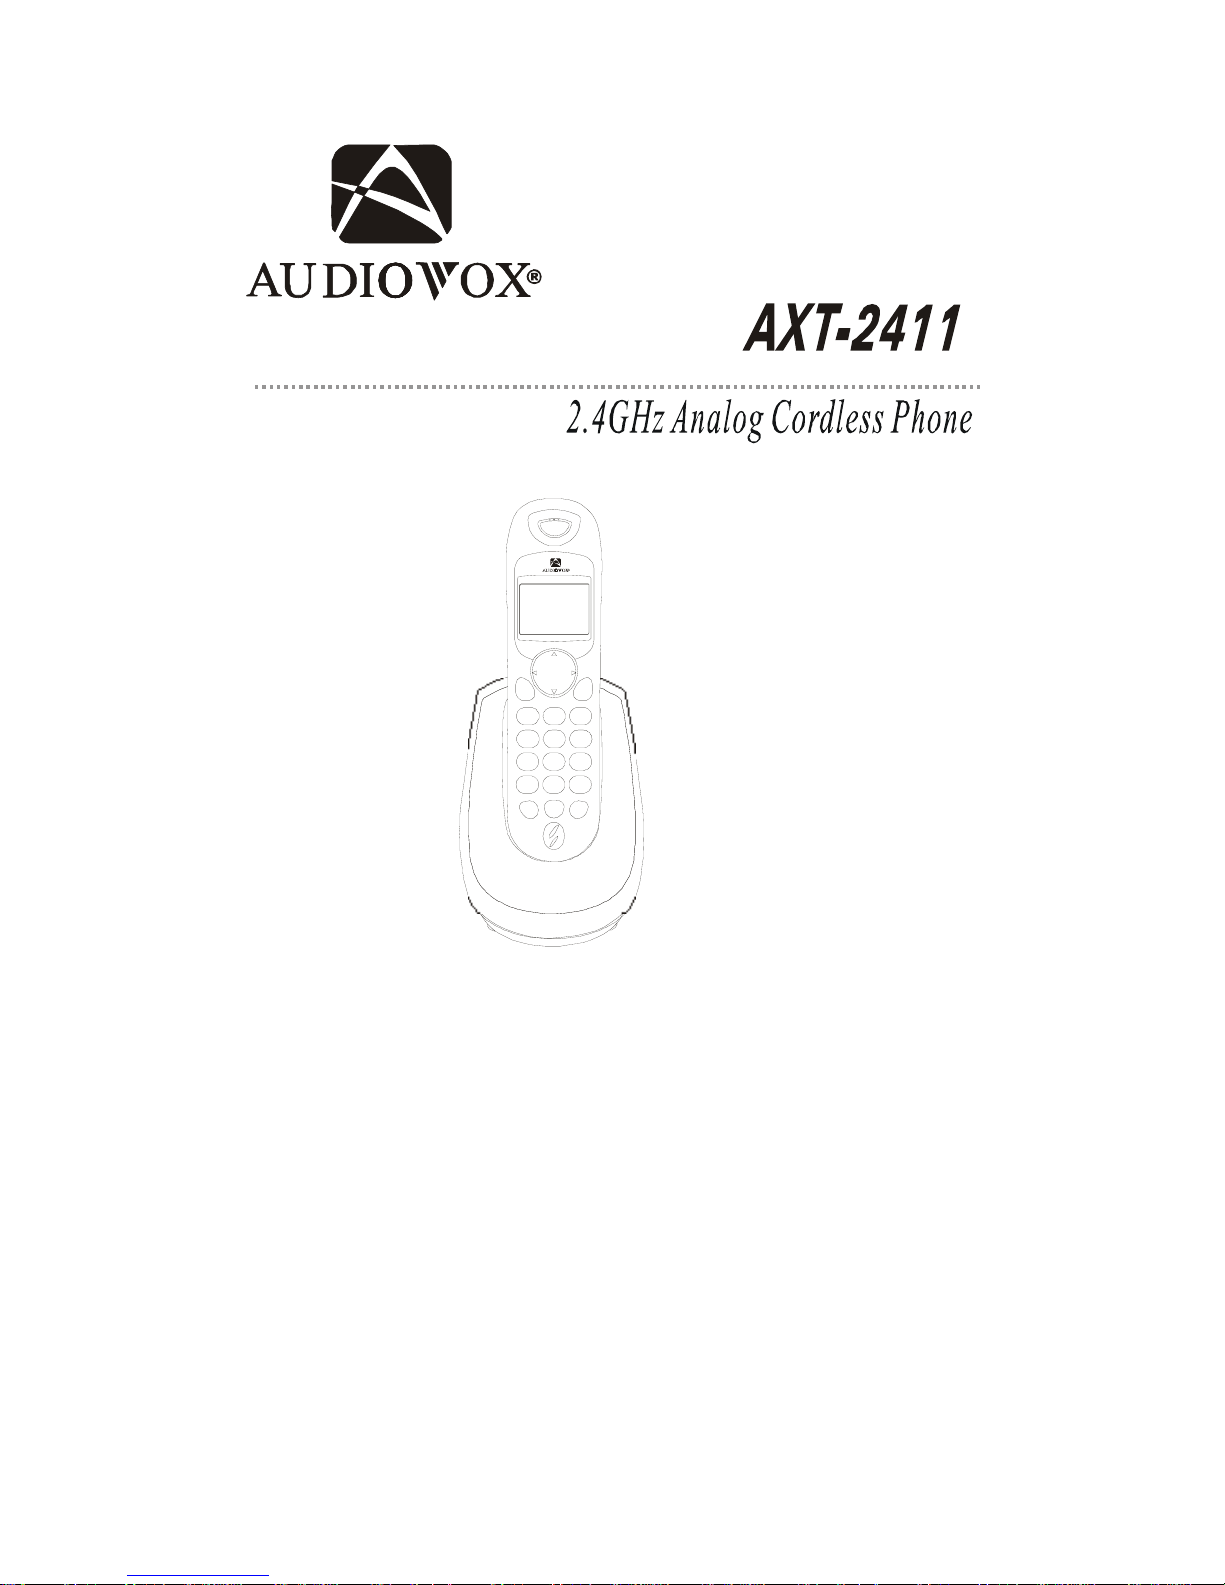
Congratulations on your selection of the AXT2411 from AUDIOVOX
Phones.This quality 2.4GHz cordless telephone with Caller ID and Call
Waiting,like all Genuine AUDIOVOX products,has been designed to give
you many years of continuous service and represents the best value for
your money,It requires little maintenance and is easy to setup and operate.
Page 2
- 2 -
IMPORTANT SERVICE INFORMATION
Read this manual before attempting to setup or use this instrument. It contains important information regarding safe installation
and use. Keep this manual for future reference. Also save the carton, packing and proof of purchase to simplify and accelerate
any needed action.
• WARNING
To prevent fire or shock hazard, do not expose this product to rain or any type of excess moisture. If accidentally dropped into
water, the AC adaptor should immediately be
unplugged from the wall along with the telephone line cord.
THIS SYMBOL IS INTENDED TO ALERT THE USER OF THE
PRESENCE OF IMPORTANT OPERATING AND MAINTENANCE
(SERVICING) INSTRUCTIONS IN THE OWNER’S MANUAL.
AXT2411
CARTON CONTENTS
· AXT2411 Base and Handset
· Rechargeable Ni-MH Battery Pack
· Telephone Line Cord
· AC Adaptor
· User’s Manual
· Warranty Card
Page 3

- 3 -
TABLE OF CONTENTS
Important Service Information...........................................................................................1
Warning...............................................................................................................................1
Carton Contents.................................................................................................................1
Safety Instructions.............................................................................................................4
Handset Controls................................................................................................................6
BaseUnitControls.............................................................................................................8
Getting Started...................................................................................................................9
Cordless Telephone Operation...........................................................................................11
Preparing for Use..........................................................................................................11
Receiving Calls..............................................................................................................11
Placing Calls..................................................................................................................12
Redial Feature...............................................................................................................12
Using the Headset Feature............................................................................................13
Caller ID System Operation...............................................................................................14
Caller ID System..........................................................................................................14
Viewing Caller Information During Incoming Calls......................................................14
Caller ID with Call Waiting...........................................................................................15
Message Waiting...........................................................................................................15
One-Touch Voice Mail Dialing.....................................................................................15
Caller List.....................................................................................................................16
Viewing the Caller List...........................................................................................16
Placing a Call from the Caller List..........................................................................16
Storing Caller ID Records into the Directory (Phone book) ................................17
Deleting a Single Record.........................................................................................17
Deleting all Records................................................................................................17
Name and Telephone Number Directory (Phone book) ....................................................18
Viewing the Directory (Phone book) ....................................................................18
Storing Phone Numbers..........................................................................................18
Telephone Keypad Characters...............................................................................19
Placing Calls from the Directory (Phone book) .....................................................20
Editing a Stored Number in the Directory (Phone book) ......................................20
Page 4

- 4 -
Deleting a Stored Number in the Directory (Phone book) ....................................21
Preferred Calls........................................................................................................21
Blocked Calls......................................................................................................21
Function Settings.............................................................................................................22
A. Setting the Ringer Level.....................................................................................23
B. Changing the Language.............................................................................23
C. Turning the First Ring ON or OFF..............................................................24
D. Setting the Time and Date..........................................................................24
E. Adjusting the Contrast.................................................................................24
F. Setting the PBX Number..............................................................................25
G. Changing the Flash Time...........................................................................25
H. Changing the Pause Time..........................................................................26
I. Programming One-Touch Voice Mail Dialing..........................................26
J. Deleting Message Waiting Indication......................................................26
K. Setting the Area Code..................................................................................27
Security System................................................................................................................28
Recharging the Battery Pack.........................................................................................29
Changing the Battery Pack............................................................................................29
Problem Solving..............................................................................................................30
Technical Information......................................................................................................32
Industry Canada Notice..................................................................................................33
Page 5

- 5 -
SAVE THESE INSTRUCTIONS
IMPORTANT SAFETY INSTRUCTIONS
To reduce the risk of fire, electric shock and/or injury, always follow these basic safety precautions when using your cordless
telephone equipment.
1. Read and understand all instructions.
2. Follow all warnings and instructions marked on the telephone.
3. Do not use this telephone near a bathtub, wash bowl, kitchen sink, or laundry tub, in a wet basement, near a swimming pool, or
anywhere else where there is water.
4. Avoid using a telephone (other than a cordless type) during an electrical storm. There may be a remote risk of electric shock from
lightning.
5. Do not use the telephone to report a gas leak in the vicinity of the leak.
6. Use only the Power Cord and Battery Pack indicated in the Owner’s Manual. Do not dispose of the Battery Pack in a fire. The
Battery Pack may explode. Check with local codes for possible special disposal instructions.
7. Operate this telephone using the electrical voltage as stated on the Base Unit or in the
Owner’s Manual. If you are not sure of the voltage in your home, consult your dealer or
local power company.
8. Unplug this telephone from the wall outlet before cleaning or replacing the Battery Pack.
Do not use liquid cleaners or aerosol cleaners on the telephone. Use a damp cloth for
cleaning.
9. Place this telephone on a stable surface. Serious damage and/or injury may result if the
telephone falls.
10. Do not cover the slots and openings on this telephone. This telephone should never be
placed near or over a radiator or heat register. This telephone should not be placed in a
built-in installation unless proper ventilation is provided.
11. Do not place anything on the power cord. Install the telephone where no one will step or
trip on the cord.
12. Do not overload wall outlets or extension cords as this can increase the risk of fire or electric shock.
13. Never push any objects through the slots in the telephone. They could touch dangerous voltage points or short out parts that could
result in a risk of fire or electric shock. Never spill liquid of any kind on the telephone.
14. To reduce the risk of electric shock, do not take this telephone apart. If service or repair work is required on this telephone, take it
to a qualified service representative. Opening or removing covers may expose you to dangerous voltage or other risks. Incorrect
reassembly can cause electric shock when the appliance is subsequently used.
15. Unplug this telephone from the wall outlet and consult a qualified service representative
in any of the following situations.
A. When the power supply cord is frayed or damaged.
B. If liquid has been spilled into the telephone.
C. If the telephone has been exposed to rain or water.
Page 6

- 6 -
D. If the telephone does not operate normally by following the operating instructions.
Adjust only those controls that are covered by the operating instructions. Improper
adjustment may require extensive work by a qualified technician to restore the
telephone to normal operation.
E. If the telephone has been dropped or the case has been damaged.
F. If the telephone exhibits a distinct change in performance.
INSTALLATION PRECAUTIONS
1. Never install telephone wiring during a lightning storm.
2. Never install telephone jacks in wet locations unless the jack is specifically designed for
wet locations.
3. Never touch uninsulated telephone wires or terminals unless the telephone line has
been disconnected at the network interface.
4. Use caution when installing or modifying telephone lines.
BATTERY CAUTIONARY INSTRUCTION
CAUTION:
Risk of explosion if Battery Pack is replaced by an incorrect type. Replace only with the same or equivalent type. Dispose of used
batteries according to the instructions. To reduce the risk of fire or personal injury, read and follow this instructions.
1. Use only the following type and size of Battery Pack:
3.6V DC, 600mAh Rechargeable Ni-MH Battery Pack
2. Do not dispose of the Battery Pack in a fire. It may explode. Check with local codes for
possible special disposal instructions.
3. Do not open or mutilate the Battery Pack. Released electrolyte from a Battery Pack is
corrosive and may cause damage to the eyes or skin. Electrolyte may be toxic if
swallowed.
4. Exercise care in handling the Battery Pack to prevent shorting the Battery Pack with
conductive materials such as rings, bracelets and keys. The Battery Pack or conductor
may overheat and cause burns.
5. Charge the Battery Pack provided with (or identified for use with) this telephone only
in accordance with the instructions and limitations specified in this manual.
6. Observe proper polarity orientation between the Battery Pack and Battery Charger.
ATTENTION:
The telephone that you have purchased contains a rechargeable Battery Pack. The Battery
Pack is recyclable. At the end of its useful life, under various state and local laws, it may be
illegal to dispose of this Battery Pack into the municipal waste stream. Check with your local
solid waste officials for details in your area for recycling options or proper disposal.
Page 7

- 7 -
INDUSTRY CANADA CERTIFIED
RINGER EQUIVALENCE NUMBER
NOTICE: The ringer equivalence number (REN) assigned to each terminal device provides and indication of maximum number
of terminals allowed to be connected to a telephone interface. The termination on an interface may consist of any combination of
devices subject only to the requirement that the sum of the ringer equivalence numbers of all devices does not exceed 5.
INDUSTRY CANADA NOTICE
NOTICE: The industry of Canada label identifies certified equipment. This certification means that the equipment meets certain
telecommunication network protective, operational and safety requirements. The Department does not guarantee the equipment
will operate to the user’s satisfaction.
Before installing this equipment, users should ensure that it is permissible to be connected to the facilities of the local
telecommunications company.
The equipment must also be installed using an approved method of connection. The customer should be aware that compliance
with the above conditions may not prevent degradation of service in some situations.
Repairs to certified equipment should be made by authorized Canadian maintenance facility designated by the supplier. Any
repairs or alterations made by the user to this equipment, or equipment malfunctions, may give the telecommunications company
cause to request the user to disconnect the equipment.
User should ensure for their own protection that the electrical ground connections of the power utility, telephone lines and
internal metallic water pipe system, if present, are connected together. This precaution may be particularly in rural areas.
CAUTION: User should not attempt to make such connections themselves, but should contact the appropriate
electric inspection authority, or electrician, as appropriate
AC ADAPTOR:
For base unit-use only Class II, 120 Volt AC/9V DC Adaptor, 300mA.
The center tip must be positive and the plug must correctly fit the unit’s DC 9V jack.
Page 8

- 8 -
LCD DISPLAY
OPTION/REDIAL/
PAUSE BUTTON
SCROLL UP /VOLUME /
MUTE BUTTON
Key Pad
MICROPHONE
MENU/SET BUTTON
CHANNEL/CODE BUTTON
FLASH/DEL BU TTON
TALK BUT TON
BACK B UTTON
Receiver
MEM / BUTTON
SCROLL DOWN /
VOLUME /
MUTE BUTTON
New Call / MSG Waiting
(Message Waiting) LED
Indicator
UP
MSG
NEW CALL
CHARGE CONTACT
AXT 2411 CONTROLS DIAGRAM
Page 9

- 9 -
DESCRIPTION:
HANDSET CONTROLS:
1. Receiver - Listen to the phone on the receiver.
2. SCROLL UP-DOWN - Press to move around the large LCD Screen.
3. FLASH/DEL (Delete) Button - (FLASH) - Press to answer a call if you have Call
Waiting./ (DELETE) - Press to delete items or individual characters.
4. TALK button - Press to answer an incoming call or to place a call. Press to end a call.
5. Volume DOWN / MUTE Button - Press to temporarily Turn Off the microphone on the
handset. Press again Turn On the microphone on the handset..
6. MEM (Memory) / Temporary Tone (*) Button - MEM (MEMORY) Press to review
the memory status of the handset / Temporary Tone (*) - Press to temporarily change the
dialing mode from PULSE to TONE for Rotary Service Users. (Press once before
entering numbers to access the answering system or electronic banking services, etc.)
7. BACK Button - Press to return the handset to standby mode.
8. Large LCD Screen - Shows call information, phone status, prompts and Directory
Phone book items.
9. Volume UP / MUTE Button - Press to temporarily Turn Off the microphone on the
handset. Press again Turn On the microphone on the handset..
10. OPT(option) /RE (Redial)/PA (Pause) Button - (REDIAL) Press to redial the last
number dialed on the handset. (Pause) Press to insert a pause while dialing. (You will need
the Re/Pa button to dial numbers which use an alternative Long Distance Access Code.)
/ Option - Press to changed the displayed number to 7,10 or 11 digits in the Call Back
Function Feature.
11. MENU/SET Button - MENU - Press to access the Special Functions operation in
standby mode. / SET - Press to save the changes on the listed items on the Menu or Caller
ID Phonebook.
12. Keypad - press to dial the numbers you wish to call, or input information into the Caller
ID Phonebook.
13. CHANNEL / CODE - CHANNEL - Press to change the operating channel when you hear
Interference. / CODE - Press to add additional handset (Optional to two or more handset
Function only)
14. Microphone - Talk on the handset using the microphone.
15. Charge Contacts - For Charging the Battery Pack inside the Handset. We recommend
cleaning the Charge Contacts periodically with a damp cloth.
16. New Call /MSG Waiting LED Indicator - (New Call) Blinks to indicate that you have
a new Caller ID call stored in memory.(Message Waiting) Blinks when receiving a Message
Waiting signal, if you have subscribed to a Voice Mail message service from your local
Telephone company.(see page 15.)
Page 10
- 10 -
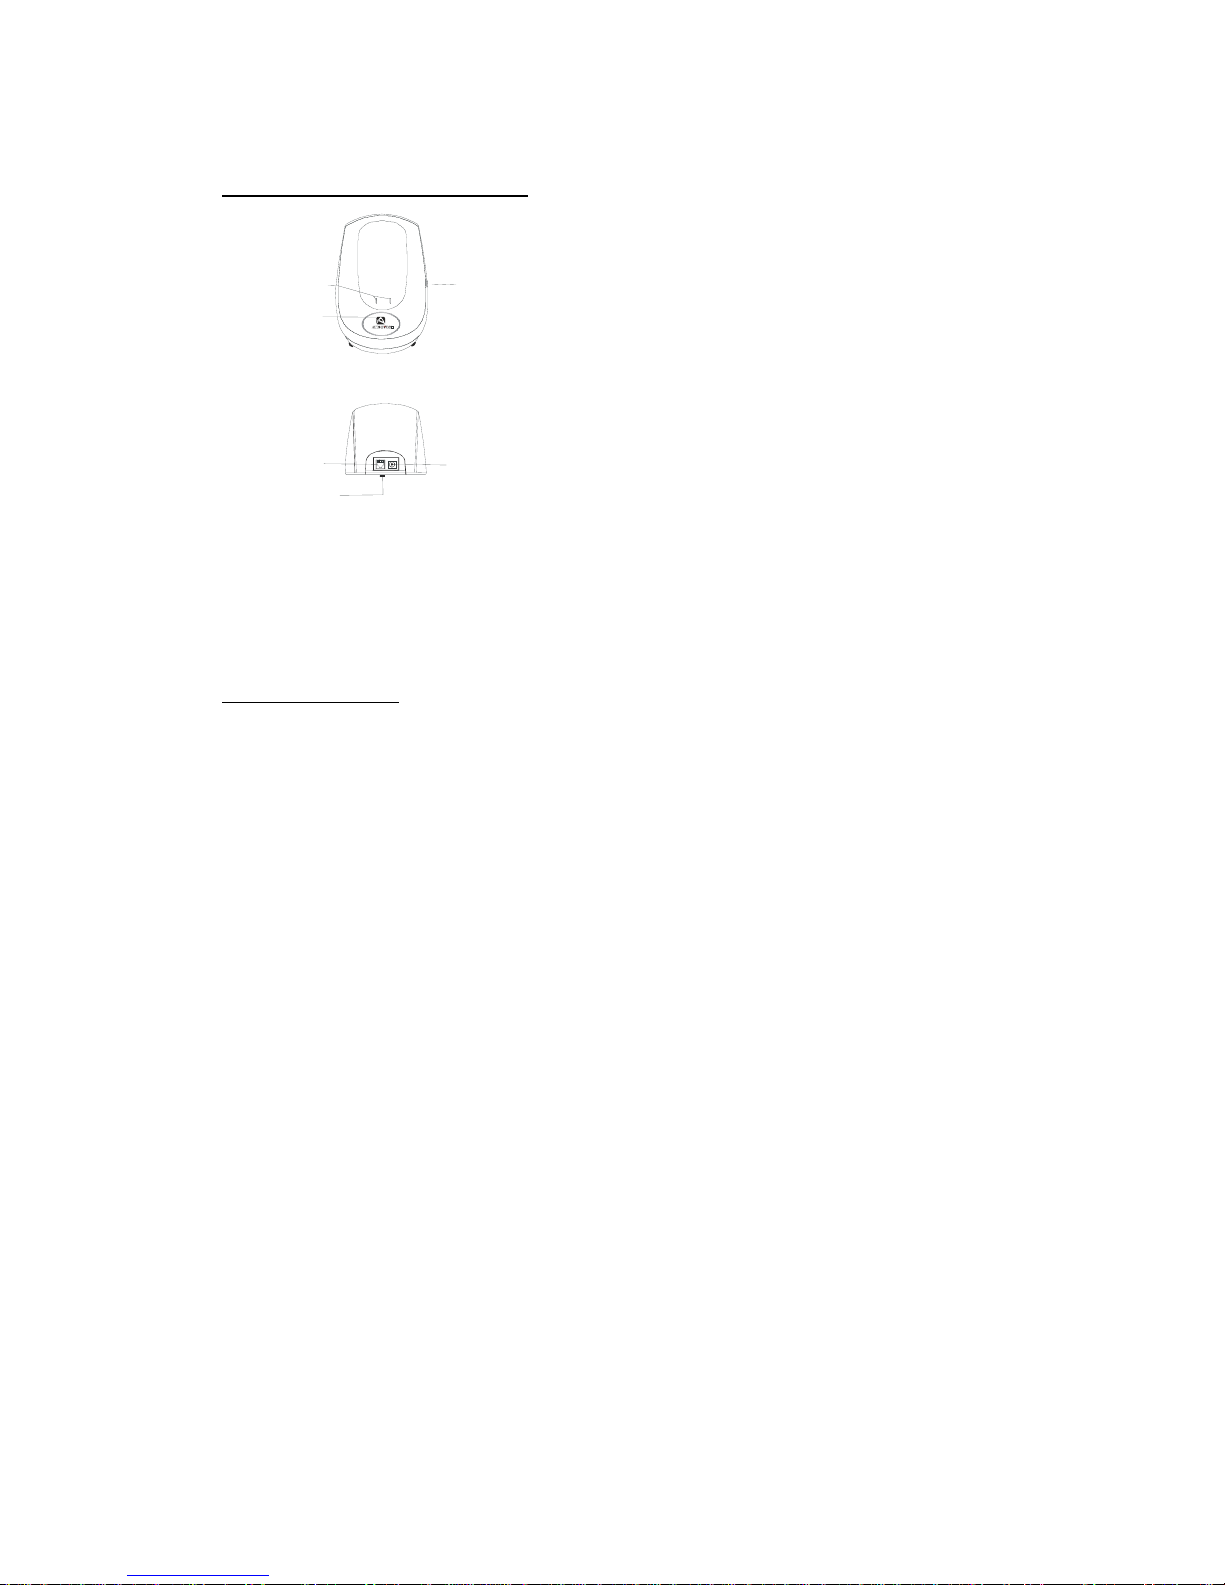
AXT 2411 CONTROLS DIAGRAM
R
PAGE
POWER JACK
LINE JACK
IN USE /CHARGE
Light Indic a tor
Base Charge
Ter minal
TONE/PULSE
Switch (Bottom)
(Base unit front view)
(Base unit rear view)
DESCRIPTION:
BASE UNIT CONTROLS:
1. TONE/PULSE Select Switch - to select Tone or Pulse Mode.
2. Power in Connection Jack
3. Telephone Line Connection Jack
4. Base Charge Terminals - For Charging the Handset Battery Pack. For best
performance, clean the charge terminals periodically with damp cloth.
5. In use / Charge Light Indicator - (IN USE) Lights up to indicate that the handset is
in TALK Mode. (CHARGE) lights up when the handset is placed on the base unit for
Charging.
Page 11

- 11 -
Battery pack
(DC 9V/300mA adaptor)
Power Jack
Telephone Jack
Line Cord
INSTALLATION
Connecting Your Phone
This section is a reference guide to the basic functions and operations of your cordless telephone. For more detailed descriptions of the
operations and features of this telephone, refer to the
Contents on page 2.
1. Carefully remove your cordless telephone from its shipping carton. If there is any visible
damage, do not attempt to operate this equipment. Return it to the place of purchase.
2. Check to be sure you have all items that come with this cordless telephone system. You
should have one Handset, One Base Unit, one AC ADAPTOR,
one Battery Pack, Telephone Line Cord, and Owner’s Manual.
POWER CONNE CTION
CAUTION:
For BASE Unit - Use only Class II, 120 Volt AC / 9V DC Adaptor, 300mA.
The center tip must be positive and the plug must correctly fit the unit’s DC 9V jack.
1. Insert the small plug on the end of the AC ADAPTOR into the Power-In Connection Jack
at the back of the Base Unit or Charger Unit.
2. Plug the AC ADAPTOR into a 120V AC wall outlet.
3. Insert one plug of the Telephone Line cord into the house telephone Jack and the other end
into the Telephone Line Connection Jack at the back of the base unit. (If you have an older
4-prong Telephone jack, you will need an RJ-11C Telephone jack adaptor. this adaptor is
available at the same place you purchased your telephone)
Battery Installation
1. Install the Handset Battery Pack by plugging it into the Battery Connector inside
the
Battery Compartment.
2. Place the Battery Pack inside the Battery Compartment.
3. Slide the Handset Battery Compartment
Cover firmly into place in its closed position.
4. IMPORTANT: Before initial use, charge the Handset for 12
hours. Place the Handset on the Base Unit and make sure
that the CHARGE LED indicator on the Base Unit lights up.
Page 12

- 12 -
INITIAL SET UP
Before you can use your cordless telephone, you must charge the Handset for 12 hours. Failure to do so will require more
frequent charging of the Battery Pack.
1. Place the Handset on the Base Unit, and another Handset on the Charger Unit for 12
hours.
2. After 12 hours, remove the Handset from the Base Unit.
Setting the TONE/PULSE Switch
A. If your home is equipped with a tone dialing system, set the TONE/PULSE Select
Switch to the TONE position.
B. If you have a rotary dialing system, set the TONE/PULSE Select Switch to the PULSE
position.
C. If you are not sure which system you have, set the TONE/PULSE Select Switch to the
TONE position. Press the Talk button on the Handset and make a call. If the call
connects, leave the switch as is; otherwise set to the PULSE position.
CAUTION: The cordless telephone operates at a frequency that cause interference to nearby TVs and VCRs; the base phone
should not be placed near, or on top of a TV or VCR. If interference is experienced, moving the cordless telephone far away from
the TV or VCR will often reduce or eliminate the interference.
Handset Registration to Base Unit (For two or more Handsets Only)
The Base Unit is capable of Registering maximum up to Three Handsets. To register the handset or additional handset, At Stand
By Mode - Press and Hold Base PAGE button until all extension Handset are successfully registered to the Base. The Base LED
will light up to indicate it is waiting for the “registration” of additional handset. Press CH/CODE button of Handset 1 until a
“beep” is heard, press the CH/CODE button of Handset 2 until a “beep” is heard, and press the CH/CODE button of Handset 3
until a “beep” is heard. Release the Page button after the last handset is successfully registered.
NOTE: If you have an existing single handset and wish to add another handset, you should re-register the existing handset after
registering the new handset.
Page 13

- 13 -
TELEPHONE OPERATION
To Place a Call
1. Press the TALK button.
2. Wait until you hear a dial tone and then
dial the phone number.
3. When you have finished your call, press
the TALK button again or place the
Handset on the Base Unit.
OR
1. Dial the phone number. If you made any
mistake during the input of number, you can
delete the number by pressing FLASH/DEL to
correct or change the number.
2. Press the TALK button. The number
displayed will be dialed out.
3. When you have finished with your call,
press the TALK button again or place
the Handset on the Base Unit.
NOTE: The Call Timer will start to count 10 seconds after you press the TALK button.
To Receive a Call
1. When the phone rings, the LCD Screen
will show “RING.” If you have Caller ID,
the LCD Screen will show the Caller ID
information after the first ring.
2. With the Handset off the Base Unit,
press the TALK button. Start your
conversation. The Call Timer starts to
count after 10 seconds.
3. To end your conversation, either press the
TALK button or place the Handset on the
Base Unit. If you place the Handset on the
Base Unit charge cradle, you activate the
Automatic standby feature.
TA LK
Call Timer Display
02 08
Minutes
Seconds
Page 14

- 14 -
Redial Feature
1. If you get a busy tone, press the TALK
button or place the Handset on the Base
Unit to hang up.
2. Later, press the TALK button again.
3. Listen for a dial tone.
4. Press the OPTION/RE/PA button. This
will automatically redial the last telephone
number you called.
5. When you have finished with your call,
press the TALK button again or place
the Handset on the Base Unit.
Call Transfer Feature (For Two or More Handsets Only)
At Talk Mode - Press the SET button followed by Handset number you wish to transfer the call. i.e. The call is now on Handset 1
and you wish to transfer the call to Handset 2, to do this - Press SET button on Handset 1 and Press key number 2, both handsets
will ring, Handset 2 can take the call from Handset 1 by pressing the TALK button on Handset 2.
Handset Volume Setting
While the Handset is at TALK Mode, you can adjust the receiver volume by pressing the UP or DOWN button to Low, Medium
and High setting.
Mute Function
At Talk mode - Press and HOLD the UP arrow Key for 2 seconds to Mute the microphone on the handset, the LCD d will show
“MUTE” to indicate the handset Microphone is Temporarily turned OFF, the Called Party can not hear you. To go back to TALK
mode with the Called Party, Press and HOLD the UP arrow key for 2 seconds to go back to TALK mode, the handset LCD will
display “TALK”.
Multi Channel Access
Your cordless telephone lets you select a channel from 40 frequencies available to transmit signals between the base unit and the
handset. When you notice interference from other cordless telephones, change to another channel by pressing the
CHANNEL/CODE button on the handset.
Page 15

- 15 -
Flash Function
Used to access custom Calling Features such as Call Waiting or Three-Way Calling provided by your local phone company.
Consult your local phone company for more details.
Used to reset the Dial Tone - In case the number you dia led is busy, you can Press FLASH/DEL to reset the Dial tone without
cutting off the telephone line connection.
Back Funtion
Used to reset the Handset to Standby mode. Press BACK button to exit and return to standy in case of any invalid input during
Menu programming or unwanted operation done.
Pause Function
In some cases such as PBX or long distance service, a pause may be needed in the dialing sequence. Pressing the Pause
(OPTION/RE/PA) button on the handset inserts a few seconds of delay between dialed numbers. Pause(s) can be inserted into the
programmed dialing sequence in the memory dialing.
Mixed Mode Dialing (Temporary Tone Dialing)
If you only have pulse dialing available in your area, accessing special services (bank by phone, etc.) require a tone signal. ensure
that your TONE/PULSE switch is set to PULSE. While in TALK mode, press the TONE (*) button to switch from Pulse to Tone
dialing temporarily. Pulse dialing mode resumes when the call is ended.
PAGE Function
If you have misplaced the handset or need to alert the person nearby the handset, press the PAGE button on the base unit.
Pressing this button once will activate the handset to ring for thirty seconds, provided that the handset is on standby mode and
located within transmitting range. The handset LCD panel will light up while the base unit is paging it. Press Page buttong again
to stop.
Low Battery Warning Indication
At Talk Mode - When the handset battery voltage level is low, the BATT LOW icon on the handset LCD panel will start to blink
and a “beep” sound will be heard every 8 seconds interval. Return the handset to its cradle on the Base unit or Charger Unit for
charging.
At Standby Mode - When the handset battery voltage level is low, the “LOW BATTERY” will be displayed on the handset LCD.
Return the handset to its cradle on the Base unit or Charger Unit for charging.
Page 16

- 16 -
55 1645 61 1234 88 852691 10 20
OUT OF AREA
PRIVATE
CALLER ID OPERATION
This telephone automatically displays an incoming caller’s name and telephone number together with the date and time of the call. It
records up to 30 calls and stores the data in
Memory.
IMPORTANT: You must subscribe to the Caller ID service from your local telephone company to utilize this feature.
Viewing Caller Information During Incoming Calls
When there is an incoming call, the name and the telephone number of the caller will automatically appear after the first ring. Press the
UP
or DOWN button to view a name or number with more than 12 characters.
OR
Caller’s telephone number will appear if the caller’s name is
not available.
OR
“OUT OF AREA” will appear when Caller ID information is
not available. The origin of the call does not support the
Caller ID system (including international calls).
OR
“PRIVATE” will appear if the caller’s name and/or
telephone number is blocked.
OR
“MESSAGE” will appear when a Voice Mail Message
has been received and is stored by the Message Waiting
service provided by the telephone company.
Page 17

- 17 -
Caller ID with Call Waiting
When you subscribe to Call Waiting service from your local telephone company, this Mixed Mode Dialing (Temporary Tone Dialing)
telephone will display the name and number of the second caller while you are having a phone conversation
with the first caller.
When a new call comes in while you are talking, you will hear a notification beep from the Handset
and the volume is momentarily muted. The new caller’s name and phone number, if available,
appears on the display.
1. When you receive a “Call Waiting” call and you want to connect the call, press the
FLASH/DEL button and start talking with the second caller. The active call will be placed
on Hold.
2. Press the FLASH/DEL button to alternate between calls.
3. Press the TALK button or place the Handset on the Base Unit to end the call.
“MESSAGE” (Message Waiting)
The Message Waiting LED indicator will blink when there is a message for you from your telephone company if you have subscribed to
Voice Mail message service and if you have requested Visual Message Indication from your local telephone company. “MESSAGE”
will appear on the LCD Screen in standby mode. (can turn off)
NOTE: This function requires voice mail subscription from the local telephone company. Furthermore, the local phone company must
provide a type of voice mail signaling called “FSK” (Frequency Shift Key). Not all telephone companies have the visual message
waiting feature available. Please contact your local telephone company to check if this is available in your area.
Page 18

- 18 -
88 852691 1020
111- 22 2 2
10
6 26 - 111- 2 22 2
10
1- 6 2 6 - 111- 2 22 2
10
Caller List
This phone automatically stores the last 30 calls received. It records call information such as caller’s name and telephone number
together with the date and time of the call. The NEW CALL LED indicator will blink to indicate that you have a new Caller ID call
stored in
memory.
Viewing the Caller List
1. With the Handset in standby mode, press the SCROLL UP or DOWN button.
2. Any unviewed (new) calls will be displayed first.
The most recent call will be displayed. The
information on the call will be displayed with the name,
number, date and time that the call was received.
3. To scroll to the next call, press the SCROLL UP
or DOWN button. Pressing the
SCROLL DOWN
button will go through the calls from the last call received to the first
Caller ID record. Pressing the SCROLL UP
button will allow you to view the calls from
the first call received to the last.
4. The name or number with 12 characters or less will be displayed on the LCD screen, if there
are more than 12 digit numbers or characters, it will be displayed right after the first 12
characters are displayed on the LCD screen.
5. Press FLASH/DEL two times if you want to delete the current reviewed number or press the
BACK button to return to STANDBY mode.
Placing a Call from the Caller List
You can place a call from the Caller List by using the Caller ID Callback feature.
1. Press the SCROLL UP
or DOWN button to find the Caller ID record you wish to
call back.
2. Press the OPTION/RE/PA button to change the displayed number to 7, 10, or 11 digits.
The first dialing option displayed after pressing
OPTION/RE/PA once is the Incoming Caller’s
number.
Press once the OPTION/RE/PA button for
the second time, the displayed number will
be Local Area Code + Incoming Caller’s
number
Press twice the OPTION/RE/PA button for the
third time, the displayed number will be Long
Distance Code + Local Area Code + Incoming Caller’s number.
3. Press the TALK button to dial the displayed number.
4. To end a call, either press the TALK button or
place the Handset on the Base Unit.
Page 19

- 19 -
Saving the Name and Number in the Caller List into the Directory (PHONE BOOK)
1. Press the SCROLL UP or DOWN button to find the record you wish to store into
the Directory (Phone book).
2. Press and hold the MEM button.
3. You will hear a “beep” tone confirmation to
indicate the number has been save into the
Phonebook.
4. If the number you wish to save is already in
the Phonebook, The handset will display
“REPEAT” and will not be save into the Phonebook.
5. If you wish to edit the newly stored number,
edit it in the Directory (Phone book)
(XXX “Editing a Stored Number”).
6. Press the BACK button to exit the Caller ID list.
Deleting Caller ID Records
When viewing the Caller ID information you can delete a single call record or all of the call records.
Deleting a Single Record
1. Press the SCROLL UP or DOWN button
to find the record you wish to delete.
2. Press the FLASH/DEL button. The LCD
Screen will display “DELETE ?”
3. To delete the record, press the FLASH /DEL
button again. You will hear a “beep” tone
confirmation to indicate the number has been
deleted from the CID Records
4. Press the BACK button to exit the Caller ID list.
Deleting All Records
1. Press the SCROLL UP or DOWN button once,
The Handset will display the CID Information summary.
2. Press and hold the FLASH/DEL button. The LCD
Screen will prompt “DELETE ALL?”
3. To delete all of the Caller ID records, press the
FLASH/DEL button. The LCD Screen will show
“DELETED” and then return to standby mode.
Page 20

- 20 -
UP
MSG
NEW CALL
Name and Telephone Number Directory (PHONE BOOK)
This Directory (Phone book) lets you scroll through the list to find the person you need
for one touch dialing. You can store up to 30 names and telephone numbers in the Memory.
Viewing the Directory (Phone book)
1. Press the MEM (Memory) button, the handset
will show the total number of Memory available.
2. Press the Telephone Keypad 2/ABC to 9/WXYZ
button that corresponds to the first letter of a
Caller’s name . Press the SCROLL UP
or DOWN
button to find the record you wish to view.
3. Press the UP or DOWN button to
view a name or number with more than 12
characters (as indicated by the arrows in the top
line of the display).
4. Press the MEM (Memory) button to exit the
Memory (Phone book).
Storing Phone Numbers
1. With the Handset in standby mode, dial the telephone number
you wish to store, using the telephone keypad 1 to 0 buttons
you can store up to 24 digits, briefly press the OPTION/RE/PA
button to insert a pause into the number.
2. Press MEM button to enter the name store, enter the name you wish to store using the
Telephone Keypad 2/ABC to 9/WXYZ buttons to enter the name, press 1 button to create
a space or to enter a new letter.
3. Press and hold the MEM button to store the number into memory.
NOTES:
1. If there are no memory locations left in the speed dial Directory (Phone book)
the LCD Screen will display “MEMORY FULL.” To continue with memory
programming, you must delete or edit existing speed dial numbers.
2. If you mis-type entering the phone number, you can move through the number and
edit it by pressing the UP or DOWN button. To delete a character
or number inside the cursor, press the FLASH/DEL button.
Page 21

- 21 -
Telephone Keypad Characters
The Telephone Keypad buttons are used to enter characters when entering names
and numbers. Press the appropriate Telephone Keypad button to get the following
characters. You can store a maximum of 18 characters on the letter icon and a maximum
of 22 digits on the number icon.
EXAMPLE:
If you want to enter the name “CLEO” with telephone number “222-555-33-666,” dial this
sequence:
1. Press number “222-555-33-666” telephone keypad
2. Press MEM button to create a new Memory (Phone Book) entry, The Handset will display
“NAME”
3. Press the following Telephone Keypad buttons to get the desired letters:
TELEPHONE KEYPAD BUTTON 222 555 33 666
LETTER C L E O
4. Press and hold MEM button to store the data in the Memory (Phone Book), A “beep” on the handset will indicate the Phone Number
is successfully save into the memory.
5. The Handset will automatically go to stand by mode after pressing the MEM button.
Keypad
Buttons
1ST
Press
2ND
Press
31RD
Press
4TH
Press
5TH
Press
6TH
Press
7TH
Press
8TH
Press
91TH
Press
1 Space 1 & ‘ ( ) . Space 1
2 A B C a b c 2 A B
3 D E F d e F 3 D E
4 G H I g h i 4 G H
5 J K L j k l 5 J K
6 M N O m n o 6 M N
7 P Q R S p q r S 7
8 T U V t u v 8 T U
9 W X Y Z w x y Z 9
0 0 0 0 0 0 0 0 0 0
* * * * * * * * * *
# # # # # # # # # #
Page 22

- 22 -
1-6 26 - 111-2 22 2
10
Placing Calls from the Directory (Phone book)
1. Press the MEM (Memory) button.
2. Press the SCROLL UP or DOWN button to find the record you want to call.
OR
Press a Telephone Keypad (2/ABC to 9/WXYZ) that corresponds to the first letter of a
Caller’s name. Press the SCROLL UP
or DOWN button to find the record you
wish to call.
3. Press the TALK button to dial the displayed number.
4. To end the call, either press the TALK button or place the Handset on the Base Unit.
Editing a Stored Number in the Directory (Phone book)
1. Press the MEM (Memory) button.
2. Press the SCROLL UP or DOWN button
to find the record you wish to edit.
3. Press the SET/MENU button. The entry will
display with a flashing prompt over the first character.
4. To erase a character or digit, press the FLASH/DEL button.
To add a letter or number, use the Telephone Keypad 1 to 0 buttons. Characters
or numbers will be inserted in front of the cursor (See page 18 for details.)
5. When the entry is edited as you desire, press and hold the MEM button to
store the edited record.
Page 23

- 23 -
10
Deleting a Stored Number in the Directory (Phone book)
1. Press the MEM (Memory) button.
2. Press the SCROLL UP or DOWN button
to find the record you wish to delete.
3. Press the FLASH/DEL button. The LCD screen
will display “DELETE ?”
4. To delete the record, press the FLASH/DEL button again.
5. Press the MEM (Memory) button to return to standby mode.
FUNCTION PROGRAMMING
You can change the setting on the Handset in the functions menu. Access the functions
menu by pressing and holding the SET/MENU button.
There are 5 settings in the functions menu which can be changed. You can scroll through
the function menu in the listed order by pressing the SCROLL UP
or DOWN button.
Settings can be accessed by pressing the corresponding number on Telephone Keypad button.
To edit a setting, use the SCROLL UP
or DOWN button to toggle between the setting options, and then press
SET/MENU button to save the changes and to exit the Functions Menu.
Keypad Function
LANGUAGE Setting - Changes the language that appears on the LCD Screen.
Choose between English, French, or Spanish.
AREA CODE Setting - Allows the programming of an Area Code where 7-digit
dialing is used for ease of callback. (Do not program if you use 10-digit dialing
to call numbers in your area).
LCD CONTRAST Setting - Adjusts the brightness of the LCD Screen for
optimum viewing. There are four levels for the LCD Contrast Setting.
RINGER ON/OFF Setting - Changes the Ringer setting ON or OFF.
TIME and DATE Setting - Changes the time and date on the handset.
NOTE: At any time during Menu Programming you can quit and the settings that you have changed will be saved. Press the
SET/MENU or BACK button to quit the options menu or let the options programming time out by not pressing any Telephone Keypad
buttons for 20 seconds.
2
11
3
4
5
Page 24

- 24 -
Function Changing the LANGUAGE Display
1. Press the SET/MENU button to enter the menu.
2. Press number 1 button to go the LANGUAGE
programming option.
3. The LCD display “ENGLISH” will begin flashing.
4. Press the SCROLL UP
or DOWN button to toggle between ENGLISH,
ESPAÑOL, and FRANCAIS.
5. When the desired setting is displayed, press SET / MENU button to save the setting.
A long “beep” will sound to confirm the setting has been saved.
Function: Setting the AREA CODE
1. Press the SET/MENU button to enter the menu.
2. Press number 2 button or Press the SCROLL UP
or DOWN button to go to the AREA CODE
programming option.
3. Press the Telephone Keypad 1 to 0 buttons to enter the three digit area
code for your phone number.
4. When the desired setting is displayed, press SET/MENU button to save the
setting. A long “beep” will sound to confirm the setting has been saved.
NOTE: Do not use the AREA CODE programming if you are required to dial
10 digits (XXX-XXX-XXXX) to dial a local number.
Function Adjusting the LCD Display CONTRAST
1. Press the SET/MENU button to enter the menu.
2. Press the 3 button or Press the SCROLL UP
or DOWN button to go to the CONTRAST
programming option.
3. Press the SCROLL UP or DOWN button to
to select the 4 level Contrast Setting.
4. When the desired setting is displayed, press SET/
MENU. A long “beep” will sound to confirm the
11
2
3
Page 25

- 25 -
setting has been saved.
Function Setting the RINGER ON or OFF
1. Press the SET/MENU button to enter the
menu.
2. Press number 4 button or Press the SCROLL UP
or DOWN button to go to the Ringer
programming option.
3. Press the SCROLL UP or DOWN button to toggle between ON and OFF
setting.
4. When the desired setting is displaye d, press SET/MENU button to save the setting.
A long “beep” will sound to confirm the setting has been saved.
Function Setting the DATE and TIME
1. Press the SET/MENU button to enter the
Menu.
2. Press number 5 button or Press the SCROLL UP
or DOWN button to go to the “SET TIME”
programming option.
3. The “Month” will begin flashing, Press the SCROLL UP or DOWN button to
select the Month. Press SET/MENU to save the Month setting.
4. The “Date” will begin flashing, Press the SCROLL UP or DOWN button to
select the Date. Press SET/MENU to save the Date setting.
5. The “Hour” will begin flashing. Press the UP or DOWN button to
select the Hour. Notice the “AM” and “PM” display when you are setting the
Hour. Press SET/MENU to save the Hour setting.
6. The “Minutes” will begin flashing. Press the UP or DOWN button to select
the Minutes. Press SET/MENU to save the Minutes setting.
NOTE: While the 2.4 GHz frequency is inherently clearer, we suggest that you do not use this phone within 20 feet of a working
microwave. The microwave produces frequencies in this range which may cause interference. This interference is normal for all
2.4 GHz phones and should not be considered a product defect.
4
5
Page 26

- 26 -
Recharging the Battery Pack
The nickel Mhmium (Ni-Mh) Battery Pack in the Handset can be recharged many times
using the built-in charger in the Base Unit.
When the BATT LOW symbol appears on the LCD Screen, a “beep” sound will be heard every
12 seconds. This indicates that the Battery Pack needs to be recharged.
Charge the Battery Pack at least once every 90 days of nonuse to avoid battery failure.
When the Battery Pack can no longer be charged, replacement of the Battery Pack will be
necessary.
NOTES:
1. During a power interruption, the Base Unit does not operate, and a phone
conversation cannot be made on the Handset.
2. To ensure your phone charges properly, place the Handset on the Base Unit with
Telephone Keypad face up
, and make sure that the CHARGE LED indicator on the
Base Unit lights up and a “beep” confirmation tone is heard.
Changing the Battery Pack
The Battery Pack provides power for the Handset of your cordless telephone.
To Replace the Battery Pack:
1. Remove the Handset Battery Compartment Cover by sliding it down.
2. Pull out the Battery Pack PLUG and remove the Battery Pack.
3. Plug the new Battery Pack into the Battery Connector.
4. Slide the Handset Battery Compartment Cover firmly into place in its closed position.
5. Before use, charge the new Battery Pack for 12 hours.
ATTENTION:
The telephone that you have purchased contains 2 rechargeable Battery Packs. The
Battery Pack are recyclable. At the end of its useful life, under various state and local
laws, it may be illegal to dispose of this Battery Pack into the municipal waste stream.
Check with your local solid waste officials for details in your area for recycling options or
proper disposal.
Page 27

- 27 -
TROUBLE SHOOTING
Problem Solving Section
For your assistance, we have listed below a few common problems.
Phone does not work, check the following:
1. Base Unit is plugged into a power source.
2. Handset is charged.
3. TONE/PULSE Select Switch is in the right position.
4. Telephone Line Cord is plugged into the Telephone Jack.
Range of phone limited, check the following:
1. Base Unit is centrally located in your residence.
2. Base Unit is not located near appliances.
No dial tone, check the following:
1. Telephone Line Cord plugs are connected to the Telephone Jack and Telephone Line
Connection Jack.
2. Base Unit is plugged into a power source.
3. If you had a power failure or had unplugged the Base Unit, replace the Handset on the
Base Unit for 2 to 5 seconds to reset the system.
Received signal flutters or fades, check the following:
1. Battery Pack in the Handset is fully charged.
2. Handset is not too far from the Base Unit.
Interference on reception, check the following:
1. Noise may be picked up from electrical products in the home or electrical storms.
Generally, this noise is a minor annoyance and should not be interpreted as a defect in
your system.
2. Choose an alternate channel using the Channel/Code button on the Handset.
3. Do not use this telephone within 20 ft. of a microwave oven while it is working, as you
may experience interference. This is a normal occurrence with 2.4GHz phones and
should not be interpreted as a defect in the product.
If after pressing the Talk button, you receive three “beeps” and no dial tone, check the following:
1. Base Unit is plugged into a power source.
2. If you had a power failure or had unplugged the Base Unit, replace the Handset on the
Base Unit.
NOTE: If none of the telephones in the house are working, disconnect one set at a time to
verify that none of the phones are causing the problem. If you still have a problem after doing
this, and your telephone still does not work, please contact your local phone company.
Page 28

- 28 -
TECHNICAL INFORMATION
Technical Information
This cordless telephone uses radio frequencies to allow mobility. There are
certain difficulties in using radio frequencies with a cordless telephone. While
these are normal, the following could affect the operation of your system.
Noise
Electrical pulse noise is present in most homes at one time or another. This noise
is most intense during electrical storms. Certain kinds of electrical equipment
such as light dimmers, fluorescent bulbs, motors, and fans also generate noise
pulses. Because radio frequencies are susceptible to these noise pulses, you
may occasionally hear them in your Handset. Generally they are a minor
annoyance and should not be interpreted as a defect in your system.
Range
Because radio frequency is used, the location of the Base Unit can affect the
operating range. Try several locations in your home or office and pick the one that
gives you the clearest signal to the Handset.
Interference
Electronic circuits activate a relay to connect the cordless telephone to your
telephone line. These electronic circuits operate in the radio frequency spectrum.
While several protection circuits are used to prevent unwanted signals, there may
be periods when these unwanted signals enter the Base Unit. You may hear clicks
or hear the relay activate while you are not using the Handset. If the interference
occurs frequently, it can be minimized or eliminated by relocating the Base Unit.
You can check for interference before selecting the final Base Unit location by
plugging in the telephone.
NOTICE
This cordless telephone uses radio communication between the Handset and the
Base Unit and may not ensure privacy of communication. Other devices, including
other cordless telephones, may interfere with the operation of this cordless
telephone or cause noise during operation. Units not containing coded access
may be accessed by other radio communication systems. Cordless telephones
must not cause interference to any licensed radio service.
Page 29

- 29 -
IC (Industry Canada): CS03 &RSS210
This telephone is registered for use in Canada.
Notice: The Industry Canada label identifies certified equipment. This certification means thar
the equipment meets certain telecommunications network, protective, operational and
safety requirements. Industry Canada does mot guarantee the equipment will operate to
the user’s satisfaction.
Before installing this equipment, users should ensure that it is permissible to be connected to the
facilities of the local telecommunications company. The equipment must also be installed using
an acceptable method of connections. The customer should be aware that compliance with the
above conditions may not prevent degradation of service in situations. Repairs to certified
equipment should be made by an authorized Canada maintenance facility designated by the
supplier. Any repairs or alterations made by the user to this equipment, or equipment
malfunctions, may give the telecommunications company cause to request the user to disconnect
the equipment.
Users should ensure for their own protection that the electrical ground connections of the power
utility, telephone lines and internal metallic water pipe system, if present, are connected together.
This precaution may be particularly important in rural areas.
Caution: Users should not attempt to make such connections themselves, but should contact
appropriate electric inspection authority, or electrician, as appropriate.
Notice: The REN assigned to this device denotes the number of devices you may connect to the
telephone loop which is used by the device to prevent overloading. The termination on
a loop may consist of any combination of devices subjected only to the requirement
that the sum of the REN does exceed five (5.0).
This device complies with RSS-210 of Industry Canada. Operation is subject to the following
two conditions: (1) this device may not cause interference, and (2) this device must accept any
interference, including interference that may cause undesired operation of the device.
Page 30

- 30 -
FCC Part15 and Part68
This equipment complies with FCC REGULATIONS 15 and 68 of the Federal Communications
commission (FCC) rules for the United States. A label is located on the underside of the base unit
containing the FCC registration number and Ringer Equivalence Number (REN). You must,
upon request, provide this information to your local telephone company.
This equipment is compatible with inductively coupled hearing aids.
FCC Part 15
Warning: Changes or modifications to this unit not expressly approved by the party responsible
for compliance could void the user’s authority to operate the equipment. Any change to the
equipment will void FCC grant.
This equipment has been tested and found to comply with the limits for a Class B digital device, pursuant to
part 15 of the FCC Rules. These limits are designed to provide reasonable protection against harmful
interference in a residential installation. This equipment generates, uses and can radiate radio frequency energy
and, if not installed and used in accordance with the instructions, may cause harmful interference to radio
communications. However, there is no guarantee that interference will not occur in a particular installation. If
this equipment does cause harmful interference to radio or television reception, which can be determined by
turning the equipment off and on, the user is encouraged to try to correct the interference by one or more of the
following measures:
--Reorient or relocate the receiving antenna.
--Increase the separation between the equipment and receiver.
--Connect the equipment into an outlet on a circuit different from that to which the receiver is connected.
--Consult the dealer or an experienced radio/TV technician for help.
FCC Part 68
The FCC requires that you connect you cordless telephone to the nationwide telephone network
through a modular telephone jack (USOCRJ11C or RJ11W).
You telephone company may discontinue you service if your equipment causes harm to the
telephone network. They will notify you in advance of disconnection, if possible. During
notification, you will be informed of your right to file a complaint with the FCC.
If it is determined that your telephone equipment is malfunctioning, the FCC requires that it not
be used and that it be unplugged from the modular jack until the problem has been corrected.
Repairs to this telephone equipment can only be made by the manufacturer or its authorized
agents or by others who may be authorized by the FCC. For repair procedures, follow the
instructions outlined under Cosmo Communications Canada Inc.Warranty.
Page 31

- 31 -
The REN is useful in determining the number or devices you may connect to your telephone line
and still enable the devices to ring when you receive a call. The general rule is that the REN
value should not exceed 5.0 total; however, contact your local telephone company for the
specific number in your area.
Page 32

- 32 -
A XT 2411
 Loading...