

Audiovox AVXMTG9B, AVXMTG9S, AVXMTG9P Operation Manual
9-inch Roof-Mount DVD Player
With DVD/CD/MP3 System
AVXMTG9B/P/S
OPERATION
MANUAL

This page intentionally left blank.

TABLE OF CONTENTS
ImportantNotices...... ... ... ... ... ... ... ... ... ... 2
Congratulations ....... ... ... ... ... ... ... ... ... ... 3
Features .. ... ....... ... ... ... ... ... ... ... ... ... 3
Controls and Indicators Diagram . . . . . . . . . . . . . . . . . . . . . 4
Remote Control Operation. . . . . . . . . . . . . . . . . . . . . . . . . . 6
Loading and Playing Discs. . . . . . . . . . . . . . . . . . . . . . . ...12
Settings and Adjustments . . . . . . . . . . . . . . . . . . . . . . . ...12
Playing JPG Files...... ... ... ... ... ... ... ... ... ...16
Playing MP3 Files ..... ... ... ... ... ... ... ... ... ...17
SourceFeatures....... ... ... ... ... ... ... ... ... ...18
Troubleshooting....... ... ... ... ... ... ... ... ... ...20
Specifications . . ...... ... ... ... ... ... ... ... ... ...22
DVDBasics ... ....... ... ... ... ... ... ... ... ... ...10
Notes..... ... ....... ... ... ... ... ... ... ... ... ...23
1

Safety Precautions
For safety reasons, when changing video media, it is
recommended that the vehicle is not in motion, and that you do
not allow children to unfasten seat-belts to change video media
or make any adjustments to the system. System adjustments can
be accomplished using the remote control, while seat-belts
remain fastened. Enjoy your AUDIOVOX entertainment system
but remember that the safety of all passengers remains the
number one priority.
An LCD panel and/or video monitor may be installed in a motor
vehicle and visible to the driver only if the LCD panel or video
monitor is used for vehicle information, system control, rear or
side observation or navigation. If the LCD panel or video monitor
is used for television reception, video or DVD play, the LCD panel
or video monitor must be installed so that these features will only
function when the vehicle is in “park” or when the vehicle's
parking brake is applied.
When connecting power and ground in a mobile video
installation, insure that the ACC wire is fused at the point where it
is connected to the vehicle’s ACC wiring. Failure to do so can
result in damage to the vehicle if a short circuit develops between
the vehicle connection point and the mobile video product.
An LCD panel and/or video monitor used for television reception,
video or DVD play that operates when the vehicle is in gear or
when the parking brake is not applied must be installed to the rear
of the driver seat where it will not be visible, directly or indirectly,
to the operator of the motor vehicle.
WARNING
Do not use any solvents or cleaning materials when cleaning
the video monitor.
Do not use any abrasive cleaners, they may scratch the screen.
Use only lightly dampened lint free cloth to wipe the screen if it
is dirty.
Lock the LCD screen in fully closed position when not in use.
Before putting on headphones, always adjust the volume setting
to OFF or lowest position.
Remember to leave the dome light switch in the off or auto
position when the vehicle is unattended, as the dome lights, if
left on, can drain the vehicle battery.
Do not put pressure on the screen.
Caution children to avoid touching or scratching the screen, as
it may become dirty or damaged
IMPORTANT NOTICES
2
Licensed under one or more of the following patents, Patent
Numbers 5,775,762, 5,927,784, and 6,678,892.

CONGRATULATIONS
3
FEATURES
9” TFT LCD monitor
Built-in DVD player
Auto on with disc insertion
Selectable IR transmit codes
Multi-lingual OSD (On Screen Display) for control of picture quality and functions
Audio/Video source inputs
Dome lights with built-in three way switch
Last memory for DVD
Built-in 16 channel frequency wireless FM modulator
Earphone jack
Screen mode selection (16:9/4:3)
Backlight controls
Day/night picture modes
AV output
USB/SD support
Congratulations on your purchase of theAUDIOUVOXAVXMTG9B/P/S DVD player with Drop-Down Video/Monitor. The
AVXMTG9/B/P/S DVD player has been designed to give you and your family many years of video entertainment in the mobile
environment. Please read the directions that follow in order to familiarize yourself with the product to ensure that you obtain the
best results from your equipment.
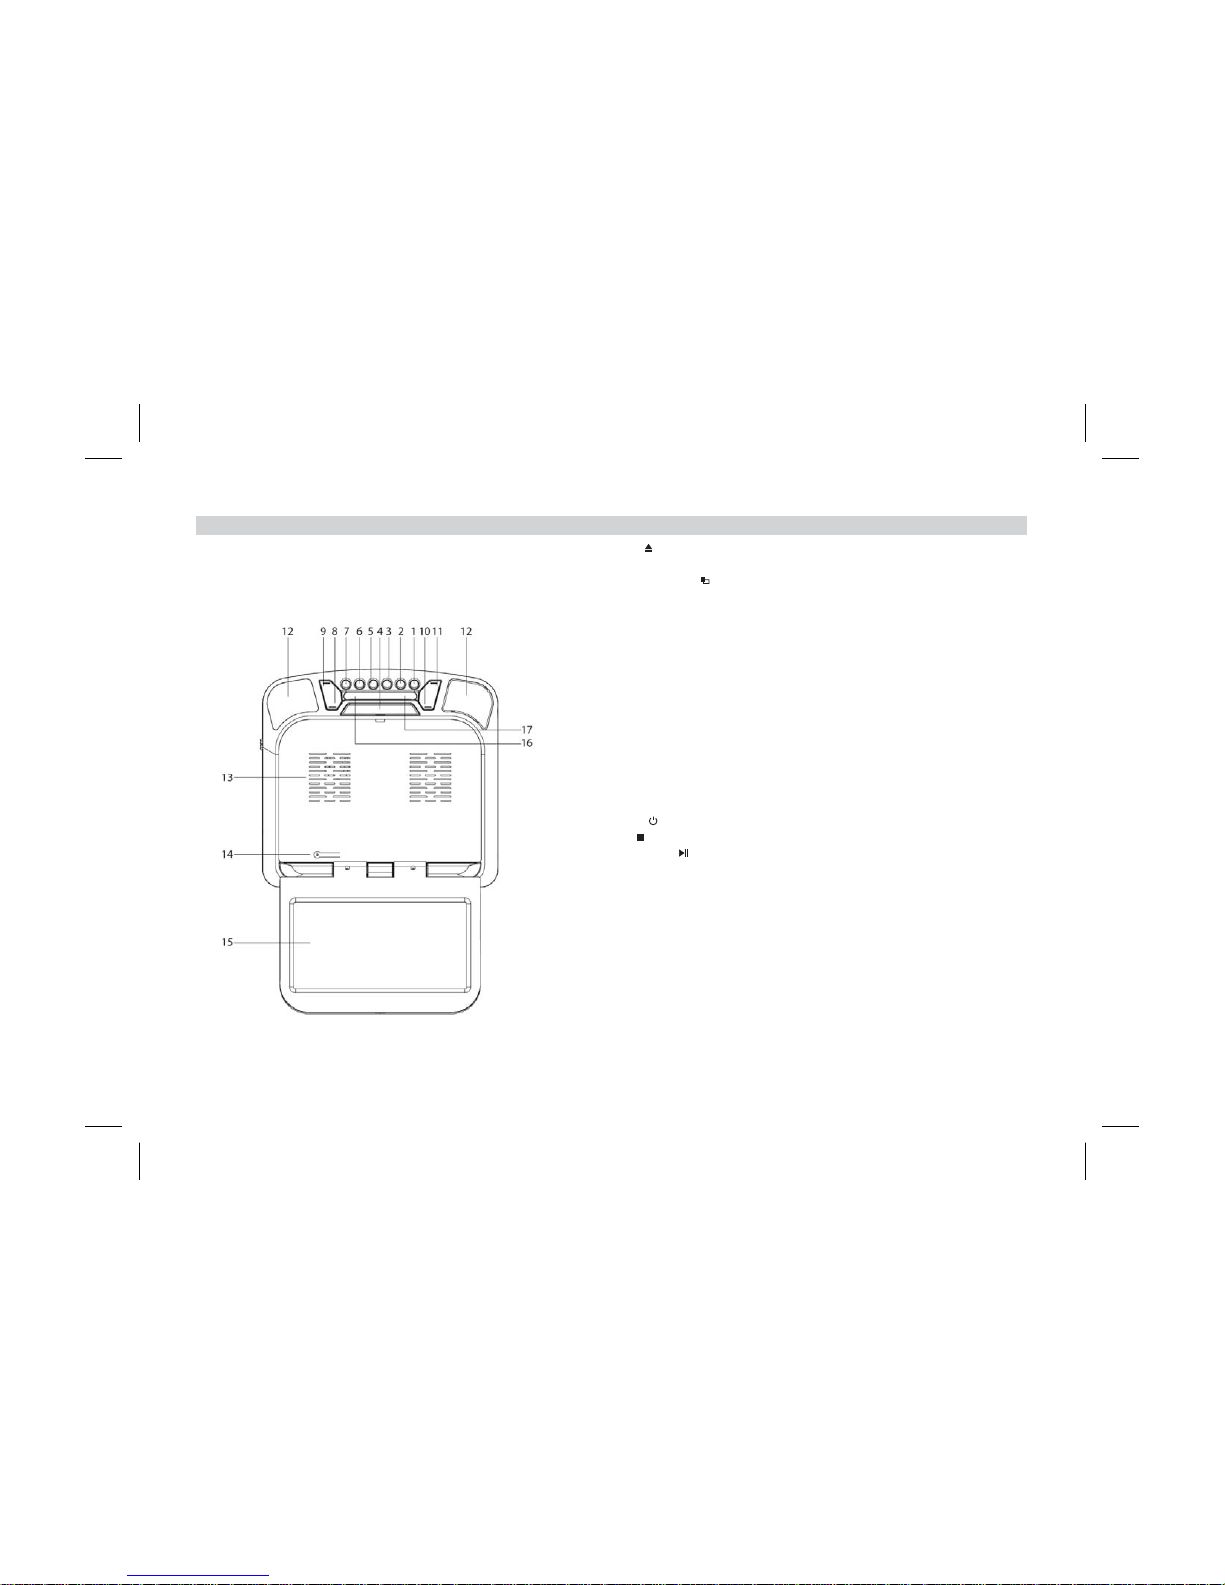
1. EJECT( ) Button - Press this button to eject discs from the disc
compartment.
( ) Button- Press this button to select or
aspect ratios.
Button - ,
h , , Ch3 88.5 Mhz,
,,,
,,,
,,,
,,,
.
SCREEN RELEASE(PRESS) Button -Press this button to release the
LCD screen.The screen will drop down slightly. Pivot the screen
downward until a comfortable viewing angle is reached
Button -Press d Press toadjust
in thefollowing sequence: Brightness, Contrast, Hue, Saturation, Reset.
6 SOURCE Button- Press to select the source menu: DVD/AV1/SD/USB.
7. POWER( ) Button - Press this button to turn the system on or off.
8. STOP( ) Button - Press this button tostop playback.
9. PLAY/PAUSE( ) Button - Press to start playback or pause playing.
10. VOLUME ( ) Button - Press this button to decrease the volume or
decrease the level ofselected picture controls.
11. VOLUME ( ) Button - Press this button to increase the volume or
increase the level of selected picture controls.
12. DOME LIGHTS - Provides additional interior illumination.
13. Ventilation openings
14. LCD Cut Off Switch - Used toturn off the LCD screen when in the closed
position.
15. 9” LCD screen
16. Wireless Headphone Transmitter - Transmits audio to an optional
wireless headphone.
17. Infrared Remote Sensor -Allows remote control to operate the unit.
2. SCREEN MODE Wide (16:9)
Normal (4:3)
3. FMM Used toselect the frequency in sequence rotation: FM OFF
C 1 88.1 Mhz Ch2 88.3 Mhz
Ch4 88.7 Mhz Ch5 88.9 Mhz Ch6 89.1 Mhz
Ch7 89.3 Mhz Ch8 89.5 Mhz Ch9 89.7 Mhz
Ch10 89.9MHz Ch11 90.1 Mhz Ch12 90.3 Mhz
Ch13 90.5 Mhz Ch14 90.7 Mhz Ch15 90.9 Mhz
Ch16 91.1 Mhz
4.
.
5. PIC to enter the picture a justment mode.
-
+
CONTROLS AND INDICATORS DIAGRAM
4
Front View

1. DVD disc insertion slot - For loading and removing disks. Unit will turn on and
load a disk when a disk is inserted. Insert a disk with the label facing up towards
the headliner.
2. Disc indicator light - Illuminates green when a disk is inserted. Illuminates red when
a disk is not present.
3. Three Position Dome Light Switch:
ON - Turns on the dome lights.
OFF - The dome lights will not turn on in this position.
AUTO - Automatically switches on the dome lights in conjunction with the vehicle’s
interior illumination.
4. SD Card Slot - Insert SD card for playback of audio/video files.
5. USB Port - Insert USB drive for playback of audio/video files.
6. Headphone jack
1. Infrared Remote Sensor -
Allows remotecontrol to operate the unit from the front seat.
Note: The driver should stop the vehicle when operating the remote control.
Side Views
5
Back View
1
2
3
4
5
6
1
REMOTE CONTROL OPERATION
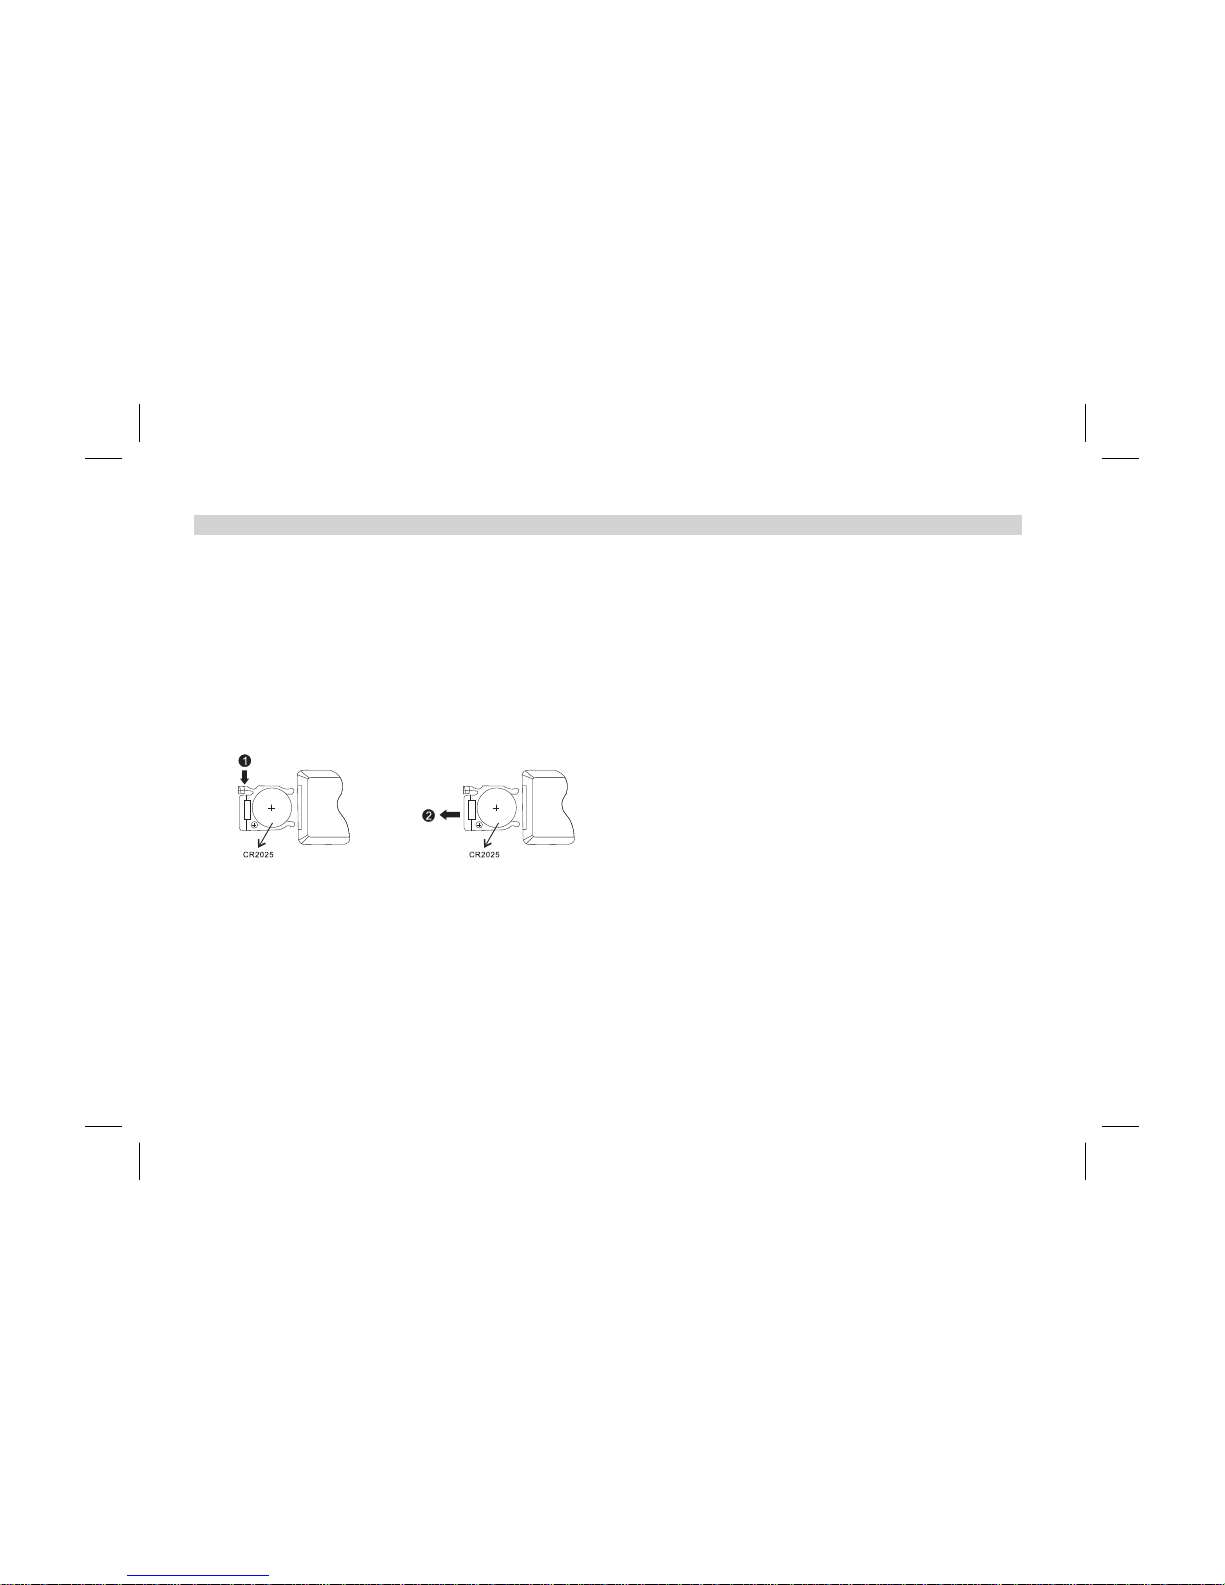
Battery Installation
Before attempting to operate your remote control, install the battery as described below:
1. Using your finger, press the tab (1) down in the direction of the arrow.
2. Slide the battery holder (2) out in the direction of the arrow.
3. Install one CR2025 battery. Make sure that the proper polarity (+ or -) is observed.
4. Slide the battery holder into the remote control until it locks.
6
Back View
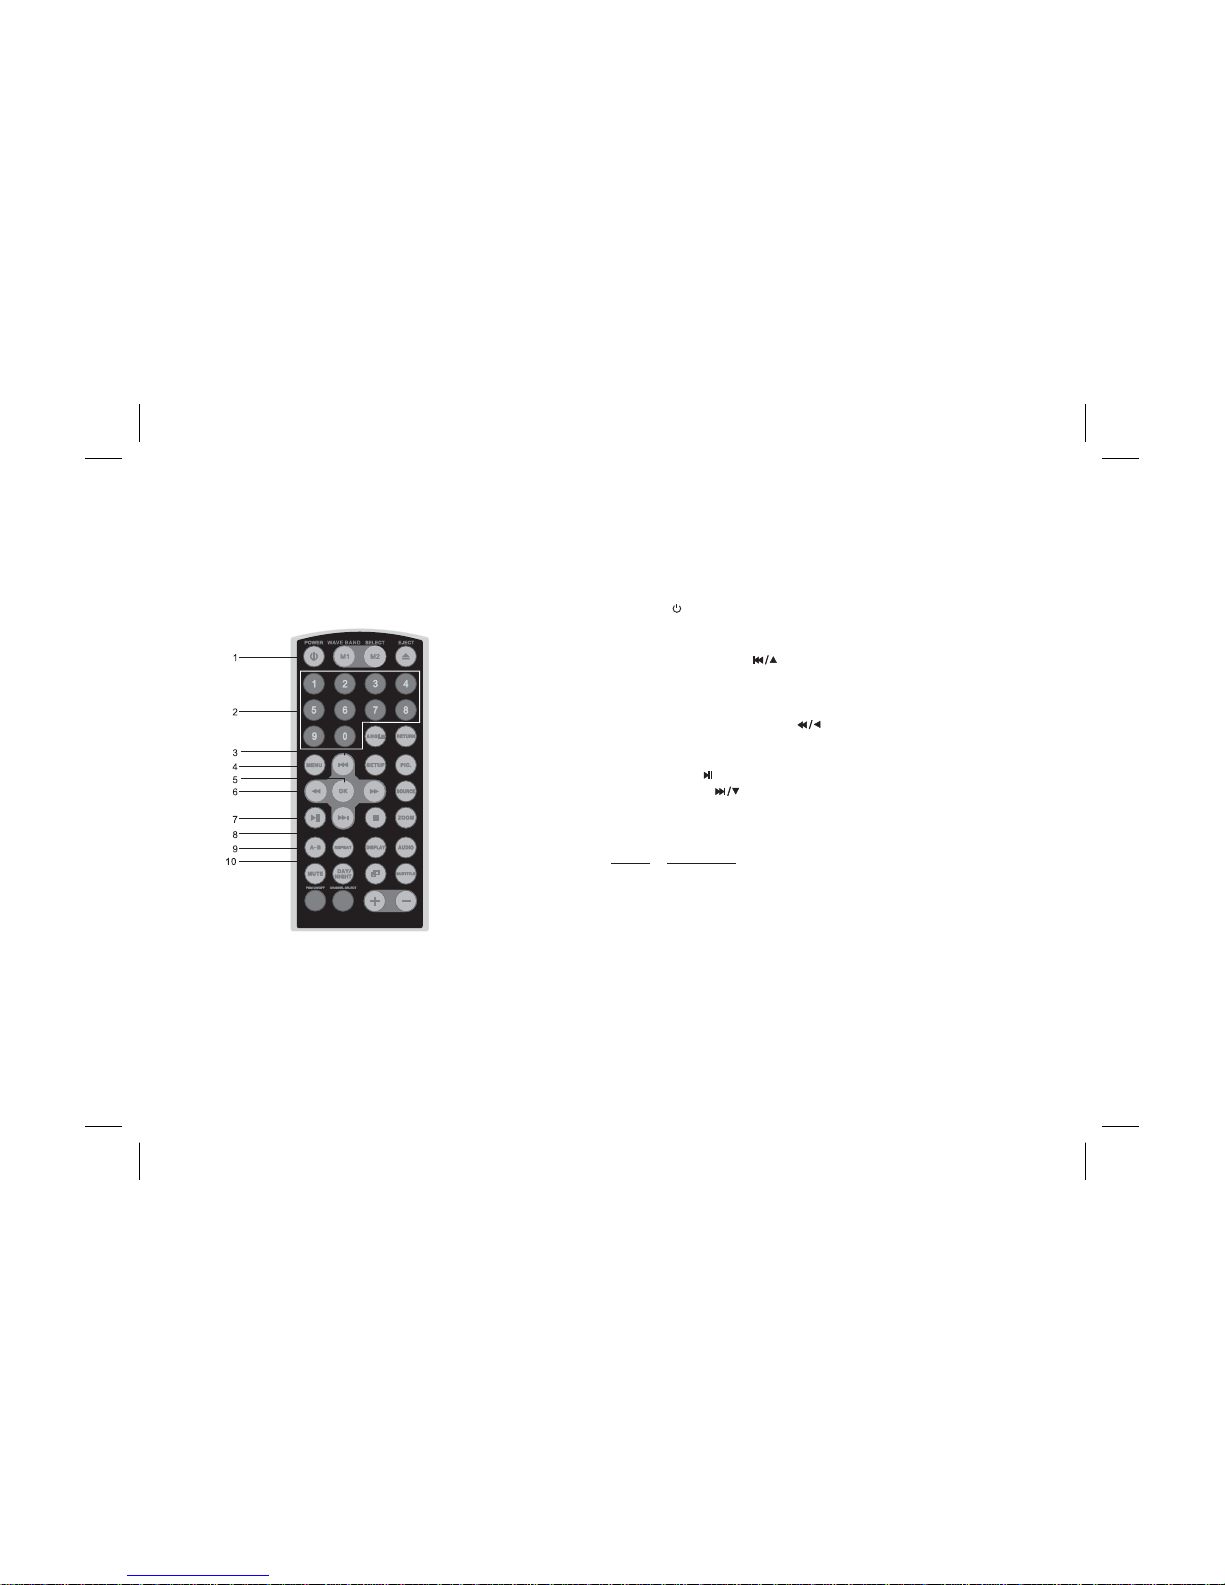
Remote Control Functional Description
1. POWER ( ) Button - Press this button to turn the unit ON and OFF.
2. NUMBER Buttons - Press to enter the numbers 0 to 9 for
selection of CD tracks, DVD chapters or password setting.
/ ) Button -
The c is menus
Button - Press root menu .
Button -
( ) Button - s
The c is menu
( ) Button - or
T ( ) Button - The
c is menus
9. A-B Button -Allows the user to repeat the playback from point A to
point B.
Once Repeat A - Marks the beginning of the section to repeat (set
point A).
Twice RepeatAB - Marks the end of the section to repeat (set
point B).
3 times Repeat Off - Cancels theA-B repeat function.
10. REPEAT Button - Allows the user to repeat a selected title, chapter or
track.
For MP3 disc, press “REPEAT” to repeat playing present file; press
it again to repeat playing the folder.
3. PREVIOUS CURSOR ( Go to the previous chapter or
track. ursor used to select on the screen.
4. MENU to access the DVD (DVD MODE)
5. OK Used to implement a selected setting or menu option.
6. SCAN BACKWARD/CURSOR Scan backward at
2,4,8,16 times speed. ursor used to select s on the
screen.
7. PLAY/PAUSE Used to start playback pause playing.
8. NEX /CURSOR Go to the next chapter or track.
ursor used to select on the screen.
Press: DVD Player
7
 Loading...