

Page 1
OWNER'S MANUAL
MANUAL DEL USUARIO
ACD-70ACD-70
ACD-70
ACD-70ACD-70
FOLD-DOWN DETACHABLE FRONT PANEL ELECTRONICALLY-TUNED
AM/FM/MPX RADIO WITH CD PLAYER, CD CHANGER CONTROLS,
WIRELESS REMOTE CONTROL AND QUARTZ CLOCK
RADIO AM/FM/MPX CON SINTONIZACIÓN ELECTRÓNICA Y PANEL
DELANTERO DESMONTABLE QUE SE PLIEGA HACIA ABAJO CON
REPRODUCTOR DE DISCOS COMPACTOS, CONTROLES DE
CAMBIADOR DE CD, CONTROL REMOTO INALÁMBRICO Y RELOJ
DE CUARZO
Page 2

INSTALLATION INSTRUCTIONSINSTALLATION INSTRUCTIONS
INSTALLATION INSTRUCTIONS
This unit is designed for installation in cars, trucks, and vans with an existing radio opening. In many cases, a
special installation kit will be required to mount the radio to the dashboard. These kits are available at electronics
IONSIONS
IONSIONS
IONS
TT
TT
T
supply stores and car stereo specialist shops. Always check the kit application before purchasing to make sure the
kit works with your vehicle. If you need a kit but cannot find it available, call our toll-free “HELP” line at 1-800-645-4994.
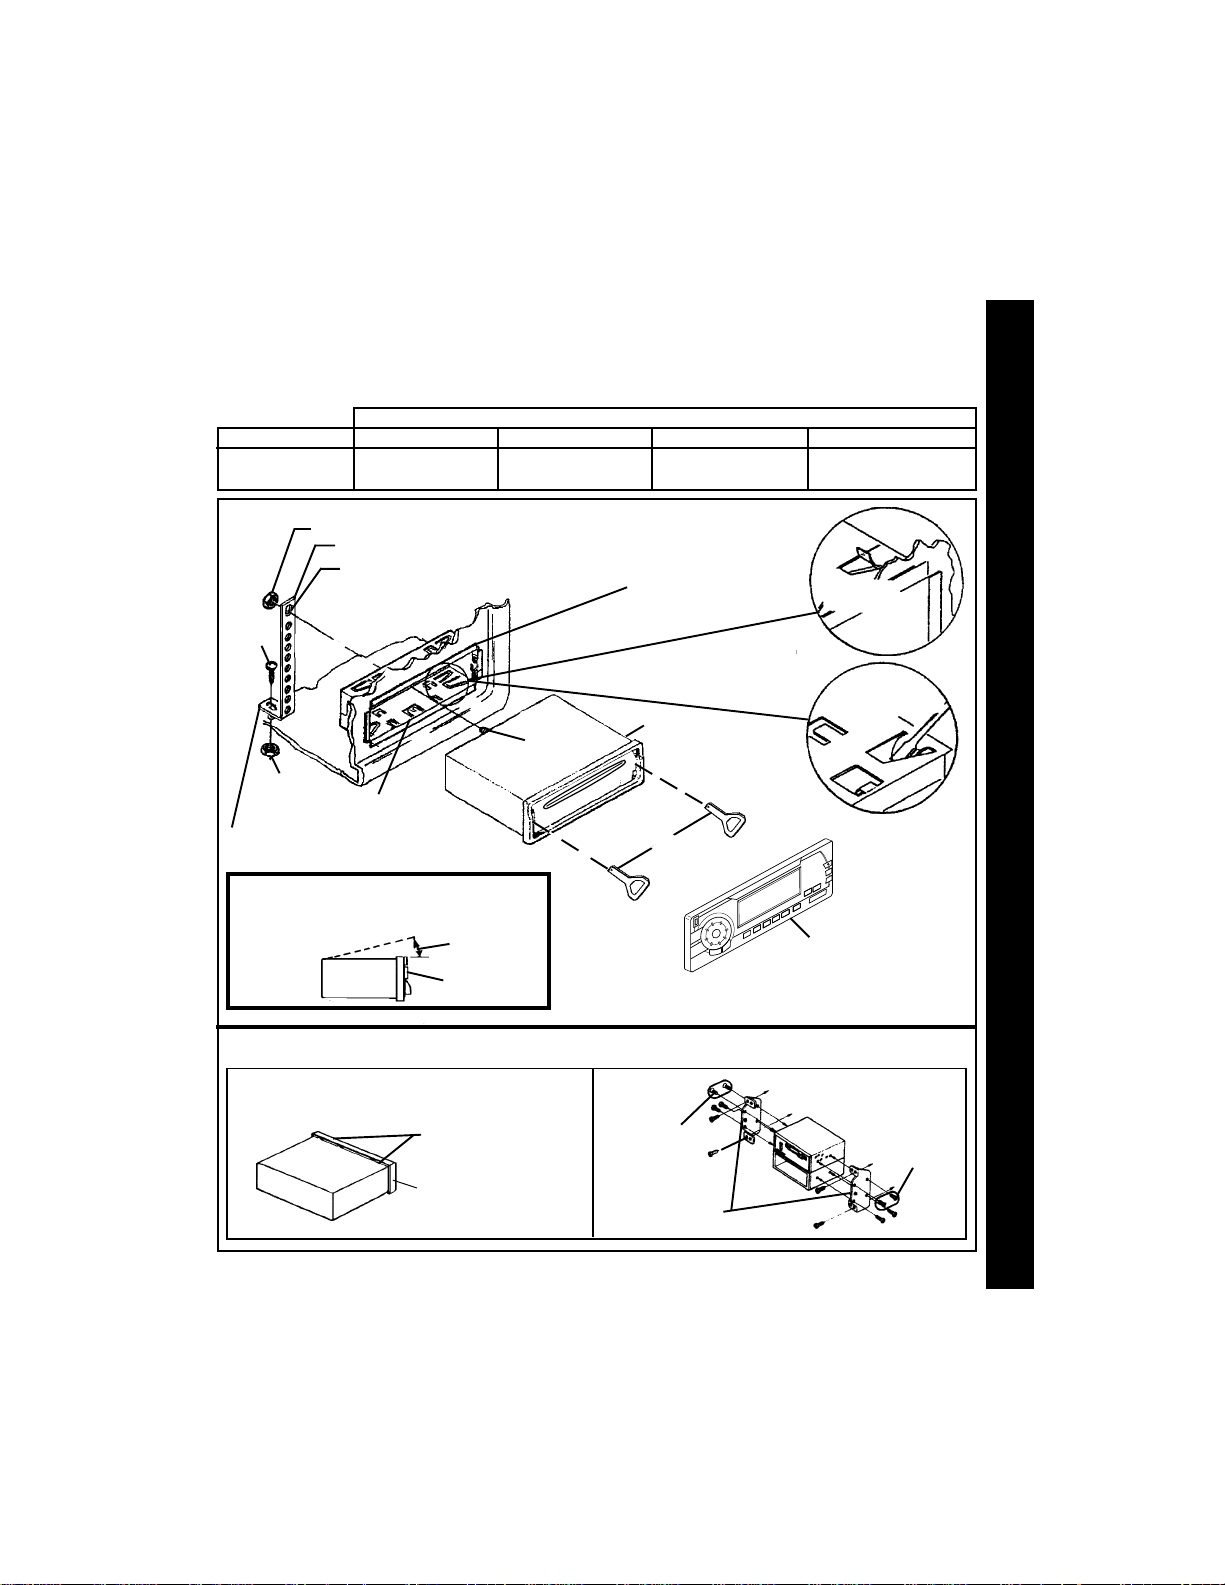
UNIVERSAL INSTALLATION PROCEDURE USING MOUNTING SLEEVE
1. Open, fold down and remove the detachable front panel, if it is attached to the chassis, by grasping the
grooved center portion and pulling the panel assembly straight out. Slide the mounting sleeve off of the chassis.
If it is locked into position, use the removal tools (supplied) to disengage it.
2. Check the dashboard opening size by sliding the mounting sleeve into it. If the opening is not large enough, carefully
cut or file as necessary until the sleeve easily slides into the opening. Do not force the sleeve into the opening or
ION INSTRUCION INSTRUC
ION INSTRUCION INSTRUC
ION INSTRUC
cause it to bend or bow. Check that there will be sufficient space behind the dashboard for the radio chassis.
TT
TT
T
3. Locate the series of bend tabs along the top, bottom, and sides of the mounting sleeve. With the sleeve fully
AA
AA
A
inserted into the dashboard opening, bend as many of the tabs outward as necessary so that the sleeve is
firmly secured to the dashboard.
ALLALL
ALLALL
ALL
4. Place the radio in front of the dashboard opening so that the wiring can be brought through the mounting
sleeve. Follow the wiring diagram carefully and make certain all connections of the wiring harness are secure
and insulated with wire nuts or electrical tape to insure proper operation of the unit. After completing the
INSTINST
INSTINST
INST
wiring connections, attach the front panel and turn the unit on to confirm operation (ignition switch must be
“on”). If unit does not operate, re-check all wiring until problem is corrected. Once proper operation is
achieved, turn off the ignition switch and proceed with final mounting of the chassis.
5. Carefully slide the radio into the mounting sleeve making sure it is right-side-up until it is fully seated
and the spring clips lock it into place.
6. Attach one end of the perforated support strap (supplied) to the screw stud on the rear of the chassis using
the hex nut provided. Fasten the other end of the perforated strap to a secure part of the dashboard either
above or below the radio using the screw and hex nut provided. Bend the strap to position it as necessary.
CAUTION: The rear of the radio must be supported with the strap to prevent damage to the dashboard
7. Re-attach the front panel to the chassis and test radio operation by referring to the Operating Instructions for the unit.
INSTALLATION USING KITS
1. If your vehicle requires the use of an installation kit to mount this radio, follow the instructions included
with the installation kit to attach the radio to the mounting plate supplied with the kit.
2. Wire and test the radio as described in Step 4 above.
3. Install the radio/mounting plate assembly to the sub-dashboard according to the instructions of the installation kit.
4. Attach the support strap to the radio and dashboard as described in Step 6 above.
5. Replace the dashboard trim panel.
ISO INSTALLATION PROCEDURE
This unit has threaded holes in the chassis side panels which may be used with the original factory mounting
brackets of some Toyota, Nissan, Mitsubishi, Isuzu, Hyundai and Honda vehicles to mount the radio to the
dashboard. Please consult with your local car stereo specialist shop for assistance on this type of installation.
1. Remove the existing factory radio from its dashboard or center console mounting. Save all hardware and
brackets as they will be used to mount the new radio.
2. Carefully un-snap the plastic frame from the front of the new radio chassis. Remove and discard the frame.
3. Remove the factory mounting brackets and hardware from the existing radio and attach them to the new radio.
11
1
11
CAUTION: DO NOT EXCEED M5 X 8 MM MAXIMUM SCREW SIZE.
4. Wire the new radio to the vehicle as per step 4 above.
5. Mount the new radio assembly to the dashboard or center console using the reverse procedure of step 1.
from the weight of the radio or improper operation due to vibration.
LONGER SCREWS MAY TOUCH AND DAMAGE COMPONENTS INSIDE THE CHASSIS.
INSTALLATION INSTRUCTIONSINSTALLATION INSTRUCTIONS
Page 3
TOLL-FREE INSTALLATION ASSISTANCETOLL-FREE INSTALLATION ASSISTANCE
TOLL-FREE INSTALLATION ASSISTANCE
The installation and wiring connections for this unit are so simple, we doubt you'll need our help, but, if you do,
we're here to help you. Just call our toll-free telephone assistance line at 1-800-645-4994 during the days and
hours shown (U.S.A. and Canada only).
DAY
MON. - FRI.
SATURDAY
NUT (5MM)
PERFORATED STRAP
FASTEN THIS END TO SCREW
STUD ON REAR OF CHASSIS
SCREW
(5MM)
NUT (5MM)
MOUNTING SLEEVE
FASTEN THIS END TO SECURE PART OF DASHBOARD.
DRILL HOLE IF NECESSARY.
TOLL-FREE INSTALLATION ASSISTANCETOLL-FREE INSTALLATION ASSISTANCE
TIME ZONE
PACIFIC
5:30AM - 4PM
6AM - 2PM
UNIVERSAL INSTALLATION USING MOUNTING SLEEVEUNIVERSAL INSTALLATION USING MOUNTING SLEEVE
UNIVERSAL INSTALLATION USING MOUNTING SLEEVE
UNIVERSAL INSTALLATION USING MOUNTING SLEEVEUNIVERSAL INSTALLATION USING MOUNTING SLEEVE
MOUNTAIN
6:30AM - 5PM
7AM - 3PM
EXISTING DASH OPENING
FILE EDGES TO FIT IF NECESSARY - DO NOT OVERFILE
NOTE: IF DASH IS SOLID, USE REAR SIDE (WITHOUT THE LIP) OF
MOUNTING SLEEVE AS A TEMPLATE & CUT OPENING
SCREW STUD
REMOVAL TOOLS
CENTRAL EASTERN
7:30AM - 6PM
8AM - 4PM
RADIO
8:30AM - 7PM
9AM - 5PM
BEND TOP
TABS UPWARD
BEND BOTTOM
TABS DOWNWARD
INST
INSTINST
INSTINST
ALL
ALLALL
ALLALL
A
AA
AA
T
TT
TT
ION INSTRUC
ION INSTRUCION INSTRUC
ION INSTRUCION INSTRUC
T
TT
TT
IONS
IONSIONS
IONSIONS
FOR PROPER OPERATION OF THE CD PLAYER, THE CHASSIS
MUST BE MOUNTED WITHIN 20° OF HORIZONTAL. MAKE SURE
THE UNIT IS MOUNTED WITHIN THIS LIMITATION.
SIDE VIEW
OF
CHASSIS
REMOVE THE PLASTIC FRAME FROM THE FRONT OF
THE CHASSIS BY CAREFULLY UN-SNAPPING IT.
CAUTION:
20° MAX.
FRONT PANEL
ISO INSTALLATIONISO INSTALLATION
ISO INSTALLATION
ISO INSTALLATIONISO INSTALLATION
UN-SNAP AT 2 PLACES
EACH ON TOP AND BOTTOM
PLASTIC FRAME
MAXIMUM
SCREW SIZE
M5 x 8
FACTORY MOUNTING
BRACKETS
FOLD-DOWN
DETACHABLE
FRONT PANEL
TYPICAL INSTALLATION
MAXIMUM
SCREW SIZE
M5 x 8
22
2
22
Page 4
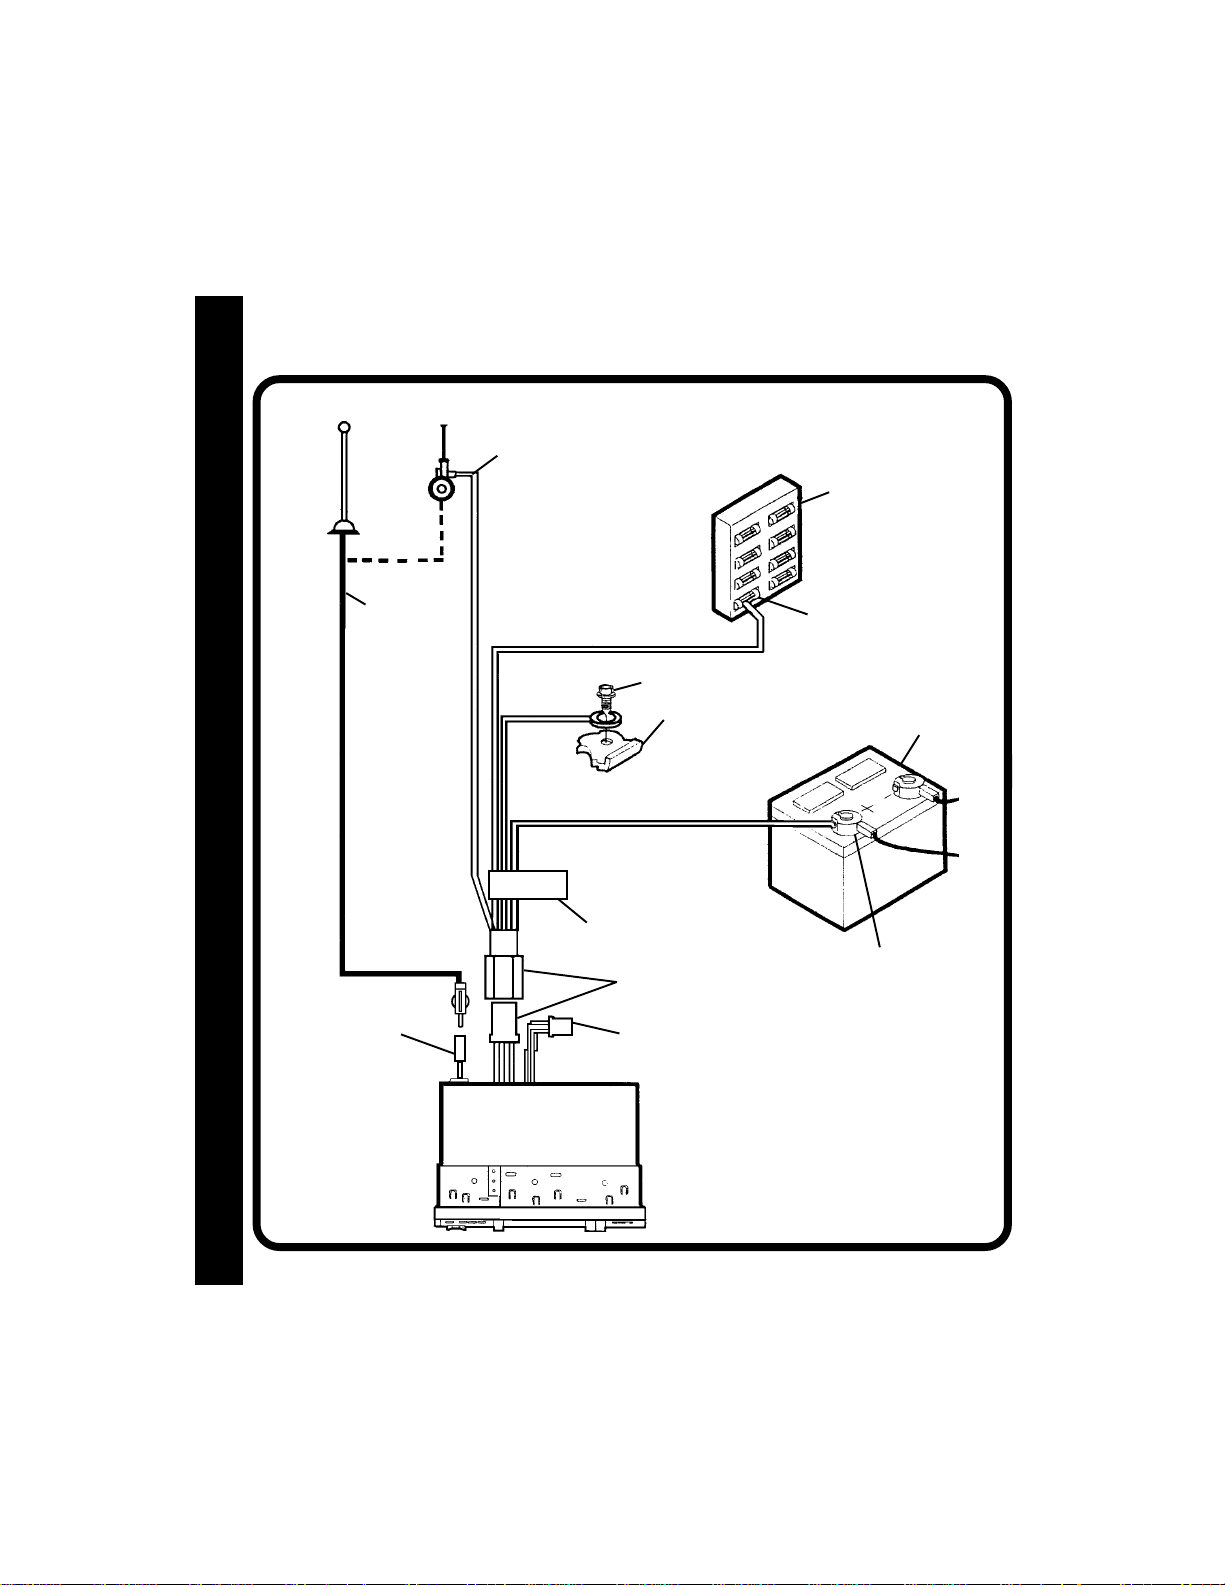
RADIO WIRINGRADIO WIRING
RADIO WIRING
RADIO WIRINGRADIO WIRING
REFER TO PAGE 4 FOR SPEAKER WIRING
ANTENNA
DIO WIRINGDIO WIRING
DIO WIRINGDIO WIRING
DIO WIRING
AA
AA
A
RR
RR
R
AUTOMATIC
ANTENNA
EXISTING
ANTENNA
CABLE
BLUE
IMPORTANT
THE BLUE WIRE CAN BE USED TO
REMOTELY ACTIVATE AN AUTOMATIC
ANTENNA OR AN EXTERNAL AMPLIFIER
(SEE ANTENNA OR AMPLIFIER MANUAL)
RED (1 AMP. FUSE)
SCREW
BLACK
FILTER/FUSE
BOX
YELLOW (15 AMP. FUSE)
YELLOW WIRE MUST BE
CONNECTED AS SHOWN OR
RADIO WILL NOT OPERATE
PROPERLY
CONTAINS:
ONE 1 AMP FUSE
ONE 15 AMP FUSE
METAL PART OF DASH
(DRILL HOLE IF NECESSARY)
IMPORTANT
4-PIN PLUGS
FUSEBLOCK
“RADIO” FUSE
+12V ACCESSORY
CAR BATTERY
POSITIVE (+) TERMINAL
12 VOLT BATTERY
33
3
33
ANTENNA LEAD
ON REAR OF RADIO
9 PIN PLUG
(SEE PAGE 4 FOR SPEAKER WIRING)
Page 5
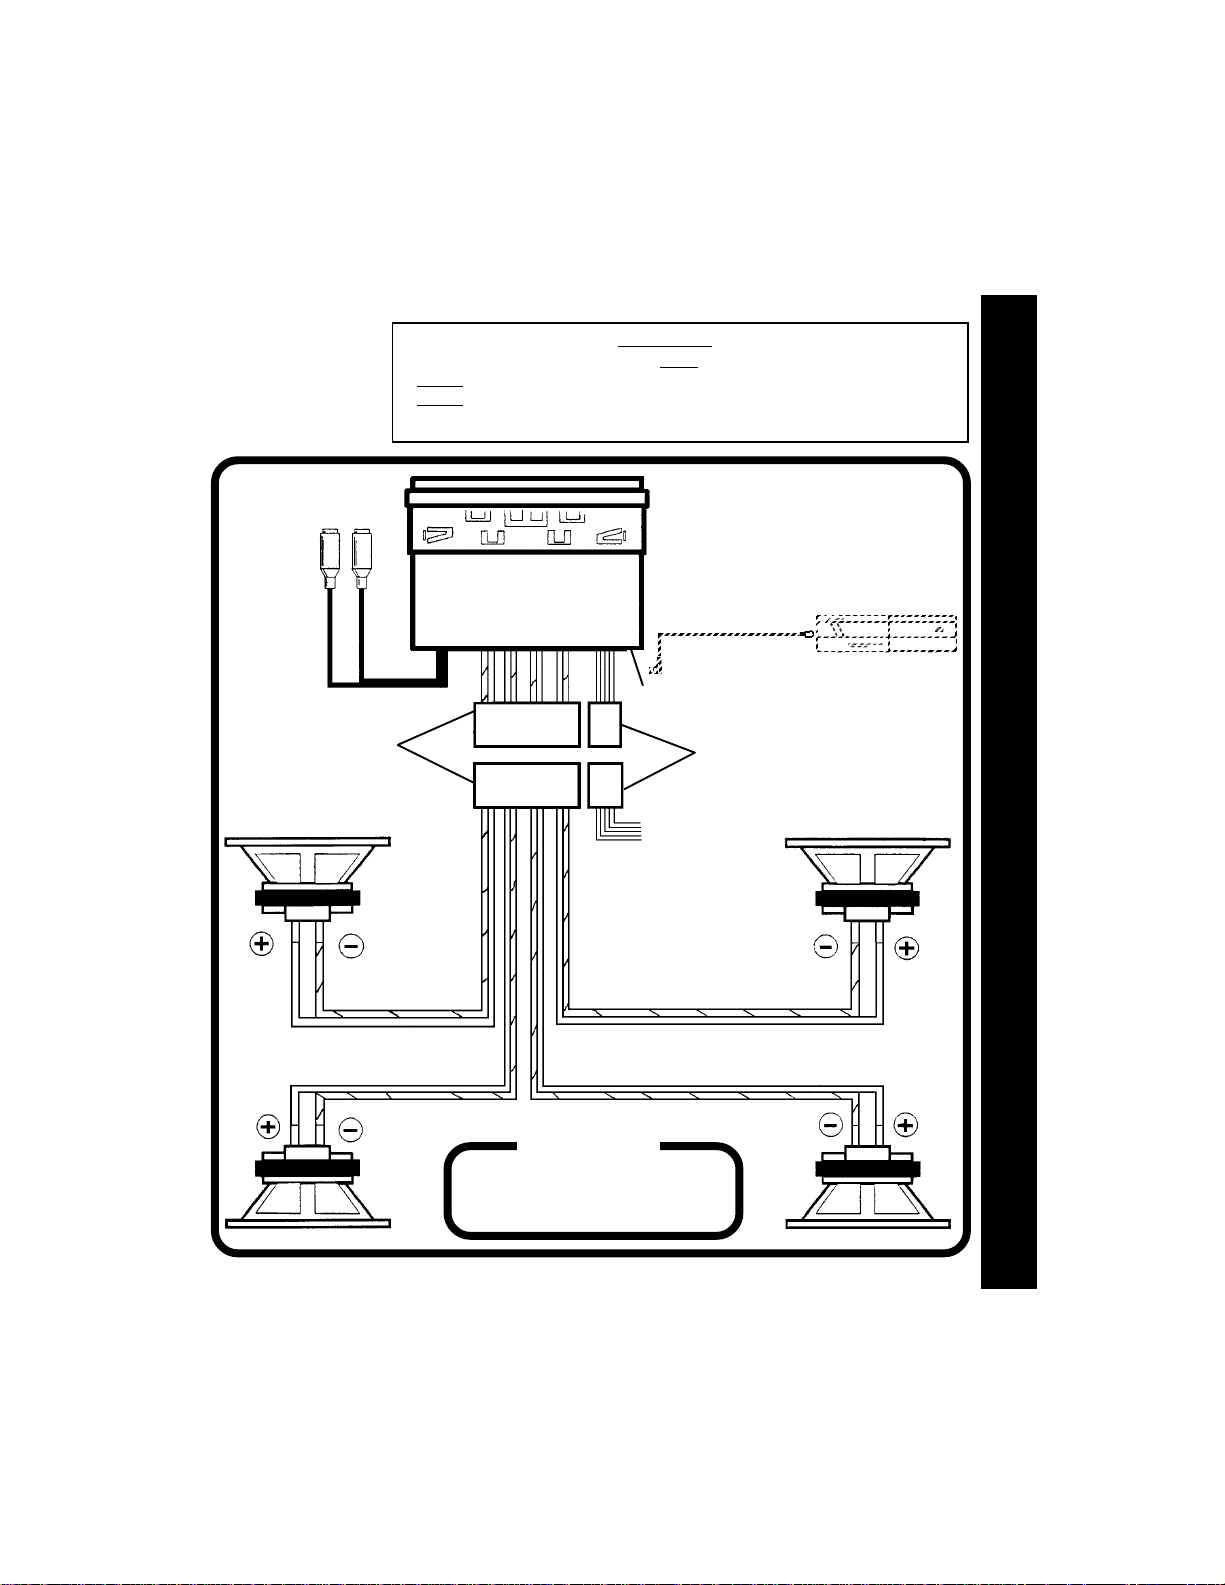
SPEAKER WIRINGSPEAKER WIRING
SPEAKER WIRING
SPEAKER WIRINGSPEAKER WIRING
REFER TO PAGE 3
FOR RADIO WIRING
RCA JACKS
LINE OUT
FOR USE WITH
OPTIONAL
EXTERNAL
AMPLIFIERS
RED=RIGHT REAR
WHITE=LEFT REAR
9-PIN PLUGS
WARNING!
l THE AMPLIFIERS IN THIS RADIO ARE ONLY DESIGNED FOR USE WITH 4 SPEAKERS.
l
NEVER COMBINE (BRIDGE) OUTPUTS FOR USE WITH 2 SPEAKERS.
NEVER GROUND NEGATIVE SPEAKER LEADS TO CHASSIS GROUND.
l
l FAILURE TO WIRE EXACTLY AS SHOWN BELOW MAY CAUSE ELECTRICAL
NOTE:
CHECK WITH YOUR RAMPAGE/AUDIOVOX CAR STEREO SPECIALIST OR CALL 1-800-645-4994 FOR RECOMMENDATIONS OF THE MODELS THAT WILL WORK
WITH YOUR RADIO.
RADIO
DIN CABLE
(SUPPLIED WITH
CD CHANGER).
8-PIN DIN SOCKET FOR CONNECTION TO
OPTIONAL CD CHANGER
4-PIN PLUGS
OPTIONAL
CD CHANGER
6
COMPACT
SPE
SPESPE
SPESPE
A
AA
AA
K
KK
KK
ER WIRING
ER WIRINGER WIRING
ER WIRINGER WIRING
LEFT FRONT SPEAKER
WHITE w/BLACK STRIPE
GREEN w/BLACK STRIPE
WHITE
GREEN
SEE PAGE 3 FOR
RADIO WIRING
GRAY w/BLACK STRIPE
GRAY
VIOLET
VIOLET w/BLACK STRIPE
RIGHT FRONT SPEAKER
HELP!
1-800-645-4994
Monday - Friday
Saturday
LEFT REAR SPEAKER RIGHT REAR SPEAKER
8:30am - 7:00pm Eastern
9:00am - 5:00pm Eastern
44
4
44
Page 6
IONSIONS
IONSIONS
IONS
TT
TT
T
ING INSTRUCING INSTRUC
ING INSTRUCING INSTRUC
ING INSTRUC
TT
TT
T
AA
AA
A
OPEROPER
OPEROPER
OPER
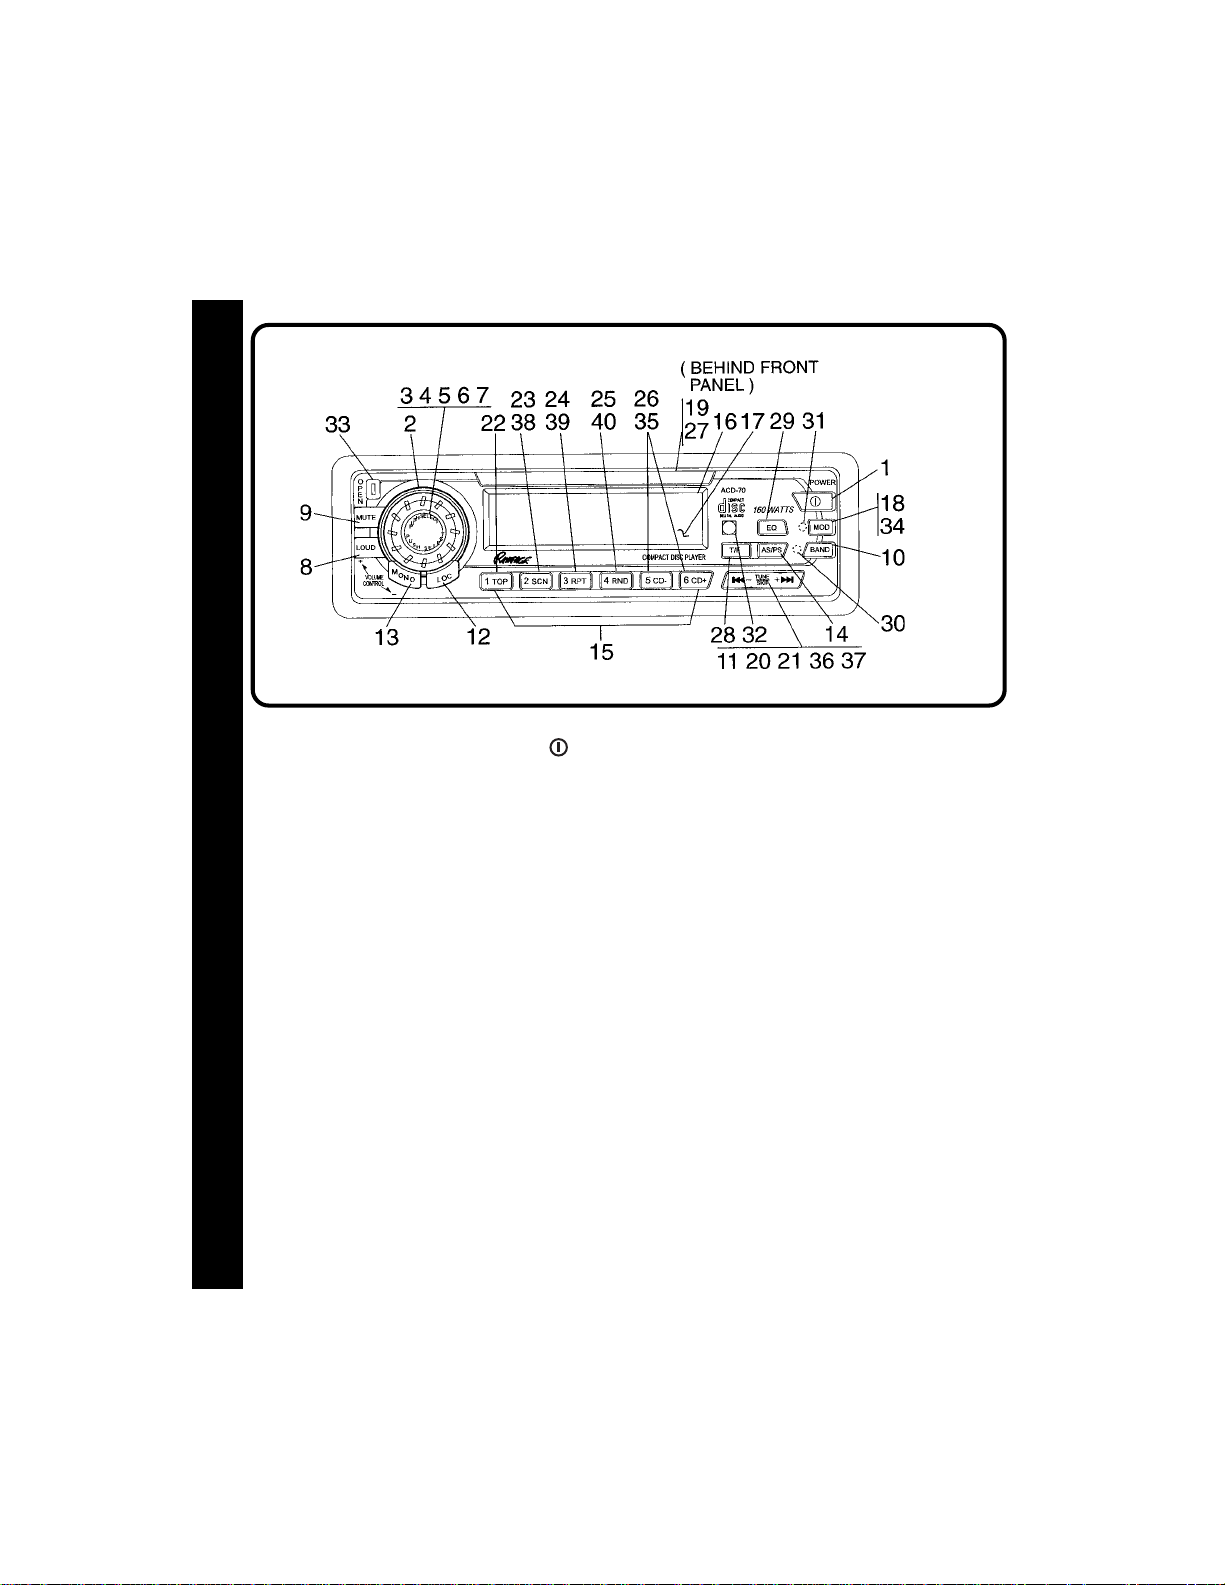
1 ON-OFF POWER BUTTON ( )
Press this button to turn the unit on or off. The
unit will also turn on automatically when a compact disc is inserted if the ignition switch is
“on”.
2 VOLUME (LEVEL) CONTROL
To increase the volume level, turn the knob
clockwise. The volume will increase and the
level will be shown on the display panel from
a minimum of VOL 00 to a maximum of VOL
39. To decrease the volume level, turn the
knob counter-clockwise. The display will automatically return to the normal indication 5
seconds after the last volume adjustment or
when another function is activated. This control is also used in conjunction with the Push
Select Control button
treble, balance and fader levels as described
in
4, 5, 6 and 7.
55
5
55
3 PUSH SELECT CONTROL BUTTON
This button, which is integral to the VOLUME
3 to adjust the bass,
CONTROL, is used to select the audio
function (volume, bass, treble, balance, or
fade) whose setting is adjusted using the
VOLUME CONTROL
Select control button once will set the unit
for bass adjustment (BAS will appear on the
display panel) and an audible beep will occur.
Pressing the button additional times will
select treble adjustment (TRE on the
display), balance (BAL), or fader (FAD ),
each accompanied by a beep tone. The
display will automatically return to the
normal indication 5 seconds after the last
adjustment or when another function is
activated.
2. Pressing the Push
4 BASS CONTROL
To adjust the bass level, first select the Bass
mode by pressing the Select button
the BAS indication appears on the display
panel. Within 5 seconds of choosing the
Bass mode, turn the Level control
counter-clockwise to decrease the bass
3 so
2
Page 7

response or clockwise to increase it as
desired. The level will be shown on the
display panel from a minimum BAS -12 to a
maximum of BAS +12 (BAS 00 indicates
flat response). The display will automatically
return to the normal indication 5 seconds
after the last adjustment or when another
function is activated.
5 TREBLE CONTROL
To adjust the treble level, first select the
Treble mode by pressing the Select button
3 so the TRE indication appears on the
display panel. Within 5 seconds of choosing
the Treble mode, turn the Level control
counter-clockwise to decrease the treble
response or clockwise to increase it as
desired. The level will be shown on the
display panel from a minimum TRE -12 to a
maximum of TRE +12 (TRE 00 indicates flat
response). The display will automatically
return to the normal indication 5 seconds
after the last adjustment or when another
function is activated.
2
6 LEFT/RIGHT BALANCE CONTROL
To adjust the left-right speaker balance, first
select the Balance mode by pressing the
Select button
appears on the display panel. Within 5
seconds of choosing the Balance mode, turn
the Level control
adjust the stereo balance to the left channel
speakers or clockwise to adjust it to the right
channel speakers. The balance position will
be shown on the display panel from BAL
L16 (full left) to BAL R16 (full right). When
the volume level between the left and right
speakers is equal, BAL 00 will be shown
on the display panel. The display will
automatically return to the normal
indication 5 seconds after the last
3 so the BAL indication
2 counter-clockwise to
adjustment or when another function is
activated.
7 FRONT/REAR FADER CONTROL
T o adjust the front-rear speaker balance, first
select the Fader mode by pressing the
Select button
appears on the display panel. Within 5
seconds of choosing the Fader mode, turn
the Level control
adjust the front-rear speaker balance to the
rear speakers or clockwise to adjust it to
the front speakers. The fader position will
be shown on the display panel from FAD
R16 (full rear) to FAD F16 (full front). When
the level between the front and rear speakers
is equal, FAD 00 will be shown on the display
panel. The display will automatically return
to the normal indication 5 seconds after the
last adjustment or when another function is
activated.
3 so the FA D indication
2 counter-clockwise to
8 LOUDNESS CONTOUR (LOUD)
When listening to music at low volume
levels, this feature will boost the bass and
treble ranges to compensate for the
characteristics of human hearing. Press the
button momentarily to activate this feature
and the indication LOUD will appear on the
display panel. Pressing the button again
momentarily will deactivate the feature (the
LOUD indication will disappear from the
display panel).
9 AUDIO MUTE SELECTOR (MUTE)
Press this button momentarily to mute the
volume from the system ( MUTE will appear
blinking on the display panel). Pressing the
button again or adjusting the Volume control
2 will return to the volume level setting in
use before the Mute function was activated.
OPER
OPEROPER
OPEROPER
A
AA
AA
T
TT
TT
ING INSTRUC
ING INSTRUCING INSTRUC
ING INSTRUCING INSTRUC
T
TT
TT
IONS
IONSIONS
IONSIONS
66
6
66
Page 8
bl AM/FM BAND SELECTOR (BAND)
Each time this button is pressed, the radio
IONSIONS
IONSIONS
IONS
band is changed. The indication AM1, AM2,
TT
TT
T
FM1, FM2 or FM3 will appear on the display
panel according to your selection.
During disc play , pressing this button will stop
play of the disc and switch to radio operation
without ejecting the disc. During this time,
the indication will remain on the display panel
ING INSTRUCING INSTRUC
ING INSTRUCING INSTRUC
ING INSTRUC
to show that a disc is still loaded in the unit.
TT
TT
T
Press the MOD button
AA
AA
A
play from the beginning of the last track in
play.
OPEROPER
OPEROPER
OPER
bt to return to disc
bm MANUAL UP/DOWN TUNING ( + /
(SEEK)
To manually select a radio station,
momematrily press the Up Tuning ( +
side of the button to advance the unit two
digits higher or the Down Tuning (
of the button to tune two digits lower.
Pressing either side of the button for longer
than 0.5 seconds and then releasing will
activate the Automatic Seek Tuning function.
The radio will seek the next station in the
selected direction and stop at that frequency .
The Seek function can be stopped by
pressing the button again or activating any
other tuning function.
Pressing and holding either side of the button
for longer than 0.5 seconds will cause the
radio to continue tuning rapidly in the
selected direction until the next available
station and stop there.
- ) AUTOMATIC SEEK TUNING
bn LOCAL/DISTANT SELECTOR (LOC)
This feature is used to select the strength of
the signals at which the radio will stop during
Automatic Seek Tuning. Pressing the button
77
7
77
will select the Local setting (LOC will appear
on the display panel) and only strong (local)
-) side
stations will be received. Pressing the button
again will select the Distant setting (LOC
will disappear from the display panel) and
the radio will stop at a wider range of signals,
including weaker (more distant) stations.
bo FM MONO/STEREO SELECTOR (MONO)
During FM radio operation, this button is
used to select mono or stereo reception of
the broadcast signal. Under normal reception
conditions, the unit should be left in the
stereo mode as indicated by the ST
indication on the display panel when tuned
to an FM stereo signal. If the stereo signal
is too noisy for comfortable listening, press
the FM Mono/Stereo Selector button to
switch to mono reception (the ST
indication will disappear from the display
panel). To return to stereo reception mode,
)
press the button again so that the ST
indication appears in the display panel.
bp PRE-SET SCAN (PS)
AUTO-STORE TUNING (AS)
Press this button momentarilyto scan the
stations pre-set into the 12 memories of the
AM bands or the 18 memories of the FM
bands. The unit will stop at each pre-set
station for 5 seconds before continuing to the
next pre-set station (the pre-set number on
the display panel will flash during Pre-Set
Scan operation). Press the button again
momentarily to stop Pre-Set Scan operation
and remain on the selected frequency. If no
buttons are pressed during the scan, the unit
will return to the original station before the
scan.
Pressing and holding the button for longer
than 2 seconds will activate the Auto-Store
Tuning feature which will automatically scan
and enter up to 6 stations into the pre-set
memories on the band in use. If you have
already set the pre-set memories to your
Page 9

favorite stations, activating the Auto-Store
Tuning feature will erase those stations and
enter the new ones. This feature is most
useful when travelling in a new area where
you are not familiar with the local stations.
bq STATION PRE-SET MEMORIES
To set any of the 6 pre-set memories in each
band, use the following procedure:
1. Turn the radio on and select the desired
band.
2. Select the first station to be pre-set using
the Manual Up/Down or Automatic Seek
Tuning Controls
3. Press the pre-set button to be set and
continue to hold it in for
approximately 2 seconds. The pre-set
number will appear on the display panel
and two beeps will sound, indicating that
the station is now set into that pre-set
memory position. The station can now
be recalled at any time by pressing that
button.
4. Repeat the above procedure for the
remaining 5 pre-sets on that band and for
the other 4 bands on the unit.
bm.
br LIQUID CRYSTAL DISPLAY PANEL
The Liquid Crystal Display (LCD) panel
displays the frequency, time, and activated
functions.
NOTE:It is a characteristic of LCD panels
that, if subjected to cold temperatures
for an extended period of time, they
may take longer to illuminate than
under normal conditions. In addition,
the visibility of the numbers on the
LCD may slightly decrease. The LCD
read-out will return to normal when
the temperature increases to a normal
range.
bs FUNCTION DISPLAY
The Function Display consists of five bar
graphs which provide a visual representation
of the volume level and the left and right
channel balance levels. The volume level is
represented by three thin bar graphs. As
the volume is increased, the number of
illuminated segments will increase. The left
and right channels are represented by the
wider bar graphs. As the signal is applied
to either the left or right channel, the number
of illuminated segments will increase.
bt MODE SELECTOR (MOD)
This button is used to select the radio, CD
player or CD changer (if installed) playback
mode. Each press of the button will select
a different mode as indicated on the display
panel.
During CD player operation, this button may
be used to change to radio CD player or CD
changer mode without ejecting the disc. The
indication will remain on the display panel
to show that the disc is still loaded in the
unit. The DISC indication will remain on
the display panel to show that the CD
changer is operating. Press the button
again to return to CD player mode and
resume play of the disc from the point at
which it was stopped.
bu DISC SLOT
With the front panel in the fold-down position,
gently insert the disc into the slot (label
surface facing up) until the soft-loading
mechanism engages and pulls the disc in.
The LOAD indication will momentarily appear
on the display panel followed by the total
playing time of the disc. The (
indication illuminates and becomes
animated, the
the track number and elapsed time will appear
on the display panel.
IN symbol lights, and
OPER
OPEROPER
OPEROPER
A
AA
AA
T
TT
TT
ING INSTRUC
ING INSTRUCING INSTRUC
ING INSTRUCING INSTRUC
T
TT
TT
IONS
IONSIONS
IONSIONS
)
88
8
88
Page 10
CAUTION: This unit is designed for play of
IONSIONS
IONSIONS
IONS
TT
TT
T
cl TRACK SELECT ( + / - )
ING INSTRUCING INSTRUC
ING INSTRUCING INSTRUC
ING INSTRUC
The Track Select functions are used to
TT
TT
T
AA
AA
A
quickly access the beginning of a particular
track. Each time the Forward Track Select
(+
OPEROPER
OPEROPER
OPER
next higher track number will be selected
as shown on the display panel. Similarly,
each time the Backward Track Select (side of the button is pressed, the next lower
track number will be selected as shown on
the display panel.
ONLY. Do not attempt to use
3" (8cm) CD-Singles in this unit,
either with or without an adapter,
as damage to the player and/or
disc can occur. Such damage
will not be covered by the
Warranty on this product.
) side of the button is pressed, the
cm CUE/REVIEW FUNCTIONS ( + /
- )
High-speed audible search to any section
of the disc can be made by the Cue and
Review functions. Press and hold the Cue
) side of the button to advance rapidly
(+
in the forward direction. (The advancing disc
playing time will be shown on the display
panel) or the Review (to advance rapidly in the backward direction
(The decreasing disc playing time will be
shown on the display panel). During either
function, the elapsed time within each track
will automatically be shown on the display
panel.
) side of the button
cn TRACK ONE POSITION (TOP)
The Track One Position function is used to
quickly return to the begining of the CD, Track 1.
99
9
99
co TRACK SCAN SELECTOR (SCN)
During disc play, press this button to play
the first 10 seconds of each track on the
disc (SCAN) will appear on the display
panel). When a desired track is reached,
press the Intro-Scan button again to cancel
the function (SCAN will disappear from the
display panel) and play of the selected track
will continue. Scan mode will also be
canceled by activating the Repeat Play
or Random Play
cq.
cp REPEAT PLAY SELECTOR (RPT)
During disc play, press this button to repeat
the play of the selected track (RPT will appear
on the display panel). Play of the track will
)
continue to repeat until the button is pressed
again and the RPT indication disappears from
the display panel. Repeat Play mode will
also be canceled by activating the Track
co or Random Play cq functions.
Scan
cq RANDOM PLAY SELECTOR (RND)
During disc play, press this button to play the
tracks on the disc in a random shuffled order
(RND will appear on the display panel). In
Random Play mode, the Track Select function
cl will also select tracks in the random order
instead of the normal progression. The Random
Play mode can be canceled by pressing the
button again (RND indication will disappear from
the display panel) or by activating the Repeat
cp or Track Scan co functions.
Play
cr DISC SELECT UP/DOWN (D+/D-)
These buttons are used to select the desired
disc for play . T o advance to a higher humber disc,
press the D+ button, and to return to a lower
number disc, press the D- button. The number
of the disc in play will be shown on the display
panel.
cp,
Page 11

cs DISC EJECT ( )
Disc play is stopped and the disc is ejected
when the front panel is folded down and this
button on the rear of the panel is pressed.
Radio or CD changer operation will automatically
resume depending on which mode was in
operation prior to disc play. If the disc is
not removed from the unit within 10 seconds
of being ejected, it will automatically be reloaded into the unit to prevent it from being
accidentally damaged (
on the display panel to indicate that a disc
is loaded in the player). Play of the disc
can be resumed by using the Mode Selector
IN will appear
bt to choose CD player function.
ct TIME/FREQUENCY SELECTOR (T/F)
During radio operation, press this button to
call the time display on the incorporated
quartz clock. The display will return to the
radio frequency indication after 5 seconds.
During CD player operation, the first press
of the button will call the track elapsed time
on the display panel. A second press will
call the time display. During CD changer
operation the first press of the button will
call the time display. A second press will
call the disc slot number and track number
in play . In either case, the display will return
to the disc indication after 5 seconds.
cu EQUALIZER BUTTON (EQ)
The EQ button applies preset sound effects
to the unit’s audio output signal. The EQ
button, when pressed, will activate one of
three operating modes (ROCK, CLAS, or
POP). When the EQ function is active the
bass and treble levels cannot be changed.
When the EQ function is not active, the unit
returns to the user set bass and treble levels.
dl THEFT-DETERRENT LED
Located on the chassis behind the front
panel, a light-emitting diode (LED) will flash
when the panel is physically removed. The
flashing light serves as a visual warning to
the would-be thief that the unit has been
disabled by removal of the front panel.
dm RESET BUTTON
circuitry and should only be activated under
the following circumstances as it will erase
the time and pre-set memories:
1. Upon initial installation after all wiring is
completed.
2.If there is a malfunction of any of the
switches, on the unit, pressing the
RESET button may clear the system and
return to normal operation.
dn REMOTE SENSOR
The sensor to detect the infrared signal from
the wireless remote control is located behind
this lens. For optimum operation of the
remote control, always aim the control at
this sensor.
do FRONT PANEL RELEASE BUTTON
(OPEN)
This button is used to release the
mechanism that holds the front panel to the
chassis. To detach the front panel, press
the button so that the paneldrops to the
lowered position. Grasp the panel at the
middle and pull it off of the chassis. After
removing the panel, push the metal plate
back up to the vertical position. To re-attach
the panel, press it straight onto the chassis
until the mechanism locks it into place.
OPER
OPEROPER
OPEROPER
A
AA
AA
T
TT
TT
ING INSTRUC
ING INSTRUCING INSTRUC
ING INSTRUCING INSTRUC
T
TT
TT
IONS
IONSIONS
IONSIONS
1010
10
1010
Page 12
NOTES ON USE OF FRONT P ANEL
1.Make sure the front panel is right-sideup when attaching it to the chassis as it
cannot be attached when up-side down.
OR CODESOR CODES
OR CODESOR CODES
OR CODES
2.Do not press very hard on the front
panel when attaching it to the chassis.
No more than light to moderate pressure
should be needed.
3. When attaching the front panel, make
sur e it is centered in the chassis frame
SETSET
TT
ING THE CLOCKING THE CLOCK
SET
T
ING THE CLOCK
SETSET
TT
ING THE CLOCKING THE CLOCK
ING THE CLOCK / ERRING THE CLOCK / ERR
ING THE CLOCK / ERRING THE CLOCK / ERR
ING THE CLOCK / ERR
1. Switch the vehicle ignition and radio “on”.
TT
TT
T
2. Press the Time/Frequency button to call the time display.
3. Press and hold the Time/Frequency Selector button ct approximaly 2 seconds until
the time display begins flashing on the LCD.
4. Within 5 seconds after the time display begins flashing, and while holding the Time/
Frequency button in, press the Down Tuning (- ) button to adjust the hours and
IONS / SETIONS / SET
IONS / SETIONS / SET
IONS / SET
AM/PM indication, or the Up Tuning (+ ) button to adjust the minutes to the correct
TT
TT
T
time.
5. Five seconds after the last hour or minute adjustment is made, the time will be set in
the unit and the display will return to the normal indication.
and is pressed straight into position.
4. When taking the front panel with you,
please use the supplied carrying case to
protect the panel from dirt and damage.
Make sure there is no dust or dirt on
the electrical terminals on the back of
the panel as this could cause
intermittent operation or other
malfunctions.
ING INSTRUCING INSTRUC
ING INSTRUCING INSTRUC
ING INSTRUC
TT
TT
T
AA
AA
A
If a problem should develop while operating the CD player, an error code (ER-1, ER-2,
ER-3, etc.) may appear on the display panel. This can indicate a number of problems
with the unit, including a mechanical error or an error in the microprocessor control of the
OPEROPER
OPEROPER
OPER
player. If an error code should appear , try ejecting and re-loading the disc into the player .
While the disc is out of the unit, make sure it is clean, undamaged, and loaded correctly
(label surface up). Y ou may also try activating the Re-Set button dm on the unit, but this
will also erase the time and pre-set memories.
If the suggested measures do not solve the problem, contact an approved warranty
1111
11
1111
station near you for further assistance.
CD PLCD PL
CD PL
CD PLCD PL
AA
YER ERRYER ERR
A
YER ERR
AA
YER ERRYER ERR
OR CODESOR CODES
OR CODES
OR CODESOR CODES
Page 13

SPECIFICATIONSSPECIFICATIONS
SPECIFICATIONS
SPECIFICATIONSSPECIFICATIONS
Size: 7" W x 2" H x6 5/16" D
178 mm x 50 mm x 160 mm
Operating Voltage: 12 volts DC, negative ground
Fuse Ratings: Constant (Yellow wire): 15 AMP.
Switched (Red wire): 1 AMP.
Output Power: 160 watts maximum
(40 watts x 4 channels)
Output Wiring: Floating-ground type designed for 4 speaker use.
Front and rear channels CANNOT be combined
(bridged) for use with 2 speakers.
RCA low-level outputs (rear channels).
Output Impedance: Compatible with 4 – 8 ohm speakers.
Low-Level Output: 500 mv.
Tuning Range: AM: 530 – 1,720 kHz. (10 kHz. step)
FM: 87.5 – 107.9 MHz. (200 kHz. step)
Sensitivity: AM: 20 uv.
FM: 1.5 uv.
SPECIFICA
SPECIFICASPECIFICA
SPECIFICASPECIFICA
T
TT
TT
IONS
IONSIONS
IONSIONS
FM Stereo Separation: >20 dB
CD Frequency Response: 17 – 20 kHz. +0/-3 dB
CD Signal/Noise Ratio: >65 dB
CD Channel Separation: >60 dB
CD Distortion: 0.2%
*Specifications are subject to change without notice.
1212
12
1212
Page 14

SS
SS
S
CD CHCD CH
CD CH
CD CHCD CH
OLOL
OLOL
OL
Built into this radio are controls to operate
an optional CD changer. Please check with
your Rampage/Audiovox car stereo
specialist or call 1-800-645-4994 for
recommendations of the models that will
work with this radio.
Adjustment of the audio functions (volume,
NGER CONTRNGER CONTR
NGER CONTRNGER CONTR
NGER CONTR
AA
AA
A
tone, balance, and fader) for the CD changer
operate in the same manner as they do for
radio play . The following controls will operate
the CD changer when it is installed and
CD CHCD CH
CD CHCD CH
CD CH
connected to this radio. Refer to the owner’s
manual included with the CD changer for
instructions on the installation and correct
loading and use of the CD magazine.
AA
NGER CONTRNGER CONTR
A
NGER CONTR
AA
NGER CONTRNGER CONTR
OLOL
OL
OLOL
dp CD CHANGER MODE SELECTOR
(MOD)
During radio or CD play , press this button to
select operation of the CD changer as shown
by CDC on the display panel. Disc play will
begin and the disc and track number will be
shown on the display panel. If a new
magazine has been loaded into the changer,
play will begin from the first track of the first
disc in the magazine. If a magazine was
already in the changer, play will resume from
the track on the disc previously in play .
dq DISC SELECT (CD+ & CD-)
These buttons are used to select the desired
disc for play . T o advance to a higher number
disc, press the CD+ button cr. T o return to
a lower number disc, press the CD - button.
The number of the disc in play will be shown
on the display panel.
dr TRACK SELECT (+ / - )
1313
13
1313
The Track Select functions are used to
quickly access the beginning of a particular
SS
S
SS
track. Each time the Forward Track Select
(+ ) side of the button is pressed, the next
higher track number will be selected as
shown on the display panel. Similarly , each
time the Backward Track Select ( -) side
of the button is pressed, the next lower track
number will be selected as shown on the
display panel.
ds CUE/REVIEW FUNCTIONS ( + /
- )
High-speed audible search to any section of
the disc can be made by the Cue and Review
functions. Press and hold the Cue (+ )
side of the button to advance rapidly in the
forward direction or the Review ( -) side
of the button to advance rapidly in the
backward direction.
dt TRACK/DISC SCAN SELECTOR
(SCN)
When the Scan button is pressed, the SCN
indication will appear on the display panel,
and the first 10 seconds of each track on
the disc will be played in order. When a
desired track is reached, press the Scan
button twice with a one second interval
between presses and play of the selected
track will continue (SCN will disappear from
the display panel). The Track Scan mode
will also be canceled by activating another
disc function (T op, Repeat or Random Play).
When the Scan button is pressed twice
the DISC and SCN indications will appear
on the display panel and the first 10 seconds
of each track on each disc in the magazine
will be played in order. When a desired disc
track is reached, press the Scan button
again and play of the selected disc will
continue uninterrupted ( DISC and SCN will
disappear from the display panel). The Disc
Page 15

Scan mode will also be canceled by
activating another disc function (T op, Repeat
or Random Play).
du DISC/TRACK REPEA T PLA Y (RPT)
When the Repeat button is pressed, the RPT
indication will appear on the display panel
and play of the selected track will be
continually repeated until the Track Repeat
mode is canceled by pressing the Repeat
button again or by activating the Disc Select
dq, Scan dt or Random Play el functions.
When the Repeat button is pressed twice
the DISC and RPT indications will appear
on the display panel and play of the selected
disc will be continually repeated until the Disc
Repeat mode is canceled by pressing the
Repeat button again or by activating the
Scan dt or Random Play el functions.
el DISC/TRACK RANDOM PLA Y (RND)
When the Random button is pressed, the
CD CHCD CH
CD CH
CD CHCD CH
If a problem should develop while operating the CD changer, the following error codes
may appear on the display panel.
ER-1: Indicates that there is no magazine loaded in the CD changer.
ER-2: Indicates a problem with the magazine eject function.
ER-3: Indicates an error in the disc loading function.
ER-4: Indicates an error in the disc un-loading function.
ER-5: Indicates an error in the magazine position.
ER-6: Indicates an error in the laser pick-up position.
ER-7: Indicates an error in the laser focus on the disc.
In any of the above situations, try ejecting the CD magazine from the changer and make
sure the discs are clean, undamaged, and loaded correctly (refer to the Owner’s Manual
of the CD changer). Re-load the magazine and check for proper operation. You may
also try activating the RESET button dm on the unit, but this will also erase the time and
pre-set memories.
If the suggested measures do not solve the problem, contact an approved warranty station
near you for further assistance.
AA
NGER ERRNGER ERR
A
NGER ERR
AA
NGER ERRNGER ERR
RND indication will appear on the display
panel and the tracks on the disc will be
played in a random, shuffled order . The Track
Select button dr will also select tracks in
the shuffled order instead of the normal
progression. The Random Track mode can
be canceled by pressing the Random button
again or by activating the Disc Select dq,
Scan dt or Repeat Play du functions.
When the Random button is pressed again,
the DISC and RND indications will appear
on the display panel and the discs in the
magazine will be played in a random, shuffled
order, as well as the tracks on each disc.
After playing a track selected at random from
a disc in the magazine, the unit will select
another disc at random and play a randomly
selected track on it. This will continue until
the Random Disc mode is canceled by
pressing the Random button again or by
activating the Scan dt or Repeat Play du
functions.
OR CODESOR CODES
OR CODES
OR CODESOR CODES
CD CH
CD CHCD CH
CD CHCD CH
A
AA
AA
NGER CONTR
NGER CONTRNGER CONTR
NGER CONTRNGER CONTR
OL
OLOL
OLOL
S / CD CH
S / CD CHS / CD CH
S / CD CHS / CD CH
A
AA
AA
NGER ERR
NGER ERRNGER ERR
NGER ERRNGER ERR
OR CODES
OR CODESOR CODES
OR CODESOR CODES
1414
14
1414
Page 16

WIRELESS REMOTE CONTROL OPERATION
IONION
IONION
ION
TT
TT
T
The wireless remote control supplied with this
AA
AA
A
model is capable of operating most of the
features of the unit from a remote location.
Each button on the remote control functions in
the same way as the referenced button on the
OL OPEROL OPER
OL OPEROL OPER
OL OPER
main unit. For optimal operation of the remote
control, always aim it toward the Remote
Sensor
dn on the front panel of the main unit.
1 ON-OFF POWER - See Main Unit 1
TE CONTRTE CONTR
TE CONTRTE CONTR
TE CONTR
2 VOLUME (LEVEL) CONTROL- See Main
Unit 2, 3 4, 5, 6, and 7 except
press +
- t o decrease level
to increase level, and press
7 RADIO PRE-SET MEMORY 1-6 - See Main
8 DISC UP SELECT (D+) - See Main
9 DISC DOWN SELECT (D-) - See Main
bl TRACK/DISC REPEAT (RPT) - See Main
bm TRACK/DISC RANDOM (RND) - See Main
bn TRACK/DISC TRACK ONE POSITION (TOP)
3 SELECT BUTTON (S) - See Main Unit 3,
4, 5, 6, and 7
bo TRACK/DISC SCAN (SCN) - See Main
4 AUDIO MUTE (MUTE) – See Main Unit 9
WIRELESS REMOWIRELESS REMO
WIRELESS REMOWIRELESS REMO
WIRELESS REMO
5 AM/FM BAND SELECTOR (BND) – See
Main Unit
bl
6 MANUAL UP/DOWN TUNING – See Main
bm except press + to increase fre-
Unit
quency, press
AUTOMA TIC SEEK TUNING – See Main
bm except press + to Seek
Unit
upward, press
CD TRACK SELECT – See Main Unit cl
and dr except press + to select a
higher track number, press
a lower track number.
- to decrease frequency.
- to Seek downward.
- to select
bp MODE SELECTOR (MOD) - See Main
bq AUDIO EQUALIZA TION BUTTON (EQ) -
br INFRARED SENDER - Emits infrared
bs BATTERY COMPARTMENT - Holds two
Unit bq
cr
Unit
cr
Unit
Unit cp and du
Unit cq and el
- See Main Unit
co and dt
Unit
Unit bt and dp
See Main Unit
signal to radio which is detected by the
sensor
AAA batteries for remote wireless control
operation.
dn
cn
cu
1515
15
1515
CD CUE/REVIEW – See Main Unit
cm and
ds except press + for Cue function,
and press
- for Review function.
Page 17

WIRELESS REMO
WIRELESS REMOWIRELESS REMO
WIRELESS REMOWIRELESS REMO
TE CONTR
TE CONTRTE CONTR
TE CONTRTE CONTR
OL OPER
OL OPEROL OPER
OL OPEROL OPER
A
AA
AA
T
TT
TT
ION
IONION
IONION
1616
16
1616
Page 18

CARE AND MAINTENANCECARE AND MAINTENANCE
CARE AND MAINTENANCE
NCENCE
NCENCE
NCE
The radio section of your new sound system does not require any maintenance. We recommend that
you keep this manual for reference on the many features found in this unit as well as how to set the
clock.
The compact disc player section also requires no routine maintenance, but proper understanding of
INTENAINTENA
INTENAINTENA
INTENA
its use and handling will help you obtain maximum enjoyment of its capabilities. The following points
should be observed:
l When cleaning the interior of the vehicle, do not get water or cleaning fluids on the unit.
l The CD player is a precision instrument and will not operate properly in extreme heat or cold.
ND MAND MA
ND MAND MA
ND MA
In case of such conditions, wait until the interior temperature of the vehicle reaches a normal
temperature before using the player.
RE ARE A
RE ARE A
RE A
l If the temperature inside the player gets too hot, a protective circuit will automatically stop play
of the disc. In this case, allow the unit to cool off before operating the player again.
CACA
CACA
CA
l Never insert anything other than a 5" (12 cm) compact disc into the player as the mechanism can
be damaged by foreign objects.
l Do not attempt to use 3" (8 cm) CD-Single discs in this unit, either with or without an adaptor, as
damage to the player and/or disc may occur. Such damage will not be covered by the Warranty
on this product.
l When not using the disc player, always remove the compact disc. Do not leave an ejected disc
sitting in the disc slot as this can expose it to sunlight and other causes of damage.
l Do not attempt to open the unit chassis. There are no user serviceable parts or adjustments inside.
l When the vehicle warms up during cold weather or under damp conditions, moisture may
condense on the lens of the disc player. Should this occur, the player will not operate properly
until the moisture has evaporated.
l The unit is designed with a vibration dampening CD mechanism to minimize interruption of disc
play due to normal vibration in a moving vehicle. When driving on very rough roads, however,
occasional sound skips may occur. This will not scratch or damage the disc and normal play will
resume when the rough conditions cease.
HANDLING COMPACT DISCS
Dirt, dust, scratches, and warpage can cause skips in the playback and deterioration of sound
quality. Please follow these guidelines to take care of your compact discs:
CARE AND MAINTENANCECARE AND MAINTENANCE
COMPACT
1717
17
1717
l Use only compact discs with the mark .
l Fingerprints, dust, and dirt should be carefully wiped off the disc’s playing surface (shiny side)
with a soft cloth. Wipe in a straight motion from the inside to the outside of the disc.
l Never use chemicals such as record sprays, household cleaners or thinner to clean compact
discs. Such chemicals can irreparably damage the disc’s surface.
l Discs should be kept in their storage cases when not in use.
l Do not expose discs to direct sunlight, high temperatures or high humidity for extended periods.
l Do not stick paper, tape, or labels on the disc surfaces nor write on them with any type of marker.
DIGITAL AUDIO
Page 19

12 MONTH LIMITED WARRANTY
AUDIOVOX CORPORATION (the Company) warrants to the original retail purchaser of this
product that should this product or any part thereof, under normal use and conditions, be
proven defective in material or workmanship within 12 months from the date of original
purchase, such defect(s) will be repaired or replaced with new or reconditioned product (at
the Company's option) without charge for parts and repair labor.
To obtain repair or replacement within the terms of this Warranty, the product is to be
delivered with proof of warranty coverage (e.g. dated bill of sale), specification of defect(s),
transportation prepaid, to the warranty center at the address shown below.
This Warranty does not extend to the elimination of car static or motor noise, to correction
of antenna problems, to costs incurred for installation, removal, or reinstallation of the
product, or damage to tapes, compact discs, speakers, accessories, or vehicle electrical
systems.
This Warranty does not apply to any product or part thereof which, in the opinion of the
Company, has suffered or been damaged through alteration, improper installation,
mishandling, misuse, neglect, accident, or by removal or defacement of the factory serial
number/bar code label(s). THE EXTENT OF THE COMPANY'S LIABILITY UNDER THIS
WARRANTY IS LIMITED TO THE REPAIR OR REPLACEMENT PROVIDED ABOVE AND, IN
NO EVENT, SHALL THE COMPANY'S LIABILITY EXCEED THE PURCHASE PRICE
PAID BY PURCHASER FOR THE PRODUCT.
This Warranty is in lieu of all other express warranties or liabilities. ANY IMPLIED
WARRANTIES, INCLUDING ANY IMPLIED WARRANTY OF MERCHANTABILITY, SHALL BE
LIMITED TO THE DURATION OF THIS WRITTEN WARRANTY. ANY ACTION FOR BREACH
OF ANY WARRANTY HEREUNDER INCLUDING ANY IMPLIED WARRANTY OF MERCHANTABILITY MUST BE BROUGHT WITHIN A PERIOD OF 30 MONTHS FROM DATE OF
ORIGINAL PURCHASE. IN NO CASE SHALL THE COMPANY BE LIABLE FOR ANY
CONSEQUENTIAL OR INCIDENTAL DAMAGES FOR BREACH OF THIS OR ANY OTHER
WARRANTY, EXPRESS OR IMPLIED, WHATSOEVER. No person or representative is
authorized to assume for the Company any liability other than expressed herein in
connection with the sale of this product.
Some states do not allow limitations on how long an implied warranty lasts or the exclusion
or limitation of incidental or consequential damage so the above limitations or exclusions
may not apply to you. This Warranty gives you specific legal rights and you may also have
other rights which vary from state to state.
U.S.A.: AUDIOVOX CORPORATION, 150 MARCUS BLVD., HAUPPAUGE, NY 11788 l1-800-645-4994
CANADA: CALL 1-800-645-4994 FOR LOCATION OF WARRANTY STATION SERVING YOUR AREA
128-4270E
W
WW
WW
A
AA
AA
RR
RRRR
RRRR
A
AA
AA
NT
NTNT
NTNT
Y
YY
YY
1818
18
1818
Page 20

INSTRUCCIONES PARA LA INSTALACIÓNINSTRUCCIONES PARA LA INSTALACIÓN
INSTRUCCIONES PARA LA INSTALACIÓN
Esta unidad está diseñada para ser instalada en automóviles, camiones y camionetas que ya tengan una abertura para radio.
En muchos casos, se necesitará un equipo de instalación especial para montar la radio en el tablero de instrumentos. Se puede
conseguir estos equipos en las tiendas de artículos electrónicos y en los negocios especializados en equipos estereofónicos
ACIÓNACIÓN
ACIÓNACIÓN
ACIÓN
para automóviles. Antes de comprar el equipo averigüe para qué aplicaciones está destinado el mismo para asegurarse de que
sirva para su vehículo. Si no puede encontrar el equipo que necesita, llame a nuestra línea gratuita de “AYUDA” al 1-800-645-
ALAL
ALAL
AL
4994.
PROCEDIMIENTO DE INSTALACIÓN UNIVERSAL CON MANGA DE MONTAJE
1. Abra, pliegue, baje y quite el panel delantero desmontable, si el mismo se encuentra enganchado al chasis, agárrelo por
la parte central acanalada y tire del mismo en línea recta hacia fuera. Deslice la manga de montaje para retirarla del chasis.
A INSTA INST
A INSTA INST
A INST
Si está trabada en su lugar, use las herramientas de extracción (provistas) para desengancharla.
2. Coloque la manga de montaje para verificar el tamaño de la abertura que hay en el tablero de instrumentos. Si la abertura
A LA L
A LA L
es pequeña, corte o lime con cuidado lo que fuese necesario hasta que la manga de montaje calce fácilmente en la abertura.
A L
No fuerce la manga en la abertura, tampoco la doble ni arquee. Asegúrese de tener espacio suficiente detrás del tablero
RR
RR
R
de instrumentos para el chasis de la radio.
AA
AA
A
3. Ubique la serie de lengüetas a lo largo de la parte superior, inferior y los lados de la manga de montaje. Con la manga de
montaje totalmente colocada dentro de la abertura del tablero de instrumentos, doble hacia afuera todas las lengüetas que
sea necesario para asegurar firmemente la manga al tablero.
4. Coloque la radio frente a la abertura del tablero de instrumentos para poder pasar el cableado a través de la manga de montaje.
Siga cuidadosamente el diagrama de cableado y asegúrese de que todas las conexiones del arnés de cableado estén seguras
y aisladas con tuercas para alambre o cinta aislante para procurar el funcionamiento correcto de la unidad. Después de
terminar las conexiones de cableado, coloque el panel delantero y encienda la unidad para confirmar su funcionamiento
(la llave de contacto debe estar en “on”). Si la unidad no funciona, revise el cableado hasta que se corrija el problema. Una
vez logrado el funcionamiento correcto, apague la llave de contacto y proceda con el montaje final del chasis.
5. Deslice con cuidado la radio en la manga de montaje, asegúrese de que esté en la posición correcta, hasta que esté totalmente
asentada y los soportes antivibratorios trabados en su lugar.
6. Fije un extremo de la correa de soporte perforada (provista) al tornillo que se encuentra en la parte posterior del chasis
con la tuerca hexagonal provista. Ajuste el otro extremo de la correa perforada a una parte segura del tablero de instrumentos,
INSTRUCCIONES PINSTRUCCIONES P
INSTRUCCIONES PINSTRUCCIONES P
INSTRUCCIONES P
ya sea por encima o por debajo de la radio, con el tornillo provisto. Doble la correa para ubicarla si es necesario.
PRECAUCIÓN: La parte posterior de la radio debe estar apoyada sobre la correa para evitar daños al tablero como
7. Vuelva a enganchar el panel delantero al chasis y consulte las Instrucciones de funcionamiento para probar el funcionamiento de
la radio.
LOS JUEGOS DE INSTALACIÓN
1. Si el vehículo requiere el uso de un juego de instalación para montar la radio, siga las instrucciones incluidas en el juego
de instalación para colocar la radio en la placa de montaje provista con el mismo.
2. Haga las conexiones de cables y pruebe la radio según se describe en el Paso 4 anterior.
3. Instale el conjunto formado por radio/placa de montaje en el subtablero, de acuerdo con las instrucciones del juego de
instalación.
4. Fije la correa de soporte a la radio y al tablero de instrumentos según se describe en el Paso 6 anterior.
5. Vuelva a colocar el panel de reborde del tablero.
consecuencia del peso de la radio o del uso incorrecto debido a la vibración.
INSTRUCCIONES PARA LA INSTALACIÓNINSTRUCCIONES PARA LA INSTALACIÓN
2020
20
2020
PROCEDIMIENTO DE INSTALACIÓN ISO
Esta unidad tiene orificios roscados en los paneles laterales del chasis que pueden usarse con los soportes de montaje originales
de fábrica de algunos vehículos Toyota, Nissan, Mitsubishi, Isuzu, Hyundai y Honda para montar la radio al tablero. Sírvase
consultar a la tienda local que sea especialista en equipos estereofónicos para automóviles así obtiene asistencia para este
tipo de instalación.
1. Quite la radio que venga de fábrica en el tablero de instrumentos o en la consola central. Guarde todas las piezas, tornillos
y soportes ya que los usará para montar la radio nueva.
2. Desenganche con cuidado el armazón de plástico de la parte delantera del chasis de la radio nueva. Quite y descarte
el armazón.
3. Quite los soportes de montaje que vengan de fábrica y los tornillos de la radio y úselos para la radio nueva.
PRECAUCIÓN: NO EXCEDA EL TAMAÑO MÁXIMO DE TORNILLO M5 X 8 MM.
4. Conecte los cables de la radio nueva al vehículo según lo indicado en el paso 4 anterior.
5. Monte la radio nueva al tablero de instrumentos o a la consola central, para lo cual siga el procedimiento inverso al paso 1.
SI LOS TORNILLOS SON MÁS LARGOS, PUEDEN TOCAR Y DAÑAR LOS COMPONENTES QUE
ESTÉN ADENTRO DEL CHASIS.
Page 21

ASISTENCIA GRATUITA PARA LA INSTALACIÓNASISTENCIA GRATUITA PARA LA INSTALACIÓN
ASISTENCIA GRATUITA PARA LA INSTALACIÓN
La instalación y las conexiones de los cables de esta unidad son muy sencillos, por lo tanto dudamos de que tenga alguna
duda o necesite ayuda, pero si tiene problemas, estamos a su disposición para prestarle ayuda. Simplemente llame a nuestro
teléfono gratuito de asistencia, 1-800-645-4994, durante los días y las horas que se indican (EE.UU. y Canadá solamente).
DÍA
LUN. VIE.
SÁBADO
TUERCA (5MM)
TORNILLO
(5MM)
TUERCA
(5MM)
MANGA DE MONTAJE
FIJE ESTE EXTREMO PARA ASEGURAR LA PIEZA AL
TABLERO - PERFORE EL AGUJERO SI ES NECESARIO
PARA QUE EL REPRODUCTOR DE DISCOS COMPACTOS
FUNCIONE CORRECTAMENTE, DEBE MONTAR EL CHASIS A NO
MÁS DE 20º DE INCLINACIÓN, ASEGÚRESE DE QUE LA UNIDAD
ESTÉ MONTADA DENTRO DE ESE LÍMITE.
VISTA LATERAL
DEL CHASIS
ASISTENCIA GRATUITA PARA LA INSTALACIÓNASISTENCIA GRATUITA PARA LA INSTALACIÓN
ZONA HORARIA
ZONA DE MONTAÑAZONA PACÍFICO
5:30AM - 4PM
6AM - 2PM
INSTALACIÓN UNIVERSAL CON LA MANGA DE MONTAJEINSTALACIÓN UNIVERSAL CON LA MANGA DE MONTAJE
INSTALACIÓN UNIVERSAL CON LA MANGA DE MONTAJE
INSTALACIÓN UNIVERSAL CON LA MANGA DE MONTAJEINSTALACIÓN UNIVERSAL CON LA MANGA DE MONTAJE
CORREA PERFORADA
FIJE ESTE EXTREMO AL
TORNILLO DE LA PARTE
POSTERIOR DEL CHASIS
PRECAUCIÓN:
MÁX. 20º
PANEL DELANTERO
6:30AM - 5PM
7AM - 3PM
ABERTURA EXISTENTE DEL TABLERO
LIME LOS BORDES PARA QUE CALCE SI ES NECESARIO - NO LIME DE MÁS
NOTA: SI EL TABLERO ES SÓLIDO, USE EL LADO POSTERIOR (SIN EL
BORDE) DE LA MANGA DE MONTAJE COMO PLANTILLA Y CORTE LA
ABERTURA.
TORNILLO
HERRAMIENTAS DE
ZONA CENTRAL ZONA ESTE
RADIO
EXTRACCIÓN
7:30AM - 6PM
8AM - 4PM
8:30AM - 7PM
9AM - 5PM
DOBLE LAS
LENGÜETAS
SUPERIORES
HACIA ARRIBA
DOBLE LAS LENGÜETAS INFERIORES
HACIA ABAJO
PANEL DELANTERO
DESMONTABLE QUE SE
PLIEGA Y BAJA
INSTRUCCIONES P
INSTRUCCIONES PINSTRUCCIONES P
INSTRUCCIONES PINSTRUCCIONES P
A
AA
AA
R
RR
RR
A L
A LA L
A LA L
A INST
A INSTA INST
A INSTA INST
AL
ALAL
ALAL
ACIÓN
ACIÓNACIÓN
ACIÓNACIÓN
INSTALACIÓN ISOINSTALACIÓN ISO
INSTALACIÓN ISO
INSTALACIÓN ISOINSTALACIÓN ISO
QUITE LA ESTRUCTURA DE PLÁSTICO DE LA PARTE DELANTERA DEL
CHASIS DESENGANCHÁNDOLO CON CUIDADO.
DESENGANCHE EN 2 LUGARES,
TANTO EN LA PARTE SUPERIOR
COMO EN LA INFERIOR
ESTRUCTURA DE
PLÁSTICO
TAMAÑO MÁXIMO
DE TORNILLO
M5 X 8
SOPORTES DE MONTAJE
QUE VIENEN DE FÁBRICA
INSTALACIÓN NORMAL
TAMAÑO MÁXIMO
DE TORNILLO
M5 X 8
2121
21
2121
Page 22

CABLEADO DE LA RADIOCABLEADO DE LA RADIO
CABLEADO DE LA RADIO
CABLEADO DE LA RADIOCABLEADO DE LA RADIO
DIODIO
DIODIO
PARA EL CABLEADO DE LOS PARLANTES CONSULTE LA PÁGINA 23
DIO
AA
AA
A
A RA R
A RA R
A R
DO DE LDO DE L
DO DE LDO DE L
DO DE L
AA
AA
A
CABLECABLE
CABLECABLE
CABLE
ANTENNA
CONEXIÓN DE LA ANTENA
EN LA PARTE TRASERA DE
LA RADIO
ANTENA
AUTOMÁTICA
CABLE DE
ANTENA
EXISTENTE
AZUL
IMPORTANTE: SE PUEDE USAR EL CABLE
AZUL PARA LA ACTIVACIÓN REMOTA DE UNA
ANTENA AUTOMÁTICA O UN AMPLIFICADOR
EXTERNO (CONSULTE EL MANUAL DE LA
ANTENA O DEL AMPLIFICADOR)
ROJO (FUSIBLE DE 1 AMP)
TORNILLO
NEGRO
AMARILLO (FUSIBLE DE 15 AMP)
DEBE CONECTAR ESTE CABLE
FILTRO / CAJA
DE FUSIBLES
COMO SE MUESTRA EN EL
DIAGRAMA, O LA RADIO NO FUNCIONARÁ CORRECTAMENTE.
CONTIENE:
UN FUSIBLE DE 1 AMP
UN FUSIBLE DE 15 AMP
PARTE METÁLICA DEL TABLERO
(PERFORE UN AGUJERO SI ES
NECESARIO)
IMPORTANTE:
ENCHUFE MACHO DE
4 CLAVIJAS
ENCHUFE MACHO DE 9 CLAVIJAS (PARA EL CABLEADO
DE LOS PARLANTES VEA LA PÁGINA 23)
PORTAFUSIBLES
FUSIBLE DE LA “RADIO”
O ACCESORIO DE
+12 VOLTIOS
BATERÍA DEL
AUTOMÓVIL
TERMINAL POSITIVO (+),
BATERÍA DE 12 VOLTIOS
2222
22
2222
Page 23

CABLEADO DECABLEADO DE
CABLEADO DE
CABLEADO DECABLEADO DE
LOS PARLANTESLOS PARLANTES
LOS PARLANTES
LOS PARLANTESLOS PARLANTES
PARA EL CABLEADO
DE LA RADIO
CONSULTE
LA PÁGINA 22
SALIDAS RCA PARA
USAR CON LOS
AMPLIFICADORES
EXTERNOS
OPCIONALES
ROJO - DERECHO
TRASERO
BLANCO -
IZQUIERDO
TRASERO
ENCHUFE MACHO DE 9 CLAVIJAS
l
l
l
l
CABLE
CABLECABLE
CABLECABLE
LOS AMPLIFICADORES DE ESTA RADIO ESTÁN DISEÑADOS ÚNICAMENTE PARA SER USADOS CON 4 PARLANTES.
NUNCA COMBINE SALIDAS (PUENTE) PARA USARLAS CON 2 PARLANTES.
NUNCA CONECTE A TIERRA LOS CONDUCTORES NEGATIVOS DEL PARLANTE CON LA CONEXIÓN A TIERRA
DEL CHASIS.
SI NO SE REALIZAN LAS CONEXIONES TAL COMO SE ILUSTRA A CONTINUACIÓN, SE PUEDE PROVOCAR
DAÑOS ELÉCTRICOS A LA RADIO.
RADIO
ADVERTENCIA:
NOTA: CONSULTE A SU ESPECIALISTA EN EQUIPOS
ESTEREOFÓNICOS PARA AUTOMÓVILES RAMPAGE/
AUDIOVOX, O BIEN LLAME AL 1-800-645-4994 PARA
OBTENER RECOMENDACIONES SOBRE LOS
MODELOS QUE VAN A FUNCIONAR CON SU RADIO.
CABLE DIN
(PROVISTO CON
CAMBIADOR DE CD)
ENCHUFE DIN DE 8 CLAVIJAS PARA SU
CONEXIÓN AL CAMBIADOR DE CD OPCIONAL
ENCHUFE MACHO
DE 4 CLAVIJAS
CAMBIADOR DE
CD OPCIONAL
6
A
AA
AA
DO DE LOS P
DO DE LOS PDO DE LOS P
DO DE LOS PDO DE LOS P
A
AA
AA
RL
RLRL
RLRL
A
AA
AA
NTES
NTESNTES
NTESNTES
COMPACT
PARLANTE IZQUIERDO
DELANTERO
BLANCO c/RAYAS NEGRAS
VERDE c/RAYAS NEGRAS
BLANCO
VERDE
PARA EL CABLEADO
DE LA RADIO VEA LA
PÁGINA 22
GRIS c/RAYAS NEGRAS
GRIS
VIOLETA
VIOLETA c/RAYAS NEGRAS
PARLANTE DERECHO
DELANTERO
AYUDA
1-800-645-4994
Lunes a viernes de 8:30 am a 7:00 pm horario del este
PARLANTE IZQUIERDO TRASERO PARLANTE DERECHO TRASERO
Sábados de 9:00 am a 5:00 pm horario del este
2323
23
2323
Page 24

OO
OO
O
MIENTMIENT
MIENTMIENT
MIENT
1 BOTÓN DE ALIMENTACIÓN
INSTRUCCIONES DE FUNCIONAINSTRUCCIONES DE FUNCIONA
INSTRUCCIONES DE FUNCIONAINSTRUCCIONES DE FUNCIONA
INSTRUCCIONES DE FUNCIONA
ENCENDIDO-AP AGADO (
Oprima este botón para encender o apagar la
unidad. La unidad también se encenderá
automáticamente cuando cargue un disco si la
llave de contacto está en “on”.
2 CONTROL DEL NIVEL DE VOLUMEN
Para subir el nivel de volumen, oprima la perilla
en sentido horario. El volumen subirá y en el
panel de visualización aparecerá el nivel desde
un mínimo de VOL 00 a un máximo de VOL 39.
Para bajar el nivel de volumen, gire la perilla en
sentido antihorario. El panel de visualización
volverá automáticamente a la indicación normal 5 segundos después del último ajuste del
volumen o cuando se active alguna otra función.
Este control se usa también en combinación
con el botón selector 3 para ajustar los tonos
graves, agudos, los niveles de equilibrio y la
atenuación acústica según se describe en
5, 6 y 7.
3 BOTÓN SELECTOR
2424
24
2424
Este botón, que es parte integral del CONTROL
DE VOLUMEN, se usa para elegir la función de
audio (volumen, tonos graves y agudos,
)
equilibrio o atenuación acústica) que se ajustará
con el CONTROL DE VOLUMEN
el botón selector una vez se prepara la unidad
para el ajuste de tonos graves (la indicación
BAS aparecerá en el panel de visualización) y
sonará un pitido de aviso. Al oprimir el botón
más veces se seleccionarán los tonos agudos
(la indicación TRE aparecerá en la pantalla),
equilibrio (BAL) o atenuación acústica (FAD). El
panel de visualización volverá automáticamente
a la indicación normal 5 segundos después
del último ajuste o cuando se active alguna otra
función.
2. Al oprimir
4 CONTROL DE LOS TONOS GRA VES
Para ajustar el nivel de tonos graves, primero
seleccione la modalidad grave apretando el
botón selector
aparezca en el panel de visualización. A los
5 segundos de elegir la modalidad de tonos
4,
graves, gire el control de nivel
respuesta de tonos graves que desee, en
sentido antihorario para disminuirla o en
sentido horario para aumentarla. En el panel
de visualización aparecerá el nivel con un
mínimo de BAS -12 a un máximo de BAS +12
3 hasta que la indicación BAS
2 para ajustar la
Page 25

(BAS 00 representa la respuesta plana). El
panel de visualización volverá automáticamente
a la indicación normal 5 segundos después
del último ajuste o cuando se active alguna otra
función.
5 CONTROL DE LOS TONOS AGUDOS
Para ajustar el nivel de tonos agudos, primero
seleccione la modalidad aguda apretando el
botón selector
aparezca en el panel de visualización. A los
5 segundos de elegir la modalidad de tonos
agudos, gire el control de nivel
la respuesta de tonos agudos que desee, en
sentido antihorario para disminuirla o en sentido
horario para aumentarla. En el panel de
visualización aparecerá el nivel con un mínimo
de TRE -12 a un máximo de TRE +12 (TRE 00
representa la respuesta plana). El panel de
visualización volverá automáticamente a la
indicación normal 5 segundos después del
último ajuste o cuando se active alguna otra
función.
3 hasta que la indicación TRE
2 para ajustar
6 CONTROL DE EQUILIBRIO ACÚSTICO
IZQUIERDO / DERECHO
Para ajustar el equilibrio acústico de los
parlantes izquierdo y derecho, primero
seleccione la modalidad de equilibrio acústico
apretando el botón selector
indicación BAL aparezca en el panel de
visualización. A los 5 segundos de elegir la
modalidad de equilibrio acústico, gire el control
de nivel
el equilibrio estereofónico en los parlantes del
canal izquierdo o en sentido horario para
ajustarlo en los parlantes del canal derecho. La
posición de equilibrio estará indicada en el
panel de visualización por BAL L16 (totalmente
a la izquierda) a BAL R16 (totalmente a la
derecha). Cuando el nivel de volumen entre los
parlantes izquierdo y derecho sea igual, en el
panel de visualización aparecerá la indicación
BAL 00. El panel de visualización volverá
automáticamente a la indicación normal 5
segundos después del último ajuste o cuando
se active alguna otra función.
2 en sentido antihorario para ajustar
3 hasta que la
7 CONTROL DEL ATENUADOR DE
VOLUMEN DELANTERO / TRASERO
Para ajustar la atenuación acústica de los
parlantes delanteros y traseros, primero
seleccione la modalidad de atenuación acústica
apretando el botón selector
indicación FAD aparezca en el panel de
visualización. A los 5 segundos de elegir la
modalidad de atenuación acústica, gire el
control de nivel
ajustar el equilibrio estereofónico en los
parlantes de la izquierda o en sentido horario
para ajustarlo en los parlantes de la derecha.
La posición de atenuación estará indicada en
el panel de visualización por FAD R16
(totalmente atrás) a FAD F16 (totalmente
adelante). Cuando el nivel de volumen entre
los parlantes delanteros y traseros sea igual,
en el panel de visualización aparecerá la
indicación FAD 00. El panel de visualización
volverá automáticamente a la indicación normal
5 segundos después del último ajuste o
cuando se active alguna otra función.
2 en sentido antihorario para
3 hasta que la
8 CONTROL DE SONORIDAD ACÚSTICA (LOUD)
Cuando se escucha música con niveles de
volumen bajos, esta función aumentará las
gamas de tonos graves y agudos para
compensar las características de la capacidad
auditiva humana. Apriete el botón para activar
el contorno de sonoridad acústica, la indicación
LOUD aparecerá en el panel de visualización.
Al apretar este botón nuevamente se desactivará
esta función (la indicació LOUD desaparecerá
del panel de visualización).
9 SELECTOR SIN AUDIO (MUTE)
Se usa este botón para suprimir o silenciar el
volumen del sistema ( MUTE aparecerá en el
panel de visualización). Al volver a apretar el
botón o al ajustar el control de volumen
volumen volverá al nivel que tenía antes de
activar esta función.
2, el
bl SELECTOR DE BANDA AM/FM (BAND)
Cada vez que se oprima este botón, se cambiará
la banda de la radio. La indicación AM1, AM2,
INSTRUCCIONES DE FUNCIONA
INSTRUCCIONES DE FUNCIONAINSTRUCCIONES DE FUNCIONA
INSTRUCCIONES DE FUNCIONAINSTRUCCIONES DE FUNCIONA
MIENT
MIENTMIENT
MIENTMIENT
O
OO
OO
2525
25
2525
Page 26

FM1, FM2 o FM3 aparecerá en el panel de
OO
OO
O
visualización según cuál sea su elección.
Durante la reproducción de un disco, al oprimir
este botón se detiene la reproducción y cambia
MIENTMIENT
MIENTMIENT
MIENT
a la función de radio sin eyectar el disco. Al
mismo tiempo, la indicación permanecerá en
el panel de visualización indicando que hay un
disco en la unidad. Oprima el botón MOD
para volver a la modalidad de reproducción de
disco, que comenzará con la pista que se estaba
reproduciendo antes.
bm CONTROL DE SINTONIZACIÓN MANUAL
ASCENDENTE Y DESCENDENTE
+ / -)
(
Para elegir una estación en forma manual,
oprima el lado de sintonización ascendente
(
+ ) del botón para avanzar la unidad dos
dígitos más, o el lado de sintonización
descendente (
dos dígitos.
INSTRUCCIONES DE FUNCIONAINSTRUCCIONES DE FUNCIONA
INSTRUCCIONES DE FUNCIONAINSTRUCCIONES DE FUNCIONA
INSTRUCCIONES DE FUNCIONA
Al oprimir cualquiera de los dos botones por
más de 0,5 segundos y luego soltarlo, activará
la función de sintonización con búsqueda
automática. La radio buscará la siguiente
estación en la dirección elegida y se detendrá
en esa frecuencia. Se puede detener la función
de búsqueda al oprimir nuevamente el botón, o
al activar cualquier otra función de sintonización.
Al oprimir y mantener apretado cualquiera de
los lados del botón por más de 0,5 segundos la
radio continuará sintonizando rápidamente en
la dirección elegida hasta llegar a la próxima
estación disponible donde se detendrá.
-) del botón para retroceder
bn SELECTOR DE SEÑAL LOCAL / DIST ANTE (LOC)
Se usa esta función para elegir la intensidad de
las señales en las cuales se detendrá la radio
durante la sintonización con búsqueda
automática. Oprima este botón para seleccionar
el ajuste local (aparecerá la indicación LOC en
el panel de visualización) y solamente se
recibirán las estaciones (locales) de mayor
potencia. Al volver a oprimir el botón se
2626
26
2626
seleccionará el ajuste distante (desaparecerá
la indicación LOC del panel de visualización) y
se detendrá la radio en una mayor gama de
señales, incluso las estaciones de menor
potencia (más distantes).
bo SELECTOR FM DE RECEPCIÓN MONOAURAL
O ESTEREOFÓNICA (MONO)
Durante el funcionamiento de la radio en FM,
se usa este botón para seleccionar la recepción
estereofónica o monoaural de la señal de
bt
transmisión. En condiciones de recepción
normal, la unidad tiene que dejarse en la
modalidad estereofónica que se indica ST
en la pantalla al sintonizar una señal FM estéreo.
Si la señal estereofónica es muy ruidosa como
para escucharse bien, oprima el botón selector
FM Mono/Stereo para cambiar a la recepción
monoaural (la indicación ST
del panel de visualización). Para volver a la
modalidad de recepción estereofónica, oprima
el botón nuevamente para que la indicación
ST
visualización.
vuelva a aparecer en el panel de
desaparecerá
bp SINTONIZACIÓN POR EXPLORACIÓN
PREEST ABLECIDA (PS)
SINTONIZACIÓN CON AUTOMEMORIA (AS)
Oprima este botón por un momento para
explorar las estaciones preestablecidas en las
12 memorias en las bandas AM o las 18 en las
FM. La unidad se detendrá en cada una de las
estaciones preestablecidas durante 5 segundos antes de continuar con la próxima estación
preestablecida (el número preestablecido en
el panel de visualización destellará durante la
exploración preestablecida). Vuelva a oprimir
el botón para detener la operación de exploración preestablecida y quedarse en la frecuencia elegida. Si no oprime ningún botón
durante la exploración, la unidad volverá a la
estación en que estaba antes de empezar la
exploración.
Al oprimir el botón por más de 2 segundos se
activará la función de Sintonización con automemoria, la radio explorará automáticamente
e ingresará 6 estaciones en las memorias
preestablecidas de la banda en uso. Si usted
ya tiene las memorias preestablecidas para sus
estaciones preferidas, al activar la función de
sintonización con automemoria se borrarán
Page 27

esas estaciones y se establecerán las nuevas.
Esta función es muy útil cuando viaja por una
zona nueva donde no esté familiarizado con las
estaciones locales.
bq MEMORIAS PREEST ABLECIDAS
DE ESTACIONES
Para fijar cualquiera de las 6 memorias
preestablecidas en cada banda, siga el
siguiente procedimiento:
1. Encienda la radio y seleccione la banda
deseada.
2. Seleccione la primera estación a
preestablecerse con los controles de
sintonización manual ascendente y
descendente o sintonización con búsqueda
automática
3. Oprima el botón preestablecido que se
utilizará para esa estación y continúe oprimiéndolo por 2 segundos aproximadamente. El número preestablecido aparecerá
en el panel de visualización y sonarán dos
pitidos para indicar que la estación ya está
fijada en esa posición de memoria preestablecida. En cualquier momento se puede
llamar esa estación apretando ese botón.
4. Repita el procedimiento anterior para las
restantes 5 estaciones preestablecidas para
esa banda de radio y para las otras 4 bandas
de la unidad.
bm.
br PANEL DE VISUALIZACIÓN EN CRIST AL LÍQUIDO
El panel con visualización en cristal líquido
(LCD) muestra la frecuencia, la hora y las
funciones activadas.
NOTA: Es típico que los paneles con LCD, al
estar sometidos a bajas temperaturas
durante un tiempo prolongado, les tome
más tiempo iluminarse que en
condiciones normales. Además, la
visibilidad de los números en el visor o
pantalla LCD puede disminuir
levemente. Las indicaciones de la
pantalla LCD volverán a ser normales
cuando la temperatura llegue a ser
normal.
bs VISUALIZACIÓN DE FUNCIONES
La misma consiste en una gráfica de cinco
barras que ofrece una representación visual del
nivel de volumen y del equilibrio en los canales
de la izquierda y la derecha. El nivel de volumen
está representado por una gráfica de tres barras
finas. Al subir el nivel de volumen, aumentará el
número de segmentos encendidos. Los
canales de la izquierda y la derecha están
representados por una gráfica de barras más
anchas. Al aumentar la señal aplicada al canal
de la izquierda o al de la derecha, aumentará el
número de segmentos encendidos.
bt SELECTOR DE MODO (MOD)
Este botón se usa para seleccionar la radio, o
el modo reproductor de CD o cambiador de CD
(si está instalado). Cada vez que oprima el
botón, seleccionará un modo diferente que
aparecerá indicado en el panel de visualización.
Durante el funcionamiento del reproductor de
CD, se puede usar este botón para cambiar a
radio o a cambiador de CD sin eyectar el disco.
La indicación permanecerá en el panel de
visualización indicando que hay un disco en la
unidad. La indicación DISC permanecerá en el
panel de visualización indicando que el
cambiador de CD está en funcionamiento.
Oprima el botón nuevamente para volver al
modo reproductor de CD y continuar con la
reproducción del disco a partir del punto donde
se detuvo.
bu RANURA P ARA DISCOS
Con el panel delantero en posición plegada
hacia abajo, inserte suavemente el disco en la
ranura (con la etiqueta hacia arriba) hasta que
el mecanismo de carga lo enganche y lo
introduzca en la unidad. La indicación LOAD
aparecerá momentáneamente en el panel de
visualización, seguida por la duración del disco.
La indicación (
moverse, se enciende el símbolo
aparecerán el número de pista y duración en el
panel de visualización.
) se ilumina y comienza a
IN, y
INSTRUCCIONES DE FUNCIONA
INSTRUCCIONES DE FUNCIONAINSTRUCCIONES DE FUNCIONA
INSTRUCCIONES DE FUNCIONAINSTRUCCIONES DE FUNCIONA
MIENT
MIENTMIENT
MIENTMIENT
O
OO
OO
2727
27
2727
Page 28

PRECAUCIÓN: La unidad está destinada a
OO
OO
O
MIENTMIENT
MIENTMIENT
MIENT
reproducir los discos compactos normales de 5" (12 cm)
SOLAMENTE. No intente usar
los discos compactos de 3"
(8 cm) en esta unidad, ya sea
con adaptador o sin él, dado
que se puede dañar el
reproductor y/o disco. Esos
daños no estarán cubiertos por
la garantía de este producto.
cl SELECCIÓN DE PISTA ( + / - )
Estas funciones de selección de pista se usan
para acceder rápidamente al principio de una
pista en particular. Cada vez que se aprieta el
lado del botón de selección de pista hacia
delante (+
guiente de pista en orden ascendente, tal como
aparece indicado en el panel de visualización.
De igual manera, cada vez que se aprieta el
lado del botón de selección de pista hacia atrás
INSTRUCCIONES DE FUNCIONAINSTRUCCIONES DE FUNCIONA
INSTRUCCIONES DE FUNCIONAINSTRUCCIONES DE FUNCIONA
INSTRUCCIONES DE FUNCIONA
(-
), se selecciona el número siguiente de
pista en orden descendente, tal como aparece
indicado en el panel de visualización.
), se selecciona el número si-
cm FUNCIONES DE AVANCE Y RETROCESO
/ - )
( +
Con estas funciones de avance y retroceso
puede efectuarse la búsqueda rápida audible
a cualquier sección del disco. Oprima y
mantenga oprimido el lado (+
del botón para avanzar rápidamente en
dirección ascendente (el tiempo de duración
de la reproducción del disco hasta donde se
avanzó aparecerá en el panel de visualización)
o el lado (moverse en dirección descendente (el tiempo
de duración de la reproducción del disco hasta
donde se retrocedió aparecerá en el panel de
visualización). Durante cualquiera de las dos
funciones, la duración de cada pista aparecerá
automáticamente en el panel de visualización.
) de retroceso del botón para
cn POSICIÓN PIST A UNO (TOP)
2828
28
2828
La función de posición pista uno se usa para
volver rápidamente al comienzo del CD, a la
pista 1.
) de avance
co SELECTOR DE EXPLORACIÓN DE PISTAS (SCN)
Durante la reproducción de un disco, oprima
este botón para reproducir los primeros 10
segundos de cada pista del disco (SCAN
aparecerá en el panel de visualización). Al llegar
a la pista que desee, oprima de nuevo el botón
de introducción y exploración para cancelar la
función (SCAN desaparecerá del panel) y
continuar con la reproducción de la pista
seleccionada. También se cancelará la función
de exploración al activar las funciones de
reproducción repetida
redistribución al azar
cp o de reproducción con
cq.
cp SELECTOR DE REPRODUCCIÓN
REPETIDA (RPT)
Durante la reproducción de un disco, oprima
este botón para repetir la reproducción de la
pista elegida (aparecerá RPT en el panel de
visualización). La reproducción de la pista
continuará repitiéndose hasta que oprima
nuevamente el botón, la indicación RPT
desaparecerá del panel de visualización.
También se cancelará la función de
reproducción repetida al activar las funciones
de exploración de pistas
con redistribución al azar
co o de reproducción
cq.
cq SELECTOR DE REPRODUCCIÓN
CON REDISTRIBUCIÓN AL AZAR (RND)
Durante la reproducción de un disco, oprima
este botón para reproducir las pistas del disco
siguiendo un orden de redistribución al azar
(RND aparecerá en el panel de visualización).
En la modalidad de redistribución al azar, al
oprimir el botón de selección de pista
elegirá las pistas siguiendo un orden de
redistribución al azar y no de avance normal.
Puede cancelar esta modalidad de
reproducción con redistribución al azar al oprimir
nuevamente el botón (la indicación RND
desaparecerá del panel de visualización) o al
activar las funciones de reproducción repetida
cl también
cp o de exploración de pistas co.
cr SELECCIÓN DE DISCO (D+ / D-)
Se usan estos botones para elegir el disco que
desee reproducir. Para avanzar a un número de
Page 29

disco mayor, oprima el botón D+, para volver a
un número de disco menor, oprima el botón
D-. El número del disco que se reproduce
aparecerá en el panel de visualización.
cs BOTÓN DE EYECCIÓN ( )
Se detiene la reproducción y se eyecta el disco
cuando se pliega y baja el panel delantero y se
oprime este botón que se encuentra en la parte
trasera del panel. La función de radio o
cambiador de CD volverá automáticamente
según la modalidad en que estaba funcionando
antes de la reproducción del disco. Si no se
retira el disco de la unidad a los 10 segundos
de su eyección, se recargará el disco
automáticamente para evitar toda posibilidad
de daño (aparecerá la indicación (
panel de visualización para indicar que hay un
disco en el reproductor). Se puede reanudar la
reproducción del disco pulsando el botón
selector de modo
reproductor de CD.
bt para elegir el modo
IN en el
ct SELECTOR DE HORA / FRECUENCIA (T/F)
Durante el funcionamiento de la radio, oprima
este botón para que aparezca indicada la hora
en el reloj de cuarzo incorporado. Después de
5 segundos, la indicación volverá a mostrar la
frecuencia de radio. Durante el funcionamiento
del reproductor de CD, la primera vez que
oprima este botón aparecerá en el panel de
visualización el tiempo transcurrido en esa
pista. Durante el funcionamiento del cambiador
de CD, la primera vez que oprima este botón
aparecerá la hora. La segunda vez que oprima
el botón aparecerá el número de disco y pista
que se esté reproduciendo. En ambos casos,
después de 5 segundos, el panel volverá a
mostrar la indicación del disco.
cu SELECTOR ECUALIZADOR (EQ)
El botón EQ agrega a la salida de la señal de
audio efectos de sonidos preestablecidos. Al
oprimir el botón EQ activa uno de los tres modos
de funcionamiento (ROCK, CLAS o POP).
Cuando la función EQ está activada, no puede
cambiar los niveles de los tonos graves y
agudos. Al desactivar la función EQ, la unidad
vuelve a los niveles de tonos graves y agudos
que eligió el usuario.
dl INDICADOR L.E.D. ANTIRROBO
El diodo emisor de luz (L.E.D.), ubicado en el
chasis detrás del panel delantero, destellará
intermitentemente cuando se quite el panel. La
luz intermitente servirá como advertencia visual
a un probable ladrón de que la unidad fue
desactivada al desmontar el panel delantero.
dm BOTÓN DE REPOSICIÓN
En el panel delantero del chasis hay un botón
de reposición (es necesario quitar el panel
delantero para tener acceso al botón). El circuito
de reposición sirve para proteger el circuito del
microprocesador y solamente debe activarse
en los siguientes casos, dado que borrará las
memorias preestablecidas para la hora y las
estaciones.
1. Durante la instalación inicial después de
terminar las conexiones de todo el cableado.
2. Si hay algún desperfecto de cualquiera de
los interruptores de la unidad, al apretar el
botón de reposición se borrará el sistema
para volver al funcionamiento normal.
dn SENSOR REMOTO
El sensor está ubicado detrás de este lente
para detectar la señal infrarroja del control
remoto inalámbrico. Siempre apunte el control
remoto a este sensor para obtener un buen
funcionamiento del mismo.
do BOTÓN DE DESCONEXIÓN DEL
PANEL DELANTERO (OPEN)
Este botón se usa para soltar el mecanismo
que sujeta el panel delantero al chasis. Para
desmontar el panel delantero, oprima el botón
para dejar caer el panel en posición baja. Sujete
el panel por el medio y sáquelo del chasis
tirando del mismo. Una vez que retiró el panel
empuje la placa de metal para ponerla en
posición vertical. Para volver a enganchar el
panel, colóquelo derecho y apriete hasta que el
mecanismo quede trabado como corresponde.
OPER
OPEROPER
OPEROPER
A
AA
AA
T
TT
TT
ING INSTRUC
ING INSTRUCING INSTRUC
ING INSTRUCING INSTRUC
T
TT
TT
IONS
IONSIONS
IONSIONS
2929
29
2929
Page 30

NOT AS SOBRE EL USO DEL P ANEL
DELANTERO
1.Asegúrese de que el panel delantero esté
en la posición correcta para fijarlo al chasis
dado que no podrá colocarse cuando esté
dado vuelta hacia abajo.
2.No lo apriete muy fuerte para enganchar
el mecanismo. Solamente es necesario
ejercer una presión que sea suave o
moderada.
AA
JUSTE DEL RELOJJUSTE DEL RELOJ
A
JUSTE DEL RELOJ
AA
JUSTE DEL RELOJJUSTE DEL RELOJ
1. Ponga la llave de contacto del vehículo y la radio en “on”.
2. Oprima el botón selector de hora/frecuencia para que aparezca la hora en el panel de
visualización.
3. Oprima y mantenga apretado el botón selector de hora/frecuencia ct durante 2 segundos
aproximadamente hasta que muestre la hora en forma intermitente en el LCD.
4. A los 5 segundos de que la hora comience a destellar en forma intermitente, y mientras
mantiene apretado el botón selector de hora/frecuencia, oprima el botón de sintonización
descendente ( - ) para ajustar las horas y la indicación AM/PM o el botón de
sintonización descendente (+ ) para ajustar los minutos hasta llegar a la hora
correcta.
5. Cinco segundos después de hacer el último ajuste de la hora o minutos, quedará
programada la hora correcta en la unidad y el panel de visualización volverá a la
indicación normal.
3.Al colocar el panel delantero, asegúrese
de que esté en el centro de la estructura
del chasis y que quede bien enganchado
en su posición.
4.Al llevarse el panel delantero, sírvase usar
el estuche provisto para evitar que el panel
se ensucie o dañe. Asegúrese de que no
haya polvo o suciedad en las terminales
eléctricas de la parte posterior del panel
que podrían provocar un funcionamiento
intermitente u otros desperfectos.
CÓDIGOS DE ERRCÓDIGOS DE ERR
CÓDIGOS DE ERR
CÓDIGOS DE ERRCÓDIGOS DE ERR
Si se presentara algún problema durante el funcionamiento del reproductor de CD, es
probable que aparezca un código de error (ER-1, ER-2, ER-3, etc.) en el panel de
visualización. Esto puede indicar que hay distintos problemas en la unidad, incluso un
error mecánico o un error en el control del microprocesador del reproductor. Si aparece
un código de error, intente eyectar y volver a cargar el disco en el reproductor . Cuando
INSTRUCCIONES DE FUNCIONAMIENTO / AJUSTE DEL RELOJ / CÓDIGOS DE ERRORINSTRUCCIONES DE FUNCIONAMIENTO / AJUSTE DEL RELOJ / CÓDIGOS DE ERROR
INSTRUCCIONES DE FUNCIONAMIENTO / AJUSTE DEL RELOJ / CÓDIGOS DE ERRORINSTRUCCIONES DE FUNCIONAMIENTO / AJUSTE DEL RELOJ / CÓDIGOS DE ERROR
INSTRUCCIONES DE FUNCIONAMIENTO / AJUSTE DEL RELOJ / CÓDIGOS DE ERROR
el disco esté fuera de la unidad, fíjese si está limpio, sin daño alguno y colocado
correctamente (con la etiqueta hacia arriba). T ambién podría intentar activar el botón de
Reposición dm de la unidad, pero esto también borrará la hora y las memorias
preestablecidas.
3030
30
3030
Si las medidas sugeridas no resuelven el problema, comuníquese con un centro de
garantía autorizado cercano a su domicilio para recibir asistencia al respecto.
OR DEL REPROR DEL REPR
OR DEL REPR
OR DEL REPROR DEL REPR
ODUCODUC
ODUC
ODUCODUC
TT
OR DE CDOR DE CD
T
OR DE CD
TT
OR DE CDOR DE CD
Page 31

ESPECIFICACIONESESPECIFICACIONES
ESPECIFICACIONES
ESPECIFICACIONESESPECIFICACIONES
Tamaño: 7" (ancho) x 2" (altura) x 6 5/16" (profundidad)
178 mm x 50 mm x 160 mm
Tensión de servicio: 12 voltios CD, negativo a masa
Fusibles: Conductor constante (cable amarillo): 15 AMP.
Conductor conmutado (cable rojo): 1 AMP.
Potencia de salida: máxima de 160 vatios
(40 vatios x 4 canales)
Cableado de salida: Tipo masa flotante diseñado para usar con 4 parlantes.
NO SE PUEDE combinar los canales delanteros y
traseros (puente) para usarlos con 2 parlantes.
Salidas RCA de bajo nivel (canales traseros)
Impedancia de salida: Compatible con parlantes de 4 - 8 ohms.
Salidas de bajo nivel: 500 mv
Margen de sintonización: AM: 530 - 1.720 KHz. (pasos de 10 kHz.)
FM: 87,5 - 107,9 MHz. (pasos de 200 kHz.)
ESPECIFICACIONES
ESPECIFICACIONESESPECIFICACIONES
ESPECIFICACIONESESPECIFICACIONES
Sensibilidad: AM: 20 uv.
FM: 1.5 uv.
Separación estereofónica FM: >20 dB
Respuesta de frecuencia de CD: 17 - 2 kHz. +0/-3 dB
Relación señal/ruido de CD: >65 dB
Separación de canales de CD: >60 dB
Distorsión de CD: 0.2%
*Las especificaciones están sujetas a cambios sin previo aviso.
3131
31
3131
Page 32

CONTRCONTR
CONTR
CONTRCONTR
La radio tiene controles incorporados para el
funcionamiento de un cambiador de CD opcional. Consulte a su especialista en equipos
estereofónicos para automóviles Rampage/
DOR DE CDDOR DE CD
DOR DE CDDOR DE CD
DOR DE CD
Audiovox, o bien llame al 1-800-645-4994 para
AA
AA
A
obtener recomendaciones sobre los modelos
que van a funcionar con su radio.
MBIMBI
MBIMBI
MBI
Las funciones de ajuste de audio (volumen,
tonos, equilibrio y atenuación acústica) para el
cambiador de CD funcionan del mismo modo
que para la radio. Los siguientes controles
harán funcionar el cambiador de CD cuando se
lo instale y conecte a esta radio. Consulte el
manual del usuario que viene con el cambiador
de CD para obtener instruc-ciones sobre la
OLES DEL CAOLES DEL CA
OLES DEL CAOLES DEL CA
OLES DEL CA
instalación y correcto uso y carga de discos.
OLES DEL CAOLES DEL CA
OLES DEL CA
OLES DEL CAOLES DEL CA
MBIMBI
MBI
MBIMBI
A
dpSELECTOR DE MODO
CAMBIADOR DE CD (MOD)
CONTRCONTR
CONTRCONTR
CONTR
Durante el funcionamiento de la radio o del
reproductor de CD, oprima este botón para
elegir la función opcional de cambiador de CD,
la indicación CDC aparecerá en el panel de
visualización. Comenzará la reproducción del
disco y el disco y número de pista aparecerán
en el panel de visualización. Si se ha cargado
un disco nuevo, comenzará la reproducción con
la primer pista del primer disco en la bandeja.
Si había una bandeja cargada en el cambiador,
la reproducción continuará desde la pista en el
disco que se estaba reproduciendo antes.
dq SELECCIÓN DE DISCO (CD+ y CD-)
Se usan estos botones para elegir el disco que
desee reproducir. Para avanzar a un número de
disco mayor, oprima el botón CD+
retroceder a un número de disco menor, oprima
el botón CD-. El número del disco que se
reproduce aparecerá en el panel de
visualización.
dr SELECCIÓN DE PISTA (+ / - )
3232
32
3232
Estas funciones de selección de pista se usan
para acceder rápidamente al principio de una
AA
DOR DE CDDOR DE CD
DOR DE CD
AA
DOR DE CDDOR DE CD
cr. Para
pista en particular. Cada vez que se aprieta el
lado de selección de pista hacia delante (+
del botón, se selecciona el número siguiente
de pista en orden ascendente, tal como
aparece indicado en el panel de visualización.
De igual manera, cada vez que se aprieta el
lado del botón de selección de pista hacia atrás
-), se selecciona el número siguiente de
(
pista en orden descendente, tal como aparece
indicado en el panel de visualización.
ds FUNCIONES DE A VANCE Y
RETROCESO ( +
Con estas funciones de avance y retroceso
puede efectuarse la búsqueda rápida audible
a cualquier sección del disco. Oprima y mantenga apretado el lado de avance (+
botón para avanzar rápidamente en dirección
ascendente o el lado de retroceso (
botón para hacerlo en dirección descendente.
/ - )
) del
-) del
dt SELECTOR DE EXPLORACIÓN DE
PIST A / DISCO (SCN)
Al oprimir el botón de exploración, aparecerá
la indicación SCN en el panel de visualización,
y se reproducirán en orden los primeros 10
segundos de cada pista del disco. Al llegar a
la pista que desee oprima dos veces el botón
de exploración, con un intervalo de un segundo
entre una y otra, para continuar con la
reproducción de la pista seleccionada (la
indicación SCN desaparecerá del panel de
visualización). También se cancelará la
función exploración de pistas al activar
cualquier otra función de disco (pista uno,
repetición o redistribución al azar).
Al oprimir el botón de exploración dos
veces, aparecerán las indicaciones DISC
y SCN en el panel de visualización, y se reproducirán en orden los primeros 10 segundos
de cada una de las pistas de cada disco que
haya en la bandeja. Al llegar al disco que
desee, oprima nuevamente el botón de
exploración para continuar con la reproducción
del disco seleccionado (las indicaciones
DISC y SCN desaparecerán del panel de vi-
)
Page 33

sualización). También se cancelará la función
exploración de disco al activar cualquier otra
función de disco (pista uno, repetición o redistribución al azar).
du REPRODUCCIÓN REPETIDA DE
DISCO / PISTA (RPT)
Cuando se oprime el botón de repetición,
aparecerá la indicación RPT en el panel de visualización y la reproducción de la pista elegida
se repetirá constantemente hasta que se
cancele al volver a oprimir el botón de repetición
o al activar las funciones de selección de disco
dq, exploración dt o redistribución al azar el.
Cuando se oprime el botón de repetición dos
veces, aparecerán las indicaciones DISC y RPT
en el panel de visualización y la reproducción
del disco elegido se repetirá constantemente
hasta que se cancele al volver a oprimir el botón
de repetición o al activar las funciones de explo-
dt o redistribución al azar el.
ración
el REPRODUCCIÓN DE DISCO / PIST A
CON REDISTRIBUCIÓN AL AZAR (RND)
Cuando oprima el botón de redistribución al
azar, aparecerá la indicación RND en el panel
de visualización y la reproducción de las
pistas del disco seguirá un orden de redistribución al azar. El botón de selección de
pistas dr también elegirá las pistas siguiendo
un orden de redistribución al azar y no de
avance normal. Se puede cancelar esta modalidad oprimiendo nuevamente el botón de
redistribución al azar o activando las funciones
de selección de disco dq, exploración dt o
repetición du.
Cuando oprima el botón de redistribución al azar,
aparecerán las indicaciones DISC y RND en el
panel de visualización y la reproducción de los
discos en la bandeja seguirá un orden de
redistribución al azar Después de repro-ducir una
pista de un disco en la bandeja, elegida con
redistribución al azar, la unidad elegirá al azar
una nueva pista en otro disco y la reproducirá.
La modalidad de redistribu-ción al azar
continuará hasta que la cancele oprimiendo
nuevamente el botón o al activar las funciones
de exploración dt o de repetición du.
CONTROLES DEL CAMBIADOR DE CD/CÓDIGOS DE ERROR DEL CAMBIADOR DE CD
CONTROLES DEL CAMBIADOR DE CD/CÓDIGOS DE ERROR DEL CAMBIADOR DE CDCONTROLES DEL CAMBIADOR DE CD/CÓDIGOS DE ERROR DEL CAMBIADOR DE CD
CONTROLES DEL CAMBIADOR DE CD/CÓDIGOS DE ERROR DEL CAMBIADOR DE CDCONTROLES DEL CAMBIADOR DE CD/CÓDIGOS DE ERROR DEL CAMBIADOR DE CD
CÓDIGOS DE ERRCÓDIGOS DE ERR
CÓDIGOS DE ERR
CÓDIGOS DE ERRCÓDIGOS DE ERR
Si se presentara algún problema durante el funcionamiento del cambiador de CD, es probable que aparezcan los siguientes códigos de error en el panel de visualización.
ER-1: Indica que no hay una bandeja cargada en el cambiador de CD.
ER-2: Indica que hay un problema con la función de eyección de la bandeja.
ER-3: Indica que hay un error en la función de carga del disco.
ER-4: Indica que hay un error en la función de descarga del disco.
ER-5: Indica que hay un error en la posición de la bandeja.
ER-6: Indica que hay un error en la posición levantada del láser.
ER-7: Indica que hay un error en el foco del láser sobre el disco.
En los casos antes citados, intente eyectar la bandeja de CD del cambiador y fíjese que los
discos estén limpios, sin daño alguno y colocados correctamente (consulte el manual del
usuario del cambiador de CD). Vuelva a cargar la bandeja y compruebe el funcionamiento
correcto. También podría intentar activar el botón de reposición
también borrará la hora y las memorias preestablecidas.
Si las medidas sugeridas no resuelven el problema, comuníquese con un centro de garantía
autorizado cercano a su domicilio para recibir asistencia al respecto.
OR DEL CAOR DEL CA
OR DEL CA
OR DEL CAOR DEL CA
MBIMBI
MBI
MBIMBI
AA
DOR DE CDDOR DE CD
A
DOR DE CD
AA
DOR DE CDDOR DE CD
dm de la unidad, pero esto
3333
33
3333
Page 34

FUNCIONAMIENTO DEL CONTROL REMOTO INALÁMBRICO
El control remoto inalámbrico de este modelo sirve
para manejar a distancia la mayoría de las
características de la unidad. Los botones de las
funciones en el control remoto funcionan de la
misma forma que el botón correspondiente en la
unidad principal. Siempre apunte el control remoto
O INALÁMBRICOO INALÁMBRICO
O INALÁMBRICOO INALÁMBRICO
O INALÁMBRICO
hacia el sensor
TT
TT
T
para obtener un buen funcionamiento.
dn ubicado en el panel delantero
1 BOTÓN DE ALIMENT ACIÓN ENCENDIDO -
AP AGADO - Consulte la unidad principal
OL REMOOL REMO
OL REMOOL REMO
OL REMO
2 CONTROL DEL NIVEL DE VOLUMEN-
Consulte la unidad principal 2, 3, 4, 5,
6 y 7 excepto oprima + para subir el
nivel y
- para bajarlo
3 BOTÓN(ES) SELECTOR(ES) - Consulte la
unidad principal
O DEL CONTRO DEL CONTR
O DEL CONTRO DEL CONTR
O DEL CONTR
4 SIN AUDIO (MUTE) – Consulte la unidad prin-
5 SELECTOR DE BANDA AM/FM (BND) –
MIENTMIENT
MIENTMIENT
MIENT
9
cipal
Consulte la unidad principal bl
3, 4, 5, 6 y 7
6 SINTONIZACIÓN MANUAL ASCENDENTE /
DESCENDENTE – Consulte la unidad princi-
bm excepto oprima + para frecuencia
FUNCIONAFUNCIONA
FUNCIONAFUNCIONA
FUNCIONA
3434
34
3434
pal
ascendente y
descendente.
SINTONIZACIÓN CON BÚSQUEDA AUTOMÁTICA – Consulte la unidad principal
excepto oprima + para búsqueda
ascendente y - para búsqueda
descendente.
SELECCIÓN DE PIST A – Consulte la unidad
cl y dr excepto oprima + para
principal
elegir un número de pista mayor y
elegir uno menor.
- para frecuencia
1
bm
- para
A VANCE Y RETROCESO – Consulte la unidad
principal cm y ds excepto oprima + para
avanzar en el disco y
- para retroceder.
7 MEMORIAS PREEST ABLECIDAS 1-6 DE LA
RADIO - Consulte la unidad principal bq
8 SELECCIÓN ASCENDENTE DE DISCO (D+) -
Consulte la unidad principal
cr
9 SELECCIÓN DESCENDENTE DE DISCO (D-) -
Consulte la unidad principal
cr
bl REPRODUCCIÓN REPETIDA DE PISTA /
DISCO (RPT) - Consulte la unidad principal
cp y du
bm REPRODUCCIÓN DE PISTA / DISCO CON
REDISTRIBUCIÓN AL AZAR (RND) - Consulte
la unidad principal
cq y el
bn POSICIÓN UNO DE PISTA / DISCO (TOP) -
Consulte la unidad principal
cn
bo EXPLORACIÓN DE PISTA / DISCO (SCN) -
Consulte la unidad principal co y dt
bp SELECTOR DE MODO (MOD) - Consulte la
unidad principal
bt y dp
bq BOTÓN ECUALIZADOR DE AUDIO (EQ) -
Consulte la unidad principal
cu
br TRANSMISOR INFRARROJO - Emite una
señal infrarroja hacia la radio que detecta el
dn
sensor
bs COMPARTIMENTO P ARA PILAS - El control
remoto inalámbrico funciona con dos pilas
AAA.
Page 35

FUNCIONA
FUNCIONAFUNCIONA
FUNCIONAFUNCIONA
MIENT
MIENTMIENT
MIENTMIENT
O DEL CONTR
O DEL CONTRO DEL CONTR
O DEL CONTRO DEL CONTR
OL REMO
OL REMOOL REMO
OL REMOOL REMO
T
TT
TT
O INALÁMBRICO
O INALÁMBRICOO INALÁMBRICO
O INALÁMBRICOO INALÁMBRICO
3535
35
3535
Page 36

OO
OO
O
La sección de la radio de su nuevo sistema de sonido no requiere mantenimiento alguno. Le
recomendamos guardar este manual para consultar las diversas funciones que tiene la unidad y la forma
de poner la hora.
La sección del reproductor de discos compactos tampoco requiere mantenimiento constante, pero los
conocimientos adecuados del sistema, su uso y manejo le ayudarán a disfrutar al máximo sus
posibilidades. Se recomienda tener en cuenta lo siguiente:
NTENIMIENTNTENIMIENT
NTENIMIENTNTENIMIENT
NTENIMIENT
l Al limpiar el interior del vehículo, no deje que entre agua o algún líquido de limpieza en la unidad.
l El reproductor de discos compactos es un instrumento de precisión y no va a funcionar como
corresponde cuando se encuentre en lugares de mucho calor o frío En caso de existir esas
condiciones, espere hasta que la temperatura interior del vehículo llegue a una temperatura normal
antes de usar el reproductor.
l Si la temperatura interior del reproductor es muy elevada, un circuito protector detendrá
DO Y MADO Y MA
DO Y MADO Y MA
DO Y MA
automáticamente el disco. En este caso, deje que la unidad se enfríe antes de volver a usar el
reproductor.
l Nunca inserte alguna otra cosa que no sea un disco compacto de 5" (12 cm) en el reproductor dado
que el mecanismo puede dañarse con objetos extraños.
CUIDACUIDA
CUIDACUIDA
CUIDA
l No intente usar discos compactos de 3" (8 cm) en esta unidad, ya sea con un adaptador o sin él, dado
que se puede dañar al reproductor y/o disco. Esos daños no estarán cubiertos por la garantía de este
producto.
l Cuando no use el reproductor de discos, siempre quite el disco compacto. No deje un disco eyectado
en la ranura del disco dado que puede quedar expuesto a la luz directa del sol y otras causas de
daños.
l No intente abrir el chasis de la unidad. No hay piezas que el usuario pueda arreglar ni tampoco se
pueden hacer ajustes internos.
l Cuando el vehículo se calienta en climas fríos, o en condiciones de mucha humedad, la humedad
puede condensarse en la lente del reproductor de discos. Si esto ocurriera, el reproductor no
funcionará en la forma adecuada hasta que se evapore la humedad.
l La unidad está diseñada con un mecanismo para discos compactos que amortigua las vibraciones a
efectos de minimizar la interrupción de la reproducción del disco como consecuencia de una vibración
normal en un vehículo en movimiento. Al conducir en carreteras de suelo desparejo, sin embargo, se
pueden producir algunas omisiones de sonido. Esto no rayará ni dañará el disco y la reproducción
normal continuará cuando las condiciones sean normales de nuevo.
MANEJO DE LOS DISCOS COMPACTOS
La suciedad, el polvo, los rayones y el combado de los discos puede ocasionar omisiones en la
reproducción y deterioro de la calidad del sonido Sírvase tener en cuenta las siguientes pautas para
cuidar los discos compactos:
CUIDADO Y MANTENIMIENTOCUIDADO Y MANTENIMIENTO
CUIDADO Y MANTENIMIENTO
CUIDADO Y MANTENIMIENTOCUIDADO Y MANTENIMIENTO
COMPACT
l Use solamente los discos compactos que tengan la marca .
l Es necesario limpiar bien toda huella digital, polvillo y suciedad que tenga la superficie del disco (el lado
brillante), para lo cual puede usar un paño suave. Limpie con movimientos rectos de adentro hacia
afuera del disco.
l Nunca use productos químicos tales como limpiadores en aerosol para discos, productos de limpieza
para el hogar o algún diluyente para limpiar los discos compactos Esos productos químicos pueden
dañar irreversiblemente la superficie del disco.
l Es conveniente guardar los discos en sus estuches cuando no estén en uso.
l No exponga los discos a la luz directa del sol, a altas temperaturas o a un alto nivel de humedad
3636
36
3636
durante períodos prolongados.
l No pegue ningún papel, cinta o etiqueta en las superficies de los discos ni tampoco escriba sobre ellos
con algún tipo de marcador.
DIGITAL AUDIO
Page 37

GARANTÍA LIMITADA DE 12 MESES
AUDIOVOX CORPORATION (la Compañía) garantiza al comprador minorista original del presente
producto que, en el caso de que este producto o cualquiera de las partes del mismo, en circunstancias
y condiciones de uso normal, tuviera algún defecto, tanto en el material como en la mano de obra, dentro
de un plazo de 12 meses a partir de la fecha de compra original, dicho(s) defecto(s) serán reparados
o reemplazados por piezas nuevas o reconstruidas (a entero criterio de la Compañía) sin cargo alguno
por las piezas y la mano de obra.
Para obtener servicios de reparación o sustitución en virtud de los términos y las condiciones de esta
Garantía, se deberá entregar o enviar el producto con la correspondiente constancia de la garantía
(por ejemplo, recibo de compra fechado) con flete prepagado al centro de servicios de garantía a la
dirección que se indica a continuación.
La presente Garantía no cubre la eliminación de la estática del vehículo o el ruido del motor, la corrección
de los problemas de antena, los gastos incurridos para la instalación, desmontaje o reinstalación del
producto, ni los daños ocasionados en cintas, discos compactos, parlantes, accesorios o sistemas
eléctricos del vehículo.
La presente Garantía no corresponde a todo producto o pieza del mismo que, según la opinión de la
Compañía, haya sufrido daños como consecuencia de alguna modificación, instalación incorrecta,
maltrato, uso indebido, negligencia, accidente o por la eliminación o mutilación de las etiquetas con el
número de serie de fábrica o los códigos de barra. EL ALCANCE DE LA OBLIGACIÓN DE LA COMPAÑÍA
EN VIRTUD DE LA PRESENTE GARANTÍA ESTÁ LIMITADO A LA REPARACIÓN O EL REEMPLAZO SEGÚN
LO PRECEDENTE Y, POR NINGÚN CONCEPTO, LA OBLIGACIÓN DE LA COMPAÑÍA EXCEDERÁ EL
PRECIO DE COMPRA PAGADO POR EL COMPRADOR POR EL PRODUCTO.
La presente Garantía reemplaza a todas las demás obligaciones o garantías expresas. TODA
GARANTIA IMPLÍCITA, INCLUSO AQUELLAS GARANTÍAS IMPLÍCITAS DE BUENA CALIDAD Y
COMERCIABILIDAD, ESTARÁ LIMITADA A LA DURACIÓN DE ESTA GARANTIA ESCRITA. TODA
DEMANDA POR INCUMPLIMIENTO DE GARANTÍA, SEGÚN LO INDICADO EN LA PRESENTE, INCLUSO
TODA GARANTÍA IMPLÍCITA O DE COMERCIABILIDAD, DEBERÁ ENTABLARSE EN UN PLAZO DE
30 MESES A PARTIR DE LA FECHA DE COMPRA ORIGINAL. EN NINGÚN CASO LA COMPAÑÍA TENDRÁ
RESPONSABILIDAD ALGUNA POR DAÑOS INDIRECTOS O INCIDENTALES POR INCUMPLIMIENTO DE
LA PRESENTE GARANTÍA O DE CUALQUIER OTRA GARANTÍA, YA SEA EXPRESA O IMPLÍCITA, DE
CUALQUIER CARÁCTER. Ninguna persona ni representante está autorizada a asumir responsabilidad
alguna en nombre de la Compañía, excepto por lo expresado en la presente garantía, en relación con
la venta de este producto.
Algunos estados no permiten las limitaciones impuestas sobre la duración de las garantías implícitas
o la exclusión o limitación de los daños indirectos, especiales o derivados, por lo tanto es probable que
las limitaciones o exclusiones antes mencionadas no correspondan en su caso. Esta Garantía otorga
derechos legales específicos y usted puede tener otros derechos que varían de acuerdo con el estado
de que se trate.
E.U.A: AUDIOVOX CORPORATION, 150 MARCUS BLVD., HAUPPAUGE, NEW YORK 11788 l 1-800-645-4994
CANADÁ: LLAME 1-800-645-4994 PARA OBTENER INFORMACIÓN SOBRE EL CENTRO AUTORIZADO PARA
SERVICIOS POR GARANTÍA MÁS CERCANO A SU DOMICILIO.
128-4270E
G
GG
GG
A
AA
AA
R
RR
RR
A
AA
AA
NTÍA
NTÍANTÍA
NTÍANTÍA
3737
37
3737
Page 38

© 2000 Audiovox Electronics Corp., Hauppauge, NY 11788 128-5639B
 Loading...