

Page 1
5 CD MINI HI-FI SYSTEM
OPERATING INSTRUCTION
- E1 -
Page 2
WARNING
To reduce the risk of fire or electric shock, do not expose EXPLANATION OF GRAPHICAL SYMBOLS:
this appliance to rain or moisture.
The lightning flash with arrowhead symbol,
WARNING
RISK OF ELECTRIC SHOCK
DO NOT OPEN
"WARNING: TO REDUCE THE RISK OF ELECTRIC
SHOCK, DO NOT REMOVE COVER (OR BACK). NO
USER-SERVICEABLE PARTS INSIDE. REFER
SERVICING T O QUALIFIED SERVICE PERSONNEL."
within an equilateral triangle, is intended to
alert the user to the presence of uninsulated
"dangerous voltage" within the product's
enclosure that may be of sufficient magnitude
to constitute a electric shock to persons.
The exclamation point with an equilateral
triangle is intended to alert the user to
presence of important operating and
maintenance (servicing) instructions in the
literature accompanying the appliance.
WARNING:
TO PREVENT ELECTRIC SHOCK HAZARD, DO NOT EXPOSE THIS
APPLIANCE TO RAIN OR MOISTURE.
CLASS 1 LASER PRODUCT
CAUTION
INVISIBLE LASER RADIATION WHEN
OPEN AND INTERLOCKS DEFEATED.
AVOID EXPOSURE TO BEAM
This product contains a low power laser device.
PRECAUTION
Follow the advice below f or safe and appropriate operation.
ON PLACEMENT
• Do not use the unit in places which are extremely
hot, cold, dusty, or humid.
• Place the unit on a flat and even surface.
• Do not restrict the air flow through the ventilation
slots by placing the unit on soft furnishings, by
covering the unit with a cloth or by placing the
unit on a carpet.
ON AC VOLTAGE
• Before using the unit, check that the rated voltage of your unit matches your local voltage.
ON SAFETY
• When connecting and disconnecting the AC cord,
grip the plug and not the cord itself. Pulling the
cord may damage it and create hazard.
• When you are not going to use the unit for a long
period of time, disconnect the AC power cord.
ON CONDENSATION
• When left in a heated room where it is warm and
damp, water droplets or condensation may from
inside the CD player.
• When there is condensation inside the unit, the
unit may not function normally.
• Let it stand in a heated room for 1 to 2 hours to
allow the condensation to dry out.
FCC INFORMATION (For USA only)
This device complies with Part 15 of FCC Rules.
Operations are subject to the following two conditions:
1.This device may not cause harmful interference, and
2. This device must accept any interference received,
including interference that may cause undesirable
operations.
Should any trouble occur, disconnect the AC
power cord and refer servicing to qualified
personnel.
- E2 -
Page 3
SYSTEM CONNECTIONS
IMPORTANT
Switch off the power before connecting speak ers and
other equipment.
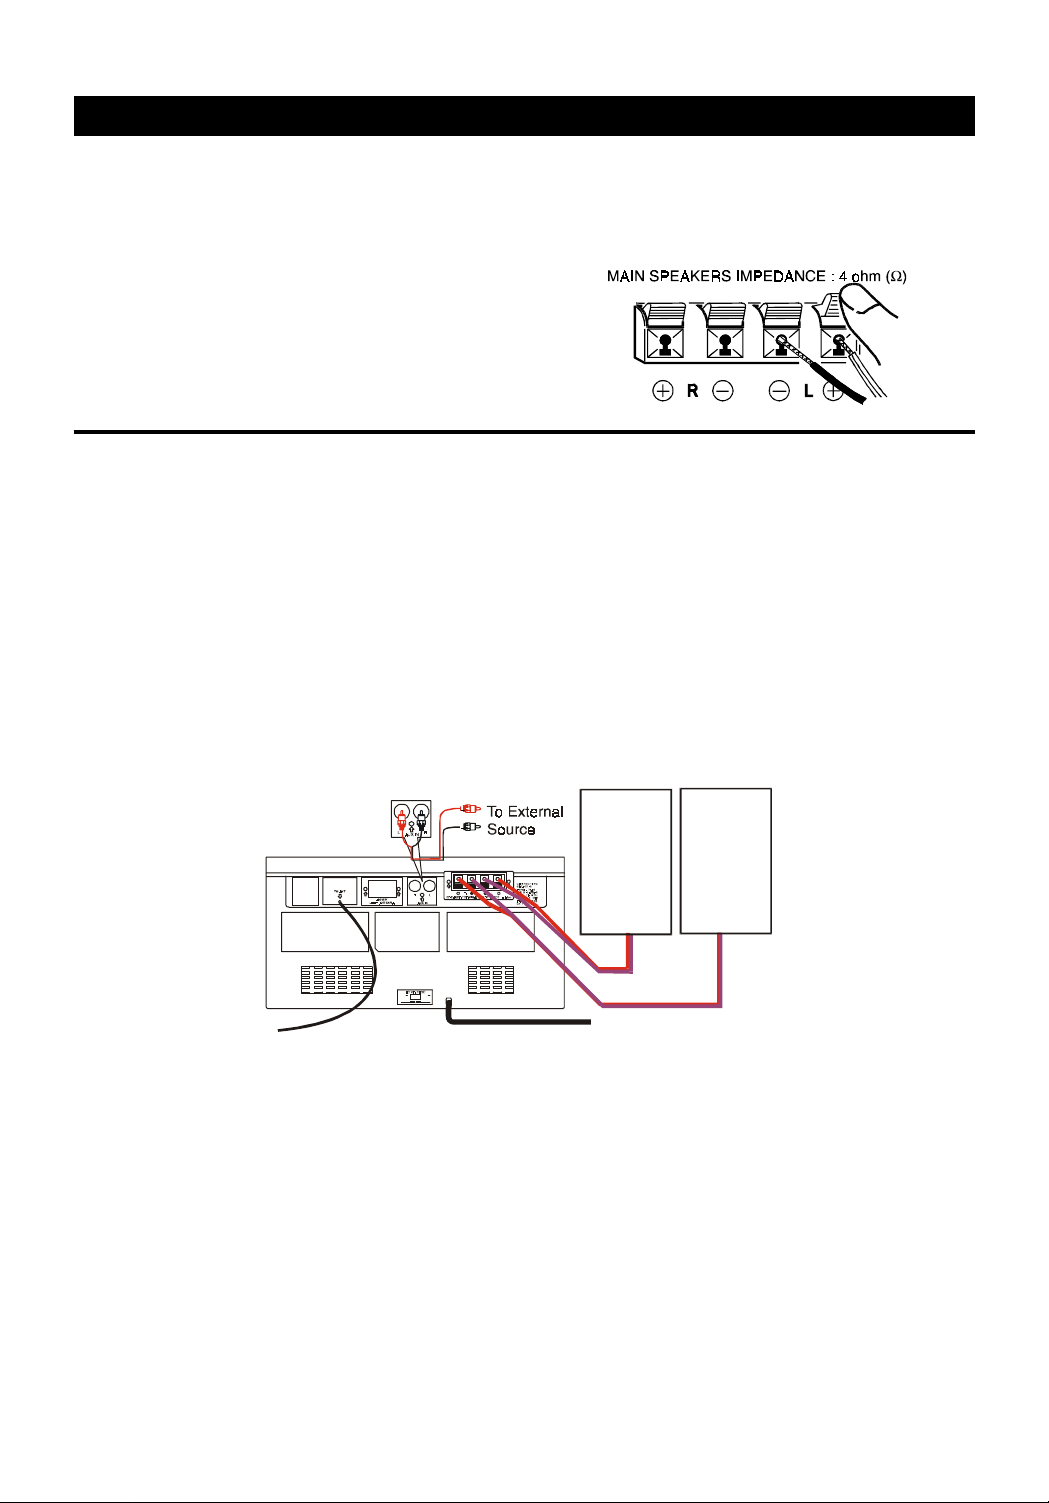
SPEAKER CORD CONNECTION
Connect the wires with the printed white lines to the
red (+) terminals and the plain-black wires to the black
(-) terminals.
NOTE: Connecting speakers other than the speakers
supplied with the unit, may damage the unit.
POWER CORD CONNECTION
1. Make sure that all the components and speakers are connected correctly.
2. Check that the rated voltage of your unit matches your local voltage.
CAUTION
To prevent electrical shock, match wide blade of plug to wide slot, fully insert. (For USA and CANADA only)
CAUTION
• Be sure the AC power cord is disconnected and all functions are off before making connections.
• When you are not going to use the unit for a long period of time, disconnect the AC power cord.
SPEAKER CONNECTIONS
Connect Speaker wires (Left & Right) from the Speaker to the amplifier's Speaker terminals.
NOTE: Ensure in each case that the striped (+) wire is connected to the (+) terminal of the speaker output and the
non-striped wire (-) is connected to the terminal of the speaker output. Also ensure that the correct orientation
for left and right main speakers is observed.
LEFT
SPEAKER
BOX
110
220
120V
240V
RIGHT
SPEAKER
BOX
AC Cord to an AC outlet
CONNECTION WITH OTHER OPTIONAL EQUIPMENT
To listen to or record audio signals from external units through this unit:
Connect the white plug to the white jack, and the red plug to the red jack to the AUX IN connector.
LISTENING TO THE CONNECTED EQUIPMENT
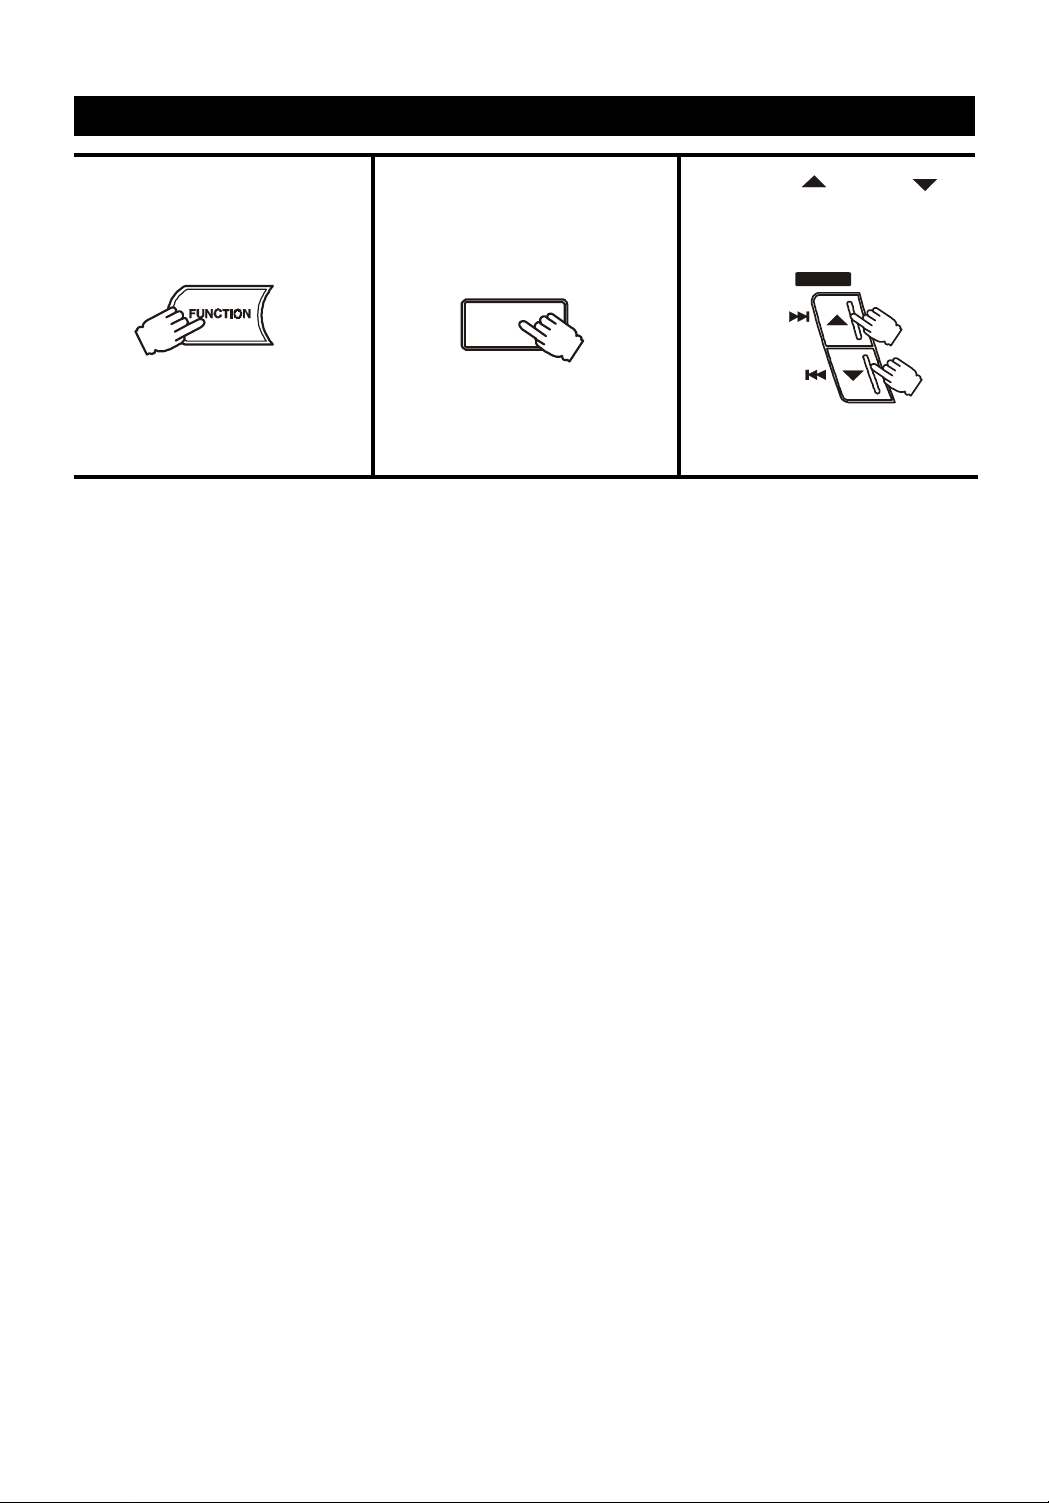
1.Press the FUNCTION button to AUX.
2.Play the external source.
NOTE: If the external equipment is a television and this audio system is close to it, you may experience
interference if the tuner function is selected while the television is working.
TO TURN ON THE UNIT
Press the POWER button. The displa y will light up . Select the desired function and the corresponding function
indicator will light up.
AFTER USE
Press the POWER button. The display light will fade and only the clock display will be shown.
- E3 -
Page 4

PARTS IDENTIFICATIONS
1
2
3
4
5
6
7
8
9
10
11
12
13
15
16
17
18
19
20
21
22
23
24
14
1) CD door
2) STEREO WIDE indicator
3) MUTE indicator
4) MUTE button
5) POWER button
6) VOLUME control buttons
7) PRESET , SKIP and MIN / HOUR
buttons
8) REMOTE SENSOR
9) PHONES jack
10) MODE selector (BEAT CUT/FM MODE/DUBBING)
11) FUNCTION button (TUNER/TAPE/CD/AUX)
12) X-BASS button
13) Cassette holder ( Deck A)
14) Cassette deck A operation controls
REC (record) button
PLAY button
REW (rewind) button
F.FWD (fast forward) button
STOP/EJECT button
PAUSE button
25
15) DISPLAYwindow
16) MEMORY/
SLEEP buttons
17) CD STOP button
18) TUNING DOWN / UP , RANDOM and
REPEAT buttons
19) CD PLAY/PAUSE button
20) CD OPEN / CLOSE button
21) DISC SKIP button
22) BAND button
23) STEREO WIDE button
24) Cassette holder (Deck B)
25) Cassette deck B operation controls
PLAY button
REW (rewind) button
F.FWD (fast forward) button
STOP/EJECT button
PAUSE button
CLOCK , TIMER and
- E4 -
Page 5
DISPLAY
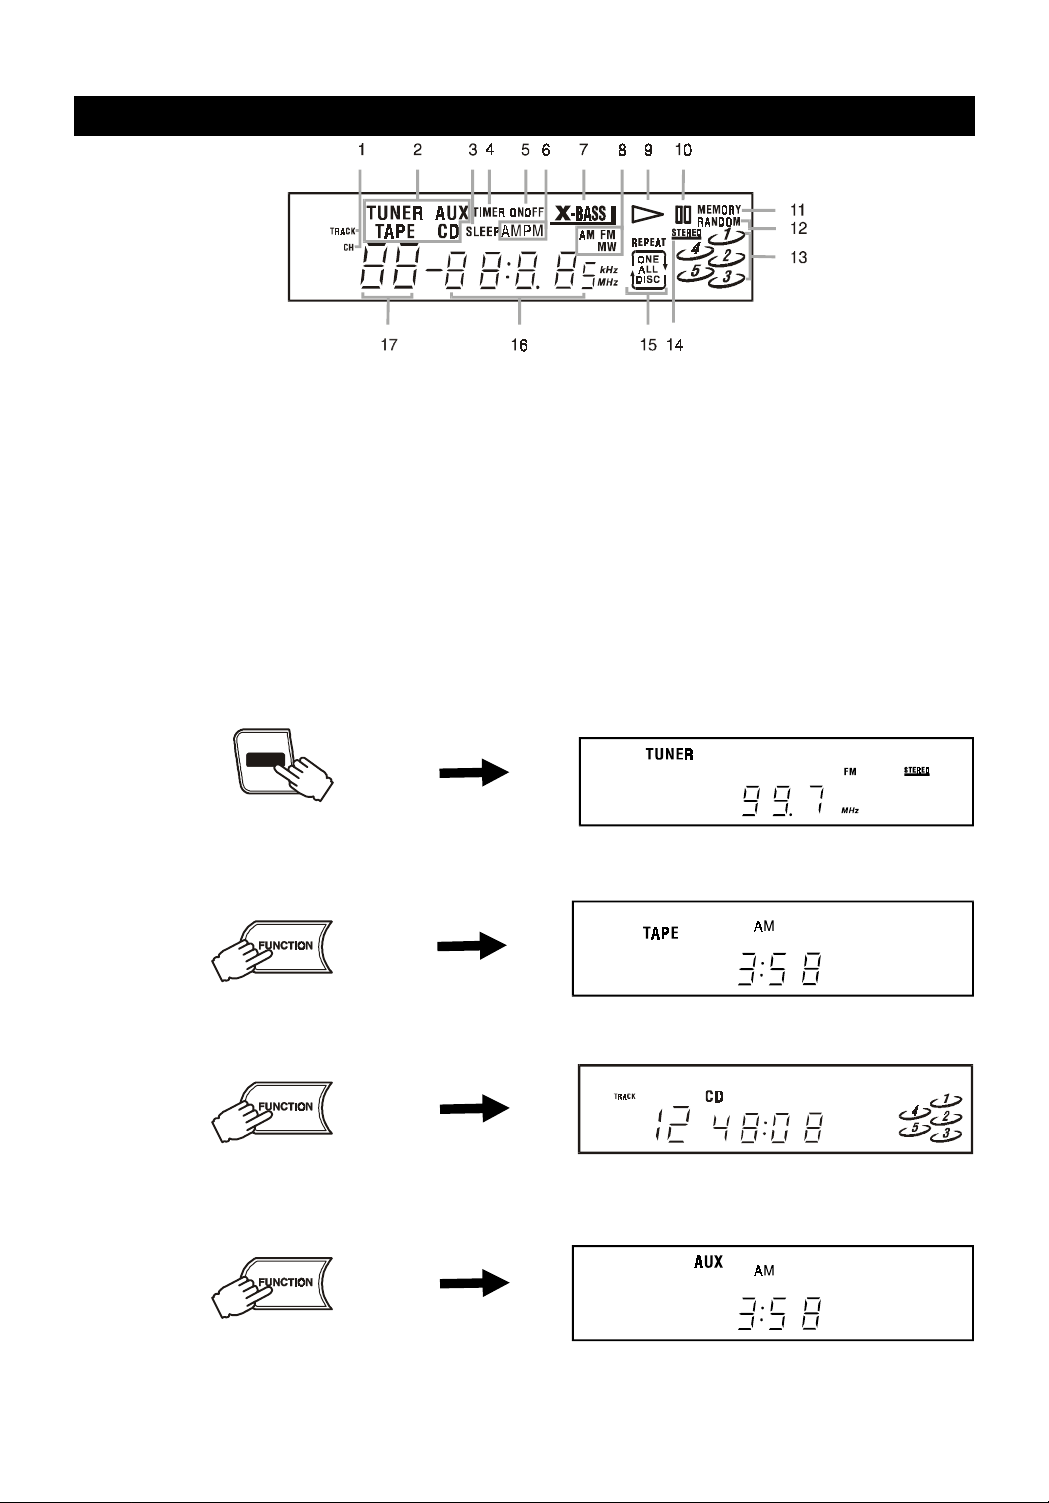
1. TRACK and CHANNEL indicators.
2. FUNCTION indicators.
3. SLEEP indicator.
4. TIMER indicator.
5. ON/OFF indicators.
6. AM/PM indicators. (for 12 hours)
7. X-Bass indicator.
8. Band FM/MW(AM)indicators.
9. Playback Indicator.
10. Pause indicator.
POWER INDICATOR
While the AC cord is connected and the unit is on stand-by, power will be consumed and only the clock display will
be lit.
• Press the POWER/STANDBY button to turn on the unit. After a short period of time the display will show:
POWER
• Press the FUNCTION button to TAPE. After a short period of time the display will show:
11. MEMORY indicator.
12. RANDOM indicator.
13. Indicators to show which disc holder of the disc tray
is occupied. If a certain disc holder is empty, the corresponding number indicator will be off.
14. STEREO indicator.
15. REPEAT mode indicators.
16. CLOCK/CD TIMING/BROADCAST ST A TION display.
17. Track number.
will resume the same mode as you power off the
unit last time for example
• Press FUNCTION button to CD. After a short period of time the display will show:
• Press the FUNCTION button to AUX. A short period of time is needed for track shuf-
• After using the unit press the POWER button and the display light will fade.
• The numbers showing in the display depend on the time, the selected frequency or the compact disc. CD numbers
will only be displayed if a compact.
- E5 -
fling, and the display will show:
Page 6
ADJUSTING THE SOUND
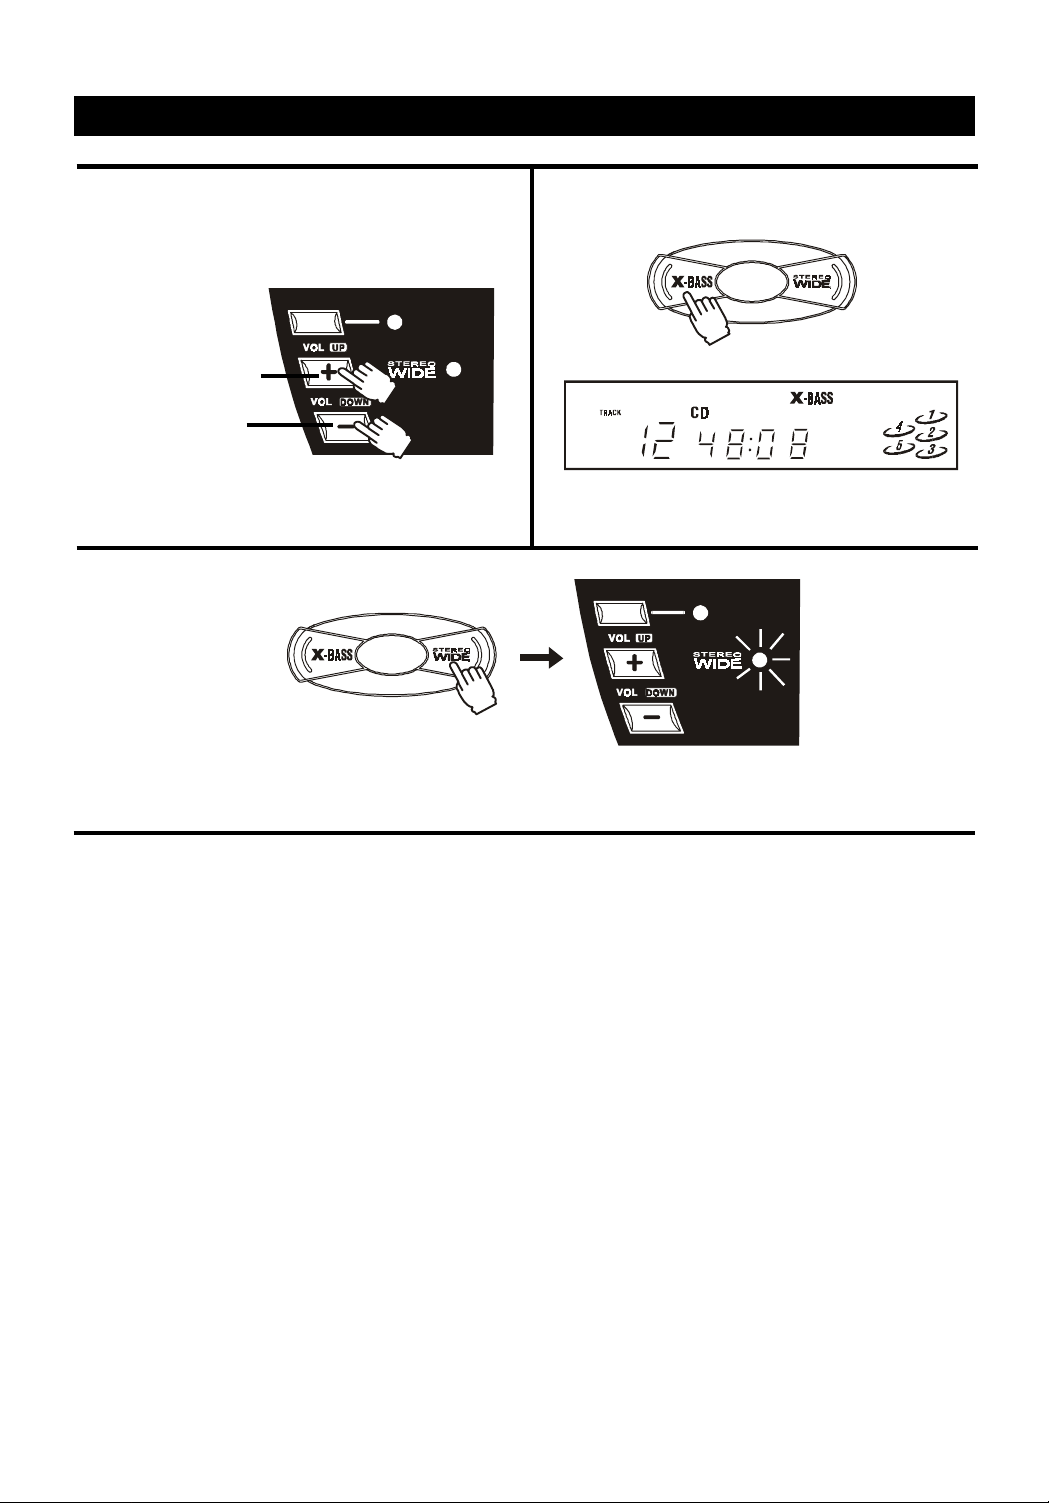
TO ADJUST THE VOLUME
Press the VOLUME +/- buttons to adjust the sound.
MUTE
To increase the
volume press here.
To decrease the
volume press here.
TO USE THE X-BASS
Press the X-BASS button to adjust the bass.
The display will show:
X-BASS is designed specifically to boost the low
frequency sound to obtain a more powerful bass.
MUTE
STEREO WIDE creates the feeling that the sound is being spread to the left and right, beyond the actual position of the
speakers. When listening to the sound in stereo, press the STEREO WIDE button to get more dynamic sound.
FOR PERSONAL LISTENING
Connect headphones (ø 3.5mm stereo mini plug) to the
PHONES jack.
Adjust the VOLUME control, X-BASS and STEREO
WIDE controls for the desired listening level. When
headphones are connected, the speakers are
automatically disconnected.
WHEN RECORDING
The VOLUME, X-BASS and STEREO WIDE controls
switch on may be adjusted with no eff ect on the recorded
signal.
- E6 -
Page 7
SETTING THE CLOCK
To set the current time (Select POWER STANDBY mode)
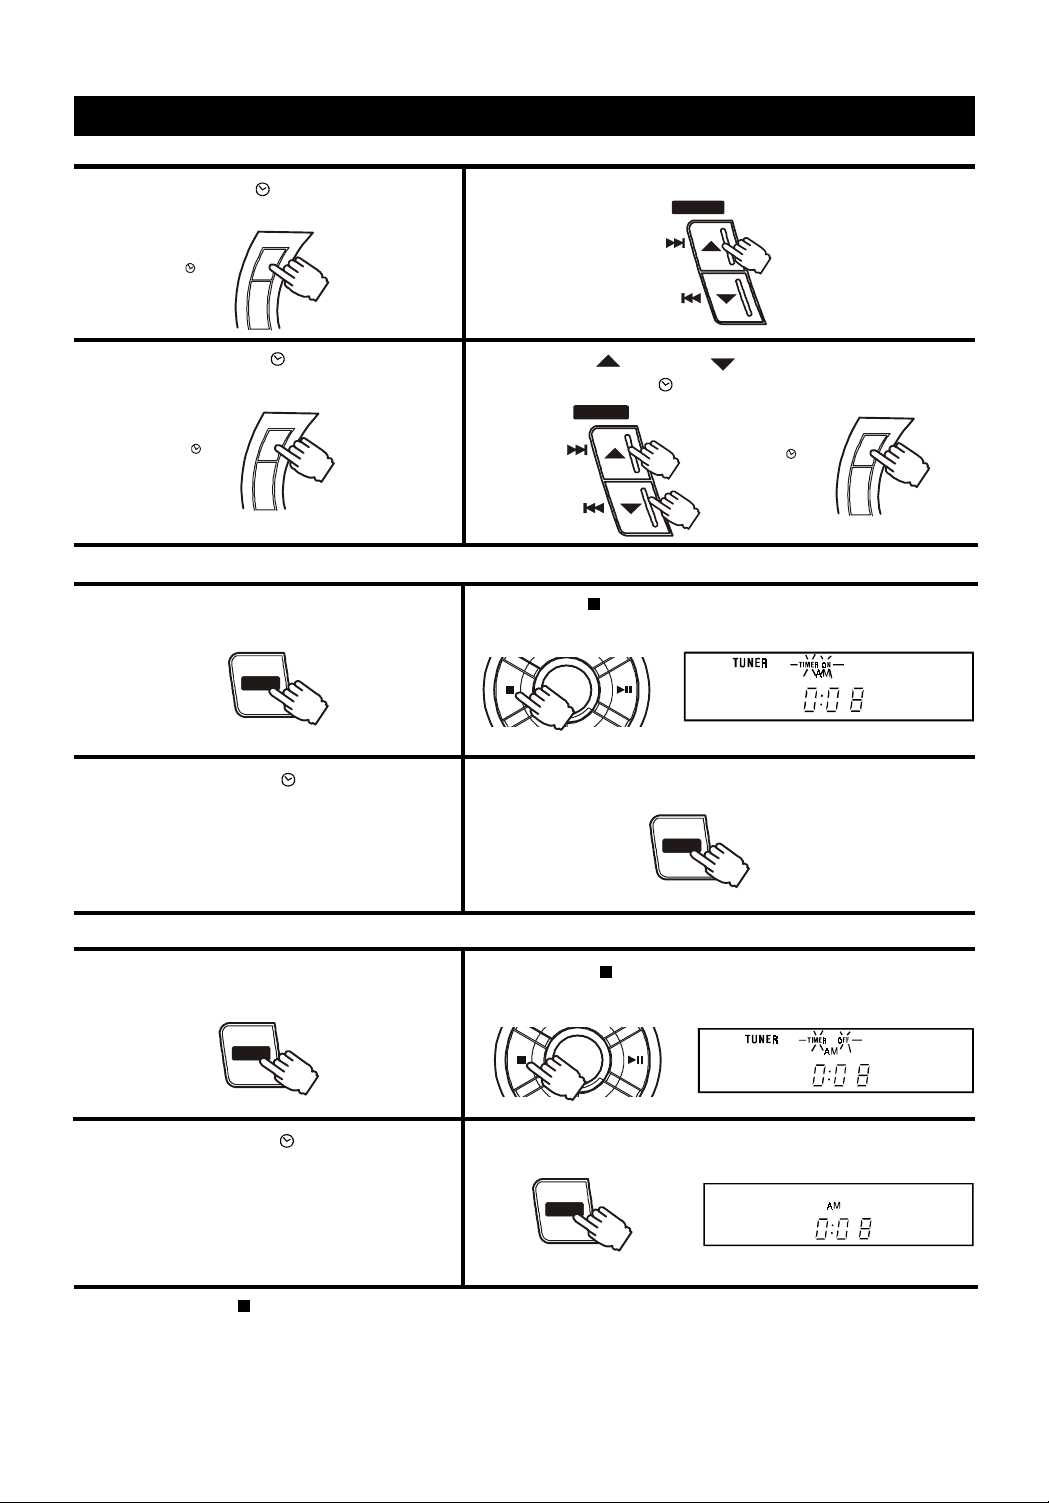
1. Press the MEMORY/ CLOCK button in clock
mode. Hours flash.
MEMORY
CLOCK
TIMER
2. Press the HOUR button repeatedly to set current hour.
SKIP
HOUR
SKIP
MIN
PRESET
3. Press the
MEMORY/ CLOCK button to
make the correct minutes flash.
MEMORY
CLOCK
TIMER
To set the timer on (time to turn on)
1. Press the POWER/STANDBY button to turn
ON the unit.
POWER
3. Press the
MEMORY/ CLOCK button in
clock mode.
repeat the steps of
the setting the current time
To set the timer off (time to turn off)
4. Press the
MEMORY/ CLOCK button to start the clock.
press
PRESET buttons to set the minutes and
PRESET
SKIP
HOUR
SKIP
MIN
2. Press the STOP button until the "TIMER ON" indicator shows
P
O
T
S
4. Press the POWER/STANDBY button to turn OFF the unit.
N
N
I
G
U
T
N
on the display
W
O
D
D
I
S
C
S
E
L
E
C
T
U
P
P
L
A
Y
/
P
A
U
S
E
AND
POWER
MEMORY
CLOCK
TIMER
1. Press the POWER/ST ANDBY button to turn ON
the unit.
POWER
3. Press the MEMORY/ CLOCK button in
clock mode.
repeat the steps of
the setting of current time
NOTE : 1) Press the
STOP button to view the local time, time to turn on and time to turn off step by step, the previous
display will be retrieved after 8 seconds.
2) The timer will work if the TIMER key is pressed so that "TIMER" lights up in the display. Cancel the timer by
pressing the key so that "TIMER" goes out.
3) Suddenly OFF when playing, the TIMER OFF function are activated. Press the ST OP button until the 'TIMER
OFF' indicator show on the display.
2. Press the
shows on the display
N
W
O
D
P
O
T
S
D
I
S
C
S
E
L
4. Press the POWER/STANDBY button to turn OFF the unit.
E
POWER
STOP button until the "TIMER OFF" indicator
N
N
I
G
U
T
U
P
P
L
A
Y
/
P
A
U
S
E
C
T
- E7 -
Page 8
SETTING THE SLEEP TIMER
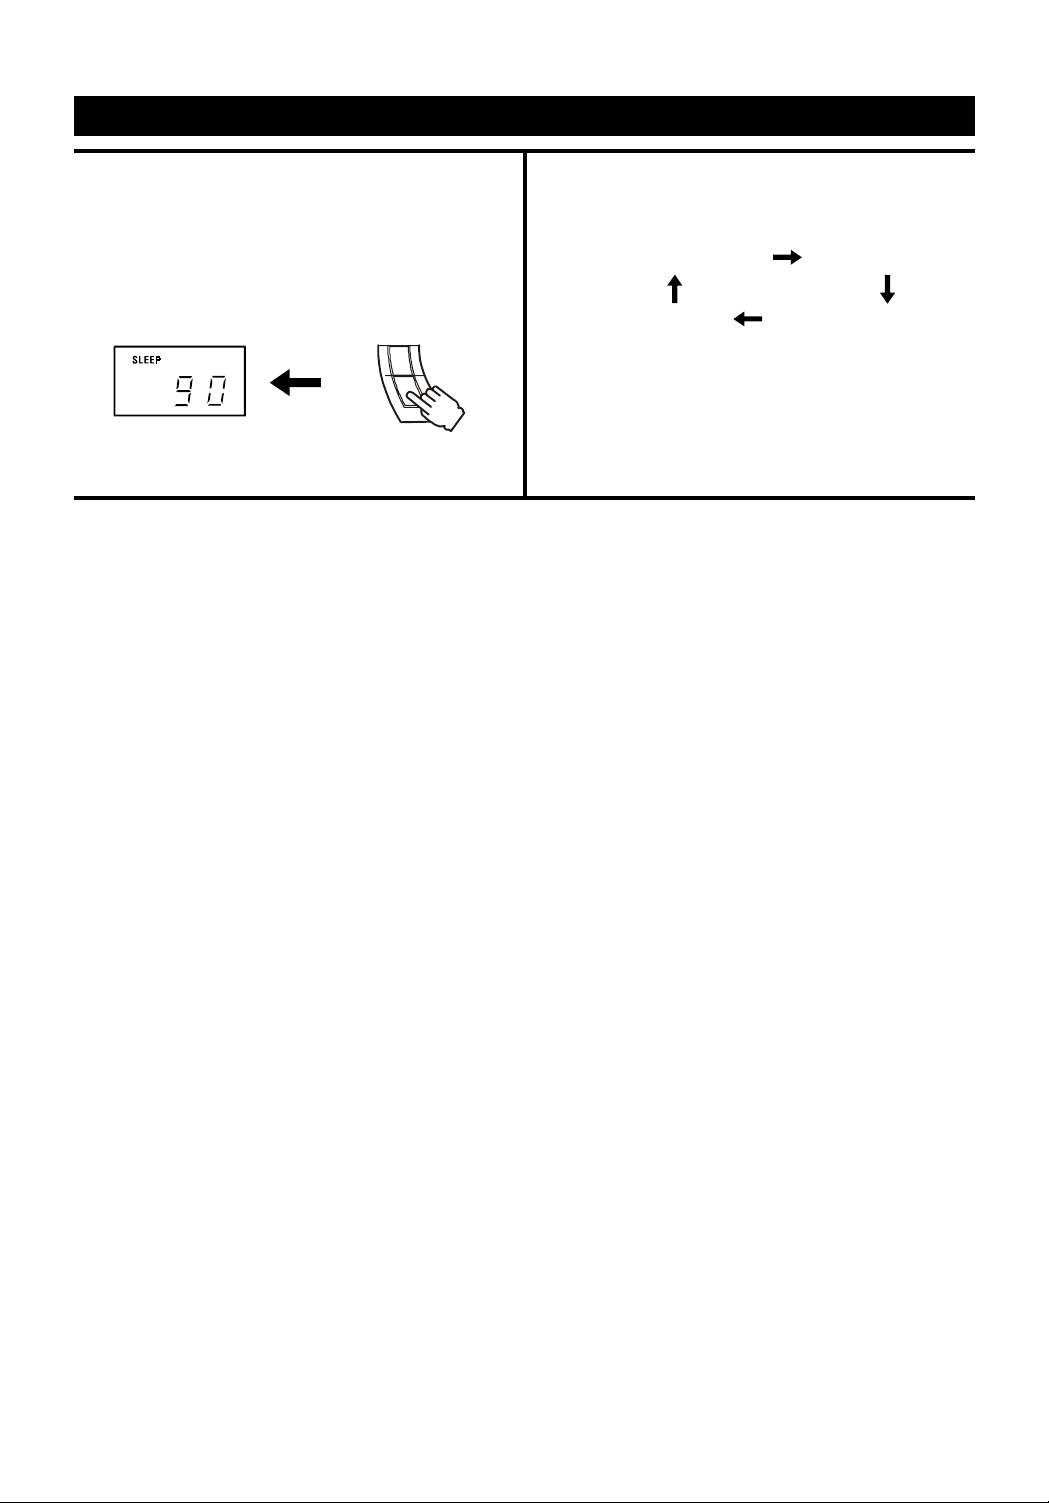
1. Press the SLEEP button while the power is on.
"SLEEP 90" lights in the display.
NOTE:
SLEEP can only be adjusted in TUNER, TAPE and AUX
modes.
TIMER
SLEEP
2.Press and hold the SLEEP button to select the length
of remaining time until the unit turns off.
It changes the indicator in the following way:
SLEEP 90 SLEEP 80
SLEEP 10 ........SLEEP 20
The Sleep Timer is set and the SLEEP indicator lights
in the display. Let go when required sleep time (in
minutes) is shown.
T o cancel the sleep timer , press the SLEEP button once
and "SLEEP" will go out in the display.
- E8 -
Page 9
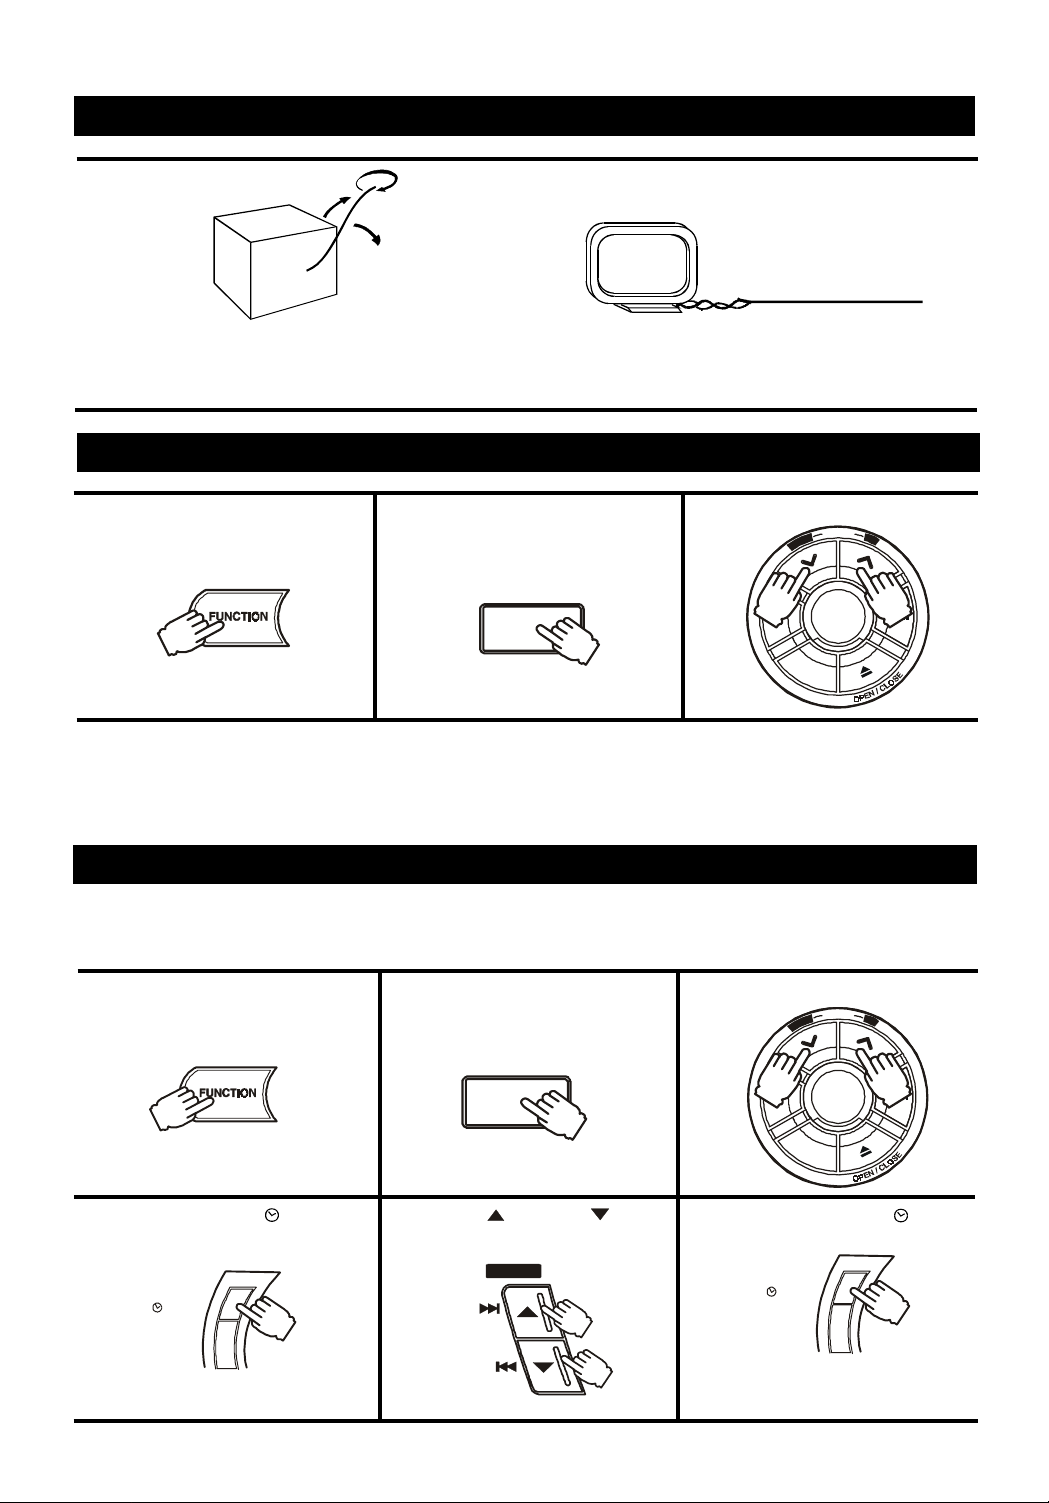
FOR BETTER RECEPTION
FM
Fully unwind the wire antenna. Then extend the wire
antenna and place it in the position that sounds best.
NOTE: Do not connect to outside antenna.
MW/AM
Connect the loop aerial (provided) to the 'MW/AM
LOOP ANTENNA' snap terminals at the back of the
unit.
TUNING INTO A STATION MANUALLY
1. Press the FUNCTION button to
TUNER.
2. Press the BAND button to select
the desired band.
BAND
TO SEARCH FOR A STATION QUICKLY
Hold the TUNING UP or DOWN button and station searching starts automatically. When a station is found, searching
stops automatically.
However, it may not stop if the signal is weak. In this case, search for the station manually.
3. Tune into a station.
N
A
R
P
O
T
S
N
U
T
N
W
O
D
M
O
D
D
I
S
C
S
K
I
P
I
G
N
U
P
RE
P
E
A
T
P
L
A
Y
/
P
A
U
S
E
PRESETTING STATIONS
You can tune into a stored station directly by entering the preset number.
20 stations on FM band can be preset.
20 stations on MW/AM band can be preset.
1. Press the FUNCTION button to
TUNER.
4. Press the MEMORY / CLOCK
button.
MEMORY
CLOCK
TIMER
2. Select a band.
BAND
5. Press the PRESET buttons
to preset number.
PRESET
SKIP
HOUR
SKIP
MIN
3. Tune into a station.
I
G
N
N
U
T
U
N
W
O
D
M
O
D
N
A
R
P
O
T
S
D
I
S
C
S
K
I
P
P
R
E
P
E
A
T
P
L
A
Y
/
P
A
U
S
E
6. Press the MEMORY / CLOCK
button.
MEMORY
CLOCK
TIMER
Then, repeat steps 2 to 6.
- E9 -
Page 10
TUNING INTO A PRESET STTUNING INTO A PRESET ST
TUNING INTO A PRESET ST
TUNING INTO A PRESET STTUNING INTO A PRESET ST
AA
TIONTION
A
TION
AA
TIONTION
1. Press the FUNCTION button to
TUNER.
TO RECEIVE THE FM BROADCAST IN STEREO
Set the MODE selector to FM STEREO.
When the FM stereo broadcast is received, FM STEREO
indicator lights up.
2. Select a band.
3. Press the PRESET but-
tons to preset number.
SKIP
HOUR
SKIP
MIN
PRESET
BAND
IF THE FM STEREO BROADCAST SIGNAL IS WEAK
Set the MODE selector to FM MONO.
Background noise will be reduced but the signal
reproduced will be mono.
- E10 -
Page 11
COMPACT DISC PLAYBACK
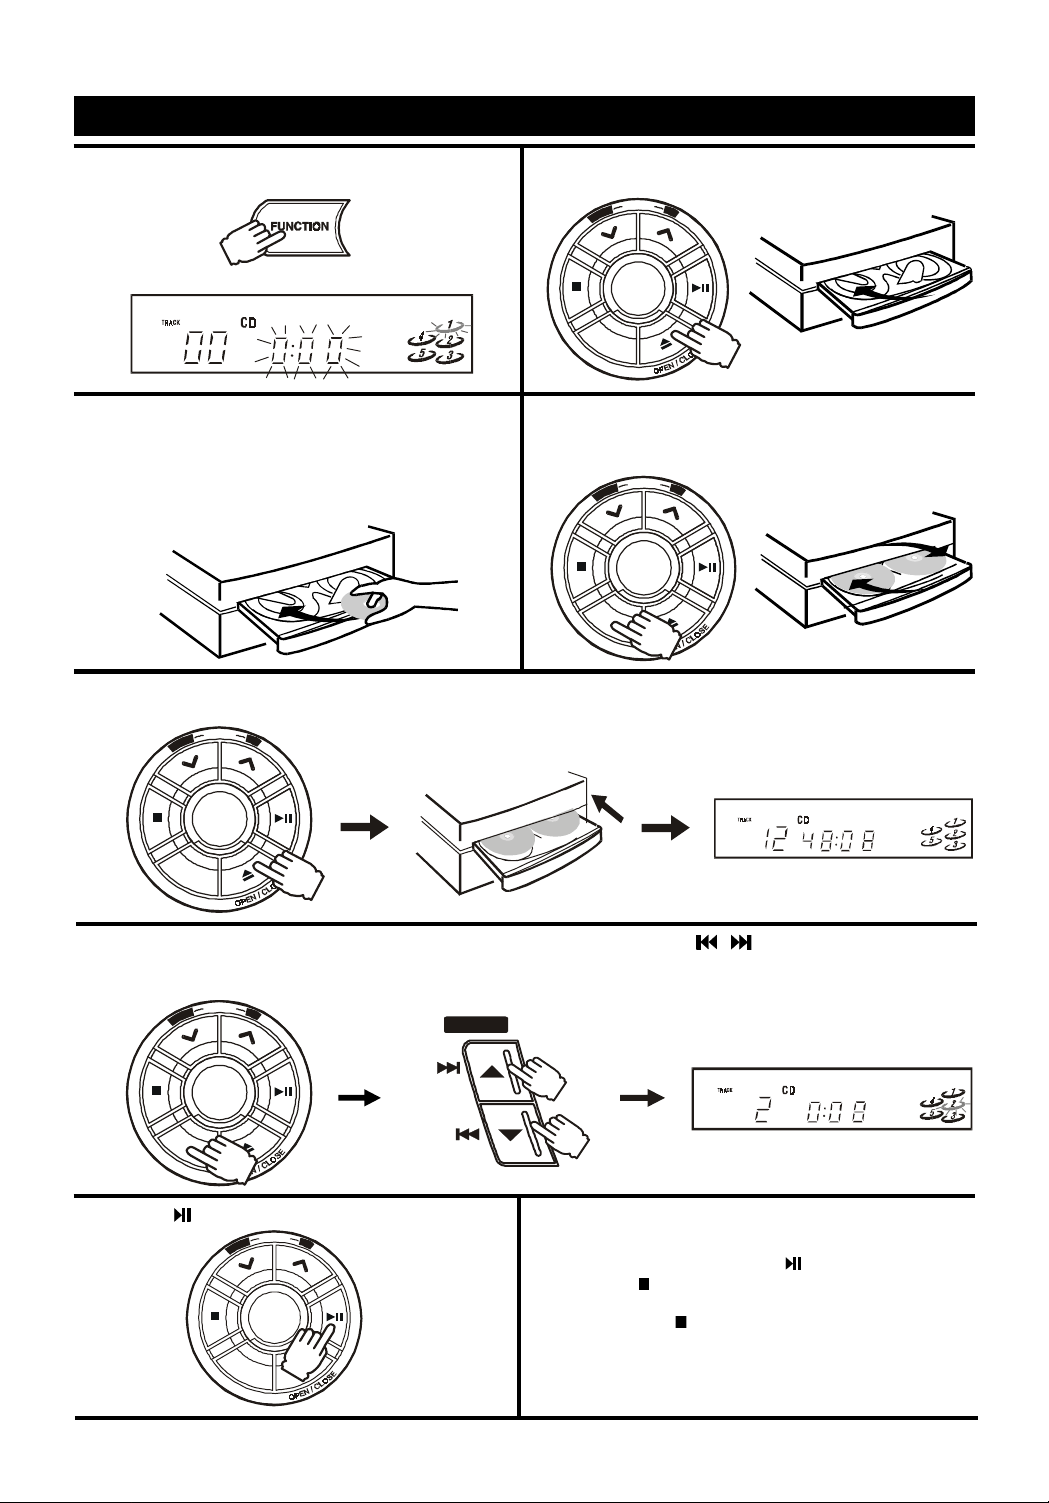
1. Press the FUNCTION button to CD.
3. Place the first disc onto the disc holder, with the label
side up.
WARNING:
• Before transporting the unit, take out all discs
from CD tray.
5. Press the OPEN/CLOSE button to close the tray.
It takes a short while for your player to check the discs.
I
G
N
N
U
T
N
W
O
D
M
O
D
N
A
R
P
O
T
S
U
P
R
E
P
E
A
T
P
L
A
Y
/
P
A
U
S
E
2. Press the OPEN/CLOSE button to open the disc
tray.
D
N
A
R
P
O
T
S
D
I
G
N
N
U
T
U
N
W
O
D
M
O
I
S
C
S
K
I
P
R
E
P
E
A
T
P
L
A
Y
/
P
A
U
S
E
P
4. Press the DISC SKIP button to revolve the tray clockwise.
Place other disc(s) on the disc holder(s).
I
G
N
N
U
T
N
W
O
D
M
O
D
N
A
R
P
O
T
S
D
I
S
C
S
K
U
P
R
E
P
E
A
T
P
L
A
Y
/
P
A
U
S
E
I
P
D
I
S
C
S
K
I
P
6. Press the DISC SKIP button to select the desired disc. Press either one of the / (SKIP) buttons to select the
desired track.
The selected disc symbol will flash.
I
G
N
N
U
T
N
W
O
D
M
O
D
N
A
R
P
O
T
S
D
I
S
C
S
K
7. Press the PLAY/PAUSE button to start playback.
U
P
R
E
P
E
A
T
P
L
A
Y
/
P
A
U
S
E
I
P
I
G
N
N
U
T
U
N
W
O
D
M
O
D
N
A
R
P
O
T
S
D
I
S
C
S
K
P
R
E
P
E
A
T
P
L
A
Y
/
P
A
U
S
E
I
P
SKIP
HOUR
SKIP
MIN
PRESET
8. To stop playing:
(a) for a moment only, press PLAY/PAUSE button
and ' ' will be displayed. Press this button again
to resume playing.
(b) Press the STOP button.
- E11 -
Page 12
COMPACT DISC PLAYBACK (CONTINUED)
Notes:1. During playback, disc tray can be opened to change/add disc, but DISC SKIP button will become invalid and
the current disc playback will not be interrupted.
2. The
LOCATING A PARTICULAR POINT IN A TRACK
/ SKIP buttons can only be used to choose a track of the current disc. To choose a track of another
disc, DISC SKIP button should be pressed to get to the desired disc first.
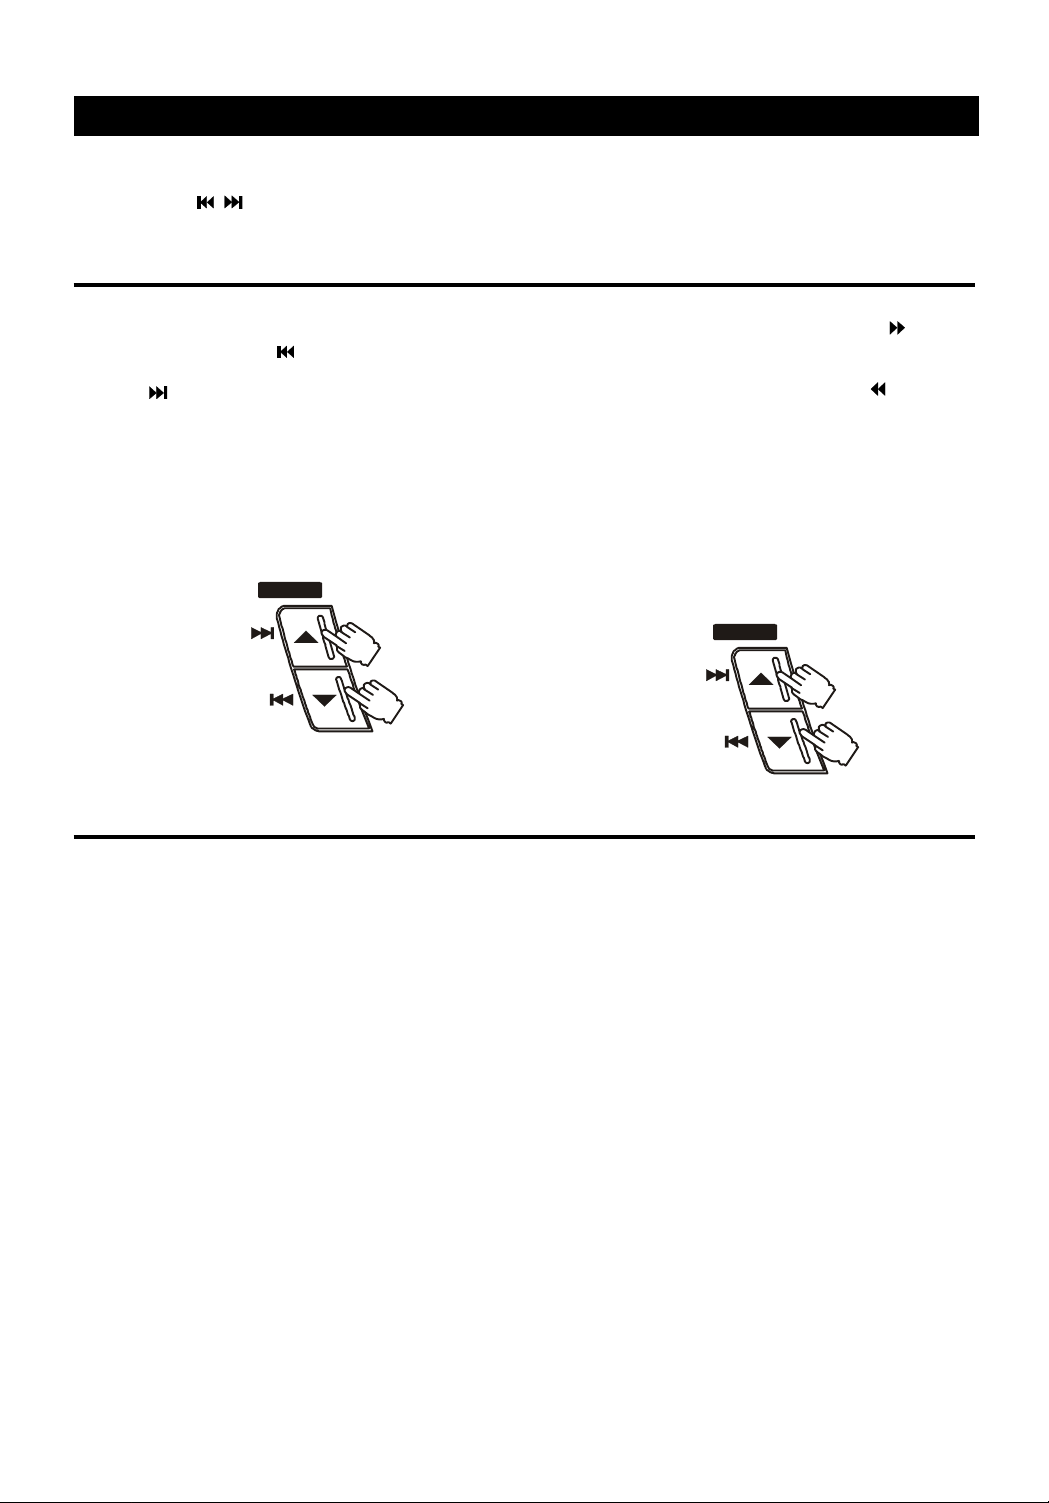
To Locate a Track in Sequence
• To locate the beginning of the current or the
preceding track, press
reverse SKIP button.
• To locate the beginning of the succeeding track,
press forward SKIP button.
• A short period of time will be needed for the disc
to read the information of the desired track bef ore
playback can begin.
To Locate a Particular Point in a Track
• To move forward at high speed, keep forward
SEARCH button pressed and release it at the desired
point.
• To move backward at high speed, keep backward
SEARCH button pressed and release it at the desired
point.
• On forward search the track is rapidly scanned, then
the next track and so on to the ne xt disc. The first tr ack
on the next disc will be played normally, to carry on
Reverse Forward
scanning release and press the search button.
skip skip
Reverse Forwar d
PRESET
SKIP
HOUR
SKIP
MIN
Press it once
Note: Searching and skipping can be done during playback or pause stage but are effective for the currently selected
disc only.
Use DISC SKIP button to choose another disc.
search search
PRESET
SKIP
HOUR
SKIP
MIN
Keep it pressed
- E12 -
Page 13
COMPACT DISC PLAYBACK (CONTINUED)
SHUFFLE PLAY - PLAYING IN A RANDOM ORDER
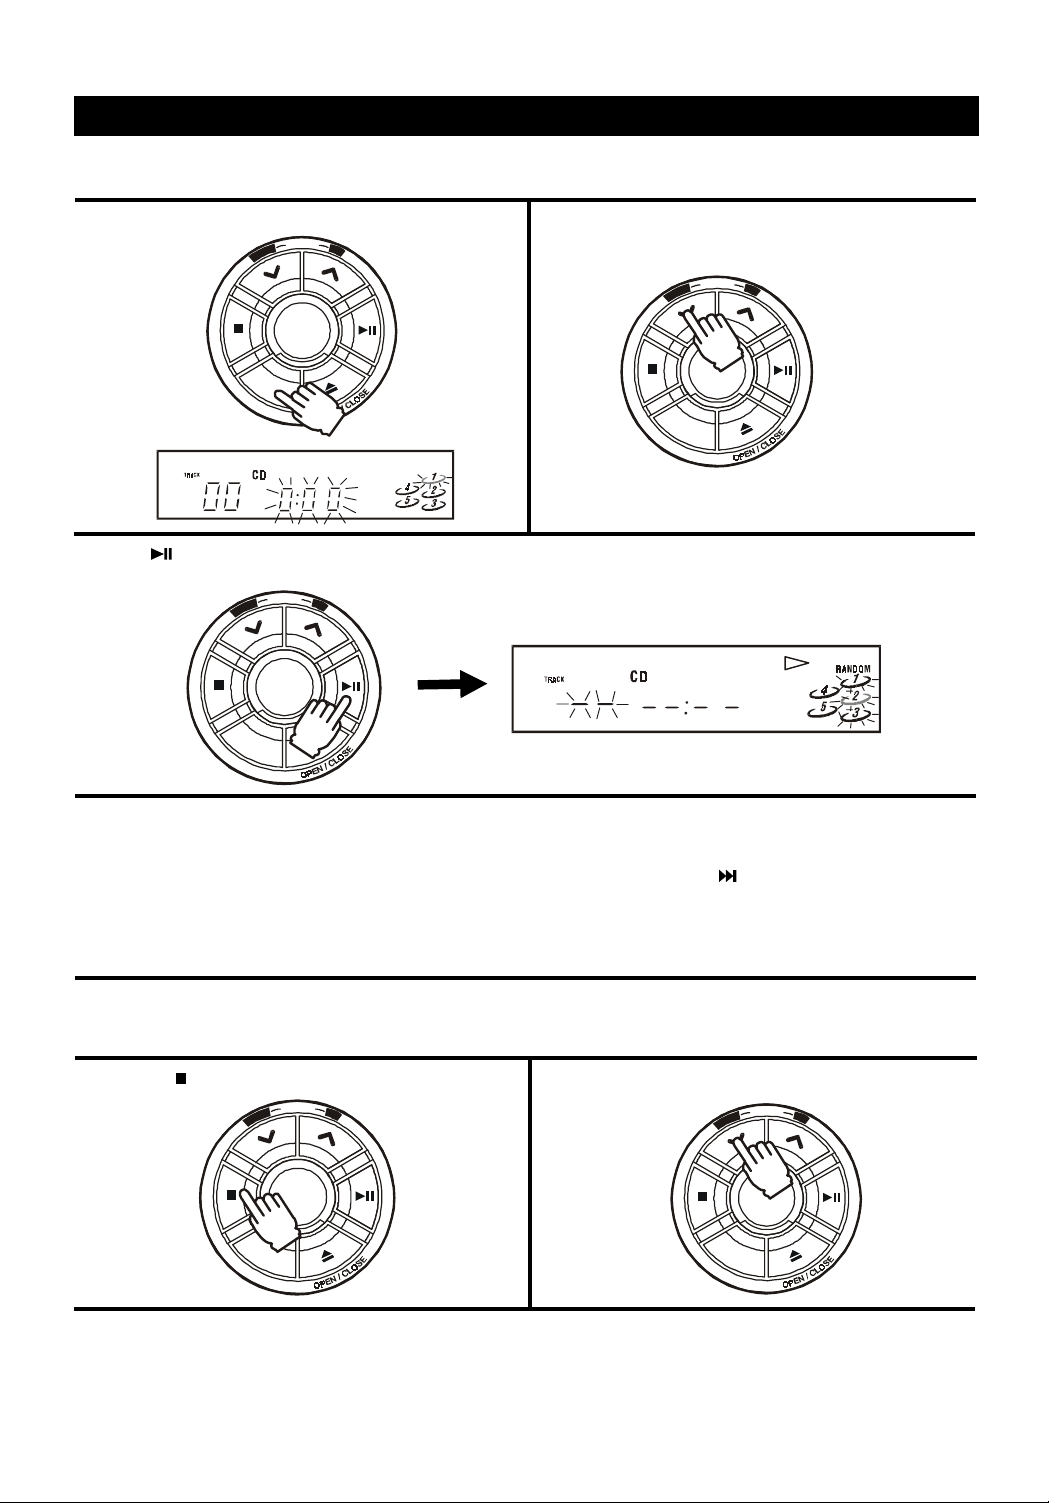
IN STOP MODE
1. Press the DISC SKIP button to select a disc.
I
G
U
N
N
T
U
P
R
E
P
E
A
T
P
L
A
Y
/
P
A
U
S
E
I
P
3. Press
N
W
O
D
M
O
D
N
A
R
P
O
T
S
D
I
S
C
S
K
PLA Y/P A USE button. Some abnormal symbols will be shown on the display and a short period of time is needed
for track shuffling, before playback can be started.
I
G
N
N
U
T
N
W
O
D
M
O
D
N
A
R
P
O
T
S
D
I
S
C
S
K
U
P
R
E
P
E
A
T
P
L
A
Y
/
P
A
U
S
E
I
P
2. Press the RANDOM button, the word "RANDOM" will
appear on the display .
I
G
N
N
U
T
N
W
O
D
M
O
D
N
A
R
P
O
T
S
D
I
S
C
S
K
U
P
R
E
P
E
A
T
P
L
A
Y
/
P
A
U
S
E
I
P
Notes:1. The random function shuffles all the tracks (maximum 48 tracks) of all discs in the disc tray and randomly
selects one track to play each time.
2. The player will skip to a new randomly selected track and start playing if SKIP button is pressed during
random playback.
IN PLAYBACK MODE
During normal playback the random function cannot be activated, it can only be switched "ON" from the STOP mode.
1. Press the STOP button to stop random playing.
I
G
N
N
U
T
N
W
O
D
M
O
D
N
A
R
P
O
T
S
D
I
S
C
S
K
I
U
P
R
E
P
E
A
T
P
L
A
Y
/
P
A
U
S
E
P
2. Press the RANDOM button to deactivate random playback.
D
N
A
R
P
O
T
S
D
I
G
N
N
U
T
N
W
O
D
M
O
I
S
C
S
K
U
P
R
E
P
E
A
T
P
L
A
Y
/
P
A
U
S
E
I
P
Notes:
During random playback, the RANDOM playback function cannot be cancelled. Random play cancellation can only be
done in stop mode.
- E13 -
Page 14
COMPACT DISC PLAYBACK (CONTINUED)
REPEA T PLAYBACK
DURING PLAYBACK MODE
I
G
N
N
U
T
U
N
W
O
D
M
O
D
N
A
R
P
O
T
S
P
R
E
P
E
A
T
P
L
A
Y
/
P
A
U
S
E
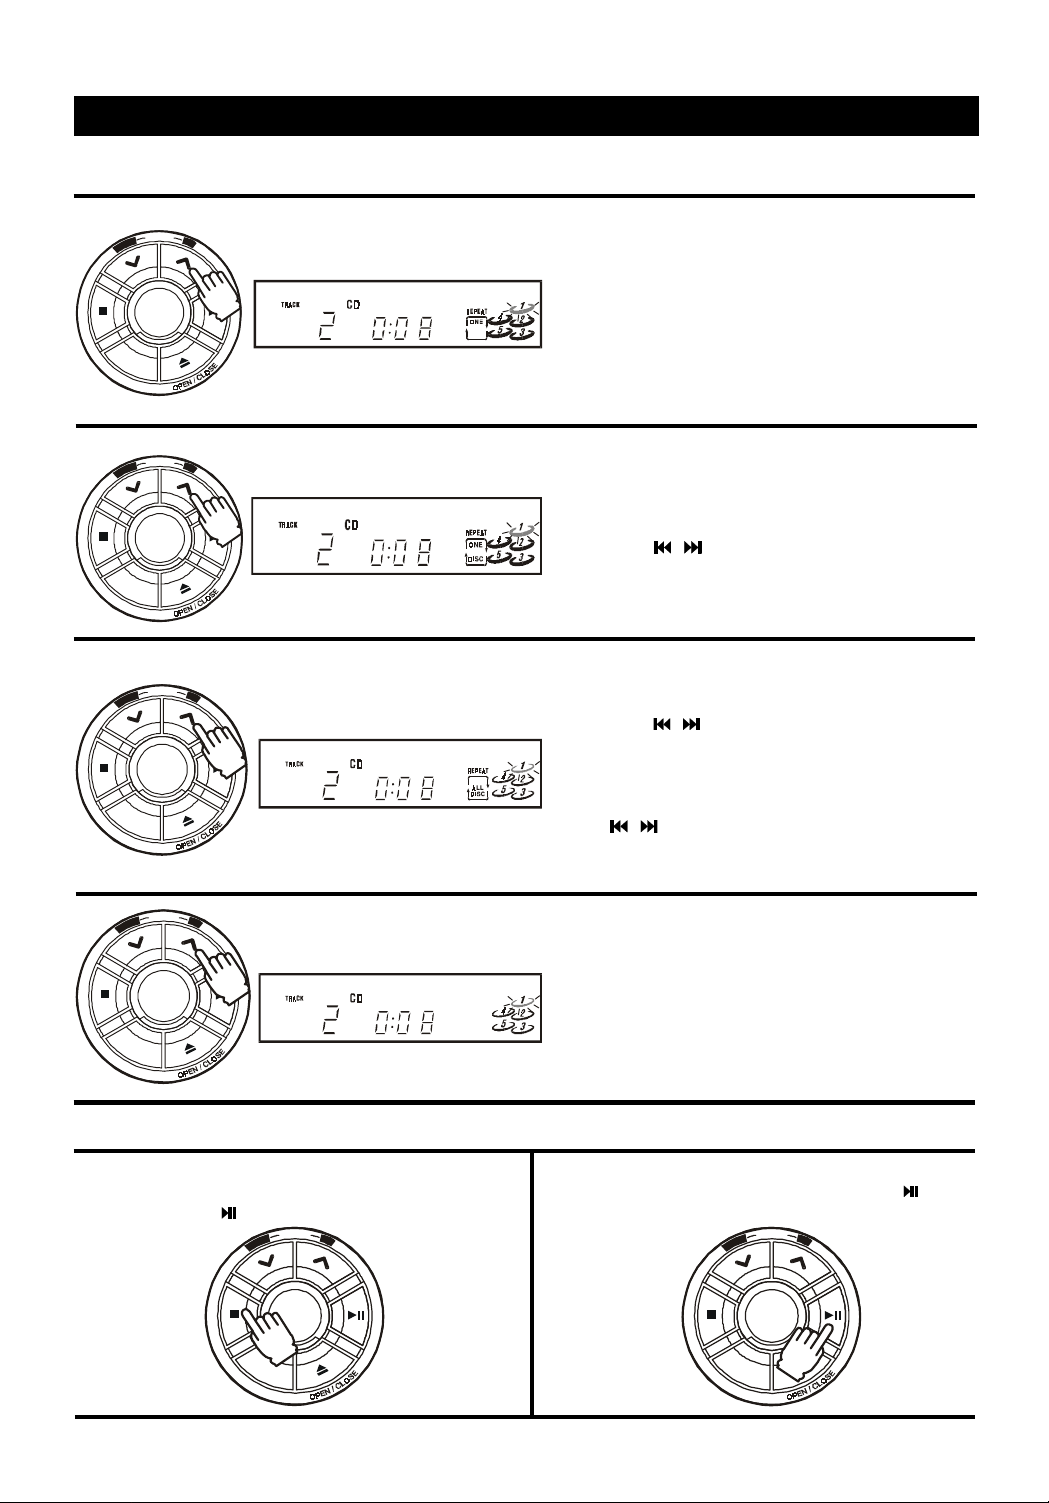
To Repeat the Current Track
• Press the REPEAT b utton until REPEA T ONE appears
on the display and the currently playing track will be
played repeatedly until the STOP button is pressed.
• SKIP and SEARCH can still be used during this function. SKIP will go to the start of the next track, Reverse Skip will go to the start of the present track, on
D
I
S
C
S
K
I
P
the second press it will then go to the start of the
previous track. SEARCH will search through the tracks
normally.
I
G
N
N
U
T
U
N
W
O
D
M
O
D
N
A
R
P
O
T
S
P
R
E
P
E
A
T
P
L
A
Y
/
P
A
U
S
E
To Repeat the Whole Disc or Programmed Tracks
• Press the REPEA T b utton until REPEAT ONE DISC
appears on the display and the current disc or the
current program will be played repeatedly starting from
the currently playing point.
• Press the / SKIP buttons with repeat-one-disc
function on, one can still search through the whole
D
I
S
C
S
K
I
P
disc or whole program, and the CD player will then
start playing from the selected point.
To Repeat All Disc
I
G
N
N
U
T
U
N
W
O
D
M
O
D
N
A
R
P
O
T
S
P
R
E
P
E
A
T
P
L
A
Y
/
P
A
U
S
E
• Press the REPEAT button until REPEAT ALL DISC
appears on the display.
• Press the
/ SKIP buttons can make the player
start playing from the newly selected point of the
currently playing disc.
• Press DISC SKIP button can make the player start
playing from the first track of the newly selected disc.
D
I
S
C
S
K
I
P
The
/ SKIP buttons can be used to choose a
particular track on this selected disc, the CD player will
then start playing from that point.
I
G
N
N
U
T
U
N
W
O
D
M
O
D
N
A
R
P
O
T
S
D
I
S
C
S
K
P
R
E
P
E
A
T
P
L
A
Y
/
P
A
U
S
E
I
P
DURING STOP MODE
The REPEAT operations can also be done in the stop mode.
The player will start playing from Track 1 of the currently
selected disc after PLAY/PAUSE button is pressed.
I
G
N
N
U
T
U
N
W
O
D
M
O
D
N
A
R
P
O
T
S
D
I
S
C
S
K
P
R
E
P
E
A
T
P
L
A
Y
/
P
A
U
S
E
I
P
- E14 -
To Cancel Repeat Play
• Press the REPEAT button until the word "REPEAT"
disappears from the display.
DURING PAUSE MODE
The REPEAT operations can be done from the pausing
point. The player will start playing again after
PLAY/
PAUSE button is pressed.
I
G
N
N
U
T
U
N
W
O
D
M
O
D
N
A
R
P
O
T
S
D
I
S
C
S
K
P
R
E
P
E
A
T
P
L
A
Y
/
P
A
U
S
E
I
P
Page 15
COMPACT DISC PROGRAMMED PLAYBACK
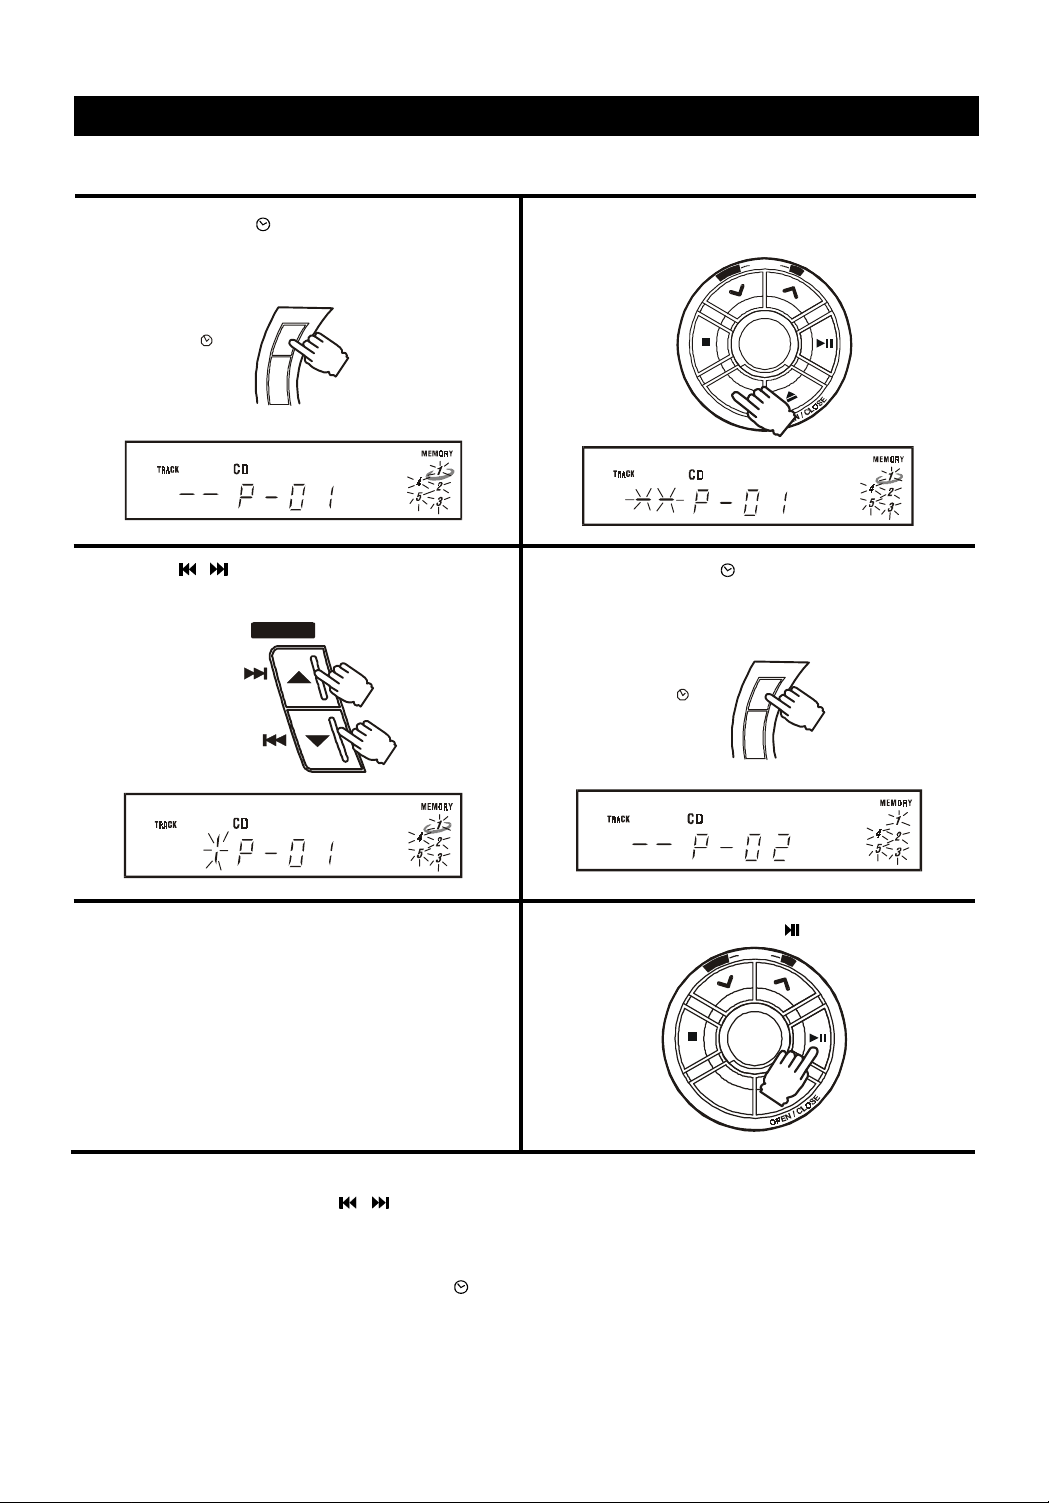
A program of up to 32 tracks from all the available discs in the disc tray can be played in a preset order.
1. Press the MEMORY/ CLOCK button (in stop mode).
MEMORY
CLOCK
TIMER
3. Press the
/ SKIP buttons to select the desired
track.
PRESET
SKIP
HOUR
SKIP
MIN
2. Press the DISC SKIP button to select the desired disc
(the disc symbol moves).
I
G
N
N
U
T
U
N
W
O
D
M
O
D
N
A
R
P
O
T
S
D
I
S
C
S
K
P
R
E
P
E
A
T
P
L
A
Y
/
P
A
U
S
E
I
P
4. Press the MEMOR Y/ CLOCK button again to store this
track in memory .
MEMORY
CLOCK
TIMER
5. To add additional tracks,
Repeat steps 2 to 4.
6. To start playback, press the
I
G
N
N
U
T
N
W
O
D
M
O
D
N
A
R
P
O
T
S
D
I
S
C
S
K
I
P
NOTE:1. The same track can be selected more than once in the same program.
2. With program on, the / SKIP buttons function can only be used for the selected tracks.
3. With program on, repeat play cannot be done for ALL DISCS.
TO CHECK THE PROGRAM
After setting the program, press the MEMORY/
CLOCK button repeatedly to check the order. This will not work
when the disc is playing.
- E15 -
PLA Y/P A USE button.
U
P
R
E
P
E
A
T
P
L
A
Y
/
P
A
U
S
E
Page 16
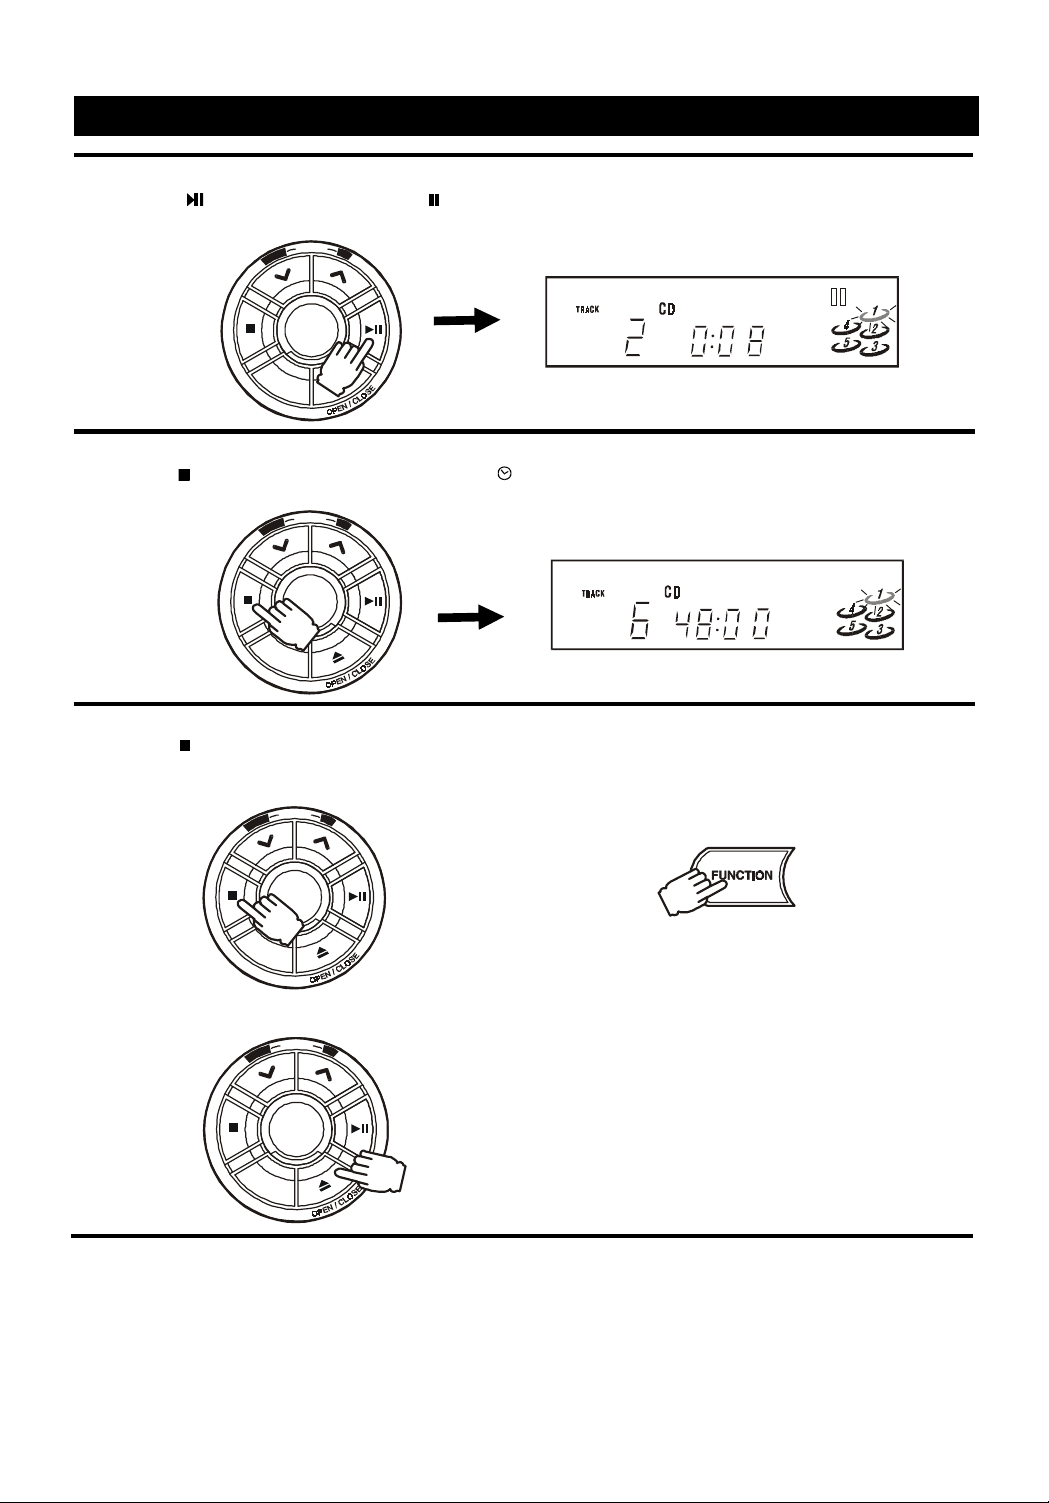
STOPPING AND CANCELLING PROGRAMMED PLAYBACK
To stop programmed play for a moment:
• Press the PLAY/PAUSE button and " " will be displayed.
Press this button again to resume playing.
I
G
N
N
U
T
U
N
W
O
D
M
O
D
N
A
R
P
O
T
S
D
I
S
C
S
K
I
T o add additional tracks during pr ogram playback:
• Press the
STOP button once, press the MEMORY/ CLOCK button until the track indication is "--" and then repeat
steps 2 to 4 (see page E15).
N
W
O
D
M
O
D
N
A
R
P
O
T
S
D
I
S
C
S
K
I
P
P
R
E
P
E
A
T
P
L
A
Y
/
P
A
U
S
E
P
I
G
N
N
U
T
U
P
R
E
P
E
A
T
P
L
A
Y
/
P
A
U
S
E
T o erase the whole program:
• Press the
STOP until the word "MEMOR Y"
disappears from the display . The displa y will then
show the information of the current disc.
I
G
N
N
U
T
U
N
W
O
D
M
O
D
N
A
R
P
O
T
S
D
I
S
C
S
K
I
P
P
R
E
P
E
A
T
P
L
A
Y
/
P
A
U
S
E
or
Open the disc tray by pressing the OPEN/CLOSE button.
I
G
N
N
U
T
N
W
O
D
M
O
D
N
A
R
P
O
T
S
D
I
S
C
S
K
U
P
R
E
P
E
A
T
P
L
A
Y
/
P
A
U
S
E
I
P
Also
By pressing the FUNCTION button to select other functions.
- E16 -
Page 17
TAPE PLAYBACK
Usable tapes - use only normal (type I) tapes for playback.
You can playback only the front sides of the tapes in Decks A and B.
1. Press the FUNCTION button to
TAPE.
2. Press the STOP/EJECT button
and load a cassette into the cassette compartment of Deck A or
Deck B.
3. Press the PLAY button to begin playback.
DECK A DECK B
DECK A DECK B
TO STOP PLAYBACK
Press the STOP/EJECT button.
TO INTERRUPT PLAYBACK
Press the PAUSE button.
To resume play, press the PAUSE button again.
TO FAST WIND
Press the REWIND or F.FWD button. Press the STOP/
EJECT button to stop winding at the desired position.
WHEN THE TAPE REACHES ITS END
During fast wind or regular play, the tape will stop
automatically when its end is reached.
WHEN BOTH DECK A AND DECK B ARE IN THE
PLA YB A CK MODE
Deck B will playback no sound will come from deck A.
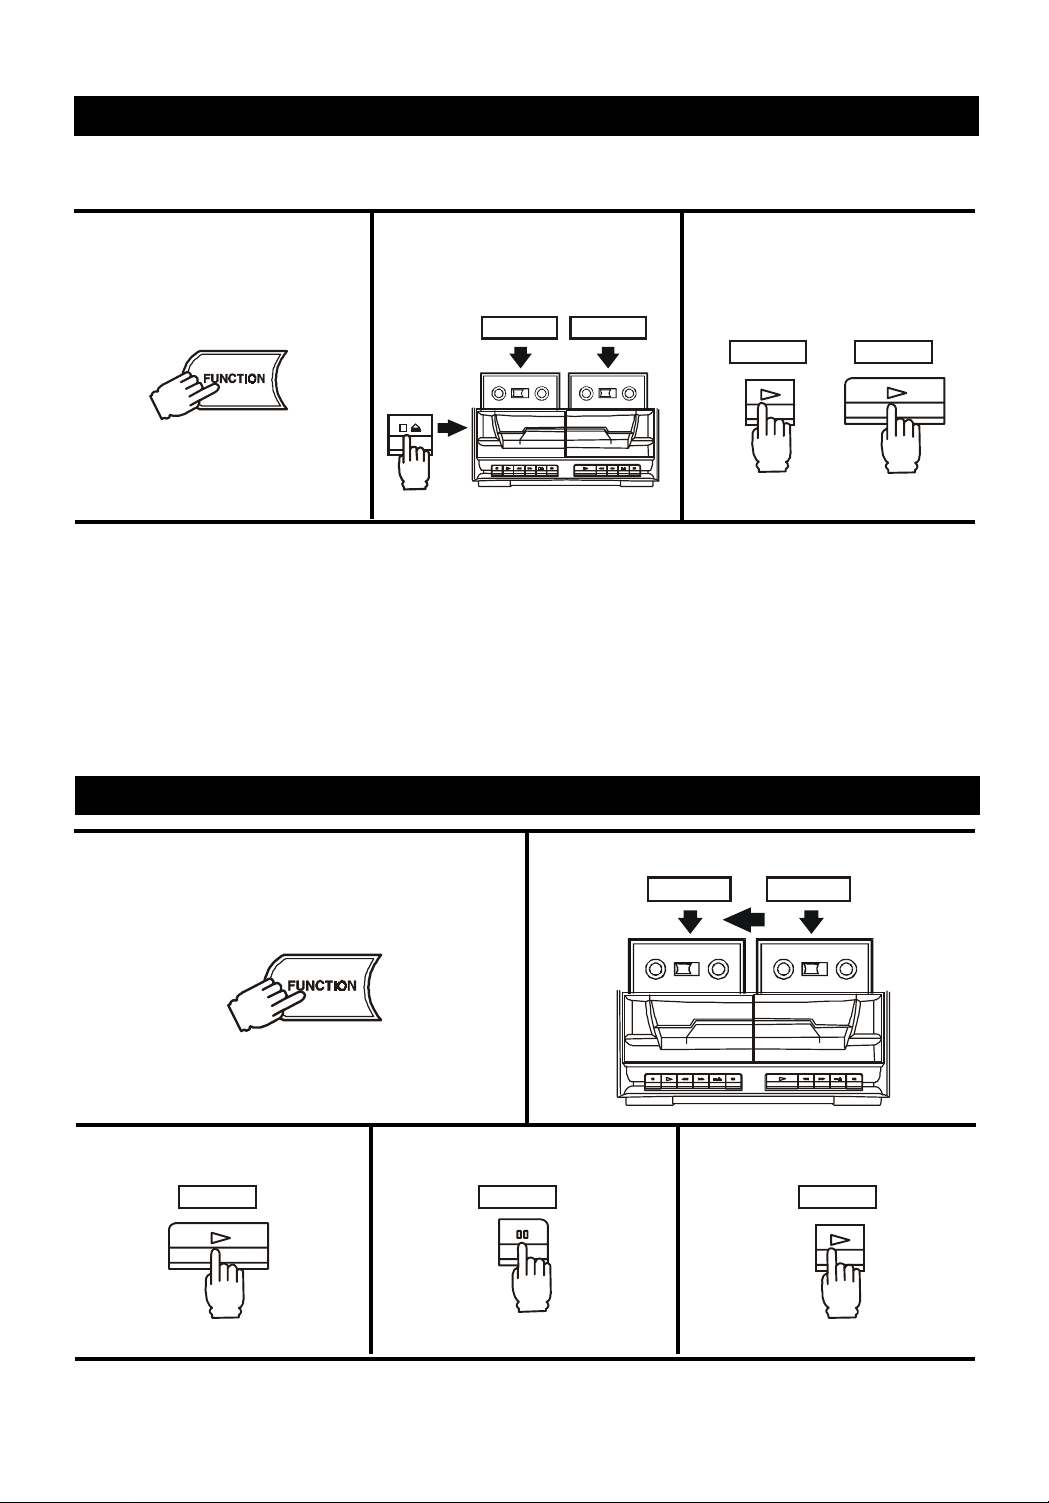
CONTINUOUS PLAYBACK ---- FROM DECK B TO DECK A
OR
1. Press the FUNCTION button to TAPE.
2. Insert a cassette in each deck.
DECK A DECK B
3. Press the PLA Y button.
Played
next
4. Press the P AUSE b utton.
5. Press the PLAY button.
Played
first
DECK B DECK A DECK A
• As soon as the tape in deck B reaches its end and stop, the pause mode for deck A is released and playback starts
automatically.
- E17 -
Page 18
TAPE CARE TIPS
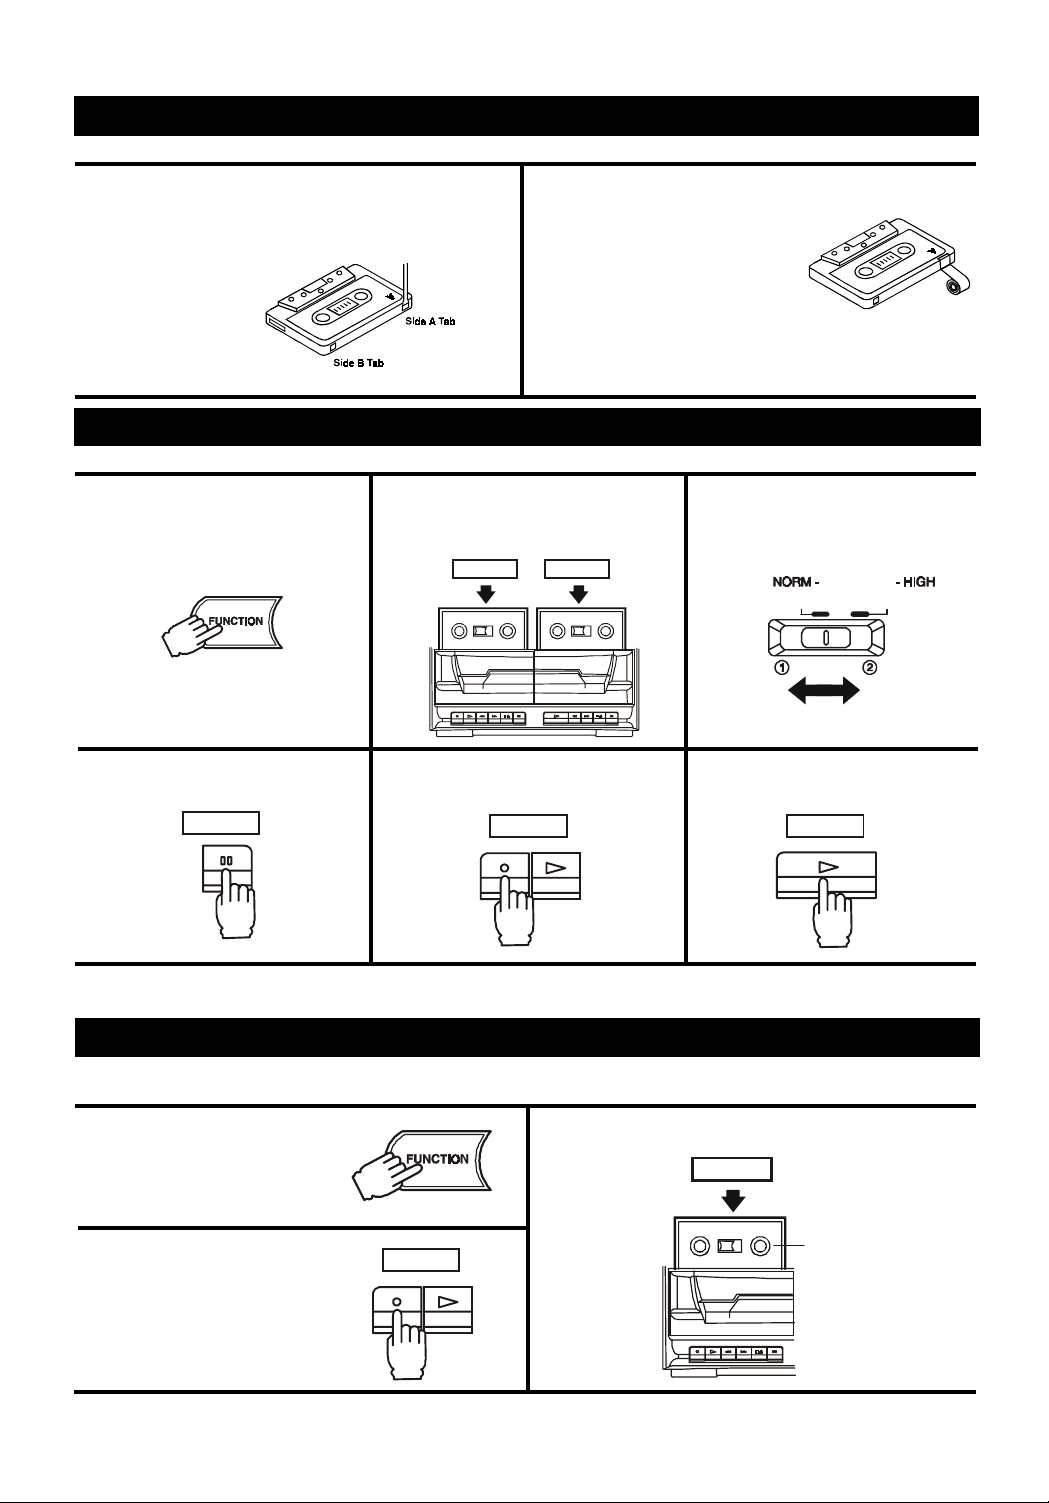
Preventing accidental erasure
1. Cassette tapes have two erase-protection tabs - one for
each side. To protect a recording from being accidentally
recorded over or erased, use a screwdriver to remove
one or both of the cassette tape's erase-protection tabs.
2. If you want to record on a tape side after you have
Notes:
1) Be sure you cover only the hole
2) Removing the erase-protection tabs does not prevent
DUBBING ---- FROM DECK B TO DECK A
Use only normal (type I) tapes for recording and playback.
1. Press the FUNCTION button to
TAPE.
2. Insert the recorded tape into Deck B
and the blank tape into Deck A.
Tape to be recorded Tape to be played
DECK A DECK B
removed the erase protection
tab, place a piece of strong plastic tape over that side's eraseprotection hole.
originally covered by the
erase-protection tab.
a bulk eraser from erasing a cassette tape.
3. Set the MODE selector according
to the desired dubbing speed:
NORMAL or HIGH.
DUBBING
FM ST EREO FM MONO
BEAT CUT
4. Press the PAUSE button.
5. Press the RECORD button which
also engages the PLA Y button.
DECK A
TO STOP DUBBING
Press the STOP/EJECT buttons of Deck A and Deck B.
RECORDING ---- DECK A ONLY
Use only normal (type I) tapes for recording.
RECORDING FROM THE BUIL T -IN TUNER
1. Press the FUNCTION button
to TUNER and tune into a desired station. (see page E10)
3. Press the RECORD button
which also engages the
PLA Y button.
DECK A
6. Press the PLAY button.
DECK A
NOTE: Do not change the dubbing speed when dubbing
is in progress.
2. Insert a tape into the cassette compartment.
DECK B
DECK A
This side
you want
to record
• If whistle is heard (beat) it may be reduced by switching the "Beat Cut" to the other position.
- E18 -
Page 19
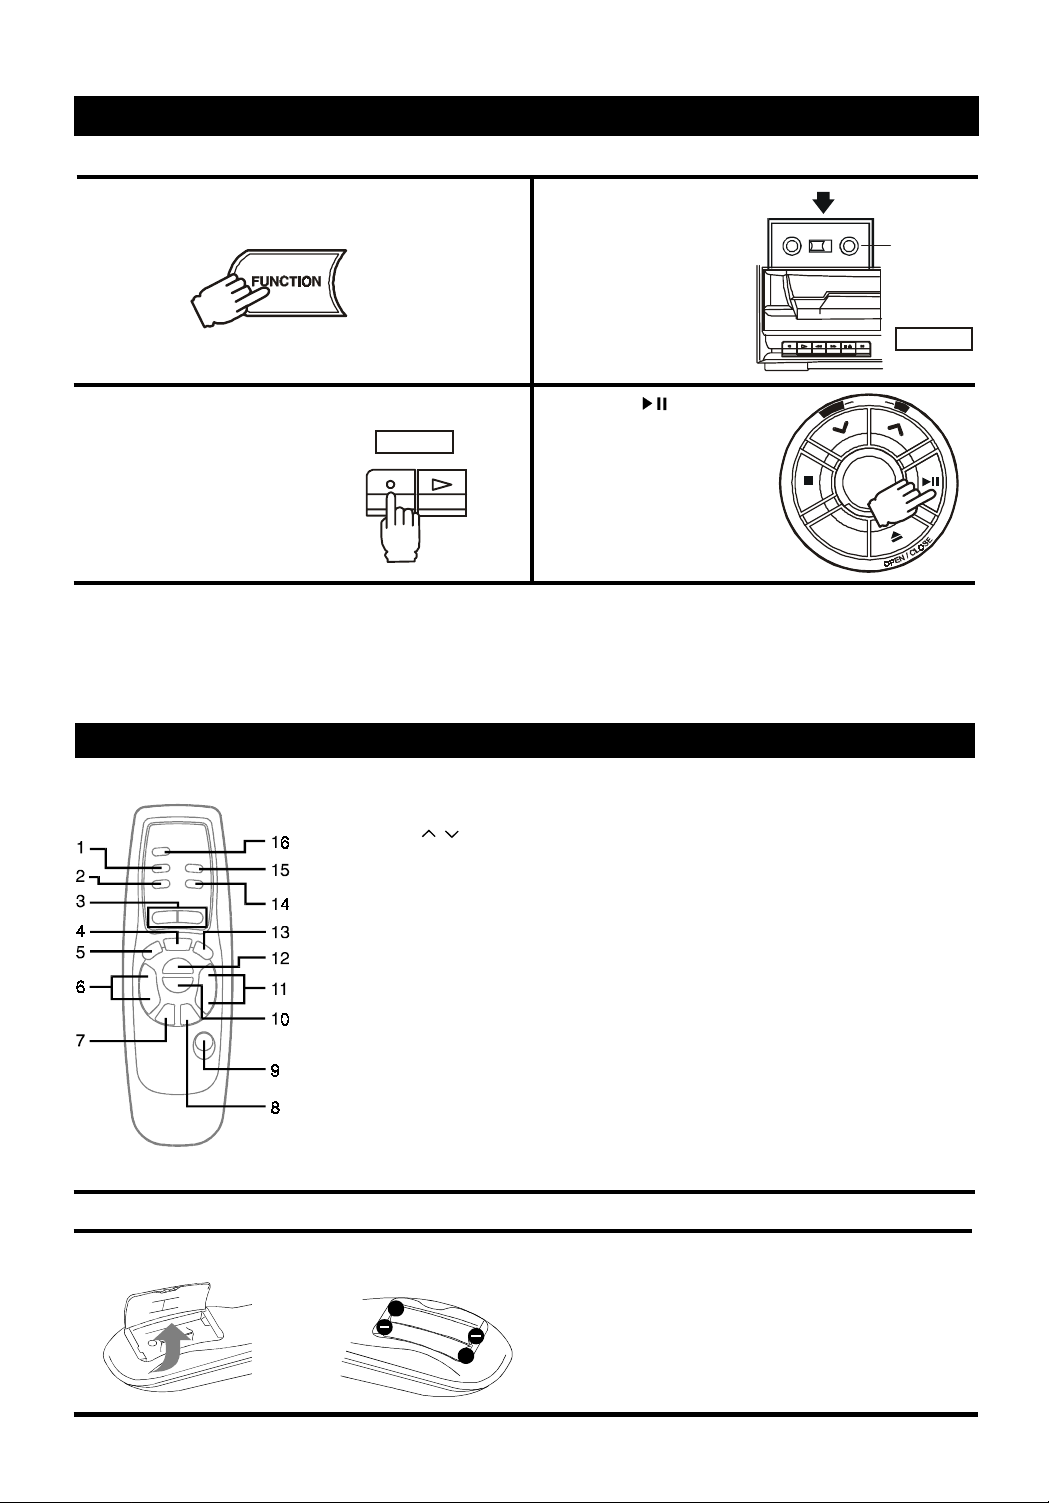
RECORDING ---- DECK A ONLY
RECORDING FROM THE CD PLAYER
1. Press the FUNCTION button to CD .
3. Press the RECORD button
which also engage the
PLA Y button.
DECK A
TO STOP RECORDING
Press the STOP/EJECT button of Deck A.
TO INTERRUPT RECORDING
Press the PAUSE button of Deck A.
To resume recording, press the PAUSE button again.
REMOTE CONTROL
2. Insert a tape into the
cassette compartment.
This side
you want
to record
DECK A
I
G
N
N
U
T
4. Press the
button of the CD play er.
play/pause
W
O
D
M
O
D
N
A
R
P
O
T
S
D
I
S
C
S
K
TO ERASE A RECORDED TAPE
1. Press the FUNCTION button to TAPE.
2. Inser t a tape with the side you want to erase facing you.
3. Press the RECORD button to star t erasing.
U
N
I
P
R
E
P
E
A
T
P
P
L
A
Y
/
P
A
U
S
E
TO INSTALL BA TTERIES
1. Open the battery door.
1) X-BASS button
2) MEMORY button
3) TUNING(
/ )/RANDOM/REPEA T buttons
4) FUNCTION button
5) SLEEP button
6) SKIP/PRESET/MIN / HOUR buttons
7) STOP button
8) PLAY/P A USE button
9) POWER button
10) DISC SKIP button
11) VOLUME UP/DOWN button
12) OPEN/CLOSE button
13) TIMER button
14) BAND button
15) MUTE button
16) STEREO WIDE button
USING THE REMOTE CONTROL CORRECTL Y
• Point the Remote Control at the REMOTE SENSOR located on the unit.
• When there is a strong ambient light source, the performance of the infrared REMOTE
SENSOR may be degraded, causing unreliable operation.
• The recommended effective distance for remote operation is about 6 meters (19 feet).
NOTE:
If there is no sound from all the speakers, the MUTE function might have been
activated. To disable the MUTE function, press the MUTE button on the unit and
remote handset.
2. Insert two R03 (AAA or UM-4)
size batteries.
BA TTER Y REPLACEMENT
When batteries become weak, the operating distance
of the Remote Control is greatly reduced and you will
+
need to replace the batteries.
NOTE:
+
If the Remote Control is not going to be used for a
long time, remove the batteries to avoid damage
caused by battery leakage corrosion.
- E19 -
Page 20

MAINTENANCE
CLEANING CD
If the CD skips or will not play, the disc may need cleaning.
Before playing, wipe the disc from the centre out with a cleaning
cloth. After playing, store the disc in its case.
CLEANING THE T APE HEADS
T o maintain optimum sound quality, clean the playback/record heads
DECK A
DECK B
(a) , erase head (b), pinch roller (c) , and capstans (d) regularly (
every 10 hours of use). Use a cotton swab lightly moistened with
cleaning fluid or denatured alcohol.
CLEANING THE UNIT
Do not use volatile chemicals on this unit. Clean by
lightly wiping with a soft cloth.
IMPORT ANT NOTE
Before transporting the unit, take out all discs from the CD tray.
TROUBLESHOOTING GUIDE
SYMPTOM
GENERAL
No sound.
No sound from one channel or unbalanced left and
right volume.
Reversed left and right sound.
Lack of bass sound or apparently imprecise physical
location of musical instruments.
Severe hum or noise.
RADIO RECEPTION
The FM STEREO indicator flashes.
Severe hum or noise.
The stereo FM program cannot be received in stereo.
CD PLA YER OPERATION
CD door does not close due to power off or other
functions are selected without closing it first.
Play does not start.
Distorted playback or sound loss during CD playback.
CASSETTE DECK OPERA TION
Recording cannot be made.
Recording or playback cannot be made or there is a
decrease in sound level.
Excessive wow or flutter, or sound dropout.
CAUSE (AND REMEDY)
• Press the VOLUME UP button.
• The headphones are connected. Disconnect them.
• The MUTE function might have been activated. To disable
the MUTE function, press the MUTE key on the remote
handset or reset the unit by pressing the Power/Standby
switch.
• Suddenly OFF when playing, the TIMER OFF function are
activted. Press the STOP button until the 'TIMER OFF'
indicator show on the display.
• Check the speaker connections of the inoperative channel.
• Check the speaker cord connection and speaker location.
• Check that the speakers are connected the correct way
round.
• The TV or VCR is too close to the stereo system. Separate
the stereo system from the TV or VCR.
• Adjust the antenna wire.
• Set the MODE switch to FM MONO, the FM STEREO light
will go out.
• Press the FUNCTION button to select CD mode and press
the DISC SKIP button. The door will close.
• The disc's are not placed correctly.
• Dir ty disc.
• The disc is inserted upside down.
• The player is in the pause mode.
• Moisture condensation
• CD disc is dirty or scratched.
• No cassette in the cassette holder.
• The tab is removed from the cassette.
• The tape is wound completely.
• Dirty head.
• Magnetic build-up on the record/playback head.
• Contamination of the capstans or pinch rollers.
- E20 -
Page 21

SPECIFICATIONS
TUNER SECTION
Frequency range FM 87.5 - 108 MHz
Antenna FM: Antenna Pig Tail
AMPLIFIER SECTION
Intermediate distortion 10% at 1kHz.
Output power Main 10W x 2 (10% THD),
Frequency Response 80Hz to 16kHz, ±3dB
Power consumption 85W
Power requirements AC ~ 100V 50/60Hz [Japan]
COMPACT DISC PLAYER SECTION
Channels 2 channels
S/N ratio 60dB
Wow & Flutter undetectable
Sampling frequency 44.1 kHz
Quantization 1 bit linear/ch
Pick up light source Semiconductor laser
Pick up wave length 790nm
CASSETTE SECTION
Track for mat 4 tracks, 2 channels
Frequency response Normal tape: 80 - 10,000 Hz
Signal to noise ratio 40 dB (Normal tape)
Wow and flutter 0.35% (WRMS)
Tape speed 4.8cm/sec.
Rewind time 120 sec (C-60)
Fast forward time 120 sec (C-60)
Recording system AC bias
Erasing system Magnet erase
Motor DC motor x 1
Heads Record/playback head x 1 (Deck A)
MW 531 - 1602 kHz 9kHz (other countries)
AM 530 - 1710 kHz 10 kHz (U.S.A. & Canada)
MW/AM: MW/AM loop antenna
AC ~ 110/120V-220/240V 50/60Hz [other countries]
AC ~ 120V 60Hz [USA and Canada]
AC ~ 220V 50Hz [Hong Kong and China]
AC ~ 230/240V 50Hz [Europe]
AC ~ 240V 50Hz [Australia}
Erasure head x 1 (Deck A)
Playback head x 1 (Deck B)
COMMON SECTION
Unit
Dimensions (WxDxH) 288mm x 373mm x 323mm
Weight 6.44 kgs
Main speakers
Dimensions (WxDxH) (230mm x 283mm x 313mm) x 2
Weight 3.18 kgs x 2
Specifications and external appearance are subject to change without advance notice due to continuous product improvement.
PRINTED IN CHINA
P/N: 811-277291-012
- E21 -
-E21 -
Page 22

MINI CHAÎNE HAUTE FIDÉLITÉ
CHANGEUR 5 CD
INSTRUCTIONS DE FONCTIONNEMENT
- F1 -
Page 23

AVERTISSEMENT
Pour réduire le risque d’incendie ou de chocs électriques,
n’exposez pas cet appareil à la pluie ou à l’humidité.
EXPLICA TION DES PICTOGRAMMES:
Le symbole de l’éclair à l’intérieur d’un
AVERTISSEMENT
RISQUE D'ÉLECTROCUTION
NE P AS OUVRIR
“AVERTISSEMENT: POUR ÉVITER LE RISQUE DE
CHOCS ÉLECTRIQUES, NE PAS RETIRER LE
COUVERCLE (OU LE DOS). AUCUNE PIÈCE
NÉCESSITANT L’ENTRETIEN PAR L’UTILISATEUR À
L’INTÉRIEUR. POUR RÉPARATION S’ADRESSER À
UN RÉPARATEUR QUALIFIÉ.
triangle a pour but d’avertir l’utilisateur
de «tension dangereuse» non isolée,
à l’intérieur de l’appareil, assez élevée
pour causer un choc électrique.
Le point d’exclamation à l’intérieur
d’un triangle a pour but d’attirer
l’attention de l’utilisateur sur des
instructions importantes de
fonctionnement et d’entretien dans le
manuel qui accompagne l’appareil.
AVERTISSEMENT: POUR ÉVITER LE RISQUE DE CHOCS ÉLECTRIQUES, NE
PAS EXPOSER CET APPAREIL À LA PLUIE OU À L’HUMIDITÉ.
PRODUIT À LASER DE CLASSE 1
RADIATIONS LASER INVISIBLES, SIL’APPAREIL
EST OUVERT ET SI LE DISPOSITIF DE
VERROUILLAGE EST NEUTRALISÉ.ÉVITER
Cet appareil contient un dispositif au laser de faible puissance.
MISE EN GARDE
L’EXPOSITION AU FAISCEAU.
MISES EN GARDEMISES EN GARDE
MISES EN GARDE
MISES EN GARDEMISES EN GARDE
Suivez les conseils ci-dessous pour un fonctionnement
correct et sans danger.
EMPLACEMENT
• N’utilisez pas cet appareil dans les endroits extrêmement
chauds, froids, poussièreux ou humides.
• Placez l’appareil sur une surface plate et de niveau.
• Laissez l’air circuler librement autour de l’appareil. Ne placez
pas l’appareil sur des surfaces susceptibles de bloquer
les orifices d’aération (tapis, couvertures, etc.) et ne
couvrez pas l’appareil avec du tissu.
TENSION CA
• Avant d’utiliser l’appareil, vérifiez si la tension indiquée pour
l’appareil correspond à votre tension locale.
• Vérifier que ce sélecteur est bien dans la position
correspondant à la valeur locale de la tension. Le cas
échéant, régler à l'aide d'un tournevis ou autre. Ce sélecteur
peut prendre les positions 110-120V ou 220-240V.
SÉCURITÉ
• Lorsque vous branchez et débranchez le cordon CA, tenez
la fiche et non le cordon. Le tirage du cordon peut
l’endommager et créer un risque.
• Si vous n’utilisez pas l’appareil pendant une longue période
de temps, débranchez le cordon d’alimentation CA.
RENSEIGNEMENT FCC
L’appareil est en conformité avec le chapitre 15 des règles
de la FCC. Son fonctionnement est soumis aux deux
conditions suivantes :
1. Cet appareil ne doit pas causer d’interférences gênantes,
et
2. Cet appareil doit supporter toute interférence reçue, y
compris celles qui pourraient causer son mauvais
fonctionnement.
CONDENSATION
• Si l’appareil est laissé dans une pièce chauffée, où il fait
chaud et humide, des gouttelettes d’eau ou de la
condensation peuvent se former à l’intérieur du changeur
de DC.
• S’il y a de la condensation à l’intérieur de l’appareil, ceci
peut affecter son fonctionnement normal.
• Laissez l’appareil dans une pièce chauffée de 1 à 2 heures
pour que la condensation se dissipe.
En cas de problème, débranchez le cordon
d’alimentation CA et faites réparer l’appareil par un
personnel qualifié.
- F2 -
Page 24

RACCORDEMENTS DE LA CHAÎNE
IMPORTANT
Mettez l’appareil hors circuit avant de raccorder les enceintes acoustiques et tout autre
appareil auxiliaire.
RACCORDEMENT DES FILS DES ENCEINTES ACOUSTIQUES
Raccordez les fils avec les lignes blanches imprimées aux bornes rouges (+) et les fils noirs
unis aux bornes noires (-).
REMARQUE: Le raccordement d’enceintes acoustiques autres que celles fournies
avec l’appareil, peut endommager l’appareil.
Branchement du cordon d'alimentation
1 . Vérifiez si les enceintes et tous les éléments sont raccordés correctement.
2 . Vérifiez si la tension indiquée pour votre appareil correspond à votre tension locale.
Mise en garde
Pour éviter un choc électrique, f aites correspondre la broche large de la fiche avec la f ente large de la prise, et insérez la fiche
à fond.
Mise en garde
• Assurez-vous de débrancher le cordon d'alimentation CA et de mettre toutes les fonctions hors circuit avant d'effectuer
les raccordements.
• Si vousn'allez pas utiliser l'appareil pendant une longue période de temps, débranchez le cordon d'alimentation CA.
Raccordement des enceintes acoustiques
Raccordez les fils des enceintes principales aux bornes pour enceintes sur l'amplificateur.
REMARQUE: Dans chaque cas, raccordez le fil rayé (+) à la borne + de sortie de l'enceinte et le fil non rayé (-) à la borne-
de sortie de l'enceinte. V eillez aussi à respecter la bonne orientation pour les enceintes principales à gauche et à droite.
RACCORDEMENT À UN APP AREIL A UXILIAIRE, EN OPTION
Pour écouter ou enregistrer des signaux audio prov enant d’appareils auxiliaires, raccordés à cet appareil:
Connectez la fiche rouge à la prise R et la fiche blanche à la fiche L aux bornes «AUX IN»
UTILISA TION DE L’APPAREIL A UXILIAIRE
1. Pressez le sélecteur de FONCTION jusqu’à AUX.
2. Effectuez la lecture provenant de la source extérieure.
Remarque: Si la source extérieure est un téléviseur et si cette chaîne audio en est proche, il peut se produire des
interférences, si le syntonisateur est en marche en même temps que le téléviseur.
POUR LE CANADA ET LES ÉT ATS-UNIS:
• Pour éviter tout choc électrique, faites correspondre la broche large de la fiche av ec la fente large de la prise et insérez la
fiche à fond.
• Débranchez le cordon d’alimentation CA et mettez toutes les fonctions hors service avant d’effectuer tout raccordement.
MISE EN MARCHE DE L ’APPAREIL
Pressez la touche POWER (alimentation). L’affichage s’allume. Choisissez la fonction désirée et le v oy ant de la fonction
choisie s’allume.
APRÈS L ’UTILISA TION
Pressez la touche POWER pour passer au mode STANDBY (disponibilité). L’éclairage de l’affichage disparaît et seul
l’affichage de l’horloge reste visible.
- F3 -
Page 25

IDENTIFICATION DES PIÈCES
1
2
3
4
5
6
7
8
9
10
11
12
13
15
16
17
18
19
20
21
22
23
24
14
1) PORTE DU LECTEUR DE CD
2) INDICATEUR "stéréo étendue"
3) INDICATEUR "coupure du son"
4) BOUTON "coupure du son"
5) BOUTON "POWER"
6) BOUTONS "contrôle volume"
7) BOUTONS "présélection+/-et réglage horloge"
8) CAPTEUR POUR TELECOMMANDE
9) PRISE CASQUE
10 ) SELECTEUR DE MODE
(interrupteur, interférences, FM, copie)
11) SELECTEUR DE FONCTIONS
(syntonisateur, cassette, CD)
12) BOUTON "X-BASS"
13) PLATINE CASSETTE (A)
14) COMMANDES MAGNETOCASSETTE (A)
touche d'enregistrement
touche de lecture
touche de rembobinage
touche d'avance rapide
touche d'arrêt/éjection
touche pause
25
15) FENETRE D'AFFICHAGE
16) BOUTON (mémoire horloge/ fonction réveil/
fonction sommeil)
17 ) Bouton "contrôle CD (STOP)
18 ) BOUTON "programmation CD"
(MEMORISATION, REPETITION, SAUT)
19) BOUTON "contrôle CD"
(PLA Y, PAUSE)
20) BOUTON "ouverture/fermeture compartiment
CD"
21 ) BOUTON "sélection de disque"
22 ) SELECTEUR DE BANDE
23) BOUTON "STÉRÉO ÉTENDUE"
24) PLATINE CASSETTE (B)
25) COMMANDES MAGNETOCASSETTE (B)
touche de lecture
touche de rembobinage
touche d'avance rapide
touche d'arrêt/éjection
touche pause
- F4 -
Page 26

AFFICHAGE
1. Indicateurs de PLAGE et de CANAL.
2. Indicateurs de FONCTION.
3. Indicateur D’ARRÊT DIFFÉRÉ (SLEEP).
4. Indicateur de MINUTERIE (TIMER).
5. Indicateurs EN/HORS CIRCUIT (ON/OFF).
6. Indicateurs AM/PM
7. Indicateur X-Bass (amplification des graves)
8. Indicateurs de bandes (FM/AM(MW)).
9. Voy ant de lecture.
10.Vo yant de pause.
11.Indicateur de MÉMOIRE (MEMORY).
12.Indicateur de LECTURE ALÉA TOIRE (RANDOM).
13.Indicateurs montrant sur quel(s) porte-disque(s) se
trouvent des DC. Si un porte-disque est vide, l’indicateur
du numéro correspondant est éteint.
14.Indicateur stéréo.
15.Indicateurs de LECTURE RÉPÉTÉE.
16. Affichage HORLOGE/DURÉE DE DC/STATION
DIFFUSÉE.
17.Numéro de plage.
VO YANT D’ALIMENTA TION
Si le cordon CA est branché et si l’appareil est en mode Stand-by (disponibilité) du courant est consommé; seul l’affichage de
l’horloge est allumé.
• Pressez la touche POWER/STANDBY pour mettre l’appareil Au bout d’une courte durée, l’affichage montre:
en marche.
STANDBY
POWER
• Pressez le sélecteur de FONCTION jusqu’à TAPE Au bout d’une courte durée, l’affichage montre:
(magnétocassette)
FUNCTION
• Pressez le sélecteur de FONCTION jusqu’à DC (changeur Au bout d’une courte durée, l’affichage montre:
de DC)
FUNCTION
• Pressez le sélecteur de FONCTION jusqu’à AUX Il faut une courte durée pour remanier les plages,
FUNCTION
puis l'affichage montre:
• Après avoir utilisé l’appareil, pressez la touche POWER et l’affichage s’éteint.
• Les numéros affichés correspondent à la durée, la fréquence choisie ou au DC. Les numéros de DC ne sont affichés que
s’il s’agit d’un disque compact.
- F5 -
Page 27

RÉGLAGE DU SON
RÉGLAGE DU V OLUME
Pressez les touches de VOLUME CROISSANT/
DÉCROISSANT pour régler le son.
Pour
MUTE
augmenter le
volume,
pressez ici.
.
Pour diminuer
le volume,
pressez ici.
EFFET STÉRÉO ÉTENDUE
AMPLIFICA TION DES GRA VES X-BASS
Pressez la touche X-BASS pour régler les graves.
L’affichage indique:
La fonction X-BASS augmente les fréquences basses pour
amplifier les graves.
MUTE
EFFET STÉRÉO ÉTENDUE
Le commutateur STEREO WIDE a pour fonction de créer l'illusion d'une plus grande diffusion du son stéréo, au-delà de la
projection normale des enceintes créant ainsi une meilleure ambiance stéréo. En écoute stéréophonique, régler le commutateur
STEREO WIDE à la position ON pour obtenir une sonorité plus dynamique.
ÉCOUTE PRIVÉE
Pour l'écoute personnelle, br ancher un casque d'écoute
(minifiche stéréo de 3,5 mm) sur la prise PHONES.
Régler le volume au niveau désiré et régler les
commutateurs X-BASS et STEREO WIDE selon les
PENDANT L'ENREGISTREMENT
Les réglages du V OLUME et des commutateurs X-BASS
et STEREO WIDE n'ont aucun effet sur le signal
enregistré.
préférences. Lorsque le casque d'écoute est branché sur
la prise, les enceintes sont automatiquement mises hors
circuit
- F6 -
Page 28

RÉGLAGE DE L’HORLOGE
Réglage de l’heure en cours (choisissez le mode Power/Standby)
1.Pressez la touche MEMORY / CLOCK en
mode pour régler l’heure. Les heures
clignotent.
MEMORY
CLOCK
TIMER
3.Pressez la touche MEMORY /
CLOCK pour
que les minutes clignotent.
MEMORY
CLOCK
TIMER
Réglage de la minuterie (déclenchement)
1 . Pressez la touche POWER/ST ANDBY pour mettre
l’appareil en marche.
STANDBY
POWER
2 .Pressez le réglage PRESET
croissant/décroissant de
façon répétée jusqu’à ce que
l’heure en cours apparaisse.
SKIP
HOUR
SKIP
MIN
PRESET
4.Pressez le réglage PRESET croissant/décroissant pour régler
les minutes et pressez la touche MEMORY /
CLCOK pour
mettre l’horloge en mode de marche.
PRESET
SKIP
HOUR
SKIP
MIN
2. Pressez la touche d’arrêt
AND
jusqu’à ce que l’indicateur «TIMER
MEMORY
CLOCK
TIMER
ON» apparaisse sur l’affichage.
P
L
A
Y
P
O
T
S
/
P
A
U
S
E
3 . Pressez la touche MEMORY /
pour régler l’heure.
répétez les étapes pour le
réglage de l’heure en cours
CLOCK en mode
4 . Pressez la touche POWER/ST ANDBY pour mettre l’appareil hors
circuit.
STANDBY
POWER
Mise hors circuit de la minuterie (arrêt à l’heure préréglée)
1 . Pressez la touche POWER/ST ANDBY pour mettre
l’appareil en marche.
STANDBY
POWER
3 . Pressez la touche MEMORY /
CLOCK en mode
pour régler l’heure.
répétez les étapes pour le
réglage de l’heure en cours
2. Pressez la touche d’arrêt
jusqu’à ce que l’indicateur «TIMER
OFF» apparaisse sur l’affichage.
P
L
A
Y
P
O
T
S
/
P
A
U
S
E
4 . Pressez la touche POWER/ST ANDBY pour mettre l'appareil hors
circuit.
STANDBY
POWER
REMARQUE:
1. Pressez la touche d’arrêt
pour voir l’heure, l’heure de mise en marche puis l’heure de mise hors circuit, une à une;
l’affichage précécent réapparait au bout de 8 secondes.
2. La minuterie fonctionne si vous pressez la touche de minuterie pour que l’indicateur «TIMER» s’allume sur l’affichage.
Annulez le réglage de la minuterie en pressant la touche pour que l’indicateur «TIMER» disparaisse.
- F7 -
Page 29

RÉGLAGE DE L’ARRÊT DIFFÉRÉ
1. Pressez la touche SLEEP (arrêt différé) pendant que
l’appareil est en circuit. «SLEEP 90» s’allume sur l’affichage.
REMARQUE:
L’arrêt différé ne fonctionne que sur les modes TUNER
(syntonisateur), TAPE (magnétocassette) et AUX.
STANDBY
POWER
2. Pressez et maintenez enfoncée la touche SLEEP
pour choisir la durée de temps restant avant la
mise hors circuit de l’appareil. L’affichage change
comme suit:
SLEEP 90 SLEEP 80
SLEEP 10 ........SLEEP 20
La minuterie d’arrêt différé est réglée et l’indicateur
SLEEP s’allume sur l’affichage. Relâchez la touche
lorsque la durée avant l’arrêt différé (en minutes) est
affichée.
Pour annuler l’arrêt différé, pressez la touche SLEEP
une fois et l’indicateur SLEEP disparaît de l’affichage.
- F8 -
Page 30

AMÉLIORATION DE LA RÉCEPTION
FM
MW/AM
Raccordez l’antenne cadre (fournie) aux bornes
Déployez complètement l’antenne filaire et placez-la dans
la position qui procure la meilleure réception.
enfichables «MW/AM LOOP ANTENNA» à l’arrière de
l’appareil.
SYNTONISATION MANUELLE D’UNE STATION
1.Pressez le sélecteur de FONCTION
jusqu’à TUNER (syntonisateur).
FUNCTION
POUR CHERCHER UNE ST A TION RAPIDEMENT
Maintenez enfoncée la touche TUNING (syntonisation) croissante ou décroissante pour commencer à chercher
automatiquement une station. Quand une station est trouvée, la recherche cesse automatiquement.
Cependant, l’appareil peut ne pas s’arrêter sur une station dont le signal est faible. Dans ce cas, il faut chercher la station
manuellement.
2.Pressez la touche BAND pour
choisir la bande désirée.
3. Syntonisez la station désirée.
I
G
N
N
U
T
U
N
W
O
D
M
O
D
N
A
R
P
O
T
S
D
I
S
C
S
K
P
R
E
P
E
A
T
P
L
A
Y
/
P
A
U
S
E
I
P
PRÉRÉGLAGE DE STATIONS
Syntonisez une station mise en mémoire en pressant le numéro préréglé.
V ous pouvez prérégler 20 stations FM, et 20 stations AM(MW).
1.Pressez le sélecteur de FONCTION
jusqu’à TUNER (syntonisation).
FUNCTION
4. Pressez la touche MEMORY /
CLOCK.
MEMORY
CLOCK
TIMER
2. Choisissez une bande. 3. Syntonisez une station
5. Pressez l’une des touches de
préréglage - PRESET + pour
prérégler le numéro.
PRESET
SKIP
HOUR
SKIP
MIN
I
G
N
N
U
T
U
N
P
W
O
D
M
O
D
N
A
R
P
O
T
S
D
I
S
C
S
K
R
E
P
E
A
T
P
L
A
Y
/
P
A
U
S
E
I
P
6. Pressez la touche MEMORY /
CLOCK.
MEMORY
CLOCK
TIMER
Répétez les étapes 2 à 6.
- F9 -
Page 31

SYNTONISATION D’UNE STATION PRÉRÉGLÉE
1.Pressez le sélecteur de FONCTION
2. Choisissez une bande.
jusqu’à TUNER (syntonisation).
FUNCTION
RÉCEPTION D’UNE ÉMISSION FM STÉRÉO
Réglez le sélecteur de mode à FM STEREO.
Lorsque l’émission FM stéréo est captée, l’indicateur FM
STEREO
s’allume.
3.Pressez les touches de préréglage
(PRESET) jusqu’au numéro de station préréglé.
PRESET
SKIP
HOUR
SKIP
MIN
SI LE SIGNAL DE L’ÉMISSION FM STÉRÉO EST
FAIBLE
Réglez le sélecteur de mode à FM MONO.
Le bruit de fond sera réduit mais le signal reproduit sera
mono.
- F10 -
Page 32

LECTURE D’UN DISQUE COMPACT
1.Pressez le sélecteur de FONCTION jusqu’à DC. 2.Pressez la touche OPEN/CLOSE pour ouvrir le tiroir du
DC.
I
G
N
N
U
FUNCTION
T
U
N
W
O
D
M
O
D
N
A
R
P
O
T
S
D
I
S
C
S
P
R
E
P
E
A
T
P
L
A
Y
/
P
A
U
S
E
K
I
P
3 . Placez le premier disque sur le porte-disque, l'étiquette
vers le haut.
4.Pressez la touche DISC SELECT pour faire tourner le
plateau dans le sens horaire.
Placez l’autre (ou les autres disques) sur le(s)
plateau(s).
I
G
N
N
U
T
U
N
P
W
O
D
M
O
D
N
A
R
P
O
T
S
D
I
S
C
S
K
R
E
P
E
A
T
P
L
A
Y
/
P
A
U
S
E
I
P
5. Pressez la touche OPEN/CLOSE pour fermer le tiroir.
Le changeur prend quelques secondes pour vérifier les disques.
I
G
N
N
U
T
U
N
W
O
D
M
O
D
N
A
R
P
O
T
S
D
I
S
C
S
K
P
R
E
P
E
A
T
P
L
A
Y
/
P
A
U
S
E
I
P
6.Pressez la touche DISC SKIP pour choisir le disque désiré. Pressez l’une ou l’autre des touches
choisir la plage désirée.
Le symbole du disque choisi clignote.
R
P
O
T
S
I
G
N
N
U
T
U
N
P
W
O
D
M
O
D
N
A
D
I
S
C
S
K
R
E
P
E
A
T
P
L
A
Y
/
P
A
U
S
E
I
P
SKIP
HOUR
SKIP
MIN
PRESET
/ (SAUT) pour
7.Pressez la touche
mencer la lecture.
LECTURE/PAUSE pour com-
I
G
N
N
U
T
U
N
P
W
O
D
M
O
D
N
A
R
P
O
T
S
D
I
S
C
S
K
R
E
P
E
A
T
P
L
A
Y
/
P
A
U
S
E
I
P
8. Pour cesser la lecture:
(a) pressez la touche
affiché. Pressez de nouveau la touche pour reprendre
la lecture.
(b) Pressez la touche d’arrêt
- F11 -
LECTURE/PAUSE et « » est
.
Page 33

LECTURE D’UN DISQUE COMPACT (SUITE)
Remarques: 1. Durant la lecture, vous pouvez ouvrir le tiroir pour changer ou ajouter un disque , mais la touche DISC
SELECT n’est plus fonctionnelle; cependant, la lecture du disque en cours ne sera pas interrompue.
2. Les touches de saut
/ ne servent qu’à choisir une plage sur le disque en cours. Pour choisir une
plage d’un autre disque, il faut presser la touche DISC SELECT pour aller d’abord au disque désiré.
COMMENT REPÉRER UN ENDROIT PRÉCIS SUR UNE PLAGE
Pour repérer une plage en séquence
• Pour trouver le début de la plage en cours ou de la plage
précédente, pressez la touche de saut en arrière
.
• Pour trouver le début de la plage suivante, presser la
touche de saut en avant
.
• Il faut une courte durée de temps pour obtenir les
renseignements de la plage désirée avant le
commencement de la lecture.
Pour repérer un endroit précis sur une plage
• Pour saut en avant à vitesse élevée , maintenez la touche
de recherche en avant
pressée et relâchez-la à l’endroit
désiré.
• Pour saut en arrière à vitesse élevée, maintenez la touche
de recherche en arrière
pressée et relâchez-la à
l’endroit désiré.
• En mode de saut en avant rapide, une plage est balayée
rapidement, puis la suivante et ainsi de suite jusqu’au
disque suivant. La lecture de la première plage du disque
suivant s’effectue normalement, donc, pour continuer le
balayage, relâchez et pressez la touche de recherche.
Saut en
arrière
SKIP
HOUR
PRESET
Saut en
avant
Recherche
en arrière
SKIP
HOUR
Recherche
en avant
PRESET
SKIP
MIN
Pressez la touche une fois
SKIP
MIN
Maintenez la touche pressée
Remarque: Recherche et saut peuvent s’effectuer durant la lecture ou la pause mais ces deux fonctions ne s’appliquent
qu’au disque choisi en cours.
Utilisez la touche DISC SELECT pour choisir un autre disque.
- F12 -
Page 34

LECTURE D’UN DISQUE COMPACT (SUITE)
LECTURE ALÉA TOIRE - LECTURE AU HASARD
EN MODE D’ARRÊT
1. Pressez la touche DISC SELECT pour choisir un disque.
I
G
N
N
U
T
U
N
P
W
R
O
D
M
O
D
N
A
R
P
O
T
S
D
I
S
C
E
P
E
A
T
P
L
A
Y
/
P
A
U
S
E
S
K
I
P
2 . Pressez la touche RANDOM, le mot «RANDOM» parait
sur l’affichage.
I
G
N
N
U
T
U
N
W
O
D
M
O
D
N
A
R
P
O
T
S
D
I
S
C
S
K
P
R
E
P
E
A
T
P
L
A
Y
/
P
A
U
S
E
I
P
3.Pressez la touche LECTURE/P AUSE. Des symboles anormaux apparaissent sur l’affichage et il faut une courte durée de
temps pour remanier les plages, avant le commencement de la lecture.
I
G
N
N
U
T
U
N
W
O
D
M
O
D
N
A
R
P
O
T
S
D
I
S
C
S
P
R
E
P
E
A
T
P
L
A
Y
/
P
A
U
S
E
K
I
P
TRACK
RANDOM
Remarques: 1. La fonction de lecture aléatoire remanie toutes les plages (48 plages maximum) des disques dans le tiroir
et choisit la lecture de chaque plage au hasard.
2. Le lecteur change à une nouvelle plage choisie au hasard et en commence la lecture si la touche de saut
est pressée durant le mode de lecture aléatoire
EN MODE DE LECTURE
Durant la lecture normale, il est impossible de passer au mode de lecture aléatoire. Cette fonction ne se met en marche qu’à
partir du mode d’arrêt.
ANNULA TION DE LA LECTURE ALÉA T OIRE
1 . Pressez la touche d’arrêt pour cesser la lecture aléatoire.
2. Pressez la touche RANDOM pour mettre la lecture
aléatoire hors fonction.
I
G
N
N
U
T
U
N
P
W
O
D
M
O
D
N
A
R
P
O
T
S
D
I
S
C
S
K
R
E
P
E
A
T
P
L
A
Y
/
P
A
U
S
E
I
P
N
A
R
P
O
T
S
I
G
N
N
U
T
U
N
W
O
D
M
O
D
D
I
S
C
S
K
P
R
E
P
E
A
T
P
L
A
Y
/
P
A
U
S
E
I
P
Remarques:
Durant la lecture aléatoire, vous ne pouvez pas annuler la fonction de lecture aléatoire; ceci ne s’effectue qu’en mode
d’arrêt.
- F13 -
Page 35

LECTURE D’UN DISQUE COMPACT (SUITE)
LECTURE RÉPÉTÉE
EN MODE DE LECTURE
Répétition de la plage en cours
• Pressez la touche REPEAT jusqu’à ce que «REPEAT ONE»
I
G
N
N
U
T
U
P
N
W
R
O
D
M
O
D
N
A
R
P
O
T
S
D
I
S
C
S
K
W
O
D
M
O
D
N
A
R
P
O
T
S
D
I
S
C
S
K
N
W
O
D
M
O
D
N
A
R
P
O
T
S
D
I
S
C
S
K
E
P
E
A
T
P
L
A
Y
/
P
A
U
S
E
I
P
I
G
N
N
U
T
U
N
P
R
E
P
E
A
T
P
L
A
Y
/
P
A
U
S
E
I
P
I
G
N
N
U
T
U
P
R
E
P
E
A
T
P
L
A
Y
/
P
A
U
S
E
I
P
apparaisse sur l’affichage; la lecture de la plage en cours sera
répétée de façon continue jusqu’à ce que vous pressiez la
touche d’arrêt.
• Vous pouvez utiliser les fonctions de SAUT et RECHERCHE
durant la répétition de lecture. La touche de saut permet de
passer au début de la plage suivante, la touche de saut en
arrière permet de retourner au début de la plage en cours; en
pressant la touche de saut une deuxième fois, vous passez
au début de la plage précédente. La touche de recherche
permet de faire une recherche normale des plages.
Répétition de tout le disque ou des plages programmées
• Pressez la touche REPEA T jusqu’à ce que «REPEAT ONE
DISC» apparaisse sur l’affichage et la lecture du disque ou
du programme en cours sera répétée de façon continue à
partir de l’endroit de lecture en cours.
• Pressez les touches de RECHERCHE
/ durant le mode de lecture répétée d’un disque pour faire
une recherche de tout le disque ou de tout le programme;
le lecteur de DC commencera la lecture à partir de l’endroit
choisi.
Répétition de tous les disques
• Pressez la touche REPEAT jusqu’à ce que «REPEAT ALL
DISC» apparaisse sur l’affichage.
• Pressez les touches de RECHERCHE
pour que la lecture commence à partir du nouvel endroit
choisi sur le disque en cours.
• Pressez la touche DISC SKIP pour commencer la lecture à
partir de la première plage du nouveau disque choisi. Les
touches de RECHERCHE
s’utiliser pour choisir une plage en particulier du disque
choisi et le lecteur de DC commencera la lecture à partir de
cet endroit.
/ et de SAUT
/ et de SAUT /
/ et de SAUT / peuvent
I
G
N
N
U
T
U
P
N
W
R
O
D
M
O
D
N
A
R
P
O
T
S
D
I
S
C
S
E
P
E
A
T
P
L
A
Y
/
P
A
U
S
E
K
I
P
EN MODE D’ARRÊT
Les fonctions de RÉPÉTITION s’effectuent aussi en mode
d’arrêt. Le lecteur commencera la lecture de la plage 1 du
disque choisi en cours après avoir pressé la touche
LECTURE/PAUSE.
P
O
T
S
I
G
N
N
U
T
U
N
P
W
O
D
M
O
D
N
A
R
D
I
S
C
S
K
R
E
P
E
A
T
P
L
A
Y
/
P
A
U
S
E
I
P
Annulation de la lecture répétée
• Pressez la touche REPEAT jusqu’à ce que le mot «REPEAT»
disparaisse de l’affichage.
EN MODE DE PAUSE
Les fonctions de RÉPÉTITION s’effectuent aussi en mode
de pause. Le lecteur reprendra la lecture après avoir pressé
la touche
LECTURE/P A USE.
N
W
O
D
M
O
D
N
A
R
P
O
T
S
D
I
S
C
S
K
I
P
I
G
N
N
U
T
U
P
R
E
P
E
A
T
P
L
A
Y
/
P
A
U
S
E
- F14 -
Page 36

LECTURE PROGRAMMÉE DE DC
V ous pouvez programmer jusqu’à 32 plages de tous les disques dans le tiroir pour en eff ectuer la lecture dans l’ordre désiré.
1. Pressez la touche MEMORY /
CLOCK (en mode
d’arrêt).
MEMORY
MEMORY
CLOCK
CLOCK
TIMER
TIMER
MEMORY
TRACK
3 . Pressez les touches de SAUT / pour choisir la plage
désirée.
PRESET
SKIP
HOUR
SKIP
MIN
TRACK
MEMORY
2 . Pressez la touche DISC SELECT pour choisir le disque
désiré (le symbole de disque se déplace).
I
G
N
N
U
T
U
N
P
W
R
O
D
M
O
D
N
A
R
P
O
T
S
D
I
S
C
S
E
P
E
A
T
P
L
A
Y
/
P
A
U
S
E
K
I
P
MEMORY
TRACK
4. Pressez de nouveau la touche MEMORY /
CLOCK
pour enregistrer cette plage dans la mémoire.
MEMORY
MEMORY
CLOCK
CLOCK
TIMER
TIMER
TRACK
MEMORY
5 . Pour ajouter des plages supplémentaires ,
Répétez les étapes 2 à 4.
6.Pour commencer la lecture, pressez la touche de LECTURE/PAUSE
.
I
N
N
U
T
N
W
O
D
M
O
D
N
A
R
P
O
T
S
D
I
S
C
S
K
I
P
REMARQUE: 1. La même plage peut être choisie plus d’une fois pour le même programme.
2. Lorsque le programme est en marche, les touches de saut
/ ne fonctionnent que pour les plages
choisies.
3. Lorsque le programme est en marche, il n’est pas possible d’effectuer la lecture répétée pour TOUS
LES DISQUES.
VÉRIFICA TION DE LA PR OGRAMMATION
Après avoir établi la programmation, pressez la touche MEMO RY /
CLOCK de f açon répétée pour vérifier l’ordre des
plages programmées. Ceci n’est pas possible en cours de lecture d’un disque.
- F15 -
G
U
P
R
E
P
E
A
T
P
L
A
Y
/
P
A
U
S
E
Page 37

ARRÊT ET ANNULATION DE LA LECTURE PROGRAMMÉE
Arrêt momentané de la lecture programmée:
• Pressez la touche de LECTURE/PAUSE
et « » apparaît sur l’affichage.
Pour reprendre la lecture, pressez de nouveau .
I
G
N
N
U
T
U
N
P
W
O
D
M
O
D
N
A
R
P
O
T
S
D
I
S
C
S
K
R
E
P
E
A
T
P
L
A
Y
/
P
A
U
S
E
I
P
Pour ajouter d’autres plages durant la lecture programmée:
• Pressez la touche D’ARRÊT
une fois, pressez la touche MEMOR Y / CLOCK jusqu’à ce que l’indication de la plage soit
|-- |, puis répétez les étapes 2 à 4 (voyez page F-16).
I
G
N
N
U
T
U
N
P
W
O
D
M
O
D
N
A
R
P
O
T
S
D
I
S
C
S
K
R
E
P
E
A
T
P
L
A
Y
/
P
A
U
S
E
I
P
Annulation de tout le programme:
• Pressez la touche D’ARRÊT
jusqu’à ce que le
mot «MEMORY» disparaisse de l’affichage.
L’affichage indique alors le renseignement sur le
I
G
N
N
U
disque en cours.
T
U
N
P
W
O
D
M
O
D
N
A
R
P
O
T
S
R
E
P
E
A
T
P
L
A
Y
/
P
A
U
S
E
Aussi
Pressez le sélecteur de FONCTION pour choisir une
autre fonction.
FUNCTION
D
I
S
C
S
K
I
ou
P
Ouvrez le tiroir des disques en pressant la touche
OPEN/CLOSE.
R
P
O
T
S
I
G
N
N
U
T
U
N
W
O
D
M
O
D
N
A
D
I
S
C
S
K
P
R
E
P
E
A
T
P
L
A
Y
/
P
A
U
S
E
I
P
- F16 -
Page 38

LECTURE D’UNE CASSETTE
Bandes utilisables - utilisez seulement des cassettes normales (type I) pour la lecture.
Les platines A et B effectuent la lecture du côté de la bande qui vous fait face.
1.Pressez le sélecteur de FONCTION
jusqu’à T APE.
FUNCTION
ARRÊT DE LA LECTURE
Pressez la touche STOP/EJECT.
INTERRUPTION DE LA LECTURE
Pressez la touche de PAUSE.
Pour reprendre la lecture, pressez de nouv eau la touche
de PAUSE.
ENROULEMENT RAPIDE
Pressez la touche REWIND (rembobinage) ou F.FWD
(avance rapide). Pressez la touche STOP/EJECT pour
cesser l’enroulement à l’endroit désiré.
2. Pressez la touche STOP/EJECT (arrêt/
éjection) et chargez une cassette dans
le compartiment de cassette de la platine
A ou B.
Platine A
EN FIN DE BANDE
En mode d’enroulement rapide ou de lecture normale, la
cassette s’arrête automatiquement en fin de bande.
LORSQUE LES DEUX PLA TINES A ET B SONT EN MODE
DE LECTURE
La lecture de la platine B commence et aucun son ne provient
de la platine A.
Platine B
3. Pressez la touche de LECTURE
pour commencer la lecture.
LECTURE CONSÉCUTIVE ---- DE LA PLATINE B À LA PLATINE A
1. Pressez le sélecteur de FONCTION jusqu’à TAPE. 2. Introduisez une cassette dans chaque platine.
Platine A
FUNCTION
3. Pressez la touche de LECTURE. 4. Pressez la touche de PAUSE.
• Dès que la cassette dans la platine B arrive en fin de bande et s’arrête, le mode de pause pour la platine A est dégagé
et la lecture commence automatiquement.
La lecture
se fait en
second
5. Pressez la touche de LECTURE.
Platine B
La lecture
se fait en
premier
- F17 -
Page 39

CONSEILS D’ENTRETIEN DES CASSETTES
nt
Pour éviter l’effacement accidentel
1. Les cassettes ont deux languettes de protection contre
l’effacement, une pour chaque côté. Pour protéger un
enregistrement d’un effacement accidentel, retirez l’une ou
les deux languettes de protection de la cassette avec
un tournevis.
2. P our effectuer un enregistrement sur une cassette dont
les languettes ont été cassées,
il suffit de fixer du ruban adhésif
solide sur l’ouverture laissée
par la languette cassée.
Remarques:
1)Ne couvrez que l’orifice où se
trouvait la languette de protection contre l’effacement.
2)Le fait de retirer les languettes de protection n’empêche
pas l’effacement par un démagnétiseur de têtes.
COPIE ---- DE LA PLATINE B À LA PLATINE A
Utilisez seulement des cassettes normales (type I) pour l’enregistrement et la lecture.
1. Pressez le sélecteur de FONCTION
jusqu’à T APE.
FUNCTION
4.Pressez la touche de P A USE. 5 . Pressez la touche
2.Introduisez une cassette
enregistrée dans la platine B et une
cassette vierge dans la platine A..
Platine A
D’ENREGISTREMENT qui déclenche
aussi la touche de LECTURE.
Platine B
3.Réglez le sélecteur de MODE à la
vitesse de copie désirée: NORMAL
ou HIGH (ÉLEVÉE)
FM ST EREO FM MO NO
6. Pressez la touche de LECTURE.
DUBBING
BEAT CUT
POUR CESSER LA COPIE
Pressez les touches STOP/EJECT des platines A et B.
REMARQUE:
Ne changez pas la vitesse de copie en cours de copie.
ENREGISTREMENT ---- PLATINE A SEULEMENT
Utilisez seulement des cassettes normales (type I) pour l’enregistrement.
ENREGISTREMENT PROVENANT DU SYNT ONISATEUR INTÉGRÉ
1. Pressez le sélecteur de
FONCTION jusqu’à TUNER et
syntonisez la station désirée
(voyez p.F-10)
3.Pressez la touche
D’ENREGISTREMENT qui
déclenche aussi la touche de
LECTURE.
• Si un sifflement (interférences) se fait entendre, une diminution est possible en réglant l’interrupteur interférences à
l’autre position.
FUNCTION
2. Introduisez une cassette dans le compartiment de cassette.
Le côté sur
lequel vous
désirez faire
l’enregistreme
Platine A
- F18 -
Page 40

ENTRETIEN
Platine A Platine B
GUIDE DE DÉPANNAGE
NETTO YAGE DES DC
Si un DC produit des sons hachés ou si la lecture n’est pas
possible, il faut peut-être nettoyer le DC. Avant d’en effectuer la
lecture, essuyez le disque en allant du centre vers le bord avec
un chiffon. Après son utilisation, rangez le disque dans son étui.
NETTO YAGE DES TÊTES DU MAGNÉTOCASSETTE
Pour conserver une qualité sonore optimale, nettoyez les têtes
de lecture/d’enregistrement
(a), la tête d’effacement (b), les galets de pression (c), et les
cabestans (d) à intervalles réguliers (après environ 10 heures
d’utilisation). Utilisez un coton-tige légèrement humecté avec un
liquide de nettoyage ou de l’alcool dénaturé.
NETTO YAGE DE L’APP AREIL
N’utilisez pas de produits chimiques volatils sur cet appareil.
Nettoyez-le en frottant légèrement avec un chiffon doux.
REMARQUE IMPORT ANTE:
Avant de transporter l'appareil, retirez tous les disques du tiroir
du changeur de DC.
SYMPTÔME
D'ORDRE GÉNÉRAL
Pas de son.
Pas de son d’un des canaux ou déséquilibre du volume
gauche et droit.
Son gauche et droit inversé.
Manque de sons graves ou impression d’emplacements
imprécis des instruments musicaux.
Bourdonnement ou bruit très gênants.
RÉCEPTION DE LA RADIO
L’indicateur FM STEREO clignote.
Bourdonnement ou bruit très gênants.
L’émission FM stéréo n’est pas reçue en stéréo.
FONCTIONNEMENT DU CHANGEUR DE DC
Le tiroir du changeur de DC ne se ferme pas car l’appareil
est hors circuit ou d’autres fonctions ont été choisies avant
de le fermer.
La lecture ne commence pas.
Lecture déformée ou perte de son durant la lecture d’un DC.
FONCTIONNEMENT DU MAGNÉTOCASSETTE
Impossible d’effectuer un enregistrement.
Enregistrement ou lecture sont impossibles ou diminution
du niveau sonore
CAUSE (ET SOLUTION)
• Presser la touche de volume CROISSANT.
• Le casque d’écoute est branché. Le débrancher.
• Si aucune enceinte ne reproduit de son, il est possible que
la fonction de coupure du son ait été mise en service. Pour
la mettre hors service, pressez la touche de coupure du son
(MUTE) sur la télécommande ou remettez l'appareil en
service en pressant la touche POWER/STANDBY.
• Si la lecture s'arrête subitement, c'est que la fonction d'arrêt
différé est mise en service. Pressez la touche ST OP jusqu'à
ce que l'indicateur TIMER OFF (arrêt différé hors service)
apparaisse sur l'affichage.
• Vérifier les connexions d’enceinte du canal inopérant.
• Vérifier la connexion du fil des enceintes et l’emplacement
des enceintes.
• Vérifier si les toutes les enceintes sont connectées
correctement.
• Téléviseur ou magnétoscope trop près de la chaîne stéréo;
l’éloigner du téléviseur ou du magnétoscope.
• Ajuster l’antenne filaire.
• Régler le sélecteur de MODE à FM MONO, l'indicateur FM
STEREO s’éteindra.
• Presser le sélecteur de FONCTION jusqu’à DC et presser
la touche DISC SKIP. Le tiroir se fermera.
• Les disques ne sont pas placés correctement.
• Le disque est sale.
• Le disque est placé à l’envers.
• Le changeur est en mode de pause.
• Condensation d’humidité.
• Le DC est sale ou égratigné.
• Pas de cassette dans le compartiment.
• La languette est retirée de la cassette.
• La cassette est en fin de bande.
• Les têtes sont sales.
• Accumulation magnétique sur la tête d’enregistrement/
lecture
• Contamination des cabestans ou des galets de pression.
- F19 -
-F20-
Page 41

FICHE TECHNIQUE
SYNTONISATEUR
Gamme de fréquence FM 87,5 - 108 MHz
Antenne FM: antenne à queue de cochon
AMPLIFICA TEUR
Déformation intermédiaire 10% à 1 kHz
Puissance Avant : 10W x 2 (10% THD)
Réponse de fréquences 80 Hz à 16 kHz, ±3dB
Consommation de courant 85 W
Exigences d’alimentation AC ~ 100V 50 Hz [Japan]
CHANGEUR DE DISQUE COMP A CT
Canaux 2 canaux
Rapport S/B 60 dB
Pleurage et scintillement Non détectable
Fréquence d’échantillonnage 44,1 kHz
Quantification Linéaire/can 1 bit
Source de lumière du faisceau Semi-conducteur au laser
Longueur d’onde du faisceau 790 nm
MAGNÉT OCASSETTE
Format de piste 4 pistes, 2 canaux
Réponse de fréquences Cassette normale: 80 - 10 000 Hz
Rapport signal/bruit 40 dB (cassette normale)
Pleurage et scintillement 0,35% (watts efficaces)
Vitesse de la bande 4,8 cm/sec
Durée, rembobinage 120 sec (C-60)
Durée, avance rapide 120 sec (C-60)
Système d’enregistrement Polarisation CA
Système d’effacement Magnétique CA
Moteur Moteur CC x 1
Têtes Tête d’enregistrement/lecture x 1 (platine A)
MW 531 - 1602 kHz
AM 530 - 1710 kHz
MW/AM: MW/AM antenne à boucle
AC ~ 110/120V - 220/240V 50/60Hz [other countries]
AC ~ 120V 60Hz [USA and Canada]
AC ~ 220V 50Hz [Hong Kong and China]
AC ~ 230/240V 50Hz [Europe]
AC ~ 240V 50Hz [Australia]
Tête d’effacement x 1 (platine A)
Tête de lecture x 1 (platine B)
ENCEINTES ACOUSTIQUES
Dimensions (L x P x H) (230 mm x 283mm x 313 mm) x 2
Poids 3.18 kg x 2
ÉLÉMENTS COMMUNS
Dimensions (L x P x H) 288 mm x 373 mm x 323 mm
Poids 6.44 kg
Les caractéristiques et l’aspect extérieur peuvent changer sans préavis, car nous visons continuellement à
perfectionner nos produits.
Imprimé en Chine
-F21-
- F20 -
811-277291-020
Page 42

MINI HI-FI SISTEMA DE 5 CD
MANUAL DE INSTRUCCIONES
- S1 -
Page 43

EXPLICACIÓN DE LOS SÍMBOLOS GRÁFICOS
T o reduce the risk of fire or electric shock, do not expose this
appliance to rain or moistre.
AVISO:
Riesgo de descarga
eléctrica no abrir
EXPLANA TION OF GRAPHICAL SYMBOLS:
El símbolo del rayo con punta de flecha
dentro de un triángulo equilátero, es para
alertar al usuario la presencia de “ alto voltaje
peligroso” (aislado dentro de la carcasa), que
puede ser de magnitud suficiente como para
constituir riesgo de descarga eléctrica para
las personas.
“ Aviso: Para reducir el riesgo de descarga eléctrica
no quite la tapa (o la parte de atrás), no contiene
piezas reparables en su interior. Refiera su servicio
a personal cualificado”
El símbolo de exclamación de un triángulo
equilátero, alerta al usuario de la presencia
de importantes instrucciones de
funcionamiento y mantenimiento (servicio
técnico).
AVISO: PARA PREVENIR EL RIESGO DE UNA DESCARGA ELÉCTRICA, NO
EXPONGA ESTA UNIDAD A LA LLUVIA O LA HUMEDAD.
Producto láser de clase 1
¡ PRECAUCIÓN !
Radiación láser invisible cuando está
abierto o cuando fallan los los
cierres.Evite la exposición al rayo.
Este producto tiene una lente de rayos láser de baja potencia.
¡ PRECAUCIÓN !¡ PRECAUCIÓN !
¡ PRECAUCIÓN !
¡ PRECAUCIÓN !¡ PRECAUCIÓN !
Siga las indicaciones que se detallan a continuación para un funcionamiento apropiado y seguro.
SOBRE COLOCACIÓN
• No use la unidad en lugares que sean extremamente
cálidos, fríos, polvorientos o húmedos.
• Ponga la unidad sobre una superficie plana.
• No impida la buena ventilación de la unidad poniéndola
en superficies blandas, tapándola con telas o
poniéndola sobre una alfombra.
SOBRE VOLTAJE AC
• Antes de usar la unidad, compruebe que el voltaje de
la unidad es el mismo que el de la red eléctrica.
SOBRE SEGURIDAD
• Cuando conecte o desconecte el cable de alimentación
AC, agárrelo por el enchuf e y no tire del cable. Tirar del
cable puede dañarlo y crea peligro.
• Cuando no vaya a usar la unidad durante un largo
periodo de tiempo. Desconecte el cable de alimentación
AC.
SOBRE CONDENSACIÓN
• Cuando se encuentre en una habitación que esté
caliente y húmeda, se pueden condensar gotas de agua
dentro del lector de CD.
• Cuando se ha creado esta condensación en el aparato,
la unidad podría no funcionar normalmente.
• Déjelo en una habitación con calefacción durante 1 o 2
horas para que se seque la condensación.
INFORMACIÓN FCC (Solo para Estados Unidos)
Este aparato se ajusta a las normas FCC parte 15.
El funcionamiento está sujeto a las siguientes condiciones:
1. Este aparato no debe causar interferencias dañinas.
2. Este aparato debe aceptar cualquier tipo de
interferencias incluyendo interferencias que causen un
mal funcionamiento.
Si ocurriera algún problema desconecte el cable de
alimentación AC y refiera su servicio a personal
cualificado.
- S2 -
Page 44

SISTEMA DE CONEXIONESSISTEMA DE CONEXIONES
SISTEMA DE CONEXIONES
SISTEMA DE CONEXIONESSISTEMA DE CONEXIONES
¡ IMPORTANTE !
Desconecte la corriente antes de conectar los
altavoces u otros equipos.
Impedancia de los altavoces
principales: 4 ohmios
CONEXIÓN DEL CABLE DE LOS ALTAVOCES
Conecte los cables de color blanco a los polos rojos
(+) y los cables negros a los polos negros (-).
NOTA: Conectar altavoces que no sean los provistos
con el aparato, podrían casusarle daños.
CONEXIÓN DEL CABLE DE ALIMENTACIÓN
1. Asegúrese que todos los componentes y los altavoces estén conectados correctamente.
2. Compruebe que el voltaje de su unidad y el de la red eléctrica sean el mismo.
¡ PRECAUCIÓN !
• Asegúrese que el cable de alimentacióno esté desconectado antes de hacer cualquier conexión.
• Cuando no vaya a usar la unidad durante un largo período de tiempo, desconecte el cable de alimentación AC.
CONEXIÓN DE LOS ALTAVOCES
Conecte los cables de los altavoces (derecho e izquierdo) a los terminales de los altavoces del amplificador.
NOTA: Asegúrese en cada caso que el cable pelado (+) se conecta al terminal (+) de la salida de altavoces del
amplificador y que el cable sin pelar (-) del altavoz se conecta a la salida (-) para altavoces del amplificador.
Asegúrese también que observa la orientación correcta para los altavoces izquierdo y derecho.
A una fuente
externa
110
220
120V
240V
Caja del
altavoz
Izquierdo
Caja del
altavoz
Derecho
Cable de alimentación AC a una toma de
corriente AC
CONEXIÓN A EQUIPOS OPCIONALES
Para escuchar o grabar señales de audio de otros equipos a través de esta unidad, conecte la clavija blanca a la toma
derecha, y la clavija roja a la toma izquierda de los conectores del “AUX IN”.
Para escuchar el equipo conectado:
1. Presione el botón “ FUNCIÓN “ para seleccionar “AUX”.
2. Ponga en marcha la fuente externa.
NOTA: Si la fuente externa es un televisor y el equipo de sonido se encuentra cerca del televisor, se podrían experimentar
interferencias si se selecciona la función “Radio” mientras el televisor esté en marcha.
Para encender la unidad, presione el botón “POWER”, la pantalla se iluminará, seleccione la función deseada y el
indicador de dicha función se iluminará.
Después de su uso, presione el botón “POWER”, la luz de la pantalla se apagará y sólo se mostrará en ella el reloj.
- S3 -
Page 45

IDENTIFICACIÓN DE LOS CONTROLES
1
2
3
4
5
6
7
8
9
10
11
12
13
15
16
17
18
19
20
21
22
23
24
14
1) Puerta del CD
2) Función STEREO WIDE
3) Función MUTE
4) Botón de encendido : MUTE
5) Botón de encendido : POWER
6) Botones de control de volumen : V OLUME
7) Botón de sintonización (PRESET/SKIP/MIN/HOUR)
8) Sensor del mando a distancia : REMOTE SENSOR
9) Toma de auriculares : PHONES
10) MODE selector (BEAT CUT/ FM MODE / DUBBING)
11) Botón de función : FUNCTION (TUNER / TAPE / CD /
AUX)
12) Botón X-BASS
13) Compartimiento de la casetera deck A
14) Operación de controles casetera deck A
Botón de GRABACION
Botón PLA Y
Botón REBOBINADO
Botón AVANCE RAPIDO
Botón de STOP/EJECT
Botón P A USA
15) Pantalla : DISPLAY
16) Botónes de MEMORY /
17) Botón de parada de CD :
18) Botónes de TUNING / RANDOM / REPEAT
19) Botón de reproducción de CD :
20) Botón de apertura de CD :
21) Botón de selección de CD : DISCK SKIP
22) Botón de selección de bandas : BAND
23) Botón STEREO WIDE
24) Compartimiento de la casetera deck B
25) Operación de controles casetera deck B
Botón PLA Y
Botón de RÈBOBINADO
Botón de AV ANCE REPIDO
Botón STOP/EJECT
Botón de P AUSA
CLOCK/TIMER/SLEEP
CD STOP
CD PLA Y / P A USE
CD OPEN / CLOSE
25
- S4 -
Page 46

PP
ANTANT
P
ANT
PP
ANTANT
ALLAALLA
ALLA
ALLAALLA
1. Indicadores de “TRACK” y “CHANNEL”
2. Indicadores de “FUNCIONES”
3. Indicador de “SLEEP”
4. Indicador de “TIMER”
5. Indicadores “ON/OFF”
6. Indicadores “AM/FM”
7. Indicador X-Bass
8. Indicadores de Banda FM/MW (AM)
9. Indicador Playback
10. Indicador de pausa
INDICADOR DE CORRIENTE ELÉCTRICA
Mientras el cable de alimentación esté enchufado a la red eléctrica y la unidad se encuentre en la función de espera,
existirá consumo de energía y la pantalla solo mostrará el reloj.
• Pulse el botón “POWER/STANDBY” para encender la
unidad
POWER
• Presione el botón “FUNCIÓN” para seleccionar “TAPE”
11. Indicador de “MEMORIA”
12. Indicador de “RANDOM”
13. Indicadores que muestran los platos para CDs que
tienen disco. Si algún plato estuviera vacío el el número
indicador correspondiente se apagaría.
14. Indicador de “STEREO”
15. Indicador de la función “REPEA T ”
16. Pantalla “CLOCK/CD TIMING/BROADCAST ST ATION”.
17. Número de pista.
Después de un corto período de tiempo la pantalla
mostrará: Lo mismo que cuando apagó la unidad por
última vez.
Después de un corto período de tiempo la pantalla
mostrará:
• Presione el botón “FUNCIÓN” para seleccionar “CD”
• Presione el botón “FUNCIÓN” para seleccionar “A UX”
• Los números que se muestran en la pantalla dependerán de la hora, la frecuencia seleccionada o del disco compacto. Los
números de “CD” solo aparecerán si los CDs están en la bandeja.
- S5 -
Después de un corto período de tiempo la pantalla
mostrará:
Se necesita un corto período de tiempo para detectar
la entrada exterior.
Page 47

AJUSTE DEL SONIDOAJUSTE DEL SONIDO
AJUSTE DEL SONIDO
AJUSTE DEL SONIDOAJUSTE DEL SONIDO
P ARA AJUSTAR EL VOLUMEN
Presione los botones
+ / - para ajustar el sonido.
Para subir el
volumen presione
aqui.
Para bajar el
volumen presione
aqui.
P ARA USAR LA FUNCIÓN “X-BASS”
Presione el botón “X-BASS” para ajustar los grabes.
MUTE
La pantalla mostrará
El “X-BASS” está diseñado específicamente para
aumentar las bajas frecuencias y obtener sonidos grabes
más potentes.
MUTE
“STEREO WIDE” crea la ilusión de que el sonido se esparce a la izquierda y a la derecha más allá de la posición actual
de los altavoces. Cuando esté escuchando el sonido en estéreo, presione el botón “STEREO WIDE” para obtener un
sonido más dinámico.
P ARA ESCUCHAR INDIVIDU ALMENTE
Conecte los auriculares (mini clavija de ø 3.5 mm de
diámetro) a la toma “PHONES”.
Ajuste los controles de “VOLUME, X-BASS” y “STEREO
WIDE” al nivel de sonido deseado.
Cuando estén conectados los auriculares, los altavoces se
desconectarán automáticamente.
CUANDO SE ESTE GRABANDO
Los controles de “VOLUME, X-BASS” y “STEREO WIDE”
se podrán ajustar sin que ello repercuta en la grabación.
- S6 -
Page 48

AJUSTE DEL RELOJAJUSTE DEL RELOJ
AJUSTE DEL RELOJ
AJUSTE DEL RELOJAJUSTE DEL RELOJ
Para ajustar la hora (Seleccione la función “PO WER STANDBY”)
1. Presione el botón “MEMORY / CLOCK” par a
ajustar el reloj. La hora parpadeará.
MEMORY
CLOCK
TIMER
3. Presione el botón “MEMOR Y/
CLOCK” para
hacer que parpadeen los minutos.
MEMORY
CLOCK
TIMER
2. Presione repetidamente el botón “PRESET /<< o >>/” para
ajustar la hora.
4. Presione los botones “
minutos y después presione el botón “MEMOR Y/
para terminar el ajuste del reloj.
SKIP
HOUR
SKIP
Para programar el temporizador (Hora de puesta en marcha)
1. Presione el botón “POWER/STANDBY” para
encender la unidad “ON”.
POWER
3. Ponga la función en reloj, presionando el botón
“MEMORY/
CLOCK”
2. Presione el botón “STOP ” hasta que aparezca en la pantalla
T
el indicador “TIMER ON” (Función de parada en la radio y el
N
W
O
D
CD)
P
O
T
S
D
I
S
C
S
E
L
E
C
4. Presione el botón “POWER/ST ANDBY” par a apagar la unidad
T
“OFF”.
MIN
U
N
PRESET
N
I
G
PRESET
SKIP
HOUR
SKIP
MIN
PRESET ” para ajustar los
CLOCK”
MEMORY
AND
U
P
P
L
A
Y
/
P
A
U
S
E
CLOCK
TIMER
Repita los pasos del
POWER
ajuste de la hora
Para programar el temporizador (Hora de parada)
1. Presione el botón “POWER/STANDBY” para
encender la unidad “ON”.
POWER
3. Ponga la función en reloj, presionando el botón
“MEMORY/
CLOCK”.
Repita los pasos del
2. Presione el botón “STOP
N
N
I
G
el indicador “TIMER OFF” (Función de parada en la radio y el
CD).
P
O
T
S
4. Presione el botón “POWER/ST ANDBY” par a apagar la unidad
“OFF”.
U
T
N
W
O
D
D
I
S
C
S
E
L
E
C
POWER
U
P
P
T
” hasta que aparezca en la pantalla
L
A
Y
/
P
A
U
S
E
ajuste de la hora.
Nota: 1) Presione el botón “STOP
” para ver en secuencia la hora local, la hora de puesta en marcha, y la hora de
apagado, la pantalla volverá a la función anterior después de 12 segundos.
2) El temporizador funcionará cuando la tecla TIMER sea presionada hasta que la palabra “TIMER” se ilumine en
la pantalla. Cancele el temporizador presionando la tecla hasta que la palabra TIMER desaparezca.
3) Si se apaga repentinamente mientras esta funcionando es que está activada la función “TIMER OFF”. Presione
el botón “STOP” hasta que la palabra “TIMER OFF” aparezca en la pantalla.
- S7 -
Page 49

AJUSTE DEL TEMPORIZADOR PAJUSTE DEL TEMPORIZADOR P
AJUSTE DEL TEMPORIZADOR P
AJUSTE DEL TEMPORIZADOR PAJUSTE DEL TEMPORIZADOR P
ARA DORMIRARA DORMIR
ARA DORMIR
ARA DORMIRARA DORMIR
1. Presione el botón “SLEEP” de su mando a distancia,
cuando la unidad esté encendida.
“SLEEP 90” aparecerá en la pantalla.
NOTA:
SLEEP solo se puede ajustar en las funciones
TUNER, T APE y A UX.
TIMER
SLEEP
2. Mantenga presionado el botón “SLEEP” para
seleccionar el tiempo a transcurrir para que se apague
el aparato.
El indicador cambiará de la siguiente manera:
SLEEP 90 SLEEP 80
SLEEP 10 SLEEP 20
Cuando se muestre el tiempo en minutos deseado en
la pantalla suelte el botón “SLEEP”.
Para cancelar el temporizador de sueño, presione una
vez el botón “SLEEP” y la palabra “SLEEP”
desaparecerá de la pantalla.
- S8 -
Page 50

PP
ARA UNA MEJOR RECEPCIÓNARA UNA MEJOR RECEPCIÓN
P
ARA UNA MEJOR RECEPCIÓN
PP
ARA UNA MEJOR RECEPCIÓNARA UNA MEJOR RECEPCIÓN
FM:
Desenrolle por completo el cable de la antena. Después
extiéndalo poniéndolo en la posición que mejor se escuche.
NOTA: No conectar a una antena exterior .
AM/MW:
Conecte la antena circular (provista) a los terminales de la
“LOOP ANTENA AN/MW” que se encuentran en la parte
posterior de la unidad.
SINTONIZANDO EN UNA EST ACION MANUALMENTE
1. Presione botón FUNCTION a
TUNER.
2. Presione el botón para seleccionar
la banda deseada.
BAND
P ARA BUSCAR UNA EST A CION RAPIDAMENTE
Retenga el botón TUNING UP o DOWN y comenzará b uscando la estación automáticamente.
Cuando la estación es encontrada, la búsqueda se detendrá automáticamente.
Sin embargo, este no podrá detenerse si la señal es débil, realice la búsqueda de la estación manualmente.
3. Sintonice en una estación.
I
G
N
N
U
T
U
N
W
O
D
M
O
D
N
A
R
P
O
T
S
D
I
S
C
S
K
I
P
P
R
E
P
E
A
T
P
L
A
Y
/
P
A
U
S
E
FIJANDO EST ACIONES
Ud puede sintonizar una estación almacenada directamente ingresando el número presintonizado.
20 estaciones en la banda FM pueden ser prefijadas.
20 estaciones en la banda MW/AM pueden ser prefijadas.
1. Presione el boton FUNCTION a
TUNER.
4. Presione el botón MEMORY /
CLOCK.
MEMORY
CLOCK
TIMER
2. Seleccione la banda.
BAND
5. Presione los botones PRESET
para números presintonizados.
PRESET
SKIP
HOUR
SKIP
MIN
3. Sintonice una estación.
A
R
P
O
T
S
6. Presione el botón MEMORY /
CLOCK.
MEMORY
Después repita pasos del 2 al 6.
M
O
D
N
D
I
S
CLOCK
TIMER
I
G
N
N
U
T
U
N
W
O
D
C
S
K
P
R
E
P
E
A
T
P
L
A
Y
/
P
A
U
S
E
I
P
- S9 -
Page 51

PP
ARA SINTONIZAR UNA EMISORA PRESELECCIONADAARA SINTONIZAR UNA EMISORA PRESELECCIONADA
P
ARA SINTONIZAR UNA EMISORA PRESELECCIONADA
PP
ARA SINTONIZAR UNA EMISORA PRESELECCIONADAARA SINTONIZAR UNA EMISORA PRESELECCIONADA
1. Presione el botón “FUNCTION”
para seleccionar “TUNER”.
P ARA RECIBIR LA RADIODIFUSORA FM EN STEREO
Situe el selector MODE a FM STEREO.
Cuando la radiodifusora FM STEREO es recibida , la luz
indicadora de FM STEREO se encenderá.
2. Presione el botón “BAND” para
seleccionar una banda.
3. Presione el botón “
”hasta el número presele-
ccionado.
SKIP
HOUR
SKIP
MIN
PRESET
BAND
SI LA SEÑAL RADIODIFUSORA FM STEREO ES DEBIL
Situe el selector MODE a FM MONO.
Los ruídos de radiodifusión se reducirán pero la señal
reproducida será monoaural.
PRESET
- S10 -
Page 52

FUNCIONAMIENTO DEL LECTOR DE CDFUNCIONAMIENTO DEL LECTOR DE CD
FUNCIONAMIENTO DEL LECTOR DE CD
FUNCIONAMIENTO DEL LECTOR DE CDFUNCIONAMIENTO DEL LECTOR DE CD
1. Presione el botón “FUNCTION”para seleccionar CD.
3. Ponga el primer disco en la bandeja, con la etiqueta
mirando hacia arriba.
A VISO:
• Antes de transportar la unidad saque todos los
discos de la bandeja.
5. Presione el botón “OPEN/CLOSE” para cerrar la bandeja.
El lector tarda un momento en comprobar los discos.
D
N
A
R
P
O
T
S
I
G
N
N
U
T
U
N
W
O
D
M
O
P
R
E
P
E
A
T
P
L
A
Y
/
P
A
U
S
E
2. Presione el botón “OPEN/CLOSE” para abrir la bandeja
porta discos.
I
G
N
N
U
T
U
N
W
O
D
M
O
D
N
A
R
P
O
T
S
D
I
S
C
S
K
I
P
R
E
P
E
A
T
P
L
A
Y
/
P
A
U
S
E
P
4. Presione el botón “DISC SKIP” para que la bandeja
gire en el sentido de las agujas del reloj.
Ponga otro(s) disco(s) en la bandeja.
I
G
N
N
U
T
N
W
O
D
M
O
D
N
A
R
P
O
T
S
D
I
S
C
S
K
U
P
R
E
P
E
A
T
P
L
A
Y
/
P
A
U
S
E
I
P
D
I
S
C
S
K
I
P
6. Presione el botón “DISC SKIP” para seleccionar el disco deseado. Presione cualquiera de los botones “
(SKIP) ” para seleccionar la pista deseada.
El símbolo del disco seleccionado parpadeará.
O
D
N
A
R
P
O
T
S
D
7. Presione el botón “
en marcha.
I
G
N
N
U
T
U
N
W
O
D
M
I
S
C
S
K
I
P
R
E
P
E
A
T
P
L
A
Y
/
P
A
U
S
E
P
PLA Y/PAUSE”para que se ponga
I
G
N
N
U
T
U
N
W
O
D
M
O
D
N
A
R
P
O
T
S
D
I
S
C
S
K
P
R
E
P
E
A
T
P
L
A
Y
/
P
A
U
S
E
I
P
SKIP
HOUR
SKIP
MIN
PRESET
8. Para parar:
(a) Si es sólo por un momento, presione el el botón “
PLA Y/PAUSE” y “ ” aparecerá en la pantalla. V uelv a a
presionar el mismo botón para que comience otra vez.
(b) Presione el botón “STOP ”.
- S11 -
/
Page 53

FUNCIONAMIENTO DEL LECTOR DE CDFUNCIONAMIENTO DEL LECTOR DE CD
FUNCIONAMIENTO DEL LECTOR DE CD
FUNCIONAMIENTO DEL LECTOR DE CDFUNCIONAMIENTO DEL LECTOR DE CD
Notas: 1. Mientras esté en marcha, la bandeja de los discos se podrá abrir para cambiar / añadir un disco, pero el botón
“DISC SKIP” quedará invalidado y el disco que esté sonando no se interrumpirá.
2. Los botones “
elegir una pista en otro disco, se deberá pulsar el botón “DISC SKIP” para acceder primero al disco deseado.
3. Antes de transportar la unidad saque todos los discos de la bandeja porta CDs.
P ARA LOCALIZAR UN PUNT O EN P ARTICULAR EN UNA PISTA
/ SKIP ” sólo se podrán usar para cambiar de pista en el disco que se esté escuchando. Para
Para localizar una pista en secuencia:
• Para localizar el comienzo de la pista que esté sonando o
de la anterior, presione el botón “
• Para localizar el comienzo de la siguiente pista, presione el
botón “
• Se necesitará un corto período de tiempo para que el disco
lea la información de la pista desada antes de que comience
SKIP ” de avance.
Rebobinado
Skip
PRESET
SKIP
HOUR
SKIP
MIN
Presione una vez
Nota: La búsqueda y salto de pistas se puede realizar mientras esté sonando o esté en pausa pero sólo son efectivas en el
disco que esté sonando.
Use el botón “DISC SKIP” para seleccionar otro disco.
SKIP “ de rebobinado.
Avance
Skip
a sonar.
Para localizar un punto en particular en una pista:
• Para avanzar rápidamente, mantenga presionado el botón
“
SEARCH “ de avance y sueltelo en el punto deseado.
• Para retroceder rápidamente, mantenga presionado el
botón “
punto deseado.
• En búsqueda hacia delante las pistas son leídas
rápidamente, déspues leerá la siguiente pista y así
sucesivamente hasta el siguiente disco. La primera pista
del siguiente disco será leida normalmente, para continuar
buscando suelte y vuelva a presionar el botón “SEARCH”.
SEARCH “ de rebobinado y sueltelo en el
Rebobinado
Search
PRESET
SKIP
HOUR
SKIP
MIN
Mantenga presionado
Avance
Search
- S12 -
Page 54

FUNCIONAMIENTO DEL LECTOR DE CDFUNCIONAMIENTO DEL LECTOR DE CD
FUNCIONAMIENTO DEL LECTOR DE CD
FUNCIONAMIENTO DEL LECTOR DE CDFUNCIONAMIENTO DEL LECTOR DE CD
Reproducción al azar en la situación de parada.
1. Presione el botón “DISC SKIP” para seleccionar un disco.
I
G
U
N
N
T
U
P
O
T
S
3. Presione el botón “
N
W
O
D
M
O
D
N
A
R
D
I
S
C
S
K
I
P
PLA Y/P A USE ”. Unos símbolos poco convencionales aparecerán en la pantalla y se necesitará un
P
R
E
P
E
A
T
P
L
A
Y
/
P
A
U
S
E
2. Presione el botón “RANDOM”, la palabra “RANDOM”
aparecerá en la pantalla.
breve momento para que se bar ajen las pistas, antes de que comience a sonar .
I
G
N
N
U
T
N
W
O
D
M
O
D
N
A
R
P
O
T
S
D
I
S
C
S
K
I
U
P
R
E
P
E
A
T
P
L
A
Y
/
P
A
U
S
E
P
I
G
N
N
U
T
N
W
O
D
M
O
D
N
A
R
P
O
T
S
D
I
S
C
S
K
U
P
R
E
P
E
A
T
P
L
A
Y
/
P
A
U
S
E
I
P
Notas: 1. La función de reproducir al azar puede barajar hasta de todos los discos que se encuentren en la bandeja y al azar
seleccionará una pista cada vez.
2. El lector saltará a una nueva pista seleccionada al azar y comenzará a sonar cada vez que se pulse el botón “
SKIP ” mientras se esté escuchando en la función azar .
Reproducción al azar en situación de puesta en marcha:
Durante la función de marcha normal no se puede activar la función de reproducción al azar, solo se puede activ ar “ON” si se
está en la función de parada “STOP”.
Para cancelar la función de reproducción al azar:
1. Presione el botón “STOP
M
O
D
N
A
R
P
O
T
S
D
I
S
” para parar la función.
I
G
N
N
U
T
N
W
O
D
C
S
K
I
U
P
R
P
2. Presione el botón “RANDOM” para desactivar la
función.
E
P
E
A
T
P
L
A
Y
/
P
A
U
S
E
O
D
N
A
R
P
O
T
S
D
I
G
N
N
U
T
N
W
O
D
M
I
S
C
S
K
U
P
R
E
P
E
A
T
P
L
A
Y
/
P
A
U
S
E
I
P
Nota:
Mientras esté reproduciendo al azar, no se puede cancelar la función “RANDOM”. Solo se podrá cancelar esta función cuando
se encuentre en el modo “stop”.
- S13 -
Page 55

FUNCIONAMIENTO DEL LECTOR DE CD)FUNCIONAMIENTO DEL LECTOR DE CD)
FUNCIONAMIENTO DEL LECTOR DE CD)
FUNCIONAMIENTO DEL LECTOR DE CD)FUNCIONAMIENTO DEL LECTOR DE CD)
Repetición mientras esté sonando:
Para repetir la pista que está sonando:
I
G
N
N
U
T
U
N
W
O
D
M
O
D
N
A
R
P
O
T
S
D
I
S
C
S
K
P
R
E
P
E
A
T
P
L
A
Y
/
P
A
U
S
E
I
P
• Mantenga presionado el botón “REPEAT” hasta que
aparezca en la pantalla “REPEAT ONE” entonces la
pista que esté sonando se repetirá continuamente hasta
que se presione el botón “STOP”.
• Presione “SKIP” se irá al comienzo de la próxima pista,
presionando rebobinar “SKIP” se irá al comienzo de la
pista que esté sonando, si se presiona por segunda
vez se irá al comienzo de la pista anterior. “SEARCH”
buscará a traves de las pistas normalmente.
I
G
N
N
U
T
U
N
W
O
D
M
O
D
N
A
R
P
O
T
S
D
I
S
C
S
K
P
R
E
P
E
A
T
P
L
A
Y
/
P
A
U
S
E
I
P
• Mantenga presionado el botón “REPEAT” hasta que
“REPEA T ONE DISC” aparezca en la pantalla, entonces
el disco que esté sonando se repetira continuamente,
comenzando por la pista que esté sonando.
• Mientras la función “REPEA T ONE DISC” esté activada,
presione los botones “
/ SKIP ”, para buscar a
traves del disco y el lector comenzará a reproducir a
partir del punto seleccionado.
Para repetir todos los discos:
Para repetir todo el disco:
I
G
N
N
U
T
U
N
W
O
D
M
O
D
N
A
R
P
O
T
S
P
R
E
P
E
A
T
P
L
A
Y
/
P
A
U
S
E
• Mantenga presionado el botón “REPEAT” hasta que
“REPEA T ALL DISC” aparezca en la pantalla.
• Presionando los botones “
/ SKIP ” hará que el
CD comience a sonar a partir del nuevo punto
seleccionado en el disco que esté sonando.
• Presionar el botón “DISC SKIP” hará que el CD comience
por la primera pista del disco seleccionado. Los botones
D
I
S
C
S
K
I
P
/ SKIP ” se pueden usar para elegir una pista,
“
en particular del disco seleccionado, el lector de CDs
comenzará a sonar a partir de ese punto.
I
G
N
N
U
T
U
N
W
O
D
M
O
D
N
A
R
P
O
T
S
P
R
E
P
E
A
T
P
L
A
Y
/
P
A
U
S
E
Para cancelar la repetición:
• Mantenga presionado el botón “REPEA T” hasta que la
palabra “REPEAT” desaparezca de la pantalla.
D
I
S
C
S
K
I
P
Mientras esté en la función “STOP”
Las operaciones de repetición “REPEA T”también se pueden
realizar en la función lector. El lector comenzará a sonar a
partir de la pista 1, del disco seleccionado, después de que
se pulse el botón “PLA Y/ PAUSE
T
N
W
O
D
M
O
D
N
A
R
P
O
T
S
D
I
S
C
S
K
I
P
”.
I
G
N
N
U
U
P
R
E
P
E
A
T
P
L
A
Y
/
P
A
U
S
E
Mientras esté en la función “P A USE”
Las operaciones de repetición “REPEA T” se pueden realizar
desde el punto de pausa. El lector comenzará su lectura
después de pulsar el botón PLA Y/P A USE
I
G
N
N
U
T
U
N
W
O
D
M
O
D
N
A
R
P
O
T
S
D
I
S
C
S
K
P
R
E
P
E
A
T
P
L
A
Y
/
P
A
U
S
E
I
P
- S14 -
.
Page 56

PROGRAMACIÓN DE LOS CDsPROGRAMACIÓN DE LOS CDs
PROGRAMACIÓN DE LOS CDs
PROGRAMACIÓN DE LOS CDsPROGRAMACIÓN DE LOS CDs
Se puede programar en un orden preestablecido hasta un total de 32 pistas de las disponibles en los discos que estén en la
bandeja.
1. Presione el botón “MEMOR Y/ CLOCK” (en la función
“STOP”).
MEMORY
CLOCK
TIMER
3. Presione los botones “ / SKIP ” para seleccionar
las pistas deseadas
PRESET
SKIP
HOUR
SKIP
MIN
2. Presione el botón “DISC SKIP” para seleccionar el disco
que desea oír (el símbolo de disco muestra cuál es el
disco seleccionado).
N
A
R
P
O
T
S
4. Presione otra vez el botón “MEMOR Y/
I
G
N
N
U
T
U
N
W
O
D
M
O
D
D
I
S
C
S
K
P
R
E
P
E
A
T
P
L
A
Y
/
P
A
U
S
E
I
P
CLOCK” para
guardar esa pista en la memoria.
MEMORY
CLOCK
TIMER
5. Para añadir más pistas,
6. Para que comience a sonar, presione el botón “ PLA Y/
PAUSE”
I
G
N
N
U
T
U
repita los pasos 2 y 4.
N
W
O
D
M
O
D
N
A
R
P
O
T
S
D
I
S
C
S
K
I
P
P
R
E
P
E
A
T
P
L
A
Y
/
P
A
U
S
E
Notas: 1. La misma pista puede ser programada más de una vez en el mismo programa.
2. Con el programa activado, los botones “
/ SKIP ” sólo se pueden usar para seleccionar pistas.
3. Con el programa activado, no se puede realizar la función de repetir todos los discos “ALL DISCS”
Para comprobar el programa:
Después de haber programado, presione repetidamente el botón “MEMOR Y CLOCK” para comprobar el orden. Esto no se
podrá realizar mientras el disco esté sonando.
- S15 -
Page 57

PP
ARA PARA P
P
ARA P
PP
ARA PARA P
ARAR Y CANCELAR LA PROGRAMACIÓN DE DISCOS COMPARAR Y CANCELAR LA PROGRAMACIÓN DE DISCOS COMP
ARAR Y CANCELAR LA PROGRAMACIÓN DE DISCOS COMP
ARAR Y CANCELAR LA PROGRAMACIÓN DE DISCOS COMPARAR Y CANCELAR LA PROGRAMACIÓN DE DISCOS COMP
Para parar momentaneamente la programación:
• Presione el botón “ PLAY/PAUSE” y " ” aparecerá en la pantalla.
Presione este botón una vez más para que vuelva a sonar .
I
G
N
N
U
T
U
N
W
O
D
M
O
D
N
A
R
P
O
T
S
D
I
S
C
S
K
I
P
R
E
P
E
A
T
P
L
A
Y
/
P
A
U
S
E
P
Para añadir pistas adicionales mientras se esté en la programación:
• Presione una vez el botón “
STOP”, presione el botón “MEMORY/ CLOCK” hasta que el indicador de pista muestre “-
-“ y repita los pasos 2 y 4 (ver página S16).
I
G
N
N
U
T
U
N
W
O
D
M
O
D
N
A
R
P
O
T
S
P
R
E
P
E
A
T
P
L
A
Y
/
P
A
U
S
E
ACTOSACTOS
ACTOS
ACTOSACTOS
D
I
S
C
S
K
I
P
Para borrar todo el programa:
• Mantenga presionado el botón “
STOP” hasta que la palabra
“MEMORY” desaparezca de la pantalla. Entonces la pantalla
mostrará la información del disco que esté tocando.
I
G
N
N
U
T
U
N
W
O
D
M
O
D
N
A
R
P
O
T
S
D
I
S
C
S
K
I
P
R
E
P
E
A
T
P
L
A
Y
/
P
A
U
S
E
P
or
Abra la bandeja porta discos presionando el botón
OPEN/CLOSE.
I
G
N
N
U
T
U
N
W
O
D
M
O
D
N
A
R
P
O
T
S
P
R
E
P
E
A
T
P
L
A
Y
/
P
A
U
S
E
ALSO
Presionando el botón “FUNCTION” para seleccionar otra
función, también podrá anular la programación.
D
I
S
C
S
K
I
P
- S16 -
Page 58

OPERACIÓN DEL TOCACASETES
REPRODUCCIÓN DE CASETES DE LA PLETINA A Y B.
Para la reproducción utilice únicamente cintas normales (tipo I)
En el caso de ambas pletinas, sólo podrá reproducir el lado del casete que esté mirando hacia fuera. I).
1. Presione el botón “FUNCTION” para
seleccionar el lector de cinta “TAPE”.
2. Presione STOP/EJECT e inserte un
casete en el compartimento para
casetes de la pletina A o B.
PLETINA A PLET INA B
3. Presione el botón “PLAY
poner en marcha.
PLETINA A
PLETINA B
OR
Para detener la reproducción
Presione el botón STOP/EJECT .
Para interrumpir la reproducción
Presione P AUSE.
Para reanudar la reproducción, presione PAUSE nuev amente.
Para adelantar o rebobinar la cinta
Presione REWIND o F.FWD. Presione STOP/EJECT para
detener la cinta a la altura deseada.
Cuando la cinta se termina
Al adelantar o rebobinar la cinta, o luego de la
reproducción del casete, la cinta se detendrá
automáticamente al acabarse.
Cuando ambas pletinas están en la modalidad de
reproducción
La pletina B sonará y la pletina A no se escuchará.
REPRODUCCIÓN CONTINUA ... DESDE LA PLETINA B HACIA LA PLETINA A
” para
1. Presione FUNCTION hasta llegar a la posición T APE.
2. Inserte un casete en cada uno de los compartimentos
para casete.
PLETINA A PLETINA B
Se toca en
segundo
lugar
3. Presione PLAY .
PLETINA B PLETINA A PLETINA A
* Tan pronto como se acabe la cinta de la pletina B y se detenga, la modalidad de pausa de la pletina A será
desactivada y comenzará la reproducción de esta cinta automáticamente.
4. Presione PAUSE.
5. Presione PLAY .
Se toca
primero
- S17 -
Page 59

CONSEJOS PCONSEJOS P
g
CONSEJOS P
CONSEJOS PCONSEJOS P
Para prevenir que se borre accidentalmente
1. Las cintas cassette tienen dos patillas protectoras antiborrado una en cada lado. Para proteger una grabación
contra un borrado accidental o una sobre grabación, use
un destornillador para
para quitar una o las dos
patillas protectoras.
ARA EL CUIDADO DE LAS CINTARA EL CUIDADO DE LAS CINT
ARA EL CUIDADO DE LAS CINT
ARA EL CUIDADO DE LAS CINTARA EL CUIDADO DE LAS CINT
2. Si usted quiere grabar una cinta después de que le haya
quitado la patilla protectora,
peguele un trozo de cinta
plástica en el orificio donde se
encontraba la patilla protectora.
Notas:
1) Asegúrese que sólo tapa el
orificio donde se encontraba la
patilla protectora
2) El quitar los protectores anti-borrado no previene que un
borrador industrial la borre.
COPIADO DE CINTA --- DE LA PLETINA B A LA PLETINA A
Utilice sólo cintas normales (tipo I) al grabar o reproducir un casete.
ASAS
AS
ASAS
1. Presione FUNCTION hasta
llegar a la posición TAPE.
4. Presione el botón PAUSE.
PLETINA A
Para detener el copiado de la cinta
Presione los botones STOP/ EJECT de las pletinas A y B.
Nota: No cambie la velocidad de copiado una vez que el proceso de copiado ya esté en progreso.
2. Inserte la cinta que va a copiar en la
pletina B y la cinta en blanco en la
pletina A.
su vez activa el botón PLAY .
Cinta donde
va a
rabar
PLETINA A PLETINA B
Cinta
original
PLETINA A
3. Elija la velocidad de copiado,
moviendo el interruptor NORMAL/
HIGH DUBBING a la posición
adecuada.
FM ST EREO FM MONO
6. Presione PLAY .5. Presione el botón RECORD , el que a
GRABACIÓN --- SÓLO PLETINA A
Utilice sólo cintas normales (tipo I) para grabar.
GRABACIÓN A PARTIR DE LA RADIO DEL EQUIPO.
DUBBING
BEAT CUT
PLETINA B
1. Presione FUNCTION hasta llegar
a la posición TUNER y sintonice
la estación deseada.
Nota: A veces es posible reducir estos ruidos al seleccionar la función de Beat Cut, presionando el botón DUBBING mientras
esté en la modalidad de radio.
2. Inserte una cinta en el compartimento
para casetes.
este es el
lado que
desea gr abar
PLETINA A
- S18 -
3. Presione el botón RECORD, el
que a su vez activa el botón PLA Y.
PLETINA A
Page 60

GRABACIÓN ---- SÓLO PLETINA A
g
GRABACIÓN A PARTIR DE UN DISCO COMP A CTO
1. Presione FUNCTION hasta llegar a la posición CD .
3. Presione el botón
RECORD , el que a su
vez activa el botón
PLA Y.
PLETINA A
P ARA DETENER LA GRABA CIÓN
Presione el botón STOP/ EJECT de la pletina A.
P ARA INTERRUMPIR LA GRABA CIÓN
Presione el botón P AUSE de la pletina A. Para reanudar la
grabación, presione nuev amente P A USE.
CONTROL REMOTOCONTROL REMOTO
CONTROL REMOTO
CONTROL REMOTOCONTROL REMOTO
CONTROL REMOTO
1) Botón “X-BASS” (incremento de
graves)
2) Botón “MEMORY” (memoria)
3) Botones TUNING (sintonizadores)/
RANDOM/REPEAT
4) Botón “FUNCIÓN” (de funciones)
5) Botón “SLEEP” (temporizador)
6) Botones “SKIP/PRESET/MIN/
HOUR” (Salto, preselección,
minutos, hora)
7) Botón “STOP” (de parada)
8) Botón “PLAY/PAUSE” (puesta en
marcha/ pausa)
2. Introduzca una cinta en
el compartimento para
casetes.
4. Presione el botón PLAY/
PAUSE
del
reproductor de CDs.
O
D
M
O
D
N
A
R
P
O
T
S
D
I
S
C
S
este es el
lado que
desea
rabar
PLETINA A
I
G
N
N
U
T
U
N
W
K
I
P
R
E
P
E
A
T
P
L
A
Y
/
P
A
U
S
E
P
P ARA BORRAR UNA CINT A GRAB ADA
1 . Presione FUNCTION hasta llegar a la posición TAPE.
2 . Inserte una cinta con el lado que desea borrar mirando
hacia usted.
3 . Presione RECORD para iniciar la grabación.
9) Botón “POWER” (encendido)
10) Botón “DISC SKIP” (salto de disco)
11) Botón “VOLUME UP/DOWN”
(aumento/disminución de volumen)
12) Botón “OPEN/CLOSE” (apertura/
cierre)
13) Botón “TIMER” (temporizador)
14) Botón “BAND” (selector de banda)
15) Botón “MUTE” (mudoa)
16) Botón “STEREO WIDE” (separación
estéreo)
P ARA INST ALAR LAS BA TERIAS
1. Abra la tapa del compartimento
de las baterías
COMO USAR EL MANDO A DIST ANCIA CORRECT AMENTE
• Dirigir el mando hacia el SENSOR que se encuentra en el aparato.
• Cuando hay mucha luz ambiental los rayos infrarrojos del SENSOR REMOTO pueden
verse afectados y causar un funcionamiento defectuoso.
• Se recomienda una distancia de 6 metros (19 pies) entre el aparato y el control
remoto.
2. Introduzca dos baterías de
tamaño (AAA o UM-4)
CAMBIO DE BA TERÍAS
Cuando las baterías se debiliten, la distancia a la
que funciona el control remoto se acortará
+
+
considerablemente y usted necesitará cambiarlas.
NOTA:
Si no se va a usar el control remoto durante un
largo período de tiempo, quite las baterías para
evitar averias causadas por perdida de líquidos
corrosivos.
- S19 -
Page 61

MANTENIMIENTOMANTENIMIENTO
MANTENIMIENTO
MANTENIMIENTOMANTENIMIENTO
(PLETINA A)
b
(PLETINA B)
d
Para limpiar el CD:
Si el CD no suena o si el sonido salta, el disco podría necesitar ser
limpiado.
Antes de ponerlo en marcha, pasele un trapo límpio desde el centro
hacia fuera.
Para limpiar las cabezas de la grabadora:
Para mantener una calidad de sonido óptima, límpie regularmente las
cabezas lectoras y de grabación (a), la cabeza de borrado (b), el cilindro
giratório guia cintas (c) y los cabrestantes (d) (cada 10 horas de uso).
d
Use un algodón ligeramente humedecido con líquido de limpieza o con
alcohol desnaturalizado.
a
¡¡Aviso importante!!¡¡Aviso importante!!
¡¡Aviso importante!!
¡¡Aviso importante!!¡¡Aviso importante!!
c
a
c
Limpieza de la unidad:
No use productos químicos volatiles para limpiar esta unidad. Límpiela
pasandole un trapo suave.
Antes de transportar la unidad saque todos los discos de la bandeja porta Cds
LIST A DE POSIBLES PROBLEMAS
SINTOMA
GENERAL
Sin sonido
No hay sonido en un canal o el volumen izquierdo y derecho
no estan en balance
El sonido izquierdo y derecho estan cambiados.
No se escuchan los graves o aparentemente la situación
física de los instrumentos es imprecisa.
Muchos ruidos o interferencias
RECEPCION DE RADIO
El indicador de FM estéreo parpadea
Muchos ruidos o interferencias
El programa FM estéreo no se puede MONO",recibir en
estéreo
FUNCIONAMIENTO DEL CD
La tapa del CD no se cierra porque no hay corriente u otras
funciones han sido seleccionadas antes de cerrar.
No comienza a sonar
Perdida o distorsión de sonido mientras se está escuchando
FUNCIONAMIENTO DE LA GRABADORA
No se puede grabar
No se puede escuchar o grabar y existe una gran
disminución en el nivel de sonido.
Demasiada distorsión y oscilación o perdida de sonido.
• Presione el botón “VOLUME UP”
• Están conectados los auriculares. Desconectelos.
• Vuelv a a ajustar la unidad presionando el interruptor “POWER/
STANDBY”.
• De repente se para “OFF” cuando está en marcha,se ha
activado la función TIMER ON. Mantenga presionado el botón
“STOP” hasta que el indicador“TIMER OFF” aparezca en la
pantalla.
• Compruebe la conexión del altavoz del canal inoperativo.
• Compruebe las conexiones de los altavoces y la situación de
los mismos.
• Compruebe que los altavoces esten conectados
correctamente.
• El TV o el VCR están demasiado cerca del equipo estéreo de
música. Se pare el equipo del TV o VCR.
• Ajuste la antena de cable
• Ponga el interruptor “MODE” en la posición “FM MONO”,la
luz piloto “FM STEREO” se apagará
• Presione el botón “FUNCIÓN” para seleccionar la función
CD y presione el botón “DISC SKIP”. La tapa se cerrará.
• El disco no está colocado correctamente
• El disco está sucio
• El disco está puesto boca abajo
• El lector está en la función de pausa
• Condesación de humedad
• El CD está sucio o arañado
• No hay cinta en la pletina
• Se le han quitado las patillas protectoras a la cinta
• La cinta esta dañada
• La cabeza está sucia
• Acumulación magnética en la cabeza de grabación y lectora
• Contaminación en los cabrestantes o en el rodillo
CAUSA ( Y REMEDIO)
- S20 -
Page 62

ESPECIFICACIONESESPECIFICACIONES
ESPECIFICACIONES
ESPECIFICACIONESESPECIFICACIONES
Sección radio
Radio frecuencias FM 87,5 – 108 MHz
MW 531 – 1602 kHz 9kHz (otros paises)
AM 530 – 1710 kHz 10kHz (U.S.A y Canada)
Antena FM: Antena de rabo de cerdo
AM/MW: AM/MW antena circular
Sección amplificador
Distorsión 10% de 1kHz
Potencia de salida 10W x 2 (10% THD)
Frecuencia de respuesta 80 Hz a 16 kHz, +- 3 dB
Consumo de energía 85 W
Requisitos de energía AC – 100V 50/60Hz (Japan)
AC – 110/120V – 220/240V 50/60Hz (otros paises)
AC – 120V 60Hz (USA y Canada)
AC – 220V 50Hz (Hong Kong y China)
AC – 230/240V 50Hz (Europa)
AC – 240V 50Hz (Australia)
Sección Lector de discos compactos
Canales 2 canales
Radio S/N 60 dB
Distorsión y oscilación inapreciable
Cuantificación 1 bit linial por canal
Receptor de luz Semiconductor laser
Receptor de longitud de ondas 790nm
Sección de la grabadora
Formato de pistas 4 pistas , 2 canales
Frecuencia de respuesta Cinta normal: 80 – 10,000 Hz
Radio de señal de ruido 40 dB (cinta normal)
Distorsión y oscilación 0,35% (WRMS)
V elocidad de la cinta 4,8 cm por segundo
Tiempo de rebobinado 120 segundos (C-60)
Tiempo de avance rápido 120 segundos (C-60)
Sistema de grabación AC bias
Sistema de borrado AC erase (borrado)
Motor DC motor x 1
Cabezas Grabación/ Reproducción x 1 (Pletina A)
Cabeza de borrado x 1 (Pletina A)
Cabeza de reproducción x 1 (Pletina B)
Sección comun
Unidad principal
Dimensiones (anchoxprofundoxalto) 288mm x 373mm x 323mm
P eso 6.44 kg
Altavoces
Dimensiones (anchoxprofundoxalto) (230mm x 283mm x 313mm) x 2
P e so 3.18 kg x 2
Las especificaciones y la apariencia externa pueden cambiar sin aviso previo debido a la continua.
- S21 -
811-277291-080
 Loading...