

Page 1
DVD3200
Installation and Owner’s Manual
Audiovox Corporation
150 Marcus Blvd.
Hauppauge, NY 11788
1-800-225-6074
www.audio vox.com
Page 2
Pag e
Co n te n ts ...................................................................................................................................................2
Sa fe ty......………………………………….................................................................................................. 3
Introduction...............................................................................................................................................4
Insta lla tio n .............................................................................................................................................5-6
Front Panel Controls.................................................................................................................................7
Rear Panel Connections...........................................................................................................................8
Sta n d A lon e DV D R e mo te C o n tr ol F u n c tio n ............................................................................................9
Standard Connections............................................................................................................................10
Ge ttin g S ta rte d ........................................................................................................................................12
DVD Ico n L is t..........................................................................................................................................13
Au d io C D Ico n L ist..................................................................................................................................14
DVD O p e ra tio n ..................................................................................................................................1 5 -1 6
Pla y ing a V ide o CD ...........................................................................................................................16-1 8
Fa v o rite T ra ck S e le c tio n (FT S)..........................................................................................................19-2 0
Cu s to mizin g D V D P lay..................................................................................................................... 21-2 3
Troubleshooting......................................................................................................................................24
Maintenance...........................................................................................................................................25
Sp e c ificati o n s..........................................................................................................................................26
Contents
WARNING
RISK OF ELECTRICAL
SHOCK, DO NOT OPEN
CAUTION: TO REDUCE THE RISK OF
ELECTRICAL SHOCK, DO NOT REMOVE
COVER (OR BACK). NO USER
SERVICEABLE PARTS INSIDE. REFER
SERVICING TO QUALIFIED SERVICE
PERSONNEL.
The lightning flash with the arrowhead symbol,
within an equilateral triangle, is intended to alert the
user to the presence of uninsulated "dangerous
voltage" within the product's enclosure that may be
of sufficient magnitude to constitute a electric
shock to persons.
The exclamation point within an equilateral triangle
is intended to alert the user to the presence of
important operating and maintenance (servicing)
instructions in the literature accompanying the
appliance.
2
Page 3
WARNING: TO PREVENT FIRE OR SHOCK HAZARD, DO NOT EXPOSE THIS PRODUCT TO
RAIN O R M OISTUR E
.
3
Page 4

Introduction
g
Congratulations on your purchase of an Audiovox DVD3200! Your DVD-Video player is a Player for
digital video discs conforming to the universal DVD Video standard. With it, you will be able to
Enjoy full-length movies with true cinema picture quality, and stereo sound. The unique features of
DVD
-Video, such as selection of soundtrack and subtitle languages, and of different camera angles
(depending on the disc), are all included. You will find your player easy to use, by way of the On
Screen Display, in combination with the remote control, as well as the m ain faceplate controls. It is
important to note that CD-R, and CD-RW discs must be FINALIZED before they can be played on
this player. The disc types which run on the player, feature one or more of these logos on the disc
DVD- Video
DVD has brought about a true revolution in video quality. The wonders of DVD -Video are possible
due to the use of the latest state-of-the-art M PEG 2 data compression that enables an entire movie
to be put on a single 5-inch disc. The complex M PEG 2 technology captures even the most
complex pictures in all of their original glory. Technically, DV D-Video provides crystal clear digital
pictures with a high resolution of over 500 lines and 720 pixels (picture elements) to each line!
This is more than double the resolution of VHS, better than Laser Discs, and is the closest match
to the digital masters made in the recording studios! DVD -Video is poised to be the universal
video system of the future, offering optimal viewing quality on any TV screen.
Unpackin
First, check and identify the contents of your DVD3200 player package, as listed below:
- DV D -V id eo P l ay e r
- DIN Plu g P o w e r Harn e ss
- Powe r Harn e s s E x te n sio n
- DIN Sle e v e
- 6' Stereo Audio/Video RCA C able
- M ou n tin g S tra p
- Ac ce s so r y Kit
- DIN Sle e v e R e mo va l Too ls
- Stand-Alone Remote Control with Batteries
If any of these items should be damaged or missing, please inform your supplier without delay.
Please keep all packaging materials, as you might need to transport your player in the future.
4
Page 5
Installa t ion-DVD 3200
Th is unit is d e s ig ned fo r ins ta lla t io n in v e h ic le c a b s w it h a n e x is tin g radio ope n ing. In m a n y
cases, a special installation kit will be re quired to m ount th e D VD3200 to the dashboard.
These kits are available at electronics supply stores and c ar stereo specialist shops. Always
check the kit application before purchasing to make sure the kit works with your vehicle.
Universal Installation Procedure Using DIN Mounting Sleeves
Slide the mounting sleeve off of the chassis. If it is locked into position, remove the end caps and
1)
use the removal tools (supplied) to disengage it.
Check the dashboard opening size by sliding the mounting sleeve into it. If the opening is not large
2)
enough, carefully cut or file as necessary until the sleeve easily slides into the opening. Do not
force the sleeve into the opening or cause it to bend or bow. Check that there is sufficient space
behind the dashboard for the DVD player chassis. Wire prior to actually installing the sleeve. (See
Figure 10 on page 15) Wiring the DIN power harness assembly should take place after hole size is
confirmed. Mount sleeve after wiring.
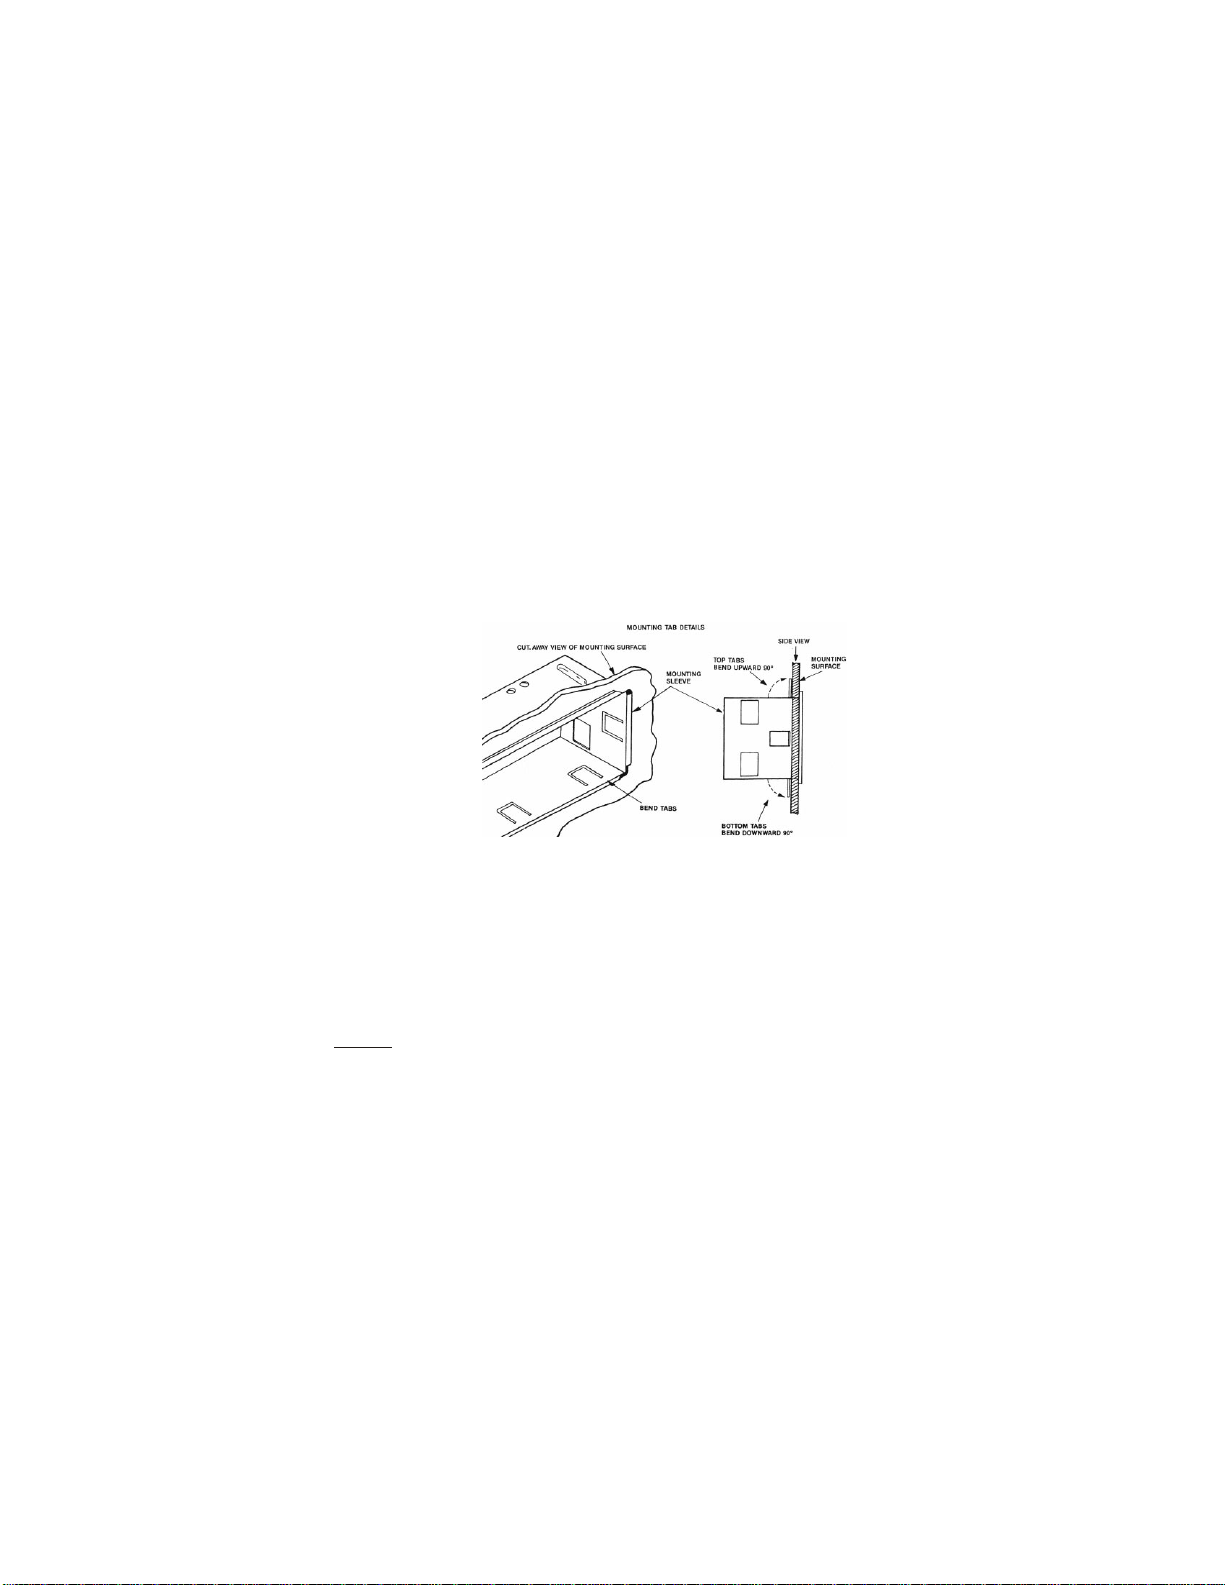
Locate the series of bend tabs along the top, bottom, and sides of mounting sleeve. W ith the sleeve
3)
fully inserted into the dash opening, bend as many tabs as necessary so that the sleeve is firmly
secured to the dashboard.
Figure 1
Follow the wiring diagram carefully, (See Figure 10 on page 15) and make certain all connections
4)
of the wiring harness are properly secured and insulated to ensure proper operation of this unit.
After completing the wiring connections, turn the unit on to confirm operation (ignition switch must
be “ON”). If unit does not operate, recheck all wiring until problem is corrected. Once proper
operation is achieved, turn off ignition switch and proceed with final mounting of the chassis.
Carefully slide the DVD player into the mounting sleeve, making sure it is right-side-up until fully
5)
seated, and that the spring clips lock it into place.
Attach one end of the DIN mounting strap (supplied) to the screw stud on the rear chassis using the
6)
flange nut provided (See Figure 2 on page 6). Fasten the other end of the DIN mounting strap to a
secure part of the dashboard, either above or below the DVD player using the screw and flange nut
provided. Bend strap to position as necessary.
The rear of the DVD player be supported with the strap to prevent damage to the
CAUTION:
dashboard from the weight of the DVD player or improper operation due to vehicle vibration.
MUST
:
5
Page 6

Ins ta l la tion Us ing Kits:
If your vehicle requires the use of an installation kit to m ount this DVD player, follow the instructions
1)
included with the installation kit to attach the DVD player to the mounting plate supplied with the kit.
Wire and test the DV D player as described in step 4 on page 5.
2)
Install the DVD player / mounting plate assembly to the sub-dash according to the instructions of the
3)
insta lla tion kit.
Attach the DVD player support strap to the player and the dashboard as described in step 6 on page
4)
5.
Replace the dashboard trim panel
5)
.
Figure 2
Page 7

Figure 3
Page 8
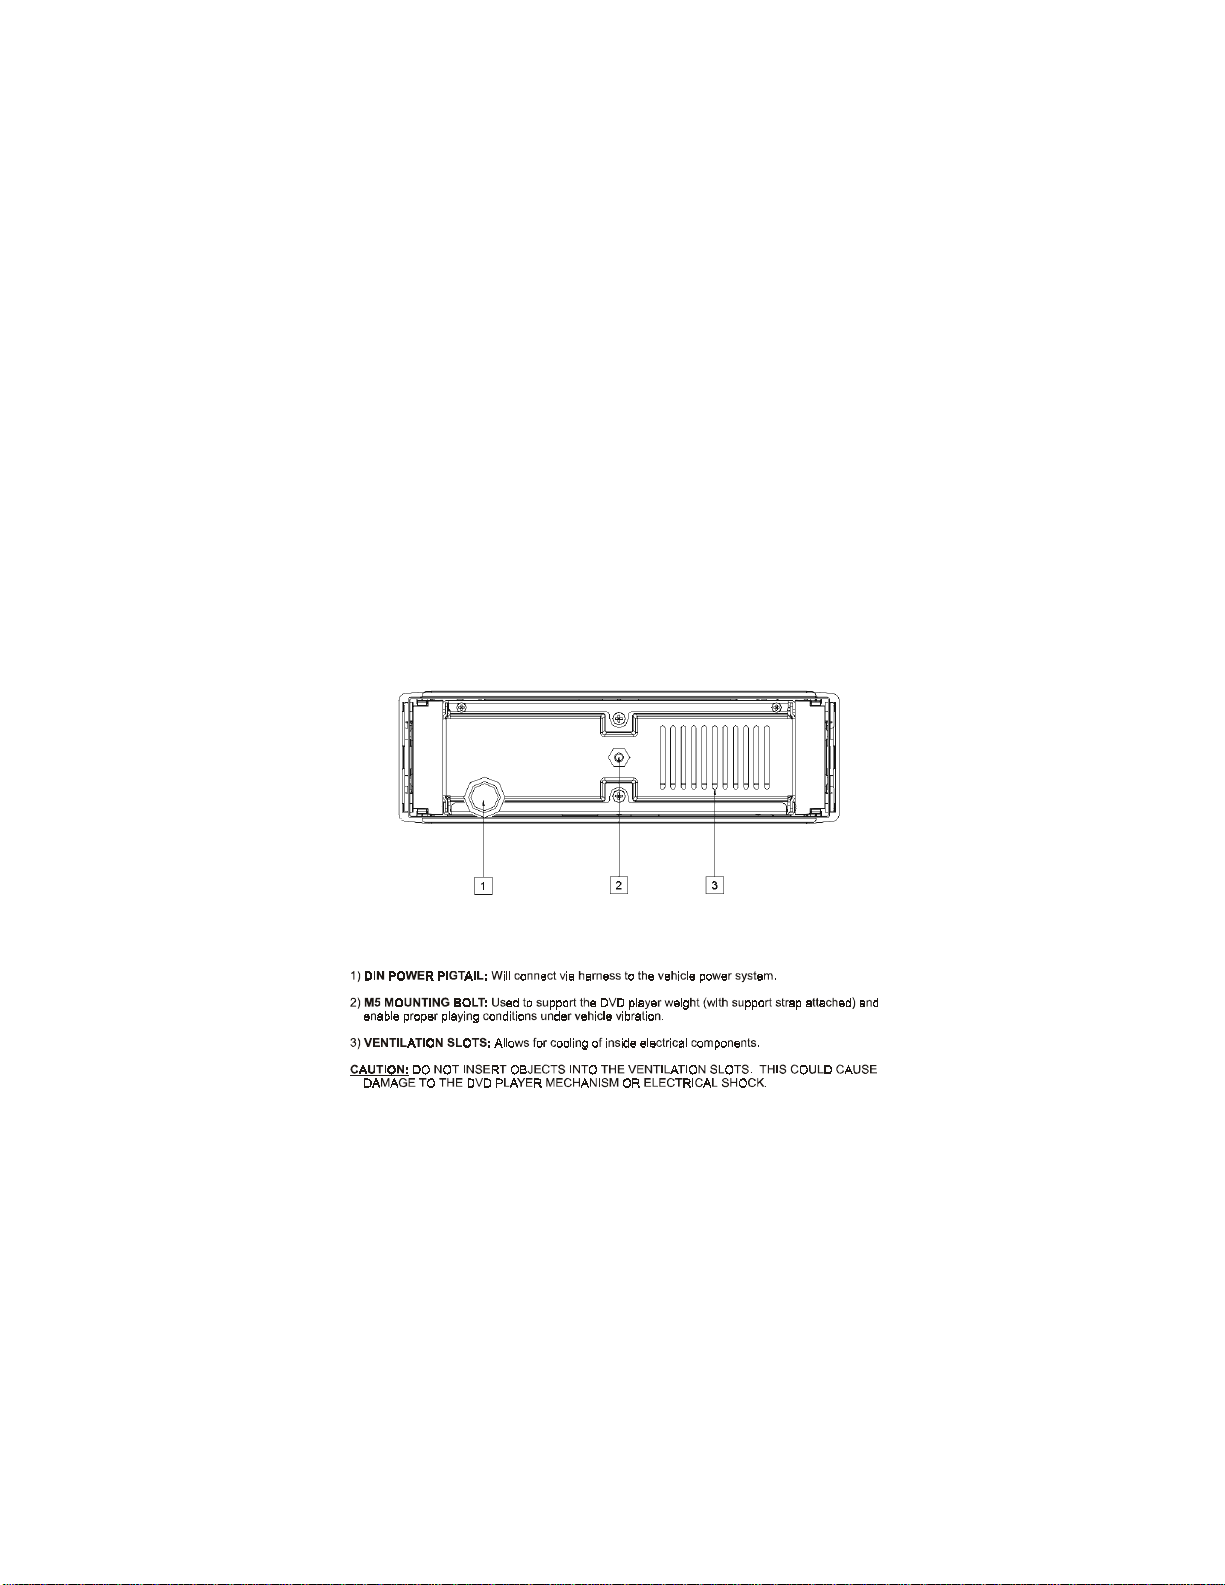
9) Select this button to access the DVD m enus. Titles and chapters may be included on the
MENU:
DVD O SD m enu along with Camera Angles, Spoken language, and Sub-title options. To remove the
OSD m enu press the m enu button again.
10) Pressing this button will stop play of the DVD disc.
STOP:
11) Pressing this button will start play of the DVD disc.
PLAY:
12) Pressing this button will shift the play to the previous chapter.
PR E V IOU S / FA S T REV E RSE:
13) Pressing this button will skip forward to the next chapter.
NEXT / FAST FORWARD:
14) If pressed in the OSD menu m ode this button will return you to the previous screen.
GO BACK:
This works the same as the RETURN on the remote control.
15) f pressed, this button will temporarily stop play of the DVD on the frame of play you are
PAUSE: I
watching. Pressing this button again will step frame by frame. Pressing PLAY resumes play.
16) This eye picks up the IR signal from the remote. A blocked
INFRARED SENSOR EYE:
“eye” will not allow the remote to function properly.
Rear Panel Connections:
Figure 4
8
Page 9
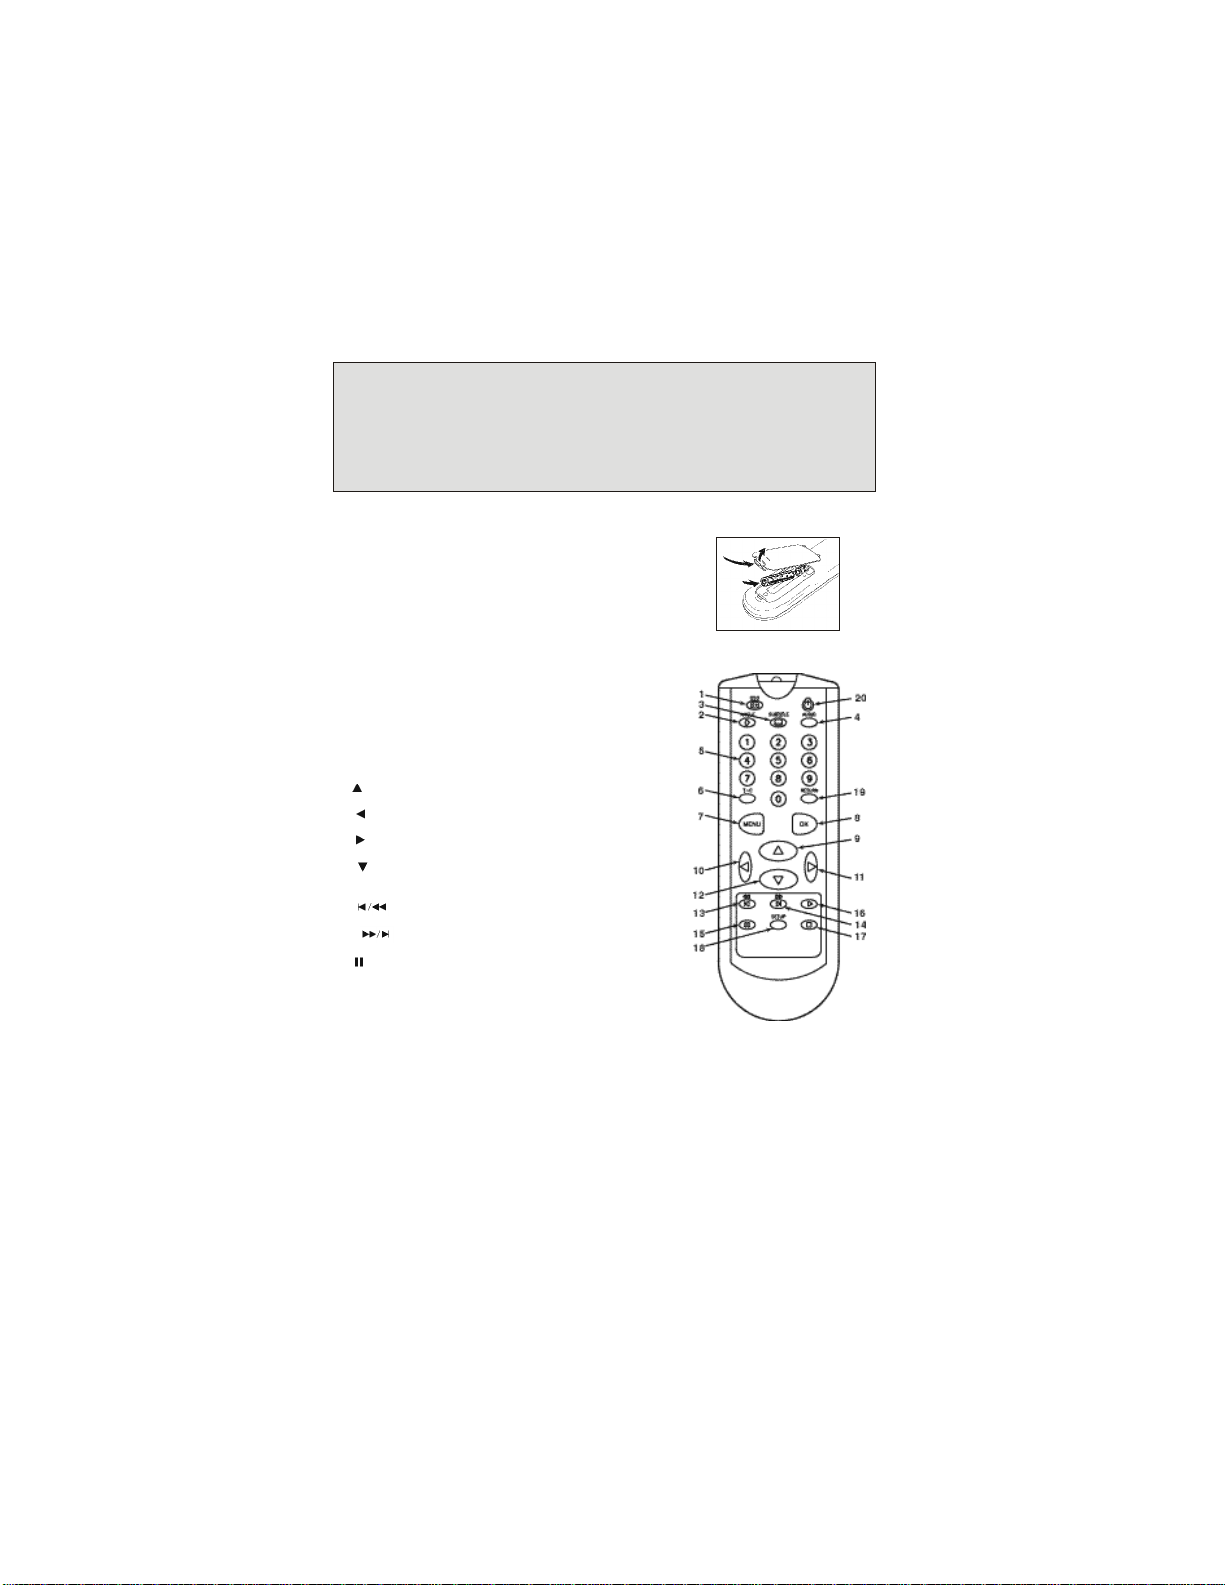
Figure 5
Figure 6
(Figure 5)
Loading the Batteries into the Infrared Remote Control
Open the battery compartment cover and insert two “AAA” (R03) batteries as indicated inside the
battery compartment. Note polarity. Close the cover.
CAUTION: DO NOT MIX OLD AND NEW BATTERIES. NEVER MIX DIFFERENT TYPES OF
BATTERIES (STANDARD, ALKALINE, AND SO ON).
OPERATION NOTE:
remote control. Always point the remote control directly at the DVD player, making sure there are
no obstructions in the path of the infrared beam. When there are corresponding keys on the front
panel, they can be used also.
Stand-Alone DVD R em ote Control Function
1) (On Screen Display) This button turns the on
OSD:
screen display on and off.
2) If the DVD disc contains sequences
ANGLE:
recorded from different camera angles, pressing this
button causes the angle icon to appear and show
you the number of camera angles available and
allows you to change the angle if you wish.
3) This button controls the language
SUBTITLE:
selector and allows you to choose whether subtitles
are able to be viewed or not.
4) This button allows you to select the language
AUDIO:
you prefer from the menu.
5) These numeric keys allow you to directly enter
0-9:
the highlighted menu chapter, or track selection.
6) This button is the mode selector for the Title /
T-C:
Ch a pte r.
7) Pressing this button will enable the user to
MENU:
select the DVD defined menu.
8) Use this button to acknowledge the highlighted
OK:
m e nu s e lection .
9) : Use this icon to navigate through the menu
selections. In play mode will also pause play.
10) : Use this icon to navigate the menu selections.
In play mode this button will also fast reverse.
11) : Use this icon to navigate the m enu selections.
In play mode this button will also fast forward 4X.
12) : Use this button to navigate the menu selections.
In play mode this button will also allow the DV D play
o be viewed in slow motion.
13 ) :Pre s s in g th is b u tto n w ill se le ct th e p re v io u s
chapter.
14
) : Pre ssing th is b u tton will sele c t th e n e xt
chapter.
15) : Pressing this button will pause the DVD play.
Pressing pause again will step through the sequence
frame b y fra me.
Unless otherwise m entioned, all operations can be directly carried out with the
: (Figure 6)
9
Page 10

13 ) : Pr e ssing th is b u tto n will star t the DV D p l ay.
Another press will resume play at the point at
which the DVD w as stopped.
14) :Pressing this button will stop the DVD play.
15) With a disc inserted in the DVD player,
SETUP:
in stop mode this button will allow you to select
playe r se ttin g s su c h a s a sp e ct r a tio, e tc .
16) This button will allow you to go back
RETURN:
one menu step.
17) : Pressing this button will turn the DVD player
on or set the player on standby.
Figure 6
10
Page 11

Page 12

Getting Started
Loading a Disc
1) Insert the DVD disc into the front slot on the
DVD3200.
2) Make sure that you insert the disc with the label
side up.
3) The disc should begin playing, if power is available
to the DVD player, even though the player is of
initially off. If the DVD player is off but power is
available, the player will automatically turn on
when the disc is inserted.
Playing a DVD -Video Disc
You will recognize DVD -Video discs by the logo. Depending on the material on the disc (a movie,
video clips, a dram a series, etc.) These discs may have one or m ore Titles, and each Title may
have one or m ore Chapters. Play stops at the end of each Title. To make access easy and
convenient, your player lets you move between Titles and also between Chapters.
NOTE: D u r in g p la y, va r io u s ic ons w ill a p p e a r o n the T V s c r e e n fo r a b o u t 2 s e c o n d s to c o nfirm
that a function has been selected. You can get rid of these icons by pressing the OSD
key on the remote. At any time during play, you can press OSD to call up the Play
Banner, which shows you which functions are active, for about 2 seconds. To keep the
Play Banner on the screen, hold OSD for a couple of seconds. To get rid of the Play
Ban n er, p res s the O S D ag a in .
12
Page 13

DVD Icon List:
..............................................................................................................................................Play
.......................................................................................................................................... Pau s e
..............................................................................................................................................Stop
..............................................................................................................Search Forw ard
............................................................................................................Se a rch Ba ck ward
...................................................................................................Slow F o rward
..........................................................................................................................A-B Repeat Start
..................................................................................................................................A-B R epeat
.................................................................................................................................Repeat Disc
.................................................................................................................................Repeat Title
...........................................................................................................................Repeat Chapter
...........................................................................................................................Chapter Shuffle
...................................................................................................................................Title Ind ic a tion
............................................................................................................................Chapter Indication
...............................................................................................................................Disa b l e F u n c tion
.................................................................................................................................................Ang le
............................................................................................................................No Altern a te A n gle
.............................................................................................................................Su b title Language
................................................................................................................................Au d io Language
...................................................................................................................................Aud io S y s te m
....................................................................................................................R e maining Time of Title
....................................................................................................................................Elap s e d T im e
............................................................................................................................................Res u me
.........................................................................................................................................Total Tim e
Page 14

Audio CD Icon List:
................................................................................................................................................Play
..........................................................................................................................................Pa us e
.............................................................................................................................................Stop
..............................................................................................................Se a rc h Forward
...........................................................................................................S e arc h B a c k w a rd
...................................................................................................Slo w F o rwar d
.........................................................................................................................A -B R e p e a t S ta rt
........................ .........................................................................................................A-B Repeat
.................................................................................................................................Repeat Disc
...............................................................................................................................Repeat Track
.........................................................................................................................................Sh u ffle
................................................................................................................................Trac k In d i ca tion
................................................................................................................................Ind ex In d ic a tion
...................................................................................................................Re m aining Time of Title
..................................................................................................................................Ela p se d Tim e
........................................................................................................................................Total Tim e
.................................................................................................................................................Ejec tin g
1
......................................................................................................................................................Ejec t
2
.................................................................................................................................................Inse rtin g
3
.................................................................................................................................................Reading
4
14
Page 15

g
DVD Operation
Playing a T itle
Play starts when you insert a disc into the DVD player. If the disc is in a stopped state, press on
the front faceplate or the remote. The disc may invite you to select an item from a menu. If the
selections are numbered, press the appropriate numerical key; if not, use the keys to
highlight your selection, and press OK. Play will stop at the end of the Title, this can result in return
to the menu. To go on to the next Title, press . To stop play at any other time, press Stop. You
can resume play from the point at which you stopped. Press when you see the icon on the
screen.
The feature applies, not only to the disc in the player, but also to the last four discs you
hav e pla y e d .
Simply reload the disc, press if the disc has been stopped, and when you see the icon on
the screen, press again
Moving to Another Chapter
When a title on a disc has more than one chapter, you can move to another chapter as follows:
Press briefly during play to step forward to the next chapter.
Press briefly during play to return to the beginning of the current chapter. Press briefly
again to step back to the previous chapter.
To go directly to any chapter, enter the chapter number using the numerical keys (0-9).
NOTE: If the num ber has mo re than one digit, press the num bers in rapid succession. For
more information about chapters, see “Checking the contents of DVD-Video discs:
Men us”.
Movin
When a disc has more than one title (which you can see from the OSD), you can m ove to another
title as fo llow s :
Press T-C, then press briefly during play to step forward to the next Title.
Press T -C, the n p re s s brie fly d u rin g p la y to re tu rn to th e b eg in n in g o f th e cu rre n t title.
Press b rie fly ag a in to s te p b a ck to th e p re v io u s title .
To go directly to any title, press T-C, then enter the title number using the numerical keys.
NOTE: If the num ber has mo re than one digit, press the num erical (0-9) keys in rapid
succession. For more information about chapters, see “Checking the contents of DVD Video discs: Menus”.
to Another Title
.
15
Page 16

S ubtit les
g
g
When subtitles are available on a disc, you can turn them on by holding down during play
until the subtitles appear.
To step through the languages option, press repeatedly.
To turn th e s u b titles off, h o ld do w n ( 1 se c o nd ) agai
n.
Checkin
For titles and chapters, selection menus may be included on the disc. The DVD’s menu feature
allows you to make selections from the menus. Press the appropriate num erical key; or use the
keys to highlight your selection, and press OK.
Pre s s M E NU .
If the present title has a root menu, this now appears on the OSD.
The root menu can list camera angles, spoken language and subtitle options, and chapters for the
title.
To remove the root menu, press MEN U again.
Press T-C followed by MEN U.
If the disc has a title menu, this now appears on the OSD.
To remove the title menu, press T-C again.
Still Picture and Step Frame
To step forward to the next picture fram e, press again.
To return to p lay, p re s s .
Playin
clips, a drama series, etc) these discs may have one or m ore tracks, and tracks may have one or
more indexes, as indicated on the disc case. To make access easy and convenient, your player
lets you move between tracks, and between indexes.
Some Video CD ‘s have Play Back Control (PBC) which is a predefined playback sequence stored
on the disc.
NOTE: D u r in g play, var io us ic o ns w ill a p p e a r o n th e T V scre e n for ab o u t 2 s e c o nds to c o nfirm
that a function has been selected. You can get rid of the icon by pressing OSD. At any
time d ur in g play, yo u c a n p re s s O SD to c a ll up the P lay Ban n e r, which s h ow s you
which functions are active, for about 2 seconds. To keep the Play Banner on the
screen, hold down OSD for a couple of seconds. To get rid of the Play Banner, press
OSD ag a in .
the Co ntents of DVD-Video Discs: M enus
To get a still picture, press during play.
a Video CD
You will recognize Video CD ‘s by the logo. Depending on the material on a disc (a movie, video
16
Page 17

Moving to Another Index
y
)
g
y
When a track has more than one index (as indicated on the disc case), you can move to another
index as follows:
Press briefly during play to step forward to the next index.
Press briefly during play to return to the beginning of the current index. Press briefly again
to step back to the previous index.
To go directly to any index, enter the index number using the numerical keys (0-9).
NOTE: If the num ber has mo re than one digit, press the num erical (0-9) keys in rapid
succession.
Pla
back Control (PBC
Load a Video CD with PBC and press .
The PBC menu appears on the TV screen. (This will be different for different discs).
Go through the menu with the keys indicated on the TV screen until your chosen passage starts to
play. If a PBC menu consists of a list of titles, you can select a title directly.
En te r y o u r ch o ice with the , o r n u meric a l ke y s (0 -9).
Pre s s the to sta rt p la y b a ck o f th e title .
Pre s s R E T UR N to g o b a ck to th e p r ev io u s men u .
PBC can be turned off in the setup menu
Camera An
If the disc contains sequences recorded from different camera angles, the angle icon appears
showing the number of available angles, and the angle being shown. You can change the cam era
angle if you w ish.
To get another angle, press .
The angle icon will show the next angle.
To go to any angle directly, enter the angle number using the num erical keys (0-9).
NOTE: The angle icon rem ains on the screen unless you turn off the angle feature.
To turn off the angle feature, press OSD .
The angle icon disappears.
To turn the angle feature on again, press again.
The angle icon appears.
12 Minute Pow er-Off Dela
Your DVD player is designed to stay powered up for 12 m inutes after the ignition is shut down.
The user can still watch a movie after the vehicle is turned off, but no t lo n g enough to drain the
batte r y.
The current scene will not be lost due to vehicle shut down. After the 12 minute delay, you can
still eject an already inserted disc, or insert a disc. To insert a disc, sim ply press EJECT to
“wake-up” the DVD unit and then the DVD w ill accept the disc.
le
17
Page 18

Video Search
g
g
To search forwards or backwards through the disc at 4X normal speed, hold down or for
about 1 second during play.
Search begins and sound is muted.
To step up to 32X normal speed, press down or again.
To go directly to 32X norm al speed, hold down or until the or icon appears.
To return to 4X normal speed, press down or again.
Search speed and direction are indicated on the screen for 2 seconds each time or is
pre ss e d .
To end the search, press or , or stop as desired.
Playin
an A udio CD
Audio CD ‘s contain music tracks only. You will recognize CD ‘s by their logo. You can play
them in conventional style using a stereo system, or via the TV using the OSD.
You can play audio CD ‘s using the OSD only, or using keys on the remote control.
a Disc
Playin
Play starts as soon as the disc is inserted.
If the disc is in a stopped state, press .
The disc starts to play; if the TV is on, the CD play screen appears on the OSD.
Play will stop at the end of the disc. To stop play at any time press STOP.
You can resume play from the point at which you stopped. Press when you see the icon.
The r e su me fe atur e ap p lie s , n o t on ly to th e d isc i n th e p la ye r, bu t a lso to th e la st fo u r d iscs
you have played.
Sim ply reload the disc, press if the disc has stopped, and when you see the icon on
the screen, press again.
18
Page 19

Favorite Track Selection
g
NOTE: Favorite track selection (FTS) is only available for audio discs and can only be
complie d with O SD o n. To sw it c h F T S on or off, r e fe r to s e c tion on S ETT IN GS.
Compilin
Selection”) or by excluding the tracks you do not want to play (”Excluding Tracks”).
To Exclude tracks:
1. Load a disc and go to Stop mode. Press .
an FTS P rogram
On this player, FTS programs can be compiled by selecting the tracks you want to play (”Track
19
Page 20

2. U se the or key to move to the first track number you want to exclude.
3. P ress th e ke y.
4. Exclude further track numbers in the same way. If you change your mind, you can re-include
any tra ck n u m be r b y m o vi n g ba c k to it a n d p res s in g th e ke y.
5. To clear your whole selection and start again, press stop on the DVD player or RETURN on the
remote c o n tro l.
When your FTS program is complete, press to start play, or R ETU RN to go back to STOP
mode. In either case, the FTS program will be automatically memorized.
To sele ct T ra ck s :
1. Load a disc and go to the STOP mode.
2. P ress .
3. Use th e o r k e y to m o v e to the fi rs t track yo u w a n t to s e le c t.
4. P ress th e ke y.
5. Select further track numbers in the same way. If you change your mind, you can
de-select the track numbers in reverse order by pressing the key as required.
6. To clear your whole selection and start again, press STO P on the DVD player or RETUR N on
the r emo te co n tr ol.
When your FTS program is complete, press the to start play, or RETURN to go back
to S TOP mo d e. In e ithe r ca s e , th e F T S p ro g ram will be a uto m a tica lly m e m o rize d .
NOTE: You can have a total of 100 FTS programmed discs. If you exceed that num ber,
the least frequently played program(s) are automatically deleted.
20
Page 21

Cu s tomizing DVD Pla
y
g
Playing FTS
When Auto FTS is switched on and the disc is complied with FTS program, first press the or
to start the FTS program and then press to start playback of the FTS program .
Settin
s
In the settings menu, you can customize your player to suit your own particular requirements.
In stop mode:
Press setup to obtain the Settings screen.
Move to the function you want to change using ( / ) then use ( / ) o scroll
to your preferred option.
To exit the settings menu, press RETURN or SETUP.
21
Page 22

Audio
The sound will be in the language you choose provided this is available on the disc in play. If
not, speech will revert to the first spoken language on the disc.
Subtitle
The subtitles will be in the language you choose provided this is available on the disc in play. If
not subtitles will revert to the first subtitle language on the disc.
TV Shape
Factory setting is 4:3. You can choose Letterbox for a “wide-screen” picture with black bars top
and bottom, or Pan Scan, for a full-height picture with the sides trimmed. If the disc has pan
Scan, the picture then m oves (scans) horizontally to keep the main action on the screen
.
Page 23

Auto Play
g
guag
Factory setting On means that discs start to play automatically when loaded. Set to
OFF if you prefer to start play manually. Setting not effective if disc contains auto play
informa tion .
Auto FTS
Factory setting ON means that when a disc with an FTS program (See “Com piling an
FTS program ”) is loaded, the FTS program automatically starts to play. Set to OFF if
you prefer to control FTS play manually.
Di
ital Output
Not available with this unit. Leave this setting on OF
Sound
This feature is not available with this unit. Leave this setting on OF F.
Video Shift
Factory setting is such that the video will be centered on your screen. Use this setting
to personalize the position of the picture on your TV by scrolling it to the left or right.
OSD Lan
The player’s on-screen display will be in the language you choose.
Audio CD Search
To search forwards or backwards through the disc at 4X normal speed, hold down or for
about 1 second during play.
Search begins, and the sound is partially muted.
To step up to 8X normal speed, press or again.
Search goes to 8X speed, and the sound is muted.
To go directly to 8X normal speed, hold down or again.
If the TV is on, search speed and direction are indicated on the screen each tim e or is
pre ss e d.
To end the search, press , , or as desired.
e
F.
Page 24

24
Page 25

Cleaning Discs
Some problem s occur because the disc inside the player is dirty. To avoid these problems, clean
your discs regularly, in the following way:
When a disc becom es dirty, clean it with a cleaning cloth. W ipe the disc from the center out with
a cleaning cloth. After playing, store the disc in it’s case.
CAUTION: Do not use solvents such as benzine, thinner, commercially available cleaners, or
anti-static spray intended for analog discs.
25
Page 26

Specifications
Playback System
DVD-Video
Video CD
CD (CD-R and CD -RW)
Optical Read-out System
Type Semiconductor last GaAIA’s
N u m eric al Ap e r ture 0.60 (DVD)
0.4 5 (V C D/CD)
W ave L ength 6 50n m (D VD )
780nm (VCD/CD)
DVD Disc Format
M ed iu m O p tic a l Disc
D ia m ete r (1 2 cm ) ( 8cm )
Play in g T im e ( 1 2cm)
O n e laye r 2 . 1 5 h ou rs*
Du al laye r 4 h our s
Tw o si d e, s ing le la y er 4.3 0 ho u rs
T wo side , du a l layer 8 h o ur s
.
Video Output Format
Signal
C om po s i te V ide o Ou t p ut
D ig it a l Com pression M P E G2 f or DVD
M PEG 1 for V C D
D V D 5 0 H z 6 0Hz
Horizontal Resolution 720 pixels** 720 pixels**
Vertical Resolution 576 lines** 480 lines**
V C D 50 H z 60 Hz
H oriz ont a l Re sol u t io n 7 20 p ixe ls * * 720 pixels**
Vertical Resolution 576 lines** 480 lines**
* Typical playing time for a movie with 2 spoken languages and three subtitle languages.
** Equivalent to 500 lines on your TV
Video Performance
Video Ou t p ut 1Vp -p in to 7 5 Ohm
26
Page 27

150 Marcus Blvd.
Hauppauge, NY 11788
1-800-225-6074
www.audiovox.com
P/N 128-6004
Revision A
12/2000
 Loading...