

Page 1

WARRANTY
EGO SYStems Inc. warrants the return policy to its original purchaser as follows; All EGO SYS products,
under normal use, will be free from faulty as long as the purchaser owns this product.
The terms of warranty is 15 months to EGO SYS distributors considering a 3-month temporary stock period
ahead of being sold to the end user. Therefore, the actual term of warranty is 12 months to the end user.
EGO SYS will, at its sole option, repair or replac e a product, which is found to be defective. This warranty
shall be null and void if, in the sole opinion of EGO SYS, a product failure is the result of misuse, abuse,
modification, or misapplication.
Except as expressly provided above, EGO SYS products are provided 'as is' without any kind of warranty. No
claim is made for merchantability or fitness for any purpose.
In no event will EGO SYS be liable for any direct, indirect, consequential, or incidental damages arising out of
use of the product.
The purchaser must contact EGO SYS or its regional representative to receive prior approval before returning
a faulty unit. All such returns must be shipped to EGO SYS' headquarters in Seoul, Korea as being packaged
in the original or equivalent protective packaging material (Rack, PCI card, Power Cables, connection cables),
with freight prepaid and adequate insurance.
If the returned product is deemed to be defective, the repaired or replacement product will be back to you at
no extra charge via the carrier chosen by EGO SYS.
TRADE MARKS
AUDIOTRAK, AUDIOTRAK Prodigy 192 and Prodigy are trademarks of EGO SYStems Inc. IBM is a registered
trademark of International Business Machines Corporation. Windows is a trademark of Microsoft Corporation. Other
product and brand names are trademarks or registered tradem arks of their respective companies.
Y our AUDIOTRAK Dealer
For technical support, contact Audiotrak:
www.audiotrak.net
support@audiotrak.net
Second Edition Jan. 2003
All features and specifications subject to change without notice.
Page 2

CONTENTS
1. Introduction to Prodigy 192........................................................................................ 4
2. Hardware Installation .................................................................................................6
1. System Requirement............................................................................................... 6
2. Preparation for hardware installation .................................................................. 7
3. Installing Prodigy 192 PCI card ............................................................................8
3. Prodigy 192 Driver Software Installation................................................................. 10
4. Connection with external device............................................................................... 17
5. Prodigy 192 Control Panel........................................................................................ 20
1. Pull Down Menu.................................................................................................... 21
2. Clock....................................................................................................................... 22
3. Sample Rate........................................................................................................... 22
4. Analog In................................................................................................................ 22
5. Digital IN – Digital Input selector........................................................................ 23
6. Digital Type –Digital format selector................................................................... 24
7. MIC......................................................................................................................... 24
8. Ana. IN/ Dig. IN – Input Level meter.................................................................. 24
9. OUT/MME –Output Level Adjust fader.............................................................25
10. V irtual 5.1 channel support................................................................................ 25
11. DirectWIRE ......................................................................................................... 26
6. Setting in Applications............................................................................................... 27
1. Windows Multimedia setup.................................................................................. 28
2. Win DVD (included).............................................................................................. 29
3. Analog CD-Rom Output....................................................................................... 32
2
Page 3

4. Native Sound Processor – SpinAudio (Included)............................................... 33
1) Quick Start......................................................................................................... 35
2) Application window........................................................................................... 40
3) Audio Routing .................................................................................................... 43
4) Application Settings........................................................................................... 44
5. nTrack Studio Pro –FARSOFT (Included)......................................................... 47
6. Cubase.................................................................................................................... 49
7. Nuendo ................................................................................................................... 50
8. Logic....................................................................................................................... 51
9. Maven 3D pro – Emersys (Included)................................................................... 52
10. Sonar/Cakewalk .................................................................................................. 53
11. Sound Forge......................................................................................................... 55
12. Wave Lab ............................................................................................................. 56
Specification...................................................................................................................57
Note:
Ego systems Inc. appreciate to the cooperation and the participation of
SpinAudio, Farsoft, Emersys, Steinberg, Native Instruments, Sinus, Abyss, CSI,
Voxengo, Silverspike, PSP audioware and Supaphaser .
3
Page 4

1. Introduction to Prodigy 192
PRODIGY 192 is the premier audio upgrade for PC users with demanding audio needs.
PRODIGY 192 features a 24-bit 192 kHz coaxial output and a 24-bit 96 kHz optical
output, with pro quality 24-bit 96 kHz A/D converters and 24-bit 192 kHz D/A
converters for analog input and output at 104 dB dynamic range.
Multiple connection options include stereo analog line inputs, a Microphone preamp
input with +5V phantom power, an amplified headphone output, plus full-duplex
simultaneous record and playback capability. PRODIGY 192 delivers complete
compatibility with Dolby Digital and DTS surround formats, and when combined with
the included software DVD player, you've got a complete, true 5.1 and 7.1home theater
surround sound system.
PRODIGY 192 supports Advanced NSP (Native Sound Processing) technology that
takes advantage of E-WDM drivers and DirectWIRE. The E-WDM driver supports
PRODIGY 192 for perfect compatibility with Windows XP, 2000, ME and 98SE and
offers ultra-low latency performance with all popular music production applications
including Nuendo, Cubase, Cakewalk, Sonar, and Logic. PRODIGY 192 is the perfect
high-fidelity PC audio upgrade solution for gamers, DVD movie fans, music lovers, DJs,
and even professional musicians.
4
Page 5

Features
- Experience High-Fidelity Surround Sound up to 7.1(with Digital Output)
- Transfer Pure Audio to Digital Devices with Coaxial(192kHz) and Optical(96kHz)
Digital Outputs
- Simultaneous 2 In / 8 Out Sound Processing
- 24-bit, 6 Channel 192 kHz Playback and 96 kHz Recording
- Experience Stereo Audio Sources with Expanded 7.1 Channel Surround Sound
- *Emulate Multi-Channel Surround Sound with SRS TruSurround XT
with Enhanced Bass and Dialog
-Expand Audio V ersatility with Advanced NSP featuring E-WDM and
DirectWIRE
- Plug In with Analog Inputs(2) and Outputs(6)
- Independent Surround Sound Channel Volume Control
- Enjoy High-Fidelity with Integrated Headphone Amp and Microphone
- Pass Pure Audio Signals to Dolby Digital and DTS Decoders
- Support Windows Media 9 with 24-bit, 96kHz 6-Channel Audio
- Support Game Surround Sound APIs such as EAX 2.0 and A3D
* This feature are available with including WinDVD4 AUDIOTRAK version.
5
Page 6

2. Hardware Installation
The Prodigy 192 requires 3-steps of installation: ‘PCI card installation’, ‘Driver
installation’, and finally ‘Connection with external device’. The ‘PCI card installation’
step includes install the Prodigy 192 card into the PCI slot. ‘Driver installation’ is
having the operating system in your computer recognize the Prodigy 192 and building
the communication channel. In the ‘Connection with external device’ step, you will
understand how to connect the Prodigy 192 to other devices such as MIC, Amp, mixer,
and recording devices such as an MD or DAT player.
1. System Requirement
To take advantages of the Prodigy 192 and its full capacity, the computer specifications
are very important. Even though the Prodigy 192 is built to have low-CPU resource
dependability, the computer needs to meet certain requirements in order to get
maximum performance. The Prodigy 192 is not just a simple soundcard, but a
multimedia digital audio device with various functions. Therefore, the performances of
the Prodigy would be affected by the computer specs that are required to process the
vast amount of digital data. A faster CPU, faster hard disk, and larger amounts of RAM
are generally recommended.
Minimum System Requirement
1. Intel Pentium III CPU or equivalent AMD CPU
2. Mainboard with Intel/VIA
3. 128MB of RAM
4. One available PCI slot
5. Microsoft Windows 98SE/ME/2000/XP operating system
6
Page 7
2. Preparation for hardware installation
The Prodigy 192 PCI card and other components in the computer can be easily damaged
by electrical shock. You need to use an anti-static device that can discharge the static
electricity of your body to avoid potential static damage to the cards.
1. The Prodigy 192 card is placed into the anti static plastic pouch as it is packaged.
Do not open the pouch before you install the card.
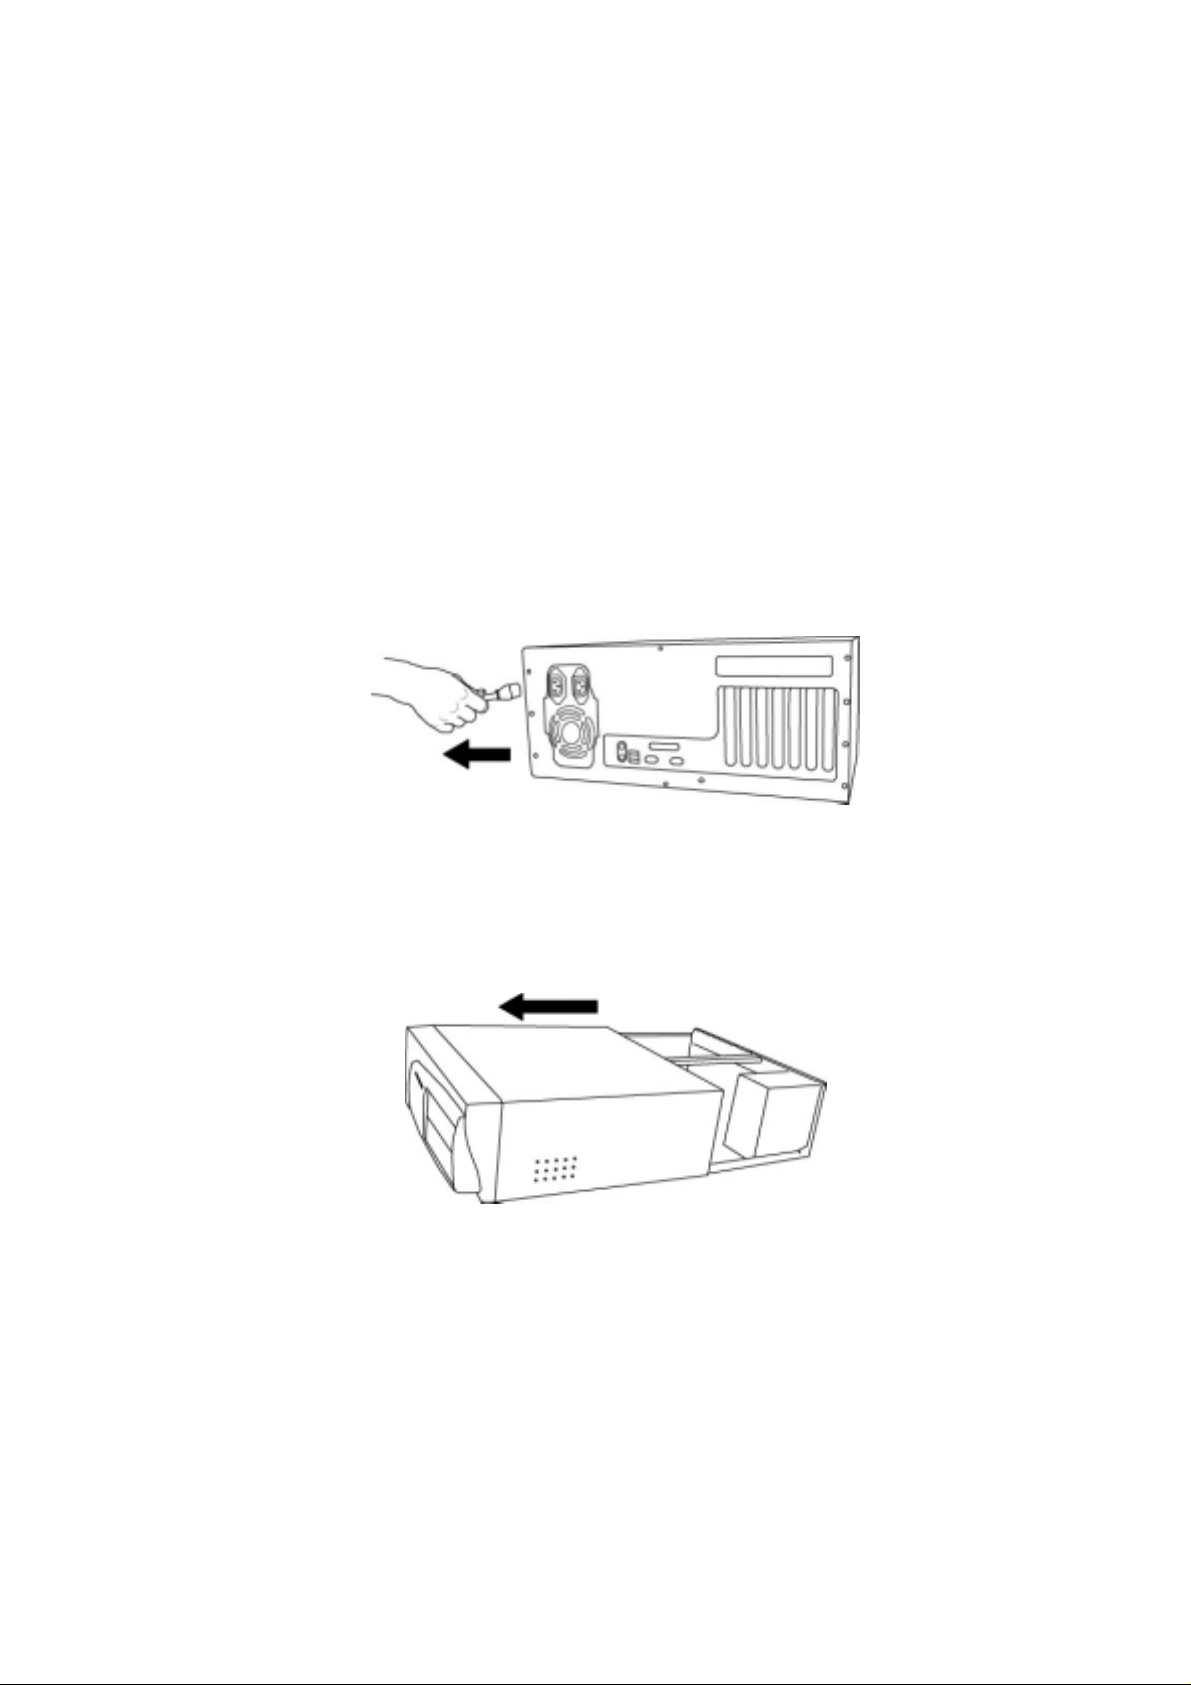
2. Turn off the computer power and remove the power cable from your computer
power supply.
3. Remove the computer cover. Make sure that you have an available PCI slot in
your motherboard to install the Prodigy 192. Please, refer to your computer
user’s manual to remove the cover.
4. To avoid possible static shock to the computer parts, discharge it by touching
the computer case or something grounded. We recommend you to use an antistatic device such as an anti-static wrist band.
5. When you need to hold the Prodigy 192 card, please hold it on the guide or he
edge of card. Do not grab the card by the board.
7
Page 8
3. Installing Prodigy 192 PCI card
Please look for an empty PCI slot. If you do not know which one is an actual PCI slot,
please, read the following;
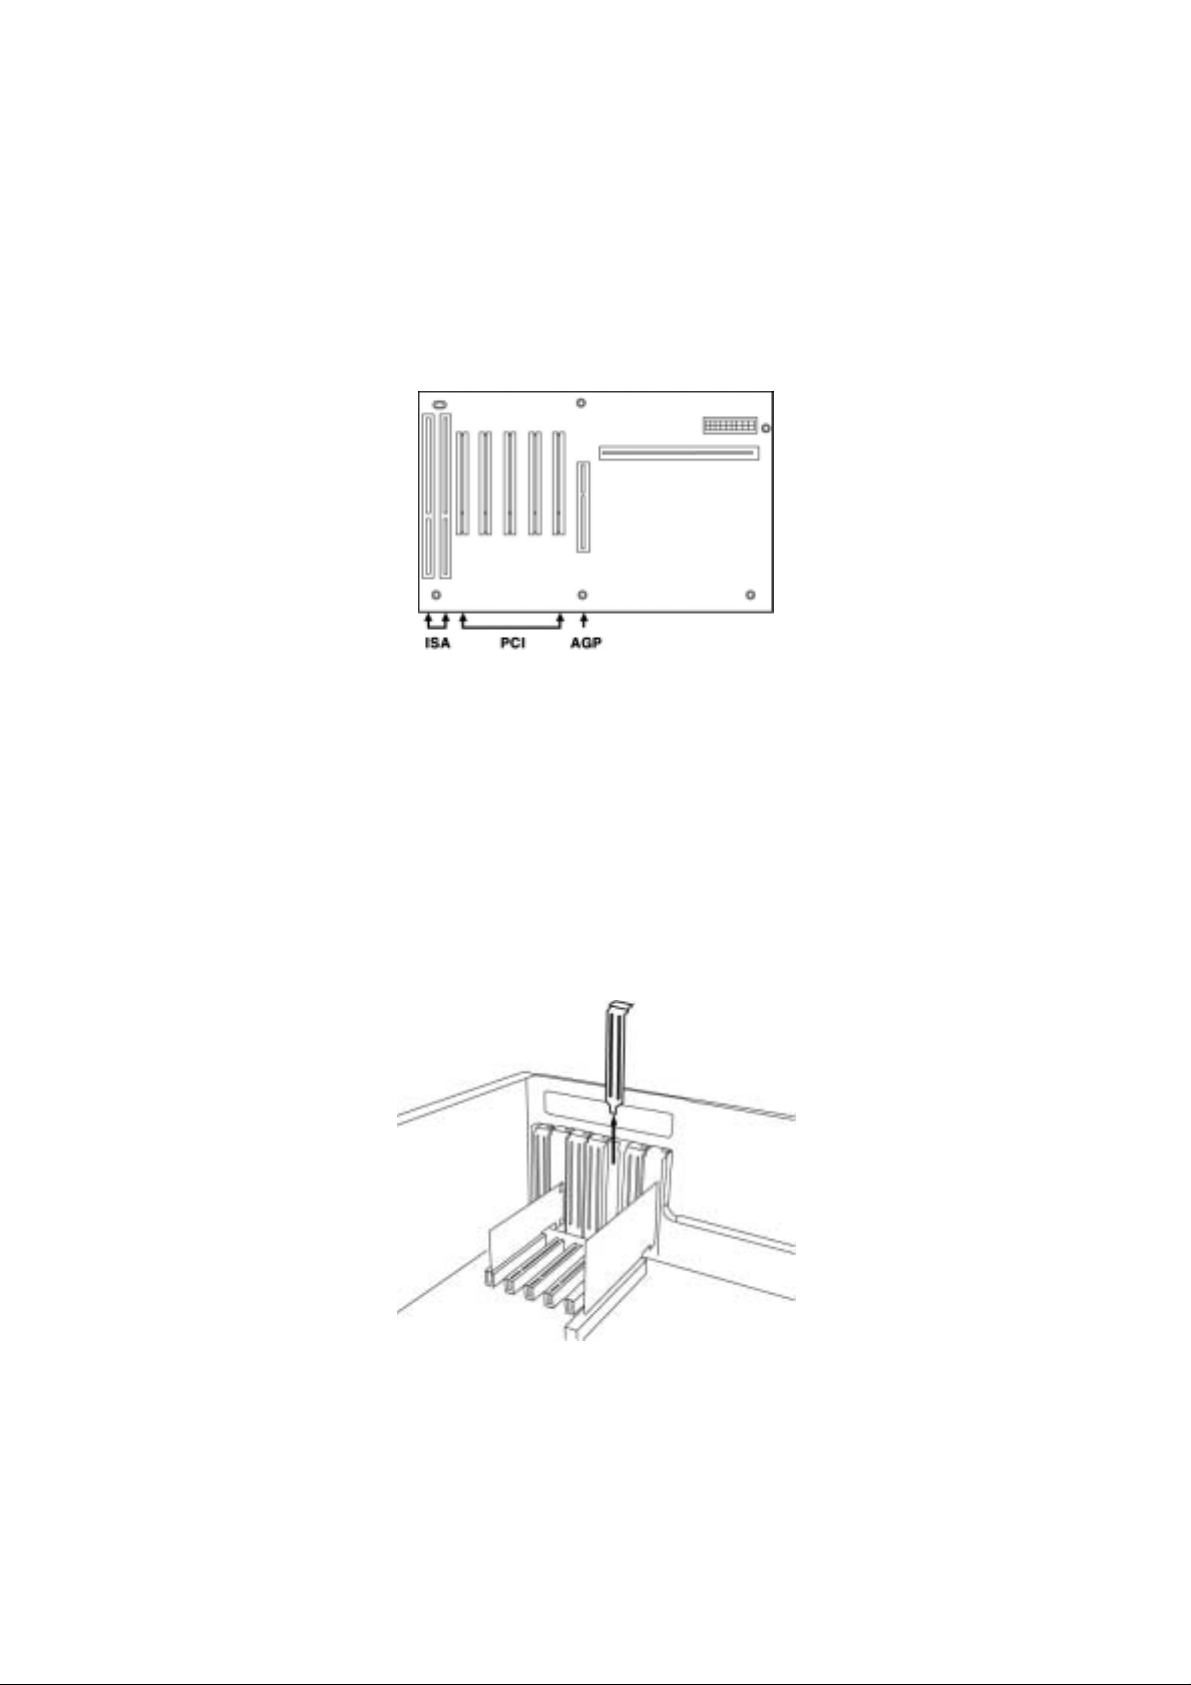
There are 3 kinds of slots in most of recent computers. The PCI slot is most common
and is used for different types of devices from the soundcard to the modem. Usually, the
PCI slot is the white-colored slot. The ISA slot is used in older computers and it is
marked with a black slot. The AGP slot is only for the video card and is the most recent
type of slot. It is marked with a brown slot and is located close to the CPU. It will be not
too hard to find the PCI slot for the Prodigy 192. If there is a guide blocking the empty
slot, please remove the guide using the proper screwdriver.
Next, put the Prodigy 192 PCI card into the slot and make sure it is placed in the slot
correctly. The card will fit into your slot and then tighten the screw.
8
Page 9
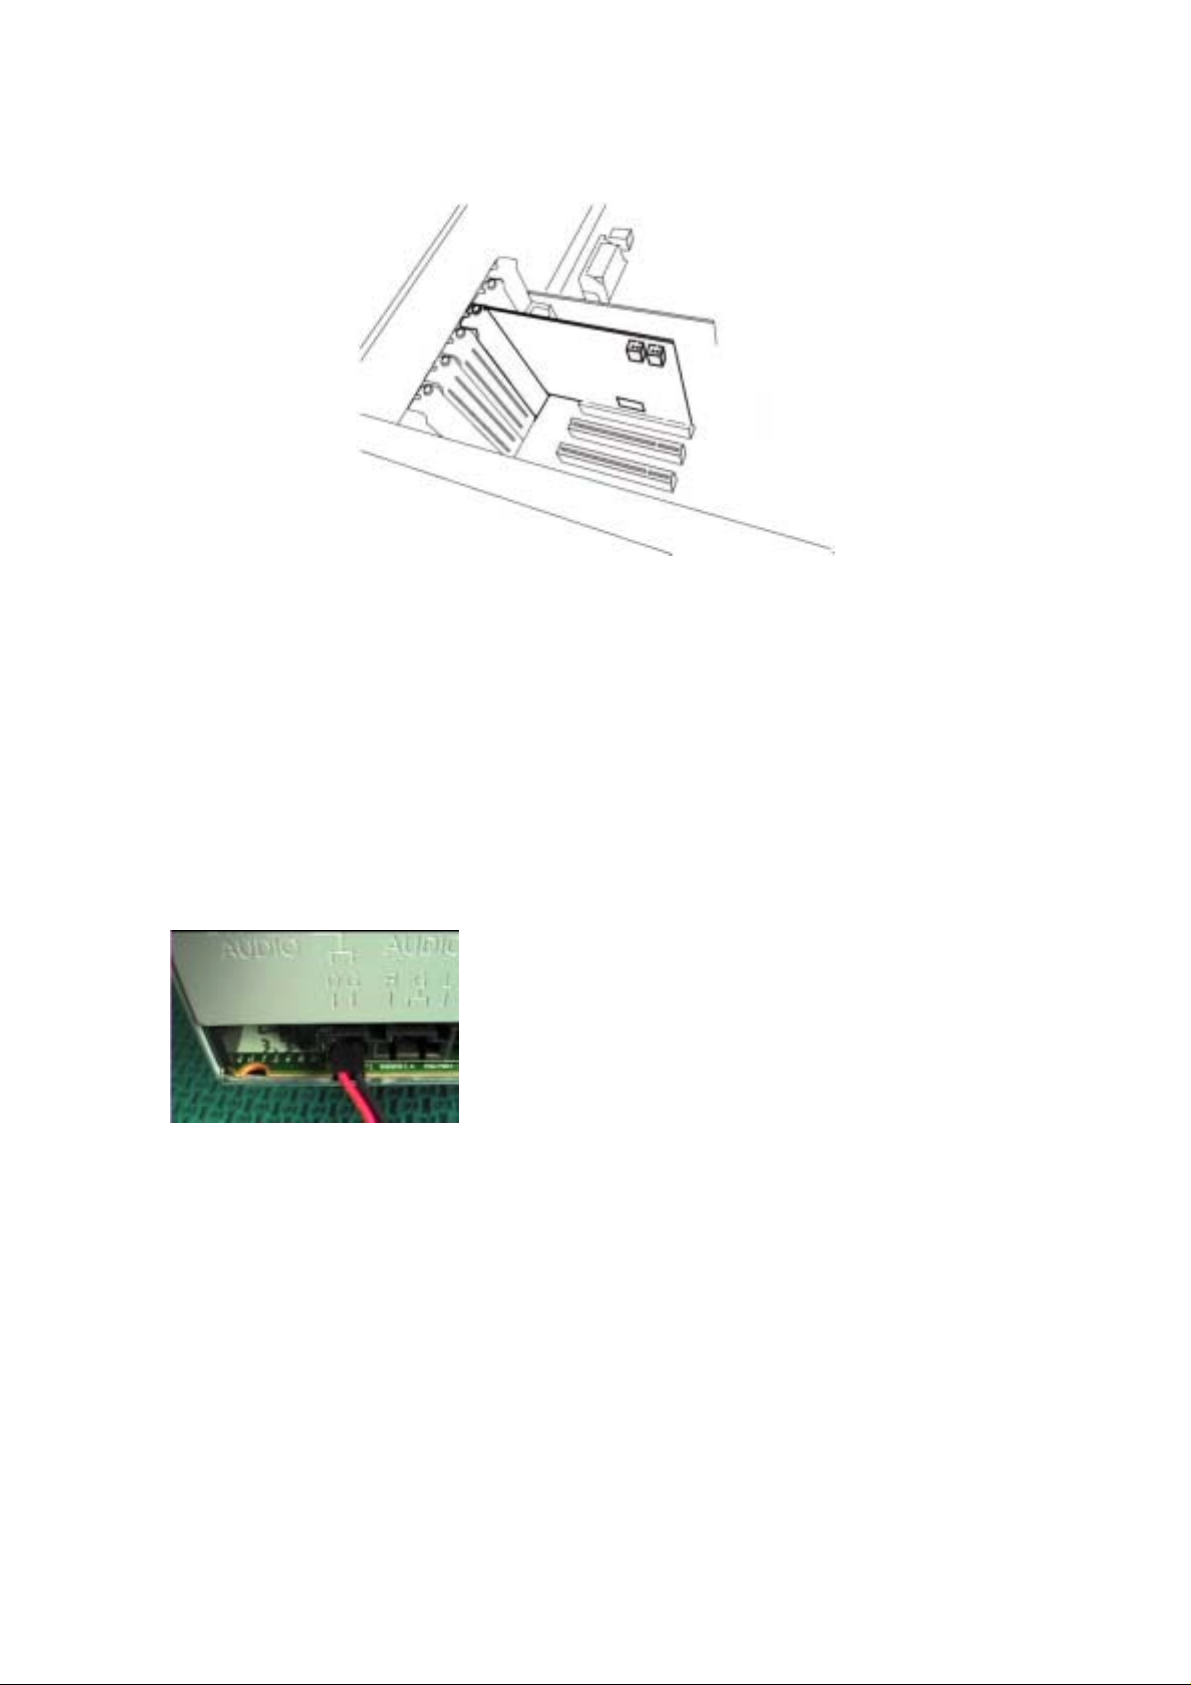
Close the computer case.
Caution;
Before the closing the computer case, connect CD-Rom drive and Prodigy 192.
Connect the Prodigy 192’s 2 pin CD-Rom connector to Digital out of your CD-Rom
drive as below picture.
9
Page 10

3. Prodigy 192 Driver Software Installation
After completing the installation of hardware for the Prodigy 192, you need to install its
driver software to use it. The software installation is not too hard, even for computer
beginners. Just follow the steps below and you will complete it without any hassel. The
installation steps under Windows 98SE, Windows ME, Windows 2000 and XP are a
little bit different from each other. Below installation procedure is for the Windows XP.
However, Driver installation procedure is similar to other Windows version.
* Caution: Depend on your operating system, you may need Windows install CD.
You need to prepare Windows installation CD before the installation procedure begins.
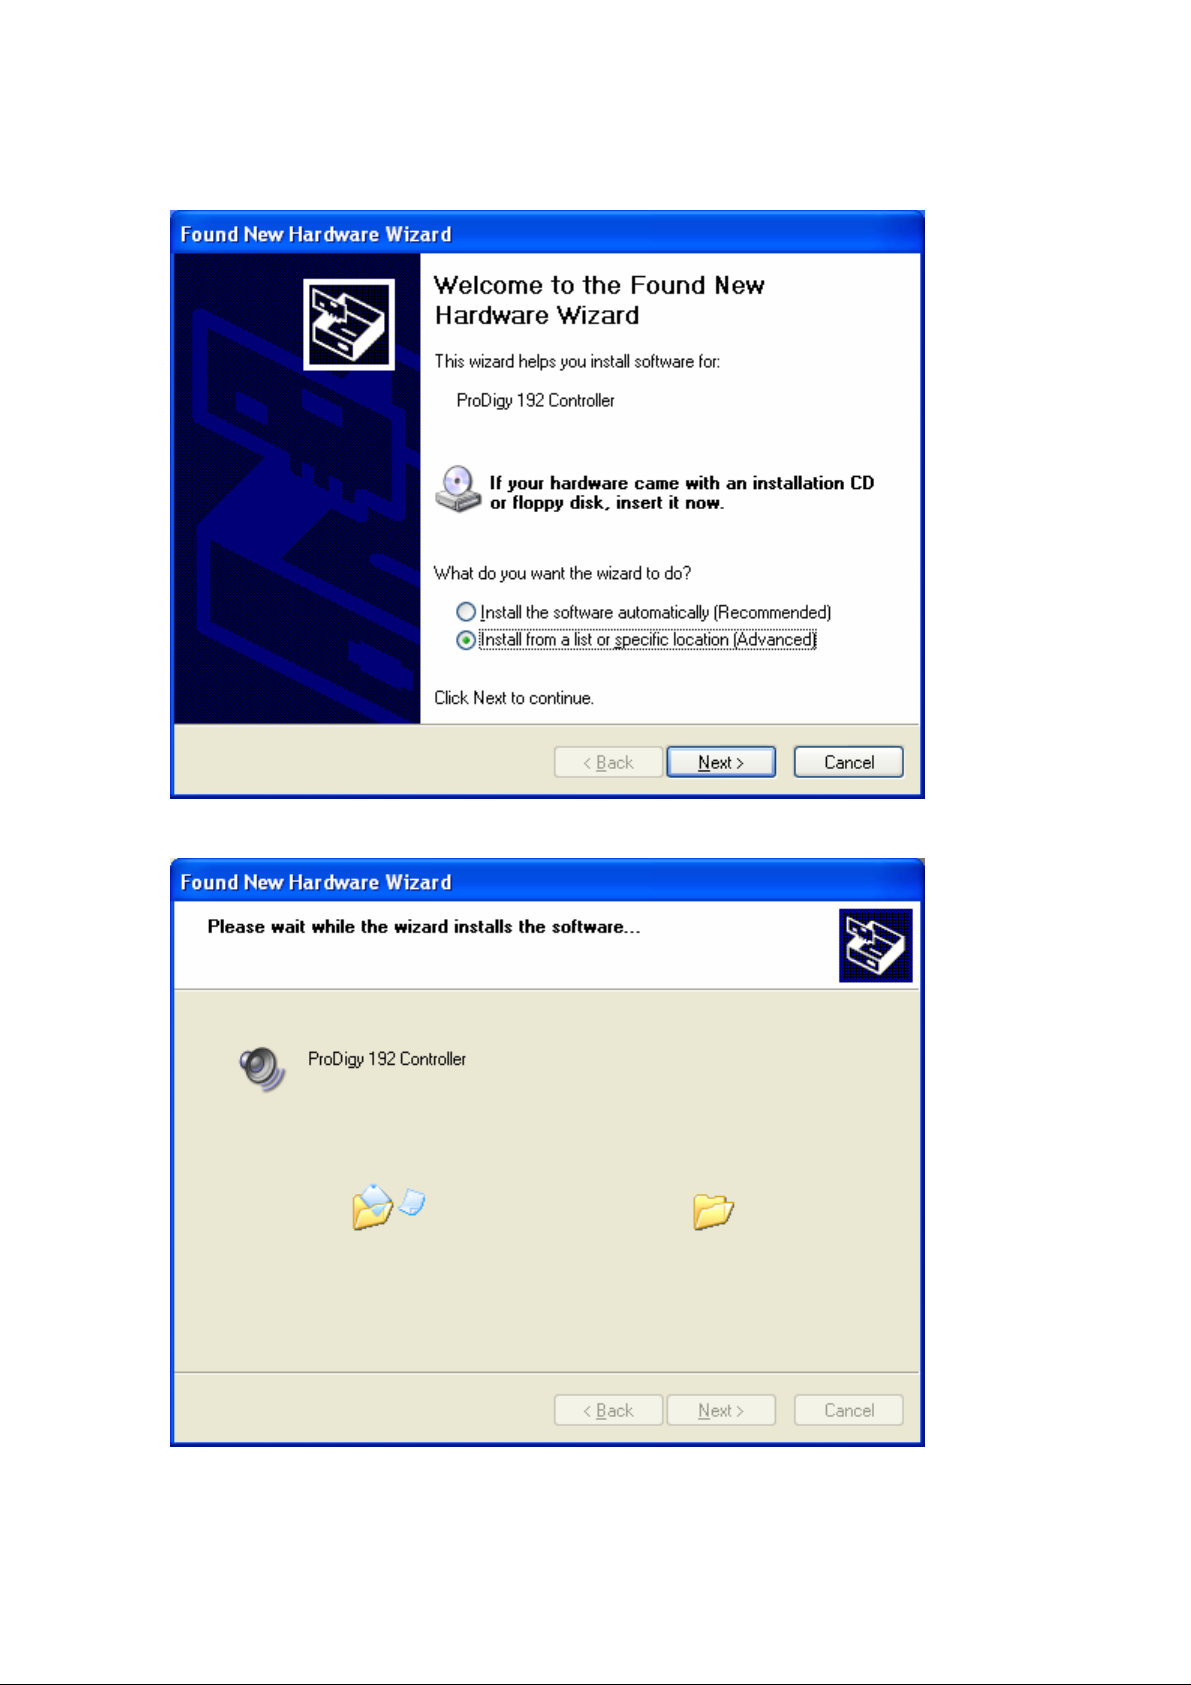
1 Turn your computer’s main power on. Windows will automatically detect a new
device has been installed and “Found New Hardware Wizard” will appear.
Choose Install from a list or specific location and click next.
10
Page 11
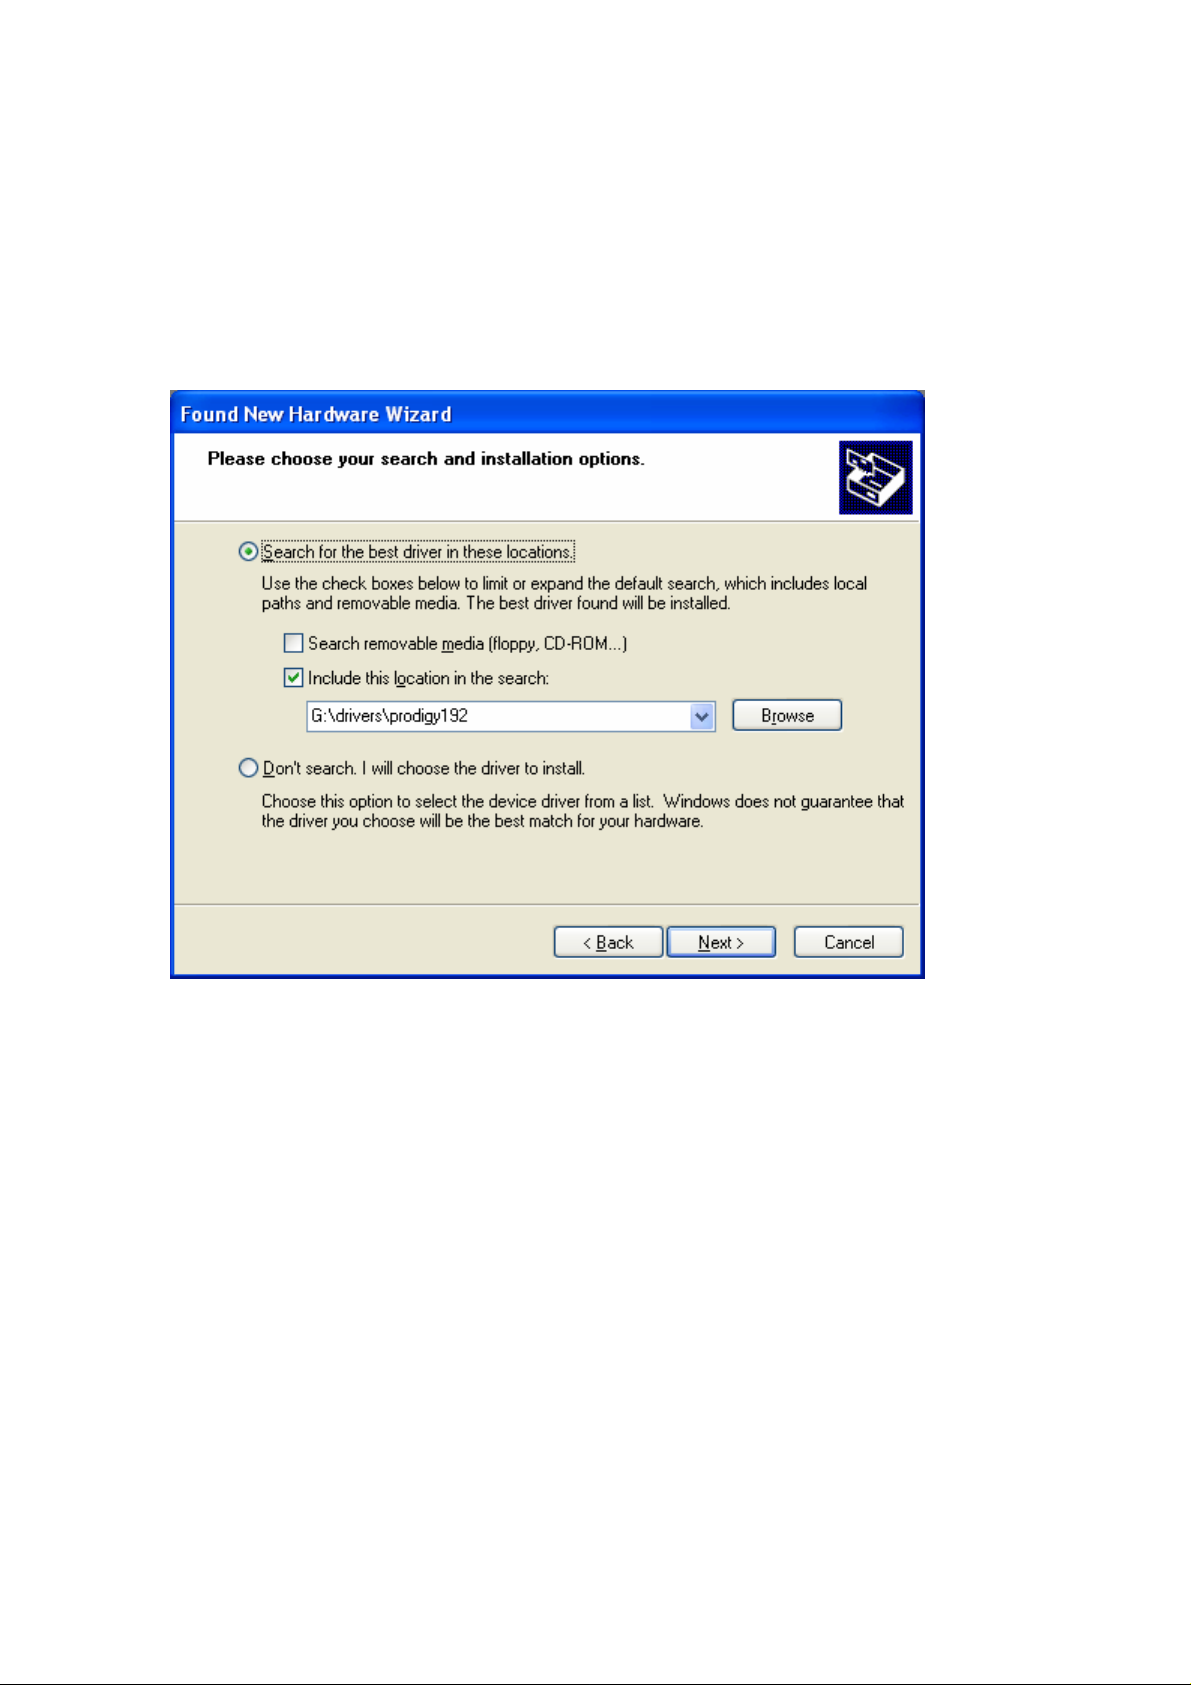
2. Choose ‘Search for the best driver in these locations’ and specify the location of the
driver. Insert the provided Driver CD into the CD-Rom drive and find ‘Prodigy driver
folder’. Copy this folder on your computer and select ‘Include this location in the
search’ and click ‘Browse’ to find the accurate location.
11
Page 12
12
Page 13
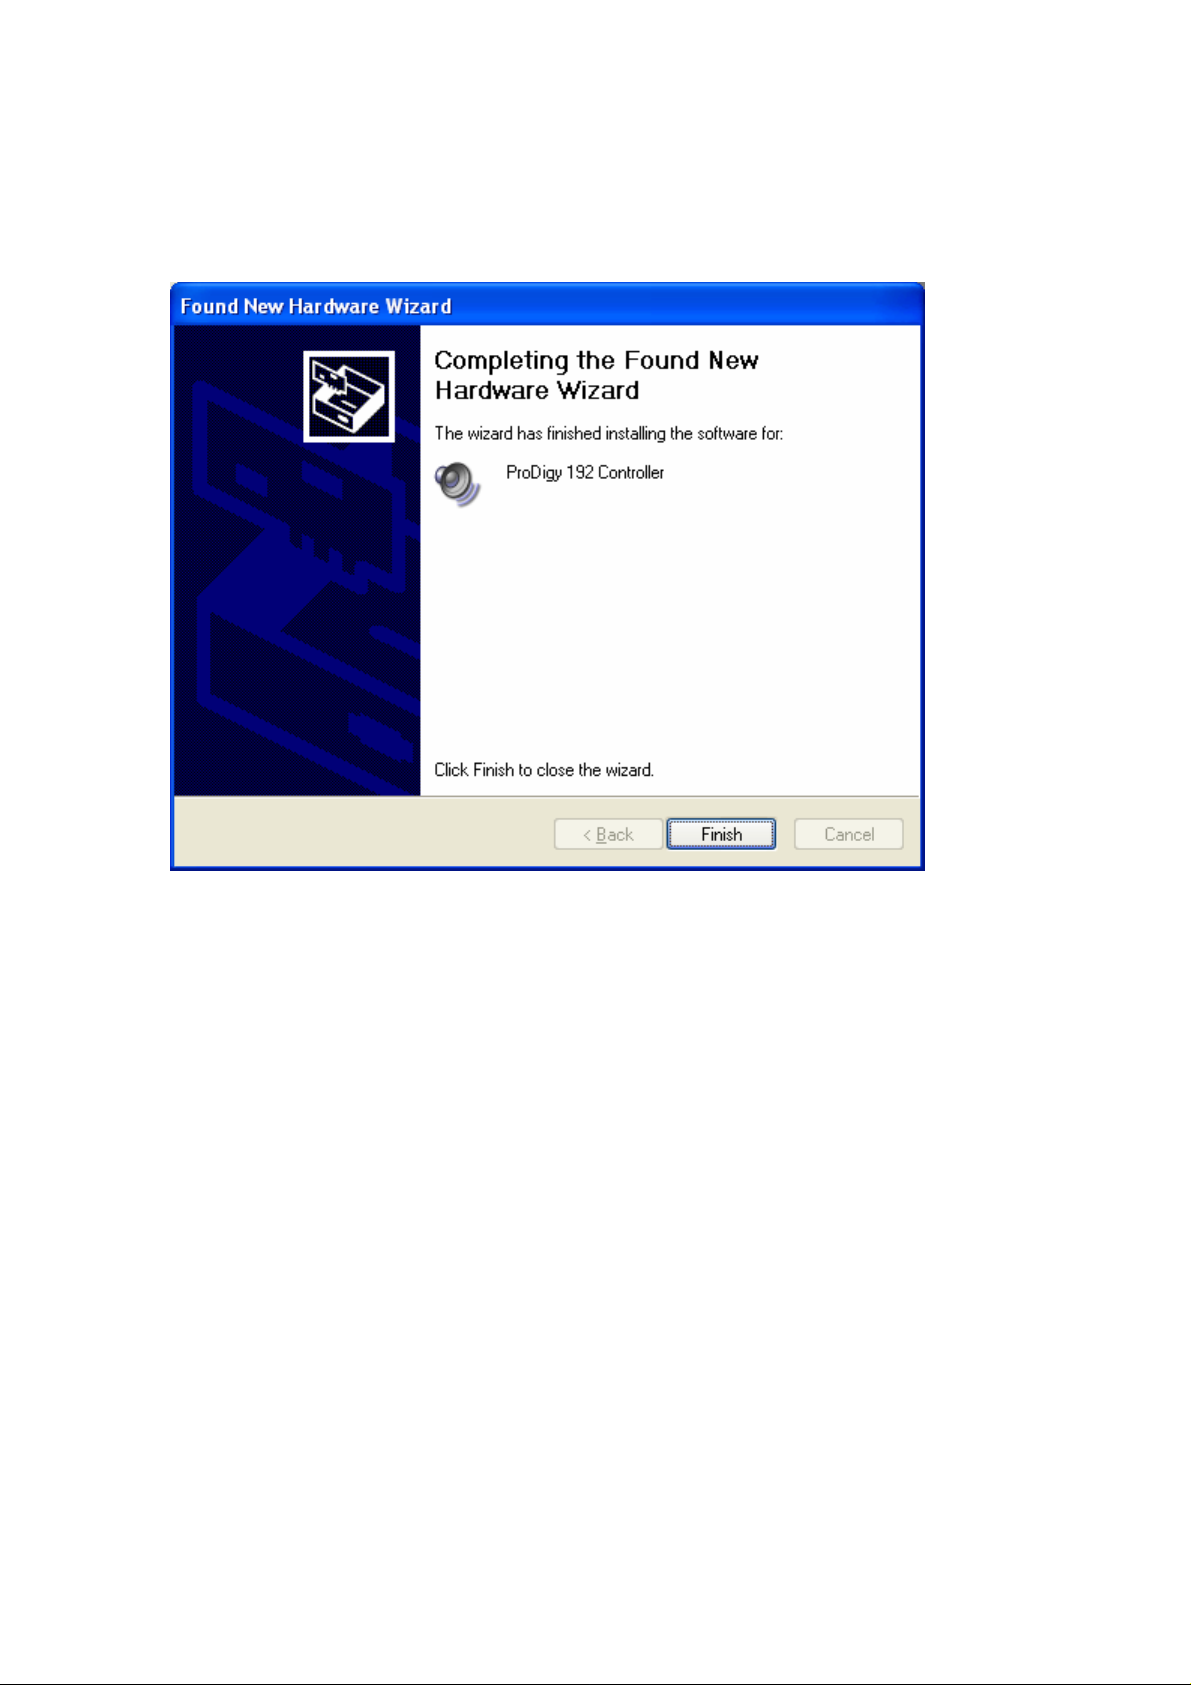
3. First Prodigy driver will be installed.
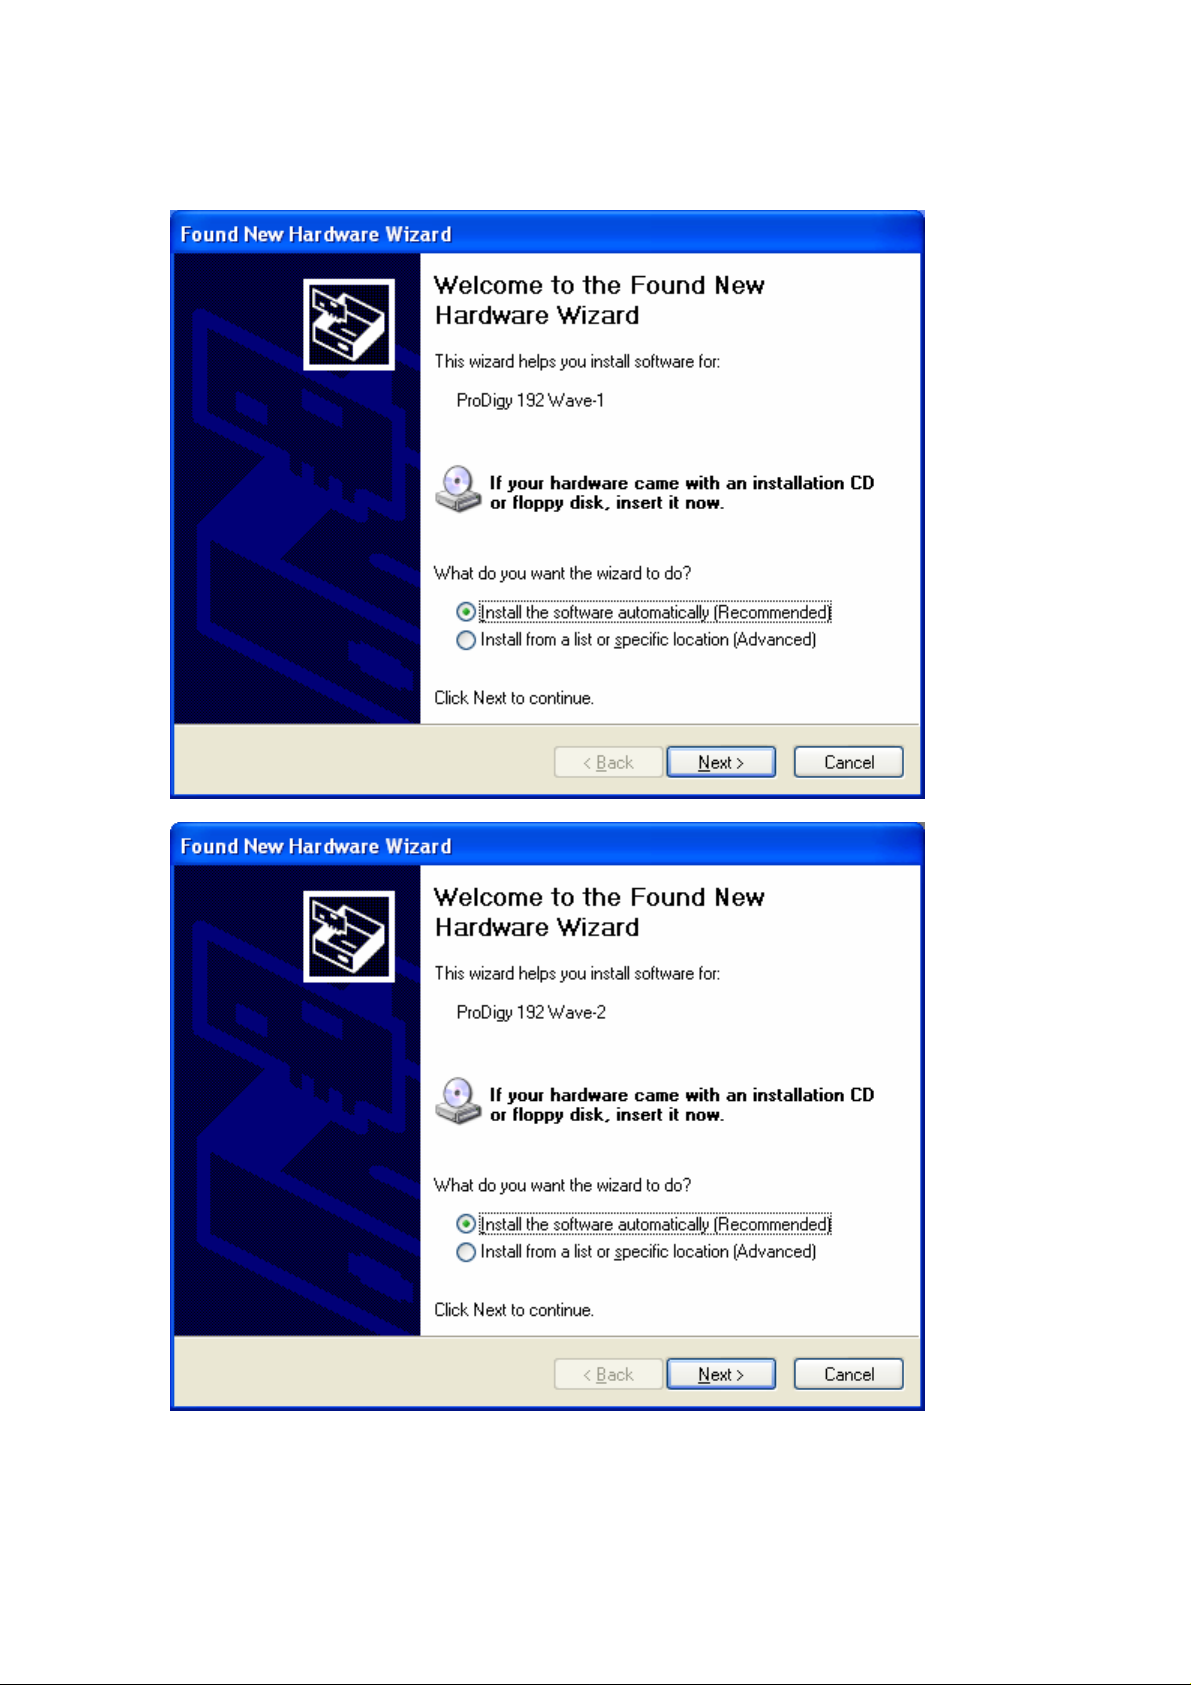
4. Windows will automatically install second driver. It’s same as above procedure.
And also Windows will continuously install from Prodigy 192 Wave2 to Wave5.
And finally Windows will recognize and install ‘Prodigy192 EWDM Midi’.
Even though, several devices will be recognized and installed, just follow above step 1
~3. When your system keeps asking restarts the computer, just ignore that and keep
going to install.
When all the drivers are installed and the system doesn’t ask driver install any more,
restart the computer.
13
Page 14
14
Page 15
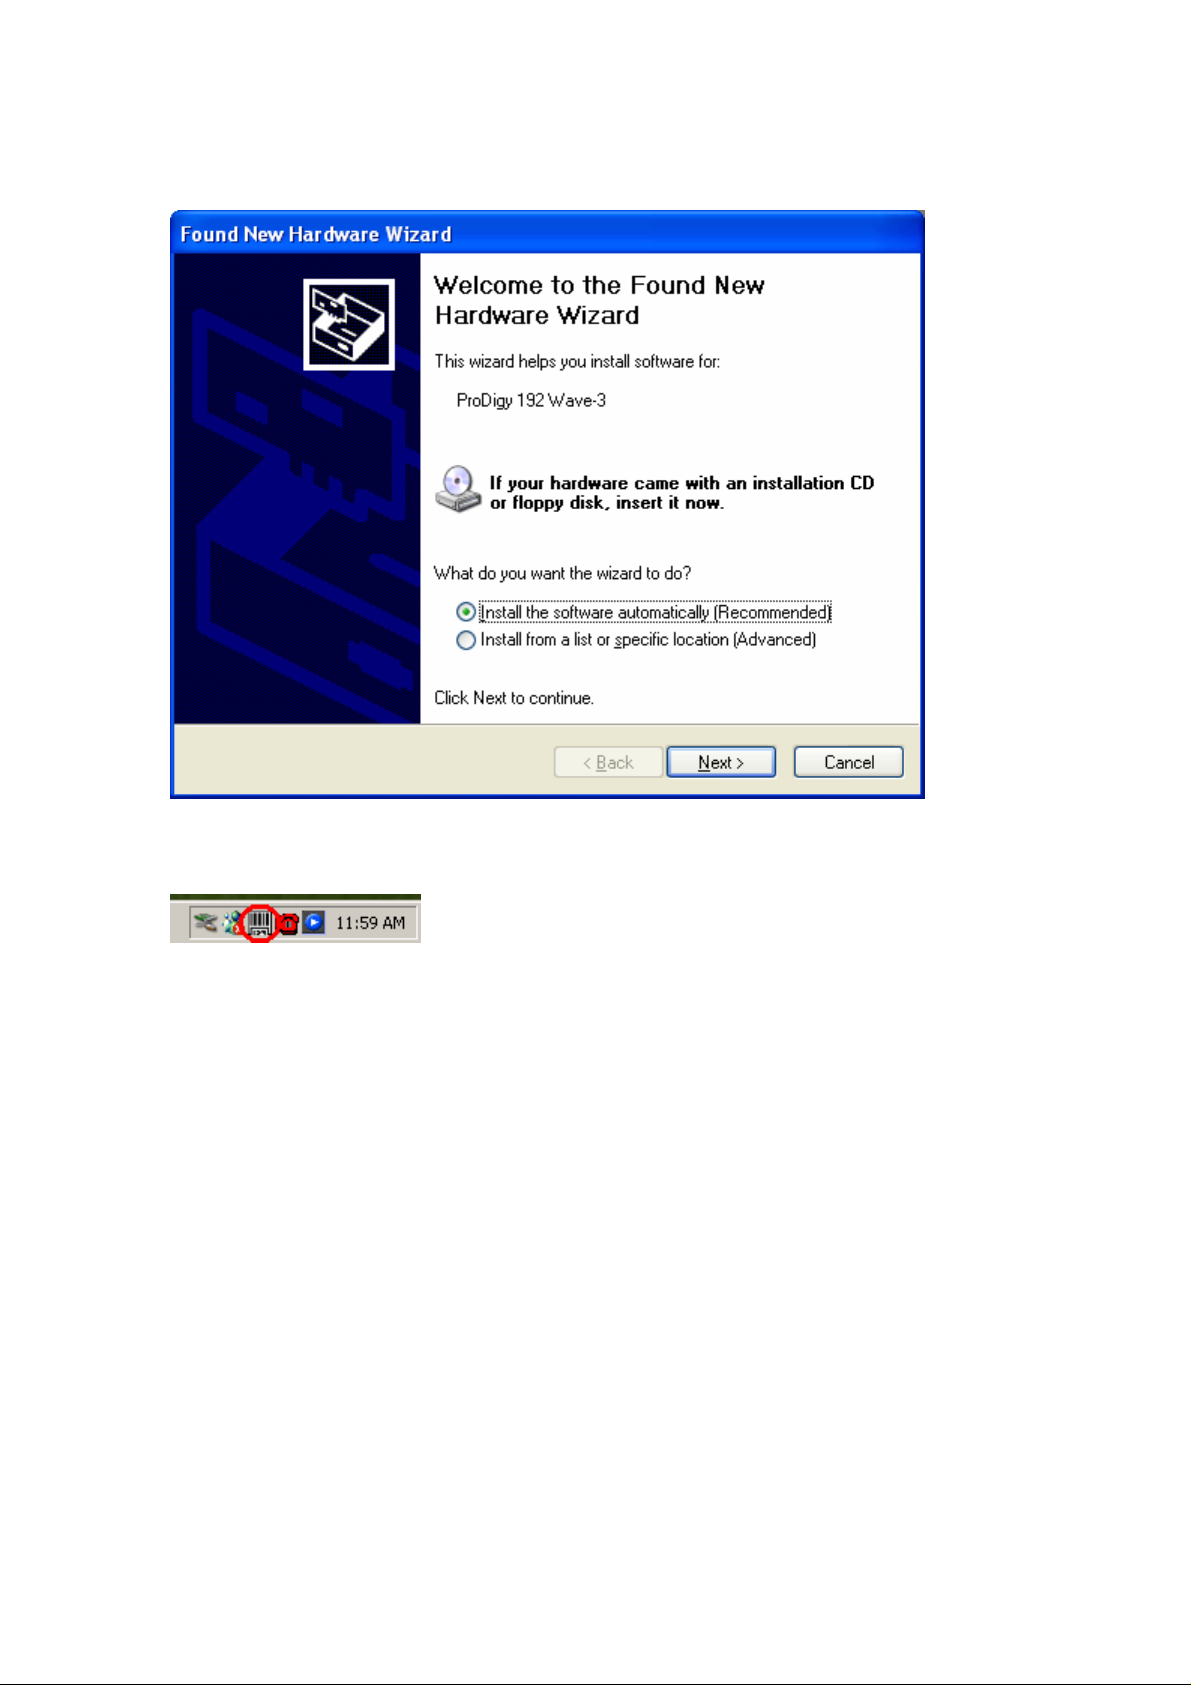
5. After restart the windows, please confirm ‘Prodigy’ icon on the system tray.
15
Page 16
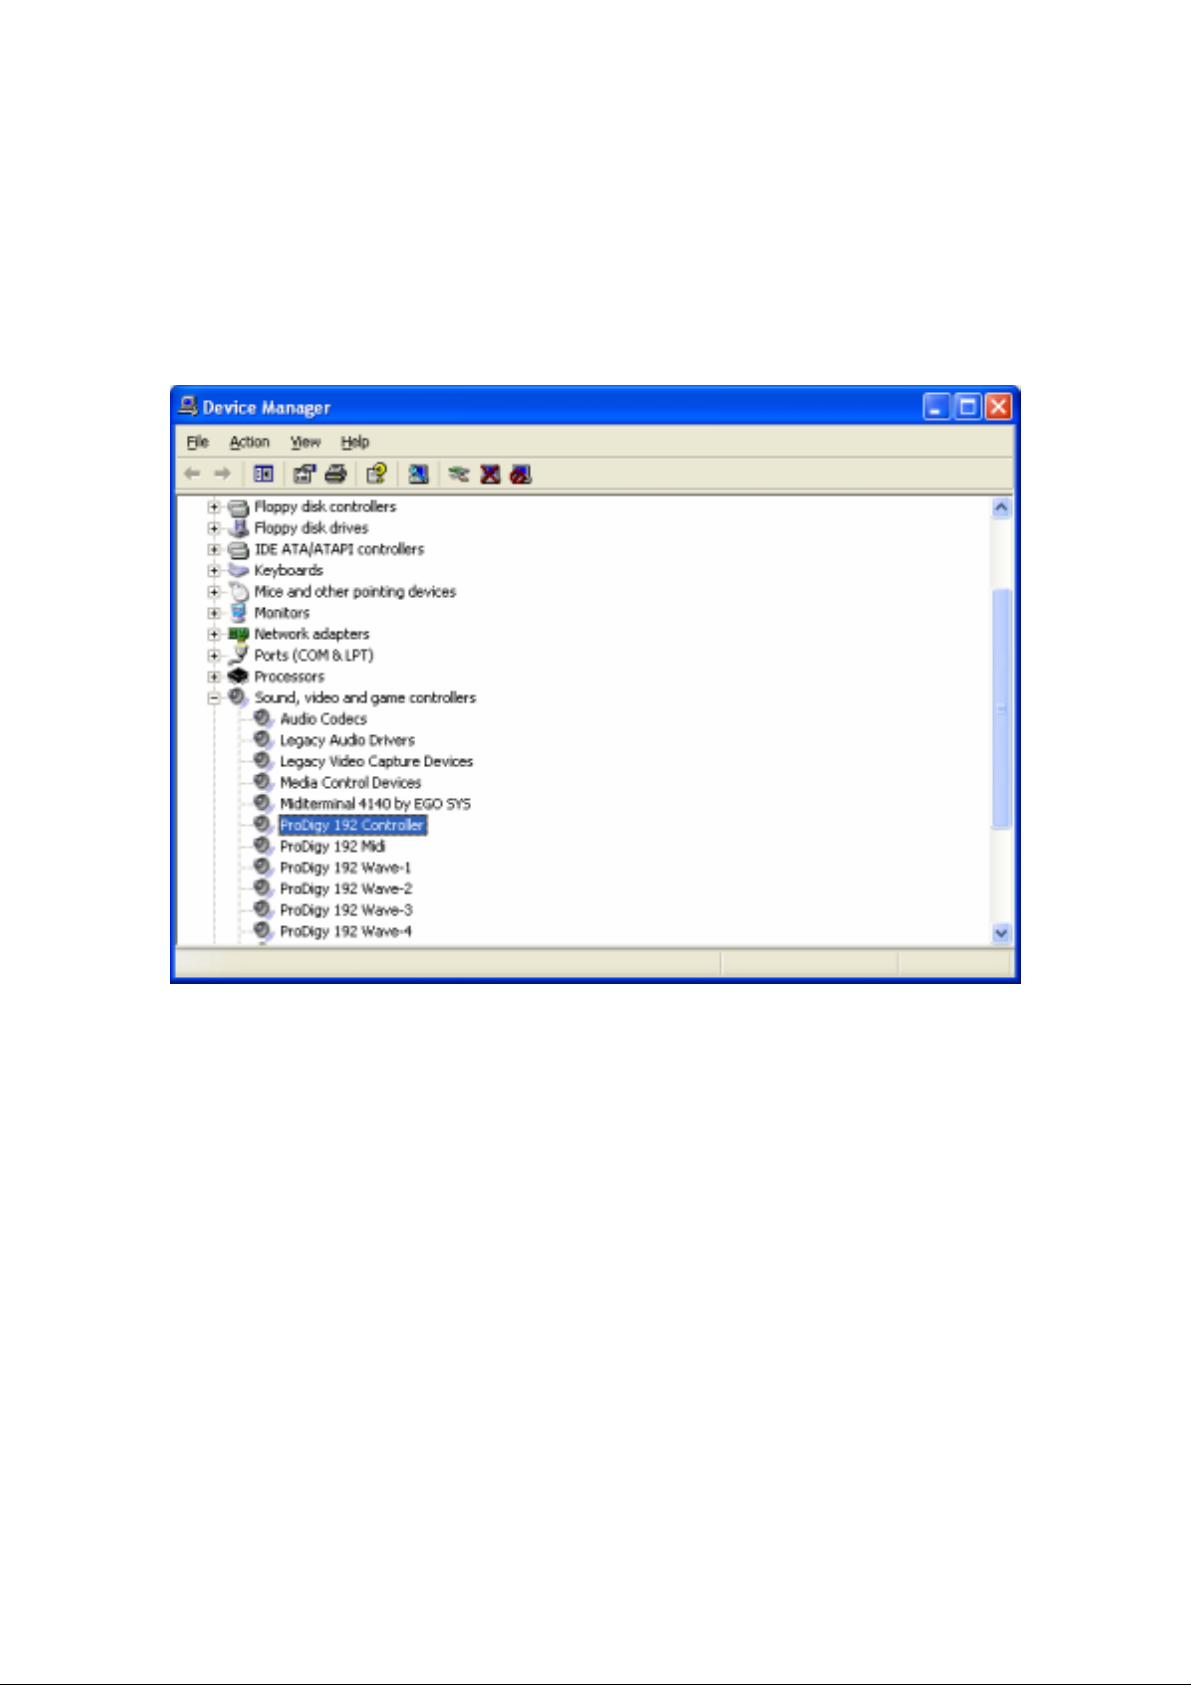
6. Restart your computer.
After rebooting, go to ‘My computer -> Control Panel -> System -> Device Manager’.
Check the devices under ‘Sound, video and game controllers’. If they are installed
correctly.
16
Page 17
4. Connection with external device
Basically, Prodigy 192 is a digital audio interface with analog 2 channel (stereo) input,
1 Mic channel(mono) input, analog 6 channel output and Digital SPDIF Optical output
and Digital SPDIF Coaxial Output.
Also with optional MI/ODI/O add-on card, you can add SPDIF Optical Input, SPDIF
Coaxial In/Out and 1 In/1 Out MIDI interface.
Caution: Since the Prodigy was made for Multimedia users, Inputs and Outputs of
the Prodigy 192 composed of 1/8 inch mini phone plug instead of 1/4 inch plug.
Caution: You cannot use MIC input and Line input at the same time.
17
Page 18

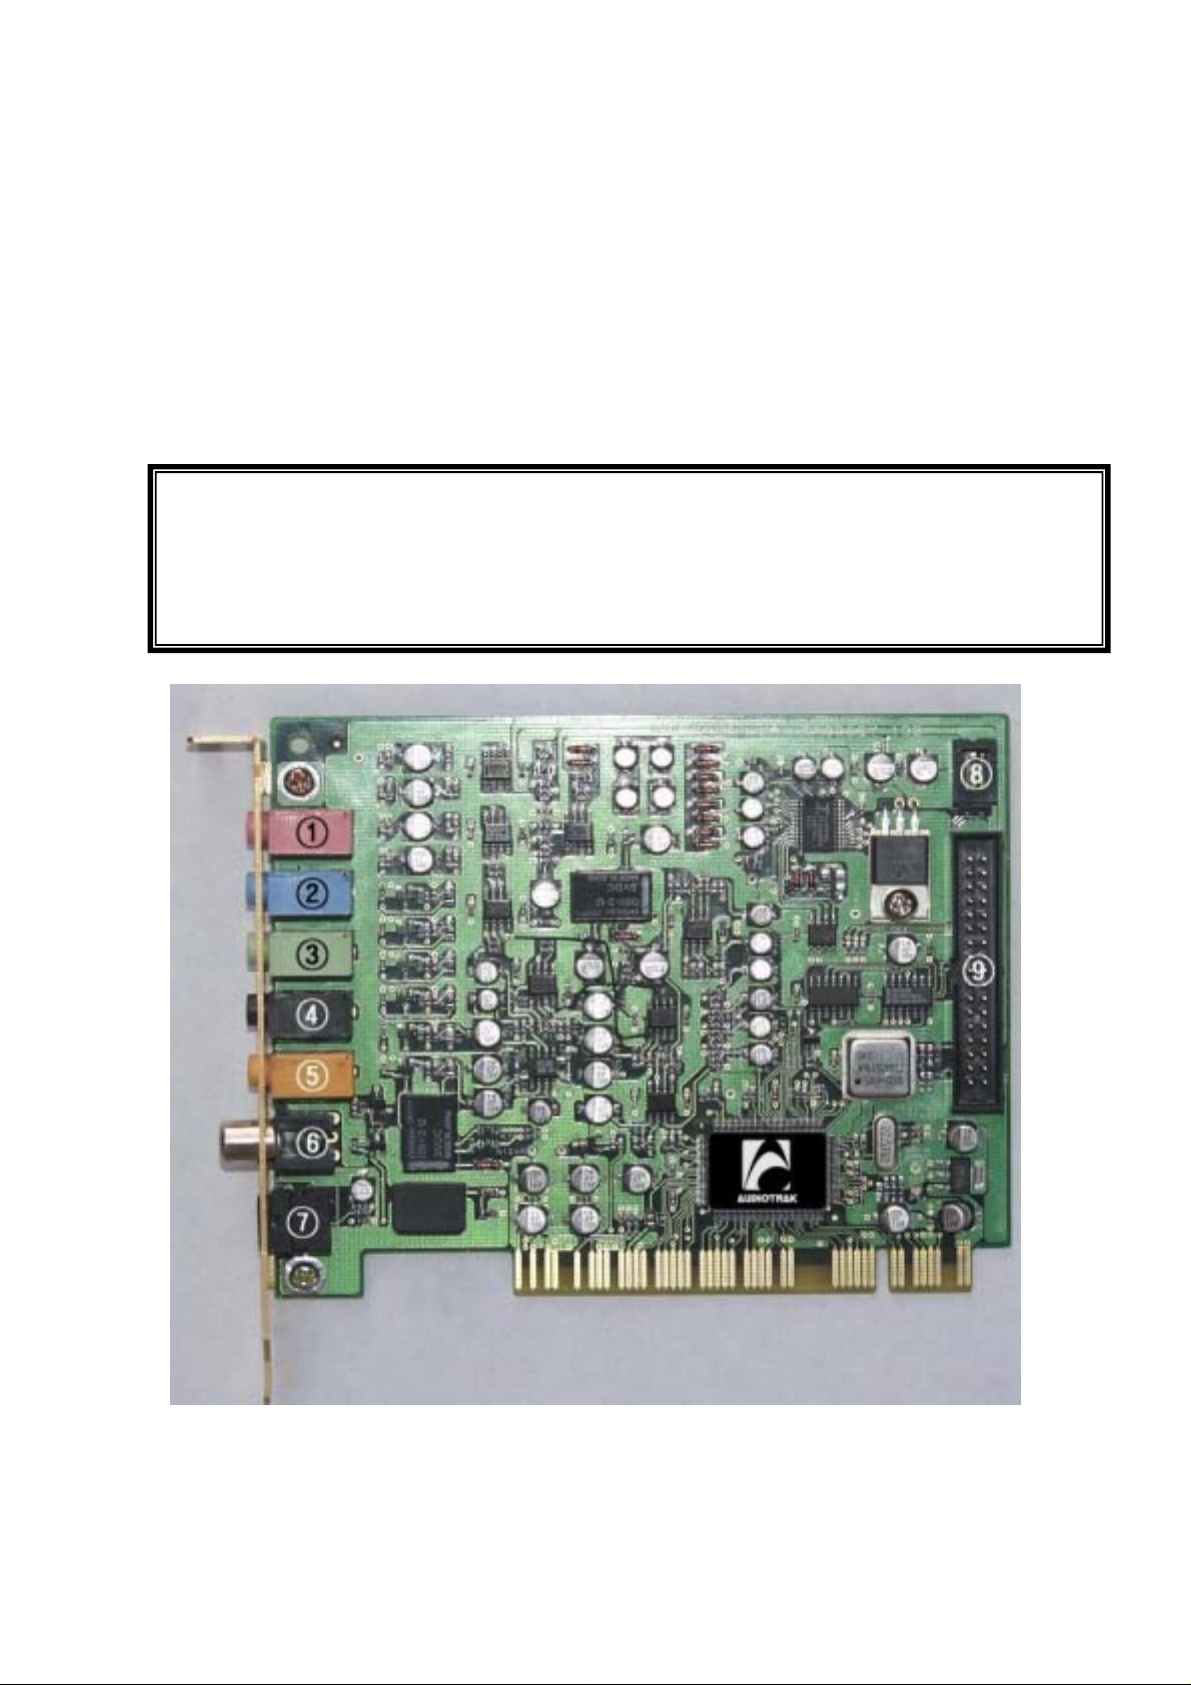
1. MIC IN (pink)
Connect to an external microphone for voice input. You cannot use this MIC input
and below Line input at the same time.
2. LINE IN (blue)
This is analog stereo Line input.
Connects to an external device (such as a Cassette, DAT, or Mini Disc player).
You cannot use MIC input and this Line input at the same time.
3 & 4. Analog Outputs 1,2 (Green) and 3,4(black)
These are stereo Analog Outputs 1,2 and 3,4. Analog 1,2 send out the signal indicated as
‘1-Prodigy 192 2ch’ on application’s device set up. Analog 3,4 send out the signal
indicated as ‘2-Prodigy 192 2ch’ on application’s device set up.
When you use Software DVD player, Analog Output 1,2 will be Front Left, Right.
Analog Output 3,4 will be Rear Left, Right.
5. Analog Outputs 5,6(yellow)
Stereo Analog Outputs 5,6 send out the signal indicated as ‘3-Prodigy 192 2ch’ on
application’s device set up. When y ou use Software DVD player, It will be Center and
Woofer.
This output port is also used as headphone connector. Prodigy 192 provides high
quality headphone amp.
* In Winamp or Media Player, If you want to use virtual 5.1 channel, choose
“Clone 4way from Out 1-2” on Config Option of Prodigy Console.
6.7. Optical & Coaxial Out/AC3 (Dolby digital)
These ports can transfer Prodigy’s audio data without loss, directly to a DAT, MD, CDrecorder, which support digital connection.
This port sends out the signal indicated as ‘4-SPDIF-AC3’ on application’s device set
up, and also sends out AC3 encoded Dolby Digital signal.
When you playback DVD title on a software DVD player, you can easily make surround
sound environment using the port and AV receiver with decoder.
In this case, software DVD player and DVD title must support AC3 digital thru function
Caution: When connecting the optical cable, never point the optical connector directly into
your eyes, as the light can cause eye damage.
18
Page 19

Caution:
When you use Prodigy 192 with Optional add-on card MI/ODI/O, you can get not only
Optical out, also Optical input and Coaxial In/Output. In this case, you need to select
Digital out on Prodigy 192’s control panel.
Caution:
Although Prodigy 192’s Tos-Link Optical I/O port can’t support 192kHz in specification,
we got the reports shows possibility while we were testing. However, it heavily depends
on system environment, it may have problem on over 100kHz sample rate. You have to
use high quality Optical cable otherwise you may get loss of data or distortion.
When you use over 96kHz, you may use Coaxial port instead of Optical port.
8. CD Rom connector
This is a connector for digital input of a CD Rom drive.
9. * MI/ODI/O connector (sold separately)
This connector is for connecting optional MI/ODI/O add-on card.
MI/ODI/O add-on card makes Prodigy 192 a total of 4 in 8out Audio / 16 MIDI channel
integrated audio interface.
19
Page 20

5. Prodigy 192 Control Panel
If you complete the Prodigy 192 hardware and driver installation, you need to learn
about the Prodigy 192 Control Panel. This control panel is what you control your setup
for the Prodigy 192.
The Prodigy 192 Control Panel is built for easy to use. However, it could give a
complicated look since there are many inputs and outputs. All input and output controls
are the same. So, if you learn about one control, you can use the others easily.
After successfully installing the Prodigy 192 hardware and driver, you can see the
Prodigy icon on the system tray. This is the Prodigy 192 control panel icon and clicking
this icon will launch the control panel.
20
Page 21

1. Pull Down Menu
The Prodigy 192 control panel includes a pull down menu bar that contains the
configuration menus for the Control Panel.
1. File - Exit
File – Exit will close the Prodigy 192 Control Panel window but it will not shut down
the Control Panel. You can always launch the Control Panel by clicking Prodigy icon on
the system tray.
2. Config – Mouse Wheel
Mouse Wheel will control the mouse wheel adjustment. When you use the mouse wheel
to adjust the volume level, the adjustment step is set to ±1.5dB as default. You can
configure the adjustment steps to your preference.
- Step 1: When you move the mouse wheel one step, the fader will move by ±1.5dB.
- Step 2: When you move the mouse wheel one step, the fader will move by ±3.0dB.
- Step 4: When you move the mouse wheel one step, the fader will move by ±6.0dB.
- Step 8: When you move the mouse wheel one step, the fader will move by ±12.0dB.
3. Config – Latency
This will decide the latency of the Prodigy 192. You have to set proper latency depends
on your situation. Generally, higher latency is fit for Multi-track recording software
using multiple tracks. Process time maybe longer, but it’s stable. Lower latency is fit for
software synthesizer, mastering software or Multi track software using only few tracks.
4. Config – Factory Default
This returns all the Prodigy 192 configurations to factory default setting.
5. Config - Always On Top
This will set the Prodigy 192 control panel to always over other Windows. If this is not
selected, the active windows will be set over the Prodigy 192 control panel.
6. Config – Card (This section is for future use)
21
Page 22

2. Clock
Select this menu for choosing digital clock source of the Prodigy 192.
- Internal: Selecting ‘Internal’ makes the Prodigy 192’s internal clock and it becomes
master clock. When you use only one the Prodigy 192 or other device was set as slave,
you have to choose this mode.
- Digital: By selecting ‘Digital’ you will be using the incoming digital audio data from
external device as the clock source. External device will be Master device and the
Prodigy 192 will become slave device.
3. Sample Rate
Auto: Selecting ‘Auto’ sets sample rate automatically according to your audio file’s
sample rate.
Lock: In this mode, you can set sample rate manually.
4. Analog In
This is where you can set input monitoring of the Prodigy 192’s stereo Line input and
MIC input.
You cannot choose two inputs at the same time.
The Prodigy 192’s input monitoring function is real-time monitoring through hardware.
That’s why we recommend using the function although other software applications have
Input monitoring function too.
Caution: When you select ‘Monitor & H.P.’ and start input monitoring, Output 5,6
will be changed as Headphone. You can monitor same signal out of Line Out 1,2
through Output 5,6(H.P)
Caution: Please do not use software monitoring and hardware monitoring in
simultaneously. You can’t get accurate monitoring and it may causes flange effect.
Caution: It is not affect on recording in software. Regardless of this button, you can
record in software safely.
22
Page 23

1. LINE
When you select this button, Prodigy 192 accepts stereo LINE Input.
2. MIC
When you select this button, Prodigy 192 accepts MIC Input.
3. Monitor H.P
When you select this button, Analog Input signals goes to Output 1,2 and Output 5,6 is
changed to Headphone out.
You can monitor Input signal in real-time. You can monitor same signal out of Output
1,2 through Output 5,6.
5. Digital IN – Digital Input selector
When you connect Prodigy 192 with MI/ODI/O add-on card(sold separately), you can
get Optical and Coaxial Input. You can select between two digital connectors in here
and turn on and turn off the selected input monitoring.
Prodigy 192’s input monitoring function is real-time monitoring and processing in
hardware.
That’s why we recommend using this function although other software applications may
have Input monitoring function too.
Caution: When you select ‘Monitor & H.P.’ and start input monitoring, Output 5,6 will
be changed as Headphone. You can monitor same signal out of Line OUT 1,2 through
Output 5,6(H.P)
Caution: Please do not use software monitoring and hardware monitoring in
simultaneously.
You can’t get accurate monitoring and it may causes flange effect.
Caution: It is not affect on recording in software. Regardless of this button, you can
record in software safely.
23
Page 24

1. Coaxial
When you connect Prodigy 192 with MI/ODI/O, you can select MI/ODI/O’s Coaxial
Input as digital input.
2. Optical
When you connect Prodigy 192 with MI/ODI/O, you can select MI/ODI/O’s Optical
Input as digital input.
3. MONITOR & H.P
When you select this button, Digital Input signals goes to Output 1,2. Also Output 5,6 is
changed to Headphone out.
You can monitor Digital input signal in real-time. You can monitor same signal out of
Output 1,2 through Output 5,6.
6. Digital Type –Digital format selector
When you use Prodigy 192 with MI/ODI/O together, this is where you to set various
digital format.
1. Pro (IEC 958 Type 1)
When you select this button, Prodigy 192’s digital in/out format is AES/EBU.
2. Consumer (IEC 958 Type II)
When you select this button, Prodigy 192’s digital in/out format is S/PDIF.
3. Digital – CD or Digital – Wave selector
This is where you can choose CD sound or Wave sound.
7. MIC
This is where you to set Prodigy 192’s MIC Input. You can adjust level or select
Phantom power.
8. Ana. IN/ Dig. IN – Input Level meter
1. Ana. IN
This is where to display Analog Input Level of Prodigy 192.
2. Dig. IN
This is where to display Digital Input Level of Prodigy 192.
24
Page 25

9. OUT/MME –Output Level Adjust fader
1. OUT 1,2 3,4 5,6 – When you don’t use input monitoring.
Output goes to Output port 1,2 3,4 5,6 as you set on your application.
Click and drag to change Level. The numbers of bottom show the relative amount of
level in dB. If you click, it changes to ‘MUTE’.
2. OUT 1,2 3,4 5,6 – When you use input monitoring
1,2: Wave source of 1,2 as setting on your application. Also this is where you can
monitor input and it will display ‘MON’.
However Input level is can’t be adjusted with this fader.
3,4: Wave source of 3,4 as setting on your application.
5,6: Output 5,6 port/fader changes to Headphone port/fader and you can monitor same
signal of Output 1,2 through 5,6. It will display ‘HP-VOL’. You can also adjust
Headphone level using this fader.
3. DIG OUT
It’s the Level meter of Prodigy192’s Digital output.
4. MME
You can adjust level of MME supporting software in here. MME driver output level
sometimes lower than its actual output level. In this case, you should adjust level using
this fader.
The ‘%’ of bottom means volume level indication.
5. Mute
When you click the number on bottom of each fader, selected fader will be muted. And
the number on bottom is changed to ‘Mute’.
10. Virtual 5.1 channel support
You can enjoy mp3 file or Wave file as a virtual 5.1 surround sound using the Prodigy
192. Just launch Prodigy 192 Console and choose ‘Clone 4way from out 1-2’ of
Option menu. It copy the signal of Output 1,2 and send it to Output 3,4 & 5,6 to make
virtual 5.1 channel.
25
Page 26

11. DirectWIRE
By clicking this menu on Prodigy 192 console, DirectWIRE window will be appeared.
DirectWIRE is a unique feature of E-WDM driver that make possible to transfer digital
audio data within different applications using same/different drivers.
As you can see, MME, WDM, ASIO and GSIF indicate driver names of Prodigy192.
Along the vertical channel indicate number, output and input ports of each driver are
showed.
Just click desired output number of the driver and drag it to the input of the driver you
want to record the source.
MME section means normal stereo application's I/O, ex.) WinAmp, WaveLab ...
Multi-MME section means SONAR, PowerDVD, Win DVD I/O ...
ASIO section means Cubase, Logic, Reason I/O ...
GSIF section means GigaStudio I/O.
26
Page 27

6. Setting in Applications
The Prodigy 192 is premium multimedia audio device designed to be used for
Multimedia and audio work in a Windows environment. It has a wide range of usage
from game sound to DVD surround sound. It is very easy to set up the Prodigy 192 in
the multimedia setup of the windows control panel. Also the Prodigy 192 can be used
with digital audio software to perform hard disk recording. This chapter includes set up
guide for some common software. Especially, the Prodigy 192 uses the E-WDM driver
that supports the audio dedicated drivers such as WDM, MME, ASIO, GSIF and Direct
Sound.
This chapter only contains the basic setup for some of the software. For more detailed
info, please refer to the manual of the software.
Driver name and Output
1. Prodigy 192 2ch Analog Output 1,2/Front
2. Prodigy 192 2ch Analog Output 3,4/Rear
3. Prodigy 192 2ch Analog Output 5,6/Center,Woofer
4. Prodigy 192 SPDIF-AC3 Digital Output
5. Prodigy 192 5.1ch Analog Output 1~6 Surround output
27
Page 28

1. Windows Multimedia setup
The Windows Multimedia setup is required to use the Prodigy 192 as the sound system
for Windows multimedia applications.
Go to ‘My computer-> Control Panel -> Sounds and Audio Device Properties -> Audio
tab. Select the Prodigy 192 driver as your playback device.
28
Page 29

2. Win DVD (included)
The Prodigy 192 can be used with 5.1 or 7.1 channel DVD software player to provide
5.1 or 7.1(with Digital out) channel surround sound. The Prodigy 192 will deliver
optimal sound for your DVD player. You can configure the Prodigy 192 easily to use it
for surround sound.
Go to ‘My computer-> Control Panel -> Sounds and Audio Device Properties -> Audio
tab. Select ‘5-Prodigy 192 8 ch’ driver as your playback device.
* You must check “DMA” in your DVD-Rom drive settings. IF you don’t check DMA, you
cannot attain a crisp picture.
29
Page 30

Then, Go to Volume and Click ‘Advanced’ on speaker settings and go to ‘Advanced
Audio Properties’ and choose ‘7.1 Surround Speakers’.
On the WinDVD main applet, click the right mouse button, and choose ‘Setting.’
Select ‘8 Speaker Output’. Now you can enjoy DVD with 5.1 or 7.1(with Digital out)
channel surround sound.
30
Page 31

* Speaker configuration of Dolby Laboratories Inc.
31
Page 32

3. Analog CD-Rom Output
Go to ‘My computer-> Control Panel -> Sounds and Audio Device Properties ->
Hardware and click CD-Rom and Set ass below picture.
32
Page 33

4. Native Sound Processor – SpinAudio (Included)
SpinAudio’s Native Sound Processor is VST 2.0 and ASIO 2.0 host combined in a stand
alone application that can turn your computer with Audiotrak audio card into a real-time
multi-channel multi-effects processor.
Besides external physical inputs and outputs, Native Sound Processor can stream audio
from/to other audio applications running in your computer using Audiotrak’s
DirectWIRE® technology.
33
Page 34

Audiotrak ASIO drivers provide audio streams in 32-bit fixed point format, that
combined with Native Sound Processor’s internal 32-bit floating point processing
guarantees that dynamic range of incoming audio signal is preserved.
DirectWIRE® is a technology incorporated into Prodigy 192 driver that allows to route
audio streams internally within multiple applications using WDM - ASIO drivers when
they are running at the same time. This means that audio outputs of applications running
along with Native Sound Processor can be routed to ASIO inputs without any external
wiring or any loss of data and with a very low additional latency added.
Here are several useful examples:
1. Processing WinAmp output with a reverb or 3D Enhancer plug in.
Wiring: two MME outs to two ASIO ins.
2. Processing WinDVD outputs with eight independent effectors.
Wiring: eight MME (WDM) outs to eight ASIO ins.
To install the NSP, Insert the Audiotrak installation CD and just run the nsp10.exe and
follow the setup instructions step by step.
The product will be ready to use right after the installation. No reboot is required.
The application can be launched from Start\Programs menu.
34
Page 35

1) Quick Start
Launch Native Sound Processor (hereinafter the application). You will see the
application window like the below.
When the application is launched for the first time it will try to detect your default VST
folder. If no folder is detected you'll be prompted to go to application settings and
specify the folder. If default VST folder is detected, you will be asked to scan it now.
Note that depending on how many VST plug ins you have in the folder the scanning
process might take some time, maybe up to a minute.
You can use Free plug Ins provided with Audiotrak Installation CD.
35
Page 36

When the folder is scanned, all VST plug ins and subfolders are stored, so next time you
launch the application it wont perform the scanning once again.
After you've set the VST folder, you should tune the streaming settings. Press 'Options'
button and select 'Application Settings' item. The application settings dialog will appear
On the ASIO page, which actually appears as default, select ASIO driver that
corresponds to your audio card and choose sampling rate. Now press 'Apply' button to
reload the driver. When it's reloaded the information in the right pane of the page will
change showing the current settings of the ASIO driver.
Now it's time to set up Audio I/O routing. Press 'Setup' button and select 'Routing'
item. As we need two slots for two plug ins, let's setup the audio routing for them.
We'll assign slot 1 for guitar and slot 2 for microphone. Select 'M->M' and 'M->S' items
36
Page 37

in drop-down Config combo-boxes for slots 1 and 2 respectively. Then select the input
and output channels for these two slots according to your audi o card specification. Press
'Ok' button to close the dialog.
Let's clarify why there are two sets of settings in Native Sound Processor: Application
settings that are accessible through Options\Settings and Setup Settings accessible
through Setup\Settings. The first set corresponds to general settings which are altered
rarely from run to run and they are common to any instance of the application. These
settings are saved automatically and loaded on the application start-up. The second
set includes settings that are changing frequently from session to session and even
from instance to instance. This includes loaded plug ins configuration, their state and
presets and I/O routing. This set is called setup and it can be saved and loaded as a file
and like general settings the setup can be automatically loaded on start-up.
It's time to load VST plug ins. Select the first (the topmost) slot in the plug in slot list.
(it should be already selected by default) Press 'Plug-in >' button and select 'All plugins' item. It will show a pop-up sub menu with the list of VST plug ins found in the
selected VST folder. So just select your guitar distortion VST plug in ( or if the plug in
you want to load is located elsewhere, select 'Browse' menu item and locate the plug in
by your own). Either way you have selected the plug in, it's loaded. After it's loaded, the
37
Page 38

application window will wrap around the plug in interface like shown on the screenshot
from the section 3.1. below. Note that a dot icon in the slots list has changed to a small
loudspeaker. This icon stands for bypass off. Pressing on the icon again will turn it to
dot, that stands for slot bypass on. Now we will load the second plug in. Select the
second slot in the list. The application will close the window of the VST plug in loaded
into the first slot and will resize to its original size. Press the 'Plug-in >' button again and
select your stereo reverb plug in to load. Again when it's loaded the application window
will wrap around it. Now select the first slot in the list. The application will show the
first slot plug in interface and wraps around it. This is how plug in window management
works in Native Sound Processor - you can see only one plug in window at once.
After plug ins are loaded you can now start the streaming and processing (you can load
them when streaming is on too, it's not recommended though). Just press 'Start' button.
Now the CPU meter should start showing actual CPU loading and you should hear the
sound processed by the plug in from your audio card output. If you don't, then it might
be that you haven't selected the inputs/outputs properly. Just go to Audio I/O routing
settings and try to select other settings. You can do that while streaming is active.
When you've played with the streaming and processing let's save the current
application setup so that next time you don't have to start from scratch. Press
'Setup' button and select 'Save As' item. A save file dialog asking for a file name
will appear. Type a name and press save. The setup will be saved.
38
Page 39

Load on start-up - There are three options: Nothing, Autosave, Default:
Nothing - Loads nothing
Autosave - Loads a setup file automatically saved on the application exit. (See the
option below)
Default - Loads default setup file. Select this option if you would like the
application to be started every time with a specific settings saved as a default setup
through 'Setup\Save as default'.
Save setup on exit - If this option is on, the application automatically saves the current
setup to a file that can be loaded back on start-up. The auto-save file name is
autosave.aps and it's resided in the product installation folder.
It's enough for the quick start so let's close the application just be pressing 'Exit' button.
Next time you run the application you can load the saved setup by pressing 'Setup'
button and selecting 'Load As' item.
39
Page 40

2) Application window
The application interface is pretty straightforward. When you run the application you
will see a window with a set of controls at the right side. Here below is the screenshot of
the application window when no plug in is loaded.
Native Sound Processor is designed so that a loaded plug in would not show up in a
separate window as it makes it hard to manage multiple windows, instead the
application window is resized so that it wraps the plug in window. Below is a screenshot
of the application with three loaded plug ins.
Plug ins are loaded into eight available slots that are represented as a list. The topmost
slot is the slot number 1. The application shows and wraps around a window of a VST
plug in loaded into currently selected slot in the list.
Below you will find description of application window controls.
40
Page 41

Start/Stop - Starts/Stops audio streaming. When the streaming is
on, the button title is changed to "Stop". To stop the streaming just
press this button again.
CPU - CPU usage indicator. Show the amount of CPU used for
processing and buffer conversion. If you would like to see how
much it takes for buffer conversion simply check the bypass button.
Plug-in > - Pressing this button shows a pop-up menu with the
following items:
[Favorites >] - Selecting this item will show a submenu that lists your favorite plug ins
and contains also two items: ' Add' and 'Organize'. Selecting 'Add' will add a loaded
plug ins in currently selected slot to favorites list. Selecting 'Organize' item will open a
dialog in which you can remove, and re-order you favorite plug ins.
[
All plug-ins >] - Selecting this item will show a submenu that lists all VST plug ins
found under the specified VST folder. The plug ins resided under subfolders of the VST
plug ins folder are accessible through the corresponding submenus marked with 'folder'
icon.
[Browse] - Selecting this item will open a dialog in which you can specify the vst plugin
file to load directly.
[Move Up], [Move Down] - Moves the selected plug in up/down in the Slots List
[Unload] - Selecting this item will unloads plug in in the current slot.
[Unload all] - Selecting this item will show a message box asking
whether you would like to unload all plug ins.
Plug in slots list - This list represents eight available plug in slots.
When plug in is loaded in a slot, the list item changes from "<Empty>" to the plug in
name. Selecting an item in the list will show a plug in window that corresponds to the
selected slot. The icons at the left in the list represent bypass state. The dot means the
bypass if on, and a small loudspeaker means the bypass is off. To switch between these
two states just click on the icon.
If you right-click on the Slots List a pop-up menu will be displayed with the following
items:
[Move Up], [Move Down] - Moves the currently selected plugin up/down in the list.
[Unload] - Unloads the currently selected plugin in the list.
41
Page 42

[Unload All] - Unloads all the plugins in the list.
Note: If you would like to see the full name of the loaded plugin, just move the mouse
over the slot and wait for a second. The full name will be displayed as a tip.
Presets > - Pressing this button shows a pop-up menu with the following items:
[All presets >] - Selecting this item will open a submenu that lists all
available internal VST presets of a plugin loaded into currently
selected slot. To load an internal VST preset just select it from the
list. The current VST preset is marked with a check in the menu.
[Rename preset] - Selecting this item will show a small dialog where
you can set a new name for the current preset.
[
Load preset], [Save preset], [Load bank], [Save bank] - These four
items allow to import and export preset/bank files in "fxp" and "fxb" formats which are
standard files for transferring presets between VST hosts.
Note that presets button is enabled only when a VST plug in is loaded.
Bypass All - Bypass buttons. Note the difference between start/stop and bypass: Bypass
simply bypasses the plug in processing, but the audio is streamed from input to output
which is not happening when streaming is not started.
Setup... This buttons shows a pop-up menu with setup options:
[Routing] - Shows audio routing dialog. See [3.2. Audio Routing] for details.
[Save as default] - Saves the current setup to a special file that can be set to be
automatically loaded on start-up (See 3.3.3 for details)
[Load default] - Loads the saved default setup.
[Save, Save As, Load, Load As] - Allow to save and load setup as a file.
Options... This buttons shows Application Settings dialog. See Settings section for
details.
[Application Settings] - Shows settings dialog. See [3.3.
Settings] for details.
[Help] - Shows this manual
[About the product] - displays the product about dialog.
There you can check product version information
[About ASIO FX Processor SE] - displays information
about ASIO FX Processor SE product
[About ASIO FX Processor ME] - displays information
about ASIO FX Processor ME product
42
Page 43

[About SpinAudio plugins] - displays a brief information about SpinAudio plugins
Exit - Exists the application. If the streaming is on, it's automatically stopped.
3) Audio Routing
Here you can specify the signal routing for each plugin slot.
Config - Specifies the number of channels in input/output pair. There are three options:
Mono-to-mono, Mono-to-stereo, and Stereo-to-stereo. Note that if input/output is set to
stereo, the corresponding list of available channels shows stereo pairs instead of single
channels.
Note that if you are using VST instrument on the first slot and thus don't need audio
input you can select 'no input' from Input channel list.
Input Channel - The list below shows available input channels or input channel pairs
depending on selected configuration.
Output Channel - The list below shows available output channels or output channel
stereo pairs depending on selected configuration.
Show actual name - If this option is on, the lists of input and output channels show
43
Page 44

names returned by ASIO driver. If this option is off the lists show channel numbers
instead of actual names.
4) Application Settings
Here you can select ASIO driver and tune its settings. The page consists of two parts:
Driver selection and loaded driver information.
The driver selection part lets you select ASIO driver from a list of available drivers and
set sampling rate which can be chosen from the list of predefined values or just typed
directly. The sample rate drop down box lists all the sample rates supported by
ESI/Audiotrak audio cards.
IMPORTANT NOTE: Native Sound Processor works only with a set of specific
ESI/Audiotrak audio cards.
44
Page 45

VST Plugin Folder - Here you can specify your VST plug ins folder. You can use
browse button to select the folder. Whenever you change the VST folder, it's
automatically re-scanned for VST plug ins when you press 'Apply' or 'OK' buttons.
Set Default - Pressing this button sets the system default VST folder.
Scan folder - Press this button to force the application to re-scan the specified VST
folder. Use it when you have installed new plug ins to that folder.
Load on start-up - There are three options: Nothing, Autosave, Default:
Nothing - Loads nothing
Autosave - Loads a setup file automatically saved on the application exit. (See the
option below)
45
Page 46

Default - Loads default setup file. Select this option if you would like the application to
be started every time with a specific settings saved as a default setup through
'Setup\Save as default'.
Save setup on exit - If this option is on, the application automatically saves the current
setup to a file that can be loaded back on start-up. The auto-save file name is
autosave.aps and it's resided in the product installation folder.
Load bypass settings - If this option is on the state of bypass buttons are loaded from
the setup file.
Window Align - There are four options for aligning application window position on its
size change:
None - no align
Centered - The application window is centered along desktop
Left - The application retains left/top corner position
Right -The application retains right/top position
The latter mode is used when you want to keep application controls position on the
desktop unchanged.
Shorten plug in names in the list - If this option is checked, the plug in names that
don't fit the plug in slots list length are shortened to show left and right parts.
Start streaming on start-up - If this option is on the audio streaming is started
automatically on application start-up.
Maximum CPU Loading - Specifies the upper allowed CPU loading limit in percents.
When the loading exceeds this limit, the audio streaming is stopped and the
corresponding message is shown. This option prevents Native Sound Processor from a
crash or a hang up due to accident CPU overhead that might happen on loading of a new
plug in. By default it is set to 80%.
Caution: Before you use NSP application, You must set the DirectWIRE from
Prodigy 7.1 Control Panel.
*For more detailed info and operation, please refer to the ‘Help’ menu of the
software.
46
Page 47

5. nTrack Studio Pro –FARSOFT (included)
After launching nTrack, go to Files -> Settings -> Preference -> Audio Devices.
When Wave devices menu appear, select ‘ ASIO 2.0 –Prodigy192’.
You can also use WDM, MME and Direct Sound driver with nTrack.
After click ‘Advanced tab’ on ‘Wave Devices’ menu, you can choose the proper driver.
47
Page 48

48
Page 49

6. Cubase
After launching Cubase, go to ‘System’ under ‘Audio’ menu. Select ‘ASIO 2.0 –Prodigy
192’ for the ASIO device and ‘Prodigy 192 Clock’ for the Audio clock source.
49
Page 50

7. Nuendo
After launching Nuendo, go to Device -> Device setup ->VST Multitrack. Select ‘ASIO
2.0 –Prodigy 192’ for the ASIO device and ‘Prodigy 192 Clock’ for the Audio clock
source.
50
Page 51

8. Logic
After launching Logic, go to Preference -> Audio Drivers2. Check the ‘ASIO’ and
select ‘ASIO 2.0 –Prodigy192’.
And go to ‘Synchronisation’ -> ‘MIDI’ and uncheck ‘Transmit MIDI Clock’ for better
performance.
51
Page 52

9. Maven 3D pro – Emersys (included)
After launching Maven 3D pro, Go to ‘Option’ -> Audio Device Setup and set like the
below picture. You can also use this software with ASIO driver mode.
52
Page 53

10. Sonar/Cakewalk
Before you using Sonar, you have to do several setting first.
You have to set proper latency on the control panel of the Prodigy 192.
After launching sonar, Go to ‘Option’ -> Audio and select ‘Wave Profiler ’ of ‘General’
tab. Unless Sonar can’t recognize buffer of the Prodigy 192.
53
Page 54

In the case of Sonar;
Like a next picture, select ‘Prodigy192 5.1 ch 1~8’ for using WDM driver.
Do not select 2 ch driver.
In the case of Cakewalk:
Cakewalk has to use MME driver, therefore select ‘Prodigy 192 2 ch’ driver
54
Page 55

11. Sound Forge
In Sound Forge, select ‘Option’ from menu bar. Select ‘Preference…’ then Wave tab.
Choose ‘Prodigy 192 2ch’ as Playback and Record device.
55
Page 56

12. W ave Lab
In Wave Lab, Go to Option -> Preferences -> Audio Card.
Choose ‘Prodigy 192 2ch’ as Playback and Record device.
56
Page 57

Specification
1. Analog Input Specification
1) Type Line in: 3.5mm Mini Phone Jack
MIC in: 3.5mm Mini Phone Jack
2) Level Line in: -10dBV Unbalanced, -10dBV Nominal,
8dBV Max (Gain +0dB)
3) Impedance : 10K Ohm
2. Analog Output Specification
1) Type : 6 Channel analog line output(3.5mm Mini Phone Jack)
2) Level : * -10dBV Unbalanced, -10dBV Nominal,
8dBV Max (Gain +0dB)
3) Attenuation : Digital 0dB ~ -96dB with mute, 0.75 step size
4) Impedance : 100 Ohm
3. MIC Preamplifier Specification
1) Sensitive : 127mV Max
1) MIC Input Gain : +20dB Fix and 0dB ~ 22.5dB Variable(1.5dB Step Size)
3) Impedance : 2K ohm
4) +5V Phantom Power, Multimedia MIC Support
4. Headphone Amplifier Specification
1) Output Power : 60mW Max
2) Signal to Noise Ratio: 110dB (Typical)
3) (THD+N)/S : -70dB, 0.03% (Typical)
5. Sample rate supports :16,22,24,32,44.1,48,88.2,96,176.4,192KHz
(176.4,192KHz only playback)
6. A/D Converter Specification
1) Type : High performance SIGMA-DELTA ADC
2) Dynamic Range (S/N) : 100 dB A-Weighted (Typical)
3) Frequency Response : 20 ~ 22.5KHz (@ fs=48kHz)
4) Sample Rate Supports : Up to 96KHz
57
Page 58

5) Resolution : 24 Bits
6) Inter channel Gain Mismatch : 0.5dB
7. D/A Converter Specification
1) Type : High performance SIGMA-DELTA DAC
2) Dynamic Range (S/N): 104dB A-Weighted (Typical)
3) Frequency Response : 20 ~ 22.5KHz (@ fs=48kHz)
4) Sample Rate Supports : Up to 192KHz
5) Resolution : 24 Bits
6) Inter channel Gain Mismatch : 0.5dB
8. Digital Specification
1) Type : Optical connector(TOS-LINK),Coaxial connector
2) Format :IEC-958Consumer(S/PDIF),
IEC-958 Professional(AES/EBU)
3) Sampling Rate : 32,44.1,48,88.2,96,176.4,192 KHz
4) Resolution : 24 Bits
58
 Loading...