

Page 1
BPHS2
3
BPHS2/BPHS2C/BPHS2S
User Manual
Broadcast Stereo Headset with Dynamic Boom Microphone /
Broadcast Stereo Headset with Condenser Boom Microphone /
Single-Ear Broadcast Headset with Dynamic Boom Microphone
2
1
6
9
7
8
5
4
ONOFF
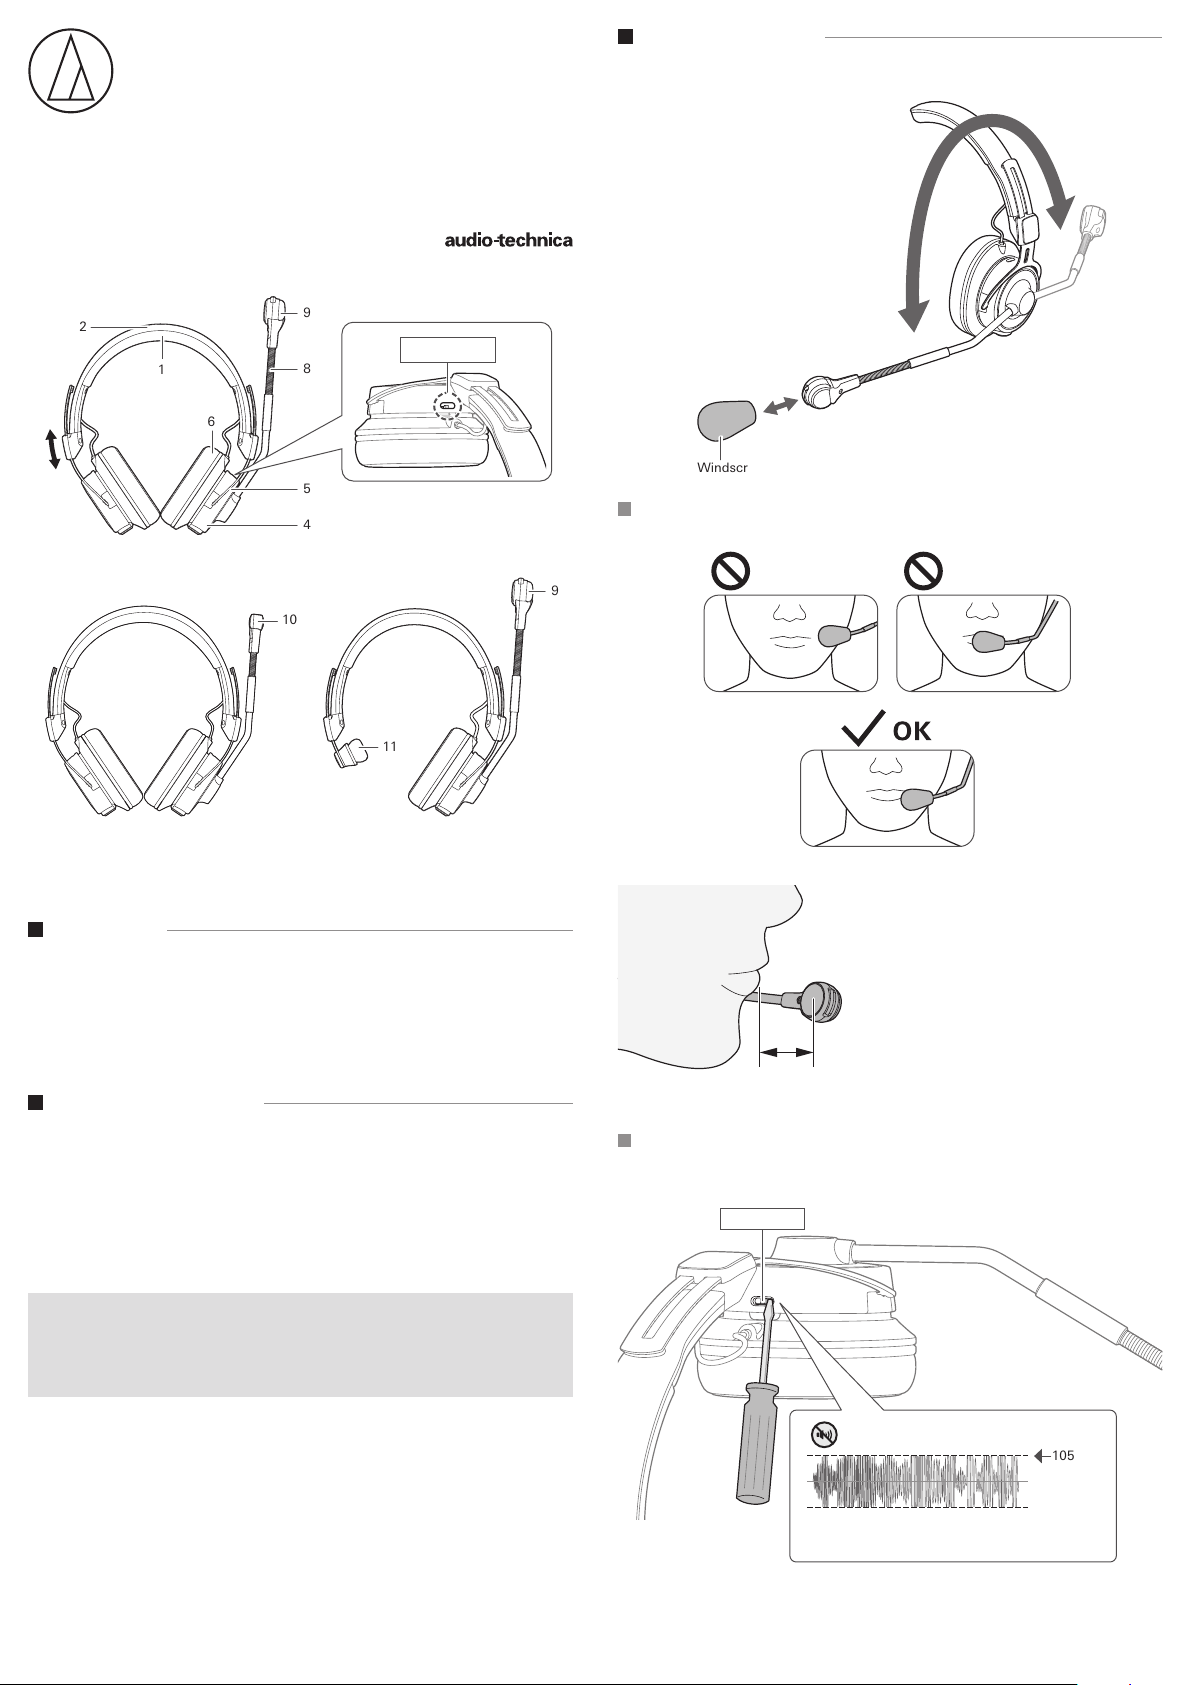
Using the product
You can use the microphone on the left or right side of your face by rotating the microphone boom
as shown in the figure.
Windscreen
Positioning the microphone boom
Use the microphone boom and gooseneck to place the microphone in the correct position.
BPHS2C BPHS2S
10
11
9
Part names
Refer to the figures and confirm the parts of the headphones before use.
1 Head pad
2 Headband
3 Slider
4 Housing
5 Arm
6 Earpad
7 Limiter switch
8 Gooseneck
9 Dynamic boom microphone
10 Condenser boom microphone
11 Temple pad
Cleaning the product
Get into the habit of regularly cleaning the product to ensure that it will last for a long time. Do not
use alcohol, paint thinners or other solvents for cleaning purposes.
• To clean, wipe the main unit with a dry cloth.
• Wipe away perspiration and any other dirt from the cable with a dry cloth immediately after
use. Failure to clean the cable may cause it to deteriorate and harden over time, resulting in
malfunction.
• Wipe the plug with a dry cloth if dirty. Failure to clean the plug may cause the sound to cut out and
may cause noise.
• Wipe the earpads and head pad with a dry cloth if dirty. Perspiration or water on the earpads or
head pad may cause discoloration. Wipe with a dry cloth and allow to dry in the shade.
• If the product will not be used for an extended period of time, store it in a well-ventilated place
free from high temperatures and humidity.
• The earpads, head pad, and temple pad are consumable items. They will deteriorate over time
due to use and storage, so replace them when necessary. For information about replacing
earpads, head pad, or other parts, or for information about other serviceable parts, contact your
local Audio-Technica dealer.
Position the microphone boom so that the
microphone is about 20 mm (0.79”) from the tip of
your mouth. Positioning the microphone directly in
front of your mouth will cause popping and other
noise from breathing.
20 mm
(0.79”)
Using the limiter switch
Use a thin-tipped tool to slide the limiter switch as shown in the figure.
Limiter switch
ONOFF
105 dB
Turning on the limiter switch helps protect your
ears by capping the volume at 105 dB.
1
Page 2
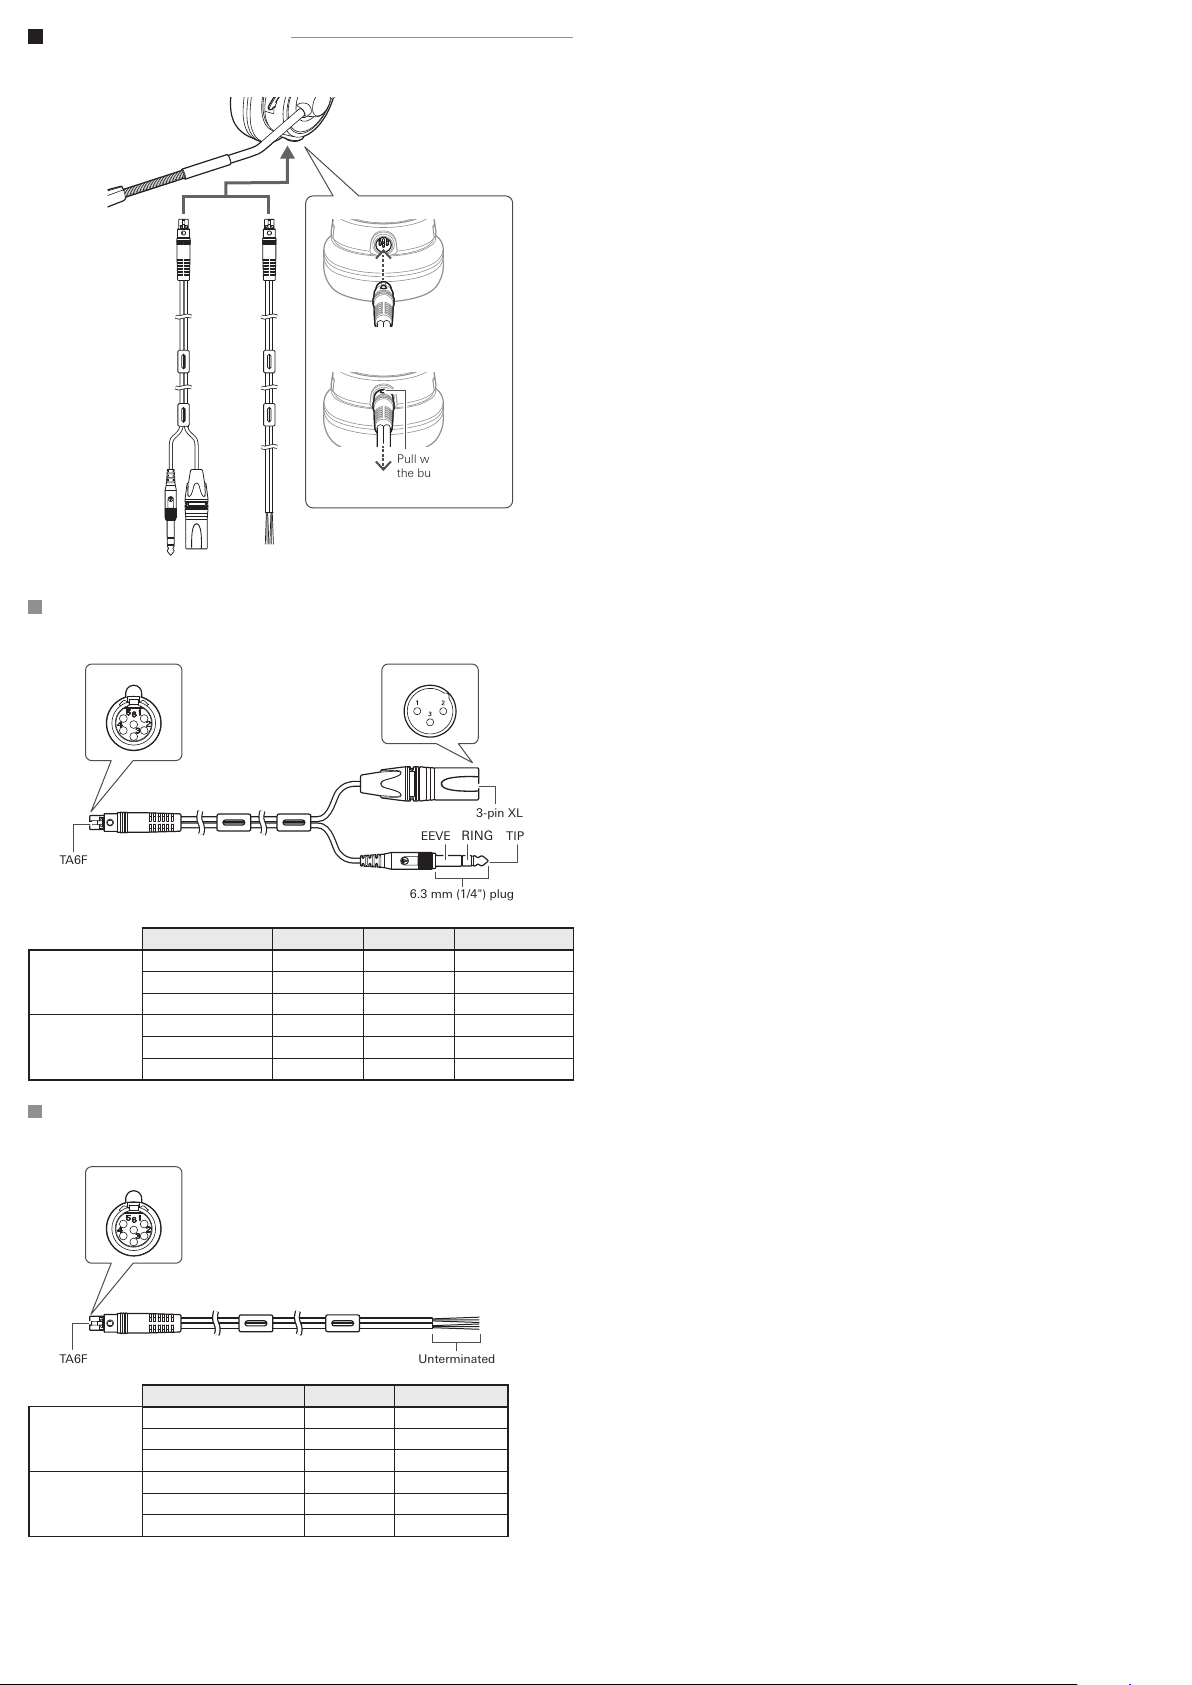
Connecting the product
Connect cables such as BPCB2 (included) or BPCB3 (sold separately) to the connector jack of the
product.
Pull while pressing
the button to
disconnect the
cable.
BPCB2 BPCB3
BPCB2
Cable for BPHS2 (all models) with a TA6F connector at one end and 3-pin XLRM connector and 6.3
mm (1/4") plug at the other.
TA6F
3-pin XLRM
3-pin XLRM
SLEEVE
TA6F
6.3 mm (1/4") plug
Function TA6F 3-pin XLRM 6.3 mm (1/4") plug
MIC + PIN 5 PIN 2 HOT -
Microphone
Headphones
BPCB3
Cable for BPHS2 (all models) with a TA6F connector at one end and unterminated connector at the
other.
TA6F Unterminated
MIC – PIN 6 PIN 3 COLD -
SHIELD PIN 1 PIN1 GND -
SPEAKER − PIN 2 - SLEEVE
SPEAKER R+ PIN 4 - RING
SPEAKER L+ PIN 3 - TIP
TA6F
RING
TIP
Microphone
Headphones
Function TA6F Unterminated
MIC + PIN 5 RED
MIC – PIN 6 YELLOW
SHIELD PIN 1 COPPER
SPEAKER − PIN 2 BLACK
SPEAKER R+ PIN 4 RED
SPEAKER L+ PIN 3 GREEN
2
Page 3

90°
180°
270°
0°
20k
(Hz)
20k
(Hz)
90°
180°
270°
0°
20k
(Hz)
20k
(Hz)
Specifications
Headphones
Type Closed-back dynamic
Driver
Φ45 mm (1.77”)
Sensitivity 102 dB/mW
Frequency response 15 to 28,000 Hz
Maximum output 1,600 mW
Impedance 38Ω (312Ω when limiter switch is on)
Input jack TB6M jack
Weight (without cable)
Accessories Windscreen x 3, clip, pouch
Replacements/separately sold items
Microphone
BPHS2/BPHS2S
Polar pattern Hypercardioid
Frequency response* 50 to 14,000 Hz (at 2 cm (0.79”))
Sensitivity* –57 dB (5.6 mV) (0 dB = 1 V/Pa, 1 kHz)
Output impedance 550Ω
Dimensions
Output connector TB6M
BPHS2C
Polar pattern Cardioid
Frequency response* 60 to 15,000 Hz (at 2 cm (0.79”))
Sensitivity* –57 dB (5.6 mV) (0 dB = 1 V/Pa, 1 kHz)
Maximum input sound pressure level* 140 dB SPL (1 kHz THD1%)
S/N ratio* 60 dB (1 kHz at 1 Pa, A-weighted)
Dynamic range 106 dB (1 kHz at Max S.P.L.)
Phantom power 11 to 52V DC, 2 mA
Dimensions Minimum width: 12 mm (0.47”), Height: 12.7 mm (0.5”)
Output connector TB6M
* During a wired connection with the product. Performance varies depending on the device used.
• 1 Pascal = 10 dynes/cm
For product improvement, the product is subject to modification without notice.
2
= 10 microbars = 94 dB SPL
BPHS2: 250 g (8.8 oz), BPHS2C: 240 g (8.5 oz),
BPHS2S: 190 g (6.7 oz)
BPCB2 (3.0 m (9.8') / TA6F, 3-pin XLRM, plug),
BPCB3 (3.0 m (9.8') / TA6F, unterminated),
Earpad HP-M60x,Head pad
Type Dynamic
Height: 18.0 mm (0.71”),
Main unit maximum diameter: 23.4 mm (0.92”)
Type Back electret condenser
Polar pattern/frequency response
BPHS2/BPHS2S
330°
300°
240°
210°
Sound pressure scale is 5 dB per unit
10dB
10dB
• During a wired connection with the product. Performance varies depending on the device used.
30°
60°
Legend
200 Hz
1 kHz
5 kHz
120°
150°
50
50
Legend
Legend
Frequency (Hz)
0°, 2 cm
Frequency (Hz)
0°, 50 cm
10k5k2k1k500200100
Response (dB)Response (dB)Response (dB) Response (dB)
10k5k2k1k500200100
BPHS2C
330°
300°
240°
210°
Sound pressure scale is 5 dB per unit
30°
60°
Legend
200 Hz
1kHz
5kHz
120°
150°
10dB
10dB
50
50
Legend
Legend
Frequency (Hz)
0°, 2 cm
Frequency (Hz)
0°, 50 cm
10k5k2k1k500200100
10k5k2k1k500200100
• During a wired connection with the product. Performance varies depending on the device used.
Audio-Technica Corporation
2-46-1 Nishi-naruse, Machida, Tokyo 194-8666, Japan
©2018 Audio-Technica Corporation
Global Support Contact: www.at-globalsupport.com
Made in Japan
142316130-02-01 ver.1 2018.08.01
3
 Loading...