

Page 1
AT-OC9/III取説_1123-00460
PCOCC = Pure Copper by Ohno Continuous Casting process
(Mono-crystalline high-purity oxygen-free copper)
Flagship model embodying the highest sound quality
ever in the series
The AT-OC9, launched on the market in 1987, was the original cartridge
model from which the AT-OC9/III evolved. Over the years, the AT-OC series
has undergone a number of model changes both inside and outside Japan,
and it has continued to be a bestseller for us for over twenty years.
While drawing on the basic design of the AT-OC9ML/II which has been
available exclusively on overseas markets and which has received high
critical acclaim, we adopted a fresh approach that called for us to review the
stylus tip, cantilever, magnetic circuit parts, damper and other aspects in
order to track down and embody the highest sound quality. It is this
approach which has given birth to our new model.
Our new stereo cartridge is designed to enable you to enjoy to the full a
sound quality packed with information and a rich expressiveness of sound
where the music reaches out to you from the depths of silence.
Special line contact stylus and solid boron cantilever
with a 0.26 mm diameter
The cartridge features a special line contact stylus with a 40µm x 7µm
curvature radius at the stylus tip. This not only ensures that the music
signals engraved in the analog records will be read out completely but also it
gives expression to the highest dynamic compliance of the series. By firmly
embedding this line contact stylus in a solid boron cantilever with its 0.26 mm
diameter and by bonding it in place, the music signals read by the tip of the
stylus are transmitted reliably to the power-generating coils.
Neodymium magnet and permendur yoke have
drastically increased the magnetic energy
Employed as the magnet is a neodymium magnet with a maximum energy
product BHmax of 50[kJ/m
3
] while used as the yoke is a permendur yoke
with a high saturation flux density and excellent magnetic materials.
Together, they further boost the magnetic field concentrated in the coil gap
area.
PCOCC used for coils and terminal pins
PCOCC does not give rise to crystalline interfacing in the transmission
direction so audiophiles can enjoy pure transmissions.
Dual moving coil with high separation and wide response
Our unique moving coil type cartridge has a basic structure where one
cylindrical coil is used for the left channel and another is used for the right
channel. This structure by which power is generated independently for the left
and right channels physically provides outstanding separation characteristics.
The leakage of signals from one channel into the other exerts a decisive
influence on the stereo expanse as well as on the sound quality. This is
because this leakage is tantamount to creating irregular cross modulation.
The reason why the dual moving coil system delivers such a clear and finely
delineated sound quality is no doubt due to the system's naturally excellent
separation.
The AT-OC9/III adopts a reverse V-shaped formation for the two left and right
coils to reduce the vibration mass as seen from the stylus tip and minimize
the unnecessary movement of the coils to further diminish the distortion.
VC mold for minimizing unnecessary vibration
The VC mold that holds the coils in place is made of a hard synthetic resin
which is combined with potassium titanate for increased strength and rigidity.
Rugged body dedicated to achieving a design with
increased rigidity
Using a precision-crafted sturdy aluminum alloy as the base, the body's
structure is made of hard resin to hold down parasitic resonance to the
minimum. This minimizes undesirable vibration, and the bottom of the body
is plated to achieve greater rigidity and an improved signal-to-noise ratio.
High-sound-quality brass mounting screw
A brass mounting screw is provided to attach the cartridge to the shell.
It is optimally suited to the high sound quality of the cartridge itself.
* The stylus section is extremely fragile. Exercise sufficient care in handling it.
(1) Mount the cartridge onto the headshell.
Install the protector to ensure that the cantilever fulcrum will not be damaged.
(The protector is contained inside the mount of the packaging case.)
Loosely secure the screws. Use the heaviest possible headshell.
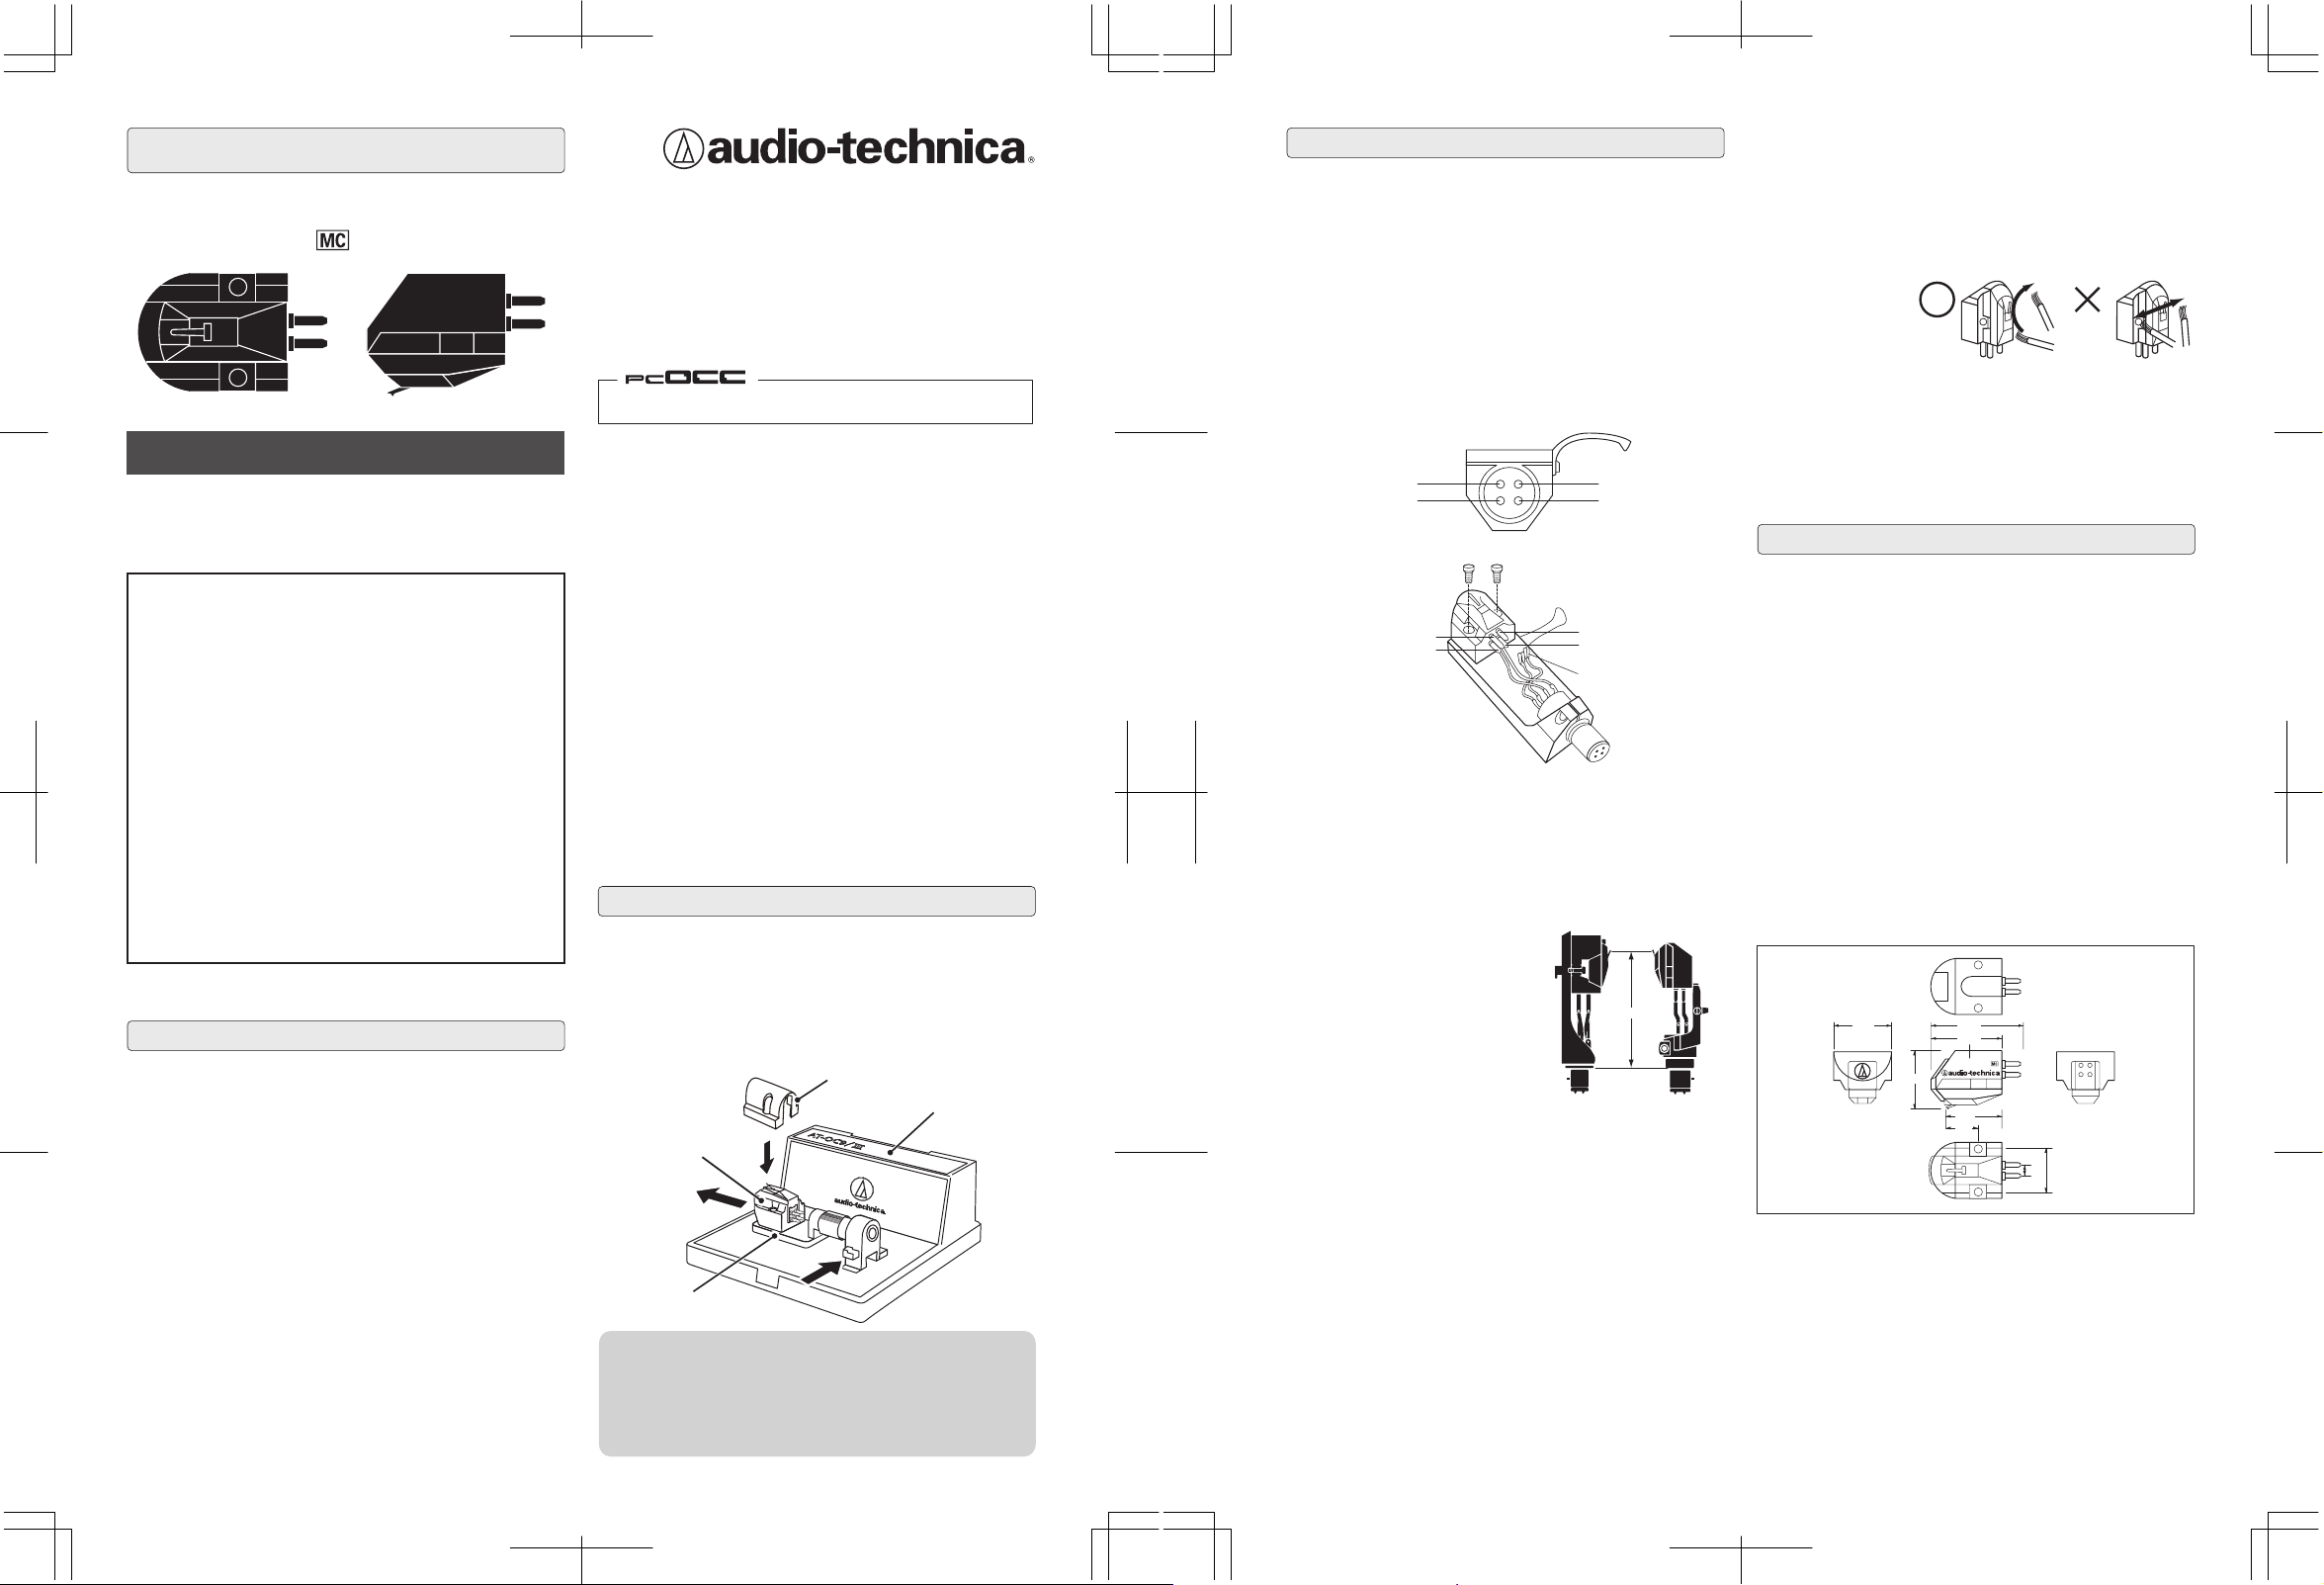
(2) While noting the polarities of the output terminals,
insert the lead wire tips.
The figure below shows the layout of the headshell lead wires of a universal
tonearm. Connect the lead wires with the same color to the output terminals
of the cartridge.
If the lead wire tips are loose, pinch them a little, and then insert. Under no
circumstances must any heat such as that accompanying soldering
operations be applied to the output terminals.
The PCOCC wires provided are the best match for the lead wires. When the
connections have been completed, remove the protector.
(4) Adjust the tracking force. The standard level is 2.0 g.
The appropriate tracking force of this cartridge is in the range of 1.8 to 2.2 g
(standard level: 2.0 g).
Normally, it is set to 2.0 g.
Depending on the air temperature, condition of the records to be played or
other operating conditions (such as heavy vibration), adjust the tracking
force, but ensure that it is adjusted to the level within the applicable range.
(5) When it is possible to adjust the arm height:
Adjust the height so that the bottom of the headshell and the surface of the
records are made parallel as seen from the side. If the arm is not positioned
at the right height, the cartridge body may touch the records and/or the
sound quality may suffer.
(6) A transformer, head amplifier or discrete phono
equalizer is required to make the connection with the
amplifier.
If the amplifier comes with a PHONO input (MC position) setting, it can be
used as is. However, to make the most of the cartridge's sound quality, use
of a step-up transformer (purchased separately), head amplifier or phono
equalizer (purchased separately) is recommended.
For details on the connections, consult the operating instructions of the
component used.
(7) Keep the stylus tip clean at all times.
Use the brush provided to remove the dirt and dust on the stylus tip.
A stylus cleaner (purchased separately) is recommended to remove
stubborn dirt.
Clean the stylus tip by moving the brush from the base toward the stylus tip.
When the cartridge has been removed from the arm, do not forget to attach
the protector, and store the cartridge away from the amplifier and other heat
sources.
* After completing the adjustment,
tighten up the screws evenly at the
left and right.
(8) When the stylus is to be replaced, replace the entire
cartridge.
Take the used cartridge to your dealer.
This cartridge, or any other model which is desired among the lineup of MC
cartridges sold by Audio-Technica, is available at the stylus replacement
price. Once the production of this cartridge has ended, one of the MC
cartridges still being marketed will be available at the stylus replacement
price. Please make a note of this.
(3) Decide on the exact position where the cartridge is to
be mounted.
(Overhang adjustment)
Adjust the overhang by following the instructions in the record player's
manual.
If the procedure is not clear, adjust the stylus tip position to the cartridge
which originally came attached to
the record player. (See figure below)
The sound quality will suffer if the
difference is great so the overhang
should be adjusted ideally to within
+/-1 mm of that of the original
cartridge.
MC Type (Dual Moving Coil) Stereo Cartridge
AT-OC9/III
Operating Instructions
Features
How to remove the cartridge from its case
Operation
Specifications
Accessories: Nonmagnetic screwdriver (× 1), washers (× 2), protector (× 1)
Cartridge mounting screws 11 mm (× 2), 16 mm (× 2)
Nuts (× 2), brush (× 1), set of PCOCC lead wires (× 1)
(Specifications are subject to change without notice due to improvements.)
Type :
Frequency response :
Output voltage :
Channel separation :
Channel balance :
Tracking force :
Coil impedance :
DC resistance :
Recommended load impedance :
Coil inductance :
Static compliance :
Dynamic compliance :
Stylus :
Cantilever :
Vertical tracking angle :
Dimensions :
Weight :
Moving coil (MC) type
15 to 50,000 Hz
0.4mV (1 kHz, 5 cm/sec.)
30 dB (1 kHz)
0.5 dB (1 kHz)
1.8 to 2.2 g (standard: 2.0 g)
12 Ω (1 kHz)
12 Ω
Min. 100 Ω
(when head amplifier is connected)
25µH (1 kHz)
35 × 10 - 6 cm/dyne
18 × 10 - 6 cm/dyne (100 Hz)
Line contact stylus
(curvature radius: 40 × 7µm)
0.26 mm diameter solid boron
23 degrees
17.3(H) × 16.8(W) × 25.7(L) mm
8.0 g
Cartridge provided with arm
(Unit: mm)
(1)(1)
Red (right channel "+")
Green (right channel "-")
White (left channel "+")
Red (right channel "+")
Blue (left channel "+")
Green (right channel "-")
If a lead wire tip is loose,
pinch it a little.
Insert the screws from this side.
Layout of shell lead wires as seen from the front (for a universal tonearm)
Front
White (left channel "+")
Blue (left channel "-")
AT-OC9/III
25.716.8
20.7
12.7
3
17.3
9.3
15.8
AT-
OC9/III
* The figure shows the headshell with the protector removed so that it is easier to see where the
connections are to be made.
Adjust this distance.
How to clean the stylus tip
Be absolutely sure to move
the brush in the direction in
which the record rotates.
(3)(3)
(2)(2)
Cartridge
Mount
Protector
Dummy shell
Caution
This stereo cartridge was designed with painstaking attention
given to safety, but trouble may occur if it is used incorrectly.
Heed the following precautions to prevent accidents from
occurring.
(1) Remove the top transparent case, and install the protector inside
the mount onto the cartridge.
(2) Push the orange button into the back position to release the lock.
(3) Take hold of the side of the cartridge, and draw it out in the
direction shown by the arrow in the diagram.
(4) Using the flat-head screwdriver provided, remove the cartridge from
the dummy shell. When doing this, take sufficient care not to
damage the tip of the cartridge stylus.
Keep the cartridge out of the reach of small children.
Failure to heed this precaution may result in accidents
or malfunctioning.
Keep the plastic bag provided with the cartridge out of the
reach of small children and away from flames.
Failure to heed this precaution may result in accidents
or a fire.
Do not put this cartridge in a location where it will be exposed
to direct sunlight, near heating appliances or in places with a
high temperature and high humidity or with high
concentrations of dust.
Failure to heed this precaution may result in
malfunctioning or trouble.
Do not touch the cartridge's cantilever fulcrum.
Failure to heed this precaution may result in
malfunctioning.
Do not attempt to disassemble or remodel the cartridge.
Failure to heed this precaution may result in
malfunctioning.
Do not subject the cartridge to strong impact.
Failure to heed this precaution may result in
malfunctioning.
* Caution
When storing the cartridge in its case, first be absolutely sure to
mount the protector and insert the dummy shell or headshell, and
then be absolutely sure to push the orange button to the front
position to engage the lock.
Unless the lock is engaged, the cartridge will fall out and be damaged.
universal tonearm
 Loading...