

Page 1

AT-MX381 SmartMixer®
8 Channel Automatic Mixer
– Software Manual –
Installation and Operation
Ver 3.0.0
© 2005-2006 Audio-Technica Corp.
All rights reserved.
Page 2

Introduction ……………………………………………………………………………3
Computer requirements ……………………………………………………………..3
Installing the Software ……………………………………………………………….4
Uninstalling the Software ……………………………………………………………6
Connecting the AT-MX381 to the computer ……………………………………...6
Starting the SmartMixer Software application ………………………...………...7
Main Configuration Window - Channel Setting Tab…………..…...……….…...7
Main Configuration Window - System Setting Tab ………………...…….……..9
Output Section ……………………………………………………………...………..9
Threshold Section …………………………………………………………………..10
Gate Processing Section …………………………………………………………..10
Mode Section ………………………………………………………………………..10
Menu Operations ……………………………………………………………………..11
– File…………………………………………………………………………………..11
– Window …………………………………………………………………………….11
– CPU …………………………………………………………………...……………11
– Help ………………………………………………………………………………...11
Contents
2
Page 3
A
Introduction
Each AT-MX381 includes the SmartMixer Software application on CD Rom. This application allows the
installer to configure many of the AT-MX381 features without needing to open up the unit or remove it from
a rack. To use this powerful configuration tool, load the application onto a PC running the Windows
operating system (Win 98-SE, 2000, or XP), connect the PC to an AT-MX381 (Master Unit in a multiple
SmartMixer setup) via the RS232 data port, and run the application.
Functions configurable through the software include:
Function
Input Attenuation 0 dB (MIC), -35 dB (LINE) 0 dB (MIC)
Phantom Power (Per Input) Off
Channel Priority Select (Per Input) Off
Threshold Level 8 (When PC is connected)
Mode (Manual/Auto Mixer) Auto Mixer
Output Attenuation (MIC/LINE) 0 dB (MIC)
Force – ON Override (Per Input) Off
Force – OFF Override (Per Input) Off
Direct Output Select (Pre/Post Gate) Pre Gate
NOMA Off
Gate Hold Time 0.5 Second
Gate Attenuation (Per Input) 36 dB
Low Cut Filter (Per Input) Off
“Last Mic On” On
Output Limiter (Overall) Off
Output Level Indicator (Pre/Post Master) Pre Master
Lock Mode (Control Lockout) Disabled
Default setting
Computer requirements
To run the SmartMixer Software, the following minimum computer hardware and software configuration
are required:
Hardware:
Pentium™ processor running at 166 MHz or better
100 MB hard disk space recommended for application
32 MB RAM
9 pin RS232 Serial Data Port (Com Port) to connect to
T-MX381
CD ROM Drive
Computer display capable of supporting at least 1024
x 768 pixel resolution
Note: SmartMixer Software will not run on a LINUX® or Apple® Macintosh® based system.
Note: the SmartMixer Software requires the Microsoft .NET framework. If your
computer does not have .NET framework installed, you will be asked to install it during
setup. After installation, you will be asked to restart your computer.
Operating System / Software
Microsoft® Windows® 98 and up including the
following versions:
98 second edition
NT 4.0 with Service Pack 5
2000 Professional with Service Pack 2 or Higher
2000 Server with Service Pack 2 or Higher
2000 Advanced Server with Service Pack 2 or Higher
XP Home
XP Professional
3
Page 4
Installing the Software
Note: you must have administrator rights for the computer in order to install the software.
1. Close all running applications.
2. Insert the SmartMixer Software CD ROM into the computer’s CD ROM drive.
Click on Start > Run and type the path (e.g., D:\setup.exe, where D is the drive letter of the CD
ROM drive) to the setup file on the CD ROM. (Or use “Browse” to locate the setup file on the CD
ROM.)
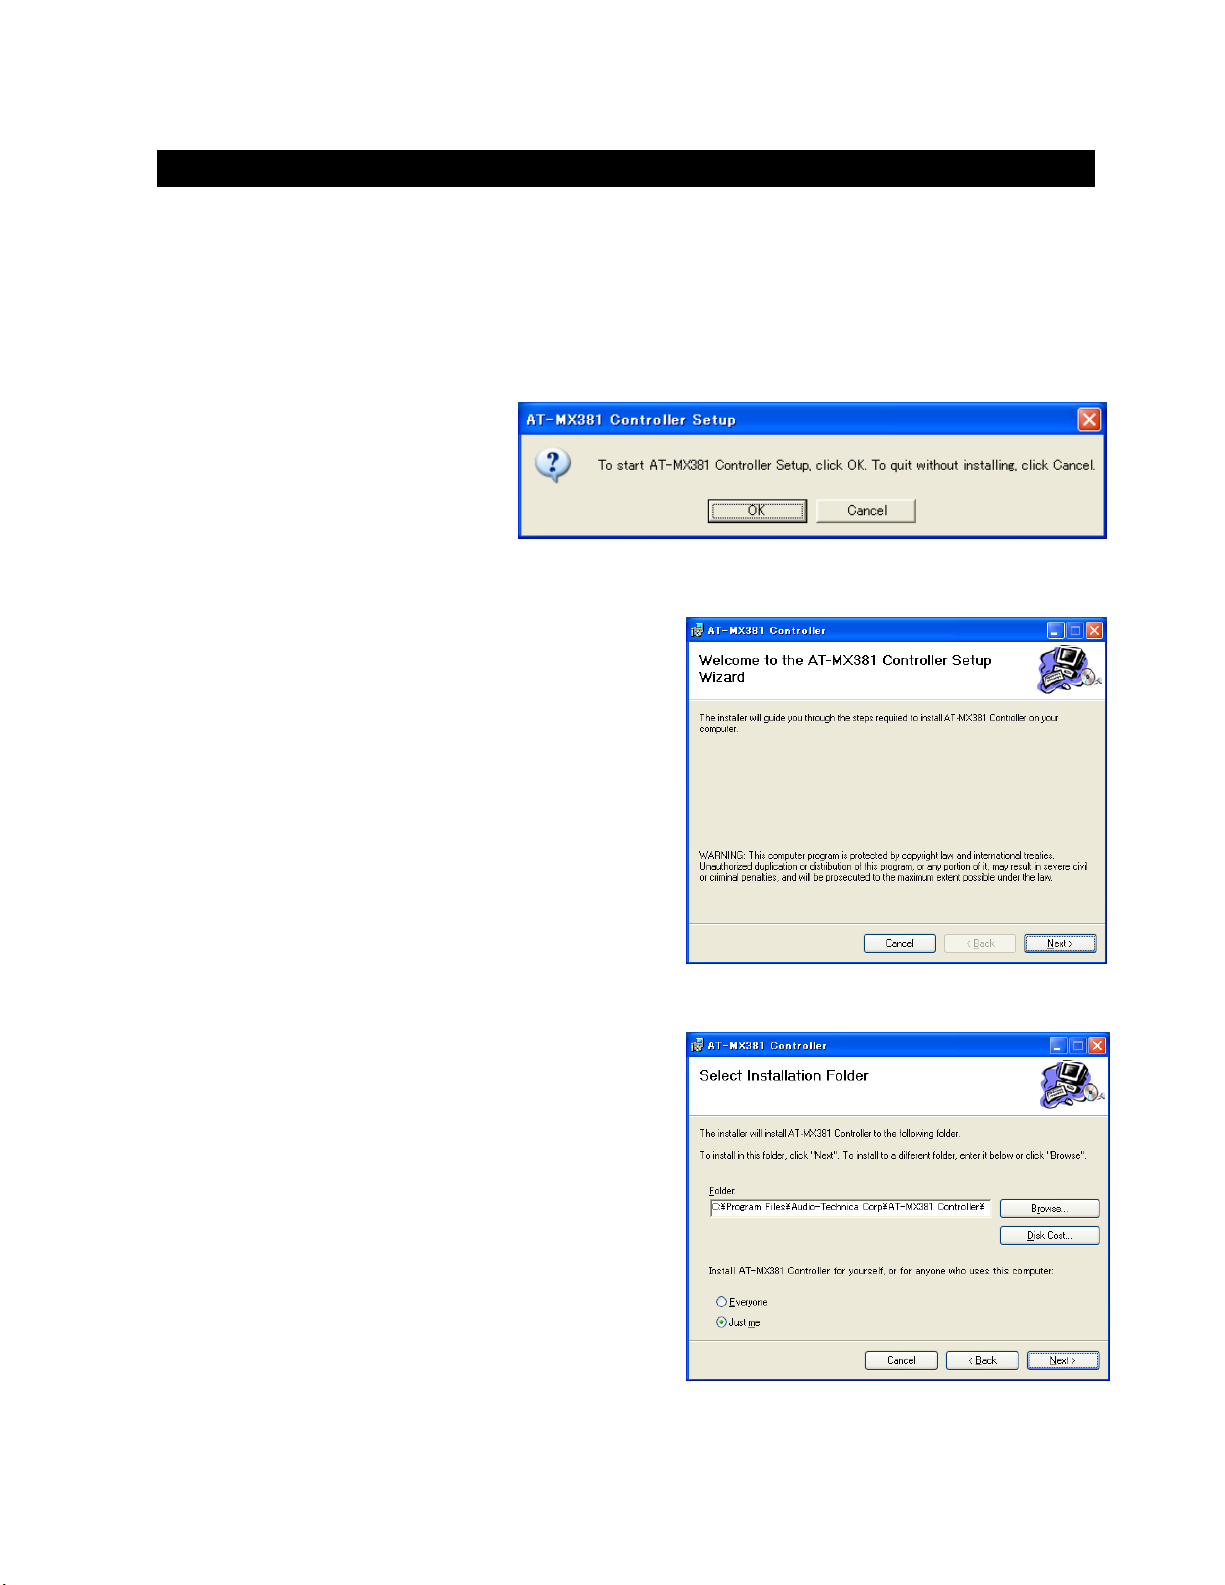
3. When “Setup” is executed, the
Setup welcome dialog box
appears.
4. Click OK to begin setup Wizard.
5. When the Setup Wizard screen appears. Click
“Next” to begin installation or “Cancel” to exit the
installer application.
When “Next” is clicked, the installer first checks for the
presence of the Microsoft .NET Framework. If this is not
present, the installer will ask if you desire to install the
included .NET Framework version.
Follow the instructions on the .NET Framework installer
screens. (You will be required to restart your computer
after installing the .NET Framework.)
Note: Microsoft .NET Framework is required to run the SmartMixer Software.
If .NET Framework is properly installed, the Select
Installation Folder screen will appear. This folder allows
you to select the location for the software installation,
check available space on your disks, and choose which
computer users can access the software.
6. Select the location for the software installation.
a. “Browse” opens a file browser window.
b. “Disk Cost” opens a window that shows
available space on your disk drives.
7. Select who can access the SmartMixer Software
by clicking the “Everyone”
or “Just Me”
4
Page 5

(
)
Installing the Software
8. Click next to begin the installation process. A
“Confirm Installation” screen appears. Click
“Next>” to continue the process, “<Back” to go
back to the previous screen, or “Cancel” to
cancel the process without installing the
SmartMixer Software.
The installation progress screen appears. Clicking cancel
at any time during the process terminates the installation
without installing the SmartMixer Software.
When the installation is complete, the “Installation
Complete” window appears. The installer automatically
adds a shortcut to the SmartMixer Software on the
desktop. (If necessary, this can be removed after
installation.)
Click “Close” close to close the window.
Note: It is advisable to use Windows Update to check for
any critical updates to the .NET framework.
Finally, an AT-MX381 Controller Setup box appears
indicating the installation and software setup succeeded.
Click OK to exit the installer.
5
Continued
Page 6

T
-
Note: you must have administrator rights for the computer in order to uninstall the software.
There is not a separate uninstall routine. To
uninstall the software, please use the “add or
remove programs” tool from your computer’s
control panel. When the “add or remove programs”
application begins, select AT-MX381 Controller
software and follow the instructions.
Note: The uninstall routine will not uninstall the
Microsoft .NET framework.
Uninstalling the Software
Connecting the A
MX381 to the computer
Connect a standard 9-pin RS232 type data cable between the computer and the RS232 port on the back
panel of the AT-MX381. If multiple AT-MX381’s are linked together, connect the data cable to the master
SmartMixer in the linked chain.
Do not apply power to the AT-MX381(‘s) at this time.
6
Page 7

Starting the SmartMixer Software application
Click on the AT_MX381 icon on the desktop to launch the
SmartMixer Software. An alternative would be to Click on
Start > Programs and locate the AT-MX381 application.
The software starts and displays an information dialog box.
At this dialog, select the language for the application
(English) and the port number for the serial port connected
to the AT-MX381.
Turn on the power to all AT-MX381 SmartMixers, starting
with any slave units and then the master.
Click OK in information dialog box to start the SmartMixer
Software application. An AT-MX381 splash screen appears
followed by the main control screen showing the current
settings for the connected Mixer (Master).
The Auto LED (master section) of the Master Mixer begins
to flash, indicating the software is controlling the mixer. At
this point all front panel functions configurable by the
computer or front panel buttons are locked out.
The SmartMixer Software application opens
to a main window with the Master mixer’s
settings appearing in a sub window.
A menu bar at the top of the main window
allows access to File settings, Window
(Mixer selection), CPU (Firmware download),
and Help. (See Menu descriptions for
detailed information on each item.)
Two “tabs” at the top of the sub window allow
for selection between the Channel Settings
and System Settings for the selected Mixer.
The view defaults to the Channel Setting tab.
The small rectangle at the lower right of the
window is a progress bar that becomes
active when settings are copied.
The AT-MX381 SmartMixer’s channel settings appear in columns with the channel number at the top. The
first column lists the items that can be configured for each channel. In the upper left corner is a button that
allows channel one’s settings to be copied to all of the other channels. Across the bottom of the window
are “Initialize” buttons. When clicked, these will set the selected channel or ALL channels to their factory
default configurations.
When the program starts, it reads and displays the current settings for the connected mixer(s).
Main Configuration Window –Channel Setting Tab
7
Page 8

The software can configure the following channel functions:
Main Configuration Window –Channel Setting Tab (Continued)
Copy Channel Information (CH1 CP) button
Clicking this button copies channel one’s settings to the other
seven channels
INPUT ATT
Allows selection between 0 dB (MIC) and –35 dB (LINE) level
inputs.
(Note: if LINE is selected, Phantom will be OFF
and if PHANTOM is ON, MIC will be selected.)
PHANTOM
Turns 48V phantom power on or off.
PRIORITY
Sets the channel’s priority status.
LOW FREQ CUT
Turns on the channel’s roll-off filter to minimize mechanical or
other low-frequency noise.
FORCE ON
Allows channel to turn on, when external contact closure is
activated, overriding any priority settings.
Note: Force on/off settings from external contact closure will
override force on/off settings from PC.
FORCE OFF
Allows channel to turn off when external contact closure is
activated, overriding any priority settings.
GATE ATT
When a channel is closed, its output is not entirely cut off, but
attenuated. GATE ATT sets the amount of attenuation when the
channel gate is closed (channel is off).
DIRECT OUTPUT
Allows the signal on each channel to appear on the Direct Out
terminal before or after the channel’s gate.
INITIALIZE
Clicking these buttons sets a channel or all channels to factory default settings.
Note: when any of the INITIALIZE or CH1 CP buttons are clicked, a confirmation box appears, clicking OK
begins the process. During the process, a blue progress bar appears in the rectangle in the windows lower
left corner.
.
8
Page 9

Main Configuration Window –System Setting Tab
Clicking the SYSTEM SETTING tab opens a system window for the selected mixer. The system window
contains global settings for the mixer.
This window contains sections for:
Mixer Output
Threshold
Gate Processing
Operational Mode
Each section can be reset to factory
defaults by clicking the initialize
button associated with the section.
The “Master Copy” button allows the
global settings to be copied to slave
mixers.
Output Section
This section contains overall settings that affect the mixer’s output.
OUTPUT ATTENUATOR
Sets the mixer’s output to –35 dB (MIC) or 0 dB (LINE) level.
LIMITER
Turns the overall limiter circuit on or off. When on, the limiter helps prevent
distortion caused by loud audio peaks.
NOMA (Number of Open Microphones Attenuated)
Turns NOMA on or off.
OUTPUT INDICATOR
Selects whether the mixer output is displayed on the mixer’s front panel before
or after the master volume control.
INITIALIZE
Clicking this button returns the output settings to factory default.
9
Page 10

Main Configuration Window –System Setting Tab (Continued)
Threshold Section
Adjust the mixer’s overall threshold level by clicking the up or down buttons.
Threshold is the level at which audio signals will cause the gates to open. Lover
settings allow quieter sounds to open the gates.
Gate Processing Section
LAST MIC ON
When turned on, the last mic active will remain on even if the sound level drops
below the threshold setting. This function is used in television/video
conferencing applications where it is desirable to have some room ambiance
sounds heard even when no one is talking. Note: To use this function in a
multi-mixer system, activate the “Last Mic On” feature on all mixers (master and
all slave units).
GATE HOLD TIME
Sets the length of time a channel’s gate remains open after the sound level
drops below the threshold setting. Choose longer Gate Hold times to avoid
having the mixer gate off the input channel during a talker’s pauses.
Mode Section
GATE MODE
Chooses whether the SmartMixer is in automatic or manual operation. When in
manual operation, the unit operates like a normal non-automatic mixer.
LOCK MODE (Key Lock)
Allows the software settings and front panel configuration parameters to be
locked out to prevent unauthorized tampering.
Note: Lock mode does not affect the channel trim, channel gain, and master
level control settings.
10
Page 11

X
®
Menu Operations
- File -
Save: Allows a set of SmartMixer configuration settings to be saved to a data file for future recall. To
save a group of settings, select Menu>Save. In the dialog box, choose the location for the saved
file and give it a name. (The default extension is .at.)
Note: Please make certain that the number of mixers (master & slave) in the previously saved
configuration file matches the number of mixers in your current configuration. If the
number of mixers in the preset does not match the number of mixers in your current
configuration, the software may not function correctly.
Open: Allows a previously saved configuration file to overwrite the current SmartMixer settings. Click
open and select the previously saved file. A dialog box opens asking to confirm replacement. Click
OK to replace the file or cancel to exit.
Exit:
Click Exit to close the program
- Window -
Use this menu to select which SmartMixer’s configuration is viewed by clicking the window of the mixer
you want to view. The default is the Master. Multiple SmartMixer windows can be open at one time. Click
on the window header to choose the one to modify.
- CPU -
This menu option is used to upgrade the AT-MX381 firmware. This function should be used only by
authorized factory-trained technicians upon specific direction from Audio-Technica.
- Help -
Clicking HELP opens a software version information screen.
Pentium™ is trademark of Intel Corporation.
Microsoft® and Windows® are registered trademarks of Microsoft Corporation.
Apple® and Macintosh® are registered trademarks of Apple Computer, Inc.
LINU
is registered trademark of Linux Mark Institute.
11
 Loading...