

Audio System R-110.4, M-135.2, R-195.2, M-90.4, R-110.4 24 V Owner's Manual

by Audio system
since 1988
the sound
R
High-Performance
Car-amplifier
owner‘s manual
R-195.2
R-110. 4
M-135.2
M-90. 4
R-110. 4 24 v
designed and engineered by audio system Germany
R+M
by Au dio sys tem
features
Congratulation on your purchase of your new r+m-Series amplifier.
IMPORTANT: Before installation your power amplifier, we recommend to read the owner´s manual carefully
and to follow the instructions regarding connection and fitting exactly.
ATTENTION: Pay attention to advices and instructions of the car manufacturer.
IMPORTANT: Your proof of purchase is evidence of warranty claim for repair or replacement. Keep your proof
of purchase, manual and original packaging.
ATTENTION: Use of sound components can impair your ability to hear necessary traffic sounds and may
constitute a hazard while driving your automobile.
Audio SystemGermany accepts no liability for hearing loss, bodily injury or property
damage as a result of use or misuse of our products. We recommend installing the equipment by an
authorized service center or dealer. A professional fitting and connection is the requirement for further
warranty and perfect sound.
R-195.2/M-135.2
- 2-Channel High Power Class-AB amplifier with SMD technology
- MOS-FET Power Supply
- Stable into 2 ohm stereo per channel and 4 ohm bridged mode
- Variable switchable Low Pass Filter from 50 to 300 Hz
- Variable switchable High Pass Filter from 25 to 300 Hz
- Variable switchable Band Pass Filter from 25 to 300 Hz and from 50 to 300 Hz (LPF)
- FSA Front Stage adjuster for analog phase correction for the left front channel
- High-Level-Input with automatically „TURN ON“
- Input Sensitivity: variable 200 mV maximum to 8 V minimum
- Multi-Way Protection Circuitry: overheating, overcurrent and short circuitry
- Operating Voltage: DC 10 ~ 16 V Power Input
- Massive heavy aluminum-heatsink
- Wired Remote Controller RTC (Optional)
- 3-step ON TOP ventilation system
- Very fast and steplessly adjustable Music Detection
R-110. 4 + R-110. 4 24 v/M-90. 4
-
v
i
t
k
a
l
READ
READ
l
o
V
r
ü
F
Y
Y
- 4-Channel High Power Class-AB amplifier with SMD technology
- MOS-FET Power Supply
- Stable into 2 ohm stereo per channel and 4 ohm bridged mode
- Variable switchable Low Pass Filter from 50 to 3500 Hz
- Variable switchable High Pass Filter from 50 to 4000 Hz
- FSA Front Stage adjuster for analog phase correction for the left front channel
- High-Level-Input with automatically „TURN ON“
- 2CH / 4CH input mode selectable button
- Input Sensitivity: variable 300 mV maximum to 8 V minimum
- Multi-Way Protection Circuitry: overheating, overcurrent and short circuitry
- Operating Voltage: DC 10 ~ 16 V Power Input (DC 20 ~ 28 V in R-110. 4 24 V)
- Massive heavy aluminum-heatsink
- Wired Remote Controller RTC (Optional)
- 3-step ON TOP ventilation system
- Very fast and steplessly adjustable Music Detection
-2-
B
e
t
r
i
e
b
!
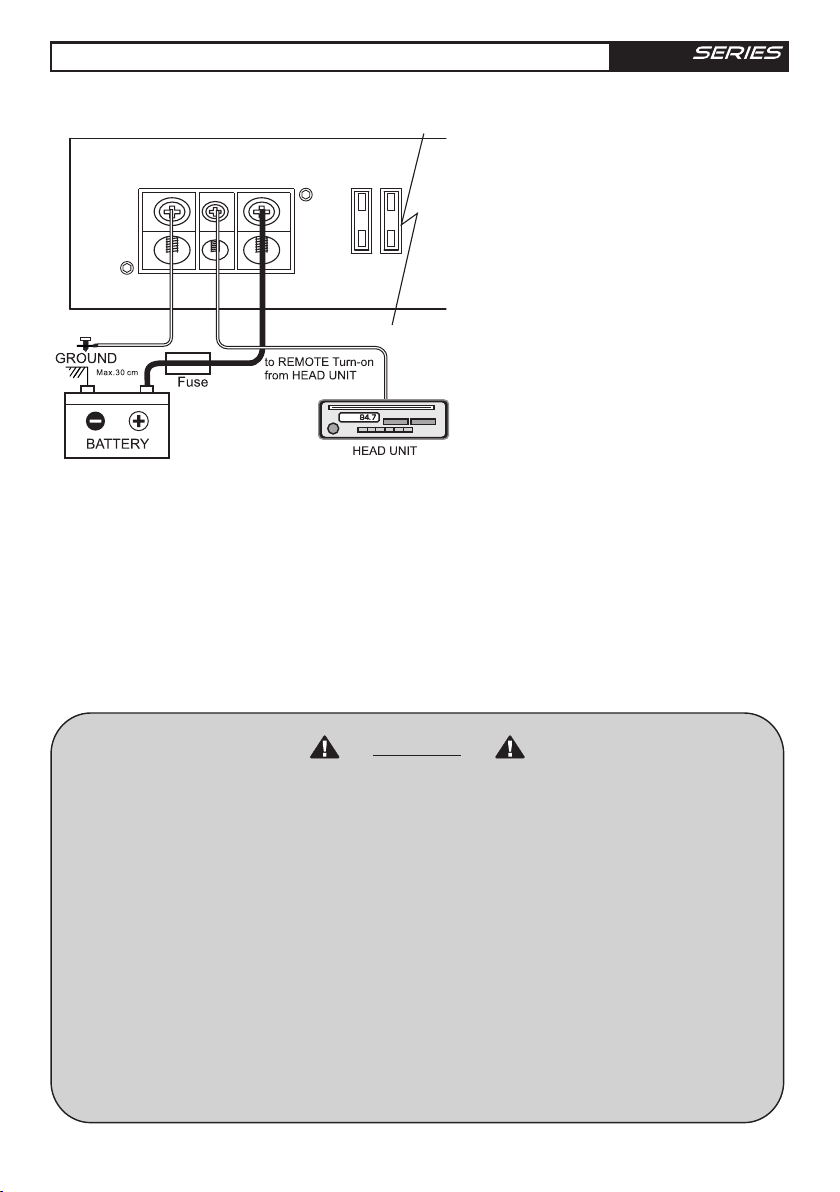
Power connection
R-110. 4 + R-110. 4 24v/R-195.2/m-90. 4/M-135.2
R+M
by Au dio sys tem
GND
+24V in R-110.4 24 V
REM
+12V
1. Battery disconnection:
First, disconnect the power supply of the vehicle
by removing the ground cable of the battery.
2. Ground connection:
Connect the GND (ground) connection
of the amplifier with the car chassis.
Keep this cable as short as possible (not longer
than 50 cm) and use a suitable cross section
(AWG size 7-5).
Make sure, that the connection with the
vehicle chassis is free of paint, dirt and
dust.
3. +12 V Power connection (+24 V in R-110. 4 24 V):
Connect the +12 V (+24 V in R-110. 4 24 V) contact of the amplifier with the supply cable via a fuse directly to
the vehicle battery. Keep in mind, that the length of the cable from fuseholder to vehicle battery has to be maximum
30cm. For the amplifier to function at its best, use a high quality fuse holder and suitable cable preferably AWG 7-5
cable. This fuse protects the amplifier and the vehicle against the possibility of a short circuit in the power cable.
4. Remote connection:
Connect the REM-terminal of the amplifier to the remote-output (automatic 12 V antenna-output
(+24 V in R-110. 4 24 V)) of the head unit. Use a 0,5 - 1,5 mm² power cable.
ATTENTION
Please follow the instructions during the installation of your amplifier:
a) Take care of a professional attachement. Pay attention, that no electrical cable, gas tank, hydraulic
breakes or other components get damaged.
b) There has to be enough cooling and air circulation. Avoid the installation in small closed boxes or close to
heatening parts.
c) Protect the amplifier from fluids, wetness, heat and foreign material as well as from other influences.
d) The amplifier is only to be built into vehicles with a 12 V DC power supply.
(+24 V in R-110. 4 24 V)
e) Never install the power supply cable with other original wires of the vehicle (gas cables), fan motors,
brand control moduls etc.
f) Install the signal cable (cinch cable) as well as the speaker cable far away of the power cables to avoid
troubles with the music signal.
g) The cables of your amplifier have to be installed, so that there is no danger of binding, squeezing or
breaking.
-3 -
 Loading...