

Page 1
EN
Instruction Manual
Rockblaster
Rechargeable - Bluetooth® RD-1556
PARTS DESCRIPTION / ONDERDELENBESCHRIJVING / DESCRIPTION DES
PIÈCES / TEILEBESCHREIBUNG / DESCRIPCIÓN DE LAS PIEZAS /
DESCRIÇÃO DOS COMPONENTES / OPIS CZĘŚCI / DESCRIZIONE DELLE PARTI /
BESKRIVNING AV DELAR / POPIS SOUČÁSTÍ / POPIS SÚČASTÍ
1
3
2
7
8
12 13
4
9
14 15 16 17
5
6
11
10
service.tristar.eu
Tristar Europe B.V. | Jules Verneweg 87
5015 BH Tilburg | The Netherlands
Page 2

EN Instruction manual FR Mode d'emploi ES Manual de usuario
SAFETY INSTRUCTIONS
• By ignoring the safety instructions the manufacturer can not be hold
responsible for the damage.
• If the supply cord is damaged, it must be replaced by the manufacturer,
its service agent or similarly qualied persons in order to avoid a hazard.
• Never move the appliance by pulling the cord and make sure the cord
can not become entangled.
• The appliance must be placed on a stable, level surface.
• The user must not leave the device unattended while it is connected to
the supply.
• To completely disconnect the power input, the AC/DC adaptor of the
apparatus should be disconnected from the mains, as the disconnected
device is the AC/DC adaptor of apparatus.
• This appliance is only to be used for household purposes and only for
the purpose it is made for.
• To protect yourself against an electric shock, do not immerse the cord,
plug or appliance in the water or any other liquid.
• The appliance can be used by children aged from 8 years and above
and persons with reduced physical, sensory or mental capabilities or
lack of experience and knowledge if they have been given supervision
or instruction concerning use of the appliance in a safe way and
understand the hazards involved. Children shall not play with the
appliance. Cleaning and user maintenance shall not be made by
children unless they are older than 8 and supervised.
• WARNING: The battery (battery or batteries or battery pack) shall not be
exposed to excessive heat such as sunshine, re or the like.
• Caution: grounding or polarization. The precautions should be taken so
that the wider blade of the ac-plug must match the slot in receptacle
"wall socket".
• The apparatus should not be exposed to dripping or splashing and no
objects lled with liquids should be placed on the apparatus.
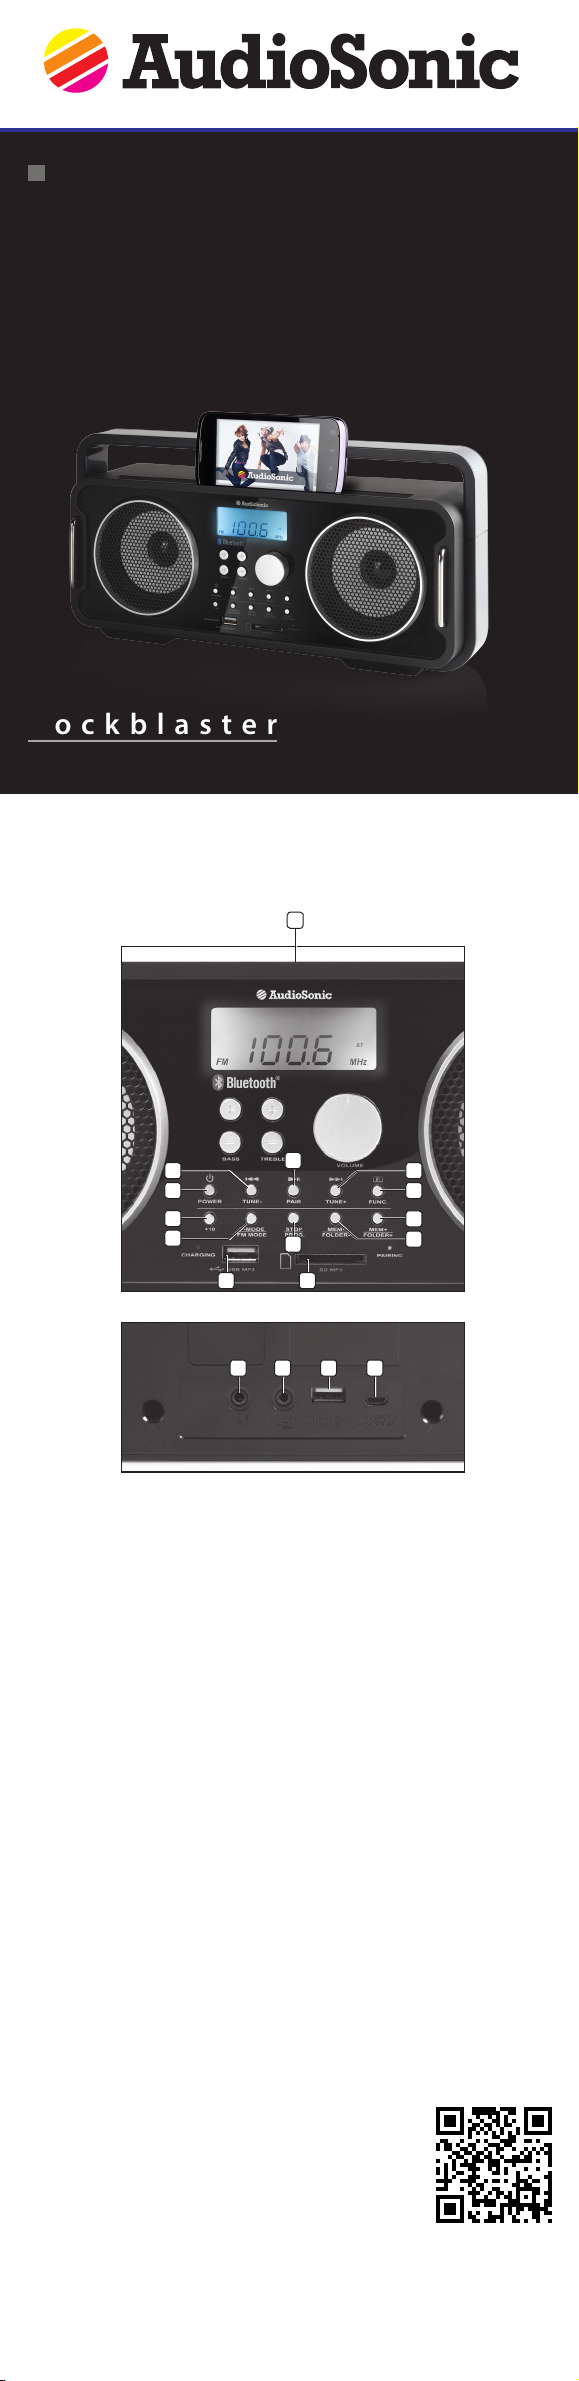
PARTS DESCRIPTION
1. Slot for placing your Smartphone/
Tablet
2. Power Key (On/ Standby)
3. Tune -/ Back key
4. Play/ Pause/ Pair key
5. Tune +/ Next Key
6. Function Key
7. + 10 key
8. P-Mode/ Fm Mode Key
BEFORE THE FIRST USE
Take the appliance andaccessoriesoutthebox.Removethe stickers,protective foilorplasticfrom thedevice.
POWER SOURCES
AC power
• You can power your portable system by plugging the detachable AC power
cord into the AC inlet at the back of the unit and into a wall AC power outlet.
Check that the rated voltage of your appliance matches your local voltage.
Make sure that the AC power cord is fully inserted into the appliance.
• This set has a built-in power saving system which will automatically put the
set into a ""standby mode"" when it detects that the set is not in use.
Note: this function is only available during AC operation.
USE
USB charging port
Connect the device you would like to charge to the USB charging port at the
back of the unit, your device will be charged even during playback.
Sound eect
At any time during playback, you can use the "bass" and "treble" knobs for
stronger bass and highs.
Radio
• Press the "FUNC" key repeatedly until the display shows FM.
• Use the "TUNE+" or "TUNE-" key to adjust the radio frequency.
• Use the "FM MODE" key to select mono or stereo mode.
• After tuning you can store a desired station. Press the "PROG" key and
choose the desired memory position with the "MEM-" and "MEM+" key.
Press the "PROG" key again to conrm.
• Use the "MEM-" and "MEM+" key to nd a saved memory station.
Bluetooth®
• Press the "FUNC" key repeatedly until the display shows "BT".
• Switch on the Bluetooth® function on your extern device, search for
"Rockblaster" and connect. Once paired you can start playback on your
external device.
NOTE: if asked for a pass code, enter "0000".
USB + SD
• Press the "FUNC" key repeatedly until the display shows "SD" or "USB".
• Press the "FOLDER-/+" keys to skip between your folders.
• Press the back and next keys to skip between the songs.
• Press the "P-mode" key to switch between the dierent playback modes:
Play >> Repeat 1 >> Repeat folder >> Repeat all >> Random play.
• Press the "Stop" key once to stop playback, Press the "Stop" key twice to
reset the playback memory.
Note: It takes time to open and verify a large USB-Drive / SD-card, and count
all the song les. If there are many les, it can take up to 60 seconds for this
process.
AUX
• Press the "FUNC" key repeatedly until the display shows "AUX".
• Connect your external device to the unit by using a standard stereo
headphone cable.
• Playback control can be done only through your external device.
GUARANTEE
• This product is guaranteed for 24 months granted. Your warranty is valid if
the product is used in accordance to the instructions and for the purpose
for which it was created. In addition, the original purchase (invoice, sales
slip or receipt) is to be submitted with the date of purchase, the name of the
retailer and the item number of the product.
• For the detailed warranty conditions, please refer to our service website:
www.service.tristar.eu
GUIDELINES FOR PROTECTION OF THE ENVIRONMENT
This appliance should not be put into the domestic garbage at the end
of its durability, but must be oered at a central point for the recycling
of electric and electronic domestic appliances. This symbol on the appliance,
instruction manual and packaging puts your attention to this important issue.
The materials used in this appliance can be recycled. By recycling of used
domestic appliances you contribute an important push to the protection of
our environment. Ask your local authorities for information regarding the point
of recollection.
SUPPORT
You can nd all available information and spare parts at service.tristar.eu!
9. Stop/ Program Key
10. Memory -/ Folder - Key
11. Memory +/ Folder + Key
12. USB MP3 Socket
13. SD-Card Socket
14. Microphone Input Socket
15. Aux-Input 1
16. USB Charging Socket
17. DC Power Socket
 Loading...