

Page 1

3900 ANNAPOLIS LANE NORTH / PLYMOUTH, MINNESOTA 55447-5447 / PHONE: 763-577-9700 FAX: 763-577-0323
Model Reference 3
STEREO PREAMPLIFIER
Owner’s Manual
Page 2
Model Reference 3
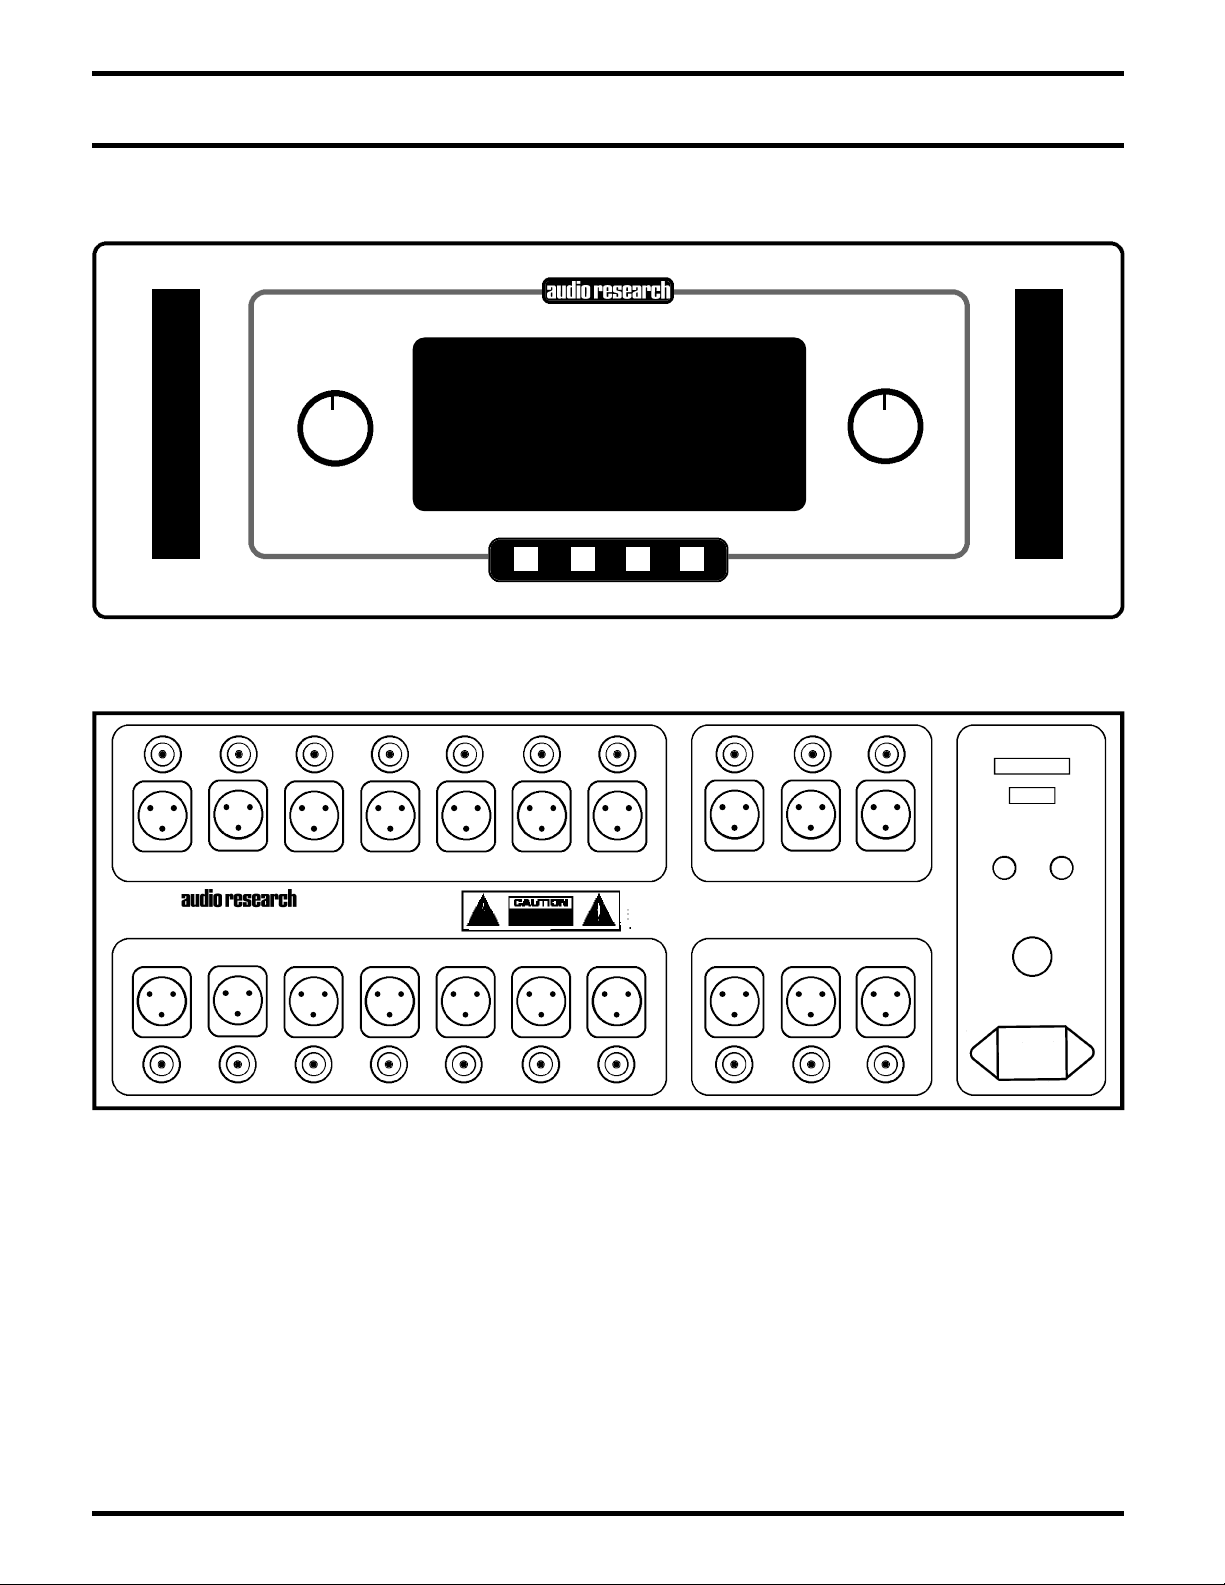
VACUUM TUBE PREAMPL IFIER REF EREN CE 3 HIGH DEFINITION
®
POWER PROC BAL/SE MUTE
VOLUME SELECT INPUT
D I S P L A Y
MODEL REF 3
STEREO PREAMPLIFIER
WARNING
TO PREVENT FIRE AND SHOCK HAZARD,
DO NOT EXPOSE THIS DEVICE TO RAIN
OR MOISTURE.
PLYMOUTH, MINNESOTA
MADE IN U.S.A.
SERIAL
VOLTS
3A FUSE SLO-BLO
T2A( 230V)
200 WATTS MAX
50/60 HZ
˜
+12V
C D
C D
TUNER
TUNER
R I G H T
R I G H T
R I G H T
R I G H T
PHONO
PHONO
VIDEO
VIDEO
AUX 1
AUX 1
VAUX 2
VAUX 2
PROCESSOR
PROCESSOR
RECORD OUT
RECORD OUT
MAIN OUTPUTS
MAIN OUTPUTS
UNIT MUST BE OPERATED
IN A HORIZONTAL POSITION.
-DO NOT OPERATE WITH COVERS REMOVED UNIT CONTAINS VOLTAGES
WHICH MAY BE HAZARDOUS.
Page 3
Model Reference 3
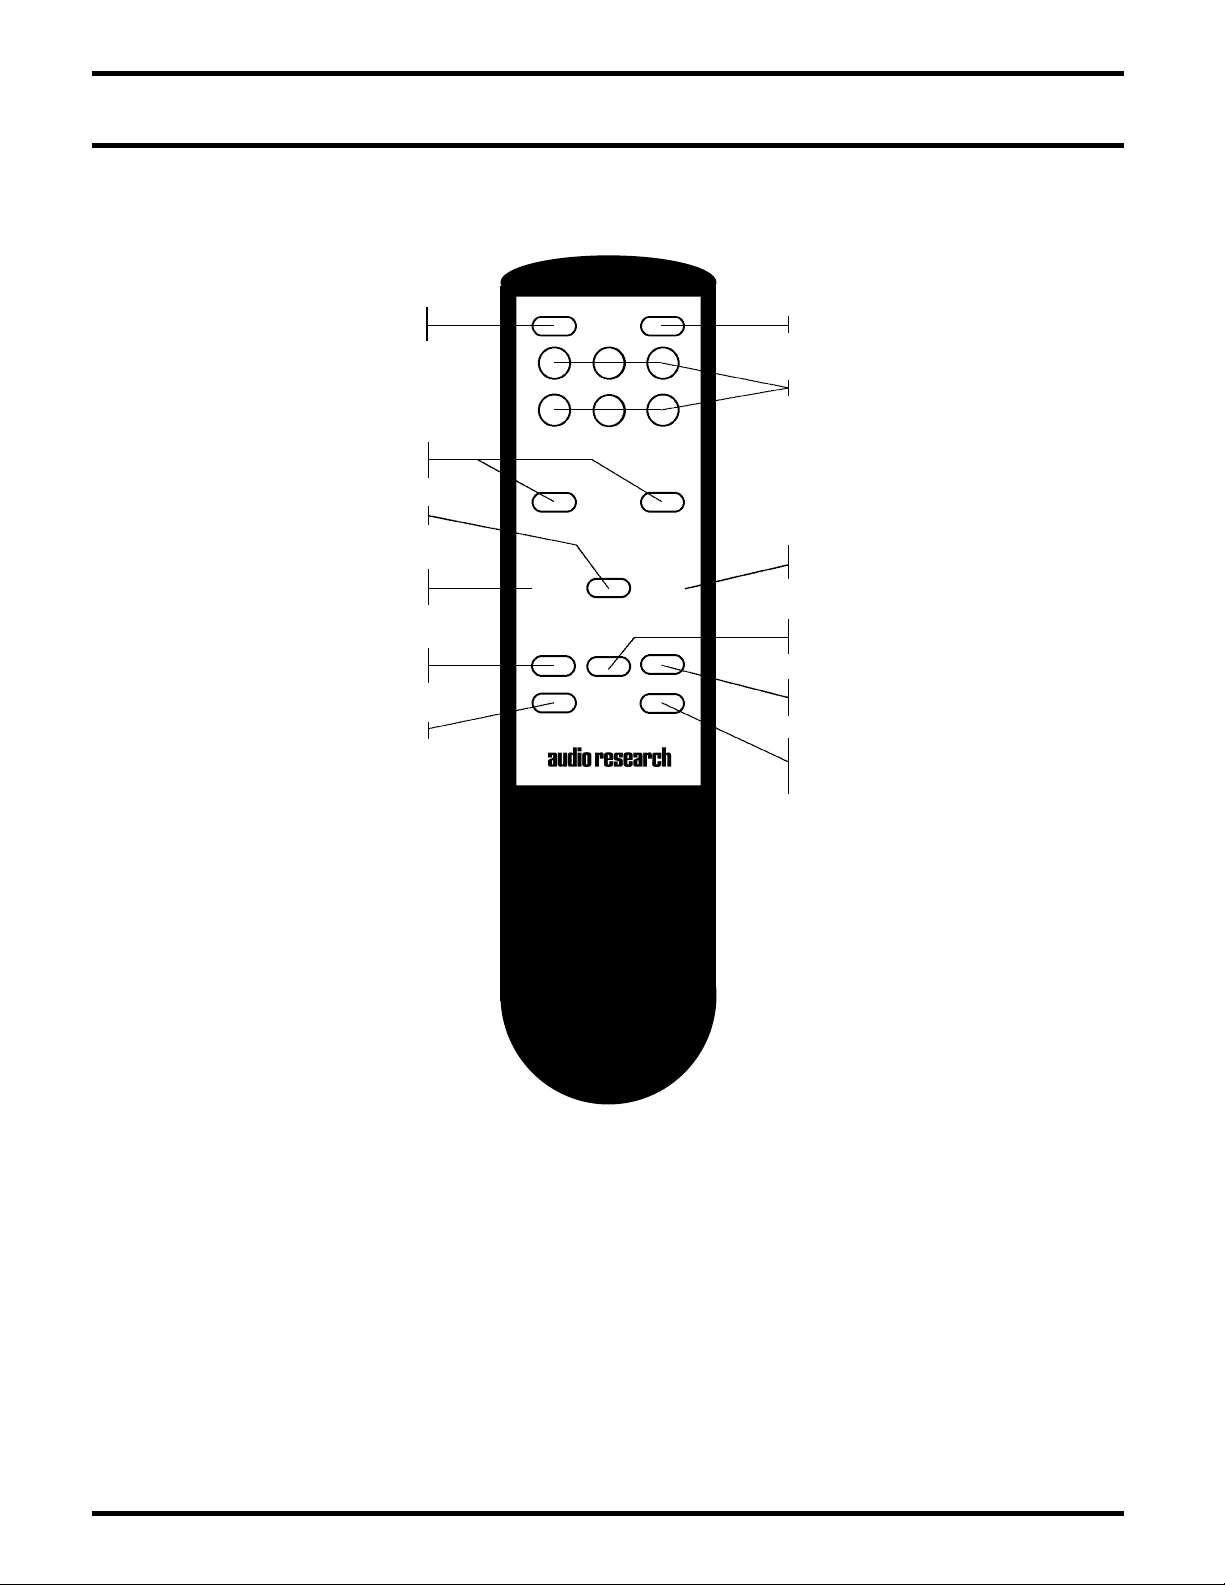
NOTE: All Reference 3 functions are
available on the REF 3R hand held
remote controller. All functions are
indicated in the display window as
they are selected. See “Description of
Controls” in this manual for more
information.
CD
PHONO AUX 1
AUX 2
TUNER VIDEO
DISPLAY POWER
MUTE VOL DN VOL UP
BAL L BAL R
BAL/SE
HOURS
INVERT
MONO
PROC
MODEL REF 3R
Adjusts illumination of display to
six levels plus off.
Turns power on/off.
Select one of six available audio inputs.
Adjusts volume up. Visible as bar graph
and numerically in display window.
Adjusts volume down. Visible as bar
graph and numerically in display window.
Input for external A–V processor. Provides
unity gain, disabling volume controls. NA
appears in display window.
Sums L and R input for mono output
from any source selected.
Displays number of operating hours
vacuum tubes have been in service.
Mutes output of the Reference 3.
Select as appropriate for Balanced (BAL)
or Single-Ended (SE) input for each source.
Adjusts balance left or right.
Bar graph appears in display window.
Inverts absolute phase of all outputs.
ln
PLYMOUTH, MINNESOTA, U.S.A.
Page 4

Preface
Please take time to carefully read and understand the
follow ing instructions before you install or attempt
to operate your Audio Research Reference 3 stereo preamplifier. Becoming familiar with the product and its
correct operating procedures will help assure you of maximum musical enjoyment and reliable operation. The effort
you invest now will be well rewarded in the years ahead.
Warnings
1. To prevent fire or shock hazard, do not expose this
product to rain or moisture.
2. This unit operates on voltages which can cause serious
injury or death. Do not operate with covers removed.
Any necessary servicing should be carried out by your
authorized Audio Research dealer or other qualified
electronics technician.
3. The power cord on this unit is safety-tested and is
equipped with a proper grounding plug. If used normally,
it will provide a safe earth ground connection of the
chassis. Defeat of the grounding plug or replacement
of the plug or power cord, or any unauthorized modification of the active circuitry or controls of this unit,
automatically voids warranty coverage, and could cause
injury or death.
4. For safe operation and protection against fire hazard,
replace fuses only with those of the same type and
rating as those supplied with this unit.
Packaging
Save all packaging accompanying this product. You have
purchased a precision electronic instrument, and it should
be properly cartoned any time shipment becomes necessary. It is very possible that this unit could be damaged
during shipment if repackaged in cartoning other than that
designe d for it. The original packaging materials help
protect your investment from unnecessary damage, delay
and added expense whenever shipment of this unit is
required.
Description of Controls
F ront Panel Rotary Contro l s
The Reference 3 has two microprocessor-driven rotary
controls.
The rotary control on the left adjusts Volume (output level)
up or down for both R and L channels. Volume control is
also selectable via Vol DN and Vol UP buttons on the
remote control. Volume adjustment is indicated in the
display window by both a bar graph with marker and by
numeric digits on 0–103 scale.
Do not turn volume up beyond normal listening levels
when “mute” is engaged to avoid unexpected or possibly
damaging sound levels. Reduce volume level whenever
changing input sources, even when muted.
The rotary control (on the right ) selects any of seven input
sources connected to the preamp: CD, Tuner, Phono, Video,
Aux 1, Aux 2, and Processor. Each of these sources may
also be selected via direct access buttons on the remote
control. The selected source is indicated in the display
window.
F ront Panel and Reference 3R Remote
C o n t rol Buttons
POWER ON/OFF: Supplies power from A.C. wall outlet to
preamp; indicated by active display window. Function
also on remote control.
For approx imatel y 40 second s after start up, “ Mut e”
appears in the display window and flashes until the automatic muting cycle is completed. This also occurs in the
event of power interruption. Upon completing the cycle,
“Mute” will cease flashing. The preamp will remain muted
until normal operation is selected by pressing the “Mute”
button.
MUTE: When activated, electrically mutes all output of the
preamplifier; indicated by “Mute” in display window. This
control should be activated before switching inputs, changing connections or shutting down your audio system to
help protect your amplifier and speakers from unexpected
signal pulses. When deactivated, “Mute” disappears from
the display window allowing normal operation. Function
also on remote control.
The Reference 3 also has automatic muting to help protect
system components during A.C. power interruptions or low
line voltage. When sensing these conditions, the preamp
automatically goes into “Mute” and disables all outputs.
The 40-second warm-up timer will restart and “Mute” will
flash in the display window when normal power conditions have been restored.
Note that automatic muting is only designed to protect
against power line interruptions or severe voltage drop.
It will not mute in the event of subsonic transmissions
from a faulty input source, amplifier failure or speaker
malfunction.
PROCESSOR (PROC): May be selected by button on front
panel or on remote control. Selects external A-V (home
theater) processor as input source and controller of volume
level for R and L channels. Reference 3 provides Unity Gain
when this input is selected.
Model Reference 3
1
Page 5

When engaged, “PROC” will appear in the display, and the
numerical volume setting will read “NA” (for “Not Applicable”) because gain is fixed and not adjustable. The preamp
will also mute the input after “PROC” is engaged.
WARNING: Before unmuting the “PROC” input, be sure
to turn the volume down on the home-theater processor.
Never connect a source with a fixed level output (DVD
pl a yer, tuner, CD, etc. ) to the PROC input or the
amplifier(s) and speaker system could be damaged when
the Reference 3 is unmuted.
VOLUME UP/ D O W N : Increases/decreases overall volume
level of both channels equally for whichever input has been
selected. Caution: do not turn up volume beyond normal
listening levels when “Mute” is engaged to avoid unexpected or possibly damaging sound levels. It is a good idea to
reduce volume whenever changing program sources, even
when muted. Function also available on remote control.
B A L / S E : Select as appropriate for each input. For source
components having balanced (XLR) connections to the
Reference 3, select BAL. For single-ended (RCA) sources,
select SE. Once selected for an input source, the setting is
memorized.
Reference 3R Remote Control Only
DISPLAY: Selects one of seven display illumination levels,
including off. When off, the display can be reactivated for
10 seconds at its lowest level by pressing any button
(except Power) on remote or front panel.
INVERT: Inverts absolute phase of the output signal.
M O N O : Sums L and R input for mono output from any
source selected.
B A L L/ B AL R: Adjusts balance left or right. Adjustment
appears in display window as movable marker on bar
graph. Useful for compensating for uneven speaker placement or imbalanced output from a phono cartridge.
H O U R S : When pressed, displays number of operating
hours vacuum tubes have been in service. WARNING: after
replacing tubes, this function should be reset to “0” only by
a qualified technician. Hours display can be reset to “0” by
pressing black button labeled “Reset Hours” located on
lower right corner of circuit board directly behind display
window. The preamp must be “On” to reset function–the
service technician must be careful to avoid any contact with
other circuit components during reset operation. Contact
Audio Research customer service (763-577-9700) for information regarding this procedure.
Connections
INPUT CONNECTORS: The Reference 3 provides seven
pairs of BAL/SE input connectors: C D , T u n e r , P h o n o , V i d e o ,
A u x 1 , A u x 2 an d Process or. Th e BAL / SE selector
button (front panel and on remote) should be selected
to match the type of connection used (BAL or SE) on each
input.
Connect either the BAL or SE connectors for each input.
Never connect the BAL and SE connectors simultaneously
for each input.
OUTPUT CONNECTORS: Two pairs of B AL/ SE main
outputs are provided.
RECORD OUTPUT: The BAL/SE tape outputs should be
connected to your recorder's “Record” or “Line” inputs.
These outputs provide a fixed-level two-channel signal
( R , L ) to your recorder from whichever input is selected.
The non-variable output level will be the same as the output of the selected source.
It is possible to dub or copy from one recorder to another
by connecting the output of the source recorder to an
unused set of stereo inputs (Aux 1, Aux 2). The signal
will then be routed to the Record Out connectors when
that input source is selected.
12V IN/OUT REMOTE START JACKS: The +12V DC input/output jacks provide the ability to remotely turn on and
off the preamp and other linked components such as power
amplifiers having similar capabilities.
Installation Instructions
While the Reference 3 does not dissipate an unus ual
amount of heat, it is important that it be provided with
reasonable airflow to assure long, trouble-free operation.
In addition, the following installation guidelines will help
insure maximum sonic performance as well as reliable
service:
1. Operate unit in upright and horizontal position, preferably on solid, non-metal shelving.
2. Do not stack the preamp on top of a power amplifier: not
only could this cause overheating, but hum may be
introduced into the preamp from the proximity of the
amplifier's power transformer. Do not stack components
or other objects directly on top of the Reference 3.
3. Do not place or operate your preamp on a soft or
irregular surface such as a rug. This will prevent proper
ventilation.
4. Do not operate your preamp without the top and bottom
cov ers installed. These are required both for
safety as well as shielding from interference (except in
service operations by qualified personnel).
Model Reference 3
2
Page 6

Installation of Vacuum Tubes
After removing the top cover and the vacuum tubes packed
in protective foam, see the accompanying illustrated sheet
for instructions on installing the tubes for your Reference 3
in their proper locations in the power supply and audio
section. Note that the numbers written on each tube correspond to a “V” number printed on the circuit board next to
each tube socket. Insert each tube firmly, carefully aligning
the tube pins with the corresponding socket holes.
Al s o r emove the pad fro m b ehind the gold -and- red
capacitors on the rear circuit board: this pad protects the
capacitors from movement during shipping. Save the pad
and the foam for the tubes, as well as all other packing
materials, for possible use in future shipment of your preamplifier. Replace the top cover before plugging in and
turning on your Reference 3.
Operating Procedure
Start-Up:
1. Secure all rear-panel connections between Reference 3,
power amplifier(s) and input sources.
2. Plug three-prong power cord from rear of chassis into
grounded AC wall outlet. The Power switch defaults to
“off ” when the unit is plugged into a power receptacle.
3. Press power switch (either remote or front panel). “Mute”
will will flash in the display window for approximately
30 seconds, then cease flashing and remain in the
display. Press “Mute” to initiate operation.
4. Select input source, then BAL or SE as necessary.
Shut-Down:
1. Activate “Mute” function.
2. Set Volume level to “0”.
3. Turn off power amplifier(s).
4. Press Power switch to “off ”.
5. Turn off input sources.
Troubleshooting:
It is possible for a static discharge to temporarily disable
the microprocessor that allows the controls to function. If
this should occur, depress the “Mute” button, then turn
off the preamp and unplug the preamp from the A.C. receptacle for 30 seconds. Reconnect the A.C. plug and turn the
pream p back on, along with other compon ents. The
controls should resume normal operation. If the problem
persists, contact your dealer or Audio Research Customer
Service at 763-577-9700.
Servicing
Be cause of its careful des ign and exacting standards
of manufacture, your Reference 3 should require no routine
maintenance. The remote control's batteries (AAA) should
be replaced once a year.
C A U T I O N : Your Reference 3 contains sufficient levels of
voltage and current to be lethal. Do not tamper with a
compon ent or part inside the unit. Refer any needed
service to your authorized Audio Research dealer or other
qualified technician.
The vacuum tubes inside your Reference 3 are quality tubes
and with normal use should not need to be changed for
approximately 4,000 hours of use. Replacement tubes
should be of equivalent quality and are available from
Audio Research. Note that tube numbers (V1, V2 etc.)
match printed numbers next to tube sockets on circuit
board.
Sho u ld s ervice b e necessary, p lease cont a ct y our
Audio Research dealer, or Audio Research Customer Service
at (763) 577-9700.
Cleaning
To maintain the new appearance of this unit, occasionally
wipe the front panel and top cover with a soft, damp (not
wet) cloth to remove dust. A mild, non-alkaline soap solution m ay be u sed to remove fin gerprints or simil ar
smudges. Cleaners containing abrasives should
not
be used
as they will damage the anodized finish of the front panel.
A small, soft paint brush is effective in removing dust from
bevels, the recessed nameplate and other features of the
front panel.
Disposal and Recycling Guidelines
To dispose of this electronic product, do not place in landfill. In accordance with the European Union Waste Electrical and Electronic Equipment (WEEE) directive effective
August 2005, this product may contain regulated materials
which upon disposal require special reuse and recycling
processing.
Please contact your dealer or importing distributor for
instructions on proper disposal of this product in your
country. Or, contact Audio Research Corporation (763-577-
9700) for the name of your importing distributor and how
to contact them.
Packing and shipping materials may be disposed of in a
normal manner.
Model Reference 3
3
Page 7

Limited Warranty
Audio Research Corporation products are covered by a
3-Year Limited Warranty, or a 90-Day Limited Warranty
(vacuum tubes). This Limited Warranty initiates from the
date of purchase, and is limited to the original purchaser, or
in the case of demonstration equipment, limited to the
balance of warranty remaining after original shipment
to the retailer or importer.
In the United States, the specific terms, conditions and
remedies for fulfillment of this Limited Warranty are
listed on the warranty card accompanying the product in
its shipping carton, or may be obtained from the authorized
retailer or from the Audio Research Customer Service
Department. Outside the United States, the authorized
importing retailer or distributor has accepted the responsibility for warranty of Audio Research products sold by
them. The specific terms and remedies for fulfillment of
the Limited Warranty may vary from country to country.
Warranty service should normally be obtained from the
importing retailer or distributor from whom the product
was purchased.
In the unlikely event that technical service beyond the
ability of the importer is required, Audio Research will
fulfill the terms and conditions of the Limited Warranty.
Such product must be returned at the purchaser's expense
to the Audio Research factory, along with a photocopy of
the dated purchase rece ipt for the product, a written
description of the problem(s) encountered, and any information necessary for return shipment. The cost of return
shipment is the responsibility of the purchaser.
Specifications
FREQUENCY RESPONSE: +0 -3dB 0.2Hz to 200kHz at rated
output. (BALANCED, 200k ohms load.)
DISTORTION: Less than .01% at 2V RMS Balanced output.
GAIN: Main output (SE or BAL input): 11.6dB Balanced output,
5.6dB Single Ended output.
Tape output: 0dB. (Processor input: 0dB Balanced)
INPUT IMPEDANCE: 120K ohms Balanced, 60K ohms SE,
Inputs (7): CD, TUNER, VIDEO, PHONO, AUX 1, AUX 2,
PROCESSOR. (XLR and RCA connectors).
OUTPUT IMPEDANCE: 600 ohms Balanced, 300 ohms SE main
(2), 20K ohms minimum load and 2000pF maximum capacitance.
Outputs (3): 2 main, 1 tape (XLR and RCA connectors).
OUTPUT POLARITY: Non inverting
MAXIMUM INPUT: 20V RMS maximum Balanced,
(10V RMS SE).
RATED OUTPUTS: 2V RMS (1V RMS SE) into 200K ohm
balanced load (maximum balanced output capability is 30V RMS
at less than 0.5% THD at 1kHz).
CONTROLS: Volume (104 steps), Select Input. Push Buttons:
Power, Proc, BAL/SE, Mute.
POWER SUPPLIES: Electronically regulated low and high voltage
supplies. Automatic 40 sec. warm-up/brown-out mute. Line
regulation better than .01%.
NOISE: 2.7uV RMS residual IHF weighted balanced equivalent
input noise with volume at 1 (106dB below 2V RMS
output.)
TUBE COMPLEMENT: (4)-6H30P dual triodes, plus
(1 each) 6550C and 6H30P in power supply.
POWER REQUIREMENTS: 100-135VAC 60Hz (200-270VAC
50/60Hz) 125 watts.
DIMENSIONS: 19" (48 cm) W x 7" (17.8 cm) H (standard
panel) x 15.5" (39.4 cm) D. Handles extend 1.5" (3.8 cm)
forward of the front panel.
WEIGHT: 29.6 lbs. (13.5 kg) Net; 43 lbs. (19.5 kg) Shipping.
Specifications subject to change without notice.
©2004 Audio Research Corporation.
Model Reference 3
4
 Loading...