

Page 1
Audio Refinement
The Pre-5 & Multi Series...
OWNER INFORMATION
Page 2

2
The remote control unit must be purchased separately
RECOMMENDATIONS
page 7
REMOTE CONTROL
page 6
FUNCTIONS
page 4,5
CARE & USE
page 3,4
INTRODUCTION
DESIGN
page 3
page 3
Pre-5
TABLE OF CONTENTS
Pre-Amplifier
Page 3

3
INTRODUCTION
Do not handle your AC cord with wet hands. If liquid spills on your amplifier, unplug immediately
and contact your dealer for cleaning instructions.
To avoid damage to your amplifier, we recommend that you disconnect the AC during electrical storm or if the unit will be unused for an extended period of time.
Ensure that your main AC voltage matches the voltage marked on the rear of the unit and on
the exterior of the shipping carton.
CARE & USE
The choice of materials is also an important part of the design of your Audio Refinement Pre-5,
the bottom is made of non-magnetic aluminum, the other parts are brushed and colored
aluminum.
The transformer is suspended to reduce the transmission of its vibrations to the rest of the circuitry.
The amplifier has only 3 feet which is the ideal way to drain vibrations.
The mechanism is designed to be as compact and as rigid as possible. The small physical size of
your Audio Refinement Pre-5 moves the resonant frequencies out of the audio domain.
An important design goal for Audio Refinement is the control of parasitic vibrations. These mechanical vibrations in the air have a negative effect on the purity of sound. The impact of these
vibrations depends on the size of the amplifier, the internal components and the rigidity of the
construction. The solutions chosen for Audio Refinement include:
DESIGN
Please read the operating instructions before connecting the amplifier to your audio/video system.
Thank you for your purchase of the Audio Refinement Pre-5, Pre-Amplifier. It is precisely crafted
innovatively designed and extremely reliable. We appreciate your faith in our products and we
trust that your Pre-5 will reward you with many years of musical pleasure.
Audio Refinement was conceived to offer the renowned musicality or "sonic signature" of YBA
Electronics by Yves-Bernard ANDRE' in a more affordable range of products. It benefits from the
same design philosophy and attention to minute detail that is the hallmark of YBA.
Page 4
4
MONITOR
VOLUME
AUX2AUX1TUNERCDDVD
Pre 5
Audio Refinement
INPUT
POWER
VA
Hz
AC
Manufactured under the YBA license
RISK OF ELECTRIC SHOCK
DO NOT OPEN
RISQUE DE CHOC ELECTRIQUE
NE PAS OUVRIR
CAUTION
Pre 5
Audio Refinement
WOOFER
WOOFER
R
L
SYSTEM
CONTROL
CENTER
DVD OUT
REAR
FRONT
PREOUT
CENTER
DVD IN
REARFRONTCDTUNER
INPUT
AUX1AUX2TAPETAPE
OUT
1
2
3
4
5
6
7
8
9
10
11
12
13
14
Do not remove the top cover of your amplifier or attempt to modify any circuitry. This will void
your guarantee and could result in serious injury.
Always turn the amplifier off before making any connections. Ensure that the speaker cables do
not touch each other at the amplifier or the loudspeaker. A short circuit will damage the unit
and is not covered under the guarantee!
This amplifier has been designed to run cool. Monitor the temperature of your amplifier if used
with a difficult load or with a high ambient temperature. If you delete any significant change,
please notify your local dealer or distributor immediately.
If the amplifier has been exposed to extreme cold, allow it to reach room temperature (30
minutes) before use. This will allow potential condensation to evaporate.
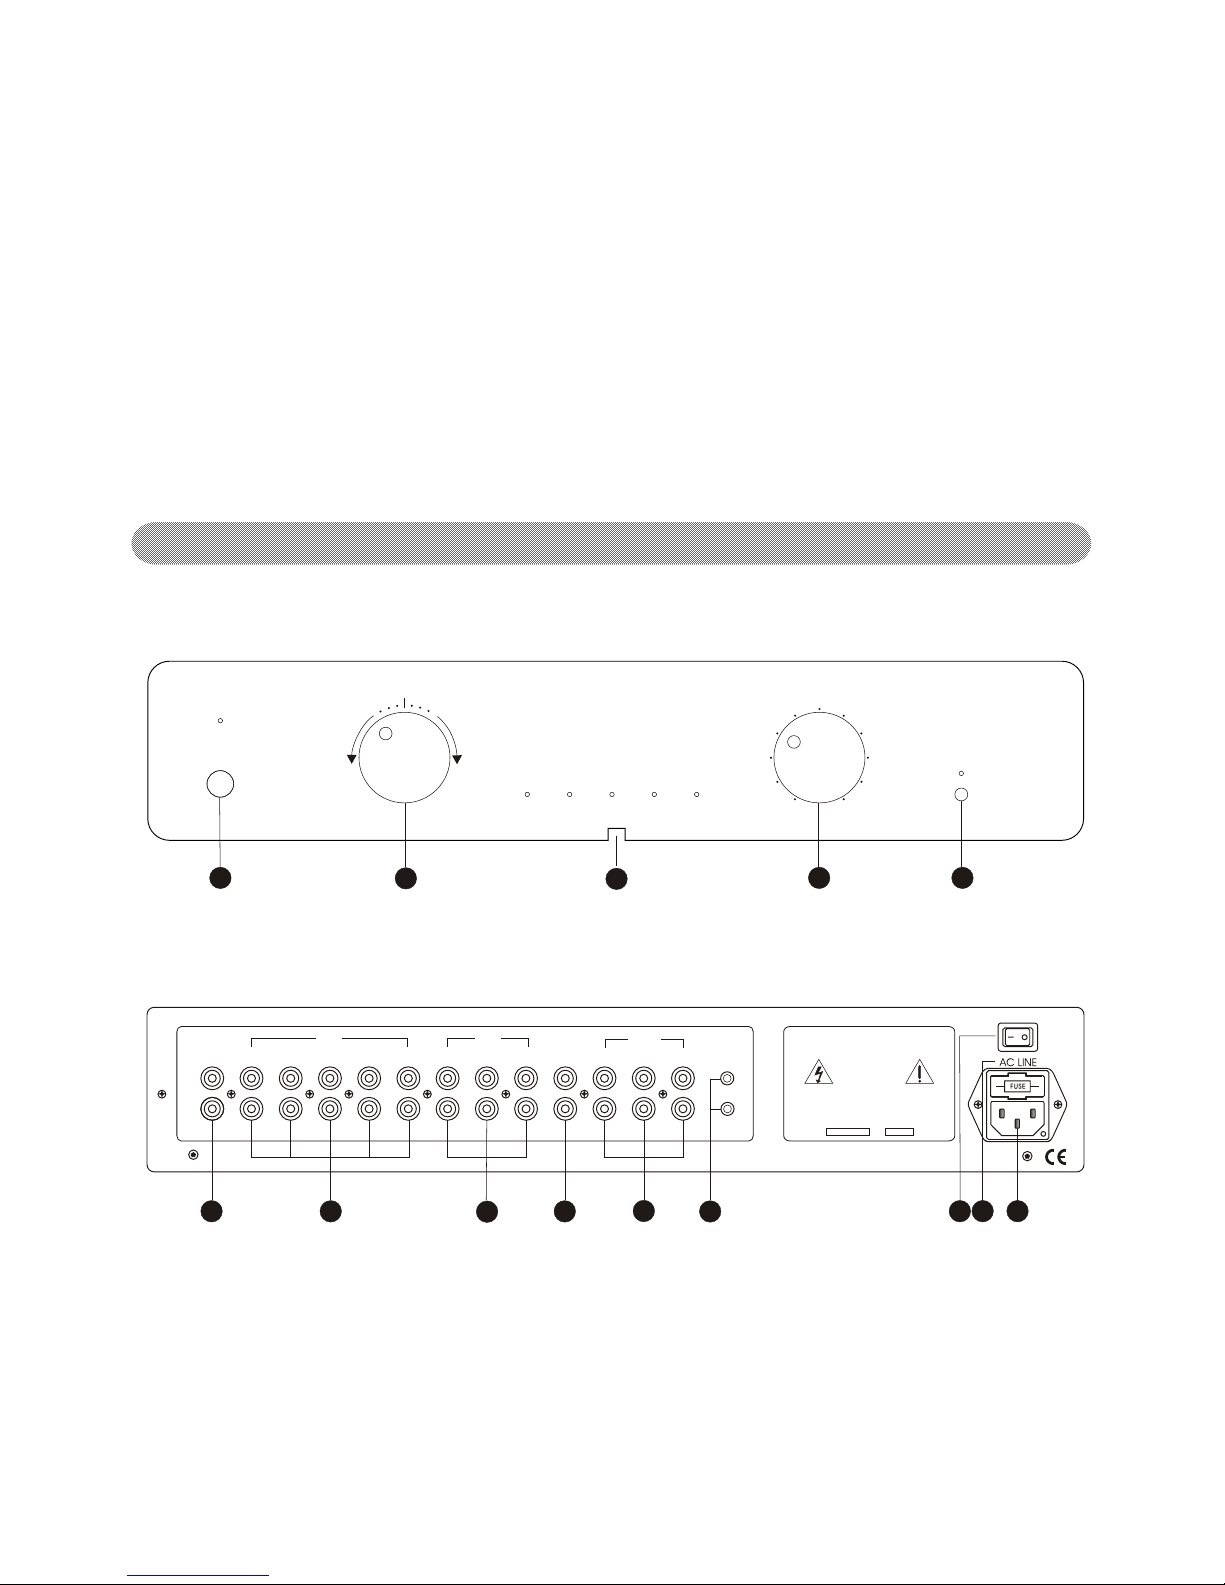
FUNCTIONS
1. POWER (on/off switch):
The color of the LED on the front panel indicates the amplifier's status.
Orange: Power On, Green: In Remote, Red: Standby, Dim out: Power Off on main AC switch.
Please check if AC power cord is not inserted tightly enough when you find LED has not lighted up
by pushing down Power Key.
Page 5

This Knob can be turned to the right and the left, and one of the LED on the panel will be lighted
up, indicating the source you desire to listen.
3. IR SENSOR:
This sensor receives a signal from the remote handset. Ensure that this sensor is not blocked in
anyway.
4. VOLUME:
Use this knob to adjust the relative sound pressure level.
5. TAPE MONITOR:
Push down this key for monitoring the sound you are recording.
6. TAPE MONITOR OUTPUT:
Connect this socket to the input of your tape deck.
7. INPUT SOCKETS:
All this part is signal input. Connect these sockets to the various source component like CD Player,
Tuner, Tape deck etc..
8. DVD IN SOCKETS:
These are the specific sockets to connect to the DVD 5.1 channel outputs of the DVD Player.
9. PRE-OUT SOCKETS:
These are the output signals sockets, corresponding to the signals that are connected to the
input sockets.
10. DVD OUT SOCKETS:
These are the output signals, corresponding to the signals that are connected to the DVD in
sockets. For your information, the DVD out front outputs are similar to the Pre-Out sockets.
11. REMOTE CONTROL HOLE:
Plug hole for remote control system. If you also have bought Pre-5, we have enclosed a REMOTE
connection cord within Pre-5, and connecting it into the REMOTE hole of Pre-5 and Multi-3 or
Multi-5, you will be able to control the 'Power On' and 'Power off', of the Power amplifier using the
remote control.
12. MAIN AC SWITCH:
This is the main power switch for the amplifier. In the OFF position, all functions are disabled
including the front POWER switch.
13. AC FUSE:
220V, 50Hz: 3.15A, slow-blow
117V, 60Hz: 3.15A, slow-blow
14. AC LINE:
Use the supplied power cord to connect the pre-5 to a wall receptacle.
5
2. INPUT SELECTOR KNOB:
SPECIFICATIONS:
Bandwidth: 5Hz-400KHz+/-2dB
Signal to Noise Ratio: 100dB
Input Impedance: Standard
Output Impedance: <20W
Power Consumption: 6.5W
Max Output Voltage: 3.8V
Dimensions: 442Wx320Dx105H(mm)
Weight: 5.8kg
Page 6

REMOTE CONTROL
The remote control unit must be purchased separately
This smart remote control set will operate all Complete series products. It uses two RO3/ AAA
(UM-4) size batteries (supplied). Follow the steps below for correct installation of the batteries in
the handset.
1. Remove back cover by unscrewing the four small screws with the supplied screwdriver.
2. Insert the batteries with the polarity (+) & (-) as designated.
3.Replace the back cover and tighten.
4.Congratulations. You are now ready to enjoy your Audio Refinement system.
6
PRE-5 PRE-AMPLIFIER
-Press the "AMP" button.
-MUTE:
This button mutes the amplifier. Pressing again returns to the listening mode.
One of the LED of the 6 inputs will be off to indicate muting.
-POWER:
Press to switch the amplifier on/off.
The volume is automatically set to minimum when the unit is switched off.
-LISTEN:
Press this button to cycle through the inputs (clockwise direction).
Holding the button down will rapidly advance through the inputs.
Same as above but in the opposite direction.
-VOLUME:
Press to increase the volume.
Press to decrease the volume.
-TAPE MONITOR:
Press the "PAUSE" button for tape monitor.
Page 7

RECOMMENDATIONS
For best sonic results, correct orientation of the AC plug is important. The prong with the red dot
should be connected to the "hot" connection of your wall socket.
Do not place unit on a glass shelf. If you really must, use "Altuglass" on the shelf. We do highly
recommend placement on wood or granite.
Check the quality of your AC cords and power strips (unlighted power strips are preferred).
For best results, the amplifier should initially be broken in with 30 hours of play. A warm up of 2
hours is best whenever the unit has been switched off.
It is preferable to leave your amplifier permanently on. The power consumption is low and the
sonic benefits are high.
In order to maintain good sonic quality, it is recommended that you do not stack the Preamplifier
and the Power amplifier on top of each other. The best is to place them separated, one on the
left and the other on the right. This is to ensure that the electromagnetic interference emitting
from the transformers of the high-current power amplifier will not affect the preamplifier, and thus
causes deterioration in the overall sonic quality.
YBA GLASS, CRISTAL or DIAMOND interconnect & speaker cables will give the best sonic result.
F-91440 BURES-SUR-YVETTE - FRANCE
Tel:(33) 01 60 12 51 00 Fax:(33) 01 60 12 50 60
BP-12
PHLOX ELECTRONIQUE
Nous restons a votre disposition pour tout
renseignement complementaire
Do not hestiate to contact us for any inquiry
Audio Refinement
7
 Loading...