

Page 1

Copyright © 2006 Audio Note (UK)
Limited
Website
www.audionote.co.uk
E-Mail
info@audionote.co.uk
Telephone +44 (0) 1273 731498
Page 1
Manual Version 1.4 - February 2007
Page 2

Copyright © 2006 Audio Note (UK)
Limited
Website
www.audionote.co.uk
E-Mail
info@audionote.co.uk
Telephone +44 (0) 1273 731498
Page 2
Table of Contents
Section 1: Introduction ............................................................................................................................................................3
Cabinets............................................................................................................................................................................... 3
A Note about Cabinet Material.........................................................................................................................................4
Handling............................................................................................................................................................................... 4
Section 2: Parts Included ........................................................................................................................................................5
Section 3: Assembly................................................................................................................................................................7
Fitting the Crossover/rear speaker connection panel.......................................................................................................... 7
Fitting the Wadding..............................................................................................................................................................8
Installing the Drivers ............................................................................................................................................................9
Installing the Tweeter.......................................................................................................................................................9
Installing the Woofer ........................................................................................................................................................9
Section 4: Connecting Your Speakers ..................................................................................................................................10
Simple Connection ............................................................................................................................................................ 11
Bi-Wire Connection............................................................................................................................................................11
Bi-Amplifying Connections.................................................................................................................................................11
Section 5: Speaker Placement..............................................................................................................................................14
Page 3

Copyright © 2006 Audio Note (UK)
Limited
Website
www.audionote.co.uk
E-Mail
info@audionote.co.uk
Telephone +44 (0) 1273 731498
Page 3
Section 1: Introduction
Thank you for purchasing this Audio Note speaker kit. Our goal is to provide you with the highest quality kit that you will
build from scratch with these instructions.
Please read this section thoroughly before beginning any construction - especially about cabinet construction
and materials that may differ from the enclosed cabinet construction plans.
Each stereo pair of woofer/tweeter/crossover has been matched and should remain in their matched group - not
mixed. You will notice that the box has been packed in such a manner that there is one such group on one side of
the box and another on the other side of the box - these are the matched groups. They may also carry an
identification number that will identify which group a matched component belongs to.
The kit is based on the world-renowned Audio Note AN/E range of loudspeakers.
The AN-E is a two-way, ported enclosure, with a carefully designed cabinet that is shaped to enhance and aid driver
dispersion on one hand, and bass output on the other. The cabinet is lightly braced and little internal damping is used.
The cabinet is designed in such a way that it augments and supports the drivers in their task, not unlike the box of a
guitar.
Audio Note have spent far more time looking at the efficiency/speaker load issues in relationship to the low power SE
triode amplifiers than anyone else, and I believe that our solutions are both original and effective, unfortunately nature is
as cruel as she is kind, when it comes to efficiency, bandwidth, size and price, so we have to accept the inevitable
compromises that she gracefully enforces.
It is important to appreciate that a finished AN-E is always likely to be better that any equivalent kit version, no matter
which one, as the drivers we use in the kits have a slightly wider "spread" in performance than the ones used in the
finished products, basically the kits get the drivers which cannot be matched within the very tight criteria used in our
finished products.
Also we do not spend anywhere near the amount of time setting up the Kit speaker's driver/crossover matching, we allow
a tolerance on the finished products of 0.2dB plus or minus, in the kits this is increased to 0.6dB plus or minus, mind you
this is still several dB better than anything done by other manufacturers, but it is audible in the overall performance of the
speakers, if you do a direct comparison on very good equipment.
This and the fact that it is necessary to rematch the driver/crossovers to the actual cabinets when assembled to maintain
the tightest possible match, this is not possible for any hobbyist building a kit and means that a kit can never get close to
the consistency of a finished product.
Again this does not necessarily mean that a Kit 03, say, would not be as good as or even better than a standard ANE/SPe provided you can make a cabinet that is on par with ours, which I doubt you can, as the production methods used
have taken years to develop and there is much we do not disclose, but is it possible to get quite close if close tolerances
are achieved.
Despite all this, I believe that if you follow the enclosed instructions carefully and build the cabinets to the correct
tolerance levels, using the recommended materials, you will be more than happy with the resulting loudspeaker, as many
others have been over the years since we introduced these popular kits.
Cabinets
Your first job will be to build a pair of cabinets for your loudspeakers. Separate plans are enclosed with the kit. I cannot
emphasize enough how important it is to follow these plans carefully and to observe the specified tolerances.
Page 4

Copyright © 2006 Audio Note (UK)
Limited
Website
www.audionote.co.uk
E-Mail
info@audionote.co.uk
Telephone +44 (0) 1273 731498
Page 4
The cabinet construction is an important part of the design of these loudspeakers and differs in various ways from those
from other manufacturers' philosophies. It is all too easy for someone who has built speaker cabinets in the past to decide
to change something during construction because it worked for another design. This should not be the case when
constructing these cabinets and would undoubtedly result in an inferior loudspeaker.
Despite what you may think, the guitar like structure of our cabinets greatly enhances efficiency, dynamics and sparkle
and sounds less colored than the alternative methods, which generally just move the resonant frequency and amplitude of
the energy lower down in the spectrum, which in most cases is more audible, mainly because this also increases the
duration of the resonance. Our belief is that the shorter the duration of the energy is, the less likely it is to interfere with the
immediacy of the original transient.
A Note about Cabinet Material
Audio Note have fairly recently changed the materials that the cabinets should be made form. The enclosed cabinet plans
may still direct you to construct the outer front, back, top, bottom, and sides from either chipboard or MDF. Since these
plans were originally drawn, however, we have changed our recommendations for all of these to be made from 13-ply
Russian Birch Ply. All of our production speakers are now made from Baltic birch plywood.
The materials that are specified for internal bracing and sub-baffle, etc. may still be of the specified materials.
Handling
Care should always be taken when handling the drivers. You should only hold them by their frames or magnet assembly.
It is easy to, for example, accidentally put your finger through the paper cone of a woofer if you are not holding it correctly
because of their top-heavy nature.
The tweeter too is a soft domed tweeter. That means that the central dome can easily be distorted by attempting to hold it
by its dome.
Page 5

Copyright © 2006 Audio Note (UK)
Limited
Website
www.audionote.co.uk
E-Mail
info@audionote.co.uk
Telephone +44 (0) 1273 731498
Page 5
Section 2: Parts Included
Here is a checklist of parts included in this kit. Note that this manual is intended to cover both our Kit02 and Kit03 range
and, as such, specific driver models will not be noted.
It is important to note that each crossover/woofer/tweeter of the stereo pair is matched and calibrated. They must,
therefore, remain together and not mixed. To ease confusion, each pair will usually be marked with a number that relates
to their matching. For example, one matched group of components will be marked, say, with a number '012' and the other
set with, say, '013'.
Part Quantity Description
Manual 1 This manual.
Cabinet Construction Drawings 1 Cabinet plans. Note that information in these plans may be overridden
by information stated in the introduction section of this manual.
Port 2 Plastic bass ports to be attached to the bass port on the rear of the
cabinets (from the inside).
Crossover/rear speaker connection
panel
2 This panel contains the crossover components, speaker terminals,
and leads that connect to the tweeter and woofer.
Woofer 2 This is the larger of the two drive units.
Tweeter 2 This is the smaller of the two drive units.
Wadding sheets 2 This is the wadding that is to be used. One sheet per loudspeaker.
Blu-Tack 2 packs This is used as both a sealant and a method of de-coupling (or
damping) the drive units from the cabinets.
T-Nut bag 1 Contains 14 t-nuts that are to be located inside the cabinets to aid the
fixing of the drivers.
Screw bag 1 Contains:
•
8x woofer fixing screws.
•
6x tweeter fixing screws.
• 8x crossover board/rear connection panel fixing screws.
Terminal Link Wires 4 Link wires for shorting out the speaker terminals when being used
with one stereo pair speaker cable per loudspeaker. More information
is available elsewhere in this manual for bi-wiring and bi-amplifying,
etc.
As you can see, the hard-wired crossovers are mounted onto the rear speaker connection panels. This has been done to
keep wire lengths down to an absolute minimum - an important design feature. The speaker terminals themselves are
made of high quality silver parts.
Drivers (both woofer and tweeter) vary from one kit model to another and may use copper or silver coils. They may also
be of standard or high efficiency types etc.
Page 6

Copyright © 2006 Audio Note (UK)
Limited
Website
www.audionote.co.uk
E-Mail
info@audionote.co.uk
Telephone +44 (0) 1273 731498
Page 6
Their matched crossovers will also vary from model to model. Some models are available with Black Gate bipolar
capacitors.
It is important to note that you should not attempt to upgrade any driver and/or crossover part yourself. This would
compromise the matching and calibration that these components have undergone.
Our production speakers use an array of methods and materials for the purpose of sealing and of dampening between the
driver basket and cabinet etc. These materials would, however, not be cost effective to use in a DIY scenario (also some
of our formulations are kept secret). The chosen DIY solution to these problems is to use Blu-Tack; of which there are two
packs enclosed (one per loudspeaker).
One recommended component that is not included with this kit, and should not be overlooked, is a high quality audio
grade silver solder (such as our own). This should be used when soldering the leads from the crossovers to the terminals
on the drive units.
Page 7

Copyright © 2006 Audio Note (UK)
Limited
Website
www.audionote.co.uk
E-Mail
info@audionote.co.uk
Telephone +44 (0) 1273 731498
Page 7
Section 3: Assembly
It is assumed from here that your cabinets have been fully assembled including the fitting of the bass port and t-nuts.
Fitting the Crossover/rear speaker connection panel
Our first job is to fit the rear panel that also contains the crossover.
The above diagram shows the rear panel. The arrows point to the fixing holes where you will insert the self-tapping
screws to fix the panel into place (these will be tightened from inside the cabinet). Make sure that the area at the back of
the speaker cabinet, where the panel will come into contact, is free from dirt or dried glue so that you have a nice flat
surface to mate with.
This panel should be located centrally in the panel cutout on the back of the cabinet. This must be sealed and airtight!
If you have finished off your cabinets with a good finish, please make sure that when you insert a rear panel through the
hole made for the woofer that you don't accidentally scratch your cabinets (i.e. with the cables coming from the
crossover).
Note that once fitted, the panel should not be resting on the brace that lies across the rear of the cabinet.
To ensure a good seal, you will use some of the supplied Blu-Tack. You will note that there are some other holes in the
panel apart from the screw holes. You must ensure that these do not allow air to pass once the panel is fitted.
How you lay the Blu-Tack is up to you and is open to experimentation, but the idea is to create an airtight seal with it so
that once the screws are in place, no pressurized air will be able to pass by it.
When you fit the securing screws, rotate the tightening process, tightening each screw by say half a turn each, so that
pressure is evenly distributed around the panel. This will provide an even pressure distribution on the sealant.
Although the seal has to be tight, make sure that you don't over-tighten - use just enough pressure to hold the panel in
place so it can stand up to its job as a binding post and, at the same time, provide a good, reliable seal.
Page 8

Copyright © 2006 Audio Note (UK)
Limited
Website
www.audionote.co.uk
E-Mail
info@audionote.co.uk
Telephone +44 (0) 1273 731498
Page 8
Fitting the Wadding
Unlike many other speaker designs, our cabinets are designed to resonate to a certain degree and need the minimal
amount of wadding. In fact, the wadding should not even be fixed to the walls of the cabinet. Instead, laying the wadding
in the correct way will be enough to hold it in place.
The following instructions are applicable to each sheet in turn.
Before you begin, please cut off approximately 30-grams of wadding from the length of the sheet (i.e. making the longest
side slightly shorter by several inches). This can be put to one side for the time being as it will be used later when we
come to fit the woofer.
Now take the remainder of the sheets and cut it in half length-ways. This should leave you with two long pieces.
Take one of these pieces and bring together the edges that are closest together so as to make a long sausage shape.
The flattened 'sausage' should be approximately the internal width of the cabinet or perhaps a bit less.
Place this 'sausage' into the top part of the cabinet through the hole left for the woofer, with the 'join' facing inward, and
tuck lightly upward and across the top of the inside of the cabinet. Try to do this evenly so that the parts of the wadding
that drop on each side of the cabinet pretty much lay on the bracings that run across each side of the cabinet. The
'sausage' can be allowed to open up so that it effectively lines the cabinet wall to a limited extent.
You should not need to attach the wadding in any way - just arrange it so that it is unlikely to move very much.
Now, take the remaining piece of wadding and create another 'sausage' with it. This time put it in the cabinet so that it is
arranged at the bottom of the cabinet in the same manner. Make sure that the wadding does not block the entrance to
the bass port!
The main wadding is now complete for one speaker cabinet. Repeat the process on the other speaker cabinet.
Page 9

Copyright © 2006 Audio Note (UK)
Limited
Website
www.audionote.co.uk
E-Mail
info@audionote.co.uk
Telephone +44 (0) 1273 731498
Page 9
Remember to put those 30-gram pieces to one side for later.
Installing the Drivers
The drivers (especially the woofer) can be difficult to maneuver because of their heaviness and odd center of gravity.
Great care should therefore be taken to ensure that accidental damage of either the drivers or the cabinet does not occur.
In fact, it may be a good idea to lay the cabinets on their backs at this point and cover the cabinet fronts with a protective
covering such as a large towel while installing the drivers.
Installing the Tweeter
Before fitting the tweeter, it must be soldered to the correct lead that comes from the crossover (marked HF). One of the
terminals on the tweeter itself should be marked with a red color. This terminal must connect to the red HF wire from the
crossover. The white HF wire connects to the other terminal. Correct polarity is essential.
Once fitted, the tweeter fitting must provide an airtight seal between it and the cabinet.
You should use some of the Blu-Tack to provide this seal. This can be applied directly around the recessed rim of the
tweeter cutout - no gaps should be left. As the tweeter front should ideally be flush with the front of the cabinet, the BluTack may be 'kneaded' and thinned down to an appropriate thickness but not so thin that the seal is compromised.
The best way to tighten the screws is to first make them all finger-tight and then turn each slightly - rotating from one
screw to another. When screwing the tweeter in place, you shouldn't tighten the screws too much. The Blu-Tack should do
a nice job of cushioning the tweeter so tighten just enough to provide an adequate long-term seal.
Installing the Woofer
The woofer must be soldered to the LF lead from the crossover. Again, the red lead is connected to the terminal marked
with a red color and the white lead connected to the other. Correct polarity is essential.
As with the tweeter, the woofer must also have a good seal between it and cabinet. There should also be a degree of
'flexibility' between the driver basket and the cabinet. So again, the screws should not be tightened too much.
The same process for applying the Blu-Tack as explained above (in the sub-section 'Installing the Tweeter') should be
observed.
Before finally securing the woofer in place, the wadding that you saved from before should now be used. This is placed in
between the back of the woofer and the crossover. It can rest on the LF lead if required. Note, however, that if it is draped
over the wire, it should not be allowed to block the bass port in any way.
Page 10

Copyright © 2006 Audio Note (UK)
Limited
Website
www.audionote.co.uk
E-Mail
info@audionote.co.uk
Telephone +44 (0) 1273 731498
Page 10
Section 4: Connecting Your Speakers
Before making any connections always turn off your amplifier.
Although the binding posts on the back of the speakers accept bare wire, it is recommended that the cable be terminated
with soldered 4mm banana plugs. Even if it seems unnecessary, it is advisable to use equal lengths of speaker cable to
each speaker.
Most speaker cable is marked so that it is possible to distinguish between conductors by the color of the insulation or by a
white stripe or small raised edge along one conductor. Correct phasing of the speakers is vital for sound quality.
Very tight and positive connections are necessary. Care should be taken to ensure that the connections are neat and that
no strands from the two conductors are allowed to touch.
At the rear of each speaker there are two pairs of red and black terminals marked LF and HF. Under normal operating
conditions these pairs are linked across by connecting links (supplied), so that the input to one pair of terminals will be fed
to both.
Your speakers should be wired in phase with each other. Proper phasing will be assured if the speaker cables connect the
red speaker input to the plus (+) or “hot” amplifier output terminals, and the black speaker input terminals to the negative () or “ground” amplifier output terminals (see figure 1).
Should you be interested in absolute phase of your system, a positive voltage at the red terminal of the speaker will cause
all drivers to move outward, provided the links are in place.
The facility to split the crossover on the AN-E range allows the speakers to be operated in a bi-wired or bi-amplifier mode.
The crossovers are split by removing the connecting links between the HF and LF terminals on the rear of the speaker. Biwiring (see figure 2) involves running two sets of cables to the rear of each speaker so that the LF section of the crossover
is fed by one set, and the HF section by the other. Both sets of cable are connected together to the corresponding pair of
terminals on the back of the amplifier. Two preamplifier outputs per channel are required for any of the following bi-amping
set-ups.
Care should be taken when using the loudspeakers with very high-powered amplifiers. Although these speakers are
reasonably tolerant and have high power handling, they are also very efficient and therefore require considerably less
power than many other similar loudspeakers. If audible distortion occurs the amplifier or the loudspeaker is being
overloaded and damage is likely to result.
The following diagrams show how to connect your speakers for different connection scenarios.
Page 11

Copyright © 2006 Audio Note (UK)
Limited
Website
www.audionote.co.uk
E-Mail
info@audionote.co.uk
Telephone +44 (0) 1273 731498
Page 11
Simple Connection
Bi-Wire Connection
Bi-Amplifying Connections
Bi-amplifying involves using 2 stereo or 4 mono power amplifiers to drive the loudspeakers. When using two stereo power
amplifiers, it is possible to bi-amplify in two ways (see figures 3 and 4).
Figure 3 shows each stereo amplifier driving one loudspeaker channel. One channel of each amplifier is driving the LF
unit and the other is driving the HF unit of each speaker.
Figure 4 shows one stereo amplifier driving the LF units of both loudspeaker channels and the other amplifier driving the
HF units of both loudspeaker channels.
Page 12

Copyright © 2006 Audio Note (UK)
Limited
Website
www.audionote.co.uk
E-Mail
info@audionote.co.uk
Telephone +44 (0) 1273 731498
Page 12
Page 13
Copyright © 2006 Audio Note (UK)
Limited
Website
www.audionote.co.uk
E-Mail
info@audionote.co.uk
Telephone +44 (0) 1273 731498
Page 13
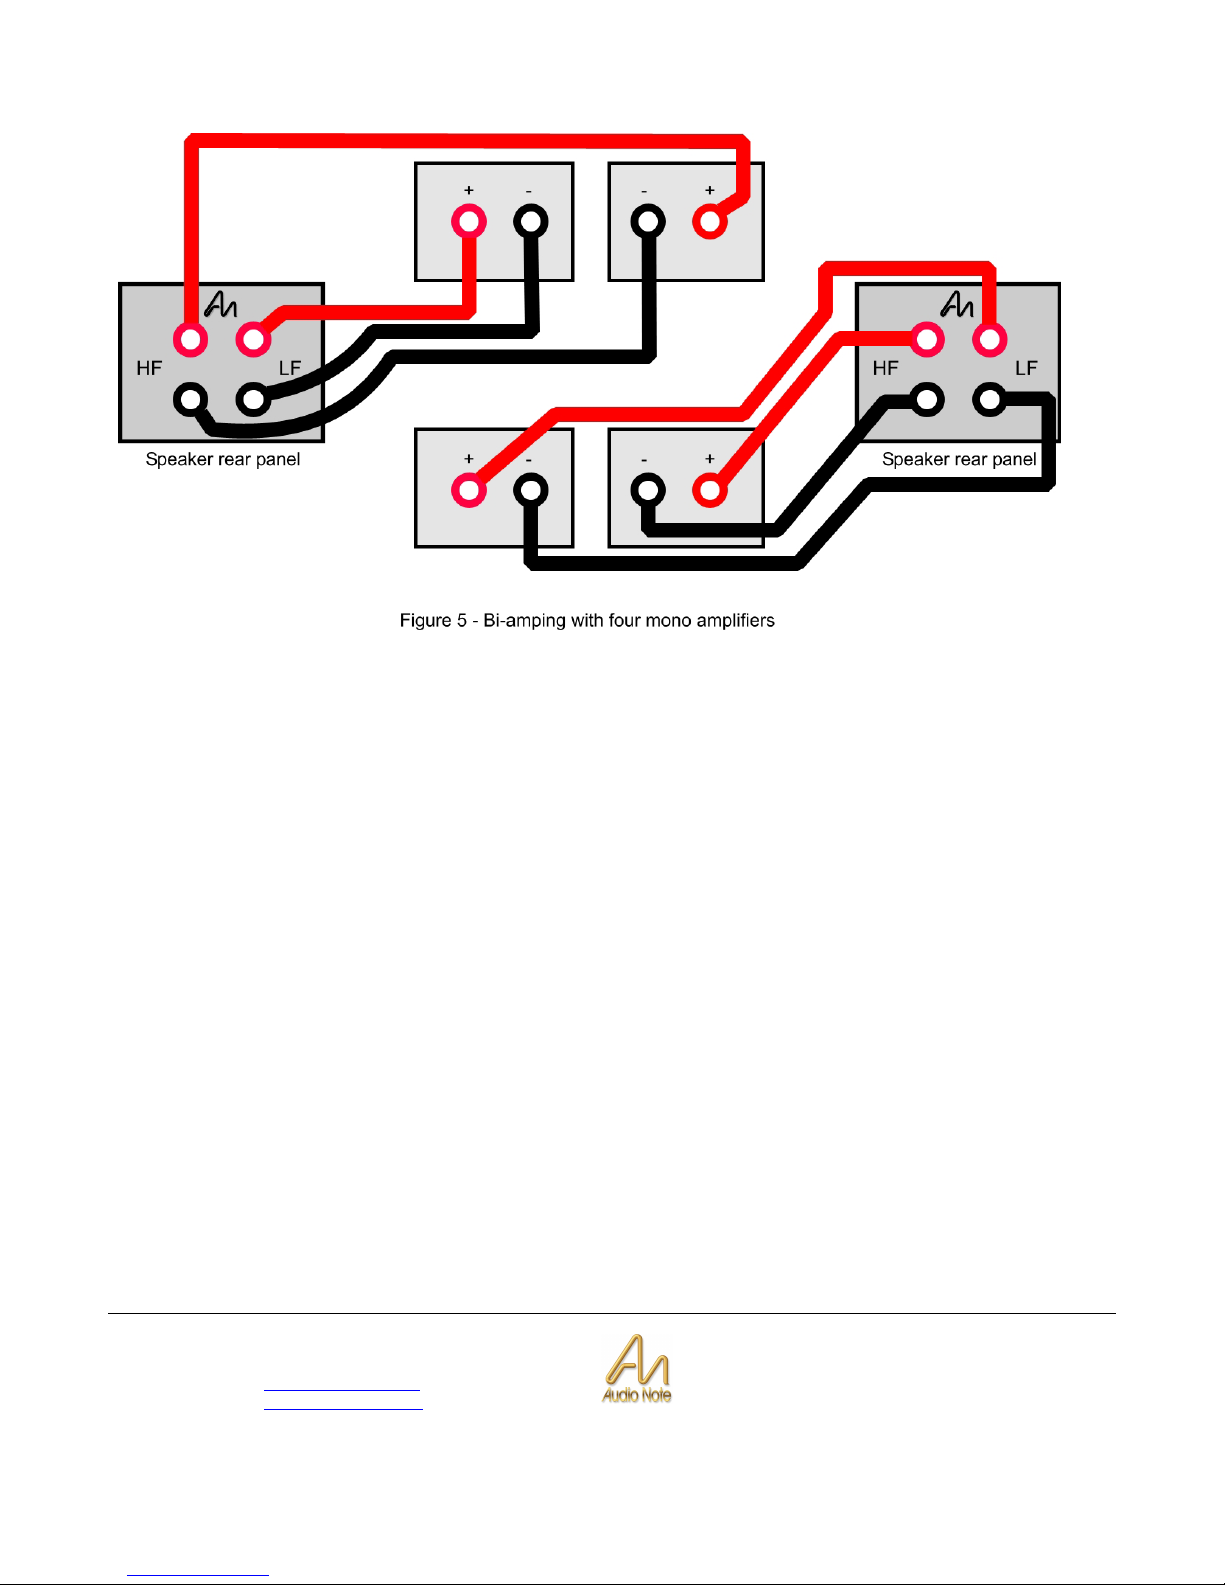
Figure 5 shows a separate mono power amplifier driving each unit in the System. It is advisable to use amplifiers of a
similar quality and input sensitivity when bi-amping Audio Note speakers.
Page 14

Copyright © 2006 Audio Note (UK)
Limited
Website
www.audionote.co.uk
E-Mail
info@audionote.co.uk
Telephone +44 (0) 1273 731498
Page 14
Section 5: Speaker Placement
Your loudspeakers are highly versatile (provided that they have been assembled correctly) and will provide satisfying
performance in most listening environments. For optimal tonal balance, they should be used on a stand of 10 inches (2427cm) in height. A light open-frame stand will give good results provided it has spikes rigidly coupling it through the carpet
to the floor.
The best results, however, will be obtained using a spiked high-mass stand that, if correctly placed, can hold the speaker
so well that even if the top of the speaker is pushed, it will not move at all! We recommend our own speaker stands for
this purpose.
The speaker should be coupled to the stand by placing 4 pea-sized balls of Blu-Tack on the stand’s top and pushing the
speaker down onto these so that they are flattened.
The distance between the speakers and the rear wall should ideally be about 30 cm to 1 meter. As all listening rooms are
different, these speakers' considerable flexibility in positioning is very useful, as it makes it possible to adjust the overall
balance of the system.
The distance between the speakers should be slightly less than the distance from the speakers to the listening area. For
best stereo imaging and sound staging the listener should be equidistant from the 2 speakers.
The speakers are designed to have a very wide listening window, so they will allow considerable angling to reduce early
sidewall reflections interfering with the direct sound from the speakers. These reflections will greatly affect tonal and
stereo balance.
The angle at which the speakers are aimed at the listener will vary from room to room.
Three alternatives are to:
•
Position the speakers parallel to the rear wall.
• To toe the speakers in, to aim at the listening area.
•
To toe the speakers even more to aim 1-2 meters in front of the listening area.
Experimentation is vitally important to achieve optimum results in any given environment.
With very few exceptions, dynamic loudspeakers have a running in period, where the drive units “loosen up”, during this
time the bass unit will not display its full lower bandwidth and the tweeter will sound slightly brighter than when run in. As
the suspension of both drivers “softens up”, the fullness of the bass and the smoothness of the treble will start to emerge.
This process can take many months to achieve.
In closing, we hope that your kit building experience has been an enjoyable one and that they will provide you with years
of musical satisfaction.
 Loading...