

Audiomedia MSM479 Owner's Manual
IN CAR AV SYSTEM
OWNER’S MANUAL

1. Only connect this unit to a 12V DC power supply
with negative grounding.
2. Never install this unit where the operation for safety
driving is restrained.
3. Never use the video display function in the front
when driving to prevent the violation of laws &
regulations and also to reduce the risk of traffic
accident except using the rear view video camera.
4. Never expose this unit, amplifier, speakers to
moisture or water to prevent electronic sparks or fires.
5. Please don't change the fuse in the power cord
without professional guidance, improper fuse may
cause damage to this using unit or even cause fire.
6. Please power off this unit at once and send it back to
the after-sales service center or the dealer / distributor
you purchased from if one of the following symptoms
is found:
(a) No audio output; (b) No image output;
(c) Water or other obstacle enters the unit;
(d) Smoking; (e) Peculiar smell.
7. To ensure safe driving, please adjust the volume to a
safe and comfort level in case of emergency situations.
Warnings
1. Never disassemble or adjust the unit without any professional guide. For
details, please consult any professional car shop / dealer for inquiry.
2. If the front panel or TFT monitor is squalid, please use a clean silicone
cloth and neutral detergent to wipe off the spot. Using a rough cloth and
non-neutral detergent such as alcohol for cleaning may result in
scratching or decoloration to the applicant.
3. If any abnormal behavior of the unit is found, please refer to trouble
shooting guide of this manual. If no relevant information is found, please
press the [RESET] key on the front panel to resume factory default.
4. If you have parked the car in hot or cold weather for a long time, please
wait until the temperature in the car becomes normal before operating the
unit.
5. Using in-car heater in low temperature environment may result in beads
coagulate inside the unit, DO NOT use the unit in this situation, eject the
disc and wipe off the bead on the disc. If the unit still doesn't work after a
few hours, please contact with after-sales service center.
6. No fierce impact to the LCD monitor when it is in open position for
preventing the damage to any mechanisms inside.
7. To prevent the damage to the screen, avoid touching it with sharp objects.
8. The monitor employs auto motorizing mechanism, please don't push, pull,
or swivel the monitor manually to prevent damage to the core mechanism.
9. To provide a clear demonstration and an alternative for easy
understanding to the operation of this unit, graphic illustrations are used.
However, these illustrations are some different from the actual images
displayed on the screen.
10. During operating the unit, “ ” will display if the current operation is illegal
or invalid.
11. Operate the unit correctly according to this manual to prevent unnecessary
problem. The guarantee won't be valid if the problem is caused by
inappropriate operation.
Precautions

Manufactured under license from Dolby Laboratories.
Dolby Digital:
“Dolby” and the double-D symbol are trademarks of Dolby Laboratories.
Manufactured under license from Dolby Laboratories.
Dolby Digital and Dolby Pro Logic II(x):
“Dolby”, “Pro Logic”, and the double-D symbol are trademarks of Dolby
Laboratories. Manufactured under license from Dolby Laboratories.
Dolby Digital and MLP Lossless:
“Dolby”, “MLP Lossless”, and the double-D symbol are trademarks of Dolby
Laboratories.
Declarations

Before using
Front Panel
Auxiliary LCD
Remote Control
Basic operations
Power on/off
Mute
Volume adjustment
Open SOURCE MENU
Playing source selection
Time display
Using the TFT monitor
Disassemble the front panel
Reset the unit
Radio mode
Select radio as playing source
Select one radio band
Auto tuning
Manual tuning
Auto save
Manual save
Preview scan
Recall the stored stations
Local seeking
RDS operations
AF function
TA function
PTY function
Program Service (PS)
CT (Clock Time)
RT (Radio Text)
Disc mode
Insert a disc
01
02
03
06
06
06
06
06
07
07
08
08
09
09
09
09
09
10
10
10
10
11
11
12
12
12
12
13
Eject the disc
Touch screen controls
Onscreen control buttons
Suspend playback
Stop playback
Display file list
Fast playback
Previous/Next
Change folder
Repeat playback
Repeat A-B
Random playback
Direct search
GOTO search
DVD MENU and TITLE
Select subtitle language
Select multi-angle views
Select audio channel
PBC function
Zoom in/out
Rotate picture
Playback information
USB mode
Select USB displaying source
Touch screen controls
Onscreen control buttons
Suspend playback
Stop playback
Display filelist
Fast playback
Previous/Next
Change folder
13
13
14
15
15
15
15
15
16
16
16
17
17
17
18
18
18
18
19
19
19
20
21
21
21
21
21
21
21
21
22
Contents

Repeat playback
Random playback
Direct search
GOTO search
Zoom in/out
Rotate picture
Playback information
Other modes
AUX
Camera
Setup
Setup procedure
General
Language
Audio
Rating
Hardware
P.VOL
TS CAL
EQ
Troubleshooting
22
22
22
22
22
22
22
23
23
24
25
25
26
26
28
28
28
29
30
Device connection
Notes of connection
Control Cables
Parking Brake Cable
Connections
Reverse Drive Cable Connections
Installation and uninstall
Notes of installation
Unit installation
Trim Ring installation
Uninstall
Specifications
Appendix
Region Code
Caution of disc using
Wiring Connections
32
33
34
34
35
35
37
37
40
42
42
42
43
Contents

Front Panel
3 2 1 15 14 13
1. [Right] Key: Next/Move cursor to the right
2. [Left] Key: Previous/Move cursor to the left
3. [DISP/WIDE] Key: Display information/Image setting
4. Panel Release Key
5. [VOL] Knob: Adjust volume/Play/Pause/Enter
6. [Reset] button: Reset the unit
7. [Power/SRC] Key: Switch on unit / Change work mode/Open SOURCE
MENU
8. Remote Sensor (Remote control I/R Receiver)
9. [MUTE] Key Mute audio outputs
1
Before using
1
2
3
4
5
6
7
8
9 10 11
15
14
13
12

2
10. AUX IN Jack
11. USB Slot
12. [EJECT] Key: Eject disc inside
13. [OPEN/Close] Key: Open/Close the TFT monitor
14. [AS/PS/TILT+] Key: Auto Store/Preview Scan/Increase display angle
15. [BAND/TILT-] Key: Change radio band/Decrease display angle
Auxiliary LCD
1. Disc indicator
Light up when one disc is inside; Light off when no disc is inside.
2. Repeat mode indicator
Light up when repeat mode is on; Light off when repeat mode is off.
3. Main display area
Display characters, playback time, tuning frequency, clock and other text
information.
4. Radio status indicators
Stereo indicator lights up when the radio broadcast is a stereo one; Local indicator
lights up when the local seeking function is activated.
Note:
1. Most information can be displayed only when the TFT monitor is closed.
2.Only English font can be supported on this LCD.
Before using

3
Remote Control
Note:
Your remote control may differ slightly from the one pictured here. The above diagram is
for illustrative purpose only.
Before using

4
1 [SRC] Key: Change work mode/Open SOURCE MENU
2 [EJECT] Key: Eject disc
3 [MENU] Key: DVD MENU/PBC
4 [TITLE] Key: DVD TITLE
5 [DISP] Key: Display information
6 [ANGLE] Key: Select view angle
7 [WIDE] Key: Adjust display mode
8 [OPEN/CLOSE] Key: Open/Close the TFT monitor
9 [PRESET] Key: Select preset radio station
10 [Up] Key: Fast Forward/Move cursor up
11 [/BAND] Key: Select radio band/Stop Playback
12 [Enter] Key: Play/Pause/Enter
13 [Left] Key: Auto search/Previous/Move cursor to the left
14 [GOTO] Key: GOTO search
15 [Down] Key: Fast Reverse/Move cursor down
16 [0~9] Key: Numeric keys
17 [MUTE] Key: Mute audio outputs
18 [POWER] Key: Power ON/OFF
19 [AUDIO] Key: Select DVD dialogue language
20 [SUBTITLE] Key: Select DVD subtitle language
21 [REPT A-B] Key: A-B repeat playback
22 [REPT] Key: Repeat playback
23 [TILT] Key: Adjusting display angle
24 [VOL+/-] Key: Adjust volume
25 [SCN] Key: Scan playback
26 [RDM] Key: Random playback
27 [Right] Key: Auto search/Next/Move cursor to the right
28 [SEL] Key: EQ
29 [ZOOM] Key: Image zoom in/out
30 [PIC] Key: Image setting
31 [SETUP] Key: Setup menu
32 [CLEAR] Key: Clear information
Before using
5
Notes of remote control using
1. Aim the remote controller at the remote sensor on the unit.
2. Remove the battery from the remote control or insert a battery insulator if the
battery has not been used for a month or longer.
3. DO NOT store the remote control under direct sunlight or in high
temperature environment, or it may not function properly.
4. The battery can work for 6 months under normal condition. If the remote
control can't work, please change the battery.
5. Use “button shaped” lithium battery “CR2025” (3V) only.
6. DO NOT recharge, disassemble, heat or expose the battery in fire.
7. Insert the battery in proper direction according to the (+) and (-) poles.
8. Store the battery in a place where children cannot reach to avoid the risk of
accident.
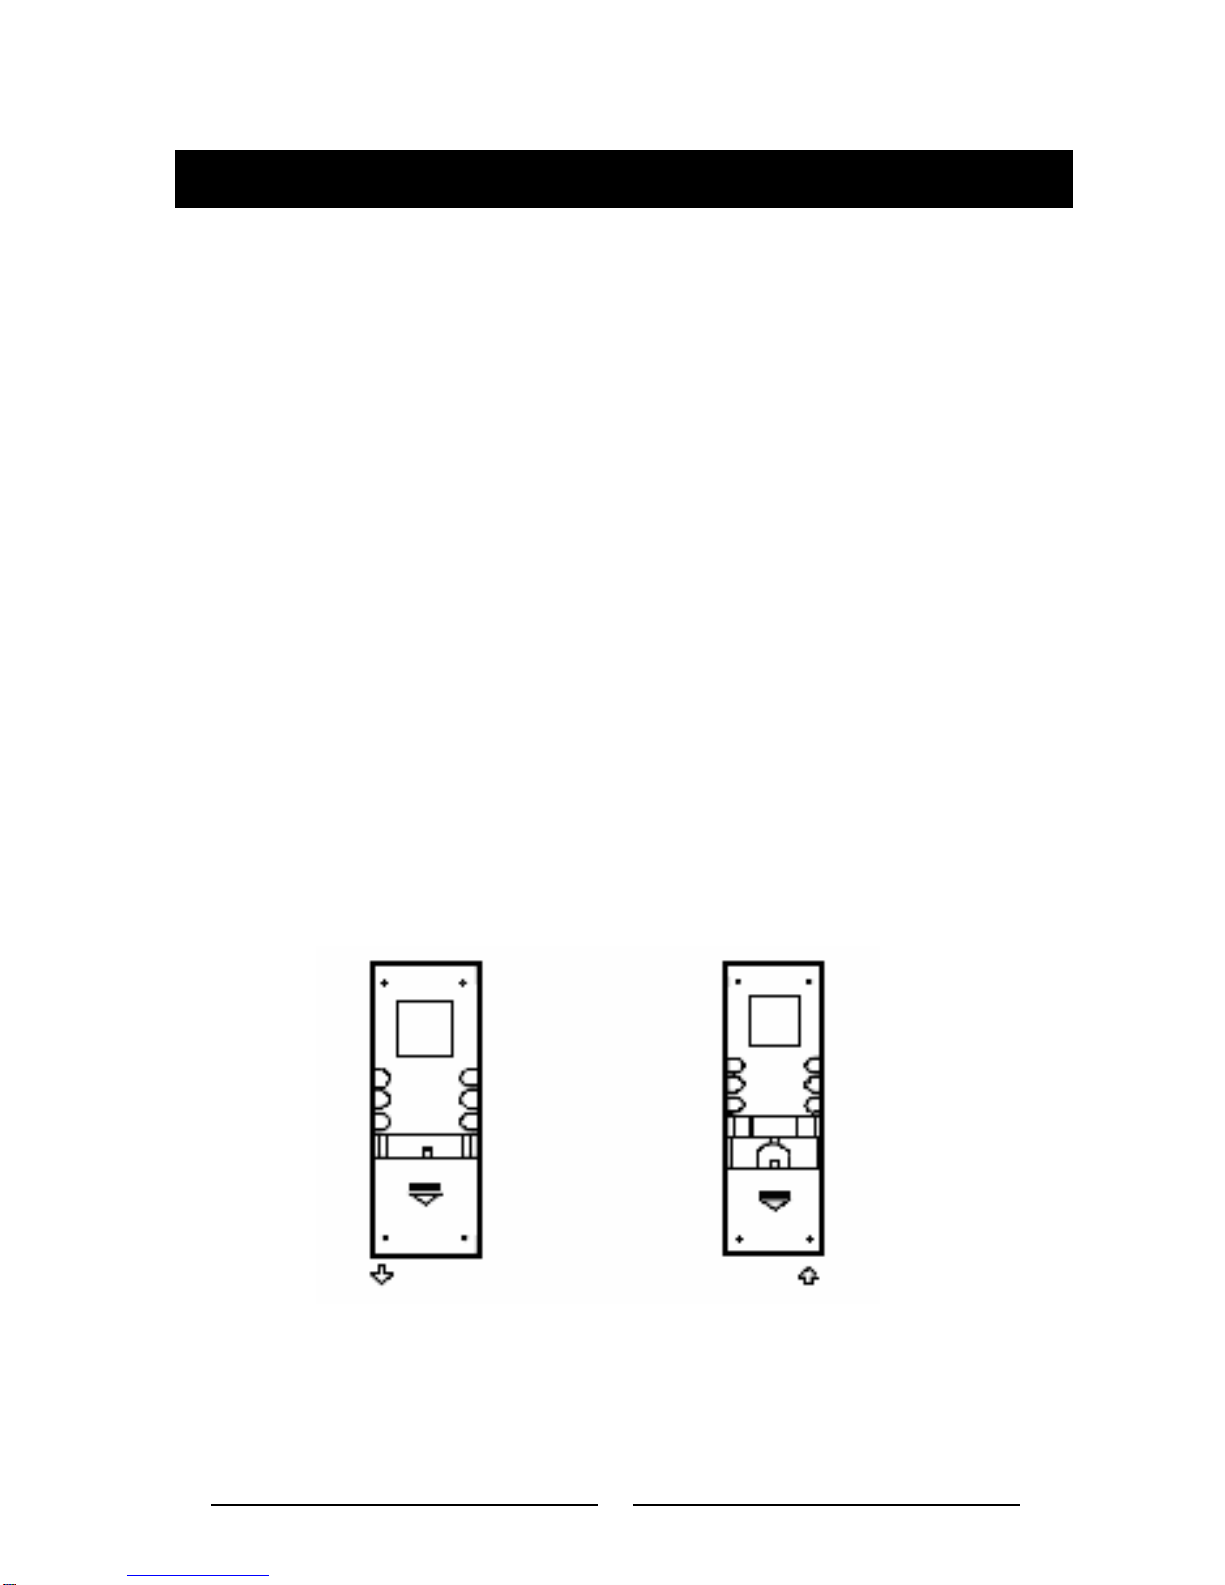
Uninstall Battery
Slide out the battery compartment
tray at the bottom on the back of
the remote control.
Install Battery
Use button-shaped lithium battery
“CR2025 (3V)” only. Insert the battery to
the battery tray with proper direction
according to the (+) and (-) poles.
Before using
PULL OUT PUSH IN

6
Power on / off
Press any key on the front panel or the [POWER] key on the remote control to turn on the
power under standby mode. The unit goes back to the last status after power on.
Press and hold the [SRC] key on the front panel or press the [POWER] key on the
remote control to turn off the power under work mode.
Mute
Press the [MUTE] key on the front panel or remote control to mute the volume from
the unit.
Notes:
1. Doing the operation above again or adjusting volume will release muting.
2. Mute icon winks on the TFT during muting.
3. Mute icon appears on the LCD if TFT is closed.
Volume adjustment
Turn the volume knob on the front panel or press the [VOL] key on the remote control.
The adjustable range of volume is 0 to 40.
Open SOURCE MENU
Press the [SRC] key on the front panel or remote control or touch the top left corner of
the screen to open the SOURCE MENU. Do the above operation again to return to
the previous source.
Playing source selection
Open the SOURCE MENU, and then touch the desired source or select the desired
source by moving the cursor and then confirm.
Notes:
1. Playing source selection means selecting work mode, such as DVD mode, Radio
mode, Camera mode, etc.
2. When some devices are not ready, they cannot be selected.
3. If TFT is closed, press several times the SRC button to select the desired
source.
Basic operations

7
Time display
Press the [DISP] key on the front panel to switch the display information between times
and playing source when the TFT monitor is closed.
Using the TFT Monitor
Open / Close monitor
Press the [OPEN/CLOSE] key on the front panel or remote control to push the display
panel out or in.
Change the monitor tilt angle
Due to the inherent character of LCD, you will get different vision impressions when you
watch it from different angles .The display angle of this unit can be changed; hence you
can select the best angle where you can get the best vision impression. Press the [TILT]
key on the display panel or the remote control to adjust the tilt angle one step at a time.
Press and hold the [TILT] key on the display panel or the remote control to adjust the tilt
angle continuously.
Change aspect ratio
Press the [WIDE] key on the display panel or remote control to adjust the aspect ratio as
follows.
Image setting
(1) Enter image setting mode Press and hold the [DISP/WIDE] key on the display panel or
press the [PIC] key on the remote control.
(2) Select one item to adjust Press the [UP]/[DOWN] keys on the remote control.
(3) Adjust the value Press the [Left]/[Right] keys on the display panel or remote control.
Basic operations
FULL FULL NORMAL

8
(4) Exit image setting mode To exit image setting mode, repeat the operation of the first
step or stop operation for some seconds.
Disassemble the front panel
The player is equipped with an anti-theft feature disassembling the front panel.
Press the panel release key on the front panel to disassemble the front panel. When the
unit is power on, the unit will power off automatically after 10s if disassemble the front
panel.
Reset the unit
If the player can not work correctly, you should reset the unit by pressing the [RESET]
button on the front panel.
Basic operations

9
Select radio as playing source
Open the SOURCE MENU and then touch RADIO.
Select one radio band
Press the [BAND] key on the display panel (when the TFT monitor is closed) or remote
control or touch the [BAND] button on the user interface to select one radio band
among FM1, FM2, Fm3, AM1 and AM2.
Auto tuning
Press the [Right]/ [Left] key on the display panel or remote control or touch the
[ ]/[ ] button on the user interface to seek a higher / lower station.
To stop searching, repeat the operation above or press other keys having radio
function.
Note:
When a station is received, searching stops and the station is played.
If the unit receives a stereo broadcasting, the indicator light of stereo 'ST' on the TFT or
LCD display will be lighted.
Manual tuning
During manual tuning, the frequency will be changed in steps. Press the
[Up]/[Down] key on the remote control or touch the [ ] / [ ] button on the user
interface to tune in a higher/lower station. Touch the numeric key pad icon ( ) and then
touch the numeric buttons to input the radio station frequency numbers.
Auto save
Only stations with sufficient signal strength will be detected and stored in the memory.
Press the [AS/PS] key on the display panel (when the TFT monitor is closed) or the
[Enter] key on the remote control, or touch the [AS] button on the user interface.
To stop auto save, press other keys having radio function
Radio mode
 Loading...