

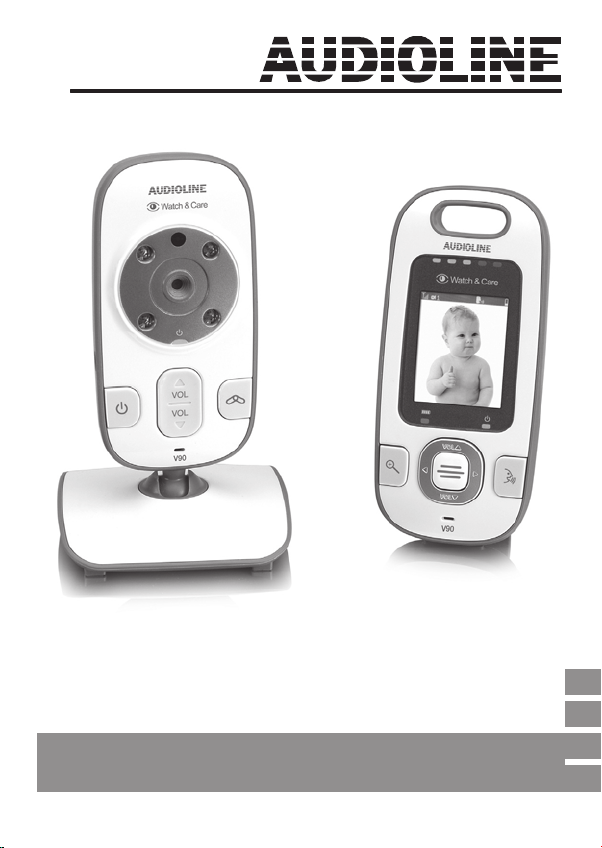
Bedienungsanleitung
Watch & Care V90
Operating Instructions
Mode d’emploi
Istruzioni d'uso
D
GB
FR
IT


Inhaltsverzeichnis
Bedienelemente . . . . . . . . . . . . . . . . . . . . . . . . . . . . . . . . . . . . . . . . . . . . . . . . . . . . . . . . . . . . . . . . . . . .2
Geräte in Betrieb nehmen . . . . . . . . . . . . . . . . . . . . . . . . . . . . . . . . . . . . . . . . . . . . . . . . . . . . . . . . . . . .3
Verpackungsinhalt prüfen . . . . . . . . . . . . . . . . . . . . . . . . . . . . . . . . . . . . . . . . . . . . . . . . . . . . . . . . . .3
Empfänger in Betrieb nehmen . . . . . . . . . . . . . . . . . . . . . . . . . . . . . . . . . . . . . . . . . . . . . . . . . . . . . .3
Akku einlegen . . . . . . . . . . . . . . . . . . . . . . . . . . . . . . . . . . . . . . . . . . . . . . . . . . . . . . . . . . . . . . . . . . .3
Netzteil anschließen . . . . . . . . . . . . . . . . . . . . . . . . . . . . . . . . . . . . . . . . . . . . . . . . . . . . . . . . . . . . . .4
Laden des Akkupacks . . . . . . . . . . . . . . . . . . . . . . . . . . . . . . . . . . . . . . . . . . . . . . . . . . . . . . . . . . . . .4
Sender (Kamera) in Betrieb nehmen . . . . . . . . . . . . . . . . . . . . . . . . . . . . . . . . . . . . . . . . . . . . . . . . .4
Den Sender (Kamera) bedienen . . . . . . . . . . . . . . . . . . . . . . . . . . . . . . . . . . . . . . . . . . . . . . . . . . . . . .5
Sender (Kamera) ein-/ausschalten . . . . . . . . . . . . . . . . . . . . . . . . . . . . . . . . . . . . . . . . . . . . . . . . . .5
Sender (Kamera) ausrichten . . . . . . . . . . . . . . . . . . . . . . . . . . . . . . . . . . . . . . . . . . . . . . . . . . . . . . .5
Nachtsicht . . . . . . . . . . . . . . . . . . . . . . . . . . . . . . . . . . . . . . . . . . . . . . . . . . . . . . . . . . . . . . . . . . . . .5
Lautstärke des Lautsprechers einstellen . . . . . . . . . . . . . . . . . . . . . . . . . . . . . . . . . . . . . . . . . . . . . .5
Den Empfänger bedienen . . . . . . . . . . . . . . . . . . . . . . . . . . . . . . . . . . . . . . . . . . . . . . . . . . . . . . . . . . .6
Empfänger ein-/ausschalten . . . . . . . . . . . . . . . . . . . . . . . . . . . . . . . . . . . . . . . . . . . . . . . . . . . . . . .6
Displaysymbole . . . . . . . . . . . . . . . . . . . . . . . . . . . . . . . . . . . . . . . . . . . . . . . . . . . . . . . . . . . . . . . . .6
Ausschalten des Displays / Umschalten Audio/Video . . . . . . . . . . . . . . . . . . . . . . . . . . . . . . . . . . . . .6
Sprechverbindung zum Kinderzimmer . . . . . . . . . . . . . . . . . . . . . . . . . . . . . . . . . . . . . . . . . . . . . . . .6
Lautstärke einstellen . . . . . . . . . . . . . . . . . . . . . . . . . . . . . . . . . . . . . . . . . . . . . . . . . . . . . . . . . . . . .6
Vergrößerung . . . . . . . . . . . . . . . . . . . . . . . . . . . . . . . . . . . . . . . . . . . . . . . . . . . . . . . . . . . . . . . . . . .6
Displayhelligkeit einstellen . . . . . . . . . . . . . . . . . . . . . . . . . . . . . . . . . . . . . . . . . . . . . . . . . . . . . . . . .7
Geräuschempfindlichkeit einstellen . . . . . . . . . . . . . . . . . . . . . . . . . . . . . . . . . . . . . . . . . . . . . . . . . .7
Geräuschaktivierung einstellen . . . . . . . . . . . . . . . . . . . . . . . . . . . . . . . . . . . . . . . . . . . . . . . . . . . . .7
Wahl des Senders (Kamera) . . . . . . . . . . . . . . . . . . . . . . . . . . . . . . . . . . . . . . . . . . . . . . . . . . . . . . . .7
Inbetriebnahme eines weiteren Senders (Kamera) . . . . . . . . . . . . . . . . . . . . . . . . . . . . . . . . . . . . . .7
Anhang . . . . . . . . . . . . . . . . . . . . . . . . . . . . . . . . . . . . . . . . . . . . . . . . . . . . . . . . . . . . . . . . . . . . . . . . . . .8
Sicherheitshinweise . . . . . . . . . . . . . . . . . . . . . . . . . . . . . . . . . . . . . . . . . . . . . . . . . . . . . . . . . . . . . .8
Bestimmungsgemäße Verwendung . . . . . . . . . . . . . . . . . . . . . . . . . . . . . . . . . . . . . . . . . . . . . . . . . .8
Aufstellungsort und Sicherheitsinformationen . . . . . . . . . . . . . . . . . . . . . . . . . . . . . . . . . . . . . . . . . .8
Netzgerät . . . . . . . . . . . . . . . . . . . . . . . . . . . . . . . . . . . . . . . . . . . . . . . . . . . . . . . . . . . . . . . . . . . . . . .8
Akkus . . . . . . . . . . . . . . . . . . . . . . . . . . . . . . . . . . . . . . . . . . . . . . . . . . . . . . . . . . . . . . . . . . . . . . . . .9
Medizinische Geräte . . . . . . . . . . . . . . . . . . . . . . . . . . . . . . . . . . . . . . . . . . . . . . . . . . . . . . . . . . . . .9
Entsorgung . . . . . . . . . . . . . . . . . . . . . . . . . . . . . . . . . . . . . . . . . . . . . . . . . . . . . . . . . . . . . . . . . . . . .9
Service-Hotline . . . . . . . . . . . . . . . . . . . . . . . . . . . . . . . . . . . . . . . . . . . . . . . . . . . . . . . . . . . . . . . . . .9
Falls es Probleme gibt: Fragen und Antworten . . . . . . . . . . . . . . . . . . . . . . . . . . . . . . . . . . . . . . . . .9
Konformitätserklärung . . . . . . . . . . . . . . . . . . . . . . . . . . . . . . . . . . . . . . . . . . . . . . . . . . . . . . . . . . . .10
Pflegehinweise . . . . . . . . . . . . . . . . . . . . . . . . . . . . . . . . . . . . . . . . . . . . . . . . . . . . . . . . . . . . . . . . .10
Technische Daten . . . . . . . . . . . . . . . . . . . . . . . . . . . . . . . . . . . . . . . . . . . . . . . . . . . . . . . . . . . . . . .11
Garantie . . . . . . . . . . . . . . . . . . . . . . . . . . . . . . . . . . . . . . . . . . . . . . . . . . . . . . . . . . . . . . . . . . . . . . .11
D
1
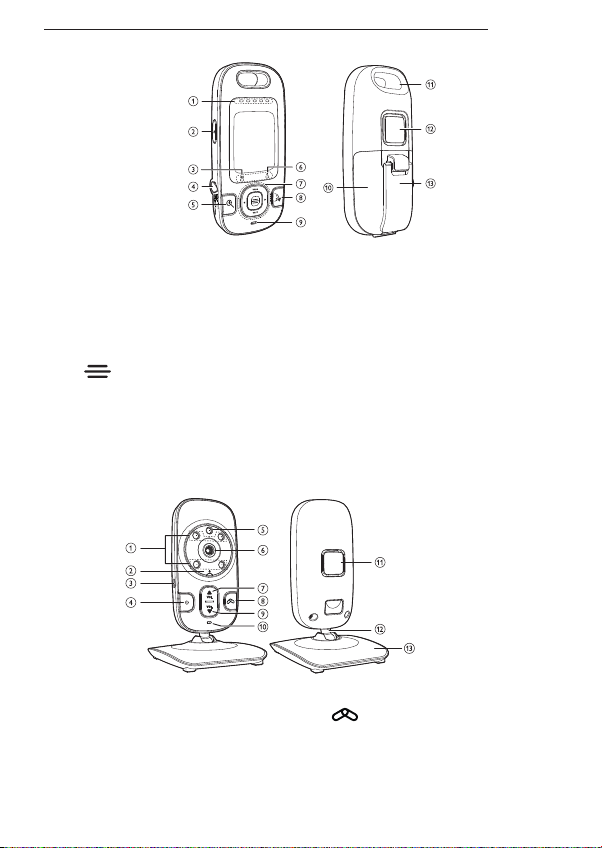
Bedienelemente
Bedienelemente
Monitor-Einheit (Empfänger)
1 Geräuschpegel-LEDs
2 Ein-/Aus-Taste / Video/Audio-Umschaltung
3 Akkuladeanzeige
4 Anschluss für Netzgerät
5 Vergrößerungstaste
6 Betriebsanzeige
7 Bedienungstasten
- Menütaste: Öffnen des Menüs /
Auswahl/Bestätigen einer Einstellung
- VOL▲: Lautstärke erhöhen / In Menüs:
aufwärts bewegen / Im Vergrößerungsmodus: drücken und halten, um den Ausschnitt
nach oben zu verschieben.
- VOL▼: Lautstärke verringern / In Menüs:
abwärts bewegen / Im Vergrößerungsmo-
Kamera-Einheit (Sender)
1 Infrarot-LEDs (beleuchten das Objekt in der
Dunkelheit)
2 Betriebsanzeige
3 Anschluss für Netzgerät
4 Ein-/Ausschalter
5 Lichtsensor
6 Objektiv
2
dus: drücken und halten, um den Ausschnitt
nach unten zu verschieben.
- ◄ : In Menüs: nach links bewegen / Im
Vergrößerungsmodus: drücken und halten,
um den Ausschnitt nach links zu verschieben.
- ► : In Menüs: nach rechts bewegen / Im
Vergrößerungsmodus drücken und halten,
um den Ausschnitt nach rechts zu verschie-
ben.
8 Sprechtaste
9 Mikrofon
10 Akkufachabdeckung
11 Befestigung für Trageband (nicht mitgeliefert)
12 Lautsprecher
13 Ausklappbare Stütze
7 ▲/VOL: Lautstärke erhöhen
8 : Anmeldetaste
9 ▼/VOL: Lautstärke verringern
10 Mikrofon
11 Lautsprecher
12 Justierungsgelenk
13 Standfuß
Geräte in Betrieb nehmen
Geräte in Betrieb nehmen
a Achtung: Lesen Sie bitte zuerst die Sicherheitshinweise auf Seite 8, bevor Sie die Geräte in
Betrieb nehmen.
Verpackungsinhalt prüfen
Zum Lieferumfang gehören:
1 Monitor-Einheit (Empfänger) 1 Kamera-Einheit (Sender)
1 Aufladbarer Akkupack für den Empfänger 1 Netzteil für den Sender
1 Netzteil für den Empfänger 1 Bedienungsanleitung
Empfänger in Betrieb nehmen
Der Empfänger kann mit dem Netzgerät oder dem Akkupack betrieben werden. Beim Betrieb mit dem
Netzgerät wird der eingelegte Akku geladen. Beim Netzbetrieb empfiehlt es sich, den Akkupack eingelegt zu haben, damit bei einem Netzausfall ein ununterbrochener Betrieb gewährleistet ist.
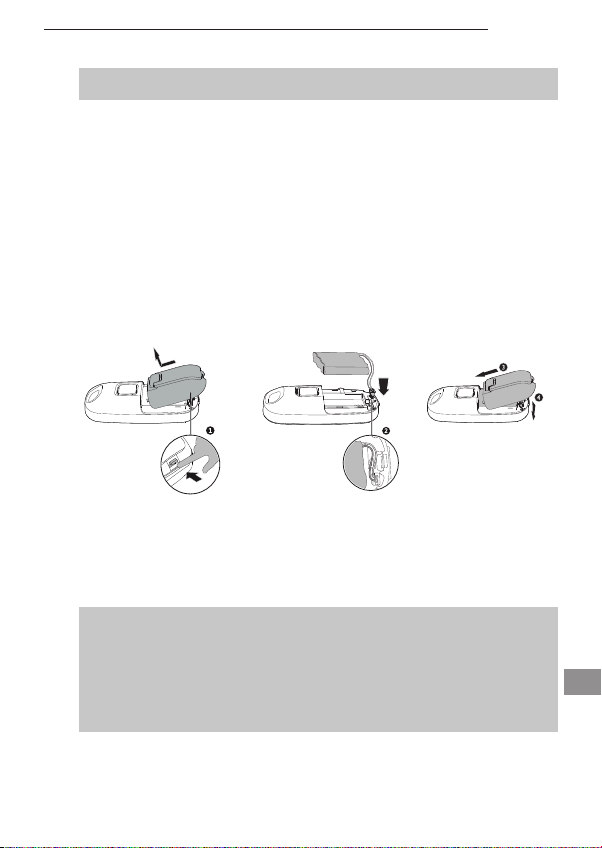
Akku einlegen
Installieren Sie den Akkupack wie abgebildet. Verwenden Sie nur den mitgelieferten Akkupack oder
Akkupacks des gleichen Typs.
1 Entriegeln Sie die Akkufachabdeckung.
2 Legen Sie den Akkupack ein und verbinden Sie den Stecker des Akkus mit der Buchse im Gerät.
Die Steckverbindung ist verpolungssicher.
Achten Sie darauf, dass das Anschlusskabel nicht vom Akkufachdeckel eingeklemmt werden kann.
3 Setzen Sie die Akkufachabdeckung wieder auf das Gehäuse.
4 Achten Sie darauf, dass die Entriegelung wieder einschnappt.
Der Akkupack wird direkt im Gerät geladen, wenn das Netzgerät angeschlossen ist.
Während des Ladens leuchtet die Akkuzustandsanzeige. Bei nur noch geringer Akkupackleistung
blinkt die Akkuzustandsanzeige. Der Akkupack muss dann geladen werden.
Die Akkuzustandsanzeige geht aus, wenn der Akkupack voll geladen ist.
Da die Betriebszeit mit Akkubetrieb begrenzt ist, sollten Sie - sofern möglich - den Empfänger mit
dem Netzgerät betreiben.
Hinweis: Bei längerem Nichtgebrauch entnehmen Sie bitte den Akkupack, um Beschädigungen des
Gerätes durch ein Auslaufen des Akkupacks zu verhindern.
D
3
Geräte in Betrieb nehmen
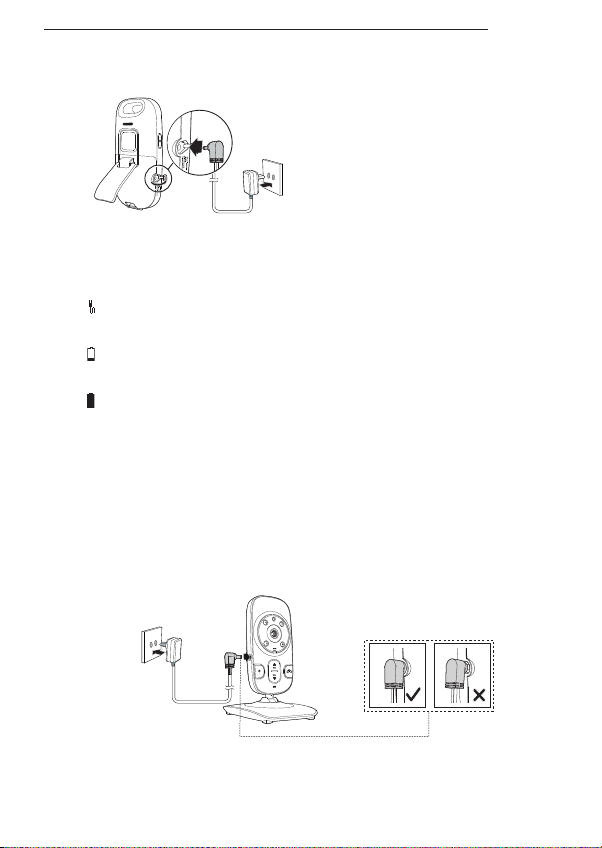
Netzteil anschließen
Schließen Sie den Empfänger wie auf der Skizze abgebildet an. Verwenden Sie aus Sicherheitsgründen nur das mitgelieferte Netzteil.
Netzsteckdose
Laden des Akkupacks
Drücken Sie nach Einlegen des Akkupacks und Anschließen des Netzgerätes die Ein/Aus-Taste, um
den Empfänger einzuschalten. Das Akkusymbol im Display informiert Sie über den Ladezustand.
Kein Akkupack eingelegt oder Akkupack nicht angeschlossen / Betrieb mit Netzteil.
- Legen Sie den Akkupack ein und laden Sie ihn für mindestens 30 Minuten.
Akkupack hat nur noch geringe Kapazität.
- Laden Sie den Akkupack für mindestens 30 Minuten.
Akkupack ist voll geladen.
Hinweise:
• Eine komplette Ladung des Akkupacks dauert ca. 12 Stunden.
• Die Ladezeit verlängert sich, wenn der Empfänger eingeschaltet ist.
• Die Betriebszeit mit Akkupack ist abhängig von den gewählten Einstellungen und dem Alter des
Akkupacks.
Sender (Kamera) in Betrieb nehmen
Schließen Sie den Sender (Kamera) wie auf der Skizze abgebildet an. Verwenden Sie aus Sicherheitsgründen nur das mitgelieferte Netzteil.
Netzsteckdose
4

Den Sender (Kamera) bedienen
Den Sender (Kamera) bedienen
Überprüfen Sie vor jedem Einsatz die einwandfreie Funktion von Sender (Kamera) und Empfänger.
Sender (Kamera) ein-/ausschalten
Drücken Sie die Ein/Aus-Taste für einige Sekunden.
Die Betriebsanzeige blinkt, bis die Verbindung zum Empfänger hergestellt ist. Dann leuchtet sie konstant.
Zum Ausschalten drücken Sie die Ein/Aus-Taste und halten sie für ca. 3 s gedrückt.
Sender (Kamera) ausrichten
a Achtung: Stellen Sie den Sender mit einem Mindestabstand von 1 m zu anderen elektronischen
Geräten auf, da es sonst zu gegenseitigen Störungen kommen kann. Richten Sie das Oberteil des
Senders auf das zu überwachende Baby bzw. Objekt aus. Überprüfen Sie, ob das Baby bzw. Objekt
auf dem Empfänger angezeigt wird.
Nachtsicht
Der Sender (Kamera) ist mit Infrarot-Dioden ausgestattet. Dadurch ist die Bildübertragung aus unbeleuchteten Bereichen möglich. Die Nachtsichtfunktion wird automatisch aktiviert, wenn die Lichtverhältnisse es erfordern.
Bei aktivierter Nachtsichtfunktion ist die Bildschirmdarstellung am Empfänger schwarz-weiß.
Lautstärke des Lautsprechers einstellen
Sie können am Sender (Kamera) die Lautstärke für die Sprachwiedergabe im Kinderzimmer einstellen. Drücken Sie ▲/VOL um die Lautstärke zu erhöhen oder ▼/VOL um die Lautstärke zu verringern.
D
5
Den Empfänger bedienen
Den Empfänger bedienen
a Achtung: Stellen Sie den Empfänger mit einem Mindestabstand von 1 m zu anderen
elektronischen Geräten auf, da es sonst zu gegenseitigen Störungen kommen kann.
Überprüfen Sie vor jedem Einsatz die einwandfreie Funktion von Sender (Kamera) und Empfänger.
Empfänger ein-/ausschalten
Drücken Sie kurz die Ein/Aus-Taste für einige Sekunden.
Die Betriebsanzeige blinkt, bis die Verbindung zum Sender (Kamera) hergestellt ist. Dann leuchtet sie
konstant und Sie sehen das Bild auf dem Monitor.
Zum Ausschalten drücken Sie die Ein/Aus-Taste und halten sie für ca. 3 s gedrückt.
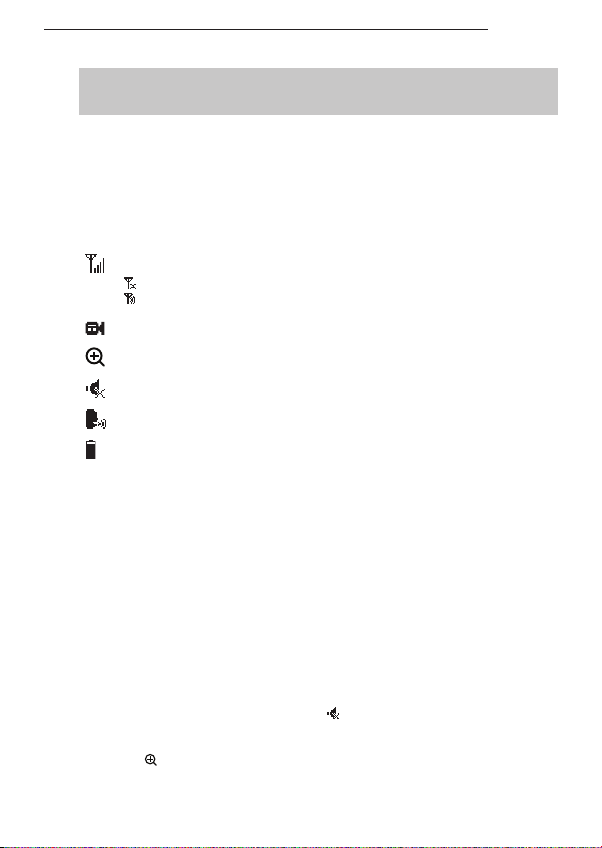
Displaysymbole
Verbindungsanzeige: Je mehr Balken zu sehen sind, desto besser ist die Verbindung.
- Verbindung zum Sender (Kamera) ist unterbrochen.
- Empfänger sucht nach dem Sender (Kamera).
x
Anzeige der aktuellen Verbindung (x = Nummer des Senders: 1…4).
Vergrößerung eingeschaltet.
Lautstärke auf „Null“ eingestellt.
Geräuschaktivierung ist eingeschaltet.
Akkuladezustand.
Ausschalten des Displays / Umschalten Audio/Video
Sie können das Display des Empfängers ausschalten, um Energie zu sparen. Sie hören weiterhin die
Geräusche aus dem Kinderzimmer.
Drücken Sie kurz die Ein-/Aus-Taste.
Zum Wiedereinschalten des Displays drücken Sie erneut kurz die Ein-/Aus-Taste.
Sprechverbindung zum Kinderzimmer
Drücken und halten Sie die Sprechtaste. Der Lautsprecher am Sender (Kamera) wird eingeschaltet
und Sie können zu Ihrem Kind oder einer anderen Person im Zimmer, in der die Kamera steht, sprechen. Während die Sprechtaste gedrückt ist, können Sie keine Geräusche aus dem Kinderzimmer
hören.
Lautstärke einstellen
Drücken Sie VOL▲ um die Lautstärke zu erhöhen oder VOL▼ um die Lautstärke zu verringern. Ist
die Lautstärke auf „Null“ eingestellt, wird im Display angezeigt.
Vergrößerung
Drücken Sie um die Vergrößerung einzuschalten.
Zum Verschieben des Ausschnittes drücken und halten Sie VOL▲ (nach oben), VOL▼ (nach
unten), ◄ (nach links) oder ► (nach rechts).
6

Den Empfänger bedienen
Drücken Sie erneut, um die Vergrößerung auszuschalten.
Displayhelligkeit einstellen
Drücken Sie die Menütaste.
Wählen Sie mit VOL▲ oder VOL▼ .
Stellen Sie mit ◄ oder ► die gewünschte Helligkeit ein.
Drücken Sie die Menütaste.
Geräuschempfindlichkeit einstellen
Sie können die Empfindlichkeit des Mikrofons im Sender (Kamera) einstellen. Je höher die Empfindlichkeit, desto leisere Geräusche werden übertragen.
Drücken Sie die Menütaste.
Wählen Sie mit VOL▲ oder VOL▼ .
Stellen Sie mit ◄ oder ► die gewünschte Empfindlichkeit ein (höchste Empfindlichkeit: ).
Drücken Sie die Menütaste.
Bitte beachten Sie, dass die Geräuschaktivierung (s. u.) nicht funktioniert, wenn die höchste
Geräuschempfindlichkeit (5) eingestellt ist. Das Display am Elterngerät ist dann dauerhaft
eingeschaltet. Im Auslieferungszustand ist Stufe 4 eingestellt.
Geräuschaktivierung einstellen
Der Empfänger überwacht dauernd die Geräusche im Kinderzimmer. Ist die Geräuschaktivierung eingeschaltet, wird das Display ausgeschaltet um Energie zu sparen, wenn innerhalb einer Zeitspanne
von 50 Sekunden kein Geräusch erkannt wird.
Sobald ein Geräusch erkannt wird, wird das Display wieder eingeschaltet.
Drücken Sie die Menütaste.
Wählen Sie mit VOL▲ oder VOL▼ .
Schalten Sie mit ◄ oder ► die Geräuschaktivierung ein ( ) oder aus ( ).
Drücken Sie die Menütaste.
Wahl des Senders (Kamera)
Haben Sie mehrere Sender (Kameras) an Ihrem Empfänger angemeldet, können Sie die jeweils aktive Kamera oder einen automatischen Wechsel auswählen.
Drücken Sie die Menütaste.
Wählen Sie mit VOL▲ oder VOL▼ .
Wechseln Sie mit ◄ oder ► die aktive Kamera (1, 2, 3 oder 4) oder schalten Sie den automatischen
Wechsel ein ( ). Beim automatischen Wechsel werden die angemeldeten Sender (Kameras) in der
chronologischen Folge 1…4 dargestellt.
Drücken Sie die Menütaste.
Inbetriebnahme eines weiteren Senders (Kamera)
Der Empfänger bietet die Möglichkeit, bis zu vier Sender (Kameras) gleichzeitig anzumelden und zwischen diesen umzuschalten bzw. einen automatischen Wechsel auszuführen.
Die mitgelieferte Kamera ist bereits an Ihrem Empfänger angemeldet.
Drücken Sie die Menütaste.
Wählen Sie mit VOL▲ oder VOL▼ und drücken Sie die Menütaste.
Folgen Sie im weiteren Verlauf der Beschreibung, die dem neuen Sender (Kamera) beiliegt.
D
7

Anhang
Anhang
Sicherheitshinweise
Lesen Sie diese Bedienungsanleitung sorgfältig durch und bewahren Sie sie gut auf.
Bestimmungsgemäße Verwendung
Das Überwachungssystem wurde zur Überwachung von Räumen entwickelt. Der Sender (Kamera)
übermittelt von seinem Standort aus Stimmlaute und Bilder an den Empfänger. Jede andere Verwendung gilt als nicht bestimmungsgemäß.
Die Verwendung des Geräts ersetzt nicht die persönliche Beaufsichtigung, z. B. eines Kindes. Der
Anwender wird nicht aus seiner persönlichen Haftung entlassen. Eigenmächtige Veränderungen oder
Umbauten sind nicht zulässig. Öffnen Sie das Gerät in keinem Fall selbst und führen Sie keine eigenen Reparaturversuche durch.
Aufstellungsort und Sicherheitsinformationen
• Legen Sie den Sender (Kamera) niemals in das Bett oder in den Laufstall eines Babys/Kindes.
• Vergewissern Sie sich, dass sich der Sender (Kamera) und das Netzkabel immer außerhalb der
Reichweite von Babys/Kindern befinden, d. h. mindestens einen Meter entfernt.
• Sorgen Sie während des Betriebs für ausreichende Belüftung aller Komponenten. Legen Sie
keine Kissen, Handtücher oder Ähnliches auf die Geräte.
• Die Geräte sind nicht für den medizinischen Einsatz geeignet. Warn- oder Signaltöne von
Atmungs- oder Herztonüberwachungsgeräten können nicht übertragen werden.
• Der Aufstellungsort hat entscheidenden Einfluss auf den einwandfreien Betrieb. Halten Sie einen
Abstand von mindestens einem Meter zu elektronischen Geräten, wie z. B. Mikrowellen oder
Hi-Fi-Geräten ein, da es sonst zu gegenseitiger Beeinflussung/Störung kommen kann.
• Vermeiden Sie Belastungen durch Rauch, Staub, Erschütterungen, Chemikalien, Feuchtigkeit,
Hitze oder direkte Sonneneinstrahlung. Verwenden Sie die Geräte nicht in explosionsgefährdeten
Bereichen.
Netzgerät
a Achtung: Verwenden Sie nur die mitgelieferten Steckernetzteile, da andere Netzteile das
Überwachungssystem beschädigen können. Versperren Sie nicht den Zugang zum Steckernetzteil
durch Möbel oder andere Gegenstände.
Achten Sie beim Betrieb mit einem Netzteil auf den einwandfreien Zustand der Kabel und Stecker.
Abgeknickte oder durchgescheuerte Kabel sind lebensgefährlich!
Das Netzteil erfüllt die Ökodesign-Anforderungen
der Europäischen Union (Richtlinie 2005/32/EG).
Dies bedeutet, dass sowohl im Betrieb als auch im
Ruhezustand der Stromverbrauch im Vergleich zu
Netzteilen älterer Bauart deutlich niedriger ist.
8
Anhang
Akkus
a Achtung: Werfen Sie Akkus oder Batterien nicht ins Feuer. Verwenden Sie nur die für die Geräte
vorgeschriebenen Akkus oder Batterien! Achten Sie auf die richtige Polung!
Medizinische Geräte
a Achtung: Benutzen Sie die Geräte nicht in der Nähe von medizinischen Geräten.
Eine Beeinflussung kann nicht völlig ausgeschlossen werden.
Entsorgung
Wollen Sie Ihr Gerät entsorgen, bringen Sie es zur Sammelstelle Ihres kommunalen
Entsorgungsträgers (z. B. Wertstoffhof). Nach dem Elektro- und Elektronikgerätegesetz sind Besitzer von Altgeräten gesetzlich verpflichtet, alte Elektro- und Elektro-
nikgeräte einer getrennten Abfallerfassung zuzuführen. Das nebenstehende Symbol
bedeutet, dass Sie das Gerät auf keinen Fall in den Hausmüll werfen dürfen!
Gefährdung von Gesundheit und Umwelt durch Akkus und Batterien!
Akkus und Batterien nie öffnen, beschädigen, verschlucken oder in die Umwelt
gelangen lassen. Sie können giftige und umweltschädliche Schwermetalle enthalten.
Sie sind gesetzlich verpflichtet, Akkus und Batterien beim batterievertreibenden Handel oder bei zuständigen Sammelstellen, die entsprechende Behälter bereitstellen,
sicher zu entsorgen. Die Entsorgung ist unentgeltlich. Die nebenstehenden Symbole
bedeuten, dass Sie Akkus und Batterien auf keinen Fall in den Hausmüll werfen dürfen, sondern dass diese über Sammelstellen entsorgt werden müssen.
Verpackungsmaterialien entsorgen Sie entsprechend den lokalen Vorschriften.
Service-Hotline
Haben Sie Probleme mit Ihrem Gerät, kontrollieren Sie zuerst die folgenden Hinweise. Bei technischen Problemen können Sie sich an unsere Service-Hotline wenden.
Die Rufnummer finden Sie auf unserer Internetseite www.audioline.de
Bei Garantieansprüchen wenden Sie sich an Ihren Fachhändler.
Die Garantiezeit beträgt 2 Jahre.
Falls es Probleme gibt: Fragen und Antworten
Keine Funktion
• Sender (Kamera) und/oder Empfänger sind nicht eingeschaltet.
• Akkupack ist leer oder defekt.
• Netzgeräte sind nicht angeschlossen.
Kein Empfang
• Sender (Kamera) und Empfänger sind nicht angemeldet.
• Der Abstand des Senders (Kamera), z. B. zum Baby, ist zu groß. Beachten Sie den Mindestab-
stand von einem Meter.
• Der Abstand zwischen Empfänger und Sender (Kamera) ist zu groß.
• Die Geräuschempfindlichkeit ist zu niedrig eingestellt.
D
9

Anhang
Empfangsstörungen
• Der Abstand zwischen Empfänger und Sender (Kamera) ist zu groß.
• Akkuleistung ist zu gering.
• Andere elektronische Geräte stören das Übertragungsfeld.
Pfeifton (Rückkopplung)
• Vergrößern Sie die Entfernung zwischen Empfänger und Sender (Kamera).
• Verringern Sie die Lautstärke am Empfänger.
Rauschen
• Akkuleistung ist zu gering.
Bild- aber keine Tonübertragung
• Die Lautstärke ist zu gering eingestellt.
Bild wird schwarz-weiß dargestellt
• Die Nachtsichtfunktion ist aktiv.
Der Akkupack im Empfänger wird nicht geladen
• Das Netzgerät ist nicht angeschlossen.
Konformitätserklärung
Dieses Gerät erfüllt die Anforderungen der EU-Richtlinie:
1999/5/EG Richtlinie über Funkanlagen und Telekommunikationsendeinrichtungen und die gegenseitige Anerkennung ihrer Konformität. Die Konformität mit der o. a. Richtlinie wird durch das CE-Zeichen auf dem Gerät bestätigt.
Für die komplette Konformitätserklärung nutzen Sie bitte den kostenlosen Download von unserer
Website www.audioline.de
Pflegehinweise
• Reinigen Sie die Gehäuseoberflächen mit einem weichen und fusselfreien Tuch.
• Verwenden Sie keine Reinigungsmittel oder Lösungsmittel.
10

Anhang
Technische Daten
Kamera (Sender) Buchse: 6 V DC
Sensor: 1 Nachtlichtsensor
IR-Dioden: 4
Monitor (Empfänger) Bildschirm: 2" LC-Farbdisplay / 176 x 220 Pixel
Buchse: 6 V DC
Stromversorgung (Empfänger) Netzteil, Input: 100-240 VAC, 50-60Hz, 150 mA,
Erstmalige Ladezeit Akkupack bis zu 16 h
Stromversorgung (Sender) Netzteil, Input: 100-240 VAC, 50-60Hz, 150 mA,
Reichweite Bis zu 300 Metern unter optimalen Bedingungen. In
Frequenzbereich 2407,5 - 2475 MHz
Zulässige Umgebungstemperatur 0° C bis 40° C
Garantie
AUDIOLINE-Geräte werden nach den modernsten Produktionsverfahren hergestellt und geprüft. Ausgesuchte Materialien und hoch entwickelte Technologien sorgen für einwandfreie Funktion und lange
Lebensdauer.
Die Garantie gilt nicht für die in den Produkten verwendeten Batterien, Akkus oder Akkupacks. Die
Garantiezeit beträgt 24 Monate, gerechnet vom Tage des Kaufs.
Innerhalb der Garantiezeit werden alle Mängel, die auf Material- oder Herstellungsfehler zurückzuführen sind, kostenlos beseitigt. Der Garantieanspruch erlischt bei Eingriffen durch den Käufer oder
durch Dritte. Schäden, die durch unsachgemäße Behandlung oder Bedienung, natürliche Abnutzung,
durch falsches Aufstellen oder Aufbewahren, durch unsachgemäßen Anschluss oder Installation
sowie durch höhere Gewalt oder sonstige äußere Einflüsse entstehen, fallen nicht unter die Garantieleistung.
Wir behalten uns vor, bei Reklamationen die defekten Teile auszubessern, zu ersetzen oder das
Gerät auszutauschen. Ausgetauschte Teile oder ausgetauschte Geräte gehen in unser Eigentum
über. Schadenersatzansprüche sind ausgeschlossen, soweit sie nicht auf Vorsatz oder grober Fahrlässigkeit des Herstellers beruhen.
Sollte Ihr Gerät dennoch einen Defekt innerhalb der Garantiezeit aufweisen, wenden Sie sich bitte
unter Vorlage Ihrer Kaufquittung ausschließlich an das Geschäft, in dem Sie Ihr AUDIOLINE-Gerät
gekauft haben. Alle Gewährleistungsansprüche nach diesen Bestimmungen sind ausschließlich
gegenüber Ihrem Fachhändler geltend zu machen. Nach Ablauf von zwei Jahren nach Kauf und
Übergabe unserer Produkte können Gewährleistungsrechte nicht mehr geltend gemacht werden.
Output: 6 VDC, 600 mA
oder NiMh-Akkupack 3,6 Volt
Output: 6 VDC, 600 mA
Gebäuden wird die Reichweite durch Wände, Türen usw.
verringert.
D
11

12

Contents
Operating Elements . . . . . . . . . . . . . . . . . . . . . . . . . . . . . . . . . . . . . . . . . . . . . . . . . . . . . . . . . . . . . . . . .2
Starting Up . . . . . . . . . . . . . . . . . . . . . . . . . . . . . . . . . . . . . . . . . . . . . . . . . . . . . . . . . . . . . . . . . . . . . . . .3
Checking the package contents . . . . . . . . . . . . . . . . . . . . . . . . . . . . . . . . . . . . . . . . . . . . . . . . . . . . .3
Putting the receiver into service . . . . . . . . . . . . . . . . . . . . . . . . . . . . . . . . . . . . . . . . . . . . . . . . . . . .3
Installing the battery . . . . . . . . . . . . . . . . . . . . . . . . . . . . . . . . . . . . . . . . . . . . . . . . . . . . . . . . . . . . .3
Operating with a power adapter plug . . . . . . . . . . . . . . . . . . . . . . . . . . . . . . . . . . . . . . . . . . . . . . . . .4
Charging the battery . . . . . . . . . . . . . . . . . . . . . . . . . . . . . . . . . . . . . . . . . . . . . . . . . . . . . . . . . . . . . .4
Putting the transmitter into service . . . . . . . . . . . . . . . . . . . . . . . . . . . . . . . . . . . . . . . . . . . . . . . . . . .4
Operating the Transmitter . . . . . . . . . . . . . . . . . . . . . . . . . . . . . . . . . . . . . . . . . . . . . . . . . . . . . . . . . . .5
Switching the transmitter on/off . . . . . . . . . . . . . . . . . . . . . . . . . . . . . . . . . . . . . . . . . . . . . . . . . . . .5
Aligning the transmitter . . . . . . . . . . . . . . . . . . . . . . . . . . . . . . . . . . . . . . . . . . . . . . . . . . . . . . . . . . .5
Night vision . . . . . . . . . . . . . . . . . . . . . . . . . . . . . . . . . . . . . . . . . . . . . . . . . . . . . . . . . . . . . . . . . . . .5
Setting the loudspeaker volume . . . . . . . . . . . . . . . . . . . . . . . . . . . . . . . . . . . . . . . . . . . . . . . . . . . .5
Operating the Receiver . . . . . . . . . . . . . . . . . . . . . . . . . . . . . . . . . . . . . . . . . . . . . . . . . . . . . . . . . . . . .6
Switching the receiver on/off . . . . . . . . . . . . . . . . . . . . . . . . . . . . . . . . . . . . . . . . . . . . . . . . . . . . . . .6
Display icons . . . . . . . . . . . . . . . . . . . . . . . . . . . . . . . . . . . . . . . . . . . . . . . . . . . . . . . . . . . . . . . . . . .6
Turn on or off the screen / Video/Audio switching . . . . . . . . . . . . . . . . . . . . . . . . . . . . . . . . . . . . . . .6
Intercom function . . . . . . . . . . . . . . . . . . . . . . . . . . . . . . . . . . . . . . . . . . . . . . . . . . . . . . . . . . . . . . . .6
Setting the volume . . . . . . . . . . . . . . . . . . . . . . . . . . . . . . . . . . . . . . . . . . . . . . . . . . . . . . . . . . . . . . .6
Setting the zoom . . . . . . . . . . . . . . . . . . . . . . . . . . . . . . . . . . . . . . . . . . . . . . . . . . . . . . . . . . . . . . . .6
Setting the brightness . . . . . . . . . . . . . . . . . . . . . . . . . . . . . . . . . . . . . . . . . . . . . . . . . . . . . . . . . . . .7
Setting the sound sensitivity . . . . . . . . . . . . . . . . . . . . . . . . . . . . . . . . . . . . . . . . . . . . . . . . . . . . . . .7
Setting the sound activation . . . . . . . . . . . . . . . . . . . . . . . . . . . . . . . . . . . . . . . . . . . . . . . . . . . . . . . .7
Selecting the transmitter (camera) . . . . . . . . . . . . . . . . . . . . . . . . . . . . . . . . . . . . . . . . . . . . . . . . . . .7
Putting an additional transmitter (camera) into service . . . . . . . . . . . . . . . . . . . . . . . . . . . . . . . . . . .7
Appendix . . . . . . . . . . . . . . . . . . . . . . . . . . . . . . . . . . . . . . . . . . . . . . . . . . . . . . . . . . . . . . . . . . . . . . . . .8
Safety Information . . . . . . . . . . . . . . . . . . . . . . . . . . . . . . . . . . . . . . . . . . . . . . . . . . . . . . . . . . . . . . . .8
Intended use . . . . . . . . . . . . . . . . . . . . . . . . . . . . . . . . . . . . . . . . . . . . . . . . . . . . . . . . . . . . . . . . . . . .8
Installation location and safety information . . . . . . . . . . . . . . . . . . . . . . . . . . . . . . . . . . . . . . . . . . . . .8
Power adapter plug . . . . . . . . . . . . . . . . . . . . . . . . . . . . . . . . . . . . . . . . . . . . . . . . . . . . . . . . . . . . . . .8
Rechargeable batteries . . . . . . . . . . . . . . . . . . . . . . . . . . . . . . . . . . . . . . . . . . . . . . . . . . . . . . . . . . .9
Medical equipment . . . . . . . . . . . . . . . . . . . . . . . . . . . . . . . . . . . . . . . . . . . . . . . . . . . . . . . . . . . . . .9
Disposal . . . . . . . . . . . . . . . . . . . . . . . . . . . . . . . . . . . . . . . . . . . . . . . . . . . . . . . . . . . . . . . . . . . . . . .9
Helpline . . . . . . . . . . . . . . . . . . . . . . . . . . . . . . . . . . . . . . . . . . . . . . . . . . . . . . . . . . . . . . . . . . . . . . . .9
Troubleshooting guide - Problems and solutions . . . . . . . . . . . . . . . . . . . . . . . . . . . . . . . . . . . . . . . .9
Declaration of conformity . . . . . . . . . . . . . . . . . . . . . . . . . . . . . . . . . . . . . . . . . . . . . . . . . . . . . . . . .10
Maintenance . . . . . . . . . . . . . . . . . . . . . . . . . . . . . . . . . . . . . . . . . . . . . . . . . . . . . . . . . . . . . . . . . . .10
Technical data . . . . . . . . . . . . . . . . . . . . . . . . . . . . . . . . . . . . . . . . . . . . . . . . . . . . . . . . . . . . . . . . . .11
Guarantee . . . . . . . . . . . . . . . . . . . . . . . . . . . . . . . . . . . . . . . . . . . . . . . . . . . . . . . . . . . . . . . . . . . . .11
GB
1
Operating Elements
Operating Elements
Monitor unit (receiver)
1 Sound level LEDs
2 On/Off button / Video/audio switching
3 Battery level indicator
4 Socket for power adapter plug
5 Zoom button
6 POWER on/off indicator
7 Control keys
- Menu key: Press to enter the menu.
While in a menu, press to choose an item or
save a setting.
- VOL▲: Press to increase the speaker volume. While in the menu, press to scroll up.
While viewing a zoomed image, press and
hold to move the image upward.
- VOL▼: Press to decrease the speaker volume. While in the menu, press to scroll down.
Camera unit (transmitter)
1 Infrared LEDs (backup light for night vision)
2 POWER on/off indicator
3 Socket for power adapter plug
4 On/Off button
5 Night sensor
6 Camera
While viewing a zoomed image, press and
hold to move the image downward.
- ◄ : While in a menu, press to choose the
option on the left side. While viewing a
zoomed image, press and hold to move the
image leftward.
- ► : While in a menu, press to choose the
option on the right side. While viewing a
zoomed image, press and hold to move the
image rightward.
8 Talk button
9 Microphone
10 Battery compartment cover
11 Slot for portable use
12 Loudspeaker
13 Stand
7 ▲/VOL: Press to increase the listening volume.
8 : Press and hold to pair to the parent unit.
9 ▼/VOL: Press to decrease the listening volume.
10 Microphone
11 Loudspeaker
12 Ball joint stand
13 Base
2

Starting Up
Starting Up
a Important: please make sure you’ve read the safety information on page 8 before you set up
your system.
Checking the package contents
The package contains:
1 Monitor unit (receiver) 1 Camera unit (transmitter)
1 Rechargeable battery pack for the receiver 1 Power adapter plug for the transmitter
1 Power adapter plug for the receiver 1 Operating manual
Putting the receiver into service
You can power up the parent unit by connecting it to AC power or to the rechargeable battery provided. Even if the parent unit is connected to AC power, it is recommended you also install the battery.
This guarantees continual operation in case of a power outage.
Installing the battery
Install the battery as shown below. Only use the rechargeable battery pack supplied or similar ones.
1 Push the detent of the battery compartment cover and lift the cover to open.
2 Plug the battery connector securely into the socket.
The connector is polarized.
Arrange the battery wire to avoid it obstructing the battery cover when closing.
3 Align the battery compartment cover against the battery compartment.
4 Push the battery compartment cover down and click into place.
The battery pack charges directly in the device when the AC adapter is connected.
While charging, the battery icon lights up. When the battery has very little charge, the battery icon
flashes. The battery must be charged.
The battery icon goes off when the battery is fully charged.
As operation time is limited by battery power, wherever possible operate the device using the power
supply.
Note: During long periods of disuse, remove the battery from the device in order to prevent any
leakage from the battery.
GB
3

Starting Up
Operating with a power adapter plug
Connect the receiver as illustrated in the diagram. For safety reasons, only use the power adapter
plug supplied.
Mains power outlet
Charging the battery
Once you have connected the parent unit and installed its battery, press the On/Off button to turn it
on. The battery icon in the display indicates the battery status.
No battery is installed but operates using AC power, or the battery has been installed incorrectly.
- Install the battery. Charge without interruption (at least 30 minutes).
The battery has very little charge.
- Charge without interruption (at least 30 minutes).
The battery is fully charged.
Note:
• The battery is fully charged after 12 hours of continuous charging.
• It takes longer to charge the battery when the parent unit is turned on.
• The standby time varies depending on the sensitivity level you set, your actual use and the age
of the battery..
Putting the transmitter into service
Connect the transmitter (camera) as illustrated in the diagram. For safety reasons, only use the
power adapter plug supplied.
Mains power outlet
4

Operating the Transmitter
Operating the Transmitter
Check the transmitter and receiver are working properly each time before the equipment is put into
operation.
Switching the transmitter on/off
Press and hold the On/Off button for approx. 3 seconds.
The POWER on/off indicator will flash until the connection to the receiver is established. Then the
LED will light constantly.
To switch the unit off, press and hold the On/Off button for approx. 3 seconds.
Aligning the transmitter
a Attention: Position the transmitter with a minimum distance of 1 m to other electronic devices,
otherwise there is a risk of mutual disturbance. Point the upper section of the transmitter towards the
baby or object you want to monitor. Check that the baby or object is suitably displayed on the
receiver.
Night vision
The transmitter is equipped with infrared diodes. This enables the transmission of pictures from areas
which are not illuminated. The night vision function is activated automatically when the light conditions make it necessary.
When the night−time vision function is activated, the screen display on the receiver turns to
black and white.
Setting the loudspeaker volume
You can adjust the volume of the voice playback in your baby's room on the transmitter (camera)
Press ▲/VOL to increase the volume or ▼/VOL to decrease the volume.
GB
5

Operating the Receiver
Operating the Receiver
a Attention: Position the transmitter with a minimum distance of 1 m to other electronic devices,
otherwise there is a risk of mutual disturbance. Point the upper section of the transmitter towards the
baby or object you want to monitor. Check that the baby or object is suitably displayed on the
receiver.
Switching the receiver on/off
Press and hold the On/Off button for approx. 3 seconds.
The POWER on/off indicator will flash until the connection to the transmitter (camera) is established.
Then the LED will light constantly and you will see the picture on the screen.
To switch the unit off, press and hold the On/Off button for approx. 3 seconds.
Display icons
Connection status: The more bars that are displayed, the better the connection is.
- The link between the transmitter and the receiver is lost.
- The receiver is searching for a transmitter.
Current view status (x = Number of the transmitter that is being viewed: 1…4).
x
The camera has zoomed in.
Volume is turned off.
Sound activation is on.
Battery status.
Turn on or off the screen / Video/Audio switching
You can turn on or off the parent unit screen without powering off the parent unit to save battery
power. You can still hear sound from the baby unit.
Press the On/Off button briefly.
For switching the display on again press the On/Off button again briefly.
Intercom function
Press and hold the Talk button. The speaker on the transmitter (camera) is turned on and you can
talk to your child or anybody else who is in the same room as the camera. While the Talk button is
being pressed, you cannot hear any noise from the baby's room.
Setting the volume
Press VOL▲ to increase the volume or VOL▼ to decrease the volume. If the volume is set to “zero“
the display shows .
Setting the zoom
Press to zoom in on the image. Press and hold to move the selection: VOL▲ (up), VOL▼
(down), ◄ (to the left) or ► (to the right).
Press again to deactivate the zoom function.
6

Operating the Receiver
Setting the brightness
Press the Menu key.
Press VOL▲ or VOL▼to select .
Press ◄ or ► to select the desired brightness.
Press the Menu key.
Setting the sound sensitivity
You can adjust the microphone sensitivity of the transmitter. The higher the sensitivity level, the more
sensitive the transmitter is in detecting sounds for transmitting to the receiver.
Press the Menu key.
Press VOL▲ or VOL▼to select .
Press ◄ or ► to select the desired sentitivity (highest sensitivity level: ).
Press the Menu key.
Note that when the highest sensitivity level (5) is selected then this will override the sound activation
function and the screen on the parent unit will remain active continuously.
The default setting is level 4.
Setting the sound activation
The receiver continuously monitors the sound level in your baby’s room. When the sound activation
mode is on, the receiver screen turns on when the transmitter detects a sound.
As long as no sound is detected within 50 seconds, the receiver screen is off to save power. When
your baby starts to cry, the sound activation triggers the receiver screen automatically turns on.
Press the Menu key.
Press VOL▲ or VOL▼to select .
Press ◄ or ► to switch the sound activation on ( ) or off ( ).
Press the Menu key.
Selecting the transmitter (camera)
If two or more transmitters (cameras) are registered to your receiver, you can select the active cameraor start automatic switching (Patrol Mode).
Press the Menu key.
Press VOL▲ or VOL▼to select .
Press ◄ or ► to change the active camera (1, 2, 3 or 4) or start the Patrol Mode ( ). If you select
Patrol Mode to view the images, the screen switches to view another transmitter automatically after
some time. The switching is in chronological order: 1…4.
Press the Menu key.
Putting an additional transmitter (camera) into service
The receiver allows you the possibility to register up to four transmitters (cameras) simultaneously,
and to manually change or automatically switch between them.
The delivered camera is already registered with your receiver.
Press Menu/Select.
Press VOL▲ or VOL▼to select and press the Menu key.
Follow the full instructions that accompany your new transmitter (camera).
GB
7

Appendix
Appendix
Safety Information
Please read this operating instruction manual thoroughly.
Intended use
The surveillance system has been developed to monitor rooms. The transmitter sends acoustic and
video signals from its point of installation to the receiver. Any other use is considered unintended use.
The use of this equipment does not substitute personal supervision, e.g. of a child. Users are not
relieved of their personal liability. Unauthorised modification or reconstruction is not permitted. Under
no circumstances open the device or complete any repair work yourself.
Installation location and safety information
• Never lay the transmitter in a baby’s/child’s bed or playpen.
• Ensure that the transmitter and power cable are out of reach of babies/children, i.e. they are at
least one meter away.
• Pay attention that the components are sufficiently well−ventilated when in operation. Do not lay a
cushion, towel or such over the devices.
• The devices are not intended for medical purposes. Warning and signal tones from respiratory or
heartbeat monitoring equipment are not transmitted.
• The installation location plays a decisive role in ensuring proper operation. Therefore, maintain a
distance of at least one meter from other electronic equipment, such as microwave ovens or hi−fi
devices, otherwise they could cause mutual interference/faults.
• Prevent excessive exposure to smoke, dust, vibration, chemicals, moisture, heat and direct sun-
light. Do not use the equipment in potentially explosive areas.
Power adapter plug
a Attention: Only use the power adapter plugs contained in the material supplied since other
power adapter plugs could damage the surveillance system. Ensure access to the power adapter
plug is not obstructed by furniture or such.
When using the equipment with a power adapter plug, pay attention that the plug and cable are in
perfect condition. Kinked or worn cable represents the risk of a fatal accident!
The power adapter plug supplied fulfils
the ecodesign requirements of the European Union (Directive
2005/32/EC). This means that, both in an
operating state and in an idling state, the power
consumption is considerably lower compared to
power adapter plugs with an older design.
8

Appendix
Rechargeable batteries
a Attention: Never throw batteries into a fire. Only use batteries of the same type!
Pay attention to correct polarity.
Medical equipment
a Attention: Never use the devices in the vicinity of medical equipment.
Effects on such equipment cannot be fully ruled out.
Disposal
In order to dispose of your device, take it to a collection point provided by your local
public waste authorities (e.g. recycling centre). According to laws on the disposal of
electronic and electrical devices, owners are obliged to dispose of old electronic and
electrical devices in a separate waste container. The adjacent symbol indicates that
the device must not be disposed of in normal domestic waste!
Batteries represent a hazard to health and the environment! Never open, damage or
swallow batteries or allow them to pollute the environment. They may contain toxic,
ecologically hazardous heavy metals. You are legally obliged to dispose of power
packs and batteries at the point of sale or in the corresponding containers provided
at collection points provided by local public waste authorities. Disposal is free of
charge. The adjacent symbols indicate that the batteries must not be disposed of in
normal domestic waste and must be brought to collection points provided by local
public waste authorities.
Packaging materials must be disposed of according to local regulations.
Helpline
Should problems arise with the device, please refer to the following information first.
In the case of technical problems, contact our Hotline. Please refer to our website
www.audioline.de
In the case of claims under the terms of guarantee, contact your sales outlet.
There is a 2 year period of guarantee.
Troubleshooting guide - Problems and solutions
Equipment does not function
• Transmitter and/or receiver are not switched on.
• The battery pack is empty or defective.
• The power adapter plugs are not connected.
No reception
• Transmitter and receiver are not registered.
• Transmitter is too far from object being monitored, e.g. baby.
Observe the minimum distance of one meter.
• The receiver and transmitter are too far apart.
• The sound sensitivity is set too low.
for the telephone number.
GB
9

Appendix
Reception interference
• The receiver and transmitter are too far apart.
• The battery power is too low.
• Other electronic devices are causing interference in the field of transmission.
Howling or squealing noise (acoustic feedback)
• Increase the distance between receiver and transmitter.
• Reduce the volume on the receiver.
Noise
• The battery power is too low.
Picture but no sound transmission
• Volume setting is too low.
Picture is in black and white
• The night vision function is active.
The battery pack in the receiver is not charged
• The power adapter plug is not connected.
Declaration of conformity
This device fulfils the requirements stipulated in the EU directive:
1999/5 EU directive on radio equipment and telecommunications terminal
equipment and the mutual recognition of their conformity.
Conformity with the above mentioned directive is confirmed by the CE symbol on the device.
To view the complete Declaration of Conformity, please refer to the free download available on our
website www.audioline.de
Maintenance
• Clean the housing surfaces with a soft, fluff−free cloth.
• Never use cleaning agents or solvents.
10

Appendix
Technical data
Camera (transmitter) Socket: 6 V DC
Sensor: 1 night light sensor
IR diodes: 4
Monitor (receiver) Screen: 2" LC colour display / 176 x 220 px
Socket: 6 V DC
Power supply (receiver) Power adapter plug,
output: 6 VDC, 600 mA
or NiMh battery pack 3.6 Volt
Initial charging time for battery Up to 16 h
Power supply (transmitter) Power adapter plug,
output: 6 VDC, 600 mA
Range Up to 300 meters under optimum conditions. Range is
Frequency range 2407.5 - 2475 MHz
Permissible ambient temperature 0°C to 40°C
Guarantee
AUDIOLINE equipment is produced and tested according to the latest production methods. Carefully
selected materials and highly developed technology ensure perfect functioning and a long service life.
The terms of guarantee do not apply to the batteries or power packs used in the products. The period
of guarantee is 24 months from the date of purchase.
All deficiencies related to material or manufacturing errors within the period of guarantee will be
redressed free of charge. Rights to claims under the terms of guarantee are annulled following tampering by the purchaser or third parties. Damage caused as the result of improper handling or operation, incorrect positioning or storage, improper connection or installation or Acts of God and other
external influences are excluded from the terms of guarantee. In the case of complaints, we reserve
the right to repair defect parts, replace them or replace the entire device. Replaced parts or devices
become our property. Rights to compensation in the case of damage are excluded where there is no
evidence of intent or gross negligence by the manufacturer.
If your device does show signs of a defect within the period of guarantee, please contact the sales
outlet where you purchased the AUDIOLINE device, producing the purchase receipt as evidence. All
claims under the terms of guarantee in accordance with this agreement can only be asserted at the
sales outlet. No claims under the terms of guarantee can be asserted after a period of two years from
the date of purchase and hand−over of the product.
input: 100-240 VAC, 50-60Hz, 150 mA
input: 100-240 VAC, 50-60Hz, 150 mA
reduced in buildings through walls, doors etc.
11
GB

12

Sommaire
Éléments de commande . . . . . . . . . . . . . . . . . . . . . . . . . . . . . . . . . . . . . . . . . . . . . . . . . . . . . . . . . . . . .2
Mettre des appareils en service . . . . . . . . . . . . . . . . . . . . . . . . . . . . . . . . . . . . . . . . . . . . . . . . . . . . . . .3
Vérifier le contenu de l’emballage . . . . . . . . . . . . . . . . . . . . . . . . . . . . . . . . . . . . . . . . . . . . . . . . . . . .3
Mettre le récepteur en marche . . . . . . . . . . . . . . . . . . . . . . . . . . . . . . . . . . . . . . . . . . . . . . . . . . . . .3
Insérer les accumulateurs . . . . . . . . . . . . . . . . . . . . . . . . . . . . . . . . . . . . . . . . . . . . . . . . . . . . . . . . . .3
Raccorder le bloc d'alimentation . . . . . . . . . . . . . . . . . . . . . . . . . . . . . . . . . . . . . . . . . . . . . . . . . . . . .4
Charger la batterie d’accumulateurs . . . . . . . . . . . . . . . . . . . . . . . . . . . . . . . . . . . . . . . . . . . . . . . . . .4
Mettre l’émetteur (caméra) en service . . . . . . . . . . . . . . . . . . . . . . . . . . . . . . . . . . . . . . . . . . . . . . . .4
Utiliser l’émetteur . . . . . . . . . . . . . . . . . . . . . . . . . . . . . . . . . . . . . . . . . . . . . . . . . . . . . . . . . . . . . . . . . .5
Allumer/éteindre l’émetteur (caméra) . . . . . . . . . . . . . . . . . . . . . . . . . . . . . . . . . . . . . . . . . . . . . . . .5
Orienter l’émetteur . . . . . . . . . . . . . . . . . . . . . . . . . . . . . . . . . . . . . . . . . . . . . . . . . . . . . . . . . . . . . . .5
Vision nocturne . . . . . . . . . . . . . . . . . . . . . . . . . . . . . . . . . . . . . . . . . . . . . . . . . . . . . . . . . . . . . . . . .5
Régler le volume du haut-parleur . . . . . . . . . . . . . . . . . . . . . . . . . . . . . . . . . . . . . . . . . . . . . . . . . . . .5
Utiliser le récepteur . . . . . . . . . . . . . . . . . . . . . . . . . . . . . . . . . . . . . . . . . . . . . . . . . . . . . . . . . . . . . . . .6
Allumer/éteindre le récepteur . . . . . . . . . . . . . . . . . . . . . . . . . . . . . . . . . . . . . . . . . . . . . . . . . . . . . . .6
Symbole de l’écran . . . . . . . . . . . . . . . . . . . . . . . . . . . . . . . . . . . . . . . . . . . . . . . . . . . . . . . . . . . . . .6
Désactivation de l’écran / Commutation audio/vidéo . . . . . . . . . . . . . . . . . . . . . . . . . . . . . . . . . . . . .6
Liaison vocale avec la chambre pour enfants . . . . . . . . . . . . . . . . . . . . . . . . . . . . . . . . . . . . . . . . . .6
Régler le volume . . . . . . . . . . . . . . . . . . . . . . . . . . . . . . . . . . . . . . . . . . . . . . . . . . . . . . . . . . . . . . . . .6
Agrandissement . . . . . . . . . . . . . . . . . . . . . . . . . . . . . . . . . . . . . . . . . . . . . . . . . . . . . . . . . . . . . . . . .6
Régler la luminosité . . . . . . . . . . . . . . . . . . . . . . . . . . . . . . . . . . . . . . . . . . . . . . . . . . . . . . . . . . . . . .7
Régler la sensibilité VOX . . . . . . . . . . . . . . . . . . . . . . . . . . . . . . . . . . . . . . . . . . . . . . . . . . . . . . . . . .7
Réglez l’activation par le son . . . . . . . . . . . . . . . . . . . . . . . . . . . . . . . . . . . . . . . . . . . . . . . . . . . . . . .7
Sélection de l’émetteur (caméra) . . . . . . . . . . . . . . . . . . . . . . . . . . . . . . . . . . . . . . . . . . . . . . . . . . . .7
Mise en service d’un autre émetteur (caméra) . . . . . . . . . . . . . . . . . . . . . . . . . . . . . . . . . . . . . . . . . .7
Annexe . . . . . . . . . . . . . . . . . . . . . . . . . . . . . . . . . . . . . . . . . . . . . . . . . . . . . . . . . . . . . . . . . . . . . . . . . . .8
Indications de sécurité . . . . . . . . . . . . . . . . . . . . . . . . . . . . . . . . . . . . . . . . . . . . . . . . . . . . . . . . . . . .8
Utilisation conforme aux dispositions . . . . . . . . . . . . . . . . . . . . . . . . . . . . . . . . . . . . . . . . . . . . . . . . .8
Lieu d’installation et informations relatives à la sécurité . . . . . . . . . . . . . . . . . . . . . . . . . . . . . . . . . .8
Appareil d’alimentation . . . . . . . . . . . . . . . . . . . . . . . . . . . . . . . . . . . . . . . . . . . . . . . . . . . . . . . . . . . .8
Accumulateurs . . . . . . . . . . . . . . . . . . . . . . . . . . . . . . . . . . . . . . . . . . . . . . . . . . . . . . . . . . . . . . . . . .9
Appareils médicaux . . . . . . . . . . . . . . . . . . . . . . . . . . . . . . . . . . . . . . . . . . . . . . . . . . . . . . . . . . . . . .9
Élimination des déchets . . . . . . . . . . . . . . . . . . . . . . . . . . . . . . . . . . . . . . . . . . . . . . . . . . . . . . . . . . .9
Hotline du service-clients . . . . . . . . . . . . . . . . . . . . . . . . . . . . . . . . . . . . . . . . . . . . . . . . . . . . . . . . . .9
En cas de problème : Questions et réponses . . . . . . . . . . . . . . . . . . . . . . . . . . . . . . . . . . . . . . . . . .9
Déclaration de conformité . . . . . . . . . . . . . . . . . . . . . . . . . . . . . . . . . . . . . . . . . . . . . . . . . . . . . . . . .10
Indications d’entretien . . . . . . . . . . . . . . . . . . . . . . . . . . . . . . . . . . . . . . . . . . . . . . . . . . . . . . . . . . . .10
Caractéristiques techniques . . . . . . . . . . . . . . . . . . . . . . . . . . . . . . . . . . . . . . . . . . . . . . . . . . . . . . .11
Garantie . . . . . . . . . . . . . . . . . . . . . . . . . . . . . . . . . . . . . . . . . . . . . . . . . . . . . . . . . . . . . . . . . . . . . . .11
FR
1

Éléments de commande
Éléments de commande
Moniteur (récepteur)
1 LED niveau de bruit
2 Bouton ON/OFF / Commutation audio/vidéo
3 Voyant niveau de charge
4 Raccordement pour bloc d'alimentation
5 Touche d’agrandissement
6 LED énergie
7 Touches de commande
- Touche menu : Ouverture du menu /
Sélection / Confirmation d’un réglage
- VOL▲: augmenter le volume, naviguer
vers le haut du menu, appuyer et tenir
appuyé en mode d’agrandissement pour
déplacer la section choisie vers le haut.
- VOL▼: réduire le volume, naviguer vers le
bas du menu, appuyer et tenir appuyé en
Caméra (émetteur)
1 LED infrarouges (éclairent l’objet dans l'obscu-
rité)
2 Voyant de service
3 Raccordement pour bloc d'alimentation
4 Bouton On/Off
5 Capteur de lumière
6 Objectif
2
mode d’agrandissement pour déplacer la
section choisie vers le bas.
- ◄ : déplacer vers la gauche dans les
menus, appuyer et tenir appuyé en mode
d’agrandissement pour déplacer la section
choisie vers la gauche.
- ► : déplacer vers la droite dans les menus,
appuyer et tenir appuyé en mode d’agrandissement pour déplacer la section choisie
vers la droite.
8 Touche conversation
9 Microphone
10 Couvercle du compartiment à accu.
11 Fixation pour cordon (non livré)
12 Haut-parleur
13 Support rabattable
7 ▲/VOL : augmenter le volume
8 : Touche d’enregistrement
9 ▼/VOL : diminuer le volume
10 Microphone
11 Haut-parleur
12 Articulation de réglage
13 Pied

Mettre des appareils en service
Mettre des appareils en service
a Important : veuillez lire d’abord les indications de sécurité page 8 avant de mettre l’appareil en
service.
Vérifier le contenu de l’emballage
La livraison inclut :
1 Unité moniteur (récepteur) 1 Unité caméra (émetteur)
1 Batterie d’accumulateurs rechargeables pour le récepteur 1 Bloc d'alimentation pour l’émetteur
1 Bloc d'alimentation pour le récepteur 1 Mode d’emploi
Mettre le récepteur en marche
Le récepteur peut être alimenté par un bloc d’alimentation ou la batterie d’accumulateurs. L’accumulateur inséré est chargé en cas de fonctionnement avec un bloc d’alimentation. En cas de branchement au réseau, il est recommandé d’avoir inséré la batterie d’accumulateurs, afin de garantir la noninterruption du service en cas de panne de réseau.
Insérer les accumulateurs
Installer la batterie d’accumulateurs comme illustré. Utilisez uniquement la batterie d’accumulateurs
livrée ou des batteries d’accumulateurs du même type.
1 Déverrouillez le couvercle du compartiment à accumulateurs.
2 Insérez la batterie d’accumulateurs et relier le connecteur de l’accumulateur à la prise de l’appa-
reil. La connexion est protégée contre l’inversion de polarité. Veillez à ce que le couvercle du
compartiment à accumulateurs ne puisse pas coincer le câble de raccordement.
3 Replacez le couvercle du compartiment à accumulateurs sur le boîtier.
4 Veillez à ce que le déverrouillage s’encastre à nouveau.
La batterie d’accumulateurs est chargée directement dans l’appareil lorsque le bloc d’alimentation est
branché. Le voyant du niveau de charge brille pendant le chargement. En cas de faible puissance
restante de la batterie d’accumulateurs, le voyant du niveau de charge clignote. Il faut alors charger
la batterie d’accumulateurs. Le voyant du niveau de charge des accumulateurs s’éteint quand la
batterie des accumulateurs est complètement chargée. La durée du fonctionnement alimenté par
accumulateurs étant limitée, il est recommandé de faire fonctionner le récepteur avec le bloc
d’alimentation.
Remarque : En cas de non-utilisation prolongée, veuillez retirer la batterie d’accumulateurs pour
éviter l’endommagement de l’appareil par un écoulement de cette dernière.
FR
3

Mettre des appareils en service
Raccorder le bloc d'alimentation
Raccordez le récepteur comme illustré sur le croquis. Pour des raisons de sécurité, n’utilisez que le
bloc d’alimentation livré.
Prise secteur
Charger la batterie d’accumulateurs
Après avoir inséré la batterie d’accumulateurs, puis raccordé le bloc d’alimentation, appuyez sur le
bouton ON/OFF pour allumer le récepteur. Le symbole de l’accumulateur sur l’écran vous informe sur
l’état de la charge.
Aucune batterie d’accumulateurs insérée ou batterie d’accumulateurs mal insérée / Mode
bloc d’alimentation.
- Insérez la batterie d’accumulateurs et chargez celle-ci pendant au moins 30 minutes.
La batterie d’accumulateurs n’a plus qu’une faible capacité.
- Chargez la batterie d’accumulateurs pendant au moins 30 minutes.
La batterie d’accumulateurs est complètement chargée.
Indications :
• Un chargement complet de la batterie d’accumulateurs dure env. 12 heures.
• La durée de chargement se prolonge, si le récepteur est allumé.
• La durée de fonctionnement avec la batterie d’accumulateurs dépend des réglages choisis et de
l’âge de la batterie d’accumulateurs.
Mettre l’émetteur (caméra) en service
Raccordez l’émetteur (caméra) comme illustré sur le croquis. Pour des raisons de sécurité, n’utilisez
que le bloc d’alimentation livré.
Prise secteur
4

Utiliser l’émetteur
Utiliser l’émetteur
Avant chaque utilisation, vérifiez le fonctionnement parfait de l’émet- teur et du récepteur.
Allumer/éteindre l’émetteur (caméra)
Appuyez et maintenez le bouton ON/OFF pendant env. 3 s.
Le voyant de service clignote jusqu’à ce que la liaison soit établie avec le récepteur. Puis, il brille en
permanence.
Pour éteindre, appuyez et maintenez de nouveau le bouton ON/OFF pendant env. 3 s.
Orienter l’émetteur
a Attention : placez l’émetteur au minimum à 1 m de distance des autres appareils électroniques
pour éviter des perturbations mutuelles. Orient- ez la partie supérieure de l’émetteur vers le bébé ou
l’objet à surveiller. Vérifiez que le bébé ou l’objet apparaît sur le récepteur.
Vision nocturne
L’émetteur est équipé de 6 diodes infrarouges. Ceci permet de transmettre des images de zones non
éclairées. La fonction vision nocturne est activée automatiquement, dès que les conditions de lumière
le requièrent.
Si la fonction vision nocturne est activée, l’image présentée sur le récepteur est en noir et blanc.
Régler le volume du haut-parleur
Vous pouvez régler le volume de la voix sur l’émetteur (caméra) dans la chambre pour enfants.
Appuyez sur ▲/VOL pour augmenter le volume ou sur ▼/VOL pour diminuer le volume.
FR
5

Utiliser le récepteur
Utiliser le récepteur
a Attention : placez le récepteur au minimum à 1 m de distance des autres appareils
électroniques pour éviter des perturbations mutuelles.
Avant chaque utilisation, vérifiez le fonctionnement parfait de l’émet- teur et du récepteur.
Allumer/éteindre le récepteur
Appuyez et maintenez le bouton ON/OFF pendant env. 3 s.
Le voyant de service clignote jusqu’à ce que la liaison soit établie avec l’émetteur (caméra). Puis il
brille en permanence et vous voyez l’image sur l’écran.
Pour éteindre, appuyez et maintenez de nouveau le bouton ON/OFF pendant env. 3 s.
Symbole de l’écran
Voyant de la liaison : plus le nombre de barres est grand, meilleure est la liaison.
- La liaison avec l’émetteur (caméra) est interrompue.
- Le récepteur chercher l’émetteur (caméra).
x
Affichage de la liaison actuelle (x = numéro de l‘émetteur : 1 ... 4).
L’agrandissement est activé.
Le volume est réglé sur « zéro ».
L’activation par le son est activée.
État de charge de la batterie.
Désactivation de l’écran / Commutation audio/vidéo
Vous pouvez désactiver l’écran du récepteur pour économiser de l’énergie. Vous pouvez continuer à
entendre les bruits provenant de la chambre pour enfants.
Appuyez brièvement sur le bouton ON/OFF.
Pour réactiver le l’écran, appuyez à nouveau brièvement sur le bouton ON/OFF.
Liaison vocale avec la chambre pour enfants
Appuyez sur la touche conversation. Le haut-parleur de l’émetteur (caméra) est activé et vous pouvez parler à votre enfant ou à une autre personne dans la chambre où se trouve la caméra. Vous ne
pouvez entendre aucun bruit provenant de la chambre pour enfants pendant que la touche conver-
sation est appuyée.
Régler le volume
Appuyez sur VOL▲ pour augmenter le volume ou sur VOL▼ pour diminuer le volume. Quand le
volume est réglé sur « zéro », s’affiche sur l’écran.
Agrandissement
Appuyez sur pour activer l’agrandissement.
Pour déplacer la section choisie, appuyez sur et maintenez appuyé VOL▲ (vers le haut), VOL▼
6

Utiliser le récepteur
(vers le bas), ◄ (vers la gauche) ou ► (vers la droite).
Appuyez sur encore une fois pour désactiver l’agrandissement.
Régler la luminosité
Appuyez sur la touche Menu.
Sélectionnez avec VOL▲ ou VOL▼.
Réglez la luminosité souhaitée avec ◄ ou ►.
Appuyez sur la touche Menu.
Régler la sensibilité VOX
Vous pouvez régler la sensibilité du microphone sur le récepteur (caméra). Plus la sensibilité est
haute, plus les bruits faibles seront transmis.
Appuyez sur la touche Menu.
Sélectionnez avec VOL▲ ou VOL▼.
Réglez la sensibilité souhaitée avec ◄ ou ► (sensibilité supérieure : ).
Appuyez sur la touche Menu.
Prière de noter que la sélection du niveau de sensibilité le plus élevé (5) a pour effet de primer sur la
fonction d’activation par le son ; l’écran de l’unité parents restera donc actif en permanence.
Le réglage par défaut est niveau 4.
Réglez l’activation par le son
Le récepteur surveille les bruits en permanence dans la chambre pour enfants. Quand l’activation par
le son est activée, l’écran s’éteint pour économiser de l’énergie, si aucun bruit n’est détecté dans les
50 secondes. L’écran est rallumé dès qu’un bruit est détecté.
Appuyez sur la touche Menu.
Sélectionnez avec VOL▲ ou VOL▼.
Activer ( ) ou désactiver ( ) l’activation par le son avec ◄ ou ►.
Appuyez sur la touche Menu.
Sélection de l’émetteur (caméra)
Si vous avez enregistré plusieurs émetteurs (caméras) sur votre récepteur, vous pouvez sélectionner
respectivement la caméra active ou un changement automatique.
Appuyez sur la touche Menu.
Sélectionnez avec VOL▲ ou VOL▼.
Changez la caméra active (1, 2, 3 ou 4) avec ◄ ou ► ou réglez le changement automatique ( ).
En cas de changement automatique, les émetteurs (caméras) enregistrés sont présentés dans l’ordre
chronologique 1 ... 4.
Appuyez sur la touche Menu.
Mise en service d’un autre émetteur (caméra)
Le récepteur offre la possibilité d’enregistrer simultanément jusqu’à quatre émetteurs (caméras) et de
commuter entre ceux-ci ou d’effectuer un changement automatique.
La caméra livrée est déjà enregistrée sur votre récepteur.
Appuyez sur la touche Menu.
Sélectionnez avec VOL▲ ou VOL▼ et appuyez sur la touche Menu.
Suivez ensuite la description jointe au nouvel émetteur (caméra).
FR
7

Annexe
Annexe
Indications de sécurité
Lisez ce mode d’emploi entièrement avec soin et conservez-le bien.
Utilisation conforme aux dispositions
Le système de surveillance a été développé pour la surveillance de pièces. Depuis son emplacement, l’émetteur transmet des voix et des images au récepteur. Toute autre utilisation est considérée
comme non conforme aux dispositions.
L’utilisation de l’appareil ne remplace pas la surveillance en personne, par exemple, d’un enfant. L’utilisateur n’est pas désengagé de sa responsabilité personnelle. Les modifications ou transformations
arbitraires sont interdi- tes. N’ouvrez l’appareil vous-même en aucun cas et n’effectuez aucune tentative de réparation de votre propre chef.
Lieu d’installation et informations relatives à la sécurité
• Ne placez jamais l’émetteur sur le lit ou dans le parc d’un bébé/enfant.
• Assurez-vous que l’émetteur et le câble secteur se situent toujours hors de portée de
bébés/d’enfants, c.-à-d. au minimum à un mètre de distance.
• Veillez à l’aération suffisante de tous les composants pendant le fonctionnement. Ne posez pas
de coussins, de serviettes ou d’autres objets similaires sur les appareils.
• Les appareils ne sont pas appropriés pour l’utilisation médicale. Les avertisseurs ou les tonalités
des appareils de surveillance du bruit cardiaque ou respiratoire ne peuvent pas être transmis.
• Le lieu d’installation exerce une influence décisive pour le fonction- nement parfait. Gardez une
distance minimale d’un mètre par rap- port aux appareils électroniques, tels que micro-ondes ou
appareils hifi, pour éviter des perturbations/influences mutuelles.
• Evitez les sollicitations occasionnées par la fumée, la poussière, les secousses, les produits chi-
miques, l’humidité, la chaleur ou les ray- ons directs du soleil. N’utilisez pas les appareils dans
des zones pré- sentant des risques d’explosion.
Appareil d’alimentation
a Attention : utilisez seulement les blocs d'alimentation livrés, car d’au- tres blocs d'alimentation
peuvent endommager le système de surveil- lance. Ne bloquez pas l’accès au bloc d’alimentation
par des meubles ou d’autres objets.
Pour le fonctionnement avec un bloc d’alimentation, veillez à l’état parfait des câbles et des fiches.
Les câbles pliés ou élimés sont très dangereux !
Le bloc d’alimentation livré répond aux exigences
de l’Union européenne en matière d’éco-conception
(directive 2005/32/CE). Cela signifie que, tant en service
qu’au repos, la consommation électrique est nettement
plus faible par rapport aux blocs d’alimentation de modèles
plus anciens.
8

Annexe
Accumulateurs
a Attention : ne jetez pas les accumulateurs ou les piles dans le feu. Utili- sez seulement les piles
ou les accumulateurs prescrits pour l’appareil ! Veillez à respecter la bonne polarité !
Appareils médicaux
a Attention : n’utilisez pas les appareils à proximité d’appareils médicaux. Une influence n’est
pas totalement exclue.
Élimination des déchets
Si vous souhaitez éliminer votre appareil, apportez-le au centre de collecte de votre
commune en charge de l’élimination des déchets (par exemple : déchetterie). Selon
la loi sur les appareils électriques et électroniques, les propriétaires d’appareils usagés sont dans l’obligation de séparer les vieux appareils électriques et électroniques
et les autres déchets. Le symbole ci-contre sig- nifie que vous ne devez en aucun
cas jeter l’appareil dans les ordures ménagères ! Mise en danger de la santé et de
l’environnement par les accumulateurs et les piles !
Ne pas ouvrir, endommager, ingérer les accumulateurs et les piles ou les laisser
accéder à l’environnement. Ils peuvent conte- nir des métaux lourds toxiques et polluants. Vous êtes dans l’obligation d’éliminer en toute sécurité les accu- mulateurs et
les piles dans le commerce distributeur de piles ainsi qu’auprès de centres de collecte compétents, qui mettent des bacs correspondants à votre disposition. L’élimination des déchets est gratuite. Les symboles ci-après signifient que vous ne devez
en aucun cas jeter les accumulateurs et les piles dans les ordures ménagères et
ceux-ci doivent être recyclés via des centres de collecte.
Les matériaux d’emballage sont à éliminer selon les consignes locales.
Hotline du service-clients
Si vous rencontrez des problèmes avec votre système de surveillance, con- trôlez tout d’abord les
indications suivantes. En cas de problème technique, vous pouvez vous adresser à notre service
d’assistance téléphonique. Le numéro de téléphone peut être trouvée sur notre site internet :
www.audioline.de
Pour les demandes de garantie, veuillez s'il vous plaît contacter votre reven- deur. La période de
garantie est de 2 ans.
En cas de problème : Questions et réponses
Aucun fonctionnement
• L’émetteur et/ou le récepteur ne sont pas allumés.
• La batterie d’accumulateurs est vide ou défectueuse.
• Les adaptateurs secteur ne sont pas raccordés.
Aucune réception
• L’émetteur et le récepteur ne sont pas enregistrés.
• La distance entre l’émetteur et le bébé, par exemple, est trop grande. Respectez la distance
minimale d’un mètre.
• La distance entre le récepteur et l’émetteur est trop grande.
• Le réglage de la sensibilité aux bruits est trop bas.
FR
9

Annexe
Perturbations de la réception
• La distance entre le récepteur et l’émetteur est trop grande.
• La puissance des accumulateurs est trop faible.
• D’autres appareils électroniques perturbent le champ de transmission.
Sifflement (rétroaction)
• Augmentez l’éloignement entre le récepteur et l’émetteur.
• Réduisez le volume du récepteur.
Bruit de fond
• La puissance des accumulateurs est trop faible.
Transmission de l’image, mais pas du son
• Le réglage du volume est trop faible.
L’image est en noir et blanc
• La fonction vision nocturne est activée.
La batterie d’accumulateurs du récepteur n’est pas chargée
• L’adaptateur secteur n’est pas raccordé.
Déclaration de conformité
Cet appareil répond aux exigences de la directive UE :
Directive 1999/5/CE concernant les équipements hertziens et les équipe- ments terminaux de télécommunications et la reconnaissance mutuelle de leur conformité. La conformité avec la directive
citée ci-avant est confirmée par le marquage CE apposé sur cet appareil.
Pour obtenir la déclaration de conformité complète, veuillez la télécharger gratuitement sur notre site
internet : www.audioline.de
Indications d’entretien
• Nettoyez les surfaces du boîtier avec un chiffon doux et sans pelu- che.
• N’utilisez aucun nettoyant ni solvant.
10

Annexe
Caractéristiques techniques
Caméra (émetteur) Prise femelle : 6 V DC
Capteur : 1 capteur de veilleuse
Diodes IR : 4
Moniteur (récepteur) Ecran : affichage 2" LC / 176 x 220 px
Prise femelle : 6 V DC
Alimentation électrique (récepteur) Bloc d'alimentation,
Premier chargement de la batterie jusqu’à 16 heures
Alimentation électrique (émetteur) Bloc d'alimentation,
Portée jusqu’à 150 mètres dans des conditions optimales. Dans
Plage de fréquences 2407,5 - 2475 MHz
Température ambiante autorisée de 0° C à 40° C
Garantie
Les appareils AUDIOLINE sont fabriqués et testés selon les procédés de production les plus modernes. Les matériaux choisis et la haute technologie assurent un fonctionnement parfait et une longue
durée de vie.
La durée de garantie est de 24 mois à partir de la date d’achat. La garantie ne s’applique pas à la
pile rechargeable standard ou aux packs de piles rechargeables utilisés dans le produit.
Pendant la période de garantie, tous les défauts dus à des erreurs de maté- riel et de fabrication sont
réparés gratuitement. La garantie expire en cas d’interventions de l’acheteur ou d’un tiers. Les dommages engendrés par une manipulation ou une utilisation inadéquate, par un mauvais emplace- ment
ou rangement, par un raccordement ou une installation inadéquate ainsi qu’en cas de force majeure
ou d’autres influences extérieures ne sont pas inclus dans la prestation de garantie. En cas de réclamations, nous nous réservons le droit de réparer ou de remplacer les pièces défectueuses ou
d’échanger l’appareil. Les pièces ou appareils échangés deviennent notre propriété. Tout droit de prétention à des dédommagements est exclu, sauf
si ce dommage est basé sur une préméditation ou une négligence grave du fabricant.
Si votre appareil comporte cependant un défaut pendant la période de garantie, veuillez vous adresser exclusivement au magasin dans lequel vous avez acheté votre appareil AUDIOLINE en présentant votre bon d’achat. Tous les droits de garantie basés sur ces dispositions ne peuvent être revendiqués qu’auprès de votre revendeur. A l’échéance des deux ans après l’achat et le transfert de nos
produits, les législations en matière de garantie ne sont plus applicables.
entrée : 100-240 VAC, 50-60Hz, 150 mA
sortie : 6 VDC, 600 mA
ou batterie d’accumulateurs NiMh 3,6 V
entrée : 100-240 VAC, 50-60Hz, 150 mA
sortie : 6 VDC, 600 mA
les bâtiments, la portée est réduite par les murs, portes
etc.
11
FR

12

Indice
Comandi . . . . . . . . . . . . . . . . . . . . . . . . . . . . . . . . . . . . . . . . . . . . . . . . . . . . . . . . . . . . . . . . . . . . . . . . . .2
Messa in funzione dell’apparecchio . . . . . . . . . . . . . . . . . . . . . . . . . . . . . . . . . . . . . . . . . . . . . . . . . . .3
Controllo del contenuto della confezione . . . . . . . . . . . . . . . . . . . . . . . . . . . . . . . . . . . . . . . . . . . . . .3
Messa in funzione del ricevitore . . . . . . . . . . . . . . . . . . . . . . . . . . . . . . . . . . . . . . . . . . . . . . . . . . . .3
Inserimento del battery pack . . . . . . . . . . . . . . . . . . . . . . . . . . . . . . . . . . . . . . . . . . . . . . . . . . . . . . . .3
Collegamento dell’alimentatore . . . . . . . . . . . . . . . . . . . . . . . . . . . . . . . . . . . . . . . . . . . . . . . . . . . . . .4
Carica del battery pack . . . . . . . . . . . . . . . . . . . . . . . . . . . . . . . . . . . . . . . . . . . . . . . . . . . . . . . . . . . .4
Messa in funzione dell'emittente (videocamera) . . . . . . . . . . . . . . . . . . . . . . . . . . . . . . . . . . . . . . . . .4
Uso dell’emittente (videocamera) . . . . . . . . . . . . . . . . . . . . . . . . . . . . . . . . . . . . . . . . . . . . . . . . . . . . .5
Accensione/spegnimento dell’emittente (videocamera) . . . . . . . . . . . . . . . . . . . . . . . . . . . . . . . . . . .5
Orientamento dell’emittente (videocamera) . . . . . . . . . . . . . . . . . . . . . . . . . . . . . . . . . . . . . . . . . . . .5
Visione notturna . . . . . . . . . . . . . . . . . . . . . . . . . . . . . . . . . . . . . . . . . . . . . . . . . . . . . . . . . . . . . . . . .5
Regolazione del volume dell'altoparlante . . . . . . . . . . . . . . . . . . . . . . . . . . . . . . . . . . . . . . . . . . . . .5
Uso del ricevitore . . . . . . . . . . . . . . . . . . . . . . . . . . . . . . . . . . . . . . . . . . . . . . . . . . . . . . . . . . . . . . . . . .6
Accensione/spegnimento del ricevitore . . . . . . . . . . . . . . . . . . . . . . . . . . . . . . . . . . . . . . . . . . . . . . .6
Simboli sul display . . . . . . . . . . . . . . . . . . . . . . . . . . . . . . . . . . . . . . . . . . . . . . . . . . . . . . . . . . . . . . .6
Spegnimento del display / commutazione audio/video . . . . . . . . . . . . . . . . . . . . . . . . . . . . . . . . . . . .6
Collegamento vocale con la camera del bebè . . . . . . . . . . . . . . . . . . . . . . . . . . . . . . . . . . . . . . . . .6
Impostazione del volume . . . . . . . . . . . . . . . . . . . . . . . . . . . . . . . . . . . . . . . . . . . . . . . . . . . . . . . . . .6
Ingrandimento . . . . . . . . . . . . . . . . . . . . . . . . . . . . . . . . . . . . . . . . . . . . . . . . . . . . . . . . . . . . . . . . . .6
Regolazione della luminosità del display . . . . . . . . . . . . . . . . . . . . . . . . . . . . . . . . . . . . . . . . . . . . . .7
Regolazione della sensibilità ai rumori . . . . . . . . . . . . . . . . . . . . . . . . . . . . . . . . . . . . . . . . . . . . . . . .7
Impostazione dell’attivazione dei rumori . . . . . . . . . . . . . . . . . . . . . . . . . . . . . . . . . . . . . . . . . . . . . . .7
Scelta dell’emittente (videocamera) . . . . . . . . . . . . . . . . . . . . . . . . . . . . . . . . . . . . . . . . . . . . . . . . . .7
Messa in funzione di un’altra emittente (videocamera) . . . . . . . . . . . . . . . . . . . . . . . . . . . . . . . . . . .7
Appendice . . . . . . . . . . . . . . . . . . . . . . . . . . . . . . . . . . . . . . . . . . . . . . . . . . . . . . . . . . . . . . . . . . . . . . . .8
Indicazioni di sicurezza . . . . . . . . . . . . . . . . . . . . . . . . . . . . . . . . . . . . . . . . . . . . . . . . . . . . . . . . . . . .8
Utilizzo secondo le disposizioni . . . . . . . . . . . . . . . . . . . . . . . . . . . . . . . . . . . . . . . . . . . . . . . . . . . . .8
Luogo di installazione e informazioni di sicurezza . . . . . . . . . . . . . . . . . . . . . . . . . . . . . . . . . . . . . .8
Alimentatore di rete . . . . . . . . . . . . . . . . . . . . . . . . . . . . . . . . . . . . . . . . . . . . . . . . . . . . . . . . . . . . . . .8
Accumulatori (batterie) . . . . . . . . . . . . . . . . . . . . . . . . . . . . . . . . . . . . . . . . . . . . . . . . . . . . . . . . . . . .9
Apparecchi medicali . . . . . . . . . . . . . . . . . . . . . . . . . . . . . . . . . . . . . . . . . . . . . . . . . . . . . . . . . . . . . .9
Smaltimento . . . . . . . . . . . . . . . . . . . . . . . . . . . . . . . . . . . . . . . . . . . . . . . . . . . . . . . . . . . . . . . . . . . .9
Linea diretta di assistenza tecnica . . . . . . . . . . . . . . . . . . . . . . . . . . . . . . . . . . . . . . . . . . . . . . . . . . .9
Qualora si verificassero dei problemi: domande e risposte . . . . . . . . . . . . . . . . . . . . . . . . . . . . . . .9
Dichiarazione di conformità . . . . . . . . . . . . . . . . . . . . . . . . . . . . . . . . . . . . . . . . . . . . . . . . . . . . . . . .10
Consigli per la cura . . . . . . . . . . . . . . . . . . . . . . . . . . . . . . . . . . . . . . . . . . . . . . . . . . . . . . . . . . . . . .10
Dati tecnici . . . . . . . . . . . . . . . . . . . . . . . . . . . . . . . . . . . . . . . . . . . . . . . . . . . . . . . . . . . . . . . . . . . . .11
Garanzia . . . . . . . . . . . . . . . . . . . . . . . . . . . . . . . . . . . . . . . . . . . . . . . . . . . . . . . . . . . . . . . . . . . . . .11
IT
1

Comandi
Comandi
Unità monitor (ricevitore)
1 LED livello di rumore
2 Tasto on/off / commutazione video/audio
3 Spia di carica della batteria
4 Collegamento per alimentatore
5 Tasto di ingrandimento
6 Spia di funzionamento
7 Tasti di comando
- Tasto menu: Apertura del menu/selezione/conferma di un’impostazione
- VOL▲: per aumentare il volume, serve per
spostarsi verso l’alto nei menu, nella modalità di ingrandimento premere e tenere premuto per spostare il settore verso l’alto
- VOL▼: per ridurre il volume, serve per
spostarsi verso il basso nei menu, nella pre-
Unità videocamera (emittente)
1 LED a infrarossi (illuminano l’oggetto nell’oscuri-
tà)
2 Spia di funzionamento
3 Collegamento per alimentatore
4 Interruttore on / off
5 Sensore di luminosità
6 Obiettivo
2
mere e mantenere premuto per spostare il
settore verso il basso.
- ◄ : serve per spostarsi a sinistra nei menu,
nella modalità di ingrandimento premere e
mantenere premuto per spostare il settore
verso sinistra.
- ► : serve per spostarsi a destra nei menu,
nella modalità di ingrandimento premere e
mantenere premuto per spostare il settore
verso destra.
8 Tasto di messa in linea
9 Microfono
10 Coperchio vano batterie
11 Fissaggio per cinturino (non fornito)
12 Altoparlante
13 Supporto ripiegabile
7 ▲/VOL: per aumentare il volume
8 : tasto di chiamata
9 ▼/VOL: per ridurre il volume
10 Microfono
11 Altoparlante
12 Giunto di regolazione
13 Supporto

Messa in funzione dell’apparecchio
Messa in funzione dell’apparecchio
a Attenzione: Si prega di leggere in primo luogo le indicazioni di sicurezza a pagina 8 prima di
mettere in funzione l'apparecchio.
Controllo del contenuto della confezione
Fanno parte della confezione:
1 Unità monitor (ricevitore) 1 Unità videocamera (emittente)
1 Battery pack ricaricabile per il ricevitore 1 Alimentatore per l’emittente
1 Alimentatore per il ricevitore 1 Istruzioni per l’uso
Messa in funzione del ricevitore
Il ricevitore può essere messo in funzione con l’alimentatore o con il battery pack. Mentre si utilizza
l’alimentatore, il battery pack inserito si carica. In caso di utilizzo con l'alimentatore si consiglia di
avere il battery pack inserito in modo tale da garantire un funzionamento ininterrotto in caso di caduta
di tensione.
Inserimento del battery pack
Inserire il battery pack come da illustrazione. Utilizzare solo il battery pack fornito o
battery pack di ugual modello.
1 Sganciare il coperchio del vano batterie.
2 Inserire il battery pack e collegare la spina dell’accumulatore con la presa nell’apparecchio. La
spina a innesto è a prova di errore.
Accertarsi che il cavo di collegamento non possa essere incastrato dal coperchio del vano batterie.
3 Riposizionare il coperchio del vano batterie sull’involucro.
4 Accertarsi che si agganci nuovamente.
Il battery pack si carica direttamente nell’apparecchio quando l’alimentatore è collegato.
Durante la carica, la spia di carica della batteria è illuminata. Se la carica residua del battery pack è
al minimo, la spia di carica della batteria lampeggia. È, quindi, necessario caricare il battery pack.
La spia che indica lo stato di carica della batteria si spegne nel momento in cui il battery pack è
completamente carico. Siccome la durata di funzionamento con batteria è limitata, si consiglia,
nel limite del possibile, di far funzionare il ricevitore con l’alimentatore.
Nota: In caso di inutilizzo prolungato, estrarre il battery pack onde evitare danni all’apparecchio
dovuti a una fuoriuscita del liquido dal battery pack.
IT
3

Messa in funzione dell’apparecchio
Collegamento dell’alimentatore
Collegare il ricevitore come da illustrazione. Per motivi di sicurezza, utilizzare solo l’alimentatore fornito.
Presa
Carica del battery pack
Dopo aver inserito il battery pack e aver collegato l’alimentatore, premere il tasto on/off per accendere il ricevitore. Il simbolo della batteria sul display informa sullo stato di carica.
Nessun battery pack inserito oppure battery pack inserito erroneamente / funzionamento con
alimentatore.
- Inserire il battery pack e caricarlo per almeno 30 minuti.
Il battery pack ha una carica residua minima.
- Caricare il battery pack per almeno 30 minuti.
Il battery pack è completamente carico.
Avvertenze:
• Una carica completa del battery pack dura circa 12 ore.
• Il tempo di carica si prolunga se il ricevitore è acceso.
• La durata di funzionamento con battery pack dipende dalle impostazioni selezionate e dall’età del
battery pack.
Messa in funzione dell'emittente (videocamera)
Collegare l’emittente (videocamera) come da illustrazione. Per motivi di sicurezza utilizzare solo l’alimentatore fornito.
Presa
4

Uso dell’emittente (videocamera)
Uso dell’emittente (videocamera)
Verificare prima di ciascun utilizzo che emittente (videocamera) e ricevitore funzionino perfettamente.
Accensione/spegnimento dell’emittente (videocamera)
Premere il tasto on/off e mantenerlo premuto per circa 3 s.
La spia di funzionamento lampeggia, finché non viene instaurato il collegamento con il ricevitore.
Dopodiché si illumina permanentemente.
Per spegnere l’emittente premere il tasto on/off e mantenerlo premuto per circa 3 s.
Orientamento dell’emittente (videocamera)
a Attenzione: Posizionare l’emittente a una distanza minima di 1 m da altri apparecchi elettronici,
poiché altrimenti potrebbero verificarsi delle interferenze reciproche. Orientare la parte superiore
dell'emittente verso il bebè o l'oggetto da sorvegliare. Verificare che il bebè o l’oggetto venga
visualizzato sul ricevitore.
Visione notturna
L’emittente (videocamera) è dotata di diodi a infrarossi. In tal modo è possibile trasmettere immagini
da aree non illuminate. La funzione di visione notturna si attiva automaticamente non appena le condizioni di luce lo richiedano.
A funzione di visione notturna attivata, l’immagine appare sul ricevitore in bianco e nero.
Regolazione del volume dell'altoparlante
Sull'emittente (videocamera) è possibile regolare il volume di riproduzione della voce nella camera
del bebè. Premere ▲/VOL per aumentare il volume o ▼/VOL per ridurlo.
IT
5

Uso del ricevitore
Uso del ricevitore
a Attenzione: Posizionare il ricevitore a una distanza minima di 1 m da altri apparecchi elettronici,
poiché altrimenti potrebbero verificarsi delle interferenze reciproche.
Verificare prima di ciascun utilizzo che emittente (videocamera) e ricevitore funzionino perfettamente.
Accensione/spegnimento del ricevitore
Premere il tasto on/off e mantenerlo premuto per circa 3 s.
La spia di funzionamento lampeggia, finché non viene instaurato il collegamento con l’emittente
(videocamera). Dopodiché si illumina permanentemente ed è possibile vedere l’immagine sul monitor.
Per spegnere il ricevitore premere il tasto on/off e mantenerlo premuto per circa 3 s.
Simboli sul display
Spia di collegamento: Più barrette appaiono e migliore è il collegamento.
- Il collegamento con l’emittente (videocamera) è interrotto.
- Il ricevitore cerca l’emittente (videocamera).
x
Visualizzazione del collegamento attuale (x = numero dell‘emittente: 1…4).
Ingrandimento attivato.
Volume impostato su “zero”.
Funzione di attivazione dei rumori attivata.
Stato di carica della batteria.
Spegnimento del display / commutazione audio/video
È possibile spegnere il display del ricevitore per risparmiare energia. Si continueranno a sentire
i rumori dalla camera del bebè.
Premere brevemente il tasto on/off.
Per riattivare il display premere di nuovo brevemente il tasto on/off.
Collegamento vocale con la camera del bebè
Premere e mantenere premuto il tasto di conversazione. Si attiva l’altoparlante sull’emittente (videocamera) ed è possibile parlare con il proprio bimbo o con un'altra persona nel locale in cui si trova la
videocamera. Mentre il tasto di conversazione è premuto si possono sentire i rumori provenienti
dalla camera del bebè.
Impostazione del volume
Premere VOL▲ per aumentare il volume o VOL▼per ridurlo. Se il volume è impostato su “zero”
viene evidenziato sul display.
Ingrandimento
Premere per attivare la funzione di ingrandimento.
Per spostare il settore premere e mantenere premuto VOL▲(verso l’alto), VOL▼(verso il baso), ◄
(a sinistra) o ► (a destra).
6

Uso del ricevitore
Premere di nuovo per disattivare la funzione di ingrandimento.
Regolazione della luminosità del display
Premere il tasto menu.
Selezionare con VOL▲ o VOL▼.
Con ◄ o ► impostare la luminosità desiderata.
Premere il tasto menu.
Regolazione della sensibilità ai rumori
È possibile regolare la sensibilità del microfono nell’emittente (videocamera). Maggiore è la sensibilità
e meglio vengono trasmessi i rumori più lievi.
Premere il tasto menu.
Selezionare con VOL▲ o VOL▼.
Con ◄ o ► impostare la sensibilità desiderata (sensibilità massima: ).
Premere il tasto menu.
Da notare che selezionando il livello massimo di sensibilità (5), si disattiverà la funzione di
attivazione rumori e il display sull’unità genitori rimarrà costantemente acceso.
L’impostazione di default è il livello 4.
Impostazione dell’attivazione dei rumori
Il ricevitore tiene costantemente monitorati i rumori nella camera del bebè. Se la funzione di attivazione rumori è attiva, il display si spegne per risparmiare energia qualora nell’arco di 50 secondi non
venga rilevato alcun rumore.
Non appena viene rilevato un rumore, il display si riattiva.
Premere il tasto menu.
Selezionare con VOL▲ o VOL▼.
Con ◄ o ► attivare ( ) o disattivare ( ) la funzione di attivazione rumori.
Premere il tasto menu.
Scelta dell’emittente (videocamera)
Qualora siano state collegate più emittenti (videocamere) al proprio ricevitore, è possibile selezionare
la videocamera di volta in volta attiva oppure un avvicendamento automatico.
Premere il tasto menu.
Selezionare con VOL▲ o VOL▼.
Alternare con ◄ o ► la videocamera attiva (1, 2, 3 o 4) oppure attivare l’avvicendamento automatico ( ). In caso di avvicendamento automatico, le emittenti (videocamere) collegate appaiono nella
sequenza cronologica 1…4.
Premere il tasto menu.
Messa in funzione di un’altra emittente (videocamera)
Il ricevitore offre la possibilità di collegare contemporaneamente fino a quattro emittenti (videocamere) e di passare dall’una all’altra o di eseguire un avvicendamento automatico.
La videocamera fornita è già collegata al ricevitore.
Premere il tasto menu.
Selezionare con con VOL▲ o VOL▼e premere il tasto menu.
Seguire nella procedura successiva la descrizione allegata alla nuova emittente (videocamera).
IT
7

Appendice
Appendice
Indicazioni di sicurezza
Leggere attentamente le istruzioni per l’uso e conservarle con cura.
Utilizzo secondo le disposizioni
Il sistema di monitoraggio è stato concepito per la sorveglianza di ambienti. L'emittente (videocamera) trasmette al ricevitore, dalla sua posizione, suoni e immagini. Qualsiasi altro utilizzo non è conforme alle disposizioni.
L’uso dell’apparecchio non sostituisce la sorveglianza personale, p.es. di un bambino. L’utente non è
esonerato dalla sua responsabilità personale. Non sono consentite modifiche o trasformazioni arbitrarie. Non aprire in alcun caso l’apparecchio da sé e non eseguire personalmente alcun tentativo di
riparazione.
Luogo di installazione e informazioni di sicurezza
• Non posizionare mai l’emittente (videocamera) nel lettino o nel box di un neonato/bambino.
• Accertarsi che l’emittente (videocamera) e il cavo di rete si trovino sempre fuori dalla portata di
neonati/bambini, ossia ad almeno un metro di distanza.
• Fare in modo che durante il funzionamento tutti i componenti siano ben areati. Non mettere cus-
cini, asciugamani od oggetti similari sugli apparecchi.
• Gli apparecchi non sono idonei ad essere utilizzati in ambito medico. I segnali di allarme o acus-
tici emessi da apparecchi di monitoraggio della respirazione o cardiaci non possono essere trasmessi.
• Il luogo di installazione influisce in modo determinante sul perfetto funzionamento. Mantenere
una distanza di almeno un metro da apparecchi elettronici, come p.es. forni a microonde o apparecchi HiFi, poiché altrimenti potrebbero verificarsi influssi/interferenze reciproci.
• Evitare esposizioni a fumo, polvere, urti, prodotti chimici, umidità, calore eccessivo o radiazioni
solari dirette. Non utilizzare gli apparecchi in aree con pericolo di esplosione.
Alimentatore di rete
a Attenzione: Utilizzare soltanto gli alimentatori forniti, poiché alimentatori di altro tipo potrebbero
danneggiare il sistema di monitoraggio. Non bloccare l’accesso all’alimentatore con mobili o altri
oggetti.
Fare attenzione, durante il funzionamento con alimentatore, che cavo e spina siano in perfette condizioni. I cavi piegati o logorati sono pericolosissimi!
L’alimentatore di rete fornito in dotazione è conforme ai requisiti
sul design ecologico definiti dall’Unione Europea (direttiva 2005/32/CE).
Ciò significa che il consumo energetico di questo alimentatore di rete è
considerevolmente inferiore, sia in condizioni di esercizio che in standby,
rispetto a modelli di alimentatori di produzione anteriore.
8

Appendice
Accumulatori (batterie)
a Attenzione: Non gettare accumulatori o batterie nel fuoco. Utilizzare solo accumulatori o batterie
prescritte per gli apparecchi! Prestare attenzione alla corretta polarità!
Apparecchi medicali
a Attenzione: Non utilizzare gli apparecchi in prossimità di dispositivi medicali. Non si può
escludere totalmente che si verifichino delle interferenze.
Smaltimento
Procedere allo smaltimento dell’apparecchio esausto consegnandolo presso uno dei
punti di raccolta istituiti dalla propria società di smaltimento rifiuti comunale (ad es.
centro di riciclo materiali). Secondo quanto previsto dalla legge sugli apparecchi elettrici ed elettronici, i proprietari di apparecchi esausti sono per legge tenuti alla consegna di tutti gli apparecchi elettrici ed elettronici presso un centro di raccolta rifiuti
differenziata. Il simbolo indica che non è assolutamente consentito smaltire l’apparecchio assieme ai normali rifiuti domestici!
Accumulatori e batterie possono provocare danni alla salute e all’ambiente!
Non aprire, danneggiare, ingerire o disperdere nell’ambiente accumulatori e batterie.
Questi possono contenere metalli pesanti nocivi e dannosi per l’ambiente. Per legge
sussiste l’obbligo di consegnare accumulatori e batterie presso i rivenditori di batterie
utilizzando gli appositi contenitori di raccolta e provvedendo in tal modo al corretto
smaltimento. Lo smaltimento è gratuito. I simboli indicano che non è assolutamente
consentito gettare accumulatori e batterie nei rifiuti domestici, ma che vanno conferiti
ai fini dello smaltimento nei rispettivi punti di raccolta.
Linea diretta di assistenza tecnica
In presenza di problemi con il apparecchio, attenersi alle indicazioni riportate qui di seguito. In caso di
problemi tecnici durante il periodo di garanzia, rivolgersi alla nostra hot line. Il numero telefonico è
reperibile sul nostro sito Webwww.audioline.de
In caso di diritti a garanzia rivolgersi al proprio rivenditore autorizzato. La durata della garanzia
ammonta a 2 anni.
Qualora si verificassero dei problemi: domande e risposte
Nessun funzionamento
• Emittente (videocamera) e/o ricevitore non sono accesi.
• Battery pack scarico o difettoso.
• Alimentatori non collegati.
Nessuna ricezione
• Emittente (videocamera) e ricevitore non sono collegati.
• La distanza dell’emittente (videocamera), p.es. dal bebè, è eccessiva. Attenersi alla distanza
minima di un metro.
• La distanza fra il ricevitore e l’emittente (videocamera) è eccessiva.
• La sensibilità ai rumori è impostata a un livello troppo basso.
IT
9

Appendice
Interferenze nella ricezione
• La distanza fra il ricevitore e l’emittente (videocamera) è eccessiva.
• Le prestazioni della batteria sono troppo basse.
• Altri apparecchi elettronici interferiscono con il campo di trasmissione.
Segnale acustico (retroazione)
• Aumentare la distanza fra ricevitore ed emittente (videocamera).
• Ridurre il volume del ricevitore.
Fruscio
• Le prestazioni della batteria sono troppo basse.
Trasmissione dell’immagine, ma non del suono
• Il volume è stato impostato a un livello troppo basso.
L’immagine appare in bianco e nero
• È attiva la funzione di visione notturna.
Il battery pack nel ricevitore non si carica
• L’alimentatore non è collegato.
Dichiarazione di conformità
Questo apparecchio soddisfa i requisiti della Direttiva UE:
1999/5/CE Direttiva concernente le apparecchiature radio, le apparecchiature terminali di telecomunicazioni e il reciproco riconoscimento della loro conformità. La conformità della direttiva sopra indicata
è confermata dal marchio CE applicato sul dispositivo. Per la dichiarazione di conformità completa si
prega di voler usufruire del servizio gratuito di download dal nostro sito Internet www.audioline.de
Consigli per la cura
• Pulire le superfici degli apparecchi con un panno morbido e antipilling.
• Non utilizzare mai detergenti o solventi.
10

Appendice
Dati tecnici
Videocamera (emittente) presa: 6 V CC
sensore: 1 sensore luce notturna
diodi a infrarossi: 4
Monitor (ricevitore) schermo: display LC a colori 2” / 176 x 220 pixel
presa: 6 V CC
Alimentazione (ricevitore) alimentatore, input: 100-240 VCA, 50/-60Hz, 150 mA, out-
oppure battery pack NiMh 3,6 Volt
Prima carica battery pack fino a 16 h
Alimentazione (emittente) alimentatore, input: 100-240 VCA, 50/-60Hz, 150 mA, out-
Portata fino a 300 metri in condizioni ottimali. Negli edifici la porta-
Campo di frequenza 2407,5 - 2475 MHz
Temperatura ambiente consentita 0° C - 40° C
Garanzia
Gli apparecchi AUDIOLINE sono costruiti e collaudati in osservanza dei processi di produzione più
moderni. L’impiego di materiali selezionati e tecnologie altamente sviluppate sono garanti di una perfetta funzionalità e lunga durata di vita. La garanzia non si estende a batterie, accumulatori o battery
pack utilizzati all’interno degli apparecchi. Il periodo di garanzia ammonta a 24 mesi a partire dalla
data di acquisto. Entro il periodo di garanzia si procederà all’eliminazione gratuita di tutti i guasti
dovuti a difetti di materiale o produzione. Il diritto di garanzia cessa in caso di interventi da parte
dell’acquirente o di terzi.
I danni derivanti da un trattamento o utilizzo non conforme agli usi previsti, da naturale usura, da
errato montaggio o errata conservazione, da collegamento o installazione impropri, da forza maggiore o altri influssi esterni sono esclusi dalla garanzia. Ci riserviamo il diritto, in caso di reclami, di riparare o sostituire i pezzi difettosi o di rimpiazzare l’apparecchio. I pezzi sostituiti o gli apparecchi rimpiazzati divengono di nostra proprietà. Sono esclusi eventuali diritti al risarcimento dei danni qualora
non siano dovuti a dolo o colpa grave del costruttore. Nel caso in cui il presente apparecchio dovesse ciò nonostante presentare un difetto durante il periodo di garanzia, si prega di rivolgersi esclusivamente al negozio di rivendita dell’apparecchio AUDIOLINE assieme al relativo scontrino di acquisto.
In base a quanto riportato nelle presenti disposizioni, tutti i diritti di garanzia dovranno essere rivendicati nei confronti del rivenditore autorizzato. Decorso il termine di due anni dalla data di acquisto e
consegna dei nostri prodotti non sarà più possibile far valere alcun diritto di garanzia.
put: 6 VCC, 600 mA
put: 6 VCC, 600 mA
ta è limitata da pareti, porte, ecc.
11
IT

12

13

Bei technischen Problemen können Sie sich an unsere Service-Hotline wenden.
Die Rufnummer finden Sie auf unserer Internetseite www.audioline.de.
In the event of technical problems, you can contact our hotline service.
For the telephone number please refer to our website www.audioline.de.
En cas de problèmes techniques, veuillez s'il vous plaît contacter notre service
d'assistance téléphonique. Le numéro de téléphone peut être trouvée sur notre site
internet www.audioline.de.
In caso di problemi tecnici rivolgersi alla nostra Service Hotline. Il numero telefonico è
reperibile sul nostro sito Internet www.audioline.de.
AUDIOLINE GmbH
Neuss
Internet: www.audioline.de
E-Mail: info@audioline.de
Version 1.0 • 31.03.2015
4 250711 993085
 Loading...