

Page 1
Digitaler VoiceRecorder
Digital VoiceRecorder
Bedienungsanleitung
Operating Instructions
VR R40
Page 2

Inhaltsverzeichnis
Sicherheitshinweise................................................................. 3
Vorbereiten ...............................................................................4
Auspacken ............................................................................4
Batterie einbauen..................................................................4
Bedienelemente........................................................................ 5
Displayanzeigen .......................................................................6
Bedienung................................................................................. 7
Einschalten des VR R40 ...................................................... 7
Speichermöglichkeiten des VR R40 .................................... 7
Notizen aufnehmen............................................................... 8
Nächste Aufnahme direkt beginnen ..................................... 9
Restaufnahmezeit anzeigen.................................................9
Direkte Aufnahme ................................................................. 9
VOS – Sprachgesteuerte Aufnahme ................................... 9
Notizen abspielen ...............................................................10
Notiz automatisch suchen (AUTO-Scan)...........................11
Notiz manuell suchen .........................................................11
Einzelne Notizen löschen ...................................................12
Kompletten Archivierungsordner löschen.......................... 12
FM Radio benutzen ............................................................ 13
Wichtige Informationen .........................................................14
Benutzersperre ................................................................... 14
Externe Mikrofon-/Lautsprecherbuchse .............................14
Aufnahmen von anderen Signalquellen.............................14
Wiedergabe über andere Geräte ....................................... 14
Fehlersuche ........................................................................15
Pflegeanleitung ...................................................................16
Garantie............................................................................... 17
Technische Daten...............................................................18
Konformitätserkärung ...........................................................19
Operating instructions...........................................................21
2
Page 3

Sicherheitshinweise
SICHERHEITSHINWEISE
Bedienungsanleitung
Bitte lesen Sie diese Bedienungsanleitung sorgfältig durch. Bei
eventuell auftretenden Fragen, wenden Sie sich bitte an unsere
Service Hotline unter der Rufnummer 0180 5 00 13 88. Öffnen
Sie das Gerät in keinem Fall selbst und führen Sie keine eigenen Reparaturversuche aus. Bei Garantieansprüchen wenden
Sie sich bitte an Ihren Fachhändler.
Batterie/Wiederaufladbarer Akku
Die benötigte Batterie befindet sich im Lieferumfang. Muß die
Batterie gewechselt werden, benötigen Sie eine Batterie des
Typs AAA 1.5V. Bitte verwenden Sie neue hochwertige alkalische oder NiMH-Batterien.
Entsorgung
Ist die Gebrauchszeit der Batterien/Akkus oder der gesamten
Anlage abgelaufen, entsorgen Sie diese bitte umweltfreundlich
gemäss den gesetzlichen Bestimmungen. Verbrauchte Batterien
niemals öffnen, kurzschliessen oder ins Feuer werfen.
CE-Zeichen
Das Gerät ist für den Einsatz im europäischen Markt freigegeben. Dieses Gerät erfüllt die Anforderungen der EU-Richtlinien.
Die Konformität des Gerätes mit den oben genannten Richtlinien wird durch das CE-Kennzeichen bestätigt. Das CEZeichen finden Sie auf der Rückseite des AUDIOLINE VR R40.
3
Page 4
Vorbereiten
VORBEREITEN
AUSPACKEN
In der Verpackung befinden sich folgende Teile:
VR R40
Batterien
Ohrhörer
Bedienungsanleitung
Audiokabel
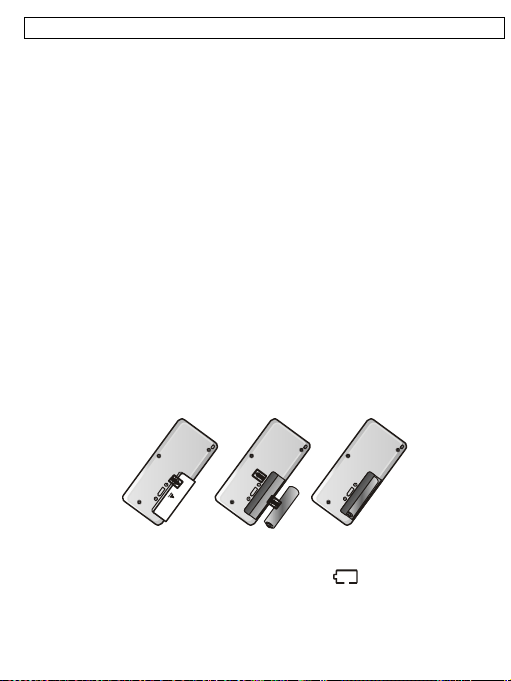
BATTERIE EINBAUEN
Schieben Sie den Batteriedeckel auf der Rückseite mit
einem leichten Druck zur Seite und öffnen Sie das Batteriefach.
Legen Sie nun die Batterie ein und achten Sie auf die
richtige Polung. Falsche Polung kann sowohl die Batterie
als auch das Gerät beschädigen.
Schliessen Sie das Batteriefach.
Hinweise:
Wenn die Batterie schwach ist und ausgetauscht werden müssen, blinkt im Display das Batteriesymbol
Batterien niemals während einer Aufnahme, da ansonsten ein
kompletter Datenverlust eintreten kann.
4
. Tauschen Sie die
Page 5
Bedienelemente
BEDIENELEMENTE
14
12
11
13
10
9
16
15
REC
vos
7
6
1
2
3
4
8
5
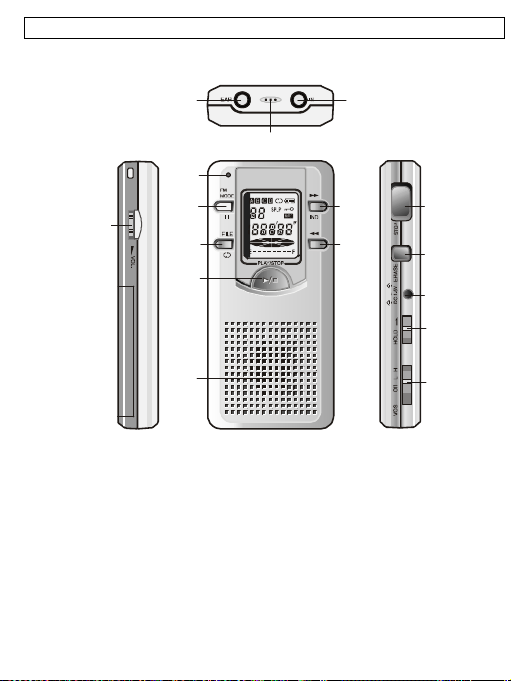
1 Taste Aufnahme (REC) 9 Taste START/STOP
2 Taste Löschen (ERASE) 10 Archive wählen/Repeat
3 Externe Stromversorgung 11 Umschaltung Radio/Pause
4 Tastensperre (HOLD) 12 Aufnahme LED (Rot)
5 Einstellung VOS (OFF L H) 13 Lautstärkeregler VOL
6 Rücklauf 14 Anschluss EAR
7 Vorlauf 15 Mikrofon
8 Lautsprecher 16 Anschluss IN
5
Page 6
Displayanzeigen
DISPLAYANZEIGEN
1
12
11
vos
REC
2
3
4
5
6
10
7
8
9
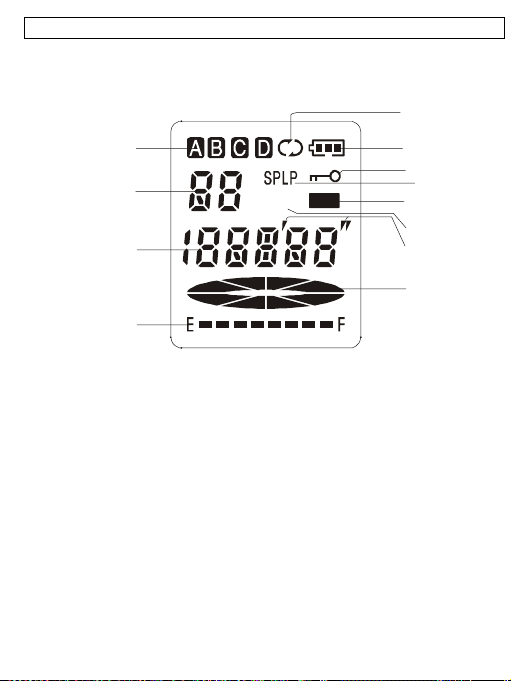
1 Wiederholen
2 Anzeige der Batteriekapazität
3 Sperre eingeschaltet (Hold)
4 Anzeige SP (Standard-Modus) und LP (Long-Play-Modus)
5 Erscheint während der Aufnahme
6 Erscheint bei sprachgesteuerter Aufnahme (VOS)
7 Minuten- und Sekundenanzeige
8 Dynamisches Symbol
9 Anzeige des Speicherplatzes
10 Zeitanzeige für Aufnahme und Restspeicherplatz
11 Anzeige der Notiznummer von 1 bis 99 innerhalb des ge-
wählten Archivierungsordners
12 Anzeige des gewählten Archivierungsordners A, B, C, D
6
Page 7

Bedienung
BEDIENUNG
EINSCHALTEN DES VR R40
Um das AUDIOLINE VR R40 einzuschalten, drücken Sie einmal
die Taste PLAY/STOP. Achten Sie darauf, dass der Schiebeschalter HOLD auf der rechten Seite nicht nach oben geschoben ist. Ansonsten lässt sich das AUDIOLINE VR R40 nicht
einschalten, und das Display zeigt für einige Sekunden die
Anzeige HOLD.
Das AUDIOLINE VR R40 ist mit einer Schaltung zum Verlängern der Lebensdauer der Batterien ausgestattet. Wenn innerhalb von einer Minute keine Bedienvorgänge ausgeführt werden, schaltet sich das Gerät automatisch aus. Das Display
erlischt, und das Gerät muss neu eingeschaltet werden.
SPEICHERMÖGLICHKEITEN DES VR R40
Im AUDIOLINE VR R40 können Sie Ihre Notizen, Nachrichten,
Ideen, Privates, usw. in vier separaten Archivierungsordnern
speichern. Die Archivierungsordner sind mit den Buchstaben A,
B, C und D gekennzeichnet. Jeder Archivierungsordner kann bis
zu 99 Aufnahmen speichern.
Die maximale Aufnahmezeit des AUDIOLINE VR R40 beträgt
im Standard-Modus 129 und im Long-Play-Modus 281 Minuten.
Die beste Aufnahmequalität erreichen Sie im Standard-Modus.
7
Page 8

Bedienung
NOTIZEN AUFNEHMEN
Achten Sie darauf, dass der Schiebeschalter HOLD in der
Stellung AUS steht (Schiebschalter nach unten).
Drücken Sie die Taste REC, um das Gerät einzuschalten.
Wählen Sie mit der Taste FILE den gewünschten Archivie-
rungsordner A, B, C oder D.
Wählen Sie nun mit der Taste MODE den gewünschten
Aufnahmemodus SP (Standard) oder LP (Long-Play) aus.
Die Auswahl wird im Display angezeigt.
Um die Aufnahme zu starten, drücken Sie erneut die Taste
REC. Das Display zeigt die Meldung „REC“ und die rote
Aufnahme-LED leuchtet. Während der Aufnahme wird im
Display die Länge der Nachricht und die Nummer der Nachricht angezeigt. Sprechen Sie nun in das Mikrofon auf der
Oberseite. Die Aufnahme muss min. 5 Sekunden lang sein.
Mit der Taste MODE/PAUSE können Sie die Aufnahme
unterbrechen.
Die Aufnahme wird mit der Taste REC wieder beendet.
Jede Aufnahme wird automatisch mit einer Nummer zwischen 1 und 99 gekennzeichnet.
Ist die Kapazität des gewählten Archivierungsordners erreicht
oder die maximale Aufnahmezeit überschritten, zeigt das Display die Meldung „FULL“. Um neue Notizen aufzuzeichnen,
müssen Sie zuerst alte oder unwichtige Aufnahmen löschen.
8
Page 9

Bedienung
NÄCHSTE AUFNAHME DIREKT BEGINNEN
Während einer laufenden Aufnahme können Sie direkt die
nächste Aufnahme starten. Drücken Sie dazu einmal die Taste
. Die laufende Aufnahme wird gestoppt und die nächste
Aufnahme sofort unter einer neuen Nummer begonnen.
RESTAUFNAHMEZEIT ANZEIGEN
Während einer Aufnahme können Sie die verbleibende Speicherkapazität abfragen. Halten Sie dazu die Taste FILE gedrückt und das Display zeigt Ihnen in Minuten und Sekunden die
verbleibende Aufnahmezeit an.
DIREKTE AUFNAHME
Um eine Aufnahme auch bei ausgeschaltetem Gerät direkt zu
beginnen, drücken Sie die Taste REC für 2 Sekunden.
VOS – SPRACHGESTEUERTE AUFNAHME
Mit dem Schiebeschalter VOS auf der rechten Seite kann der
sprachgesteuerte Aufnahmemodus (Voice Operated System)
eingeschaltet werden. Bei eingeschaltetem VOS (Schiebeschalter in Pfeilrichtung) werden eventuell auftretende Pausen während der Aufnahme nicht mit aufgezeichnet. Wird nicht gesprochen, schaltet das AUDIOLINE VR R40 die Aufnahme auf Pause (Display zeigt „VOS“). Wird wieder gesprochen, setzt das
Gerät die Aufnahme automatisch fort. Es stehen zwei Empfindlichkeitsstufen L (Low=Leise) und H (High=Laut) zur Verfügung.
Bei ausgeschaltetem VOS wird kontinuierlich aufgenommen.
9
Page 10
Bedienung
NOTIZEN ABSPIELEN
Achten Sie darauf, dass der Schiebeschalter HOLD in der
Stellung aus steht (Schiebschalter nach unten).
Wählen Sie mit der Taste FILE den gewünschten Archivie-
rungsordner A, B, C oder D.
Wählen Sie nun mit den Tasten
wünschte Nachricht aus. Die Nummer der Notiz wird im Display angezeigt.
Durch Drücken der Taste
Mit der Taste FM MODE/
unterbrechen, und dann mit der Taste FM MODE/
wieder fortfahren.
Um das Abspielen zu beenden, drücken Sie erneut die
Multitaste
oder die Taste REC.
Die Lautstärke kann mit dem kleinen Drehrad auf der linken
Seite eingestellt werden.
Hinweise: Möchten Sie in einer langen Notiz vor- oder zurückspulen, benutzen Sie bitte die Tasten
Mit der Taste FILE/
wird das Abspielen dauerhauft wieder-
holt (Repeat). Die Funktion wird mit der Taste
ausgeschaltet.
10
und die ge-
wird die Notiz abgespielt.
II
können Sie das Abspielen
II
und .
wieder
oder
Page 11
Bedienung
NOTIZ AUTOMATISCH SUCHEN (AUTO-SCAN)
Möchten Sie eine bestimmte Notiz innerhalb eines Archivierungsordners suchen, können Sie die SCAN-Funktion nutzen.
Hierbei werden immer nur die ersten 5 Sekunden der Notiz
abgespielt und dann automatisch zur nächsten Notiz gewechselt.
Drücken Sie dazu die Multitaste
Das Display zeigt SCAN. Die SCAN-Funktion startet immer
von der gerade eingestellten Notiz-Nummer.
Haben Sie die richtige Nachricht gefunden, drücken Sie
erneut die Multitaste
ren.
, um diese Notiz komplett zu hö-
für eine Sekunde.
NOTIZ MANUELL SUCHEN
Um eine andere Notiz anzuwählen, benutzen Sie die Tas-
und . Möchten Sie schnell innerhalb des Archi-
ten
vierungsordners suchen, halten Sie die Tasten
,solange gedrückt, bis Sie die gewünschte Nummer der
Notiz im Display sehen.
Während Sie eine Notiz abhören, können Sie automatisch
zur vorherigen oder nächsten Notiz wechseln. Benutzen Sie
dazu einfach die Tasten
(Rücklauf) und (Vorlauf).
oder
11
Page 12

Bedienung
EINZELNE NOTIZEN LÖSCHEN
Wählen Sie zunächst die Nachricht, die Sie löschen möch-
ten. Benutzen Sie dazu die Taste FILE und die Tasten
und
Drücken Sie dann für eine Sekunde die Taste ERASE. Die
Notiz wird abgespielt und im Display blinkt die Meldung „ERASE“.
Drücken Sie die Taste ERASE erneut, um die Notiz zu
löschen. Möchten Sie den Löschvorgang aber abbrechen,
drücken Sie irgendeine andere Taste, ausser der Taste
ERASE.
.
KOMPLETTEN ARCHIVIERUNGSORDNER
LÖSCHEN
Wählen Sie zunächst mit der Taste FILE den gewünschten
Archivierungsorder A, B, C oder D, den Sie löschen möchten. Benutzen Sie dazu die Taste FILE.
Drücken Sie nun gleichzeitig für drei Sekunden die beiden
Tasten REC und ERASE. Das Display zeigt die Meldung
„AL ERASE“
Drücken Sie die Taste ERASE erneut, um die Notizen zu
löschen. Möchten Sie den Löschvorgang aber abbrechen,
drücken Sie irgendeine andere Taste, ausser der Taste
ERASE.
12
Page 13

Bedienung
FM RADIO BENUTZEN
Das VR R40 ist mit einem integrierten FM-Radio ausgestattet.
Drücken Sie die Taste FM/MODE für mehr als eine Sekunde
und das Radio wird eingeschaltet.
Ist der Ohrhörer eingesteckt, wird dieser als Antenne für das
Radio genutzt. Möchten Sie aber über den eingebauten Lautsprecher Radio hören, stecken Sie den Ohrhörer in die IN
Buchse auf der Oberseite. Der Lautsprecher bleibt eingeschaltet, und der Ohrhörer wird über die Buchse IN als Antenne
genutzt.
Um einen Sender einzustellen, drücken Sie die Taste
das Radio sucht den ersten Sender ab 88 MHz aufwärts. Möchten Sie den nächsten Sender suchen, drücken Sie erneut die
Taste
Sind Sie am oberen Frequenzende von 108 MHz angekommen,
können Sie mit der Taste
chen.
Drücken Sie die Taste FM/MODE für mehr als eine Sekunde
und das Radio wird wieder ausgeschaltet.
Die gewählte Frequenz wird nicht im Display angezeigt.
.
darunter liegende Sender su-
und
13
Page 14

Wichtige Informationen
WICHTIGE INFORMATIONEN
BENUTZERSPERRE
Auf der rechten Seite befindet sich der Schiebeschalter HOLD.
Ist die Funktion eingeschaltet (Schalter in Pfeilrichtung) lässt
sich das Gerät nicht mehr bedienen. So kann z. B. beim Transport keine unbeabsichtigte Aufnahme oder Wiedergabe erfolgen. Das Display zeigt bei jedem Tastendruck die Meldung
„HOLD“.
EXTERNE MIKROFON-/LAUTSPRECHERBUCHSE
Ihr AUDIOLINE VR R40 kann mit einem externen Mikrofon
(optional) und dem mitgelieferten Ohrhörer betrieben werden.
Der Mikrofonanschluss IN und der Ohrhöreranschluss EAR
befinden sich auf der Oberseite des AUDIOLINE VR R40.
AUFNAHMEN VON ANDEREN SIGNALQUELLEN
Mit Ihrem AUDIOLINE VR R40 können Sie auch andere Signalquellen, wie zum Beispiel eine Stereoanlage oder ein Radio
aufnehmen. Verbinden Sie dazu das mitgelieferte Kabel mit
dem Mikrofoneingang IN und dem passenden Anschluss zu
dem Audioausgang des gewünschten Gerätes. Benutzen Sie
bei diesen Geräten entweder den Kopfhörer- oder einen Audioausgang und niemals einen Lautsprecheranschluss.
WIEDERGABE ÜBER ANDERE GERÄTE
Die aufgenommenen Notizen können Sie auch über andere
Audiogeräte wiedergeben oder z. B. auf einem Computer digital
speichern. Verbinden Sie dazu das mitgelieferte Kabel mit dem
Ohrhöreranschluss EAR und dem passenden Anschluss zu
dem Audioeingang des gewünschten Gerätes. Die Lautstärke
kann mit dem Regler VOL eingestellt werden.
14
Page 15

Wichtige Informationen
FEHLERSUCHE
Das Display hat keine Anzeige.
- Schalten Sie das Gerät mit der Taste REC ein.
- Überprüfen Sie die Batteriekapazität.
- Überprüfen Sie die richtige Polung der Batterien.
Es werden keine Notizen aufgenommen.
- Überprüfen Sie die Stellung des Schalters HOLD.
- Überprüfen Sie, ob die maximale Speicherkapazität oder die
maximale Anzahl der Notizen innerhalb eines Archivierungsordners überschritten wurde.
- Überprüfen Sie die Batteriekapazität.
Es werden keine Notizen abgespielt.
- Überprüfen Sie die Stellung des Lautstärkereglers.
- Möchten Sie die Notizen über den eingebauten Lautsprecher
hören, darf kein Ohr- oder Kopfhörer angeschlossen sein.
- Möchten Sie die Notizen über einen anderen Lautsprecher
hören, muss das Verbindungskabel korrekt angeschlossen
sein.
Kein Radioempfang
- Nutzen Sie den Ohrhörer als Antenne über die EAR oder IN
Buchse.
Reset bei Fehlfunktionen
Achtung: Alle Aufnahmen werden gelöscht!
- Entnehmen Sie die Batterie.
- Legen Sie die Batterie wieder ein und halten Sie gleichzeitig
die Tasten ERASE und REC für 3 Sekunden gedrückt.
- Das Display zeigt „AL ERASE“ und der Reset ist abgeschlossen.
15
Page 16

Wichtige Informationen
PFLEGEANLEITUNG
Bei korrekter Bedienung werden Sie jahrelang Freude an Ihrem
AUDIOLINE VR R40 haben. Die Gehäuseoberfläche kann mit
einem trockenen, weichen und fusselfreien Tuch gereinigt werden. Niemals Reinigungsmittel oder gar aggressive Lösungsmittel verwenden. Legen Sie das Gerät niemals an einen feuchten
oder staubigen Platz. Vermeiden Sie die Nähe zu Wärmequellen wie Heizkörpern und setzen Sie das Gerät keiner direkten
Sonnenbestrahlung aus.
16
Page 17

Wichtige Informationen
GARANTIE
AUDIOLINE - Geräte werden nach den modernsten Produktionsverfahren
hergestellt und geprüft. Ausgesuchte Materialien und hoch entwickelte Technologien sorgen für einwandfreie Funktion und lange Lebensdauer. Sollte Ihr
Gerät dennoch einen Defekt innerhalb der Garantiezeit aufweisen, wenden
Sie sich bitte unter Vorlage Ihrer Kaufquittung ausschliesslich an das Geschäft, in dem Sie Ihr AUDIOLINE - Gerät gekauft haben. Die Garantiezeit
beträgt 24 Monate, gerechnet vom Tage des Kaufs zu nachfolgenden Bedingungen: Innerhalb der Garantiezeit werden alle Mängel, die auf Material- oder
Herstellungsfehler zurückzuführen sind, kostenlos beseitigt. Der Garantieanspruch erlischt bei Eingriffen durch den Käufer oder durch Dritte. Schäden, die
durch unsachgemässe Behandlung oder Bedienung, durch falsches Aufstellen oder Aufbewahren, durch unsachgemässen Anschluss oder Installation
sowie durch höhere Gewalt oder sonstige äussere Einflüsse entstehen, fallen
nicht unter die Garantieleistung. Wir behalten uns vor, bei Reklamationen die
defekten Teile auszubessern oder zu ersetzen oder das Gerät auszutauschen.
Ausgetauschte Teile oder ausgetauschte Geräte gehen in unser Eigentum
über. Schadenersatzansprüche sind ausgeschlossen, soweit sie nicht auf
Vorsatz oder grober Fahrlässigkeit des Herstellers beruhen. Alle Gewährleistungsansprüche nach diesen Bestimmungen sind ausschliesslich gegenüber
Ihrem Fachhändler geltend zu machen. Nach Ablauf von einem Jahr nach
Kauf und Übergabe unserer Produkte können Gewährleistungsrechte nicht
mehr geltend gemacht werden. Bei unnötiger oder unberechtigter Beanspruchung des Kundendienstes berechnen wir das für unsere Dienstleistungen
übliche Entgelt für Material, Arbeitszeit, Porto + Verpackung. Reklamationen
sind unmittelbar nach Feststellung zu melden. Die Garantie ist gültig innerhalb
der Bundesrepublik Deutschland.
17
Page 18

Wichtige Informationen
TECHNISCHE DATEN
Aufnahmezeit Standard-Modus (SP): 129 min.
Grösse 40 x 12,8 x 85 mm (BxTxH)
Gewicht 32g ohne Batterien
Stromversorgung 1,5V
Stromversorgung extern DC 1,5V
Betriebsdauer ca. 7 Std. im Aufnahmemodus
Speichermedium FLASH-Speicher
Anzahl der Notizen 99 je Archivierungsordner A, B, C,
Ausgangsleistung 80mW bei THD 10%, 8 Ohm
Frequenzgang 600 bis 2.900 Hz
Aufnahmequelle eingebautes Kondensatormikrofon
Eingang MIC
Ausgang Ohr-/Kopfhörer (Mini Plug Stereo
Lautsprecher 20 mm, 8 Ohm, Dynamisch
FM Radio 88 – 108 MHz
Umgebungstemperatur 0 bis 40°C
Die technischen Daten können ohne vorherige Ankündigung
geändert werden.
18
Long-Play-Modus (LP): 281min.
ca. 5 Std. im Abspielmodus über
Lautsprecher bei mittlerer Lautstärke
ca. 6 Std. im Abspielmodus über
Ohrhörer bei mittlerer Lautstärke
D
Impedanz über 32 Ohm )
Page 19

Wichtige Informationen
KONFORMITÄTSERKÄRUNG
WIR AUDIOLINE GmbH
IN HELLERSBERGSTR. 2a
ALS INVERKEHRBRINGER IN DER EU ERKLÄREN
VOLLVERANTWORTLICH, DASS DAS PRODUKT
MODEL: VR R40
BESCHREIBUNG: DIGITALER VOICE RECORDER
KONFORM IST MIT DEN GRUNDLIEGENDEN ANFORDERUNGEN
DER RICHTLINIE: 1999/5/EC
BEVOLLMÄCHTIGTER:
Unterschrift: ________________________________
Name: MANFRED ZINNOW
Position in der Firma: GESCHÄFTSFÜHRER
Datum der Ausstellung: 27.09.2002
Eine Kopie dieser Erklärung wird bis 10 Jahre nach der letzten
Produktion aufbewahrt.
Dieses Produkt ist für den Betrieb innerhalb Deutschlands entwickelt
worden.
D-41460 NEUSS
GERMANY
LIEFERANT: AUDIOLINE GmbH, Hellersbergstr. 2a,
D-41460 NEUSS
PRODUKT: VR R40
19
Page 20

Wichtige Informationen
20
Page 21

Contents
Safety Information.................................................................. 22
Preparation .............................................................................23
Unpacking ...........................................................................23
Installing the batterie...........................................................23
Operational elements............................................................. 24
Display symbols .....................................................................25
Operation ................................................................................26
Switching on the VR R40 ................................................... 26
VR R40 Storage Facilities .................................................. 26
Recording Memos............................................................... 27
Starting next recording directly........................................... 28
Display remaining recording time .......................................28
Direct Recording .................................................................28
VOS – Voice Controlled Recording.................................... 28
Replaying Memos ............................................................... 29
Searching for a memo automatically (Auto Scan).......... 30
Searching for a memo manually ........................................ 30
Erasing individual memos .................................................. 31
Erasing complete archive files............................................31
FM Radio............................................................................. 32
Important Information ............................................................33
User Lock ............................................................................ 33
External Microphone/Loudspeaker Jack............................ 33
Recording other signal sources..........................................33
Playback via other equipment ............................................33
Fault Finding ....................................................................... 34
Care Instructions .................................................................35
Guarantee ...........................................................................36
Technical Data .................................................................... 37
Declaration of Conformity .....................................................38
21
Page 22

Safety Information
SAFETY INFORMATION
Operating Instructions
Please read these operating instructions carefully. If you should
have any questions, please contact our service department on
the Hotline number 0180 5 00 13 88. Under no circumstances
open the unit yourself and do not try to carry out your own repairs. For any claims under the guarantee, please refer to your
dealer.
Battery/Rechargeable Battery
The required battery is included in the scope of supply. When
the battery have to be changed, you will need one type AAA 1.5
V battery. Please use new, high quality alkaline or NiMH batteries.
Disposal
If the useful life of the batteries or the complete equipment has
expired, please dispose of these carefully in accordance with
the statutory requirements and in a manner friendly to the environment. Never open used batteries, short circuit them or throw
them into the fire.
CE marking
The unit is approved for use on the European market. This unit
fulfils the requirements of the EU Directives. Conformity of the
unit with these directives is confirmed by the CE mark. You will
find the CE mark on the backside of the AUDIOLINE VR R40.
22
Page 23

Preparation
PREPARATION
UNPACKING
The following parts will be found in the package:
VR R40
Operating instructions
Batteries
Ear piece
Audio connection cable
INSTALLING THE BATTERIE
Slide the battery cover on the rear of the unit sidewards
with a light pressure and open the battery compartment.
Now insert the battery and check that the polarity is correct.
The wrong polarity can damage both the battery and the
unit.
Close the battery compartment.
Note:
When the battery become weak and need to be replaced, the
battery symbol
battery while recording as otherwise a total loss of data could
occur.
will flash in the display. Never change the
23
Page 24

Operational elements
OPERATIONAL ELEMENTS
14
15
12
13
11
10
9
vos
16
REC
7
6
1
2
3
4
8
5
1 REC button 9 PLAY/STOP button
2 ERASE button 10 FILE button/Repeat
3 External power supply 11 Switch FM/PAUSE button
4 Slide control HOLD 12 Record LED (red)
5 Slide control VOS 13 Loudspeaker VOL
6 Rewind button 14 EAR connection
7 Forward button 15 Microphone
8 Loudspeaker 16 MIC connection
24
Page 25

Display symbols
DISPLAY SYMBOLS
1
12
11
vos
REC
2
3
4
5
6
10
7
8
9
1 Repeat Icon
2 Battery capacity indicator
3 Hold
4 Appears in Long Play Mode (LP) and Standard-Modus (SP)
5 Appears during recording
6 Appears if VOS is on
7 Minutes and Seconds
8 Dynamik Operation Icon
9 Memory indicator
10 Recording time for Playback and Remaining time
11 Memo number indicator from 1 to 99 in the selected archive
file
12 Selected archive file indicator A, B, C, D
25
Page 26

Operation
OPERATION
SWITCHING ON THE VR R40
To switch on the AUDIOLINE VR R40 press the PLAY/STOP
button once. Ensure that the HOLD slide switch on the righthand side has not been moved to the top position. Otherwise, it
will not be possible to switch on the AUDIOLINE VR R40 and
the display will show the message HOLD for a few seconds.
The AUDIOLINE VR R40 is equipped with a circuit to increase
the battery life. If no activity takes place within one minute, the
unit switches itself off automatically. The display goes off and
the unit must be switched on again.
VR R40 STORAGE FACILITIES
You can store memos, messages, ideas, confidential information, etc. in the AUDIOLINE VR R40 in four separate archive
files. The archive files are identified by the letters A, B, C and D.
Each archive file can store up to 99 recordings.
The maximum recording time for the AUDIOLINE VR R40 is 129
minutes in standard mode and 281 minutes in long play mode.
You will get the better recording quality in standard mode.
26
Page 27

Operation
RECORDING MEMOS
Ensure that the HOLD slide switch is in the OFF position
(slide switch down).
Press REC to switch the unit on.
Using the FILE button select the required archive file A, B, C
or D.
Now select the required recording mode SP (Standard) or
LP (Long-Play) using the MODE button. The selection will
be shown in the display.
To start recording, press the REC button once more. The
display shows the message “REC” and the red recording
LED illuminates. During recording, the length of the message and the number of the message will be shown in the
display. Now speak into the microphone on the top of the
unit. The minimum recording time is 5 seconds.
You can break off recording using the MODE/PAUSE but-
ton.
Recording is ended by means of the REC button. Every
recording will be identified automatically with a number between 1 and 99.
If the maximum capacity of the selected archiving file is reached
or if the maximum recording time is exceeded, the display will
show the message “FULL”. In order to be able to record new
memos you must first erase old or unimportant recordings.
27
Page 28

Operation
STARTING NEXT RECORDING DIRECTLY
You can start the next recording directly while making the current recording. To do this, press the multi button. The current
recording will be stopped and the next recording started immediately under a new number.
DISPLAY REMAINING RECORDING TIME
You can find out the remaining memory capacity during a recording. To do this, press and hold the FILE button and the
display will show you the recording time remaining in minutes
and seconds.
DIRECT RECORDING
To start recording directly even when the unit is switched off,
press the REC button for 2 seconds.
VOS – VOICE CONTROLLED RECORDING
The voice controlled recording mode (Voice Operated System)
can be switched on using the VOS slide switch on the right-hand
side of the unit.
When VOS is switched on (slide switch in the direction of the
arrow), any pauses that may occur during recording will not be
recorded. When not speaking, the AUDIOLINE VR R40
switches the recording to Pause (display shows “SENSE”). On
speaking again, the unit automatically continues recording. You
can set the VOS to L (low) and H (High).
When VOS is switched off, recording takes place continuously.
28
Page 29

Operation
REPLAYING MEMOS
Ensure that the HOLD slide switch is in the OFF position
(slide switch down).
Using the FILE button select the required archive file A, B,
C or D.
Now use the buttons
message. The memo number will be shown in the display.
The memo can be played back by pressing button
You can interrupt play back by using the FM MODE/
button and then continue once more with the multifunction
switch
To end play back, press the multi switch
press the REC button.
The volume can be adjusted using the small rotary control
on the left-hand side of the unit.
Notes: If you want to fast forward or rewind a long memo,
please use the buttons
The FILE/
sage continuously.
.
button enables to repeat a required certain mes-
and to select the required
II
again or
and .
.
29
Page 30

Operation
SEARCHING FOR A MEMO AUTOMATICALLY
(AUTO SCAN)
If you want to find a particular memo within an archive file, you
can use the SCAN function. Here, only the first 5 seconds of the
memo are played back before switching automatically to the
next memo.
To do this, press the multi switch
The display shows SCAN. The SCAN function always
starts from the number currently set.
When you have found the right message, press the multi
switch
once more to hear this memo in its entirety.
for one second.
SEARCHING FOR A MEMO MANUALLY
To select a different memo, use the buttons and .
If you want to search quickly within the archive file, hold the
or until you see the required number in the dis-
play.
You can change automatically to the previous or next
memo while you are listening to a memo. To do this, simply
30
use the
or .
Page 31

Operation
ERASING INDIVIDUAL MEMOS
First select the message that you want to erase. To do this,
use the FILE button and the buttons
Then press the ERASE button for one second. The memo
will be played back and the message “ERASE” will flash in
the display.
Press the ERASE button once more to erase the memo. If
however you want to break off the erasing process, press
any button other than the ERASE button.
and .
ERASING COMPLETE ARCHIVE FILES
First select the required file A, B, C or D that you want to
erase by using the FILE button.
Now press both the REC and ERASE buttons simultane-
ously for three seconds. The display shows the message
“AL ERASE”.
Press the ERASE button once more to erase the memo. If
however you want to break off the erasing process, press
any button other than the ERASE button.
31
Page 32

Operation
FM RADIO
Press FM/MODE button more then 1 seond and the VR R40 will
be changed to the radio.
Earphone will be used as FM antenna, when the user listen to
the radio by earphone. During speaker playback the IN connec-
tor can be used as antenna by connecting the earphone to the
IN connection.
Press
88MHz. If you want to listen to the next station, press the
button again.
After reaching the last radio station at 108 MHz, press the
button to search down-wards.
Press FM/MODE button and the radio will changed off.
No frequency band display on the LCD.
button, then the unit will search a radio station from
32
Page 33

Important Information
IMPORTANT INFORMATION
USER LOCK
The HOLD slide switch can be found on the right-hand side of
the unit. If the function is switched on (switch in the direction of
the arrow), the unit can no longer be used. This prevents any
unintentional recording or play back when carrying, for example.
The display shows the message “HOLD” if any button is
pressed.
EXTERNAL MICROPHONE/LOUDSPEAKER JACK
Your AUDIOLINE VR R40 can be used with an external microphone (optional) and ear piece. The connection for the microphone IN and the EAR piece can be found on the top of the
AUDIOLINE VR R40.
RECORDING OTHER SIGNAL SOURCES
Using your AUDIOLINE VR R40, you can record signals from
other sources such as stereo equipment or a radio, for example.
To do this, connect the provided cable between the microphone
input IN and the appropriate audio output connection on the
required equipment. With these units, use either the headphones output or an audio output and never a loudspeaker
connection.
PLAYBACK VIA OTHER EQUIPMENT
You can also reproduce recorded memos on other audio
equipment or, for example, save them digitally on a computer.
To do thisconnect the provided cable between the ear piece
connector EAR and the appropriate audio input connection on
the required equipment. The volume can be adjusted using the
VOL control.
33
Page 34

Important Information
FAULT FINDING
The display is blank.
- Switch the unit on using the REC button.
- Check the battery capacity.
- Check the correct polarity of the batteries.
Memos are not recorded.
- Check the position of the HOLD switch.
- Check whether the maximum storage capacity or the maxi-
mum number of memos within one archive file has been exceeded.
- Check the battery capacity.
Memos are not played back.
- Check the position of the volume control.
- If you want to listen to the memos using the inbuilt loud-
speaker then an ear piece or headphones must not be connected.
- If you want to listen to the memos using a different loudspeaker then the connection cable must be connected correctly.
No Radio station
- Earphone must be used as FM antenna, over the EAR or IN
connector.
Reset after malfunction
Important note: All memory will be ereased.
- Take out the batterie.
- Insert the batterie with pressing ERASE and REC together for
3 seconds and release the buttons.
- „AL ERASE“ is displayed and the unit will be reset.
34
Page 35

Important Information
CARE INSTRUCTIONS
If used correctly, you will get many years of enjoyment from your
AUDIOLINE VR R40. The surface of the case can be cleaned
with a soft, dry, lint-free cloth. Never use cleaning agents, particularly aggressive solvents. Never put the unit down in a damp
or dusty place. Avoid proximity to sources of heat such as radiators and do not expose the unit to direct sunlight.
35
Page 36

Important Information
GUARANTEE
AUDIOLINE equipment is manufactured and tested in accordance with the most up to date production methods. Selected
materials and highly developed technology ensure trouble-free
operation and long life. If your unit should develop a fault within
the guarantee period, however, please contact the shop where
you bought your AUDIOLINE equipment exclusively and have
your purchase receipt available for inspection. The guarantee
period is 24 months from the day of purchase under the following conditions: within the guarantee period, all defects due to
material or manufacturing faults will be repaired free of charge.
The guarantee is invalidated if the equipment has been tampered with by the purchaser or third parties. Any damage
caused by improper handling or operation, by incorrect positioning or storage, by improper connection or installation or by
excessive force or other external influences is not covered by
the guarantee. In the case of complaint, we reserve the right to
repair or replace defective parts or to exchange the equipment.
Exchanged parts or exchanged equipment become our property. Claims for compensation are excluded insofar as they do
not relate to criminal intent or gross negligence on the part of
the manufacturer. All guarantee claims according to these conditions must be raised exclusively with your dealer. Rights under
the guarantee can no longer be enforced after the expiry of one
year from purchase and delivery of our products. In the case of
unnecessary or unjustified demands on the customer service
department, we will levy our usual service charges for materials,
time, postage and packing. Any complaints must be reported as
soon as a problem is found. The guarantee is valid within the
German Federal Republic.
36
Page 37

Important Information
TECHNICAL DATA
Recording time
Size 40 x 12,8 x 85 mm (BxTxH)
Weight 32g without batteries
Power supply 1,5V
Power supply external DC 1,5V
Operating time ca. 7 hours in recording mode
Storage medium FLASH memory
Number of memos 99 in each archive file
Output power 80 mW at THD 10%, 8 Ohm
Frequency response 600 to 2.900 Hz
Recording source Inbuilt condenser microphone
Input MIC
Output Ear piece/earphones (mini plug
Loudspeaker 20 mm, 8 Ohm, dynamic
FM Radio 88 – 108 MHz
Ambient temperature 0 to 40°C
Technical data are subject to change without previous notice.
Standard mode (SP): 129 min.
Long play mode (LP): 281 min.
ca. 5 hours in play back mode via
loudspeaker at medium volume
ca. 6 hours in play back mode via
ear piece at medium volume
stereo)
Impedance greater than 32 Ohm
37
Page 38

Important Information
DECLARATION OF CONFORMITY
WE AUDIOLINE GmbH
OF HELLERSBERGSTR. 2a
DECLARE UNDER OUR SOLE RESPONSIBILITY AS EU DISTRIBUTOR THAT THE PRODUCT
MODEL: VR R40
DESCRIPTION: DIGITAL VOICE RECORDER
IS IN CONFORMITY WITH THE BASIC REQUIREMENTS OF DIRECTIVE: 1999/5/EC
AUTHORISED SIGNATORY:
Signature:
________________________________
Name: MANFRED ZINNOW
Position in the company: MANAGING DIRECTOR
Date of issue: 27.09.2002
A copy of this declaration will be retained for 10 years after cessation of
production.
SUPPLIER: AUDIOLINE GmbH, Hellersbergstr. 2a,
D-41460 NEUSS
PRODUCT: VR R40
This product has been developed for use within Germany.
41460 NEUSS
GERMANY
38
Page 39

Page 40

AUDIOLINE GmbH
Neuss
Service Hotline 0180 5 00 13 88
Internet: www.audioline.de
E-mail: info@audioline.de
 Loading...