

Page 1
Telefon
Telephone
Bedienungsanleitung
Operating Instructions
TEL5 clip
Page 2

TEL5 clip
Bedienungsanleitung 3. . . . . . . . . . .
Operating Instructions 17. . . . . . . . .
2
Page 3

- Inhaltsverzeichnis -
1 Allgemeine Hinweise 5...............
1.1 Bestimmungsgemäße Verwendung 5.........
1.2 Aufstellungsort 5..........................
1.3 Nebenstellenanlagen 5.....................
1.4 Hinweise zur Entsorgung 6.................
1.5 Temperatur und Umgebungsbedingungen 6...
1.6 Reinigung und Pflege 6.....................
2 Bedienelemente 7....................
2.1 Hörer Innenseite 7.........................
2.2 Hörer Oberseite 7.........................
2.3 Unterseite Basisgerät 8.....................
2.4 Innenseite Basisgerät 8....................
3 Inbetriebnahme 9....................
3.1 Allgemeine Hinweise 9.....................
3.2 Verpackungsinhalt prüfen 9.................
3.3 Telefonhörer anschließen 9.................
3.4 Batterien einsetzen 9.......................
3.5 Telefon anschließen 9......................
3.6 Wandmontage 10...........................
3.7 Datum und Uhrzeit einstellen 10..............
4 Bedienung 11.........................
4.1 Telefonieren 11............................
4.2 Anrufe entgegennehmen 11..................
4.3 Anzeige der Gesprächsdauer 11..............
4.4 Einstellen der Hörerlautstärke 11..............
4.5 Wahlwiederholung 11.......................
4.6 Einstellbarer Tonruf 12......................
4.7 Kurzwahlnummern speichern 12..............
4.8 Kurzwahlnummern abrufen 12................
5 Rufnummernanzeige (CLIP) 13.........
5.1 Anruferliste einsehen 13.....................
5.2 Telefonnummer aus der Anruferliste direkt
anwählen 14...............................
5.3 Telefonnummer aus der Anruferliste löschen 14.
5.4 Komplette Anruferliste löschen 14.............
3
Page 4

- Inhaltsverzeichnis -
6 Nebenstellenanlagen / Zusatzdienste 15
6.1 R-Taste an Nebenstellenanlagen 15...........
6.2 R-Taste und die Zusatzdienste Ihres
Netzbetreibers 15...........................
6.3 Wahlpause 15.............................
7 Wichtige Informationen 16.............
7.1 Garantie 16................................
8 Konformitätserklärung 16..............
4
Page 5

- Allgemeine Hinweise -
1 Allgemeine Hinweise
Bitte lesen Sie diese Bedienungsanleitung sorgfältig durch.
Öffnen Sie das Gerät in keinem Fall selbst und führen Sie
keine eigenen Reparaturversuche durch. Bei
Gewährleistungsansprüchen wenden Sie sich bitte an Ihren
Fachhändler. Im Zuge von Projektverbesserungen behalten
wir uns technische und optische Veränderungen am Artikel
vor.
1.1 Bestimmungsgemäße Verwendung
Dieses Telefon ist für den Betrieb an einem analogen
Telefonanschluss (PSTN) entwickelt worden. Allerdings
kann, wegen der Unterschiede zwischen den verschiedenen
Telekommunikations-Netzbetreibern, keine Garantie für
einwandfreie Funktion an jedem
Telekommunikations-Endgeräteanschluss übernommen
werden. Schließen Sie das Anschlusskabel des Telefons
nur an eine dafür bestimmte Telefonsteckdose an.
Wechseln Sie den Stecker des Anschlusskabels nicht aus.
1.2 Aufstellungsort
Stellen Sie das Gerät auf eine ebene und rutschfeste
Fläche. Normalerweise hinterlassen die Füße des Gerätes
keine Spuren auf der Aufstellfläche. Wegen der Vielzahl der
verwendeten Lacke und Oberflächen kann es jedoch nicht
ausgeschlossen werden, dass durch die Gerätefüße Spuren
auf der Abstellfläche entstehen.
1.3 Nebenstellenanlagen
Das Telefon kann auch an einer Nebenstellenanlage
angeschlossen werden. Ob Ihr Telefon an Ihrer
Nebenstellenanlage einwandfrei funktioniert, erfahren Sie
bei dem Händler, bei dem die Nebenstellenanlage gekauft
wurde. Es kann nicht garantiert werden, dass das Telefon
an jeder Nebenstellenanlage funktioniert.
5
Page 6

- Allgemeine Hinweise -
1.4 Hinweise zur Entsorgung
Die Umsetzung europäischen Rechtes in nationale Gesetze
und Verordnungen verpflichtet Sie zur sachgerechten
Entsorgung von Gebrauchsgütern. Dies dient dem Schutz
von Personen und Umwelt.
Das nebenstehende Symbol bedeutet,
dass elektrische und elektronische Altgeräte
und Batterien getrennt vom Hausmüll zu
entsorgen sind.
Alte oder ausgediente Geräte entsorgen
Sie bei einer Sammelstelle eines
geeigneten Entsorgungsträgers.
Batterien und Akkumulatoren entsorgen Sie beim
batterievertreibenden Handel sowie zuständigen
Sammelstellen, die entsprechende Behälter bereitstellen.
Verpackungsmaterialien entsorgen Sie entsprechend den
lokalen Vorschriften.
1.5 Temperatur und Umgebungsbedingungen
Das Telefon ist für den Betrieb in geschützten Räumen mit
einem Temperaturbereich von 10 °C bis 30 °C ausgelegt.
Das Telefon darf nicht in Feuchträumen wie Bad oder
Waschküche aufgestellt werden. Vermeiden Sie die Nähe
zu Wärmequellen wie Heizkörpern und setzen Sie das Gerät
keiner direkten Sonnenbestrahlung aus.
Vermeiden Sie Belastungen durch Rauch, Staub,
Erschütterungen, Chemikalien, Feuchtigkeit, Hitze oder
direkte Sonneneinstrahlung.
1.6 Reinigung und Pflege
Reinigen Sie die Gehäuseoberflächen mit einem trockenen,
weichen und fusselfreien Tuch. Verwenden Sie keine
Reinigungsmittel oder Lösungsmittel. Außer einer
gelegentlichen Gehäusereinigung ist keine weitere Pflege
erforderlich. Die Gummifüße des Telefons sind nicht gegen
alle Reinigungsmittel beständig. Der Hersteller kann daher
nicht für evtl. Schäden an Möbeln o. Ä. haftbar gemacht
werden.
6
Page 7
- Bedienelemente -
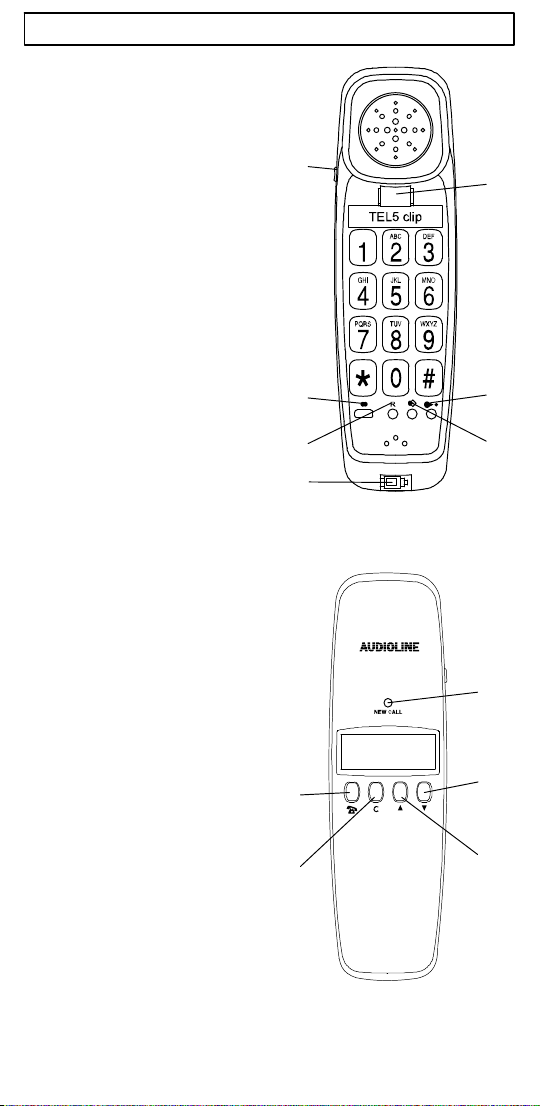
2 Bedienelemente
2.1 Hörer Innenseite
1. Trenntaste / Hörergabel
2. Kurzwahltaste
3. Speichertaste
4. Verbindung zum
Basisgerät
5. R-Signaltaste
6. Wahlwiederholung /
Pause
7. Einstellung der
Hörerlautstärke
2.2 Hörer Oberseite
8. Kontrollleuchte bei
neuen Anrufen
9. Auswahltaste abwärts
10. Auswahltaste aufwärts
11. Löschtaste
12. Wählen aus der
Anruferliste
12
7
6
5
4
1
2
3
8
9
11
10
7
Page 8
- Bedienelemente -
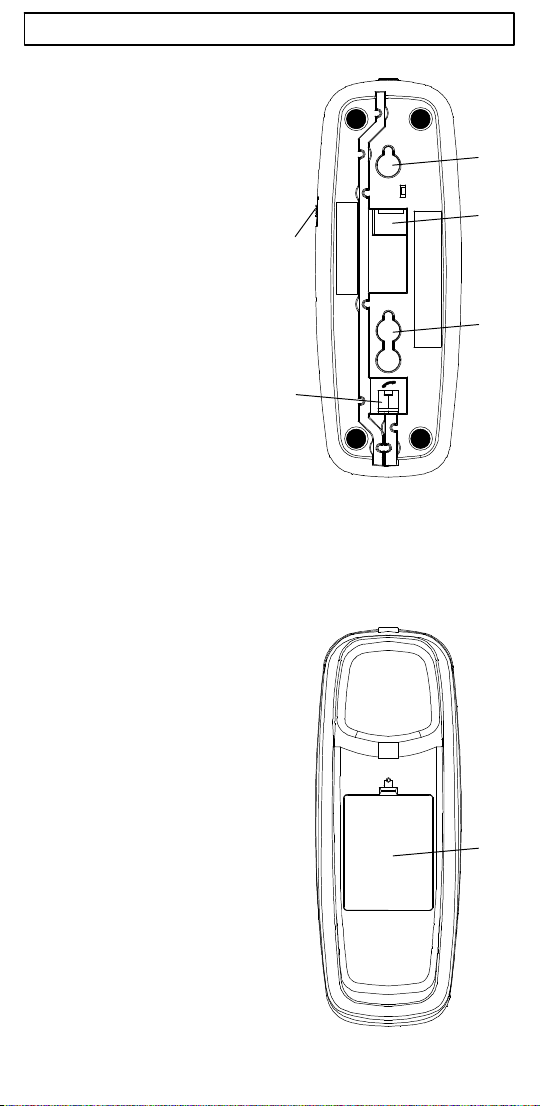
2.3 Unterseite Basisgerät
1. Befestigung für
Wandmontage
2. Anschluss Telefonkabel
3. Befestigung für
Wandmontage
4. Anschluss Spiralkabel
5. Einstellung der
Ruftonlautstärke
2.4 Innenseite Basisgerät
1
2
5
3
4
6. Batteriefach
8
6
Page 9

- Inbetriebnahme -
3 Inbetriebnahme
3.1 Allgemeine Hinweise
3.2 Verpackungsinhalt prüfen
Zum Lieferumfang gehören:
eine Telefonbasis ein Telefonhörer
ein Telefonanschlusskabel ein Spiralkabel
eine Bedienungsanleitung drei Batterien Typ AA
3.3 Telefonhörer anschließen
Nachdem Sie Ihr Telefon ausgepackt haben, müssen Sie
zuerst den Telefonhörer mit der Telefonbasis verbinden.
Nehmen Sie nun das kurze Ende des Spiralkabels und
stecken Sie es in die Buchse am unteren Ende des Hörers.
Drehen Sie die Telefonbasis um und stecken Sie das
andere Ende in die untere Buchse (siehe Kapitel 2,
Abschnitt Unterseite Basisgerät Punkt 4.). Klemmen Sie das
Kabel in den Kabelkanal nach außen.
3.4 Batterien einsetzen
Bevor Sie Ihr neues Telefon mit dem Telefonnetz verbinden,
sollten die Batterien eingebaut werden. Bitte benutzen Sie
immer qualitativ gute Batterien des Typs AA. Die Batterien
werden für die Displayanzeigen bei aufgelegtem Hörer
benötigt. Bevor Sie die Batterien einbauen oder wechseln,
achten Sie darauf, dass das Telefon nicht mit dem
Telefonnetz verbunden ist.
Die Batterien sollten ausgetauscht werden, wenn im Display
das Symbol \ angezeigt wird. Alle drei Batterien müssen
dann ersetzt werden. Bei entladenen Batterien bleibt das
Display dunkel.
3.5 Telefon anschließen
Verbinden Sie das beiliegende Telefonkabel mit der
Telefonsteckdose und der Telefonbuchse (siehe Kapitel 2,
Abschnitt Unterseite Basisgerät Punkt 2.) auf der Unterseite
der Telefonbasis. Führen Sie dann das Kabel durch die
Achtung: Lesen Sie vor der Inbetriebnahme un
bedingt die allgemeinen Hinweise am Anfang die
ser Bedienungsanleitung.
1. Das Batteriefach befindet sich in der Innenseite
der Telefonbasis.
2. Öffnen Sie das Batteriefach mit einem kleinen
Schraubenzieher oder einem spitzen Gegenstand.
3. Legen Sie die Batterien ein. Achten Sie dabei auf
die richtige Polung.
4. Schließen Sie das Batteriefach.
9
Page 10

- Inbetriebnahme -
Kabelführung entweder nach oben oder nach unten aus
dem Telefongehäuse heraus. Klemmen Sie das Kabel fest
in den Kabelkanal.
Das Telefon arbeitet mit dem MFV-Wählverfahren
(Tonwahl).
3.6 Wandmontage
Ihr Telefon ist auch zur Wandmontage geeignet. Benutzen
Sie zur Befestigung zwei Schrauben, bohren Sie zwei
Löcher im Abstand von 85 mm senkrecht untereinander und
lassen Sie die Schrauben 5 mm aus der Wand
herausstehen. Stecken Sie nun die Telefonbasis auf die
Schrauben und schieben Sie es etwas nach unten. Ist das
Telefon an einer Wand montiert, können Sie den Hörer an
das Telefon hängen, ohne dass die Verbindung
unterbrochen wird. Dazu befindet sich am oberen Ende der
Hörerablage ein kleiner Einhängehaken.
3.7 Datum und Uhrzeit einstellen
1. Drücken Sie für 4 Sekunden die Taste y.
2. Durch Drücken der y und z Tasten stellen
sie den Kontrast am LCD Display ein.
3. Bestätigen Sie mit der Taste C.
4. Durch Drücken der y und z Tasten stellen
sie die Flashzeit (100 ms oder 300 ms) ein.
5. Bestätigen Sie mit der Taste C.
6. Durch mehrmaliges Drücken der y und z
Tasten geben Sie die aktuelle Stunde ein.
7. Bestätigen Sie mit der Taste C. Der Cursor
springt zur Minutenanzeige.
8. Durch mehrmaliges Drücken der y und z
Tasten geben Sie die aktuellen Minuten ein.
9. Bestätigen Sie mit der Taste C. Der Cursor
springt zur Datumseingabe.
10. Durch mehrmaliges Drücken der
y und z Tasten geben Sie den aktuellen
Tag ein.
11. Bestätigen Sie mit der Taste C. Der Cursor
springt zur Monatsangabe.
12. Durch mehrmaliges Drücken der y und z
Tasten geben Sie den aktuellen Monat ein.
13. Bestätigen Sie mit der Taste C. Die Eingabe ist
nun beendet und die aktuellen Daten werden im
Display angezeigt.
Hinweis: Sind die Batterien vollständig entladen, müssen
die Uhrzeit und das Datum erneut eingeben
werden.
10
Page 11

- Bedienung -
4 Bedienung
4.1 Telefonieren
Ihr Telefon kann wie jedes konventionelle Telefon benutzt
werden.
1. Nehmen Sie den Telefonhörer ab und warten Sie
auf das Freizeichen.
2. Wählen Sie nun die gewünschte Telefonnummer.
Die gewählte Rufnummer wird im Display
angezeigt. Das Display zeigt maximal eine
Telefonnummer mit 14 Zahlen an. Ist die gewählte
Telefonnummer länger, werden nur die letzten 14
Zahlen angezeigt.
3. Um das Gespräch zu beenden, legen Sie den
Hörer wieder auf die Ablage zurück. Mit der
Trenntaste können Sie das laufende Gespräch
beenden und Sie erhalten direkt eine neue
Amtsleitung.
4.2 Anrufe entgegennehmen
Sobald Sie ein Anruf erreicht, hören Sie das Rufsignal. Das
Gespräch kann nun über den Hörer entgegengenommen
werden.
4.3 Anzeige der Gesprächsdauer
Während eines Gesprächs wird die Gesprächszeit im
Display in Minuten und Sekunden angezeigt. Die Anzeige
wird, nach dem Sie die Rufnummer gewählt haben, im
Display eingeblendet. Nach Beendigung des Gesprächs
bleibt die Anzeige noch für einige Sekunden im Display
erhalten.
4.4 Einstellen der Hörerlautstärke
Ist Ihnen die Hörerlautstärke zu leise oder zu laut, können
Sie diese Ihren Bedürfnissen anpassen.
Mit dem Schiebeschalter VOL. am Hörer können Sie die
Lautstärke von leise
4.5 Wahlwiederholung
Ist ein Anschluss, den Sie gewählt haben, besetzt oder
konnten Sie niemanden erreichen, legen Sie den
Telefonhörer einfach wieder auf. Die zuletzt gewählte
Rufnummer bleibt automatisch im Telefon gespeichert. Um
die Wahlwiederholung zu nutzen, gehen Sie wie folgt vor:
Heben Sie den Hörer ab und drücken Sie die
Wahlwiederholungstaste F. Die gespeicherte Rufnummer
der Wahlwiederholung wird nun gewählt.
auf laut anpassen.
11
Page 12

- Bedienung -
4.6 Einstellbarer Tonruf
Mit dem Schiebeschalter
Telefonbasis können Sie die Stellungen
(leise) auswählen, um die Lautstärke des Tonrufes Ihren
Bedürfnissen anzupassen. Möchten Sie einmal nicht gestört
werden, benutzen Sie die Stellung
4.7 Kurzwahlnummern speichern
Mit Ihrem Telefon können Sie 10 Rufnummern zur Kurzwahl
speichern. Als Speicherplätze dienen die Zahlen 0 bis 9 des
Zahlenfeldes.
1. Nehmen Sie den Telefonhörer ab.
2. Drücken Sie die Taste S, Das Display zeigt
SPEICHERN ?.
3. Drücken Sie erneut die Taste S. Der Cursor
blinkt und das Display zeigt SPEICHERPLATZ.
4. Drücken Sie den gewünschten Speicherplatz auf
dem Zahlenfeld zwischen 0 und 9.
auf der rechten Seite der
(laut) oder
(aus).
S Sollte der Speicherplatz bereits belegt sein, zeigt
das Display den Hinweis UEBERSCHREIBEN ?.
S Möchten Sie den Speicherplatz überschreiben,
drücken Sie erneut die Taste S.
S Möchten Sie den Speicherplatz nicht
überschreiben, drücken Sie einmal die Trenntaste
und wiederholen die komplette Eingabe.
5. Geben Sie nun die gewünschte Rufnummer mit
max. 22 Stellen ein.
6. Speichern Sie mit der Taste S. Das Display
zeigt GESPEICHERT !.
4.8 Kurzwahlnummern abrufen
Um eine gespeicherte Kurzwahlnummer anzurufen, gehen
Sie wie folgt vor:
1. Nehmen Sie den Telefonhörer ab.
2. Drücken Sie die Taste e und den gewünschten
Speicherplatz zwischen 0 und 9. Die gespeicherte
Rufnummer wird direkt angewählt.
12
Page 13

- Rufnummernanzeige (CLIP) -
5 Rufnummernanzeige (CLIP)
Mit der Rufnummernanzeige können Sie bei eingehenden
Gesprächen erkennen, wer Sie anruft. Wenn diese Funktion
an Ihrer Telefonleitung zur Verfügung steht, zeigt Ihnen das
Display bereits während des Klingelns die Rufnummer im
Display an. Das Display meldet folgende Information, wenn
keine Rufnummer zur Verfügung steht.
Erscheint im Display die Meldung LEITUNGSFEHLER,
wurde die Rufnummer nur teilweise oder fehlerhaft
empfangen.
Erscheint im Display die Meldung NICHT VERFUEGBAR,
ist die Information der Rufnummer nicht verfügbar. Es
könnte sich um ein internationales Gespräch handeln.
Erscheint im Display die Meldung PRIVAT, hat der Anrufer
das Senden seiner Rufnummer unterdrückt oder die
Nummer konnte nicht übermittelt werden.
Während Ihrer Abwesenheit werden alle Anrufe in der
Anruferliste mit Datum und Uhrzeit gespeichert. Bis zu 99
Rufnummern werden in der Anruferliste gespeichert. Sobald
die Liste voll ist, wird immer die älteste Rufnummer aus der
Liste gelöscht.
Wurden während Ihrer Abwesenheit Anrufe registriert, wird
dies im Display mit der Anzeige NEU angezeigt und die
Kontrollleuchte für neue Anrufe blinkt.
5.1 Anruferliste einsehen
Mit der Taste z gelangen Sie zur zuletzt registrierten
Rufnummern. Mit y und z können Sie dann in der
Anruferliste blättern. Alle registrierten Anrufe werden wie
folgt dargestellt:
Der Anruf ist neu Uhrzeit und Datum
Speicherplatz innerhalb
der Anruferliste
Rufnummer
des Anrufers
Der Anrufer
hat mehrmals
angerufen
REPEAT
Haben Sie den letzten Speicherplatz der Liste erreicht, zeigt
das Display die Meldung ENDE DER LISTE.
Hinweis: Werden alle neu aufgezeichneten Rufnummern
kontrolliert, erlischt die Kontrollleuchte für neue
Anrufe und die Anzeige NEU im Display zeigt ”00”.
Hinweis: Wird innerhalb von 30 Sekunden keine Taste
gedrückt, wird die Anruferliste verlassen und das
Display zeigt wieder die aktuelle Uhrzeit und das
13
Page 14

- Rufnummernanzeige (CLIP) -
Datum sowie die Anzahl der in der Anruferliste
gespeicherten Telefonnummern und die Anzahl
der neu gespeicherten Rufnummern an.
5.2 Telefonnummer aus der Anruferliste direkt
Sie können Telefonnummern aus der Anruferliste direkt
anwählen:
5.3 Telefonnummer aus der Anruferliste löschen
5.4 Komplette Anruferliste löschen
anwählen
1. Wählen Sie mit den Tasten y und z die
gewünschte Telefonnummer aus.
2. Um die Rufnummer zu wählen, drücken Sie die
Taste ~.
3. Haben Sie den Hörer bereits abgenommen, wird
die Rufnummer direkt angewählt. Bei aufgelegtem
Hörer erscheint die Displaymeldung HOERER
ABNEHMEN.
4. Heben Sie nun den Hörer ab. Das Display zeigt
WAEHLEN ... und die Verbindung wird hergestellt.
1. Wählen Sie mit den Tasten y und z die
Rufnummer aus der Anruferliste, die Sie löschen
möchten.
2. Drücken Sie einmal die Taste C. Das Display
zeigt die Meldung LOESCHEN ?.
3. Halten Sie nun sofort die Taste C für
2 Sekunden gedrückt. Die Rufnummer ist gelöscht
und das Display zeigt nun eine weitere
Rufnummer aus der Anruferliste an.
1. Wählen Sie eine beliebige Rufnummer aus der
Anruferliste.
2. Halten Sie nun die Taste C solange gedrückt,
bis im Display die Meldung ALLES LOESCHEN ?
erscheint.
3. Halten Sie nun sofort die Taste C für
2 Sekunden gedrückt, bis im Display die Meldung
KEINE ANRUFE erscheint.
14
Page 15

- Nebenstellenanlagen / Zusatzdienste -
6 Nebenstellenanlagen / Zusatzdienste
Die Taste R Ihres Telefons können Sie an
Nebenstellenanlagen und bei der Verwendung von
Zusatzdiensten Ihres Netzbetreibers nutzen.
6.1 R-Taste an Nebenstellenanlagen
Ist Ihr Telefon über eine Nebenstellenanlage
angeschlossen, können Sie über die Taste R alle
Möglichkeiten, wie z. B. Anrufe weiterleiten, automatischen
Rückruf usw., nutzen. An einer Nebenstellenanlage wird
eine Flash-Zeit von 100 ms benötigt (Einstellung
siehe Kapitel “Grundeinstellungen”). Ob Ihr Telefon an Ihrer
Nebenstellenanlage einwandfrei funktioniert, erfahren Sie
bei dem Händler, bei dem die Anlage gekauft wurde.
6.2 R-Taste und die Zusatzdienste Ihres
Ihr AUDIOLINE-Telefon unterstützt die wichtigsten
Zusatzdienste Ihres Netzbetreibers (z. B. Makeln,
Anklopfen, Dreier-Konferenz). Zur Freischaltung der
Zusatzdienste wenden Sie sich bitte an Ihren Netzbetreiber.
6.3 Wahlpause
Bei Nebenstellenanlagen ist es erforderlich, eine bestimmte
Nummer zu wählen (z. B. “9” oder “0“), um ein Freizeichen
für eine Amtsleitung zu bekommen. Bei wenigen, älteren
Nebenstellenanlagen dauert es einige Zeit, bis das
Freizeichen zu hören ist. Speziell für diese
Nebenstellenanlagen kann nach der Amtsholung eine
automatische Pause eingefügt werden, so dass Sie direkt
weiter wählen können, ohne das Freizeichen abzuwarten.
Drücken Sie zwischen der Amtskennziffer und der
Rufnummer einmal die Taste F. Nach der Amtsholung
wartet Ihr Telefon für 3 Sekunden mit dem Wählen der
eigentlichen Telefonnummer.
Netzbetreibers
15
Page 16

- Wichtige Informationen -
7 Wichtige Informationen
7.1 Garantie
AUDIOLINE - Geräte werden nach den modernsten
Produktionsverfahren hergestellt und geprüft. Ausgesuchte
Materialien und hoch entwickelte Technologien sorgen für
einwandfreie Funktion und lange Lebensdauer. Die Garantie
gilt nicht für die in den Produkten verwendeten
Standard-Akkus oder Akkupacks. Die Garantiezeit beträgt
24 Monate, gerechnet vom Tage des Kaufs.
Innerhalb der Garantiezeit werden alle Mängel, die auf
Material- oder Herstellungsfehler zurückzuführen sind,
kostenlos beseitigt. Der Garantieanspruch erlischt bei
Eingriffen durch den Käufer oder durch Dritte. Schäden, die
durch unsachgemäße Behandlung oder Bedienung, durch
falsches Aufstellen oder Aufbewahren, durch
unsachgemäßen Anschluss oder Installation sowie durch
höhere Gewalt oder sonstige äußere Einflüsse entstehen,
fallen nicht unter die Garantieleistung. Wir behalten uns vor,
bei Reklamationen die defekten Teile auszubessern oder zu
ersetzen oder das Gerät auszutauschen. Ausgetauschte
Teile oder ausgetauschte Geräte gehen in unser Eigentum
über. Schadenersatzansprüche sind ausgeschlossen,
soweit sie nicht auf Vorsatz oder grober Fahrlässigkeit des
Herstellers beruhen.
Sollte Ihr Gerät dennoch einen Defekt innerhalb der
Garantiezeit aufweisen, wenden Sie sich bitte unter Vorlage
Ihrer Kaufquittung ausschließlich an das Geschäft, in dem
Sie Ihr AUDIOLINE - Gerät gekauft haben. Alle
Gewährleistungsansprüche nach diesen Bestimmungen
sind ausschließlich gegenüber Ihrem Fachhändler geltend
zu machen. Nach Ablauf von zwei Jahren nach Kauf und
Übergabe unserer Produkte können Gewährleistungsrechte
nicht mehr geltend gemacht werden.
8 Konformitätserklärung
Dieses Gerät erfüllt die Anforderungen der EU-Richtlinie:
1999/5/EG Richtlinie über Funkanlagen und
Telekommunikationsendeinrichtungen und die gegenseitige
Anerkennung ihrer Konformität. Die Konformität mit der o. a.
Richtlinie wird durch das CE-Zeichen auf dem Gerät
bestätigt. Für die komplette Konformitätserklärung nutzen
Sie bitte den kostenlosen Download von unserer Website
www.audioline.de
.
16
Page 17

- Contents -
1 General Information 19................
1.1 Intended use 19............................
1.2 Installation location 19.......................
1.3 Private branch exchanges 19.................
1.4 Information on disposal 20...................
1.5 Temperature and ambient conditions 20.......
1.6 Cleaning and upkeep 20.....................
2 User Controls 21......................
2.1 Inside the receiver 21.......................
2.2 Upper side of receiver 21....................
2.3 Underside of base unit 22....................
2.4 Inside of base unit 22.......................
3 Setting up 23.........................
3.1 Safety Information 23.......................
3.2 Check contents of pack 23...................
3.3 Connecting the receiver 23...................
3.4 Fitting the batteries 23.......................
3.5 Connecting the telephone 23.................
3.6 Wall mounting 24...........................
3.7 Adjust date and time 24.....................
4 Operation 25..........................
4.1 Making a call 25............................
4.2 Receiving calls 25..........................
4.3 Call Duration Display 25.....................
4.4 Adjusting the receiver volume 25..............
4.5 Redial facility 25............................
4.6 Adjusting the receiver volume 25..............
4.7 Storing speed dial numbers 26...............
4.8 Calling up speed dial numbers 26.............
5 Caller display (CLIP) 27................
5.1 Viewing the caller list 27.....................
5.2 Dialling a telephone number directly from the caller
list 28.....................................
5.3 Deleting telephone numbers from the caller list 28
5.4 Deleting the entire caller list 28...............
17
Page 18

- Contents -
6 Private Branch Exchanges /
Supplementary Services 29............
6.1 R-button on Private Exchanges 29............
6.2 R-button and supplementary services offered by
your telephone network provider 29...........
6.3 Dialling pause 29...........................
7 Important information 30..............
7.1 Fault finding 30.............................
7.2 Guarantee 30..............................
8 Important Notes on the Guarantee 31...
18
Page 19

- General Information -
1 General Information
Please read this operating instruction manual thoroughly.
Under no circumstances open the device or complete any
repair work yourself. In the case of claims under the terms of
guarantee, contact your sales outlet. We reserve the right to
make technical and optical modifications to the product
during the course of product improvement.
1.1 Intended use
This telephone has been developed for use when connected
to an analogue telephone network connection (PSTN).
However, due to the different services offered by the various
telecommunication network providers, there is no guarantee
that the equipment will function trouble-free on every
telecommunication terminal connection. Only connect the
telephone line from the telephone to a telephone line socket
designed for it. Never change the plug on the connection
cable.
1.2 Installation location
Place the telephone on a level, non-slip surface. Normally,
the footpads on the telephone do not leave any marks on
the surface where it is located. However, due the diverse
types of paints and surfaces which come into question, it
cannot be fully ruled out that the footpads will leave marks
on the surface on which it is located.
1.3 Private branch exchanges
The telephone can also be connected to a private branch
exchange. Ask the dealer where your private branch
exchange was purchased whether the telephone will
function properly on the private branch exchange. There is
no guarantee that the telephone will work on every private
branch exchange.
19
Page 20

- General Information -
1.4 Information on disposal
The implementation of European law in national laws and
directives obliges you to dispose of consumable goods
appropriately. This serves to protect both persons and the
environment.
The adjacent symbol indicates that
electrical and electronic apparatus no l
onger required must be disposed of s
eparate from domestic waste.
Equipment which is old or has outlived
its service life must be disposed of at a
suitable collection point provided by the
public waste authorities.
Batteries and power packs must be disposed of at the
point of sale or at the appropriate collection
points provided by the public waste authorities.
Packaging materials must be disposed of according to
local regulations.
1.5 Temperature and ambient conditions
The telephone is designed for use in protected rooms with a
temperature range from 10 °C to 30 °C. The telephone
should not be used in rooms exposed to moisture, such as
bathrooms or laundries. Do not locate the device in the
vicinity of sources of heat such as radiators, and never
expose it to direct sunlight.
Prevent excessive exposure to smoke, dust, vibration,
chemicals, moisture, heat and direct sunlight.
1.6 Cleaning and upkeep
Clean the housing surfaces with a soft, dry, fluff-free cloth.
Never use cleaning agents or solvents. Apart from
occasionally cleaning the housing, no other upkeep is
necessary. The rubber footpads on the telephone are not
resistant to all cleaning agents. The manufacturer is not
liable for any claims for damage to furniture or such.
20
Page 21

- User controls -
2 User Controls
2.1 Inside the receiver
1. Disconnect button/
receiver rest
2. Speed dial button
3. Store button
4. Connection to base unit
5. R Signal button
6. Redial / Pause
7. Receiver volume
adjustment
2.2 Upper side of receiver
8. Indicator light for new
calls
9. Selector key, down
10. Selector key, up
11. Delete button
12. Dialling from the
caller list
12
7
6
5
4
1
2
3
8
9
11
10
21
Page 22

- User controls -
2.3 Underside of base unit
1. Fixing for wall mounting
2. Connection for
telephone cable
3. Fixing wall mounting
4. Connection for spiral
receiver cable
5. Ringer volume
adjustment
2.4 Inside of base unit
6. Battery compartment
5
4
1
2
3
22
6
Page 23

- Setting up -
3 Setting up
3.1 Safety Information
Caution: Before setting up, it is essential that you
read the General Information at the beginning of
this manual.
3.2 Check contents of pack
The following items are supplied:
one telephone base one telephone receiver
one telephone connecting
cable
one instruction manual three AA batteries
3.3 Connecting the receiver
After unpacking your telephone, you must first connect the
telephone receiver to the telephone base. First take one end
of the spiral cable and plug it into the socket at the bottom of
the receiver. Turn the telephone over and plug the other end
into the lower socket (see Chapter 2, Section entitled
Underside of base unit, Item 4.). Bring the cable out via the
cable duct.
3.4 Fitting the batteries
Before connecting your new telephone to the telephone
network, the batteries should be fitted. Please always use a
good type of AA batteries. No messages will be shown in the
display if the batteries are not fitted. Before installing or
changing the battery, make sure that the telephone is not
connected to the telephone network.
one spiral cable
1. The battery compartment is to be found on the
inside of your telephone base.
2. Open the battery compartment with a small
screwdriver or a pointed object.
3. Insert the batteries, ensuring that the polarity is
correct.
4. Close the battery compartment.
The battery should be changed when the \ symbol
appears in the display. All three batteries must then be
changed. If the batteries become discharged, the display will
go dark.
3.5 Connecting the telephone
Connect the telephone cable supplied to the telephone
socket and the telephone jack on the underside of the
23
Page 24

- Setting up -
telephone base (see Chapter 2, Section entitled Underside
of base unit, Item 2.). Then feed the cable out of the
telephone housing through the cable guide either towards
the top or the bottom. Secure the cable firmly in the cable
duct. The telephone works using the MF system (Tone
Dialling).
3.6 Wall mounting
Your telephone is also suitable for wall mounting. Use two
screws for fixing to the wall. Drill two holes 85 mm apart,
vertically one above the other, and leave the screws
protruding 5 mm from the wall. Now place the telephone
base over the screws and push down slightly.
When the telephone is mounted on a wall, you can hang the
receiver on the telephone without cutting off the call. A small
hook is located at the top of the receiver rest for this
purpose.
3.7 Adjust date and time
1. Press the button y for 4 seconds.
2. Press the y or z button to set the contrast in
the LC display.
3. Confirm with the C button.
4. Press the y or z button to set the Recall
time (100 ms or 300 ms).
5. Confirm with the C button.
6. Enter the current hour by repeatedly pressing the
y or z buttons.
7. Confirm with the C button. The display jumps to
the minutes display.
8. Enter the current minutes by repeatedly pressing
the y or z buttons.
9. Confirm with the C button. The cursor jumps to
the day display.
10. Enter the current day by repeatedly pressing the
y or z buttons.
11. Confirm with the C button. The cursor jumps to
the month display.
12. Enter the current month by repeatedly pressing
the y or z buttons.
13. Confirm with the C button. This completes the
entries and the current data will now be shown in
the display.
Note: If the batteries are fully discharged, the time and
date must be re-entered.
24
Page 25

- Operation -
4 Operation
4.1 Making a call
Your telephone can be used like any conventional
telephone.
1. Lift the receiver and wait until you hear the dialling
tone.
2. Now dial the required telephone number. The
display can show a telephone number with a
maximum of 14 digits. If the number dialled is
longer than this, only the last 14 digits will be
displayed.
3. To end the call, replace the receiver on the rest.
You can end the current call by using the
disconnect button and you will immediately obtain
a new dialling tone.
4.2 Receiving calls
When a call comes through, you will hear the ringing tone.
The call can now be accepted using the receiver.
4.3 Call Duration Display
The call duration is shown in the display in minutes and
seconds during a call. The indication starts after the number
has been dialled. The call duration still remains showing in
the display for a few seconds after the call has been ended.
4.4 Adjusting the receiver volume
If the receiver volume is too quiet or too loud for you, you
can change this to suit your requirements.
You can adjust the volume from soft
the VOL. slide switch on the receiver.
4.5 Redial facility
If a connection that you have dialled is engaged or you were
unable to get through to anybody, simply replace the
receiver. The last number dialled remains stored in the
telephone automatically. To use the redial facility, proceed
as follows:
Lift the receiver and press the redial button F. The stored
redial number will now be dialled.
4.6 Adjusting the receiver volume
By means of the slide switch
telephone base you can choose the settings
(soft) to match the volume of the ringing tone to your
requirements. If at any time you do not want to be disturbed,
use the
(off) setting.
to loud using
on the right side of the
(loud) or
25
Page 26

- Operation -
4.7 Storing speed dial numbers
Your telephone allows you to store 10 numbers for speed
dialling. The numbers 0 to 9 on the number pad are used as
memory locations.
1. Lift the receiver.
2. Press the S button and the display will show
SPEICHERN ?.
3. Press the S button again. The cursor will flash
and the display will show SPEICHERPLATZ.
4. Press the required memory location between 0
and 9 on the number pad.
S If the memory location is already occupied, the
display will show the message
UEBERSCHREIBEN ?.
S If you want to overwrite the memory location,
press the S button again.
S If you do not want to overwrite the memory
location, press the disconnect button once and
repeat the entire process.
5. Now enter the required telephone number with a
maximum of 22 digits.
6. Save with the S button. The display will show
GESPEICHERT !.
4.8 Calling up speed dial numbers
To call a saved speed dial number, proceed as follows:
1. Lift the receiver.
2. Press the e button and the required storage
location between 0 and 9. The saved telephone
number will be dialled directly.
26
Page 27

- Caller display (CLIP) -
5 Caller display (CLIP)
In the case of incoming calls, you can see who is calling you
by means of the caller display facility. If this function is
available on your line, the display shows you the caller's
telephone number while the telephone is ringing. The
display reports the following information when there is no
telephone number available.
If the message LEITUNGSFEHLER appears in the display,
the number has only been partially or incorrectly received.
If the message NICHT VERFUEGBAR or
FERNGESPRAECH appears in the display, the particulars
of the number are not available. This could have been an
international call.
If the message PRIVAT appears in the display, the caller
has suppressed the transmission of his telephone number or
it was not possible to transmit the number.
In your absence, all calls will be saved in a caller list with
date and time. Up to 99 numbers are saved in the caller list.
When the list is full, the oldest number is always deleted
from the list.
If calls are registered during your absence, this will be
indicated in the display by the message NEU and the
indicator light for new calls will flash.
5.1 Viewing the caller list
Use the z button to move to the last phone number
registered. You can then page through the caller list with
y and z . All calls registered will be shown as follows:
The call is new Time and date
Memory location in the
caller list
Phone
number of
the caller
The caller
called
several times
REPEAT
When you reach the last storage location in the list, the
display will show the message ENDE DER LISTE.
Note: When all newly recorded numbers have been
checked, the new call indicator light goes off and
the NEU indicator in the display shows ”00”.
Note: If no button is pressed within 30 seconds, the
caller list is no longer displayed and the display
shows the current time and date once more along
with the number of telephone numbers stored in
27
Page 28

- Caller display (CLIP) -
the caller list and the number of newly stored
telephone numbers.
5.2 Dialling a telephone number directly from the
You can dial telephone numbers directly from the caller list.
5.3 Deleting telephone numbers from the caller list
5.4 Deleting the entire caller list
caller list
1. Select the required telephone number using the
y and z buttons.
2. To dial the number, press the ~.button.
3. If you have already lifted the receiver, the number
will be dialled directly. If the receiver is in place,
the message HOERER ABNEHMEN. will appear
in the display.
4. Pick up the handset. The display will show the
message WAEHLEN ... and the number will be
dialed.
1. Select the telephone number from the caller list
that you want to delete with the y and z
buttons.
2. Press the delete button C once. The display will
show the message LOESCHEN ?.
3. Now immediately press and hold the delete
button C for 2 seconds. The number will be
deleted and the display will now show another
number from the caller list.
1. Select any telephone number from the caller list.
2. Hold the C button pressed until the message
ALLES LOESCHEN ? appears in the display.
3. Now immediately press and hold the C button
again for 2 seconds until the message KEINE
ANRUFE appears in the display.
28
Page 29

- Private Branch Exchanges -
6 Private Branch Exchanges /
Supplementary Services
The R button on the handset is used in private branch
exchanges and for taking advantage of supplementary
services provided by telephone network provider.
6.1 R-button on Private Exchanges
If the telephone is connected to a private branch exchange,
all the functions associated with the
transferring calls, automatic call back, etc., can be used. A
private branch exchange requires a Flash time of 100 ms.
The dealer where you purchased the exchange can provide
information as to whether the telephone will work properly
with the exchange.
6.2 R-button and supplementary services offered
by your telephone network provider
Your AUDIOLINE telephone supports the most important
supplementary services provided by your telephone network
provider (e.g. brokering, call waiting, three-way
conferencing, etc.). Please contact your telephone network
provider with regard to enabling the supplementary services.
6.3 Dialling paus
In the case of private branch exchanges, it is necessary to
dial a specific number (e.g. “9” or “0”) in order to obtain the
dialling tone for an outside line. When using some older
private branch exchanges, it takes a little time before the
dialling tone becomes audible. Particularly in the case of
such private branch exchanges, it is possible to insert an
automatic pause after the number for the outside line so that
the number can be dialled in a continuous process without
having to wait for the dialling tone.
Press the F button once between dialling the number for
the outside line and the actual phone number.
the number for the outside line, the telephone waits 3
seconds before dialling the actual phone number.
e
R button, such as
After dialling
29
Page 30

- Important information -
7 Important information
7.1 Fault finding
Remove all extra telephone equipment and connect only the
telephone directly to the telephone socket.
If the fault is still present, connect another telephone (if
available) to the telephone socket. The results will show you
whether the fault lies with the unit or with the telephone line.
7.2 Guarantee
AUDIOLINE equipment is produced and tested according to
the latest production methods. The implementation of
carefully chosen materials and highly developed
technologies ensure trouble-free functioning and a long
service life. The terms of guarantee do not apply where the
cause of equipment malfunction is the fault of the telephone
network operator or any interposed private branch extension
system. The terms of guarantee do not apply to the standard
batteries or power packs used in the products. The period of
guarantee is 24 months from the date of purchase.
All deficiencies resulting from material or production faults
which occur during the period of guarantee will be eliminated
free of charge. Rights to claims under the terms of
guarantee are annulled following intervention by the
purchaser or third parties. Damage caused as a result of
improper handling or operation, incorrect positioning or
storing, improper connection or installation, Acts of God or
other external influence are not covered by the terms of
guarantee. In the case of complaints, we reserve the right to
repair or replace defect parts or provide a replacement
device. Replacement parts or devices become our property.
Rights to compensation in the case of damage are excluded
where there is no evidence of intent or gross negligence by
the manufacturer.
If your device shows signs of defect during the period of
guarantee, please return it to the sales outlet in which you
purchased the AUDIOLINE device together with the
purchase receipt. All rights to claims under the terms of
guarantee in accordance with this agreement must be
asserted exclusively with regard to your sales outlet. Two
years after the purchase and transfer of our products, claims
under the terms of guarantee can no longer be asserted.
30
Page 31

Important Notes on the Guarantee
8 Important Notes on the Guarantee
The period of guarantee for the AUDIOLINE product begins
on the date of purchase. Rights to claims under the terms of
guarantee relate to deficiencies resulting from material or
production faults. Rights to claims under the terms of
guarantee are annulled following intervention by the
purchaser or third parties. Damage caused as a result of
improper handling or operation, normal wear and tear,
incorrect positioning or storing, improper connection or
installation, Acts of God or other external influence are not
covered by the terms of guarantee.
CLAIMS UNDER THE TERMS OF GUARANTEE MAY
ONLY BE ASSERTED TO THE RETAILER WHERE THE
EQUIPMENT WAS PURCHASED, WHEREBY THE
PURCHASE RECEIPT MUST ALSO BE SUBMITTED.
TO PREVENT UNNECESSARY LONG DELAYS,
PLEASE DO NOT
COMPLAINT TO OUR OFFICE ADDRESS.
SEND EQUIPMENT UNDER
IN THE CASE OF QUESTIONS CONCERNING
OPERATION OR THE TERMS OF GUARANTEE,
PLEASE REFER TO THE OPERATING MANUAL.
AUDIOLINE GmbH
Neuss
Internet: www.audioline.de - E-mail: info@audioline.de
31
Page 32

- WICHTIGE GARANTIEHINWEISE -
Die Garantiezeit für Ihr AUDIOLINE - Produkt beginnt mit
dem Kaufdatum. Ein Garantieanspruch besteht bei Mängeln,
die auf Material- oder Herstellungsfehler zurückzuführen
sind. Der Garantieanspruch erlischt bei Eingriffen durch den
Käufer oder durch Dritte. Schäden, die durch
unsachgemäße Behandlung oder Bedienung, natürliche
Abnutzung, durch falsches Aufstellen oder Aufbewahren,
durch unsachgemäßen Anschluss oder Installation sowie
durch höhere Gewalt oder sonstige äußere Einflüsse
entstehen, fallen nicht unter die Garantieleistung.
BITTE WENDEN SIE SICH IM GARANTIEFALL
AUSSCHLIESSLICH AN DEN HÄNDLER, BEI DEM SIE
DAS GERÄT GEKAUFT HABEN UND VERGESSEN SIE
NICHT, DEN KAUFBELEG VORZULEGEN.
UM UNNÖTIG LANGE WARTEZEITEN ZU VERMEIDEN,
SENDEN SIE REKLAMATIONSGERÄTE BITTE NICHT
AN UNSERE BÜROADRESSE.
BEI FRAGEN ZUR BEDIENUNG UND
GARANTIELEISTUNG LESEN SIE BITTE DIE
BEDIENUNGSANLEITUNG.
AUDIOLINE GmbH
Neuss
Internet: www.audioline.de - E-mail: info@audioline.de
4 250711 991630
Version 1.3 - 29.01.2013
 Loading...