

Page 1
Telefon mit Rufnummernanzeige
Telephone with Caller Display
Bedienungsanleitung
Operating Instructions
TEL39G CLIP
Page 2

INHALTSVERZEICHNIS TELEFON 39G CLIP
Sicherheitshinweise .........................................................3
1.
Bedienelemente ................................................................ 4
2.
Installation.........................................................................5
2.1 Telefonhörer anschliessen...................................................5
2.2 Batterien einsetzen..............................................................5
2.3 Telefon anschliessen ........................................................... 5
2.4 Wandmontage .....................................................................6
2.5 Hörgeräte kompatibel........................................................... 6
2.6 T-NET Anpassung ...............................................................6
2.7 Displaykontrast einstellen.................................................... 6
2.8 Standardeinstellungen programmieren................................ 6
3. Bedienung ......................................................................... 8
3.1 Telefonieren über den Hörer oder die
Freisprecheinrichtung .......................................................... 8
3.2 Anrufe entgegennehmen .....................................................9
3.3 Wahlwiederholung ............................................................... 9
3.4 Anzeige der Gesprächsdauer..............................................9
3.5 Rufnummern im Telefonbuch speichern............................ 10
3.5.1 Rufnummer im Telefonbuch speichern.................................10
3.5.2 Wählen aus dem Telefonbuch..............................................10
3.6 Einstellbarer Tonruf............................................................ 10
4.
Rufnummernanzeige (CLIP) .......................................... 11
4.1 Anruferliste einsehen............................................................12
4.2 Telefonnummer aus der Anruferliste
direkt anwählen.................................................................. 13
4.3 Telefonnummer aus der Anruferliste löschen ...................13
4.4 Komplette Anruferliste löschen ..........................................13
5. Die "R" Signaltaste.........................................................14
5.1 R Taste an Nebenstellenanlagen ....................................14
5.2 R Taste und die T- NET-Funktionen
der DEUTSCHEN TELEKOM ............................................ 14
5.3 Telefonnummern wählen und speichern
bei dem Betrieb an Nebenstellenanlagen ..........................15
6. Wichtige Hinweise ..........................................................16
6.1 Fehlersuche ....................................................................... 16
6.2 Telefonkabel austauschen................................................. 16
6.3 Garantie............................................................................. 17
6.4 Konformitätserklärung........................................................ 18
Operating Instructions .............................................................19
2
Page 3

TELEFON 39G CLIP SICHERHEITSHINWEISE
SICHERHEITSHINWEISE
Bedienungsanleitung: Bitte lesen Sie diese Bedienungsanleitung
sorgfältig durch. Bei eventuell auftretenden Fragen, wenden Sie sich bitte
an unseren Service unter der Hotline - Rufnummer 0180 5 00 13 88.
Öffnen Sie das Gerät in keinem Fall selbst und führen Sie keine eigenen
Reparaturversuche aus. Bei Garantieansprüchen wenden Sie sich bitte
an Ihren Fachhändler.
Entsorgung: Ist die Gebrauchszeit der Batterien oder der gesamten
Anlage abgelaufen, entsorgen Sie diese bitte umweltfreundlich gemäss
den gesetzlichen Bestimmungen.
Pflege: Die Gehäuseoberflächen können mit einem trockenen, weichen
und fusselfreien Tuch gereinigt werden. Niemals Reinigungsmittel oder
gar aggressive Lösungsmittel verwenden.
Temperatur und Umgebungsbedingungen: Das Gerät ist für den
Betrieb in geschützten Räumen mit einem Temperaturbereich von +5 °C
bis 45 °C ausgelegt. Das Gerät darf nicht in Feuchträumen wie Bad oder
Waschküche aufgestellt werden. Vermeiden Sie die Nähe zu
Wärmequellen wie Heizkörpern und setzen Sie das Gerät keiner direkten
Sonnenbestrahlung aus. Es ist völlig normal, dass sich das Telefon beim
täglichen Gebrauch erhitzen kann. Wir empfehlen daher, dieses Produkt
nicht auf antiken Möbeln, Furnieren oder anderen Holzoberflächen zu
benutzen.
Anschlusshinweise: Das AUDIOLINE Telefon 39G CLIP besitzt die
Voraussetzungen an einer TAE-Steckdose mit F-/N- Codierung
gemeinsam mit anderen Anschlussgeräten wie Fax, Anrufbeantworter
oder einem Modem benutzt zu werden.
Zulassung und CE-Zeichen: Das Gerät ist für den Einsatz im
europäischen Telefonnetz freigegeben. Dieses Gerät erfüllt die
Anforderungen der EU-Richtlinien. Die Konformität des Gerätes mit den
oben genannten Richtlinien wird durch das CE-Kennzeichen bestätigt.
Die Konformitätserklärung finden Sie am Ende dieser Anleitung.
3
Page 4
BEDIENELEMENTE TELEFON 39G CLIP
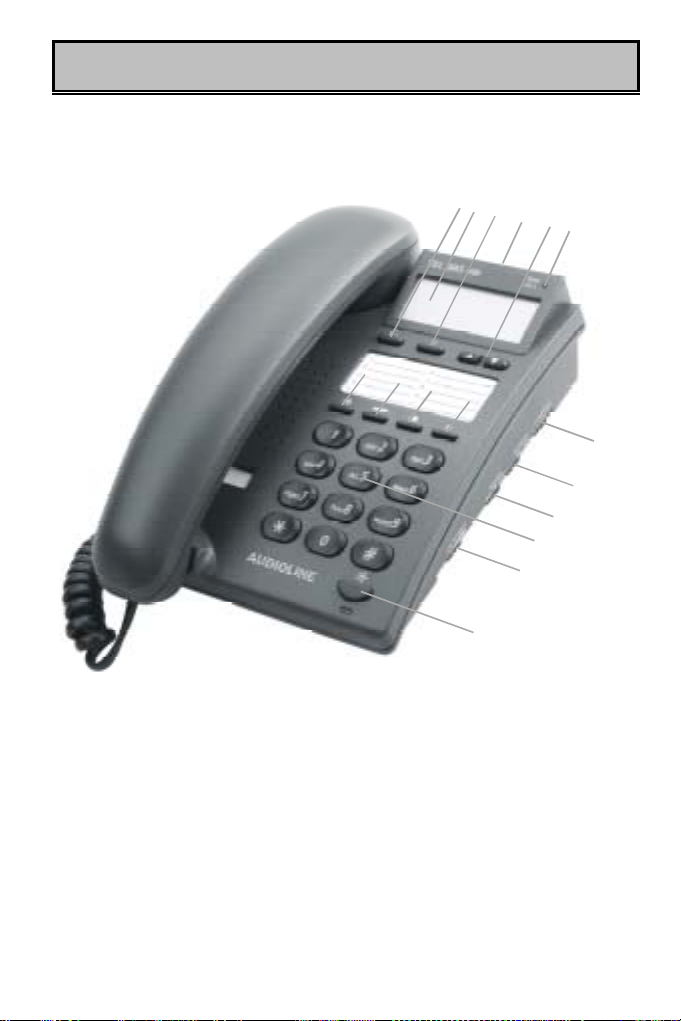
1. BEDIENELEMENTE
1
2
3
4
5
6
7
8
9
10
13
14
15
11
12
1. Taste Wählen
2. Display
3. Taste Löschen
4. Telefonanschluss (hinten)
5. Auswahltasten
6. LED Neuer Anruf (New call)
7. Speichertaste
8. Telefonbuch/Kurzwahl
4
16
9. Wahlwiederholung
10. R Signaltaste
11. Schieberegler Contrast
12. Schieberegler Flash
13. Schieberegler Klingel
14. Zahlenfeld, 1-9,0. * und #
15. Lautstärke Freisprechen
16. Freisprechtaste
Page 5

TELEFON 39G CLIP INSTALLATION
2. INSTALLATION
2.1 TELEFONHÖRER ANSCHLIESSEN
Nachdem Sie Ihr Telefon ausgepackt haben, müssen Sie zuerst den
Telefonhörer mit dem Grundgerät verbinden. Das dazu benötigte
Spiralkabel hat zwei identische Anschlüsse, so dass Sie nichts
verwechseln können. Nehmen Sie nun das eine Ende des Spiralkabels
und stecken Sie es in die Buchse am unteren Ende des Hörers. Das
andere Ende stecken Sie in die Buchse auf der linken Seite des
Grundgerätes.
2.2 BATTERIEN EINSETZEN
Bevor Sie Ihr neues Telefon mit dem Telefonnetz verbinden, sollten die
Batterien eingebaut werden. Bitte benutzen Sie immer Batterien des Typs
AAA Alkaline. Die Batterien werden für die Rufnummernanzeige, die
Freisprecheinrichtung und für weitere Funktionen des Telefons benötigt.
Bevor Sie die Batterien einbauen oder wechseln, achten Sie darauf, dass
das Telefon nicht mit dem Telefonnetz verbunden ist.
1. Das Batteriefach befindet sich auf der Unterseite Ihres Telefons.
2. Öffnen Sie das Batteriefach mit einem kleinen Schraubenzieher oder
einem spitzen Gegenstand.
3. Legen Sie die Batterien ein. Achten Sie dabei auf die richtige Polung.
4. Schliessen Sie das Batteriefach.
Die Batterien sollten ausgetauscht werden, wenn im Display das Symbol
angezeigt wird. Alle vier Batterien müssen dann ersetzt werden,
damit die Rufnummernanzeige und die gespeicherten Telefonnummern
wieder einwandfrei funktionieren.
2.3 TELEFON ANSCHLIESSEN
Verbinden Sie das beiliegende Telefonkabel mit der Telefonsteckdose
und der Telefonbuchse auf der Rückseite des Telefons. Das AUDIOLINE
TELEFON 39G CLIP arbeitet mit dem MFV-Wählverfahren (Tonwahl).
5
Page 6

INSTALLATION TELEFON 39G CLIP
2.4 WANDMONTAGE
Ihr AUDIOLINE TELEFON 39G CLIP ist auch zur Wandmontage
geeignet. Benutzen Sie zur Befestigung die zwei Schrauben, bohren Sie
zwei Löcher im Abstand von 83 mm und lassen Sie die Schrauben 5 mm
aus der Wand herausstehen. Stecken Sie nun das Telefon auf die
Schrauben und schieben Sie es etwas nach unten.
2.5 HÖRGERÄTE KOMPATIBEL
Das Telefon besitzt eine Spezialschaltung auf Induktionsbasis zur
Sprachübertragung an Hörgeräte. Bitte stellen Sie Ihr Hörgerät auf T.
2.6 T-NET ANPASSUNG
Ihr AUDIOLINE TELEFON 39G CLIP unterstützt die wichtigsten
Mehrwertdienste der DEUTSCHEN TELEKOM (z.B.: Makeln, Anklopfen,
Dreier-Konferenz, u.a.). Dazu benötigen Sie die Einstellung FLASH an
Ihrem Telefon. Weitere Informationen erhalten Sie unter Punkt 5. Zur
Freischaltung Ihrer Leitung für diese Funktionen (die z.T.
gebührenpflichtig sind) wenden Sie sich bitte an die DEUTSCHE
TELEKOM.
2.7 DISPLAYKONTRAST EINSTELLEN
Der Displaykontrast kann mit dem Schiebeschalter KONTRAST auf der
rechten Seite in drei Stufen eingestellt werden.
2.8 STANDARDEINSTELLUNGEN PROGRAMMIEREN
Bevor Sie Ihr neues Telefon benutzen können, müssen einige
Einstellungen vorgenommen werden. Telefonnummern werden im
Display immer mit der Ortsvorwahl oder bei Auslandsgesprächen auch
mit der entsprechenden Landesvorwahl angezeigt. Werden diese
Rufnummern direkt über die Anruferliste gewählt, kann bei
Ortsgesprächen die Vorwahl natürlich weggelassen werden. Deshalb
sollten Sie Ihre Ortsvorwahl und die Landesvorwahl von Deutschland
(0049) eingeben. Weiterhin kann hier Datum und Uhrzeit eingegeben
werden. Bitte beachten Sie die folgenden Hinweise:
1. Halten Sie die Tasten
2. Das Display zeigt -----, Ortsvorwahl. Geben Sie nun über das
Zahlenfeld Ihre Ortsvorwahl mit max. 5 Stellen ein.
und für 4 Sekunden gedrückt.
6
Page 7
TELEFON 39G CLIP INSTALLATION
3. Drücken Sie die Taste
Landesvorwahl im Display sehen . Bei der Eingabe einer 5-stelligen
Ortsvorwahl springt das Display direkt zur nächsten Eingabe
Landesvorwahl.
4. Geben Sie nun über das Zahlenfeld Ihre Landesvorwahl 0049 für
Deutschland ein.
5. Drücken Sie die Taste
DATUM? im Display sehen. Das Display blinkt zur Eingabe der
aktuellen Stunde.
6. Geben Sie jetzt über die Tasten
zwischen 00 und 23 ein und bestätigen Sie mit der Taste
Display blinkt nun zur Eingabe der Minuten.
7. Geben Sie jetzt über die Tasten
Minutenangabe zwischen 1 und 59 ein und bestätigen Sie mit der
Taste
8. Geben Sie jetzt über die Tasten
Tagesangabe zwischen 1 und 31 ein und bestätigen Sie mit der
Taste
9. Geben Sie jetzt über die Tasten
zwischen 1 und 12 ein und bestätigen Sie mit der Taste . Die
Eingabe ist hiermit abgeschlossen und das Display zeigt in der
oberen Zeile die eingegebene Uhrzeit und das Datum an.
Wichtige Hinweise!
Müssen Sie einmal die Standardeinstellungen verändern, starten Sie die
Programmierung wie unter Punkt 1. beschrieben. Mit der Taste
können Sie nun den blinkenden Cursor zu jeder Zahl hinbewegen und mit
den Tasten
Drücken der Taste
zur Landesvorwahl und zur Eingabe der Uhrzeit.
Um eine Orts- oder Landesvorwahl zu kürzen, gehen Sie hinter das Ende
Ihrer eingegebenen Zahlen (Cursor blinkt). Mit den Tasten und
stellen Sie dann das Minuszeichen - ein.
. Das Display blinkt nun zur Eingabe des Datums.
. Das Display blinkt nun zur Eingabe der Monatsangabe.
und eine Änderung vornehmen. Durch mehrmaliges
gelangen Sie automatisch von der Ortsvorwahl,
so oft, bis Sie die Meldung
so oft, bis Sie die Meldung ZEIT?
und die aktuelle Stunde
. Das
und die aktuelle
und die aktuelle
und den aktuellen Monat
7
Page 8
BEDIENUNG TELEFON 39G CLIP
3. BEDIENUNG
3.1 TELEFONIEREN ÜBER DEN HÖRER ODER DIE
FREISPRECHEINRICHTUNG
Das AUDIOLINE TELEFON 39G CLIP kann wie jedes konventionelle
Telefon benutzt werden und besitzt zusätzlich einige nützliche
Besonderheiten, die Ihnen das Telefonieren wesentlich erleichtern. Um
ein Gespräch zu führen, haben Sie zwei Möglichkeiten:
A: Telefonieren über den Hörer
Nehmen Sie den Telefonhörer ab und warten Sie auf das Freizeichen.
1.
Das Display zeigt das Symbol
Wählen Sie nun die gewünschte Telefonnummer. Die gewählte
2.
Rufnummer wird im Display angezeigt. Das Display zeigt maximal
eine Telefonnummer mit 16 Zahlen an. Ist die gewählte
Telefonnummer länger, werden nur die letzten 16 Zahlen angezeigt.
Um das Gespräch zu beenden, legen Sie den Hörer wieder auf.
3.
Möchten Sie während eines Gesprächs vom Hörer auf die Freisprecheinrichtung wechseln, drücken Sie die Taste
auf.
B. Telefonieren über die Freisprecheinrichtung
1. Drücken Sie die Taste
Display zeigt das Symbol . Sie hören das Freizeichen über den
eingebauten Lautsprecher.
2. Wählen Sie die gewünschte Rufnummer. Die gewählte Rufnummer
wird im Display angezeigt. Das Display zeigt maximal eine
Telefonnummer mit 16 Zahlen an. Ist die gewählte Telefonnummer
länger als 16 Zahlen, werden nur die letzten 16 Zahlen angezeigt.
Nimmt Ihr Gesprächspartner den Anruf entgegen, erklingt seine Stimme
über den eingebauten Lautsprecher. Sprechen Sie bei der Benutzung der
Freisprecheinrichtung immer laut und deutlich in die Richtung des
Telefons. Die Lautstärke lässt sich mit dem Regler auf der rechten Seite
Ihres Telefons einstellen. Möchten Sie von der Freisprecheinrichtung zum
Hörer wechseln, nehmen Sie einfach den Telefonhörer ab.
3. Um das Gespräch zu beenden drücken Sie die Taste oder
legen Sie den Hörer auf.
8
.
und legen Sie den Hörer
. Die LED unter der Taste leuchtet und das
Page 9
TELEFON 39G CLIP BEDIENUNG
3.2 ANRUFE ENTGEGENNEHMEN
Sobald Sie ein Anruf erreicht, erscheint die Rufnummer des Anrufers im
Display. Weitere Hinweise zur Rufnummernanzeige erhalten Sie im
Kapitel 4. Die Rufnummernanzeige (CLIP).
Das Gespräch kann nun über den Hörer oder die Freisprecheinrichtung
entgegengenommen werden. Heben Sie den Telefonhörer ab oder
benutzen Sie die Freisprecheinrichtung indem Sie die Freisprechtaste
drücken.
Um das Gespräch zu beenden, legen Sie den Telefonhörer wieder auf
oder drücken Sie die Freisprechtaste
3.3 WAHLWIEDERHOLUNG
Ist ein Anschluss, den Sie gewählt haben, besetzt oder konnten Sie
niemanden erreichen, legen Sie den Telefonhörer einfach wieder auf. Die
zuletzt gewählte Rufnummer mit maximal 32 Zahlen bleibt automatisch im
Telefon gespeichert. Um die Wahlwiederholung zu nutzen, gehen Sie wie
folgt vor:
1. Heben Sie den Hörer ab oder drücken Sie die Freisprechtaste
2. Drücken Sie die Wahlwiederholungstaste . Die gespeicherte
Rufnummer der Wahlwiederholung wird nun gewählt.
3.4 ANZEIGE DER GESPRÄCHSDAUER
Während eines Gesprächs wird im Display die aktuelle Gesprächsdauer
in Stunden, Minuten und Sekunden angezeigt.
.
.
9
Page 10
BEDIENUNG TELEFON 39G CLIP
3.5 RUFNUMMERN IM TELEFONBUCH SPEICHERN
Mit Ihrem Telefon können Sie 18 Rufnummern im Telefonbuch speichern.
3.5.1 RUFNUMMER IM TELEFONBUCH SPEICHERN
1. Geben Sie bei aufgelegtem Hörer die gewünschte Rufnummer mit
maximal 16 Zahlen über das Zahlenfeld ein.
2. Drücken Sie die Speichertaste
3. Drücken Sie die Kurwahltaste .
4. Das Display zeigt die Anzeige (--). Geben Sie nun über das
Zahlenfeld den gewünschten Speicherplatz zwischen 01 und 18 ein
und die eingegebene Rufnummer ist gespeichert. Das Display zeigt
die Meldung GESPEICHERT.
Bei schon belegten Speicherplätzen zeigt das Display die Meldung
ÜBERSCHREIBEN. Mit der Taste
Speicherplatz mit der neuen Rufnummer überschrieben. Möchten Sie den
Speicherplatz nicht überschreiben, drücken Sie eine der beiden Tasten
oder , um die Eingabe abzubrechen.
3.5.2 WÄHLEN AUS DEM TELEFONBUCH
1. Heben Sie den Hörer ab oder drücken Sie die Freisprechtaste .
2. Drücken Sie die Kurzwahltaste
Speicherplatz von 01 bis 18.
Sie können auch direkt die Kurzwahltaste
Speicherplatz zwischen 01 und 18 drücken. Das Telefon schaltet sich in
diesem Fall automatisch in die Freisprecheinrichtung.
3.6 EINSTELLBARER TONRUF
Mit dem Schiebeschalter KLINGEL auf der rechten Seite können Sie die
Stellungen LEISE ( ) oder LAUT auswählen, um die Lautstärke des
Tonrufes Ihren Bedürfnissen anzupassen. Möchten Sie einmal nicht
gestört werden, benutzen Sie die Stellung AUS.
.
wird der gewählte
und den gewünschten
und den gewünschten
10
Page 11

TELEFON 39G CLIP RUFNUMMERNANZEIGE
4. RUFNUMMERNANZEIGE (CLIP)
Mit der Rufnummernanzeige können Sie bei eingehenden Gesprächen
erkennen, wer Sie anruft. Wenn diese Funktion an Ihrer Telefonleitung
zur Verfügung steht, zeigt Ihnen das Display bereits während des
Klingelns die Rufnummer im Display an.
Wird der Anruf nicht entgegengenommen, bleibt diese Anzeige für 60
Sekunden im Display, bevor wieder die aktuelle Uhrzeit und das Datum
angezeigt wird.
Ausserdem werden während Ihrer Abwesenheit alle Anrufe in der
Anruferliste mit Datum und Uhrzeit gespeichert. Bis zu 99 Rufnummern
werden in der Anruferliste gespeichert. Sobald die Liste voll ist, wird
immer die älteste Rufnummer aus der Liste gelöscht.
Wurden während Ihrer Abwesenheit Anrufe registriert, blinkt die LED
NEW CALL und das Display zeigt die Anzahl der neu gespeicherten
Rufnummern (XX NEU) an. Weiterhin wird die Gesamtzahl der in der
Anruferliste gespeicherten Rufnummern angezeigt (XX ANRUF). Wie Sie
die Anruferliste einsehen können, erfahren Sie im nächsten Kapitel 4.1.
Achtung!
Die Rufnummernanzeige ist ein optionaler Service Ihres
Telefonproviders. Ihr Telefon zeigt die Rufnummern im Display,
wenn Ihr Telefonprovider diesen Service anbietet. Bitte fragen
Sie Ihren Telefonprovider für weitere Informationen. Steht dieser
Service nicht zur Verfügung, werden eingehende Anrufe nicht im
Display angezeigt.
11
Page 12

RUFNUMMERNANZEIGE TELEFON 39G CLIP
4.1 ANRUFERLISTE EINSEHEN
Mit den Tasten
Mit der Taste
Während Sie mit der Taste
Rufnummern sehen. Haben Sie den letzten Speicherplatz der Liste
erreicht, zeigt das Display die Meldung Ende der Liste.
Im Display erscheint unter CALL # die Nummer zwischen 1 und 99, des
gerade angewählten Speicherplatzes.
Hinweise!
Hat ein Anrufer mehrmals versucht Sie zu erreichen, erscheint im Display
die Anzeige RPT und darunter die Anzahl der Anrufe. Als Datum und
Uhrzeit wird immer der letzte Anruf angezeigt.
Werden alle neu aufgezeichneten Rufnummern kontrolliert, erlischt die
LED NEW CALL und die Anzeige NEU im Display zeigt 0.
Wird innerhalb von 20 Sekunden keine Taste gedrückt, wird die
Anruferliste verlassen und das Display zeigt wieder die aktuelle Uhrzeit
und das Datum sowie die Anzahl der in der Anruferliste gespeicherten
Telefonnummern und die Anzahl der neu gespeicherten Rufnummern an.
Das Display meldet folgende Information, wenn keine Rufnummer zur
Verfügung steht.
Erscheint im Display die Meldung Error, wurde die Rufnummer nur
teilweise oder fehlerhaft empfangen.
Erscheint im Display die Meldung Nicht verfügbar , ist die Information
der Rufnummer nicht verfügbar. Es könnte sich um ein internationales
Gespräch handeln.
und können Sie in der Anruferliste blättern.
sehen Sie die neusten Rufnummern.
die schon länger gespeicherten
Erscheint im Display die Meldung Privat, hat der Anrufer das Senden
seiner Rufnummer unterdrückt oder die Nummer konnte nicht übermittelt
werden.
12
Page 13

TELEFON 39G CLIP RUFNUMMERNANZEIGE
4.2 TELEFONNUMMER AUS DER ANRUFERLISTE
DIREKT ANWÄHLEN
Sie können Telefonnummern aus der Anruferliste direkt anwählen.
1. Heben Sie den Telefonhörer ab und wählen Sie mit den
Tasten
2. Drücken Sie nun die Taste
angewählt.
Über die Freisprecheinrichtung wählen
1. Wählen Sie mit den Tasten
Anruferliste, die Sie anrufen möchten.
2. Drücken Sie nun die Taste
eingeschaltet und die Rufnummer wird direkt angewählt.
Hinweis!
Vor dem Wählen vergleicht Ihr Telefon die Landes- und Ortsvorwahl der
gewählten Rufnummer mit Ihrem Standort (Land + Ortsvorwahl). Haben
Sie während der Installation Ihre Landes- und Ortsvorwahl eingegeben,
werden die entsprechenden Zahlen nicht mehr mitgewählt, wenn es sich
um eine Rufnummer aus Ihrem Land und Ortsnetz handelt.
4.3 TELEFONNUMMER AUS DER ANRUFERLISTE LÖSCHEN
1. Wählen Sie mit den Tasten
Anruferliste, die Sie löschen möchten.
2. Drücken Sie nun zweimal die Taste
gelöscht.
4.4 KOMPLETTE ANRUFERLISTE LÖSCHEN
Drücken Sie die Taste
Meldung KEIN ANRUF und die komplette Anruferliste ist gelöscht.
und die gewünschte Telefonnummer aus.
und die Rufnummer wird direkt
und die Rufnummer aus der
. Die Freisprecheinrichtung wird
und die Rufnummer aus der
und die Rufnummer wird
für 3 Sekunden. Das Display zeigt die
13
Page 14

R-SIGNALTASTE TELEFON 39G CLIP
5. DIE "R" SIGNALTASTE
Die "R" Signaltaste Ihres Telefons können Sie an Nebenstellenanlagen
und bei der Verwendung der T-NET Funktionen der DEUTSCHEN
TELEKOM nutzen.
5.1 “R” TASTE AN NEBENSTELLENANLAGEN
Haben Sie Ihr Telefon mit einer Nebenstellenanlage verbunden, können
Sie alle Möglichkeiten, wie z.B. Anrufe weiterleiten, automatischen
Rückruf usw. nutzen. Die R Signaltaste verschafft Ihnen den Zugang zu
diesen Möglichkeiten. An einer Nebenstellenanlage wird die FLASH-Zeit
"100ms" benötigt.
Stellen Sie dazu den Schalter FLASH/ms auf die Einstellung 100ms.
Ob Ihr Telefon an Ihrer Nebenstellenanlage einwandfrei funktioniert, und
welche weiteren Möglichkeiten Sie dadurch erhalten, erfahren Sie bei
dem Händler, bei dem die Anlage gekauft wurde.
5.2 “R” TASTE UND DIE T- NET-FUNKTIONEN DER DEUTSCHEN
TELEKOM
Ihr AUDIOLINE TELEFON 39G CLIP unterstützt die wichtigsten
Mehrwertdienste der DEUTSCHEN TELEKOM (z.B.: Makeln, Anklopfen,
Dreier-Konferenz, u.a.). Das T- NET arbeitet mit der Einstellung "FLASH
300ms".
Stellen Sie dazu den Schalter FLASH/ms auf die Einstellung 300ms.
Zur Freischaltung der T- NET Funktionen (die z.T. gebührenpflichtig sind)
wenden Sie sich bitte an die DEUTSCHE TELEKOM.
14
Page 15

TELEFON 39G CLIP R-SIGNALTASTE
5.3 TELEFONNUMMERN WÄHLEN UND SPEICHERN BEI DEM
BETRIEB AN NEBENSTELLENANLAGEN
Hinweis!
Die in diesem Kapitel erklärte Pausenfunktion zwischen der Kennziffer für
die Amtsholung (meistens 0 oder 9) ist nur bei älteren
Nebenstellenanlagen erforderlich.
Bei einigen Nebenstellenanlagen entsteht eine kurze Pause zwischen der
Amtskennziffer (meistens 0 oder 9) und dem Freizeichen. Beim
manuellen Wählen und dem Wählen aus dem Telefonbuch kann diese
Pause mit eingegeben werden, damit die weiteren Zahlen nicht zu schnell
gewählt werden.
Pause beim manuellen Wählen eingeben
Drücken Sie zwischen der Kennziffer für die Amtsholung und der
eigentlichen Telefonnummer einmal die Taste
wartet Ihr Telefon für 4 Sekunden mit dem Wählen der eigentlichen
Telefonnummer.
Pause mit speichern
Drücken Sie während des Speicherns nach der Kennziffer für die
Amtsholung und vor der eigentlichen Rufnummer einfach die Taste
Beim Wählen aus dem Telefonbuch wird dann nach der Kennziffer für die
Amtsholung automatisch eine Pause von vier Sekunden eingefügt.
. Nach der Amtsholung
.
15
Page 16

WICHTIGE HINWEISE TELEFON 39G CLIP
6. WICHTIGE HINWEISE
6.1 FEHLERSUCHE
Entfernen Sie alle zusätzlichen Telefonapparate und verbinden Sie nur
das Telefon direkt mit der Telefonbuchse. Sollte der Fehler immer noch
auftreten, verbinden Sie ein anderes Telefon (wenn vorhanden) mit der
Telefonbuchse. Die Ergebnisse zeigen Ihnen, ob der Fehler am Gerät
oder der Telefonleitung liegt. Natürlich können Sie auch die
Störungsstelle Ihres Telefonnetzanbieters anrufen, die Ihnen weitere
Hinweise zum Überprüfen Ihrer Anlage gibt.
6.2 TELEFONKABEL AUSTAUSCHEN
Müssen Sie Ihr Telefonkabel austauschen, finden Sie anhand der
untenstehenden Zeichnung das passende Kabel bei Ihrem Händler.
Modular Stecker
Type RJ 11 6/4
ab
TAE Stecker
Codierung "F"
34
5
2
16
6
a => TAE Stecker Pin 1
b => TAE Stecker Pin 2
1
Page 17

TELEFON 39G CLIP WICHTIGE HINWEISE
6.3 GARANTIE
AUDIOLINE - Geräte werden nach den modernsten Produktionsverfahren
hergestellt und geprüft. Ausgesuchte Materialien und hoch entwickelte
Technologien sorgen für einwandfreie Funktion und lange Lebensdauer.
Sollte Ihr Gerät dennoch einen Defekt innerhalb der Garantiezeit
aufweisen, wenden Sie sich bitte unter Vorlage Ihrer Kaufquittung
ausschliesslich an das Geschäft, in dem Sie Ihr AUDIOLINE - Gerät
gekauft haben. Die Garantiezeit beträgt 12 Monate, gerechnet vom Tage
des Kaufs zu nachfolgenden Bedingungen: Innerhalb der Garantiezeit
werden alle Mängel, die auf Material- oder Herstellungsfehler
zurückzuführen sind, kostenlos beseitigt. Der Garantieanspruch erlischt
bei Eingriffen durch den Käufer oder durch Dritte. Schäden, die durch
unsachgemässe Behandlung oder Bedienung, durch falsches Aufstellen
oder Aufbewahren, durch unsachgemässen Anschluss oder Installation
sowie durch höhere Gewalt oder sonstige äussere Einflüsse entstehen,
fallen nicht unter die Garantieleistung. Wir behalten uns vor, bei
Reklamationen die defekten Teile auszubessern oder zu ersetzen oder
das Gerät auszutauschen. Ausgetauschte Teile oder ausgetauschte
Geräte gehen in unser Eigentum über. Schadenersatzansprüche sind
ausgeschlossen, soweit sie nicht auf Vorsatz oder grober Fahrlässigkeit
des Herstellers beruhen. Alle Gewährleistungsansprüche nach diesen
Bestimmungen sind ausschliesslich gegenüber Ihrem Fachhändler
geltend zu machen. Nach Ablauf von einem Jahr nach Kauf und
Übergabe unserer Produkte können Gewährleistungsrechte nicht mehr
geltend gemacht werden.
17
Page 18

WICHTIGE HINWEISE TELEFON 39G CLIP
6.4 KONFORMITÄTSERKLÄRUNG
WIR AUDIOLINE GmbH
IN PROMENADENSTR. 1
D-41460 NEUSS
ALS INVERKEHRBRINGER IN DER EU ERKLÄREN
VOLLVERANTWORTLICH, DASS DAS PRODUKT
MODEL: TEL 39 G CLIP
BESCHREIBUNG: Schnurgebundenes Telefon
KONFORM IST MIT DEN GRUNDLIEGENDEN ANFORDERUNGEN
DER RICHTLINIE: 1999/5/EC
BEVOLLMÄCHTIGTER:
Unterschrift: ________________________________
Name: MANFRED ZINNOW
Position in der Firma: GESCHÄFTSFÜHRER
Datum der Ausstellung: 06.12.2000
Eine Kopie dieser Erklärung wird bis 10 Jahre nach der letzten Produktion
aufbewahrt.
GERMANY
LIEFERANT: AUDIOLINE GmbH, PROMENADENSTR. 1,
D-41460 NEUSS
PRODUKT: TEL 39 G CLIP
Dieses Produkt ist für den Betrieb an einem analogen Telefonanschluss
(PSTN) innerhalb Deutschlands entwickelt worden. Allerdings kann,
wegen der Unterschiede zwischen den verschiedenen TelekomNetzbetreibern, keine Garantie für einwandfreie Funktion an jedem
Telekom-Endgeräteanschluss übernommen werden.
18
Page 19

TELEPHONE 39G CLIP CONTENTS
Safety Information ....................................................................20
1.
Operational Elements..................................................... 21
2.
Installation ....................................................................... 22
2.1 Connecting the receiver..................................................... 22
2.2 Insert batteries .................................................................. 22
2.3 Connecting the Telephone................................................. 22
2.4 Wall Mounting.................................................................... 23
2.5 Hearing aid compatible ...................................................... 23
2.6 T-NET Set-up..................................................................... 23
2.7 Adjusting the display contrast ............................................ 23
2.8 Programming standard settings......................................... 23
3. Operation ......................................................................... 25
3.1 Making a call using the receiver or handsfree feature........ 25
3.2 Receiving Calls.................................................................. 26
3.3 Redial................................................................................. 26
3.4 Call Duration Display .........................................................26
3.5 Storing numbers in the phone book ...................................27
3.5.1 Storing numbers in the phone book......................................27
3.5.2 Dialling from the phone book ................................................ 27
3.6 Adjustable ringing tone ...................................................... 27
4. Caller Display (CLID) ......................................................28
4.1 Viewing the Caller List ....................................................... 29
4.2 Dialling a telephone number directly from the Caller List... 30
4.3 Deleting numbers from the caller list.................................. 30
4.4 Deleting the entire caller list............................................... 30
5. The "R" Signal Button .................................................... 31
5.1 R Button on private exchanges........................................31
5.2 R Button and the DEUTSCHE TELEKOM
T-Net functions .................................................................. 31
5.3 Dialling and storing Telephone nu mbers
when using on private exchanges......................................32
6. Important Information .................................................... 33
6.1 Fault Finding ...................................................................... 33
6.2 Replacing the telephone cable........................................... 33
6.3 Guarantee..........................................................................34
6.4 Declaration of Conformity ..................................................35
19
Page 20

SAFETY INFORMATION TELEPHONE 39G CLIP
SAFETY INFORMATION
Operating Instructions : Please read these operating instructions
carefully. If you should have any questions, please contact our Service
Department on the Hotline number 0180 5 00 13 88. Under no
circ umstances open the unit yourself and do not try to carry out your own
repairs. For any claims under the guarantee, please refer to your dealer.
Disposal: If the useful life of the batteries or the complete equipment has
expired, please dispose of these carefully in accordance with the statutory
require ments and in a manner frie ndly to the environment.
Care: The surface of the case can be cleaned with a soft, dry, lint-free
cloth. Never use cleaning agents, particularly aggressive solvents.
Temperature and Ambient Cond itions: The unit is designed for use in
protected rooms with a temperature range of +5 °C to 45 °C. The unit
must not b e installed in damp rooms su ch as a bathroom or laundry room.
Av oid proximity to sources of heat suc h as radiators and do not expose
the unit to direct su nlight. It is completely normal for the telephone to
become warm in daily use. We therefore recommend that this product
should not be used on antique furniture, veneers or other wood en
surfaces.
Connection Information: The AUDIOLINE Telephone 39G CLIP
requires a TAE socket with F/N coding in common with other plug in units
suc h as fax mach ines, answering ma chines or modems.
Approval and CE Mark ing: The unit is approv ed for u se on the
European telephone network. This unit fulfils the requirements of the EU
Directives. Conformity of the unit to the above-mentioned directiv es is
confirmed b y the CE mark. You will find th e Declaration of Conformity at
the end of this manual.
20
Page 21

TELEPHONE 39G CLIP OPERATIONAL ELEMENTS
1. OPERATIONAL ELEMENTS
1
2
3
4
5
6
7
8
9
10
12
13
14
15
11
1. Call button
2. Display
3. Delete button
4. Telephone socket (rear)
5. Selection buttons
6. New Call LED
7. Store button
8. Phone book/Speed dial
16
9. Redial
10. R Sig nal button
11. Slide control Contrast
12. Slide control Flash
13. Slide control Ringer
14. Number pad, 1-9,0. * and #
15. Handsfree volume
16. Handsfree button
21
Page 22

INSTALLA TION TELEPHONE 39G CLIP
2. INSTALLATION
2.1 CONNECTING THE RECEIVER
Afte r unpacking your telephone, you must first connect the telephone
receiver to the base unit. The spiral cable needed for this has two
identical connections so that there can be no confusion. First tak e one
end of the spiral cable and plug it into the socket at the bottom of the
receiv er. Now plug the other end into the socke t on the left-hand side of
the b ase unit.
2.2 INSERT BATTERIES
Before connecting your new telephone to th e telephone netw ork, the
batteries should be installed. Please always use type AAA alkaline
batteries. The batteries are required for the call number display, the
handsfree fa cility and other feature s of the telephone. Before installing or
ch anging the ba tteries make sure that the telephone is not conne cted to
the telephone ne twork.
1. T he battery compartment is to be found on the unde rside of your
telephone
2. O pen the battery c ompartment with a small screwdriver or a pointed
objec t.
3. Insert the b atteries. Ensure that the polarity is correct.
4. Close the battery compartment.
The batteries should be changed when this symbol
display. All four batteries must then be replaced so that the call number
display and the stored telephone numbers continue to work correctly.
2.3 CONNECTING THE TELEPHONE
Connect the telephone cable provided to the telephone jac k and the
telephone socket on the rear of th e telephone. T he AUDIOLINE
TELEPHONE 39G CLIP work s using the T TD system (Touch-Tone
Dialling).
appears in the
22
Page 23

TELEPHONE 39G CLIP INSTALLA TION
2.4 WALL MOUNTING
Your AUDIOLINE TELEPHONE 39G CLIP is also suitable for wall
mounting. U se the two screw s for fixing it to th e wall. Drill two h oles 83
mm apart and leave the screws protruding 5 mm from the wall. Now place
the telephone over the screws and push down slightly.
2.5 HEARING AID COMPATIBLE
The telephone has a spe cial circu it working on the basis of induc tion for
transmitting speech to hearing aids. Please set your hearing aid to T.
2.6 T-NET SET-UP
Your AUDIOLINE TELEPHONE 39G CLIP supports th e most important
DEUTSCHE TELEKOM added value functions (e.g. brokering, call
waiting, three-way c onference, etc .). For these, you will need th e FLASH
setting on your telephone. M ore information can b e found in item 5 .
Please contact DEUTSCHE TELEKOM to gain access to these functions
(some of which are subject to charge).
2.7 ADJUSTING THE DISPLAY CONTRAST
The display contrast can be adjusted in three steps by means of the
CONTRAST slide switch on the right-hand side.
2.8 PROGRAMMING STANDARD SETTINGS
Before you can use your telephone, it is necessary to make certain
settings. Telephone numbers are always shown in the display with the
local dia lling code or, in the case of international c alls, also with the
appropriate c ountry code. If these nu mbers are dialled directly from th e
caller list, the dialling cod e can of course b e omitted with local calls.
There fore, you should e nter you r local dialling code and the cou ntry code
for Germany (0049). Moreover, you can also enter the date and time at
this point. Please follow the instructions b elow:
1. Press and hold the
2. The display will show -----, local dialling code . Now enter your local
dialling c ode with a max imum of 5 digits using th e number pad.
and buttons for 4 seconds.
23
Page 24

INSTALLA TION TELEPHONE 39G CLIP
3. Press the
message country code in the display. If a 5 digit local dia lling code
is entered the display jumps directly to the next entry country code.
4. Now enter the country code 0049 for Germany using the number
pad.
5. Press th e
message TIME? DATE? in the display. The display flashes ready to
enter the cu rrent hour.
6. Now enter the current hour between 00 and 23 using the
bu ttons and confirm with the button. Th e display now
flashes ready to enter the current minute.
7. Now enter the current minute between 1 and 59 using the and
bu ttons and confirm with the button. Th e display now
flashes ready to enter the date.
8. Now enter the current day between 1 and 31 using the
buttons and confirm with the
ready to enter the month.
9. Now enter the current month between 1 and 12 using the and
bu ttons and confirm with the button. This comple tes the
entry and the top line of the display shows the time and date entered.
Important information!
If you ever have to change the standard settings, start programming as
described under item 1. You can now move the flashing cursor to any
number using the
buttons. You can automatically go from th e local dialling c ode to the
country code and to the time entry by repeatedly pressing the
bu tton.
To shorten a loca l or country dialling cod e, go to after the end of the
numbers you have entered (cursor flashes) and then use the
buttons to enter the minus sign -.
button as many times as necessary until you see the
button as many times as necessary until you see the
and
and
b utton. Th e display now flashe s
button and make a change using the and
and
24
Page 25

TELEPHONE 39G CLIP OPERATION
3. OPERATION
3.1 MAKING A CALL USING THE RECEIVER OR HANDSFREE
FEATURE
The AUDIOLINE TELEPHONE 39G CLIP can be used like any
conv entional telephone a nd, in add ition, has some u seful specia l features,
wh ich make phoning considerably ea sier for you. You have two ways of
making a call:
A: Using the receiver
Lift the rec eiver and wait until you hear the dia lling tone. The display
1.
shows the
Now d ial the required teleph one number. The number dialled w ill be
2.
shown in the display. The display shows a telephone number with a
maximum of 16 digits. If the number dialled is longer, only the last 16
digits will be d isplayed.
To end the call simply replace the receiver.
3.
If you want to change from the receiver to the handsfree feature during a
call, press the
B. Using the handsfree facility
1. Press the
display sh ows the
in-b uilt loudspeak er.
2. Dial the re quired telephone number. The number dialled will be show n
in the display. The display shows a telephone number with a
maximum of 16 digits. If the number dialled is longer, only the last 16
digits will be d isplayed.
If th e other party accepts th e call, h is voice will be h eard over the in-built
loudspea ker. When u sing the handsfre e facility always speak loudly and
clearly towards the telephone. The volume can be adjusted using the
control on the right-h and side of you r telephone. If you want to c hange
from the ha ndsfree facility to the receiv er, simply lift the receive r.
3. To end the call, press the button or replace the receiver.
symb ol.
button and replace the receiver.
bu tton. The LE D below th e button comes on and the
symb ol. You will hear th e dialling tone over th e
25
Page 26

OPERATION TELEPHONE 39G CLIP
3.2 RECEIVING CALLS
As soon a s you receive a call, the callers numbe r appears in the displa y.
Fu rther information on caller display is g iven in Chapter 4 Caller Display
(CLID).
The c all can now be acc epted using the rec eiver or the handsfre e fa cility.
Lift the rec eiv er or use the handsfre e fa cility by pressing the hand sfree
bu tton
To end the call, replace the receiver or press the handsfree button
3.3 REDIAL
If a connection tha t you have dialled is engage d or you were una ble to get
through to anybody, simply replace the receiver. The last number dialled
with a maximum of 32 digits remains stored in the telephone
automatic ally. To use the redial facility, proc ee d as follows:
1. Lift the receiver or press the handsfree button
2. Press the redial button . Th e stored red ial number w ill now be
3.4 CALL DURATION DISPLAY
The actual call duration in hours, minutes and seconds is shown in the
display during a call.
.
.
.
dialled automatically.
26
Page 27

TELEPHONE 39G CLIP OPERATION
3.5 STORING NUMBERS IN THE PHONE BOOK
Your telephone allows you to store up to 18 telephone numbers in the
phone book.
3.5.1 STORING NUMBERS IN THE PHONE BOOK
1. With the receiver on the hook enter the required telephone number
with a maximum of 16 digits using the number pad.
2. Press the store button
3. Press the speed dial button .
4. The display shows (--). Now enter the required storage location
between 01 and 18 using the number pad and the telephone number
entered will be stored. The display shows the message STORED .
If a storage location has already been used, the display shows the
message OVERWRITE. The selected storage location is overwritten
with the new telephone number by means of the
not want to overwrite the storage location, press one of the buttons
to cancel the entry.
3.5.2 DIALLING FROM THE PHONE BOOK
1. Lift the receiver or press the handsfree button
2. Press the speed dial button and the required storage location
from 01 to 18.
You can also press the speed dial button
location between 01 and 18 directly. In this case, the telephone will
automatic ally sw itch to the hand sfree facility.
3.6 ADJUSTABLE RINGING TONE
By means of the Ringer slide switch on the right-hand side of your
telephone you can ch oose the settings S OFT ( ), or LOUD to match
the volume of the ringing tone to your require ments. If at any time you do
not want to be disturbed, use the OFF setting.
.
button. If you do
or
.
and the required storage
27
Page 28

CALLER DISPLAY TELEPHONE 39G CLIP
4. CALLER DISPLAY (CLID)
Using caller display, you can see with inc oming calls who is calling you. If
this function is available on your line, the display shows you the callers
telephone number while th e telephone is ringing.
If the call is not accepted, this indication remains in the display for 60
seconds before the current time and date are shown once more.
Furthermore, in your absence, all calls are saved in a caller list with date
and time. Up to 99 numbers are saved in the caller list. When the list is
full, the oldest number is always deleted from the list.
If calls are registered during your absence, the NEW CALL LED flashes
and th e display show s the number of newly stored numbers (XX NEW ).
The total number of telephone numbers stored in the calle r list is also
displayed (XX CALLS). You can find out how to view the list in the next
chapter 4.1.
Warning!
Caller display is an optional servic e from your telephone
provider. Your telephone will show th e number in the display if
your telephone provider offers this service. Please ask your
telephone prov ider for furth er information. If this service is not
available, incoming calls will not be show n in the display.
28
Page 29

TELEPHONE 39G CLIP CALLER DISPLAY
4.1 VIEWING THE CALLER LIST
You can page through the caller list using the
You can see the latest numbers by means of the
can view the numbers that have been stored for some time by using the
button. When you reach the last storage location the display shows
the message End of list.
The number of the currently selected storage location between 1 and 99
appears under CA LL # in the display.
Note!
If a caller has tried to reach you several times, the message RPT
appears in the display and beneath it the number of calls. The date and
time of the last call is always shown.
Wh en all newly record ed numbers have been checked, the NEW CALL
LED goes off and the NEW indicator in the display shows 0.
If no b utton is pressed w ithin 20 seconds, the calle r list is no longer
displayed and the display shows th e current time and date once more
along with the number of telephone numbers stored in the caller list and
the number of newly stored telephone numbers.
The display reports the following information when there is no telephone
number available.
If the message Error appears in the display, the number has only been
partially or incorrectly received.
If the message Not available appears in the display, the telephone
number information is not availab le. This c ould hav e been an international
call.
and
buttons.
button whereas you
If the message Private appears in the display, the caller has
suppressed the tra nsmission of his telephone nu mber or it was not
possible to transmit the number.
29
Page 30

CALLER DISPLAY TELEPHONE 39G CLIP
4.2 DIALLING A TELEPHONE NUMBER DIRECTLY FROM THE
CALLER LIST
You ca n dial telephone numbers directly from the ca ller list.
1. Lift the receiver and select the required telephone number using the
and buttons.
2. Now press the
directly.
Dialling using the handsfree facility
1. Select the telephone number that you want to ca ll from the caller list
using the
2. Now press the
and the number dialled directly.
Note!
Before dia lling, your telephone compares the cou ntry and local dialling
cod es of the number dialle d with your loc ation (local dialling code). If you
have entered your loca l dialling code d uring installation, the appropriate
numbers w ill not be dialled if this is a number from w ithin your local
netw ork.
4.3 DELETING NUMBERS FROM THE CALLER LIST
1. Select the telephone number that you want to delete from the caller
list using the
2. Now press the button twice and th e number will be deleted.
4.4 DELETING THE ENTIRE CALLER LIST
Press th e
NO C ALLS and the entire caller list will be dele ted.
button for 3 seconds. Th e display will show the message
b utton and the telephone numbe r will be dialled
and buttons.
button. The handsfree fac ility will be switche d on
and
buttons
.
30
Page 31

TELEPHONE 39G CLIP R-SIGNAL BUTTON
5. THE "R" SIGNAL BUTTON
You can use the R signal b utton on your te leph one on private
exchanges and when using DEUTSCHE TELEKOMs T-Net functions.
5.1 “R” BUTTON ON PRIVATE EXCHANGES
If you have c onnected your telephone to a priva te exch ange, you can use
all the facilities such as c all transfer, automatic recall, etc. The R signal
button gives you acc ess to these facilities. The FLAS H time 100ms will
be required on a private exchange.
For this purpose, set the FLASH/ms switch to the 100ms setting.
You can find out from the dealer from whom the equipment was
purc hased whether your telephone will work on your private exchange
without a ny problems and what furth er facilities you will receive from this.
5.2 “R” BUTTON AND THE DEUTSCHE TELEKOM T-NET
FUNCTIONS
Your AUDIOLINE TELEPHONE 39G CLIP supports th e most important
DEUTSCHE TELEKOM added value functions (e.g. brokering, call
waiting, three-way conference, etc.). The T-NET works using the "FLASH
300ms" setting.
For this purpose, set the FLASH/ms switch to the 300ms setting
Please contact DEUTSCHE TELEKOM to gain access to the T-NET
functions (some of wh ich are subject to ch arge).
31
Page 32

R-SIGNAL BUTTON TELEPHONE 39G CLIP
5.3 DIALLING AND STORING TELEPHONE NUMBERS WHEN
USING ON PRIVATE EXCHANGES
Note!
The pause function after an outside line code (usually 0 or 9) described in
this c hapter is only require d on older private e xchanges.
With some private exchanges, there is a short pause between the code
for th e outside line (usually 0 or 9) and the d ialling tone. W hen dia lling
manually a nd when dialling from the teleph one book, th is pause can be
entered along with the number so that the following digits are not dialled
too qu ickly.
Entering the pause when d ialling manually
Press th e
the ac tual teleph one number. After connecting to an outside line you r
telephone will wait for 4 second s before dialling th e actual telephone
number.
Storing the pause
When storing a number, simply press the
the outsid e line and before the actual telephone nu mber. When d ialling
from the phone book a pause of fou r seconds will automa tically be
inserted after the number for the outside line.
button once between the number for the outside line and
button afte r the number for
32
Page 33

g
TELEPHONE 39G CLIP IMPORTANT INFORMATION
6. IMPORTANT INFORMATION
6.1 FAULT FINDING
Remove all extra te lephone equipme nt and connec t only the teleph one
directly to the telephone socket. I f the fault is still there, connect a
different teleph one (if available) to the telephone socke t. The results w ill
show you whether the fault lies with the unit or with the telephone line. Of
cou rse, you can alw ays ring your telephone netw ork providers serv ice
department, which will give you more a dvice on c hecking your insta llation.
6.2 REPLACING THE TELEPHONE CABLE
If you have to replace your telephone cable, you can locate the
appropriate cable at your dealers with the help of the diagram below.
Modular Plug
Type RJ 11 6/4
a
b
TAE Plug
Coding "F"
5
34
2
1
6
a => TAE Plug Pin 1
b => TAE Plu
Pin 2
33
Page 34

IMPORTANT INFORMATION TELEPHONE 39G CLIP
6.3 GUARANTEE
AUDIOLINE equipment is manufactured and tested in accordance with
the most up to date production methods. Selected materials and highly
developed tech nology ensure trouble -free operation and long life. If you r
unit should develop a fault within the guarantee period, however, please
contact the shop where you bought your AUDIOLINE equipment
exclusively and have your purchase receipt available for inspection.
The guarantee period is 1 2 months from the day of purchase under the
following conditions: w ithin the gu arantee period, all defects due to
material or manufacturing faults will b e repaired free of charge. The
guarantee is invalidated if the equipment has been tampered with by the
purchaser or third parties. A ny damage caused by improper handling or
operation, by incorrect positioning or storage, by improper connection or
installation or by excessive force or other e xternal influences is not
covered by the guarantee. In the case of complaint, we reserve the right
to repair or replace defective parts or to exchange the equipment.
Exchanged parts or exchange d equipment be come our property. Cla ims
for compensation are excluded insofar as they do not relate to criminal
intent or g ross negligence on th e part of the manufacturer. A ll guarantee
claims ac cording to the se conditions must be ra ised exclusiv ely with your
dealer. Rights under the guarantee can no longer be enforced after the
expiry of one year from purchase and delivery of our products.
In th e case of unnec essary or unjustified demands on th e customer
service department, we will levy our usua l service charges for materials,
time, postage and pac king. Any c omplaints must be re ported as soon as
a problem is found. The guarantee is valid within the German Federal
Republic.
34
Page 35

TELEPHONE 39G CLIP IMPORTANT INFORMATION
6.4 DECLARATION OF CONFORMITY
WE AUDIOLINE GmbH
OF PROMENADENSTR. 1
D-41460 NEUSS
GERMANY
DECLARE UNDER OUR SOLE RESPONSIBILITY AS EU
DISTRIBUTOR THAT THE PRODUCT
MO DEL: TEL 39 G CLIP
DESCRIPTION: CORD CONNECTED TELEPHONE
IS IN CONFORMITY WITH THE BASIC REQUIREMENTS OF
DIRECTIVE: 1999/5/EC
AUTHORISED SIGNATORY:
Signature: ________________________________
Name: MANFRED ZINNOW
Position in th e company: MA NAGING DIRECT OR
Date of issue : 06.12.2000
A copy of this declaration will be retained for 10 years after
cessation of production.
SUPPLIER: AUDIOLINE GmbH, PROMENADENSTR. 1,
D-41460 NEUSS
PRODUCT: TEL 39 G CLIP
This product has been developed for use with an analogue telephone line
(PSTN) within Germany. However, no guarantee can be accepted for
troub le-free operation on a ll telecommunic ations terminal equipme nt
connections due to th e differences b etween th e different
telecommu nications network operators.
35
Page 36

AUDIOLINE GmbH
Promenadenstrasse 1
41460 Neuss
Service Hotline 0180 5 00 13 88
Internet: www.audioline.de
E-mail: info@audioline.de
 Loading...