

Page 1

TEL35b
Hands-Free Speaker telephone
User guide
Page 2

PLEASE KEEP THIS MANUAL SAFE FOR
FUTURE REFERENCE.
AFFIX PROOF OF PURCHASE BELOW.
Page 3

TEL35 CONTENTS
CONTENTS
Layout 2 Others 6
Location of controls 2 Speaker volume control 6
Mute button 6
Installation 3 Recall 6
Battery 3 Ringer volume 6
Connection 3 REN 6
Setting the time 3 Cleaning 6
Wall mounting 3 Guarantee 6
Fault finding 7
Using the phone 4 Technical assistance 7
To make a call 4 Declaration of conformit 8
Handset operation 4
Handsfree operation 4
Last number redial 4
Memory 5
Memory operation 5
Storing one touch memories 5
Storing two touch memories 5
Memory dialling 5
Dialling one touch memories 5
Dialling two touch memories 5
1
Page 4
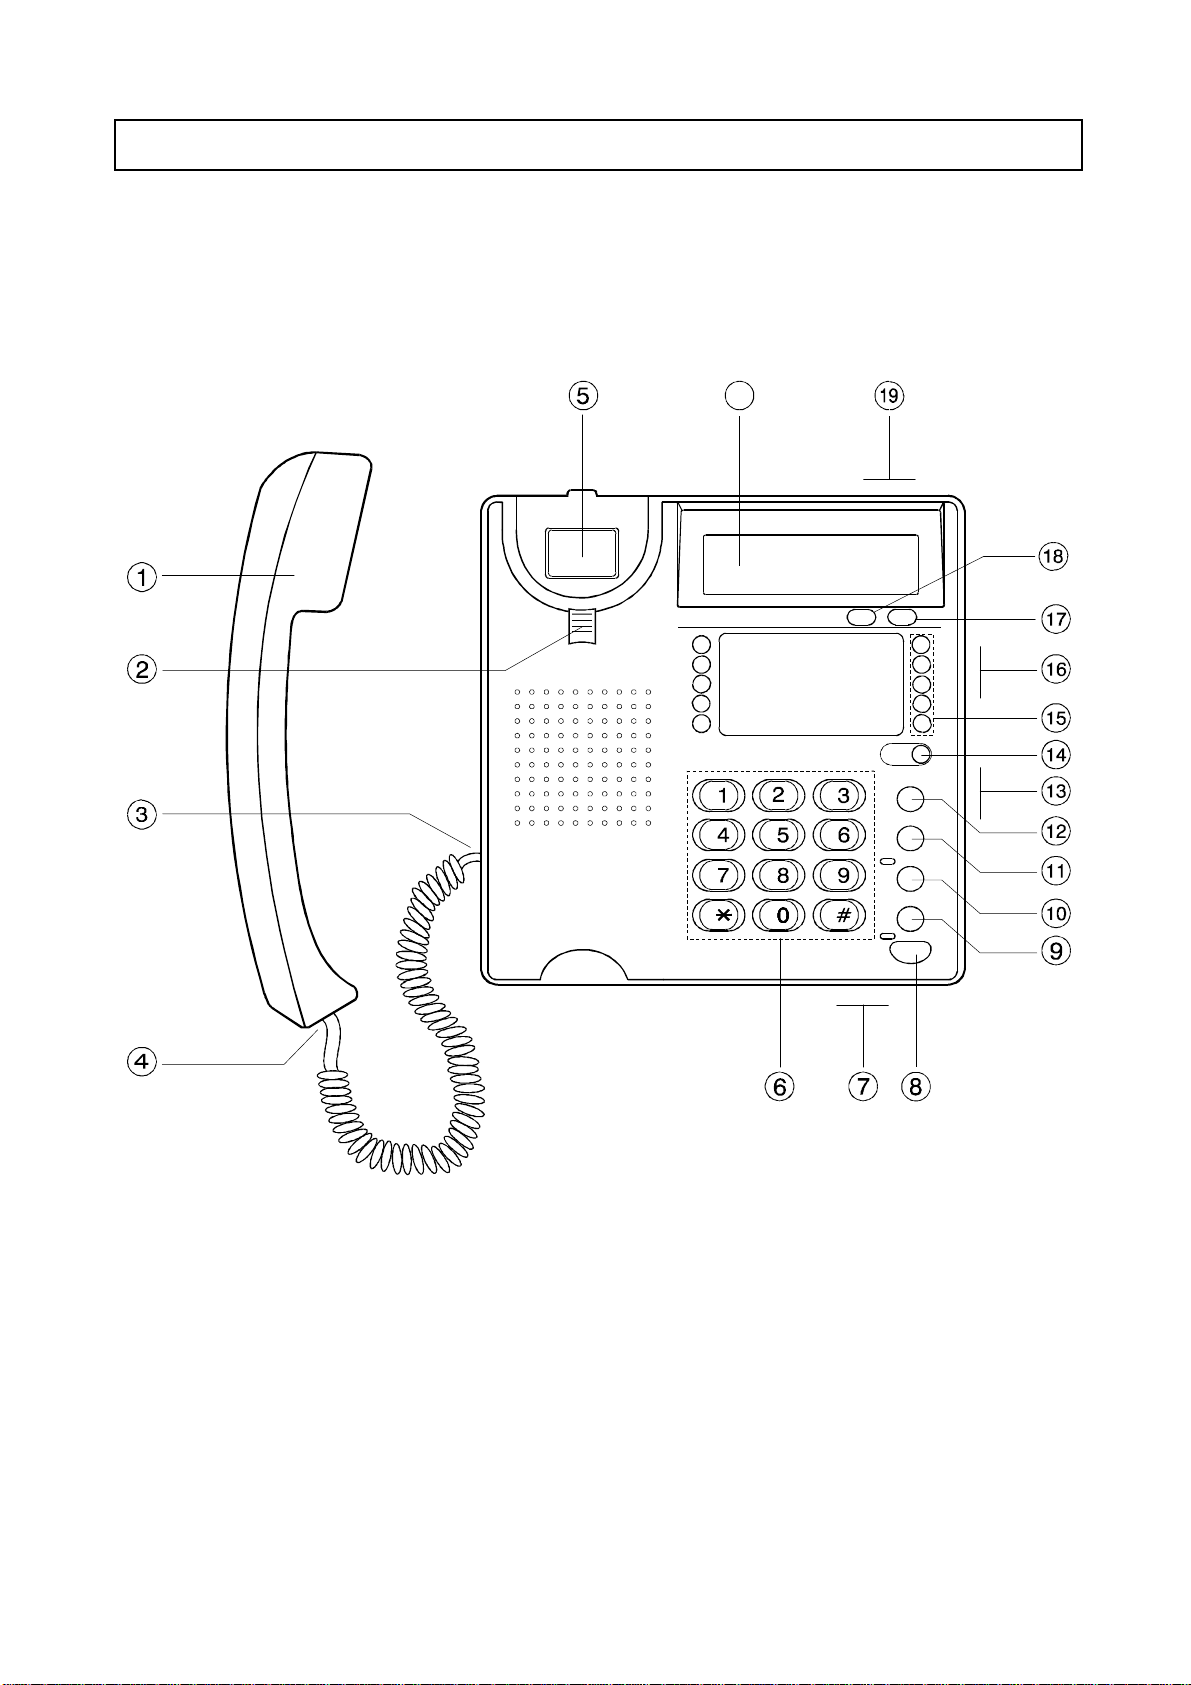
LAYOUT TEL35
LOCATION OF CONTROLS
20
1 Handset 11 Recall button
2 Hanger hook for wall mounting 12 Store button
3 Socket for handset cord (on the side) 13 Volume control (on the side)
4 Socket for handset cord (on handset) 14 Memory shift button
5 Hook switch 15 Memory buttons
6 Keypad digits 0-9, *, # 16 Ringer control (on the side)
7 Microphone 17 Set button
8 Speaker button and indicator 18 Time button
9 Last number redial button 19 Socket for line cord (rear)
10 Mute button and indicator 20 Display
2
Page 5

TEL35 INSTALLATION
BATTERY
Insert one 1.5V 'AAA' or equivalent alkaline batteries (not supplied) to power the LCD
display.
# Remove the screw from the battery cover on the underside of the telephone.
# Insert batteries, observing correct polarity.
# Replace cover and retaining screw.
# The display will start counting from 00-00-00.
If replacing the batteries ensure the telephone is disconnected from the telephone
socket
CONNECTION
# Connect the curly cord to the handset and to the base unit handset socket.
# Connect the line cord to the socket on the rear of the unit and to a telephone
network wall socket.
Do not place the unit in direct sunlight, use near water, or during a thunderstorm. It
is recommended that you disconnect the telephone during a thunderstorm storm.
In some situations the rubber feet on the bottom of the unit can discolour some
sensitive surfaces.
SETTING THE TIME
# Press the SET button, the hour digits will start flashing.
# Press the TIME button, until the correct hour is shown.
# Press the SET button, the minute digits start flashing.
# Press the TIME button, until the correct minutes are shown.
# Press the SET button, the clock will commence counting.
WALL MOUNTING
The Audioline 35 can be wall mounted using the template and screws supplied.
Full instructions for wall mounting the telephone are provided on the template.
Note: When the telephone is wall mounted the hanger hook must be pulled out and
rotated 180 degrees.
3
Page 6

USING THE PHONE TEL35
TO MAKE A CALL
HANDSET MODE
# Lift the handset, the call timer will start counting from 0-00.
# Dial the telephone number required, the display will show the number dialed. Call
timer will be displayed after approximately 10 seconds.
# To terminate the call, replace the handset.
To switch from handset to speakerphone mode, press the SPEAKER button and replace
the handset.
HANDSFREE MODE
# Press the SPEAKER button, the speaker led will illuminate.
# Dial the telephone number required.
# When the other party answers, speak clearly in the direction of the microphone at the
front of the telephone.
# The speaker volume can be controlled with the volume slide on the right hand side of
the telephone.
# To terminate the call, press the SPEAKER button.
To switch from speakerphone to handset mode, simply lift the handset.
LAST NUMBER REDIAL
If the last number dialled was engaged or the call was not answered, it is possible to redial
the number (up to 32 digits) using the REDIAL button. The number will be retained in
memory until another number is dialled
# Lift the handset or press the SPEAKER button, dial tone will be heard.
# Press the REDIAL button, the telephone will now dial the last dialled number.
4
Page 7

TEL 35 MEMORIES
MEMORY OPERATION
The telephone can store up to 20 telephone numbers (10 one touch plus 10 two touch
memories), up to a maximum of 24 digits per number. Ignore any voice messages or tones
that may be heard in the earpiece/speaker.
STORING ONE TOUCH MEMORIES
# Lift the handset or press the SPEAKER button, you will hear a dial tone.
# Press and release the STORE button.
# Dial the telephone number you wish to store.
# Press and release the memory location button.
# Replace the handset or press the SPEAKER button.
STORING TWO TOUCH MEMORIES
# Lift the handset or press the SPEAKER button, you will hear a dial tone.
# Press and release the STORE button.
# Dial the telephone number you wish to store.
# Press and release the SHIFT button.
# Press and release any single keypad number (0 - 9).
# Replace the handset or press the SPEAKER button.
MEMORY DIALLING
ONE TOUCH MEMORIES
# Lift the handset or press the SPEAKER button, you will hear a dial tone.
# Press the appropriate memory location button.
# The number stored will now be dialled.
# To terminate the call replace the handset or press the SPEAKER button.
TWO TOUCH MEMORIES
# Lift the handset or press the SPEAKER button, you will hear a dial tone.
# Press and release the SHIFT button.
# Press the appropriate memory location on the telephone keypad (0 - 9).
# The number stored will now be dialled.
# To terminate the call replace the handset or press the SPEAKER button.
5
Page 8

OTHER TEL 35
SPEAKER VOLUME CONTROL
When using the telephone in ‘handse-free’ mode the volume of the speaker may be
adjusted by using the VOLUME CONTROL on the right hand side of the telephone.
MUTE BUTTON
If you wish to talk privately without your caller overhearing, press and hold the
MUTE button. To resume your conversation with your caller release the MUTE
button.
RECALL
The recall button can be used to access additional PBX or network operator services.
The phone supports Timed Break recall operation.
RINGER VOLUME
To adjust the ringing volume of the telephone, move the switch on the right hand side
to either off - low - high position.
REN
The REN number of the AUDIOLINE 35 is 1. The REN number (Ringer Equivalence
Number) is designated to represent the amount of power that a telephone draws from the
telephone line. Most normal exchange lines have a REN capacity of 4. If you exceed 4,
one telephone may not ring. Any other equipment connected unless marked otherwise
should be assumed to be of a REN rating of 1.
CLEANING
Unplug the product from the telephone network before cleaning. The casing should be
cleaned by wiping with a damp cloth. Do not use abrasives or spray polish that may cause
damage.
GUARANTEE
The AUDIOLINE 35 is guaranteed for a period of 12 months from the date of purchase.
In the unlikely event of a fault occurring during this period, please return it with a copy
of the purchase receipt to your place of purchase.
This guarantee does not extend to damage caused by misuse, negligence, excessive
voltage, faults on the telephone line or lightening.
This guarantee in no way affects your statutory rights.
6
Page 9

TEL 35 OTHER
FAULT FINDING
In the unlikely event of a fault occurring, proceed as follows:
THE DISPLAY IS BLANK
# Check/change batteries.
THE PHONE DOES NOT RING
# Check if the total of REN numbers exceeds 4.
# Check if the ringer switch on the right hand side of the telephone is not set to Off.
THE PHONE DOES NOT WORK
# Plug the phone into another network socket and re-try.
SPEAKER VOLUME LOW
# Adjust the volume control on the side of the telephone.
MEMORY NUMBERS ARE NOT DIALLING
# Repeat the memory storage procedure and re-try.
Technical Support:
If you cannot resolve the fault using the fault finder section, technical support is
available on the Pemium Rate Number: 0906 302 0114.
Calls cost 50 pence per minute (prices correct at the time of going to press),and is
operational between 9AM - 5PM Monday-Friday, excluding Bank Holidays.
You can contact us in writing: Consumer Support Group, Doro UK Ltd, 22 Walkers
Road, North Moons Moat, Redditch, Worcestershire, B98 9HE, (regarding any Spares
or Technical query), or.
Telephoning Spares: 01527 584377
E-mail on: tech@doro-uk.com
Web site: www.doro-uk.com
7
Page 10

8
Page 11

NOTES.
Page 12

 Loading...