

Page 1

TEL35
‘Hands-free’ Speakerphone
with LCD Display
User guide
Downloaded from: http://www.guardianalarms.net
Page 2
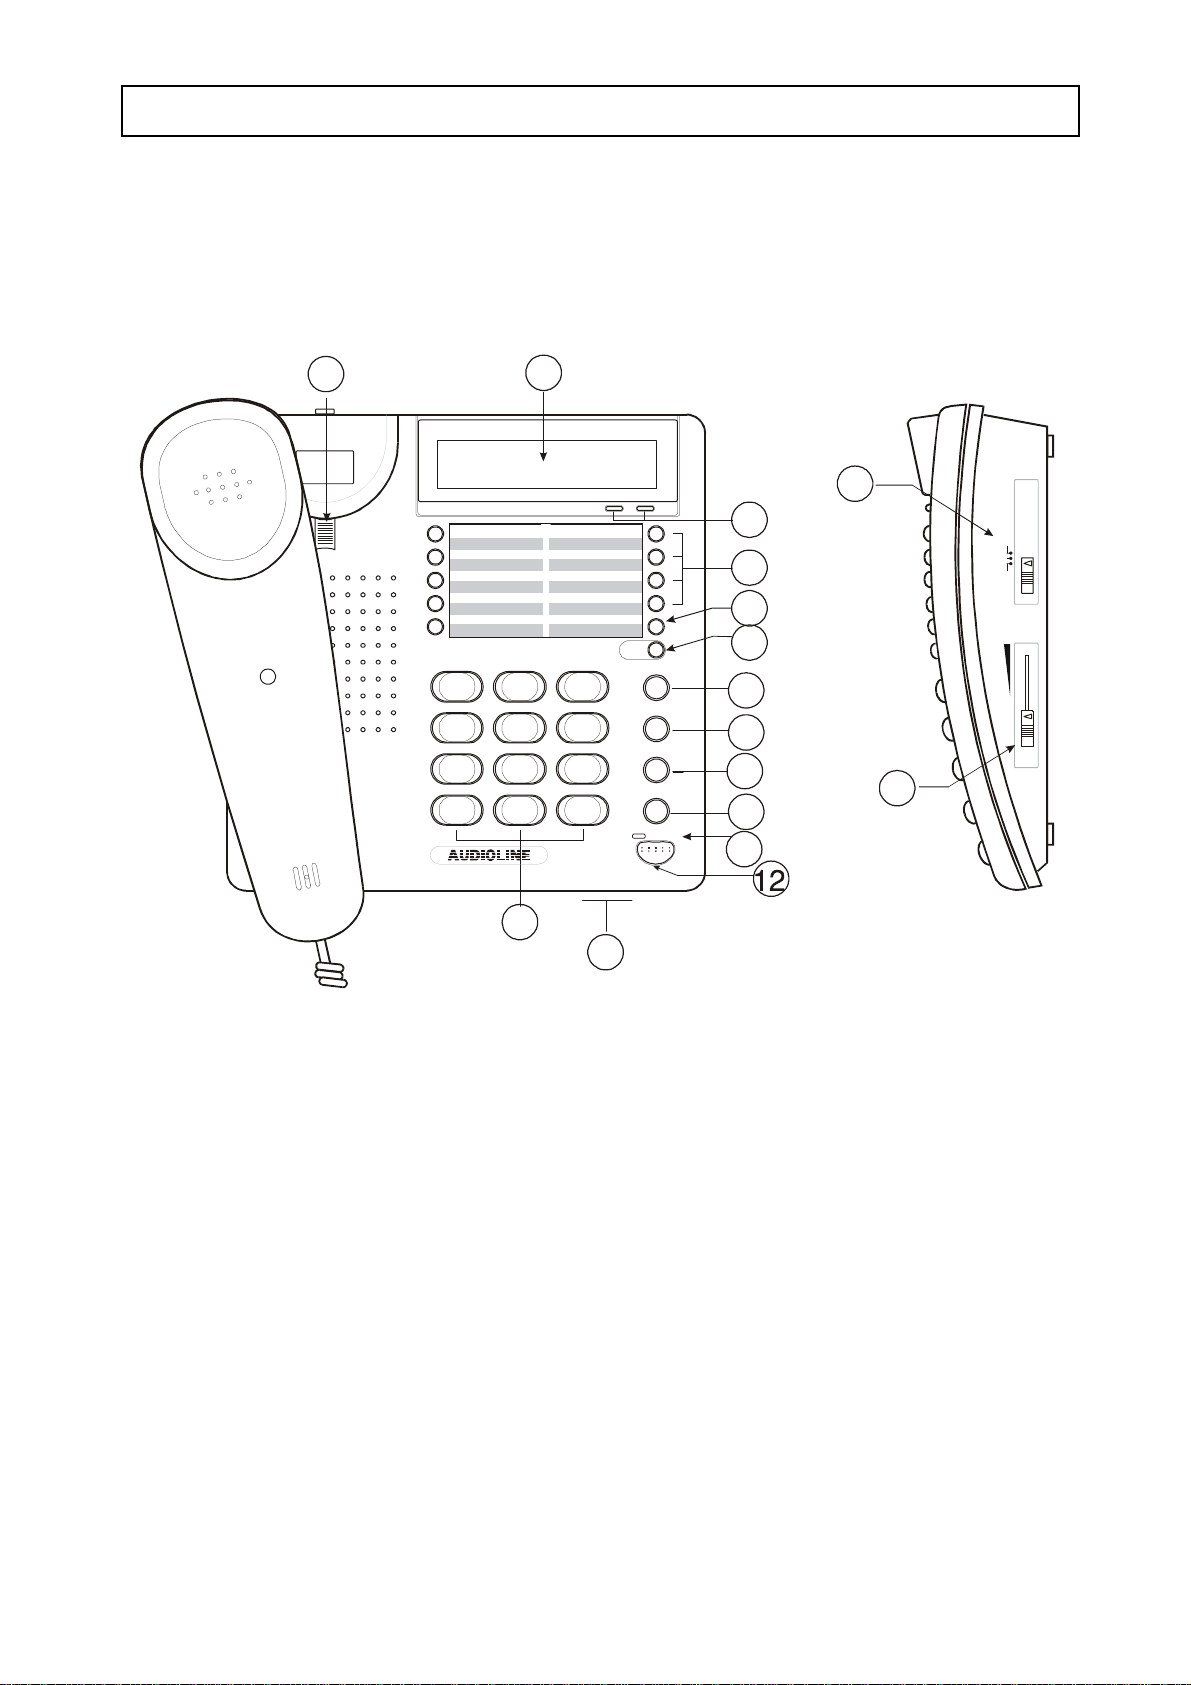
AUDIOLINE TEL35 INSTALLATION
FUNCTIONS
1
2
SETTIME
16
3
RINGER
OFF LO HIGH
VOLUME
PQRS
4
10
1010
5
6
7
8
9
15
SHIFT
STORE
1
ABC
2
DEF
GHI
4
JKL
5
MNO
7
TUV
8
WXYZ
*
0
#
RECALL
3
MUTE
6
PAUSE
9
REDIAL
SPEAKER
11
13
14
1 Wall mount clip 11 Speaker LED
2 LCD Display 12 Speaker button
3 Time and Set buttons 13 Dial buttons, 0-9, *, #
4 Memory buttons 14 Microphone
5 Shift button 15 Volume Control
6 Store button 16 Ringer Switch (Off/Low/High)
7 Recall button
8 Mute button
9 Pause button
10 Redial button
1
Page 3

INSTALLATION AUDIOLINE TEL35
ASSEMBLY INSTRUCTIONS
PARTS LIST
1 - TEL35 Telephone
1 - Telephone Handset
1 - Line cord
BATTERY
Two “AAA” 1.5V batteries (not supplied) must be fitted before connection to the
telephone network. This will ensure full function of the LCD display and memory
retention in the event of the telephone being disconnected from the Network.
# Remove screw from battery compartment on base.
# Insert batteries, observing correct polarity.
# Replace cover and retaining screw.
# The clock will commence at 12-00-00 (see page 6 for setting the current time).
NOTE: 1. Always disconnect the telephone from the line when replacing batteries.
2. Dispose of used batteries safely and never in a fire. 3. The batteries should be
replaced when the display intensity becomes significantly reduced.
GETTING CONNECTED
# Insert the telephone plug into a telephone socket.
# The majority of modern digital exchanges are now Tone dialling and consequently this
telephone has been pre-set to Tone dialling. If you experience any problems contact
your Network Operator.
2
Page 4

AUDIOLINE TEL35 THE TELEPHONE
MAKING & RECEIVING CALLS
Handset Operation
# Lift handset and wait for Dial Tone (the Call Timer commences counting from 0-00).
# Dial the telephone number (the Display shows number dialled and after 10 seconds
call time commences counting).
# To terminate the call replace the handset.
Hands-free Operation
# Press the [SPEAKER] button (the red LED light will illuminate).
# Dial the telephone number.
# When the called party answers, speak clearly in the direction of the microphone at the
front of the telephone.
# To terminate the call press [SPEAKER] button (the LED light will go off).
# It is possible to receive a call in the hands-free mode, simply press [SPEAKER] button
when the phone rings.
Switching from ‘Hands-free’ to Handset use
# Lift the handset.
# Hands-free mode will be automatically disabled.
# Replace the handset to terminate the call.
Switching from Handset to ‘Hands-free’
Simply, press and hold the [SPEAKER] button and then replace the handset.
3
Page 5

THE TELEPHONE AUDIOLINE TEL35
MEMORY STORAGE & DIALLING
Your 18 most frequently used numbers (up to 16 digits) can be stored in the memory. 9
at one touch access and 9 at two touch access.
Memory Storage - one touch access
# Lift handset or press [SPEAKER] button.
# Press and release [STORE] button.
# Enter the telephone number.
# Press and release memory location button.
# Replace handset or press [SPEAKER] button.
Memory storage - two touch access
# Lift handset or press [SPEAKER] button.
# Press and release [STORE] button.
# Enter the telephone number.
# Press and release [SHIFT] button.
# Press and release [MEMORY] location button.
# Replace handset or press [SPEAKER] button.
NOTE: If you are storing successive numbers you must always replace the handset
before entering the next number for storage.
Make a note of the name of the owner of the telephone number and its location on the
memory index pad.
4
Page 6

AUDIOLINE TEL35 THE TELEPHONE
DIALLING USING MEMORY
One Touch Access
# Lift handset or press [SPEAKER] button.
# Press the appropriate memory location button.
Two Touch Access
# Lift handset or press [SPEAKER] button.
# Press and release [SHIFT] button.
# Press the appropriate memory location button.
CHAIN DIALLING
Telephone numbers stored in different memory locations can be dialled one after anothe r
by simply pressing the appropriate buttons. This feature is useful when accessing
electronic banking facilities, where the banks telephone number, your account and pin
number are stored in different memory locations.
LAST NUMBER REDIAL
If the number you called is busy or if you want to call the previous number again, simply;
P Lift the handset and wait for Dial Tone.
P Press the [REDIAL] button (item 10 on the diagram on page 1) . The phone will call the
last number you dialled.
5
Page 7

THE TELEPHONE AUDIOLINE TEL35
LCD DISPLAY
Your Audioline TEL35 has a multi-function LCD (Liquid Crystal Display) which
indicates:
The current time
The number you are dialling
The duration of both incoming and outgoing calls
Setting the current time
12 Hour Clock P denotes PM, A denotes AM
WHAT YOU DO WHAT YOU SEE
Press set button The hour digit(s) will flash
Press [TIME] button until the correct
hour is displayed
Press [SET] button The minute(s) digits will flash
Press [TIME] button until the correct
minute(s) is displayed
Press [SET] button The clock will commence counting
MUTE
If you wish to talk privately without your caller overhearing, press and hold the [MUTE]
button. To resume your conversation with your caller, release the [MUTE] button.
RECALL
The [RECALL] button can be used to access additional PABX facilities. The Audioline
TEL35 is pre-set to 100ms Time Break Recall for Australia and 600ms for
New Zealand.
PAUSE
For some Network services such as home banking or PABX use, it may be necessary to
insert a pause between digits. Use the [PAUSE] button to enter a 3 second pause.
6
Page 8

AUDIOLINE TEL35 THE TELEPHONE
SPEAKER VOLUME CONTROL
When using the telephone in the ‘hands-free’ mode the volume level of the speaker may
be adjusted by using the control on the right handside of the telephone (item 15 on the
diagram on page 1)
RINGER CONTROL
To adjust the ringing volume of the telephone, move the switch on the right hand side to
either Off-Low-High (item 16 on the diagram on page 1).
ADDITIONAL NETWORK SERVICES
Optional services such as call waiting, call foward etc,. Can be accessed via the Recall
button. A subsription may apply. For further information contact your Network
Operator.
WALL MOUNTING
The Audioline TEL35 can be wall mounted with an optional bracket (part no. TWB223
not supplied).
When the telephone is wall mounted the handset wall mount clip must be rotated 180
degrees (item 1 on the diagram on page 1).
7
Page 9

OTHER INFORMATION AUDIOLINE TEL35
WARNING
It is recommended that you disconnect your telephone during a thunderstorm as you can
get a shock from your telephone (and other electrical appliances). We recommend you
follow these simple precautions during a thunderstorm:
# Do not use your telephone unless the call is urgent.
# If you must use your telephone, make the call as brief as possible and keep clear of
electrical equipment and metal fixtures.
# Do not stand in bare feet on uncovered concrete floors.
# Do not touch brick or concrete walls.
NOTE: Do not install your telephone in damp or high humidity locations, such as a
laundry or bathroom. If any damage is caused by such elements it is not covered by
the manufacturers warranty.
CLEANING
The casing should be cleaned by wiping with a damp cloth.
# Do not use abrasives, solvents or spray polish that may enter through holes in the
earpiece and mouthpiece and cause damage.
# Do not place the telephone in direct sunlight or use in extreme humidity.
# Clean the display with a soft dry cloth. Do not push on the display, it can be damaged.
REN
The REN (Ringer Equivalance Number) is of significance only if you wish to connect
more than 1 telephone to your telephone line. Your telephone line has a maximum REN
capacity of 3. Your Audioline TEL35 has a REN of 1, thus it is feasible to connect 2
more telephones of a value of 1 to your system. You should not exceed a value of 3 on
the complete system, otherwise the volume of the ringer in any phone will decrease and
one telephone may not ring at all.
8
Page 10

AUDIOLINE TEL35 GUARANTEE
GUARANTEE
If you believe your Audioline TEL35 is malfunctioning, please refer to the relevant
section and/or consult the troubleshooting guide in this manual to ensure that you have
followed the instructions carefully.
The Audioline TEL35 is guaranteed for a period of 12 months from the date of purchase.
In the unlikely event of a fault during this period, please contact our Helpline for
assistance. If the product is then found to be faulty you will be asked to return it directly
to DORO with a copy of the purchase receipt.
DORO Australia Pty Ltd
PO Box 6760
Baulkham Hills BC NSW 2153 Australia
Helpline (02) 8853 8444 Fax: (02) 8853-8489
Email: doro@doro.com.au
NOTE: The guarantee does not extend to damage caused by misuse, negligence,
excessive voltage, faults on the telephone line or lightning. This guarantee in no way
affects your statutory rights. DORO is the trademark of DORO AB.
9
Page 11

 Loading...