

Page 1
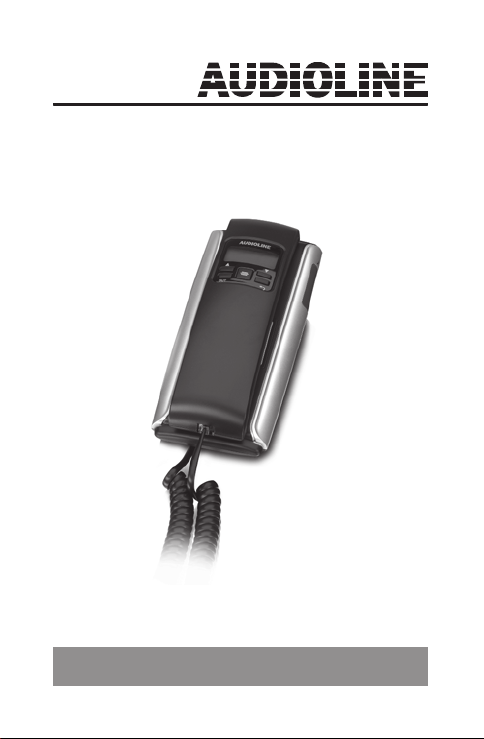
Telefon
Telephone
Bedienungsanleitung
Operating Instructions
TEL106
Page 2

Page 3

Inhaltsverzeichnis
1 Allgemeine Hinweise . . . . . . . . . . . . . . . . . . . .3
Bestimmungsgemäße Verwendung . . . . . . . . . . . . . .3
Aufstellungsort . . . . . . . . . . . . . . . . . . . . . . . . . . . . . .3
Entsorgung . . . . . . . . . . . . . . . . . . . . . . . . . . . . . . . . .4
2 Bedienelemente . . . . . . . . . . . . . . . . . . . . . . . .6
3 Inbetriebnahme . . . . . . . . . . . . . . . . . . . . . . . .8
Sicherheitshinweise . . . . . . . . . . . . . . . . . . . . . . . . . .8
Verpackungsinhalt . . . . . . . . . . . . . . . . . . . . . . . . . . .8
Batterien einlegen . . . . . . . . . . . . . . . . . . . . . . . . . . .8
Telefonhörer anschließen . . . . . . . . . . . . . . . . . . . . . .8
Telefon anschließen . . . . . . . . . . . . . . . . . . . . . . . . . .8
Wandmontage . . . . . . . . . . . . . . . . . . . . . . . . . . . . . .9
4 Einstellungen . . . . . . . . . . . . . . . . . . . . . . . . . .9
Datum und Uhrzeit einstellen . . . . . . . . . . . . . . . . . .10
Ortsvorwahl einstellen . . . . . . . . . . . . . . . . . . . . . . .10
Amtskennzahl einstellen . . . . . . . . . . . . . . . . . . . . . .12
Auto-IP einstellen . . . . . . . . . . . . . . . . . . . . . . . . . . .13
Wahlverfahren einstellen . . . . . . . . . . . . . . . . . . . . .13
Displaykontrast einstellen . . . . . . . . . . . . . . . . . . . . .13
Klingeltonlautstärke . . . . . . . . . . . . . . . . . . . . . . . . .14
5 Telefonieren . . . . . . . . . . . . . . . . . . . . . . . . . .15
Anrufe entgegennehmen . . . . . . . . . . . . . . . . . . . . .15
Anrufen . . . . . . . . . . . . . . . . . . . . . . . . . . . . . . . . . . .15
Wahlwiederholung der letzten Rufnummer . . . . . . .16
Wahlwiederholung (Liste) . . . . . . . . . . . . . . . . . . . . .16
Anrufliste . . . . . . . . . . . . . . . . . . . . . . . . . . . . . . . . . .18
Gespräch halten / Wartemusik . . . . . . . . . . . . . . . . .20
D
1
Page 4

Inhaltsverzeichnis
6 Betrieb an Telefonanlagen/Zusatzdienste . .21
Betrieb an Telefonanlagen . . . . . . . . . . . . . . . . . . . .21
Zusatzdienste Ihres Netzbetreibers . . . . . . . . . . . . .21
7 Anhang . . . . . . . . . . . . . . . . . . . . . . . . . . . . . .22
Fehlersuche . . . . . . . . . . . . . . . . . . . . . . . . . . . . . . .22
Konformitätserklärung . . . . . . . . . . . . . . . . . . . . . . .22
Pflegehinweise . . . . . . . . . . . . . . . . . . . . . . . . . . . . .23
Garantie . . . . . . . . . . . . . . . . . . . . . . . . . . . . . . . . . .23
2
Page 5

Allgemeine Hinweise
1 Allgemeine Hinweise
Bitte lesen Sie diese Bedienungsanleitung sorgfältig
durch. Bei eventuell auftretenden Fragen, wenden Sie sich
bitte an unseren Service. Die Rufnummer finden Sie auf
unserer Internet-Seite www.audioline.de.
Bei Gewährleistungsansprüchen wenden Sie sich bitte an
Ihren Fachhändler.
Bestimmungsgemäße Verwendung
Dieses Telefon ist geeignet zum Telefonieren innerhalb
eines Telefonnetzes. Jede andere Verwendung gilt als
nicht bestimmungsgemäß. Eigenmächtige Veränderungen
oder Umbauten sind nicht zulässig. Öffnen Sie das Gerät
in keinem Fall selbst und führen Sie keine eigenen Reparaturversuche durch.
Aufstellungsort
Stellen Sie das Telefon nicht in die unmittelbare Umgebung von anderen elektronischen Geräten wie z. B. Mikrowellen oder HIFI-Geräten, da es sonst zu gegenseitiger
Beeinflussung kommen kann. Der Aufstellort hat entscheidenden Einfluss auf den einwandfreien Betrieb des Telefons.
Stellen Sie das Telefon auf eine ebene und rutschfeste
Fläche. Normalerweise hinterlassen die Füße des Telefons
keine Spuren auf der Aufstellfläche. Wegen der Vielzahl
D
3
Page 6

Allgemeine Hinweise
der verwendeten Lacke und Oberflächen kann es jedoch
nicht ausgeschlossen werden, dass durch die Gerätefüße
Spuren auf der Abstellfläche entstehen.
Verwenden Sie das Telefon nicht in explosionsgefährdeten
Bereichen.
Vermeiden Sie übermäßige Belastungen durch Rauch,
Staub, Erschütterungen, Chemikalien, Feuchtigkeit, Hitze
und direkte Sonneneinstrahlung.
Entsorgung
Wollen Sie Ihr Gerät entsorgen, bringen Sie es
zur Sammelstelle Ihres kommunalen Entsorgungsträgers (z. B. Wertstoffhof). Nach dem Elektro- und Elektronikgerätegesetz sind Besitzer von
Altgeräten gesetzlich verpflichtet, alte Elektro−
und Elektronikgeräte einer getrennten Abfallerfassung zuzuführen. Das nebenstehende Symbol
bedeutet, dass Sie das Gerät auf keinen Fall in
den Hausmüll werfen dürfen!
Gefährdung von Gesundheit und Umwelt
durch Akkus und Batterien! Akkus und Batte-
rien nie öffnen, beschädigen, verschlucken oder
in die Umwelt gelangen lassen. Sie können giftige
und umweltschädliche Schwermetalle enthalten.
Sie sind gesetzlich verpflichtet, Akkus und Batterien beim batterievertreibenden Handel sowie bei
4
Page 7

Allgemeine Hinweise
zuständigen Sammelstellen, die entsprechende
Behälter bereitstellen, sicher zu entsorgen. Die
Entsorgung ist unentgeltlich. Die nebenstehenden
Symbole bedeuten, dass Sie Akkus und Batterien
auf keinen Fall in den Hausmüll werfen dürfen
sondern dass diese über Sammelstellen der Entsorgung zugeführt werden müssen.
Verpackungsmaterialien entsorgen Sie entsprechend den lokalen Vorschriften.
D
5
Page 8
Bedienelemente
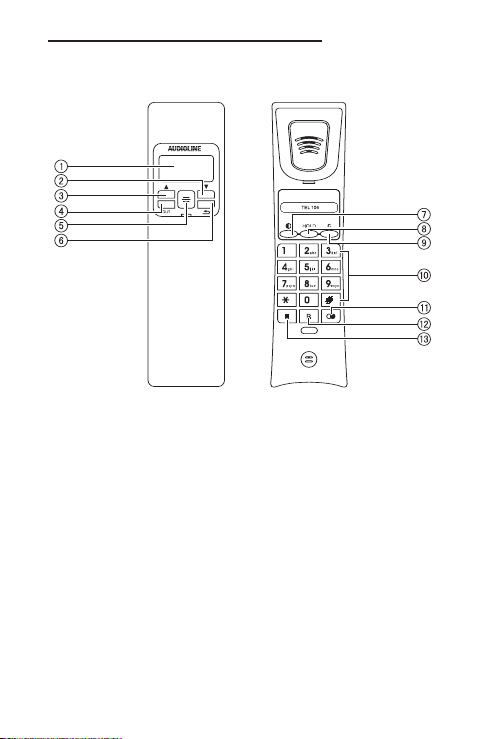
2 Bedienelemente
1 Display
2 Abwärts-Taste ▼
3 Aufwärts-Taste ▲
4 Gewählte Rufnummern
5 Programmiertaste
6 Zurück-Taste
7 Helligkeit Display
8 Halten-Taste
9 Lösch-Taste
10 Wähltastatur
6
11 Wahlwiederholung
12 Flash (R)-Taste
13 Pause
Page 9
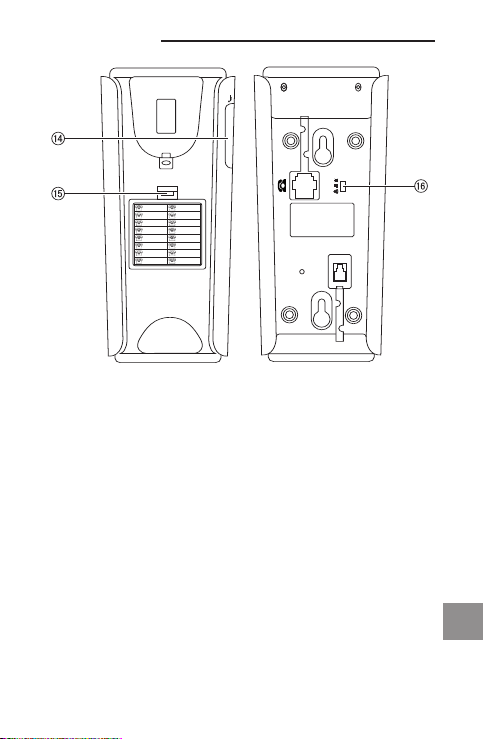
14 Anruf-LED
15 Batteriefach
16 Einstellung Klingeltonlautstärke
Bedienelemente
D
7
Page 10

Inbetriebnahme
3 Inbetriebnahme
Sicherheitshinweise
Lesen Sie vor der Inbetriebnahme unbedingt die allgemeinen Hinweise am Anfang dieser Anleitung.
Verpackungsinhalt
1 Telefonbasis 1 Telefonhörer
1 Telefonanschlusskabel 1 Spiralkabel
1 Bedienungsanleitung
Batterien einlegen
Legen Sie 3 AAA-Batterien (nicht mitgeliefert) ein, bevor
Sie die Kabel anschließen. Die Batterien werden für die
Displayanzeige und die Funktionen Wahlwiederholung und
Anrufliste benötigt - einfaches Telefonieren können Sie
auch ohne Batterien.
Öffnen Sie das Batteriefach (15) und legen Sie die Batterien ein. Achten Sie auf die richtige Polung! Schließen Sie
das Batteriefach wieder.
Telefonhörer anschließen
Nehmen Sie das kürzere Ende des Spiralkabels und stecken Sie es in die Buchse am unteren Ende des Hörers.
Stecken Sie das längere Ende des Kabels in die untere
Buchse an der Rückseite des Telefons. Klemmen Sie das
Kabel in den vorgesehenen Kabelkanal.
8
Page 11

Inbetriebnahme
Telefon anschließen
Verbinden Sie das beiliegende Telefonkabel mit der Telefonsteckdose und der oberen Buchse auf der Rückseite
des Telefons ( ). Klemmen Sie das Kabel in den
Kabelkanal nach oben.
Das Telefon arbeitet im Auslieferungszustand mit dem
MFV-Wahlverfahren (Tonwahl).
Wandmontage
Ihr Telefon ist auch zur Wandmontage geeignet. Benutzen
Sie zur Befestigung zwei Schrauben. Bohren Sie zwei
Löcher im Abstand von 106 mm vertikal untereinander und
lassen Sie die Schrauben 5 mm aus der Wand herausstehen. Stecken Sie nun das Telefon auf die Schrauben und
schieben Sie es etwas nach unten.
Damit der Hörer bei einer Wandmontage im aufgelegten
Zustand nicht herunterfällt, gibt es in der Hörerablage eine
kleine Einhängevorrichtung. Schieben Sie mit einem kleinen Schraubenzieher o. ä. den Einsatz nach oben heraus,
drehen Sie ihn um und schieben Sie ihn wieder hinein.
D
9
Page 12

Einstellungen
4 Einstellungen
Datum und Uhrzeit einstellen
1 Der Hörer ist aufgelegt.
2 Drücken Sie die Programmiertaste.
Im Display erscheint 1 .
3 Drücken Sie die Programmiertaste, die letzten beiden
Ziffern der Jahreszahl blinken.
4 Stellen Sie mit der Aufwärts-Taste ▲ bzw. der
Abwärts-Taste ▼ die Jahreszahl ein.
5 Drücken Sie die Programmiertaste zur Bestätigung.
6 Stellen Sie in der gleichen Weise den Monat, den Tag,
die Stunden und die Minuten ein. Drücken Sie nach
jeder Einstellung die Programmiertaste zur Bestäti-
gung.
7 Wenn Sie nach der letzten Eingabe (Minuten-Einerstel-
le) die Programmiertaste gedrückt haben, erscheint im
Display die Eingabemöglichkeit für die Ortsvorwahl.
Falls Sie diese eingeben und weitere Einstellungen vor-
nehmen möchten, siehe nächsten Abschnitt.
Wollen Sie keine weiteren Einstellungen vornehmen,
kehrt das Telefon nach ca. 12 s in den Ruhezustand
zurück.
10
Page 13

Einstellungen
Ortsvorwahl einstellen
Bei eingestellter Ortsvorwahl wird in der Anzeige
bei ankommenden Anrufen nur die Rufnummer
angezeigt, wenn die gesendete Ortsvorwahl mit
der eingegebenen Ziffernfolge übereinstimmt.
Besteht Ihre Ortsvorwahl nur aus 3 oder 4 Ziffern,
lassen Sie nach der letzten Ziffer oder stehen.
Bitte beachten Sie, dass dazu die Rufnummernübermittlung an Ihrem Anschluss verfügbar sein
muss. Bei Fragen wenden Sie sich bitte an Ihren
Netzbetreiber.
1 Der Hörer ist aufgelegt.
2 Drücken Sie die Programmiertaste.
3 Drücken Sie die Aufwärts-Taste ▲.
Im Display erscheint 2 0.
4 Drücken Sie die Programmiertaste, die erste Eingabe-
stelle blinkt.
5 Stellen Sie mit der Aufwärts-Taste ▲ bzw. der
Abwärts-Taste ▼ die erste Ziffer Ihrer Ortsvorwahl ein.
6 Drücken Sie die Programmiertaste zur Bestätigung.
7 Stellen Sie in der gleichen Weise die weiteren Ziffern
ein. Drücken Sie nach jeder Einstellung die Program-
miertaste zur Bestätigung.
D
Wollen Sie keine weiteren Einstellungen vornehmen,
11
Page 14

Einstellungen
kehrt das Telefon nach ca. 12 s in den Ruhezustand
zurück.
Amtskennzahl einstellen
Diese Einstellung ist nur notwendig, wenn Sie das
Telefon an einer Telefonanlage betreiben.
Wenn Sie einen Eintrag aus der Anrufliste zurückrufen
wollen (Rufnummer muss mehr als 6 Ziffern lang sein),
wird automatisch die eingegebene Amtskennzahl
gefolgt von einer einer 1 Sekunden-Pause der
Rufnummer vorangestellt.
Besteht Ihre Amtskennzahl nur aus einer Ziffer, lassen
Sie nach dieser Ziffer stehen.
1 Der Hörer ist aufgelegt.
2 Drücken Sie die Programmiertaste.
3 Drücken Sie zweimal die Aufwärts-Taste ▲.
Im Display erscheint 3 0.
4 Drücken Sie die Programmiertaste, die erste Eingabe-
stelle blinkt.
5 Stellen Sie mit der Aufwärts-Taste ▲ bzw. der Abwärts-
Taste ▼ die erste Ziffer der Amtskennzahl ein.
6 Drücken Sie die Programmiertaste zur Bestätigung.
7 Stellen Sie in der gleichen Weise die zweite Ziffer ein.
Drücken Sie nach jeder Einstellung die Programmier-
taste zur Bestätigung.
12
Page 15

Einstellungen
Wollen Sie keine weiteren Einstellungen vornehmen,
kehrt das Telefon nach ca. 12 s in den Ruhezustand
zurück.
Auto-IP einstellen
Diese Einstellung ist in Deutschland nicht notwendig.
Wahlverfahren einstellen
Sie können Tonwahl (Auslieferungszustand) oder
Impulswahl einstellen. Für die meisten Anschlüsse
ist Tonwahl die richtige Einstellung.
1 Der Hörer ist aufgelegt.
2 Drücken Sie die Programmiertaste.
3 Drücken Sie vier mal die Aufwärts-Taste ▲.
Im Display erscheint .
4 Drücken Sie die Programmiertaste, je nach Einstellung
blinkt 0 (Tonwahl) oder (Impulswahl).
5 Stellen Sie mit der Aufwärts-Taste ▲ bzw. der
Abwärts-Taste ▼ das gewünschte Wahlverfahren ein.
6 Drücken Sie die Programmiertaste zur Bestätigung.
Wollen Sie keine weiteren Einstellungen vornehmen,
kehrt das Telefon nach ca. 12 s in den Ruhezustand
zurück.
D
13
Page 16

Einstellungen
Displaykontrast einstellen
1 Der Hörer ist aufgelegt.
2 Drücken Sie die Programmiertaste.
3 Drücken Sie fünf mal die Aufwärts-Taste ▲.
Im Display erscheint .
4 Drücken Sie die Programmiertaste, die aktuelle Ein-
stellung wird angezeigt.
5 Stellen Sie mit der Aufwärts-Taste ▲ bzw. der
Abwärts-Taste ▼ den gewünschten Kontrast ein.
6 Drücken Sie die Programmiertaste zur Bestätigung.
Wollen Sie keine weiteren Einstellungen vornehmen,
kehrt das Telefon nach ca. 12 s in den Ruhezustand
zurück.
Klingeltonlautstärke
Zum Einstellen der Klingeltonlautstärke schieben Sie den
Schalter (16) an der Rückseite des Telefons auf (laut),
(leise) oder (aus).
14
Page 17

Telefonieren
5 Telefonieren
Anrufe entgegennehmen
Ein eingehender Anruf wird auf dem Display angezeigt
und mit Datum und Uhrzeit in die Anrufliste übernommen. Unterdrückte Rufnummern werden mit ....
angezeigt, bei Fehlern in der Rufnummernübermittlung
erscheint ..... Wird keine Rufnummer übertragen
wird .... angezeigt.
Bitte beachten Sie, dass dazu die Rufnummernübermittlung an Ihrem Anschluss verfügbar sein
muss. Bei Fragen wenden Sie sich bitte an Ihren
Netzbetreiber.
1 Heben Sie den Telefonhörer ab.
2 Um das Gespräch zu beenden, legen Sie den Telefon-
hörer wieder auf.
Anrufen
1 Nehmen Sie den Telefonhörer ab und warten Sie auf
das Freizeichen.
2 Wählen Sie nun die gewünschte Telefonnummer.
Nach ca. 6 s wird die Gesprächsdauer im Display ange-
zeigt.
3 Um das Gespräch zu beenden, legen Sie den Hörer
wieder auf.
D
14
15
Page 18

Telefonieren
Wahlwiederholung der letzten Rufnummer
Ist ein Anschluss, den Sie gewählt haben, besetzt, drücken Sie einfach kurz die Wahlwiederholungstaste.
Die Rufnummer wird erneut gewählt.
Wahlwiederholung (Liste)
Ihr Telefon speichert bis zu 5 gewählte Rufnummern
zusammen mit der Gesprächsdauer. Sie können diese
Liste ansehen, daraus erneut anrufen oder Einträge
löschen. Bei mehr als 5 ausgehenden Gesprächen
wird der älteste Eintrag überschrieben.
1 Der Hörer liegt auf oder ist abgenommen.
2 Drücken Sie die Taste Gewählte Rufnummern (4). Die
zuletzt gewählte Rufnummer wird angezeigt.
3 Drücken Sie wiederholt die Taste Gewählte Rufnum-
mern, um die weiteren Einträge anzuzeigen. Sind keine
weiteren Einträge vorhanden, zeigt das Display
.
Wählen aus der Wahlwiederholliste
1 Der Hörer liegt auf.
2 Drücken Sie die Taste Gewählte Rufnummern. Die
zuletzt gewählte Rufnummer wird angezeigt. Wählen
Sie ggf. durch wiederholtes Drücken der Taste den
gewünschten Eintrag aus.
16
Page 19

Telefonieren
3 Drücken Sie die Zurück-Taste (6) - die Rufnummer
wird gewählt. Heben Sie Hörer ab und führen Sie das
Gespräch.
Löschen von Einträgen in der Wahlwiederholliste
1 Heben Sie den Hörer ab.
2 Drücken Sie die Taste Gewählte Rufnummern. Die
zuletzt gewählte Rufnummer wird angezeigt. Wählen
Sie ggf. durch wiederholtes Drücken der Taste den
gewünschten Eintrag aus.
3 Drücken Sie die Lösch-Taste (9) - der Eintrag wird
gelöscht.
Zum Löschen aller Einträge halten Sie die Lösch-
Taste für ca. 3 s gedrückt.
17
D
Page 20

Telefonieren
Anrufliste
Ihr Telefon speichert bis zu 38 Anrufe zusammen mit
Datum und Uhrzeit in der Anrufliste. Sie können diese
Liste ansehen, daraus zurückrufen oder Einträge
löschen. Bei mehr als 38 Einträgen wird der älteste
Eintrag überschrieben.
1 Der Hörer liegt auf oder ist abgenommen.
2 Drücken Sie die Aufwärts-Taste ▲. Der neueste Ein-
trag wird angezeigt.
3 Blättern Sie mit der Aufwärts-Taste ▲ bzw. der
Abwärts-Taste ▼ durch die Liste. Sind keine weiteren
Einträge vorhanden, zeigt das Display
.
Wählen aus der Anrufliste
1 Der Hörer liegt auf.
2 Drücken Sie die Aufwärts-Taste ▲. Der neueste Ein-
trag wird angezeigt.
3 Wählen Sie mit der Aufwärts-Taste ▲ bzw. der
Abwärts-Taste ▼ den gewünschten Eintrag.
4 Drücken Sie die Zurück-Taste (6) - die Rufnummer
wird gewählt. Heben Sie Hörer ab und führen Sie das
Gespräch.
18
Page 21

Telefonieren
Löschen von Einträgen in der Anrufliste
1 Heben Sie den Hörer ab.
2 Drücken Sie die Aufwärts-Taste ▲. Der neueste Ein-
trag wird angezeigt.
3 Wählen Sie mit der Aufwärts-Taste ▲ bzw. der
Abwärts-Taste ▼ den gewünschten Eintrag.
4 Drücken Sie die Lösch-Taste (9) - der Eintrag wird
gelöscht.
Zum Löschen aller Einträge halten Sie die Lösch-
Taste für ca. 3 s gedrückt.
19
D
Page 22

Telefonieren
Gespräch halten / Wartemusik
Wenn Sie ein Gespräch „halten“, wird dem Anrufer während dieser Zeit eine Wartemusik eingespielt.
Während eines Gesprächs
1 Drücken Sie während eines Gesprächs die Halten-
Taste (8). Ihr Gesprächspartner hört die Haltemusik.
Das Mikrofon an Ihrem Telefon ist ausgeschaltet.
2 Um das Gespräch wieder aufzunehmen, drücken Sie
die Halten-Taste (8) erneut.
20
Page 23

Betrieb an Telefonanlagen/Zusatzdienste
6 Betrieb an Telefonanlagen/Zusatzdienste
Betrieb an Telefonanlagen
Ist Ihr Telefon an einer Telefonanlage angeschlossen, können Sie über die Flash- Taste (R-Taste / 12) weitere Funktionen nutzen, wie z. B. „Anrufe weiterleiten“ und „Automatischen Rückruf“. Die Flashzeit an Ihrem Telefon ist werksseitig auf 100 ms fest eingestellt. Ob Ihr Telefon an Ihrer
Telefonanlage einwandfrei funktioniert, erfahren Sie bei
dem Händler, bei dem die Anlage gekauft wurde.
Zusatzdienste Ihres Netzbetreibers
Ihr Telefon unterstützt Zusatzdienste Ihres Netzbetreibers,
wie z. B. Makeln, Anklopfen und Konferenz. Über die
Flash- Taste (R-Taste / 12) können Sie diese Zusatzdienste
nutzen. Die Flashzeit an Ihrem Telefon ist werksseitig auf
100 ms fest eingestellt. Zur Freischaltung von Zusatzdiensten wenden Sie sich bitte an Ihren Netzbetreiber.
21
D
Page 24

Anhang
7 Anhang
Fehlersuche
Entfernen Sie alle zusätzlichen Telefonapparate und verbinden Sie nur das Telefon direkt mit der Telefonbuchse.
Sollte der Fehler immer noch auftreten, verbinden Sie ein
anderes Telefon (wenn vorhanden) mit der Telefonbuchse.
Die Ergebnisse zeigen Ihnen, ob der Fehler am Gerät
oder an der Telefonleitung liegt.
Bei technischen Problemen können Sie sich an unsere
Service-Hotline wenden. Die Rufnummer finden Sie auf
unserer Website www.audioline.de
Bei Garantieansprüchen wenden Sie sich an Ihren Fachhändler. Die Garantiezeit beträgt 2 Jahre ab Kaufdatum.
Konformitätserklärung
Dieses Gerät erfüllt die Anforderungen der EURichtlinie:
- 1999/5/EG Richtlinie über Funkanlagen und Telekom-
munikationsendeinrichtungen und die gegenseitige
Anerkennung ihrer Konformität.
Die Konformität mit der o. a. Richtlinie wird durch das CEZeichen auf dem Gerät bestätigt.
22
Page 25

Anhang
Für die komplette Konformitätserklärung nutzen Sie bitte
den kostenlosen Download von unserer Website
www.audioline.de
Pflegehinweise
Reinigen Sie die Gehäuseoberflächen mit einem weichen
und fusselfreien Tuch. Verwenden Sie keine Reinigungsoder Lösungsmittel.
Garantie
AUDIOLINE-Geräte werden nach den modernsten Produktionsverfahren hergestellt und geprüft. Ausgesuchte Materialien und hoch entwickelte Technologien sorgen für einwandfreie Funktion und lange Lebensdauer.
Ein Garantiefall liegt nicht vor, wenn die Ursache einer
Fehlfunktion des Gerätes bei dem Telefonnetzbetreiber
oder einer eventuell zwischengeschalteten Telefonanlage
liegt. Die Garantie gilt nicht für die in den Produkten verwendeten Batterien, Akkus oder Akkupacks. Die Garantiezeit beträgt 24 Monate, gerechnet vom Tage des Kaufs.
Innerhalb der Garantiezeit werden alle Mängel, die auf
Material- oder Herstellungsfehler zurückzuführen sind,
kostenlos beseitigt. Der Garantieanspruch erlischt bei Eingriffen durch den Käufer oder durch Dritte. Schäden, die
.
D
23
Page 26

Anhang
durch unsachgemäße Behandlung oder Bedienung, natürliche Abnutzung, durch falsches Aufstellen oder Aufbewahren, durch unsachgemäßen Anschluss oder Installation
sowie durch höhere Gewalt oder sonstige äußere Einflüsse entstehen, fallen nicht unter die Garantieleistung.
Wir behalten uns vor, bei Reklamationen die defekten Teile
auszubessern, zu ersetzen, oder das Gerät auszutauschen. Ausgetauschte Teile oder ausgetauschte Geräte
gehen in unser Eigentum über. Schadenersatzansprüche
sind ausgeschlossen, soweit sie nicht auf Vorsatz oder
grober Fahrlässigkeit des Herstellers beruhen.
Sollte Ihr Gerät dennoch einen Defekt innerhalb der
Garantiezeit aufweisen, wenden Sie sich bitte unter Vorlage Ihrer Kaufquittung ausschließlich an das Geschäft, in
dem Sie Ihr AUDIOLINE-Gerät gekauft haben. Alle
Gewährleistungsansprüche nach diesen Bestimmungen
sind ausschließlich gegenüber Ihrem Fachhändler geltend
zu machen. Nach Ablauf von zwei Jahren nach Kauf und
Übergabe unserer Produkte können Gewährleistungsrechte nicht mehr geltend gemacht werden.
24
Page 27

Table of contents
1 General Information . . . . . . . . . . . . . . . . . . . .27
Intended use . . . . . . . . . . . . . . . . . . . . . . . . . . . . . . .27
Position . . . . . . . . . . . . . . . . . . . . . . . . . . . . . . . . . . .27
Disposal . . . . . . . . . . . . . . . . . . . . . . . . . . . . . . . . . .28
2 Operating Elements . . . . . . . . . . . . . . . . . . . .30
3 Commissioning . . . . . . . . . . . . . . . . . . . . . . .32
Safety information . . . . . . . . . . . . . . . . . . . . . . . . . .32
Contents of pack . . . . . . . . . . . . . . . . . . . . . . . . . . .32
Inserting the batteries . . . . . . . . . . . . . . . . . . . . . . . .32
Connecting the telephone receiver . . . . . . . . . . . . .32
Connecting the telephone . . . . . . . . . . . . . . . . . . . .33
Wall mounting . . . . . . . . . . . . . . . . . . . . . . . . . . . . . .33
4 Settings . . . . . . . . . . . . . . . . . . . . . . . . . . . . . .34
Setting date and time . . . . . . . . . . . . . . . . . . . . . . . .34
Setting the area code . . . . . . . . . . . . . . . . . . . . . . . .35
Setting the PABX code . . . . . . . . . . . . . . . . . . . . . . .36
Setting Auto IP . . . . . . . . . . . . . . . . . . . . . . . . . . . .37
Setting the dialling method . . . . . . . . . . . . . . . . . . . .37
Setting the display contrast . . . . . . . . . . . . . . . . . . .38
Ringer volume . . . . . . . . . . . . . . . . . . . . . . . . . . . . .38
5 Telephoning . . . . . . . . . . . . . . . . . . . . . . . . . .39
Taking a call . . . . . . . . . . . . . . . . . . . . . . . . . . . . . . .39
Making a call . . . . . . . . . . . . . . . . . . . . . . . . . . . . . .39
Redialling the very last telephone number . . . . . . . .40
Redialling (List) . . . . . . . . . . . . . . . . . . . . . . . . . . . . .40
Calls list . . . . . . . . . . . . . . . . . . . . . . . . . . . . . . . . . .42
Music on hold . . . . . . . . . . . . . . . . . . . . . . . . . . . . . .44
GB
25
Page 28

Table of contents
6 PBX / Supplementary Services . . . . . . . . . .45
PBX . . . . . . . . . . . . . . . . . . . . . . . . . . . . . . . . . . . . .45
Supplementary services . . . . . . . . . . . . . . . . . . . . . .45
7 Appendix . . . . . . . . . . . . . . . . . . . . . . . . . . . .46
Fault finding . . . . . . . . . . . . . . . . . . . . . . . . . . . . . . .46
Declaration of Conformity . . . . . . . . . . . . . . . . . . . . .46
Maintenance . . . . . . . . . . . . . . . . . . . . . . . . . . . . . . .47
Guarantee . . . . . . . . . . . . . . . . . . . . . . . . . . . . . . . . .47
26
Page 29

General Information
1 General Information
Please read these operating instructions carefully. If you
should have any questions, please contact our Hotline.
Please refer to our website www.audioline.de for the telephone number.
For any claims under the warranty, please refer to your
dealer.
Intended use
The telephone is suitable for telephoning within a public
telephone network system. Any other use is considered
unintended use. Unauthorised modification or reconstruction is not permitted. Under no circumstances open the
device or complete any repair work yourself.
Position
Do not set up telephone in the immediate vicinity of other
electrical equipment such as microwaves or hi-fi systems,
as this may result in mutual interference. The location has
a decisive influence on the trouble-free operation of the
telephone.
Place the telephone on a flat and non-slip surface. The
feet of the telephone do not normally leave any marks on
the surface. However, due to the large number of varnishes and surfaces in use, it may not be possible to prevent
marks occurring on the surface due to the feet of the unit.
GB
27
Page 30

General Information
Do not use the telephone in areas where there is a risk of
explosion.
Avoid excessive exposure to smoke, dust, vibrations, chemicals, moisture, heat and the direct rays of the sun.
Disposal
In order to dispose of your device, take it to a collection point provided by your local public waste
authorities (e.g. recycling centre). According to
laws on the disposal of electronic and electrical
devices, owners are obliged to dispose of old
electronic and electrical devices in a separate
waste container.
The adjacent symbol indicates that the device
must not be disposed of in normal domestic
waste!
Batteries represent a hazard to both health
and the environment! Never open, damage or
swallow batteries, nor allow them to get into the
environment. They may contain toxic and ecologically hazardous heavy metals.
You are legally obliged to dispose of batteries at
the point of sale or at appropriate collection points
provided by your local public waste authorities.
Disposal is free of charge.
28
Page 31

General Information
The adjacent symbols indicate that batteries must
not be disposed of in normal domestic waste and
but at authorised collection points.
Packaging materials must be disposed of according to local regulations.
29
GB
Page 32

Operating Elements
2 Operating Elements
1 Display
2 Down ▼
3 Up ▲
4 Dialled calls
5 Set
6 Back
7 Brightness display
8 Hold
9 Delete
10 Numerical keypad
30
11 Redial
12 FLASH / RECALL
13 Pause
Page 33

14 Ring LED
15 Battery compartment
16 Ringtone volume
Operating Elements
31
GB
Page 34

Commissioning
3 Commissioning
Safety information
Before commissioning, it is essential that you read the
general information at the beginning of this manual.
Contents of pack
1 Telephone base 1 Telephone receiver
1 Telephone connection cable 1 Spiral cable
1 Operating Manual
Inserting the batteries
Insert 3 AAA batteries (not included) before connecting
any cable. The batteries are essential for the display and
the redial and call list function - without batteries only simple telephoning is possible.
Open the battery compartment (15) and insert the batteries. Observe the correct polarity! Close the battery compartment.
Connecting the telephone receiver
After unpacking your telephone, you must first connect the
telephone receiver to the base unit. First take the short
end of the spiral cable and plug it into the socket at the
bottom of the receiver. Plug the long end of the spiral
cable into the lower socket on the rear side of the phone.
Feed the cable through the respective cable channel.
32
Page 35

Commissioning
Connecting the telephone
Connect the telephone cable supplied to the telephone
socket and the upper jack on the rear side of the telephone ( ). Feed the cable through the respective cable
channel.
The telephone works using the tone dialling system (in
delivery state).
Wall mounting
Your telephone is also suitable for wall mounting. Use two
screws for fixing. Drill two holes vertically, 106 mm apart,
and leave the screws protruding from the wall by 5 mm.
Now place the telephone over the screws and push it
slightly downwards.
There is a small hanging device in the receiver rest to prevent the receiver from falling when it is placed on the rest
with the telephone mounted on the wall. Insert a small
screwdriver or something suiteable to remove it, turn it
over and push it back in.
33
GB
Page 36

Settings
4 Settings
Setting date and time
1 The receiver is placed on the base.
2 Press the Set key.
The display shows 1 .
3 Press the Set key, the last two digits of year flash.
4 Use the Up key ▲ or the Down key ▼ to set the
year.
5 Press the Set key to confirm.
6 Use the same method to set the month, date, hour and
minute. After each setting press the Set key to confirm.
7 After having pressed the Set key to confirm the lase
setting (minutes), The display offers the setting for the
area code. If you want to do further settings, please
refer to the following paragraphs.
If you don’t want to do further settings, the phone
will return to idle state after approx. 12 seconds.
34
Page 37

Settings
Setting the area code
If the local area code is set, the phone will auto-filter
and suppress the area code in the display if the first
several digits are same as the local area code.
If your local area code consist of only 3 or 4 digits,
leave or after the last digit.
Please note, that for using this feature the transmission of the caller number must be available with
your telephone line. Contact your network provider for
further information.
1 The receiver is placed on the base.
2 Press the Set key.
3 Press the Up key ▲.
The display shows 2 0.
4 Press the Set key, the first digit will flash.
5 Set the first digit for your area code using the Up key
▲ or the Down key ▼.
6 Press the Set key to confirm.
7 Use the same method to set the following digits. After
each setting press the Set key to confirm.
If you don’t want to do further settings, the phone
will return to idle state after approx. 12 seconds.
35
GB
Page 38

Settings
Setting the PABX code
This setting is only necessary, if your phone is
connected to a PABX.
If you want to call back using an entry in the calls list
(and the telephone number consists of more than 6
digits), automatically the stored PABX code followed
by a 1 second pause is dialled ahead the telephone
number.
If your PABX code consist of only one digit, leave
after this digit.
1 The receiver is placed on the base.
2 Press the Set key.
3 Press the Up key ▲ twice.
The display shows 3 0.
4 Press the Set key, the first digit will flash.
5 Set the first digit for your PABX code using the Up key
▲ or the Down key ▼.
6 Press the Set key to confirm.
7 Use the same method to set the second digit. After
each setting press the Set key to confirm.
If you don’t want to do further settings, the phone
will return to idle state after approx. 12 seconds.
36
Page 39

Settings
Setting Auto IP
This setting is not necessary in Germany.
Setting the dialling method
You can set tone dialling (DTMF = delivery state) or
pulse dialling. In most situations the “Tone“ option
should be selected.
1 The receiver is placed on the base.
2 Press the Set key.
3 Press the Up key ▲ four times.
The display shows .
4 Press the Set key, depending on the current setting
0 (DTMF) or is flashing.
5 Select your preferred dialling method using the Up key
▲ or the Down key ▼.
6 Press the Set key to confirm.
If you don’t want to do further settings, the phone
will return to idle state after approx. 12 seconds.
37
GB
Page 40

Settings
Setting the display contrast
1 The receiver is placed on the base.
2 Press the Set key.
3 Press the Up key ▲ five times.
The display shows .
4 Press the Set key, the current setting is shown.
5 Adjust the contrast using the Up key ▲ or the Down
key ▼.
6 Press the Set key to confirm.
If you don’t want to do further settings, the phone
will return to idle state after approx. 12 seconds.
Ringer volume
Slide the switch (6) on the rear side of the phone to adjust
the ringer volume to (high), (low) or (off).
38
Page 41

Telephoning
5 Telephoning
Taking a call
An incoming call is shown on the display and saved to
the calls list including time and date.
If the sender suppresses his telephone number, ....
is shown. An error in incoming telephone number is
shown as ..... If no number is transmitted, .... is
shown.
Please note, that for using this feature the transmission of the caller number must be available with
your telephone line. Contact your network provider for
further information.
1 Lift the receiver.
2 To end the call, replace the receiver.
Making a call
1 Lift the receiver and wait until you hear a dialling tone.
2 Now dial the required telephone number.
The LCD will auto-time the conversation after 6
seconds.
3 To end the call, replace the receiver.
39
GB
Page 42

Telephoning
Redialling the very last telephone number
If a connection that you have dialled is engaged or you
were unable to get through to anybody, simply press the
redial button. The last dialled number will now be dialled
again.
Redialling (List)
Your telephone stores up to 5 dialled telephone
numbers in the redial list, including conversation
duration. You can scroll through the list, call again or
delete entries.
If already 5 entries are stored, any new outgoing call
replaces the oldest entry in the list.
1 The receiver is on hook or off hook.
2 Press the Dialled numbers key (4). The very last dial-
led telephone number is shown.
3 Press the Dialled numbers key repeatedly to show
further entries. At the end of the list the display shows
.
40
Page 43

Telephoning
Dialling from the redial list
1 The receiver is placed on the base.
2 Press the Dialled numbers key. The very last dialled
telephone number is shown. If neccessary press the
key repeatedly for selecting the desired entry.
3 Press the Back key (6) - the telephone number will be
dialled. Lift the receiver and conduct the call.
Deleting entries in the redial list
1 Lift the receiver.
2 Press the Dialled numbers key. The very last dialled
telephone number is shown. If neccessary press the
key repeatedly for selecting the desired entry.
3 Press the Delete key (9) - the entry will be deleted.
For deleting all entries press and hold down the
Delete key for approx. 3 seconds.
41
GB
Page 44

Telephoning
Calls list
Your telephone stores up to 38 incoming calls in the
calls list, including time and date. You can scroll
through the list, call back or delete entries.
If already 38 entries are stored, any new incoming call
replaces the oldest entry in the list.
1 The receiver is on hook or off hook.
2 Press the Up key ▲. The latest entry is shown.
3 Use the Up key ▲ or the Down key ▼ to scroll
through the list. At the end of the list the display shows
.
Dialling from the calls list
1 The receiver is placed on the base.
2 Press the Up key ▲. The latest entry is shown.
3 Use the Up key ▲ or the Down key ▼ to select the
desired entry.
4 Press the Back key (6) - the telephone number will be
dialled. Lift the receiver and conduct the call.
42
Page 45

Telephoning
Deleting entries in the calls list
1 Lift the receiver.
2 Press the Up key ▲. The latest entry is shown.
3 Use the Up key ▲ or the Down key ▼ to select the
desired entry.
4 Press the Delete key (9) - the entry will be deleted.
For deleting all entries press and hold down the
Delete key for approx. 3 seconds.
43
GB
Page 46

Telephoning
Music on hold
If you hold a call, the caller will hear music during this
time.
Whilst in a call
1 Press Hold key (8) to enter the hold mode and the hold
music is sent out.
The microphone on your receiver is muted.
2 To resume the call, press Hold key (8) again.
44
Page 47

PBX / Supplementary Services
6 PBX / Supplementary Services
PBX
If the telephone is connected to a private branch exchange, functions such as transferring calls and automatic call
back can be used via the FLASH / RECALL button (12).
The flash time on your phone is factory set to 100 ms. The
sales outlet where you purchased the exchange can provide information as to whether the telephone will work properly with the exchange.
Supplementary services
Your telephone supports supplementary services provided
by your telephone network provider, such as brokering,
call waiting and conference facilities. These supplementary
services can be used via the FLASH / RECALL button
(12).
The flash time on your phone is factory set to 100 ms.
Contact your telephone network provider with regard to
enabling supplementary services.
45
GB
Page 48

Appendix
7 Appendix
Fault finding
Remove all extra telephone equipment and connect only
the telephone directly to the telephone socket. If the fault
is still present, connect another telephone (if available) to
the telephone socket. The results will show you whether
the fault lies with the unit or with the telephone line.
In the case of technical problems, contact our Hotline.
Please refer to our website www.audioline.de
phone number.
In the case of claims under the terms of guarantee, contact your sales outlet. There is a 2 year period of guarantee from the date of purchase.
Declaration of Conformity
This device fulfils the requirements stipulated in the EU
directive:
- 1999/5/EU directive on radio equipment and
telecommunications terminal equipment and the mutual
recognition of their conformity.
Conformity with the above mentioned directive is confirmed by the CE symbol on the device.
for the tele-
46
Page 49

Appendix
To view the complete Declaration of Conformity, please
refer to the free download available on our web site
www.audioline.de
Maintenance
Clean the housing surfaces with a soft, fluff-free cloth.
Do not use any cleaning agents or solvents.
Guarantee
AUDIOLINE equipment is produced and tested according
to the latest production methods. The implementation of
carefully chosen materials and highly developed technologies ensure trouble-free functioning and a long service life.
The terms of guarantee do not apply where the cause of
equipment malfunction is the fault of the telephone network operator or any interposed private branch extension
system. The terms of guarantee do not apply to the batteries or power packs used in the products. The period of
guarantee is 24 months from the date of purchase.
All deficiencies related to material or manufacturing errors
within the period of guarantee will be redressed free of
charge. Rights to claims under the terms of guarantee are
annulled following tampering by the purchaser or third parties. Damage caused as the result of improper handling or
.
GB
47
Page 50

Appendix
operation, normal wear and tear, incorrect positioning or
storage, improper connection or installation or Acts of God
and other external influences are excluded from the terms
of guarantee. In the case of complaints, we reserve the
right to repair defect parts, replace them or replace the
entire device. Replaced parts or devices become our property. Rights to compensation in the case of damage are
excluded where there is no evidence of intent or gross
negligence by the manufacturer.
If your device shows signs of defect during the period of
guarantee, please return it to the sales outlet in which you
purchased the AUDIOLINE device together with the purchase receipt. All claims under the terms of guarantee in
accordance with this agreement can only be asserted at
the sales outlet.
No claims under the terms of guarantee can be asserted
after a period of two years from the date of purchase and
hand-over of the product.
48
Page 51

Page 52

Wichtige Garantiehinweise
Die Garantiezeit für Ihr AUDIOLINE-Produkt beginnt mit dem
Kaufdatum. Ein Garantieanspruch besteht bei Mängeln, die auf
Material- oder Herstellungsfehler zurückzuführen sind. Der Garantieanspruch erlischt bei Eingriffen durch den Käufer oder durch
Dritte. Schäden, die durch unsachgemäße Behandlung oder
Bedienung, natürliche Abnutzung, durch falsches Aufstellen oder
Aufbewahren, durch unsachgemäßen Anschluss oder Installation
sowie durch höhere Gewalt oder sonstige äußere Einflüsse entstehen, fallen nicht unter die Garantieleistung.
BITTE WENDEN SIE SICH IM GARANTIEFALL AUSSCHLIESSLICH AN DEN HÄNDLER, BEI DEM SIE DAS GERÄT GEKAUFT
HABEN, UND VERGESSEN SIE NICHT, DEN KAUFBELEG
VORZULEGEN. UM UNNÖTIG LANGE WARTEZEITEN ZU VERMEIDEN, SENDEN SIE REKLAMATIONSGERÄTE BITTE NICHT
AN UNSERE BÜROADRESSE.
BEI FRAGEN ZUR BEDIENUNG UND GARANTIELEISTUNG
LESEN SIE BITTE DIE BEDIENUNGSANLEITUNG, FRAGEN
SIE IHREN FACHHÄNDLER ODER WENDEN SIE SICH AN
UNSERE
Die Rufnummer der Service-Hotline finden Sie auf unserer Internetseite
AUDIOLINE GmbH
Neuss
Internet: www.audioline.de
E-Mail: info@audioline.de
Version 1.0 • 18.05.2015
www.audioline.de
4 250711 993528
Service-Hotline
 Loading...