

Page 1
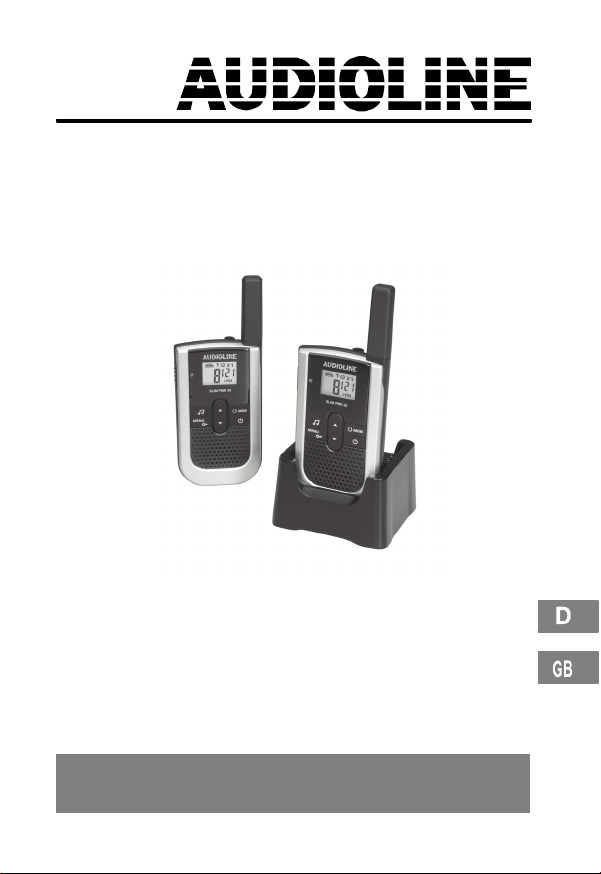
Sprechfunkgeräte−Set
Walkie−Talkie Set
Bedienungsanleitung
Operating Instructions
SLIM PMR 30
Page 2

2
SLIM PMR 30
Bedienungsanleitung 3. . . . . . . . . . . . . . . . .
Operating Instructions 21. . . . . . . . . . . . . . .
Page 3

1
Inhaltsverzeichnis
1 Sicherheitshinweise 4. . . . . . . . . . .
2 Funkgeräte in Betrieb nehmen 6. . . .
3 Bedienelemente 8. . . . . . . . . . . . . .
4 Wie bediene ich meine Funkgeräte? 9
5 Falls es Probleme gibt 16. . . . . . . . . .
6 Technische Eigenschaften 17. . . . . . .
7 Pflegehinweise / Garantie 18. . . . . . .
8 Stichwortverzeichnis 19. . . . . . . . . . .
3
Page 4
Sicherheitshinweise
1 Sicherheitshinweise
Lesen Sie diese Bedienungsanleitung sorgfältig durch.
Bestimmungsgemäße Verwendung
Diese Sprechfunkgeräte sind geeignet für die Kommunikation mit
anderen Sprechfunkgeräten gleichen Standards. Jede andere
Verwendung gilt als nicht bestimmungsgemäß. Eigenmächtige
Veränderungen oder Umbauten sind nicht zulässig. Öffnen Sie
die Geräte in keinem Fall selbst und führen Sie keine eigenen
Reparaturversuche durch.
Verwendungsbereich
Vermeiden Sie Belastungen durch Rauch, Staub, Erschütterungen, Chemikalien, Feuchtigkeit, Hitze oder direkte Sonneneinstrahlung.
Verwenden Sie die Funkgeräte nicht in explosionsgefährdeten
Bereichen.
Netzteil
Achtung: Verwenden Sie nur das mitgelieferte Ste−
ckernetzteil, da andere Netzteile die Funkgeräte zerstören können. Sie dürfen den Zugang zum Steckernetzteil nicht durch Möbel oder andere Gegenstände
versperren.
Achtung: Sobald die Stromversorgung hergestellt ist,
dürfen die Klinkenstecker weder gegenseitig noch mit
anderen Metallgegenständen in Berührung kommen.
Medizinische Geräte
Achtung: Benutzen Sie die Funkgeräte nicht in der
Nähe von medizinischen Geräten. Eine Beeinflussung
kann nicht völlig ausgeschlossen werden. Funkgeräte
können in Hörgeräten einen unangenehmen Brummton verursachen.
4
Service−Hotline Deutschland: Tel. 0180 5 001388 (Kosten Telekom bei Drucklegung: 14 ct/min)
Page 5

Sicherheitshinweise
Entsorgung
Sie sind gesetzlich zur sachgerechten Entsorgung von
Gebrauchsgütern verpflichtet. Das nebenstehende Symbol bedeutet, dass elektrische und elektronische Altgeräte und Akkus getrennt vom Hausmüll zu entsorgen
sind.
Elektrische oder elektronische Geräte entsorgen Sie
bei einer Sammelstelle eines geeigneten Entsorgungs−
trägers.
Akkus entsorgen Sie beim batterievertreibenden Handel sowie bei zuständigen Sammelstellen, die entsprechende Behälter bereitstellen.
Verpackungsmaterialien entsorgen Sie entsprechend
den lokalen Vorschriften.
Service−Hotline Deutschland: Tel. 0180 5 001388 (Kosten Telekom bei Drucklegung: 14 ct/min)
5
Page 6
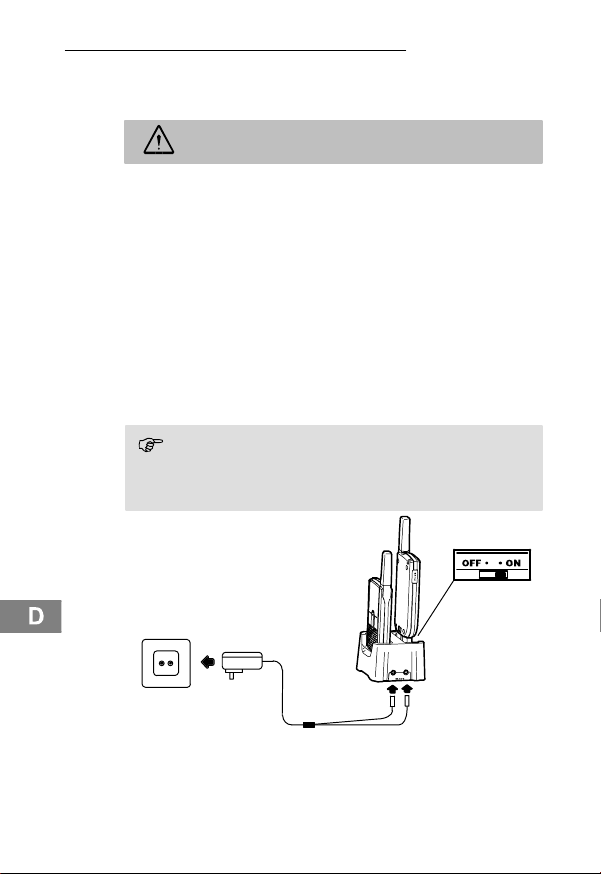
Funkgeräte in Betrieb nehmen
2 Funkgeräte in Betrieb nehmen
Sicherheitshinweise
Achtung: Lesen Sie vor der Inbetriebnahme unbe-
dingt die Sicherheitshinweise in Kapitel 1.
Verpackungsinhalt prüfen
Zum Lieferumfang gehören:
− zwei Funkgeräte mit
integriertem Akku
− zwei Headsets − ein Netzteil
− eine Bedienungsanleitung
− eine Doppellade−
station
Funkgeräte aufladen
Schließen Sie die Ladestation wie auf der Skizze abgebildet an.
Verwenden Sie aus Sicherheitsgründen nur das mitgelieferte
Netzteil.
Während des Aufladens kann Ihr Funkgerät nicht sen-
den oder empfangen.
Stellen Sie den Hauptschalter, an der Unterseite der
Funkgeräte, auf ON.
Netzsteckdose
Laden Sie die Funkgeräte vor der ersten Inbetriebnahme für mindestens 18 Stunden. Wenn Sie die Funkgeräte korrekt angeschlossen haben, leuchten die roten LEDs. Diese erlöschen bei
vollständig geladenen Funkgeräten.
6
Service−Hotline Deutschland: Tel. 0180 5 001388 (Kosten Telekom bei Drucklegung: 14 ct/min)
Page 7

Funkgeräte in Betrieb nehmen
Laden Sie die Funkgeräte nicht mit fremden Auflade−
geräten. Für eine optimale Lebensdauer des Akkus,
brechen Sie den Ladevorgang ab, wenn Ihr Funkgerät
vollständig geladen ist.
Der aktuelle Akkuladezustand wird im Display angezeigt:
voll halb schwach leer
Sobald die Anzeige im Display blinkt und Warntöne zu
hören sind, muss das Funkgerät aufgeladen werden.
Funkgeräte direkt aufladen
Schließen Sie das Netzteil an die Headset−/Ladebuchse des
Funkgeräts an. Verwenden Sie aus Sicherheitsgründen nur das
mitgelieferte Netzteil.
Während des Aufladens kann Ihr Funkgerät nicht sen-
den oder empfangen.
Stellen Sie den Hauptschalter, an der Unterseite der
Funkgeräte, auf ON.
Netzsteckdose
Hinweis:
Nur dieses Netzteil verwenden
KEAD−237 (DVE−DV−6400UP)
Laden Sie niemals gleichzeitig die Funkgeräte mit bei-
den Lademöglichkeiten. Für eine optimale Lebensdauer des Akkus, trennen Sie die Ladeverbindung,
wenn Ihr Funkgerät vollständig geladen ist.
Laden Sie die Funkgeräte vor der ersten Inbetriebnahme für mindestens 9 Stunden. Wenn Sie die Funkgeräte korrekt angeschlossen haben, leuchten die roten LEDs. Diese erlöschen bei
vollständig geladenen Funkgeräten.
Service−Hotline Deutschland: Tel. 0180 5 001388 (Kosten Telekom bei Drucklegung: 14 ct/min)
7
Page 8

Bedienelemente
3 Bedienelemente
Die Merkmale und Funktionen Ihres Funkgeräts sind in den untenstehenden Abbildungen dargestellt.
Mobilteil
1 Headset−/Ladebuchse
2 Display
3 Lautstärke + /
Einstellung aufwärts
4 Kanalsuche / Monitor
5 Ein / Aus
6 Lautstärke − /
Einstellung abwärts
7 Hauptschalter OFF / ON
8 Lautsprecher
9 Menü / Tastensperre
10 Rufton senden
11 Mikrophon
12 PTT−Taste
13 LED Betriebsanzeige
1
13
12
11
10
9
8
2
3
4
5
6
7
Display
1 Akkukapazität
2 Tastensperre
3 Kanalsuche
4 Bestätigungston
5 CTCSS / CDCSS−Code
6 iVOX−Mode / VOX−Mode
7 Kanal
8
Service−Hotline Deutschland: Tel. 0180 5 001388 (Kosten Telekom bei Drucklegung: 14 ct/min)
2
1
3
4
567
Page 9
Wie bediene ich meine Funkgeräte?
4 Wie bediene ich meine Funkgeräte?
Darstellungsweise in der Bedienungsanleitung
P Abgebildete Taste drücken
a, P Abgebildete Taste lange drücken
b, P Abgebildete Taste loslassen
[
y ] Displayanzeige
ð In das Mikrofon sprechen
Ein− / Ausschalten der Funkgeräte
An der Unterseite Ihrer Funkgeräte befindet sich der Hauptschalter. Stellen Sie den Schalter auf ON, bevor Sie das Funkgerät
einschalten.
aV Funkgerät einschalten
Es erklingt ein Signal. Im Display werden der zuletzt
eingestellte Kanal und die Rufcodierung angezeigt
und die Betriebs−LED blinkt.
a V Funkgerät ausschalten
Sollten Sie das Funkgerät längere Zeit nicht benutzen,
empfehlen wir den Hauptschalter auf OFF zu stellen.
Nach längerer Zeit werden Kanal und Rufcodierung
auf die Werkseinstellungen zurückgesetzt.
Lautstärkeregelung
X/Y lauter oder leiser (16 Stufen)
Senden und Empfangen
3
Senden
Wenn Sie die Taste P drücken, leuchtet die Betriebs−LED.
Wird die Taste P länger als 60 Sekunden gedrückt, ertönt ein
Warnton. Die Übertragung wird unterbrochen.
a, P, ð Senden
Halten Sie das Funkgerät ca. 5 bis 7 cm vom Mund ent-
fernt und sprechen Sie mit normaler Lautstärke. Um mit
anderen Teilnehmern zu sprechen, müssen alle Funkgeräte auf den gleichen Kanal und Rufcodierung eingestellt sein.
Service−Hotline Deutschland: Tel. 0180 5 001388 (Kosten Telekom bei Drucklegung: 14 ct/min)
2
9
Page 10
Wie bediene ich meine Funkgeräte?
4
Empfangen
b, P Empfangen
Sie können keine Funksignale empfangen, wenn Sie
die Taste P gedrückt halten.
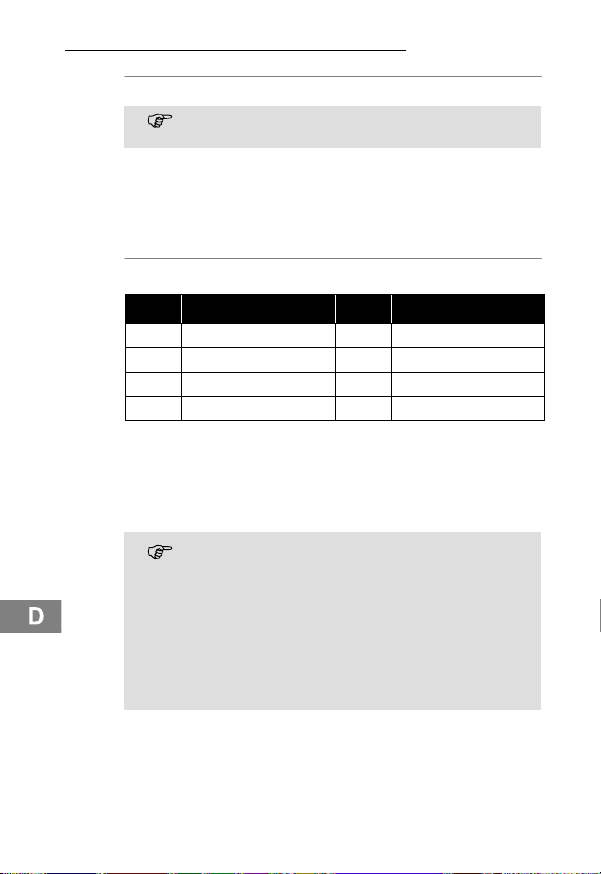
Kanalwahl
PMR446 (Private Mobil Radio) Funkgeräte können überall in
Europa anmelde− und gebührenfrei benutzt werden. Es sind 8
Funkkanäle im Frequenzbereich von 446.000 MHz bis 446.100
MHz freigegeben.
1 x M, X/Y, P Kanal auswählen und bestätigen
Kanal Frequenz (MHz) Kanal Frequenz (MHz)
1 446.00625 5 446.05625
2 446.01875 6 446.06875
3 446.03125 7 446.08125
4 446.04375 8 446.09375
CTCSS1/ CDCSS2−Code (Rufcodierungen) wählen
Es stehen 38 analoge (CTCSS 1 − 38) und 83 digitale (CDCSS
39 − 121) Codierungen je Kanal zur Verfügung. Funkteilnehmer
können nur miteinander kommunizieren, wenn Funkkanal und
CTCSS/CDCSS−Code an den Geräten übereinstimmen.
Der Kanal und die Rufcodierung werden als nicht
hörbares Signal mit der normalen Sprachnachricht mitgesendet. Bei dem Empfänger wird die Sprache nur
dann auf den Lautsprecher übertragen, wenn der eingestellte Kanal und die Rufcodierung mit den empfangenen identisch sind. Sollte zufälligerweise auf demselben Kanal ein anderer Teilnehmer dieselbe Rufcodierung verwenden, wechseln Sie bitte mit Ihrem
Gespächspartner auf einen anderen freien Kanal.
1
CTCSS: Continous Tone Coded Squelch System = Selektivruf
2
CDCSS: Continous Digital Coded Squelch System = Selektivruf
10
Service−Hotline Deutschland: Tel. 0180 5 001388 (Kosten Telekom bei Drucklegung: 14 ct/min)
Page 11

Wie bediene ich meine Funkgeräte?
2 x M Einstellungsmodus aktivieren
X/Y, P Rufcodierung auswählen und
Eine Ausnahme ist die Rufcodierung 0 (Null). Bei
dieser Einstellung können, unabhängig von der Ruf−
codierung, alle Gespräche auf dem eingestellten Kanal
gehört werden. Um am Funkverkehr teilnehmen zu
können, müssen Sie dann die gewünschte Rufcodie−
rung einstellen.
Wenn Sie mit Funkgeräten kommunizieren möchten, die keine
Rufcodierung verwenden, müssen Sie an Ihrem Funkgerät die
Rufcodierung 0 (Null) auswählen.
Kanalsuche
In einer Endlosschleife wird auf den acht Kanälen nach Signalen
gesucht. Im Display wird das −Symbol angezeigt. Wird ein
aktiver Kanal gefunden, stoppt die Kanalsuche. Die Betriebs−LED
blinkt einmal pro Sekunde. Drücken Sie die Taste P, um am
Funkverkehr teilzunehmen. Wenn Sie die Taste P nicht drük-
ken, wird die Kanalsuche nach fünf Sekunden fortgesetzt.
Globale Kanalsuche starten / beenden
Stellen Sie die Rufcodierung des Ausgangskanals auf
0 (Null), um die Globale Kanalsuche" durchzuführen. Der Suchlauf stoppt bei jedem Kanal, auf dem ein Signal empfangen wird,
unabhängig davon, mit welcher Rufcodierung dieses Signal gesendet wird.
N Kanalsuche starten / beenden
Der Ausgangskanal ist der Kanal, der beim Aktivieren
der Kanalsuche eingestellt ist.
Gezielte Kanalsuche starten / beenden
Stellen Sie die Rufcodierung von jedem Kanal auf einen individuellen Wert, um die Gezielte Kanalsuche" durchzuführen.
Der Suchlauf stoppt nur, wenn ein Signal auf einem Kanal emp−
fangen wird, das mit dem eingestellten Wert übereinstimmt.
N Kanalsuche starten / beenden
bestätigen
Service−Hotline Deutschland: Tel. 0180 5 001388 (Kosten Telekom bei Drucklegung: 14 ct/min)
11
Page 12

Wie bediene ich meine Funkgeräte?
Wenn bei Gezielte Kanalsuche" ein gewünschter Ka-
nal komplett durchsucht werden soll, ist für diesen Kanal die Rufcodierung auf 0 (Null) zu stellen.
Kanalsuche fortsetzen
X oder Y Kanalsuche fortsetzen
Kanal ausschließen
5
Wenn ein gefundener Kanal von der Kanalsuche nicht weiter berücksichtigt werden soll, dann können Sie diesen ausschließen.
Halten Sie die Taste X / Y für 3 Sekunden.
Beim Start einer neuen Kanalsuche werden wieder alle Kanäle
berücksichtigt.
a, 3 Sek. X oder Y Kanal wird ausgeschlossen und
Rufton senden
Der Rufton macht andere Teilnehmer darauf aufmerksam, dass
Sie ein Gespräch beginnen möchten. Voraussetzung dafür ist,
dass die anderen Teilnehmer den gleichen Kanal und Rufcodierung verwenden.
T Rufton senden
Rufton wählen / ausschalten
Sie haben 10 Ruftöne zur Auswahl. Um den Rufton auszuschalten, wählen Sie die Einstellung 0 (Null).
3 x M Einstellungsmodus aktivieren
X oder Y, P Rufton auswählen und bestätigen
Monitor
Die Monitor−Funktion ermöglicht es Ihnen, auf dem aktuell eingestellten Kanal nach schwachen Signalen zu suchen. Wenn Sie
ein fremdes Signal empfangen, wechseln Sie auf einen freien
Kanal. Kommunizieren Sie mit anderen Teilnehmern immer auf
einem freien Kanal, um Störungen zu vermeiden.
a, N Kanal abhören
b, N Abhören beenden
Kanalsuche wird automatisch
fortgesetzt
12
Service−Hotline Deutschland: Tel. 0180 5 001388 (Kosten Telekom bei Drucklegung: 14 ct/min)
Page 13

Wie bediene ich meine Funkgeräte?
Tastensperre
Die Tastensperre verhindert das ungewollte Ändern von Ein−
stellungen. Bei eingeschalteter Tastensperre wird das
bol im Display angezeigt.
Aktivieren
6
a, 3 Sek. M Tastensperre aktivieren
7
Deaktivieren
a, 3 Sek. M Tastensperre deaktivieren
Bestätigungston
Der Bestätigungston erklingt, wenn Sie die Taste P loslas-
sen. Dadurch wird Ihrem Gesprächspartner signalisiert, dass Ihre
Übertragung beendet ist.
8
Bestätigungston ein−/ausschalten
Schalten Sie das Funkgerät aus. Halten Sie die Taste X ge-
drückt und schalten Sie gleichzeitig das Funkgerät wieder ein.
Bei eingeschaltetem Bestätigungston wird das
Display angezeigt.
Headset
9
Benutzen Sie das in der Verpackung enthaltene Headset.
Stecken Sie das Funkgerät beispielsweise in die Brusttasche, um
beide Hände frei zu haben. Da das mitgelieferte Headset über
eine zusätzliche P−Taste verfügt, können Sie über diese am
Headset senden.
Schalten Sie das Sprechfunkgerät aus, bevor Sie ein
Headset anschließen.
1. Schalten Sie das Funkgerät aus.
2. Stecken Sie den Stecker des Headsets in die
Anschlussbuchse.
3. Schalten Sie das Funkgerät ein.
−Sym-
−Symbol im
Service−Hotline Deutschland: Tel. 0180 5 001388 (Kosten Telekom bei Drucklegung: 14 ct/min)
13
Page 14

Wie bediene ich meine Funkgeräte?
Automatische Abschaltung
Sie können Ihre Funkgeräte so einstellen, dass sie nach Ablauf
einer bestimmten Zeit ausgeschaltet werden. Sie können 30, 60
oder 90 Minuten einstellen. Die Funktion ist deaktiviert, wenn Sie
die Einstellung 0" ausgewählt haben.
5 x M Einstellungsmodus aktivieren
X oder Y, P Zeit auswählen und bestätigen
VOX1 / iVOX2 (Freisprechen)
Bei diesen Funktionen beginnt das Funkgerät automatisch zu
senden, wenn Ihre Stimme oder ein Geräusch erkannt wird.
Wenn Sie anfangen zu sprechen, tritt eine kurze Verzö-
gerung auf, bevor das Funkgerät sendet.
VOX−Modus aktivieren
Beim Freisprechen im VOX−Modus wird über ein Headset ge−
sprochen.
Benutzen Sie ein handelsübliches
Headset ohne PTT−Taste
3−poligen 2,5 mm Stereoklinkenste−
cker.
Steckerbelegung: 1 = Lautsprecher,
2 = Mikrofon, 3 = Masse
Schalten Sie das Sprechfunkgerät aus, bevor Sie ein
Headset anschließen. Das im Lieferumfang enthaltene
Headset ist für diese Funktion nicht ausgelegt, da dieses Headset zusätzlich mit einer PTT−Taste ausgestattet ist. Weitere Informationen finden Sie auf Seite 13.
1. Schalten Sie das Funkgerät aus.
2. Stecken Sie den Stecker eines Headsets in die
Anschlussbuchse.
3. Schalten Sie das Funkgerät ein.
4. Im Display wird VOX" angezeigt.
mit einem
2
1
3
1
VOX: Voice Operated Transmission = Geräuscherkennung
2
iVOX: Intelligent Voice Operated Transmission = Geräusch-
erkennung
14
Service−Hotline Deutschland: Tel. 0180 5 001388 (Kosten Telekom bei Drucklegung: 14 ct/min)
Page 15

Wie bediene ich meine Funkgeräte?
VOX−Modus deaktivieren
Um den VOX−Modus zu deaktivieren, ziehen Sie den Stecker
des Headsets aus der Anschlussbuchse oder drücken Sie die
Taste P.
iVOX−Modus aktivieren
Beim Freisprechen im iVOX−Modus wird über das Funkgerät ge-
sprochen. Die P−Taste muss nicht gedrückt werden, um zu
senden.
1. Schalten Sie das Funkgerät aus.
2. Halten Sie die Taste P gedrückt und schalten Sie
gleichzeitig das Funkgerät wieder ein.
3. Im Display wird iVOX" angezeigt.
iVOX−Modus deaktivieren
Um den iVOX−Modus zu deaktivieren, schalten Sie das Funkgerät aus und wieder ein.
VOX / iVOX−Empfindlichkeit wählen
Für den Betrieb im VOX / iVOX−Modus können 3 Empfindlichkeitsstufen entsprechend der Umgebungsgeräusche gewählt
werden.
Stufe 1 Stufe 2 Stufe 3
laute Umgebungs-
geräusche
4 x M Einstellungsmodus aktivieren
X oder Y, P Empfindlichkeit auswählen und
normale Umgebungs-
geräusche
bestätigen
leise Umgebungs-
geräusche
Service−Hotline Deutschland: Tel. 0180 5 001388 (Kosten Telekom bei Drucklegung: 14 ct/min)
15
Page 16

Falls es Probleme gibt
5 Falls es Probleme gibt
Haben Sie Probleme mit Ihren Funkgeräten, kontrollieren Sie zuerst die folgenden Hinweise. Bei Garantieansprüchen wenden
Sie sich an Ihren Fachhändler. Die Garantiezeit beträgt 2 Jahre.
Fragen und Antworten
Fragen Antworten
Keine Funktion − Funkgerät nicht geladen
Senden nicht
möglich
Kein Empfang − Taste P loslassen
− Tastensperre aktiviert
− Taste P zum Senden vollständig
drücken
− Kanal wird von anderen Teilnehmern
benutzt
− Lautstärke zu gering eingestellt
− Sie befinden sich außerhalb des
Empfangsbereichs, ändern Sie Ihre
Position
− Hindernisse wie Bäume und Gebäude haben einen negativen Einfluss auf die Reichweite
− CTCSS / CDCSS−Code ist nicht identisch mit dem des Gesprächspartners
− Kanal wird von anderen Teilnehmern
benutzt
16
Service−Hotline Deutschland: Tel. 0180 5 001388 (Kosten Telekom bei Drucklegung: 14 ct/min)
Page 17

Technische Eigenschaften
6 Technische Eigenschaften
Technische Daten
Merkmal Wert
Ausgangsleistung 0.5 W
Reichweite ca. 5 km − bei freier Sichtlinie
Gesamt−Betriebszeit Bis zu 12 Std. (Basierend auf 5 %
Max. Gesprächsdauer Bis zu 36 Min.
Ladezeit über
Doppelladestation
Ladezeit über Head-
set−/Ladebuchse
Akku 3,7 V Li−ion Akku, 700 mAh
Stromversorgung Eingang: 230 V, 50 Hz
Konformitätserklärung
Dieses Gerät erfüllt die Anforderungen der EU−Richtlinie:
1999/5/EG Richtlinie über Funkanlagen und Telekommunikationsendeinrichtungen und die gegenseitige
Anerkennung ihrer Konformität. Die Konformität mit
der o. a. Richtlinie wird durch das CE−Zeichen auf
dem Gerät bestätigt.
Für die komplette Konformitätserklärung nutzen Sie bitte den
kostenlosen Download von unserer Website www.audioline.de
Senden, 5 % Empfangen und 90 %
Stand−by−Zeit)
Min. 18 Std.
Min. 9 Std.
Ausgang: 6 V, 200 mA
.
Service−Hotline Deutschland: Tel. 0180 5 001388 (Kosten Telekom bei Drucklegung: 14 ct/min)
17
Page 18

Pflegehinweise / Garantie
7 Pflegehinweise / Garantie
Pflegehinweise
Reinigen Sie die Gehäuseoberflächen mit einem weichen
und fusselfreien Tuch.
Verwenden Sie keine Reinigungsmittel oder Lösungsmittel.
Garantie
AUDIOLINE − Geräte werden nach den modernsten Produktionsverfahren hergestellt und geprüft. Ausgesuchte Materialien und
hoch entwickelte Technologien sorgen für einwandfreie Funktion
und lange Lebensdauer. Die Garantie gilt nicht für die in den Produkten verwendeten Batterien, Akkus oder Akkupacks. Die Garantiezeit beträgt 24 Monate, gerechnet vom Tage des Kaufs.
Innerhalb der Garantiezeit werden alle Mängel, die auf Material−
oder Herstellungsfehler zurückzuführen sind, kostenlos beseitigt.
Der Garantieanspruch erlischt bei Eingriffen durch den Käufer
oder durch Dritte. Schäden, die durch unsachgemäße Behandlung oder Bedienung, natürliche Abnutzung, durch falsches Aufstellen oder Aufbewahren, durch unsachgemäßen Anschluss
oder Installation sowie durch höhere Gewalt oder sonstige
äußere Einflüsse entstehen, fallen nicht unter die Garantieleistung. Wir behalten uns vor, bei Reklamationen die defekten Teile
auszubessern, zu ersetzen oder das Gerät auszutauschen. Ausgetauschte Teile oder ausgetauschte Geräte gehen in unser Eigentum über. Schadenersatzansprüche sind ausgeschlossen,
soweit sie nicht auf Vorsatz oder grober Fahrlässigkeit des Herstellers beruhen.
Sollte Ihr Gerät dennoch einen Defekt innerhalb der Garantiezeit
aufweisen, wenden Sie sich bitte unter Vorlage Ihrer Kaufquittung ausschließlich an das Geschäft, in dem Sie Ihr AUDIOLINE
− Gerät gekauft haben. Alle Gewährleistungsansprüche nach diesen Bestimmungen sind ausschließlich gegenüber Ihrem Fachhändler geltend zu machen. Nach Ablauf von zwei Jahren nach
Kauf und Übergabe unserer Produkte können Gewährleistungsrechte nicht mehr geltend gemacht werden.
18
Service−Hotline Deutschland: Tel. 0180 5 001388 (Kosten Telekom bei Drucklegung: 14 ct/min)
Page 19

8 Stichwortverzeichnis
A
Aufladen, 6, 7
Ausschalten, 9
Automatische Abschaltung, 14
B
Bedienelemente, 8
Bedienung, 9
Bestätigungston, 13
C
CTCSS/CDCSS−Code, 10
D
Display, 8
E
Einführende Informationen, 9
Einschalten, 9
Empfangen, 10
F
Fehlerbehebung, 16
Fragen, 16
G
Garantie, 18
Gezielte Kanalsuche, 11
Globale Kanalsuche, 11
H
Hauptschalter, 6, 7, 9
Headset, 13
I
Inbetriebnahme, 6
iVOX (Freisprechen), 14
Stichwortverzeichnis
K
Kanal ausschließen, 12
Kanalsuche, 11
Kanalwahl, 10
Konformitätserklärung, 17
L
Laden, 6, 7
Lautstärkeregelung, 9
M
Monitor, 12
P
Pflegehinweise, 18
R
Rufcodierung, 10
Rufton, 12
S
Senden, 9
Sicherheitshinweise, 4
Steckerbelegung, 14
T
Tastensperre, 13
Technische Daten, 17
U
Umgebungsgeräusche, 15
V
Verpackungsinhalt, 6
VOX (Freisprechen), 14
Service−Hotline Deutschland: Tel. 0180 5 001388 (Kosten Telekom bei Drucklegung: 14 ct/min)
19
Page 20

Notizen
Notizen
20
Page 21

10
Contents
1 Safety Information 22. . . . . . . . . . . . .
2 Putting the Walkie−Talkies into
Operation 24. . . . . . . . . . . . . . . . .
3 Operating Elements 26. . . . . . . . . . . .
4 Operating the Walkie−Talkies 27. . . . .
5 In Case of Problems 34. . . . . . . . . . .
6 Technical Properties 35. . . . . . . . . . .
7 Maintenance / Guarantee 36. . . . . . . .
8 Index 37. . . . . . . . . . . . . . . . . . . . . .
21
Page 22

Safety Information
1 Safety Information
Please read this operating instruction manual thoroughly.
Intended use
These walkie−talkies have been conceived for communication
with other walkie−talkies complying to the same standards. Any
other use is considered unintended use. Unauthorised modification or reconstruction is not permitted. Under no circumstances
open the devices or complete any repair work yourself.
Ambient conditions
Prevent excessive exposure to smoke, dust, vibration, chemicals,
moisture, heat and direct sunlight.
Do not use the walkie−talkies in potentially explosive areas.
Power adapter plug
Attention: Only use the power adapter plug supplied
because other power supplies could damage the
walkie−talkies. Ensure access to the power adapter
plug is not obstructed by furniture or such.
Attention: As soon as the power supplied is con-
nected, the jack plugs must not come into contact with
each other nor with other metallic objects.
Medical equipment
Attention: Never use the walkie−talkies in the vicinity
of medical equipment. Effects on such equipment
cannot be fully ruled out. Walkie−talkies can cause an
unpleasant humming sound in hearing aids.
22
Service−Hotline Germany: Tel. 0180 5 001388 (cost via Telekom at time of going to print: 14 ct/min)
Page 23

Safety Information
Disposal
You are obliged to dispose of consumable goods
according to legal requirements. The adjacent symbol
indicates that electrical and electronic apparatus and
batteries no longer required must be disposed of separate from domestic waste.
Electrical and electronic devices must be disposed of
at suitable collection points provided by the public waste
authorities.
Batteries must be disposed of at the point of sale or at
the appropriate collection points provided by the public
waste authorities.
Packaging materials must be disposed of according to
local regulations.
Service−Hotline Germany: Tel. 0180 5 001388 (cost via Telekom at time of going to print: 14 ct/min)
23
Page 24

Putting the Walkie−Talkies into Operation
2 Putting the Walkie−Talkies into Operation
Safety information
Attention: It is essential to read the Safety Information
in Chapter 1 before starting up.
Checking the package contents
The package contains:
− two walkie−talkies with
integrated batteries
− two headsets − a power adapter plug
− an operating manual
Charging the walkie−talkies
Connect the charging station as illustrated in the diagram.
For safety reasons, only use the power adapter plug supplied.
Your radio will not Transmit / Receive during charging.
Set the main switch, located on the underside of the
walkie−talkies, to ON.
Mains power
outlet
− a double charging
station
Before using the walkie−talkies for the first time, charge them for
at least 18 hours. When the walkie−talkies are connected correctly, the red LEDs light up. They go out when the walkie−talkies
are fully charged.
Do not charge the walkie−talkies with charging units
from other manufacturers.
For optimal battery life, remove the radio from the charger after fully charging.
24
Service−Hotline Germany: Tel. 0180 5 001388 (cost via Telekom at time of going to print: 14 ct/min)
Page 25

Putting the Walkie−Talkies into Operation
The current battery charge status is indicated in the display:
Full Half empty Low Empty
The walkie−talkies need to be recharged as soon as the
indicator flashes in the display and acoustic warning
signals are issued.
Charging the walkie−talkies directly
Connect the power adapter plug to the headset/charging socket
on the walkie−talkies. For safety reasons, only use the power
adapter plug supplied.
Your radio will not Transmit / Receive during charging.
Set the main switch, located on the underside of the
walkie−talkies, to ON.
Mains power outlet
Note:
Use only power supply
KEAD−237 (DVE−DV−6400UP)
Do not charge the same radio with plug−in charger and
drop−in charger simultaneously.
For optimal battery life, disconnect the charging connection after fully charging.
Before using the walkie−talkies for the first time, charge them for
at least 9 hours. When the walkie−talkies are connected correctly,
the red LEDs light up. They go out when the walkie−talkie are
fully charged.
Service−Hotline Germany: Tel. 0180 5 001388 (cost via Telekom at time of going to print: 14 ct/min)
25
Page 26

Operating Elements
3 Operating Elements
The features and functions of the product are depicted in the diagram below.
Handset
1 Headset/Charging socket
2 Display
3 Volume + /
Increase setting
4 Channel scan / Monitor
5 On / Off
6 Volume − /
Decrease setting
7 Main switch OFF / ON
8 Loudspeaker
9 Menu / Key lock
10 Transmit call tones
11 Microphone
12 PTT button
13 LED, indicator
1
13
12
11
10
9
8
2
3
4
5
6
7
Display
1 Battery capacity
2 Key lock
3 Channel search
4 Confirmation signal
5 CTCSS / CDCSS code
6 iVOX mode / VOX mode
7 Channel
26
Service−Hotline Germany: Tel. 0180 5 001388 (cost via Telekom at time of going to print: 14 ct/min)
2
1
3
4
567
Page 27

Operating the Walkie−Talkies
4 Operating the Walkie−Talkies
Display and notation of operating sequences
P Press the button depicted
a, P Press and hold the button
b, P Release the button displayed
[
y ] Display indicator
ð Speak into the microphone
Switching the walkie−talkies on/off
The main switch is located on the underside of each walkie−
talkie. Set the switch to ON before switching the walkie−talkie on.
aV Switch the walkie−talkie on
A beep tone is heard. The channel and code used last
time will display and the Ready LED flashes.
a V Switch the walkie−talkie off
If the walkie−talkie is to remain unused for a longer
period, we recommend you set the main switch to OFF.
If set the switch to OFF for a long time, the channel and
code will return to its default setting.
Volume control
X/Y Raise or lower the volume
Transmitting and receiving
12
Transmitting
After pressing the P button, the Transmit LED lights up.
If the P button is pressed longer than 60 seconds, a warning
signal is issued. Transmission is interrupted.
a, P, ð Transmit
Hold the walkie−talkie approx. 5 to 7 cm from your
mouth and speak at a normal volume. In order to talk to
other subscribers, the respective walkie−talkies must
be set to the same channel and CTCSS/CDCSS codes.
Service−Hotline Germany: Tel. 0180 5 001388 (cost via Telekom at time of going to print: 14 ct/min)
displayed
11
(16 levels)
27
Page 28

Operating the Walkie−Talkies
13
Receiving
b, P Receive
Radio signals cannot be received when the P
button is being pressed.
Selecting a channel
PMR446 (Private Mobile Radio) walkie−talkies can be used
throughout Europe free of registration and call charges.
There are 8 radio channels available in the frequency range
446.000 MHz to 446.100 MHz.
1 x M, X/Y, P Select the channel and confirm it
Channel Frequency (MHz) Channel Frequency (MHz)
1 446.00625 5 446.05625
2 446.01875 6 446.06875
3 446.03125 7 446.08125
4 446.04375 8 446.09375
Selecting the CTCSS1/ CDCSS2 code
There are 38 analogue (CTCSS 1 − 38) and 83 digital (CDCSS
39 − 121) codes available per channel. It is only possible to communicate using the walkie−talkies when they are each set to the
same channel and CTCSS/CDCSS codes.
The channels and the codes are transmitted as inaudi-
ble signals together with the standard voice communication. The voice communication is only transferred
to the receiving device’s loudspeaker when the channel and the code that it is set on is identical to that received.
If another subscriber is coincidentally using the same
channel and code, switch to a different, free channel together with the person operating the device called.
1
CTCSS: Continous Tone Coded Squelch System = Selective call
2
CDCSS: Continous Digital Coded Squelch System = Selective call
28
Service−Hotline Germany: Tel. 0180 5 001388 (cost via Telekom at time of going to print: 14 ct/min)
Page 29

Operating the Walkie−Talkies
2 x M Activate programming mode
X/Y, P Select the code and confirm it
An exception here is code 0 (zero). In the case of this
setting, all the calls on the set channel can be heard regardless of the CTCSS/CDCSS code. To be able to
participate in the radio communication, it may be
necessary to set the necessary CTCSS/CDCSS code.
If you want to communicate with the walkie−talkies which are not
using a CTCSS/CDCSS code, you must select CTCSS/CDCSS
code 0" (zero) on your walkie−talkie.
Scanning for a channel
Signals are searched for in the eight channels in a continuous
cycle. The
is detected, the channel scan stops. The Ready LED flashes every second. Press the P button to enable radio communication. If the P button is not pressed, channel scan resumes
after five seconds.
Start/End global channel scanning
To execute a global channel scan", set the CTCSS/CDCSS code
of the output channel to 0 (zero). The scanning routine stops at
every channel on which a signal is received, regardless of the
code transmitted with the signal.
N Start/End channel scanning
The output channel is the channel which is set when the
Start/End specific channel scanning
To execute a specific channel scan", set the CTCSS/CDCSS
code for each channel to an individual value.
The scanning routine only stops when a signal is received on a
channel that matches the value set.
N Start/End channel scanning
If a certain channel should be scanned fully during a
icon appears in the display. If an active channel
channel scan is activated.
specific channel scan", the code must be set to 0 (zero)
for this channel.
Service−Hotline Germany: Tel. 0180 5 001388 (cost via Telekom at time of going to print: 14 ct/min)
29
Page 30

Operating the Walkie−Talkies
Resuming channel scanning
X or Y Resume channel scanning
14
Excluding a channel
If a channel found during the channel scanning process should
not be considered for subsequent use, it can be excluded.
All the channels are taken into consideration again when a new
channel scan is started. During the time that the walkie−talkie is
temporarily stopped on the unwanted channel, press and hold
the X / Y for 3 seconds to exclude that channel.
a, 3 sec. X or Y The channel is excluded and
Transmit ringing tone
The ringing tones indicate to other subscribers that you want to
talk to them. A condition for this is that the other subscribers are
using the same channel and CTCSS/CDCSS code.
T Send ringing tones
Selecting/Deactivating the ringing tone
There are 10 ringing tones available for selection. To deactivate
the ringing tone, select the setting 0" (zero).
3 x M Activate programming mode
X or Y, P Select the ringing tone and
Monitor
The Monitor function enables the search for weak signals on the
channel currently set. If you receive an external signal, switch to
a free channel. Always communicate with other subscribers on a
free channel to prevent interference.
a, N Monitor the channel
b, N End the monitoring function
channel scanning automatically
resumed
confirm it
30
Service−Hotline Germany: Tel. 0180 5 001388 (cost via Telekom at time of going to print: 14 ct/min)
Page 31

Operating the Walkie−Talkies
Key lock
The key lock function prevents inadvertent modification of settings. When the key lock function is activated, the
appears in the display.
Activating
15
a, 3 sec. M Activate the key lock
16
Deactivating
a, 3 sec. M Deactivate the key lock
Confirmation signal
The confirmation signal is issued on releasing the P button.
This indicates to the caller that you have ended transmission.
17
Activating/Deactivating the confirmation signal
Switch the walkie−talkie off. Press and hold the X button and,
while doing so, switch the walkie−talkie on again.
If the confirmation signal is activated, the
the display.
Headset
18
Use the headset enclosed with the walkie−talkies.
You can put the walkie−talkie in your breast pocket, for example,
so that both hands are free. The headset supplied is equipped
with an additional P button which can be used to transmit via
the headset.
Switch the walkie−talkie off before connecting a head-
set.
1. Switch the walkie−talkie off.
2. Insert the plug on the headset in the connection socket.
3. Switch the walkie−talkie on.
icon
icon appears in
Service−Hotline Germany: Tel. 0180 5 001388 (cost via Telekom at time of going to print: 14 ct/min)
31
Page 32

Operating the Walkie−Talkies
Automatic deactivation
The walkie−talkies can be set up so that they are automatically
switched off after a certain time. It can be set to 30, 60 or 90 minutes. The function is deactivated when the 0" setting is selected.
5 x M Activate programming mode
X or Y, P Select the time and confirm it
VOX1 / iVOX2 (handsfree)
When this function is active, the walkie−talkie automatically starts
to transmit when the unit detects your voice or a sound.
When you start to speak, there is a slight delay before
the walkie−talkie starts to transmit.
Activating VOX mode
When using the handsfree function in VOX mode, conversation is
carried out via the headset.
Use a commercially available headset
without a PTT button
3−pin, 2.5 mm stereo jack plug.
Pin assignment: 1 = Loudspeaker,
2 = Microphone, 3 = Earth
Switch the walkie−talkie off before connecting a head-
set. The headset supplied with the walkie−talkie is not
designed for this function because it is equipped with a
PTT button. Further information is provided on
Page 31.
1. Switch the walkie−talkie off.
2. Insert the plug on the headset in the connection socket.
3. Switch the walkie−talkie on.
4. VOX" appears in the display.
equipped with a
2
1
3
1
VOX: Voice Operated Transmission = Noise detection
2
iVOX: Intelligent Voice Operated Transmission = Noise de-
tection
32
Service−Hotline Germany: Tel. 0180 5 001388 (cost via Telekom at time of going to print: 14 ct/min)
Page 33

Operating the Walkie−Talkies
Deactivating VOX mode
To deactivate VOX mode, pull the headset plug out of the connection socket or press the P button.
Activating iVOX mode
When using the handsfree function in iVOX mode, conversation
is carried out via the walkie−talkie. The P button on the
walkie−talkie need not be pressed to transmit.
1. Switch the walkie−talkie off.
2. Press and hold the P button and, while doing so, switch
the walkie−talkie on again.
3. iVOX" appears in the display.
Deactivating iVOX mode
In order to deactivate iVOX mode, switch the walkie−talkie off and
on again.
Selecting VOX / iVOX sensitivity
There are three sensitivity levels available for operation in VOX /
iVOX mode and can be selected according to the ambient
noise.
Level 1 Level 2 Level 3
High ambient noise Normal ambient noise Low ambient noise
4 x M Activate programming mode
X or Y, P Select the sensitivity and
confirm it
Service−Hotline Germany: Tel. 0180 5 001388 (cost via Telekom at time of going to print: 14 ct/min)
33
Page 34

In Case of Problems
5 In Case of Problems
Should problems arise with the walkie−talkies, please refer to the
following information first. In the case of claims under the terms
of guarantee, please contact your sales outlet. There is a 2 year
period of guarantee.
Problems and solutions
Problems Solutions
Equipment does
not function
Transmission not
possible
No reception − Release P
− Walkie−talkie has not been charged
− Key lock has been activated
− Press P in fully to transmit
− Channel is being used by other
subscribers
− Volume setting is too low
− You are outside the range of reception, change your position
− Obstructions such as trees and build−
ings impair the range
− CTCSS / CDCSS code set is not
identical to that of the other party.
− Channel is being used by other
subscribers
34
Service−Hotline Germany: Tel. 0180 5 001388 (cost via Telekom at time of going to print: 14 ct/min)
Page 35

Technical Properties
6 Technical Properties
Technical data
Feature Value
Output power 0.5 W
Range Approx. 5 km in open space
Total operating
time
Max. talk time Up to 36 min.
Charging time
(double charging
station)
Charging time
(headset/charging
socket)
Rechargeable
battery
Power supply Input: 230 V, 50 Hz
Declaration of Conformity
This device fulfils the requirements stipulated in the
EU directive:
1999/5/EU directive on radio equipment and telecommunications terminal equipment and the mutual recognition of their conformity. Conformity with the above
mentioned directive is confirmed by the CE symbol on
the device.
To view the complete Declaration of Conformity, please refer to
the free download available on our web site www.audioline.de
Up to 12 h (Based on 5 % transmit,
5 % receive and 90 % standby time)
Min. 18 h
Min. 9 h
3.7 V Li−ion Battery, 700 mAh
Output: 6 V, 200 mA
.
Service−Hotline Germany: Tel. 0180 5 001388 (cost via Telekom at time of going to print: 14 ct/min)
35
Page 36

Maintenance / Guarantee
7 Maintenance / Guarantee
Maintenance
Clean the housing surfaces with a soft, fluff−free cloth.
Never use cleaning agents or solvents.
Guarantee
AUDIOLINE equipment is produced and tested according to the
latest production methods. The implementation of carefully chosen materials and highly developed technologies ensure trouble−
free functioning and a long service life. The terms of guarantee
do not apply to the batteries or power packs used in the products.
The period of guarantee is 24 months from the date of purchase.
All deficiencies related to material or manufacturing errors within
the period of guarantee will be redressed free of charge. Rights
to claims under the terms of guarantee are annulled following
tampering by the purchaser or third parties. Damage caused as
the result of improper handling or operation, normal wear and
tear, incorrect positioning or storage, improper connection or
installation or Acts of God and other external influences are excluded from the terms of guarantee. In the case of complaints, we
reserve the right to repair defect parts, replace them or replace
the entire device. Replaced parts or devices become our property. Rights to compensation in the case of damage are excluded where there is no evidence of intent or gross negligence by
the manufacturer.
If your device shows signs of defect during the period of guarantee, please return it to the sales outlet in which you purchased
the AUDIOLINE device together with the purchase receipt. All
claims under the terms of guarantee in accordance with this
agreement can only be asserted at the sales outlet. No claims
under the terms of guarantee can be asserted after a period of
two years from the date of purchase and hand−over of the product.
36
Service−Hotline Germany: Tel. 0180 5 001388 (cost via Telekom at time of going to print: 14 ct/min)
Page 37

8 Index
A
Ambient noise, 33
Automatic deactivation, 32
C
Call codes, 28
Charging, 24, 25
Confirmation signal, 31
CTCSS/CDCSS code, 28
D
Declaration of Conformity, 35
Display, 26
E
Excluding a channel, 30
G
Global channel scanning, 29
Guarantee, 36
H
Headset, 31
I
iVOX (handsfree), 32
K
Key lock, 31
M
Main switch, 24, 25, 27
Maintenance , 36
Monitor, 30
O
Operating elements, 26
Operation, 27
Index
P
Package contents, 24
Pin assignment, 32
Preliminary information, 27
Q
Questions, 34
R
Receiving, 28
Ringing tone, 30
S
Safety information, 22
Searching for a channel, 29
Selecting a channel, 28
Specific channel scanning, 29
Starting up, 24
Switching off, 27
Switching on, 27
T
Technical data, 35
Transmitting, 27
Troubleshooting, 34
V
Volume control, 27
VOX (handsfree), 32
Service−Hotline Germany: Tel. 0180 5 001388 (cost via Telekom at time of going to print: 14 ct/min)
37
Page 38

Notes
Notes
38
Page 39

Notes
Notes
39
Page 40

Wichtige Garantiehinweise
Die Garantiezeit für Ihr AUDIOLINE − Produkt beginnt mit dem Kaufdatum.
Ein Garantieanspruch besteht bei Mängeln, die auf Material− oder
Herstellungsfehler zurückzuführen sind. Der Garantieanspruch erlischt bei
Eingriffen durch den Käufer oder durch Dritte. Schäden, die durch
unsachgemäße Behandlung oder Bedienung, natürliche Abnutzung,
durch falsches Aufstellen oder Aufbewahren, durch unsachgemäßen
Anschluss oder Installation sowie durch höhere Gewalt oder sonstige
äußere Einflüsse entstehen, fallen nicht unter die Garantieleistung.
BITTE WENDEN SIE SICH IM GARANTIEFALL AUSSCHLIESSLICH
AN DEN HÄNDLER, BEI DEM SIE DAS GERÄT GEKAUFT HABEN,
UND VERGESSEN SIE NICHT, DEN KAUFBELEG VORZULEGEN.
UM UNNÖTIG LANGE WARTEZEITEN ZU VERMEIDEN, SENDEN
SIE REKLAMATIONSGERÄTE BITTE NICHT
BÜROADRESSE.
BEI FRAGEN ZUR BEDIENUNG UND GARANTIELEISTUNG LESEN
SIE BITTE DIE BEDIENUNGSANLEITUNG ODER WENDEN SIE
SICH AN UNSERE HOTLINE:
0180 500 13 88 (Kosten Telekom bei Drucklegung: 14 ct/min)
AN UNSERE
AUDIOLINE GmbH
Neuss
Service−Hotline 0180 500 13 88
(Kosten Telekom bei Drucklegung: 14 ct/min)
Internet: www.audioline.de − E−mail: info@audioline.de
Version 1.1 − 16.07.2007
 Loading...