

Page 1

SENSOR 150
Telephone with calling number display
User guide
Page 2

AUDIOLINE SENSOR 150 TABLE OF CONTENTS
TABLE OF CONTENTS
Installation ............. 1 Calling Number Display .... 7
Location of controls ........ 1 Explanation of CND ........... 7
Battery .................. 2 New calls ................... 7
Connection .............. 2 To view the new call information .. 8
Wall mounting ............ 2 Caller display log full ........... 8
Warning ................. 3 Dialling from the caller display log . 9
The display .............. 3 Erase caller display number ...... 9
Setting the date and time ..... 3
Using the telephone ..... 4 Phone Book (Memories) ... 10
Ringer volume ............ 4 Programming ................. 10
Select Language ........... 4 Dialling from memory .......... 11
Handset On/Off ........... 4 Erasing ..................... 11
Earpiece volume ........... 4 Answering incoming calls
5 .................. Settings 12 .................... T o
make a call ................ 5 Least Cost Routing (LCR) ....... 12
Call timer ................ 5 Programming ................. 12
Last number redial ......... 5
Additional network services .. 5 Other ................. 13
Main Menu ............... 6 Troubleshooting ............ 13
Cleaning ................ 13
REN/RN .................. 13
Thunderstorm Warning ........ 14
Guarantee ................. 14
Page 3
C
10
11
12
8
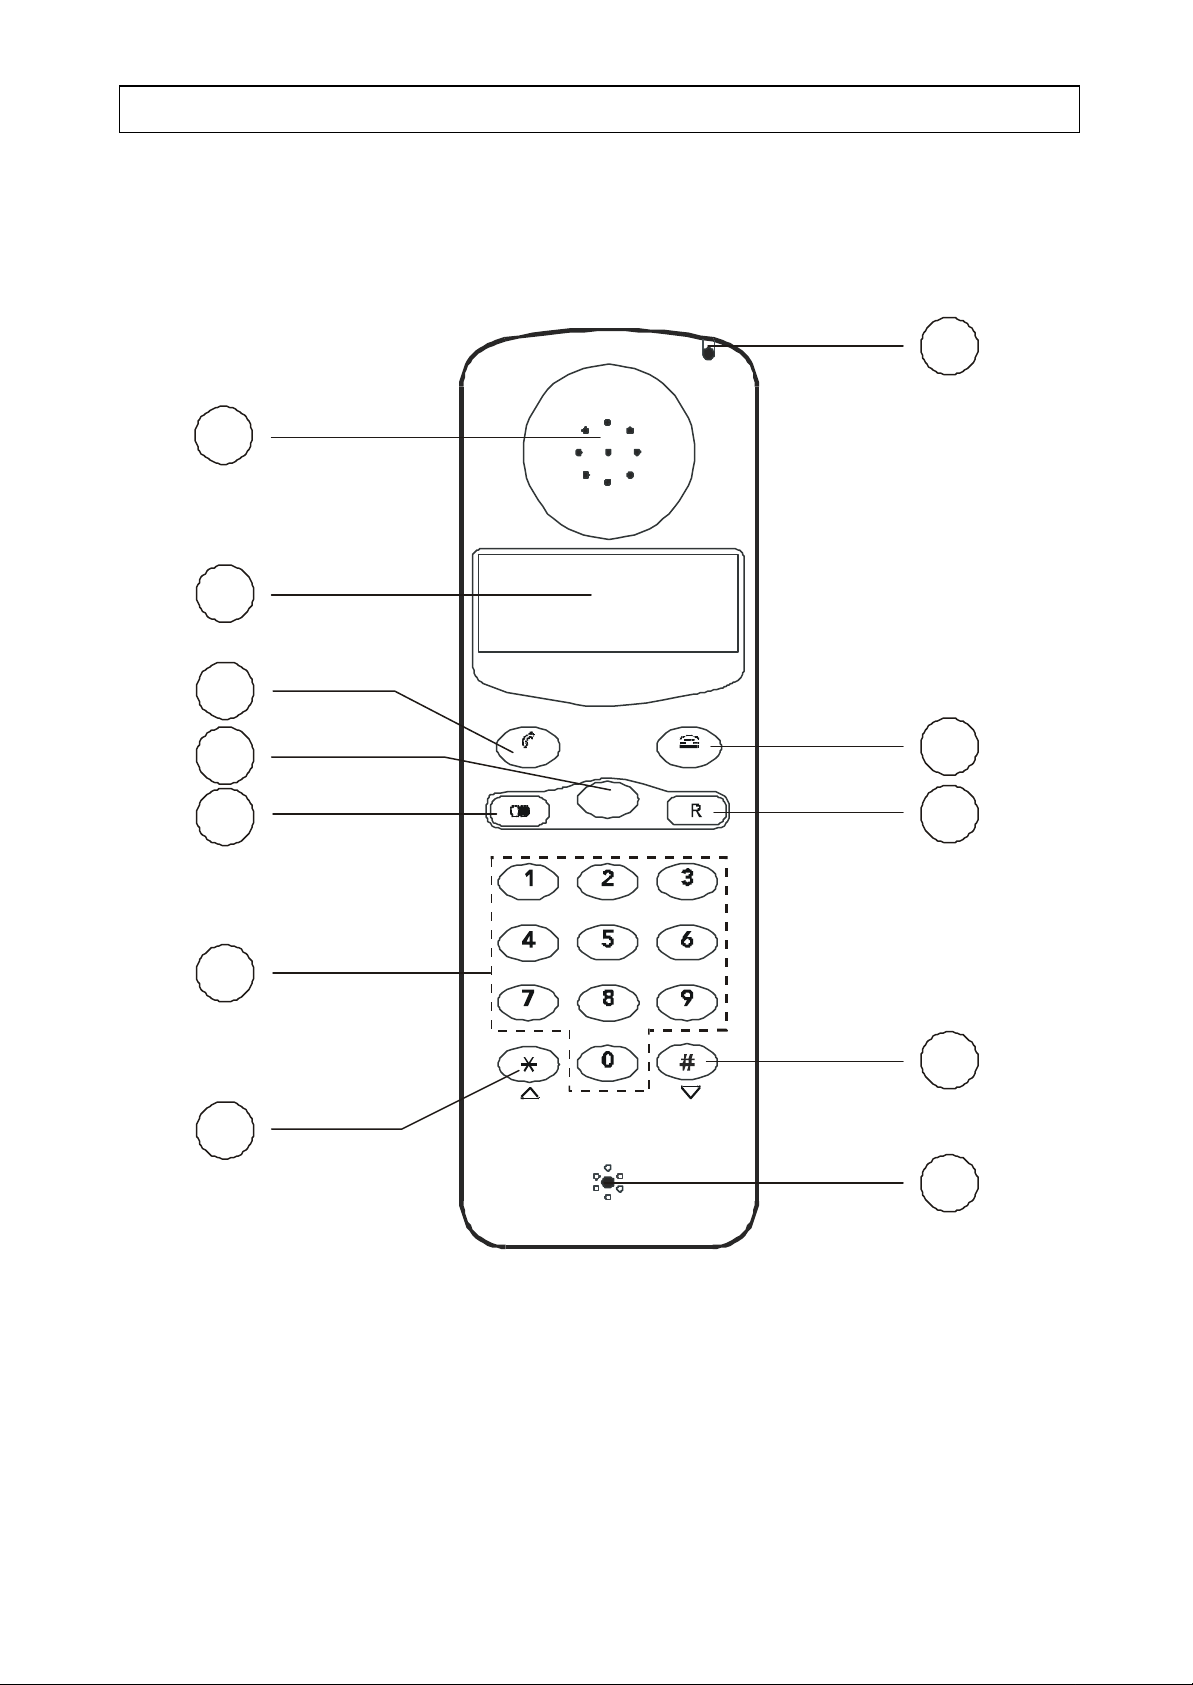
INSTALLATION AUDIOLINE SENSOR 150
LOCATION OF CONTROLS
1
2
3
4
5
6
7
OK
MENU
ABC
DEF
MNOJKLGHI
WXYZTUVPQRS
9
1 Earpiece 7 Scroll UP and * button
2 Display 8 Microphone
3 Talk/OK button 9 Scroll DOWN and # button
4 Menu button 10 Recall button
5 Last number redial 11 End call/Erase button
6 Keypad 0-9 12 New call indicator
1
Page 4
AUDIOLINE SENSOR 150 INSTALLATION
BATTERY
3 x 1.5 V batteries (AAA) must be installed, otherwise functions such as caller display,
memory etc will not work. When the batteries are low the symbol will illuminate on
the display.
P Remove the line cord before installing or replacing batteries.
P Remove the screw from the battery compartment on the rear of the handset. Fit the
batteries (supplied) observing correct polarity.
NOTE: F or the telephone to operate correctly batteries must be installed. If no
batteri es are installed the talk button must be pressed and held down for 1-2 seconds
to access the telephone line.
CONNECTION
P Fit the batteries, as described above.
P Connect the line cord to a telephone wall socket.
WALL MOUNTING
The telephone can be placed on the desk or on the wall with the supplied wall bracket.
Check for hidden cables, water pipes, etc, before drilling holes, also ensure that the
intended mounting point is within reach of a telephone socket.
P Use the wall bracket provided to mark two holes (86 mm apart) on a wall, one above
the other.
P Hold the wall bracket to the wall and secure with two screws (not supplied.)
WARNING The handset may retain small ferromagnetic objects, such as pins
and staples around the earpiece. To prevent injury, you should check for the
presence of these objects before use.
2
Page 5
INSTALLATION AUDIOLINE SENSOR 150
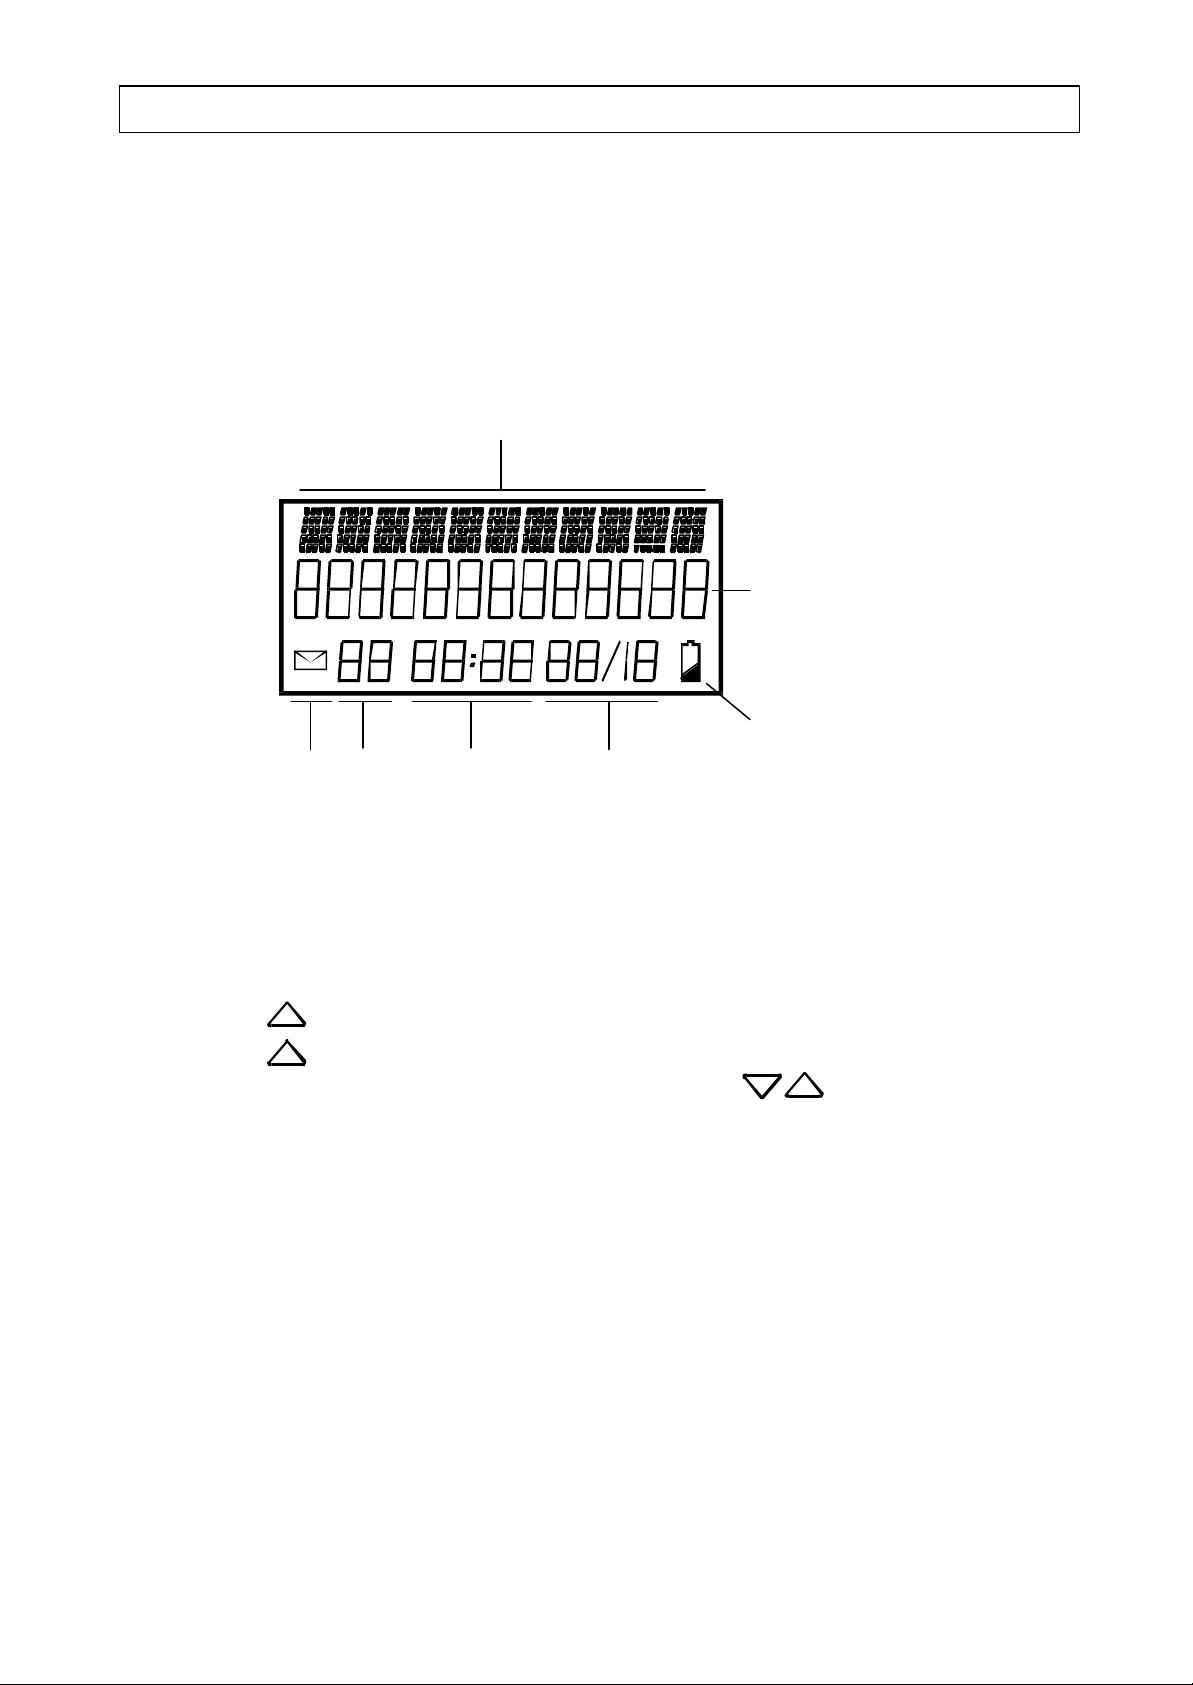
THE DISPLAY
When the Sensor 150 is in standby mode, the 11 character/13 digit display will show the
current date and time, how many incoming calls are stored in the caller log, and if the
battery is low.
Text information
Incoming telephone number
Low battery
New call Number Time Date
indicator of calls
SETTING THE DATE AND TIME
P Press the MENU button. The display will show "VOLUME"
P Press the button repeatedly until the display shows "SETTING". Press OK.
P Press the button repeatedly until the display shows "SET TIME". Press OK.
P The hour digit(s) will flash on the display. Use the buttons to set the
correct hour. Press OK to store the setting.
P Set the minute, day and month in the same way. Press OK after every setting.
P Press the C button to store the setting and return to standby.
3
Page 6
AUDIOLINE SENSOR 150 USING THE TELEPHONE
RINGER VOLUME
The ringer can be set to either high, low or off.
n Press the MENU button. The display will show "VOLUME" .
n Press the or buttons until the display shows "SETTING". Press OK.
n The display will show "RING". Press OK.
n The display shows the current setting (2 = High, 1 = Low, 0 = Off).
n Press the or buttons to set the volume. Press OK.
SELECT LANGUAGE
The Sensor 150 can change the display texts language. The languages available are
English, German, French and Spanish.
n Press the MENU button. The display will show "VOLUME".
n Press the or buttons until the display show "SETTING". Press OK.
n Press the or buttons until the display show "LANGUAGE". Press OK.
n The display will show the current setting.
n Press the or buttons to select the desired language. Press OK.
HANDSET ON/OFF
The Sensor 150 does not have a hook switch. Access to the telephone line is via two
buttons, TALK/OK and END CALL/C.
# Press the TALK/OK button you will hear dial tone.
# Press the END CALL/C button to terminate the call.
EARPIECE VOLUME
The earpiece volume can be set to two levels (1=low, 2=high).
n Press the MENU button. The display will show "VOLUME". Press OK.
n Press the or buttons to set the volume. Press OK.
4
Page 7

USING THE TELEPHONE AUDIOLINE SENSOR 150
ANSWERING INCOMING CALLS
n To answer an incoming call press the TALK/OK button
n Press the End Call button to terminate the call.
NOTE: For the telephone to operate correctly batteries must be installed. If batteries
are not installed the talk button must be pressed and held down for 1-2 seconds to
access the telephone line.
TO MAKE A CALL
n Dial the telephone number you wish to call. If you enter an incorrect digit this can be
erased using the C button.
# Press the TALK/OK button .
# Press the END CALL/C button to terminate the call.
Alternatively
# Press the TALK/OK and then dial the telephone number required.
# Press the END CALL/C button to terminate the call.
CALL TIMER
A few seconds after a call has started, the call timer will display the elapsed time of the
call.
LAST NUMBER REDIAL
If the last number dial led was engaged or the call was not answered, it is possible to redial
the number using the Redial button .
n Press the last number Redial button .
n Press the TALK/OK button.
ADDITIONAL NETWORK SERVICES
Networ k services such as call waiting, call forward etc., can be accessed via the Recall
[R], # and * buttons. For further information, contact your Network Operator.
5
Page 8

AUDIOLINE SENSOR 150 USING THE TELEPHONE
MAIN MENU
The Sensor 150 has a simple menu system which displays texts, this is accessed using
five buttons.
The MENU button is used to enter the menu system.
The and buttons are used to scroll through the menu system.
The OK button is used to confirm your choice.
The C button is used to erase an incorrect entry.
THE MAIN MENU HAS FOUR HEADINGS:
VOLUME - Earpiece volume
You can select the earpiece volume required. See page 4 for more information.
CALLER ID - Calling Number Display
The incoming telephone numbers can be displayed and dialled. See pages 7-9 for more
information.
PHONE BOOK - Memories
Most frequentl y dialled telephone numbers/names can be stored into memory. See pages
10-11 for more information.
SETTING - Settings
All of the settings for the telephone ringer, language etc can be altered. See page 4 for
more information.
6
Page 9

CALLING NUMBER DISPLAY AUDIOLINE SENSOR 150
EXPLANATION OF CALLING NUMBER DISPLAY
Calling Number Display allows you to see who is calling before you answer a call, and
also t o see who called in your absence. When you have subscribed with your telephone
network service provider to the "Calling Number Display" service, the telephone number,
name (if the number is stored in the phonebook), date and time of your calls will be
displayed. Up to 15 numbers can be stored in the Sensor 150 call log.
It is not possible to view the call log and take a new call at the same time.
NOTE: Calling Number Display is an optional telephone Network service. This
telep hone will provide Calling Number Display information provided the service is
available via your Network service provider and any subscription charges have been
paid. Check with your service provider for full details.
If the Calling Number Display service is not implemented on your telephone line,
incoming call information will not be displayed.
NEW CALLS
When a new call is received the new call indicator at the top of the telephone will flash,
the words "NEW CALLS" and the total number of new calls will be displayed.
Below is an example of f our new numbers/calls, with a total of thirteen calls in the call log.
7
Page 10

AUDIOLINE SENSOR 150 CALLING NUMBER DISPLAY
TO VIEW THE NEW CALL INFORMATION
n Press the MENU button. The display will show "VOLUME"
n Press the button until the display shows "CALLER ID". Press OK.
n Press the or to see the incoming telephone numbers.
n Press the MENU button to exit.
The button scrolls from the beginning of the call log, showing the oldest telephone
number first.
The button scrolls from the end of the call log, showing the newest telephone
number first.
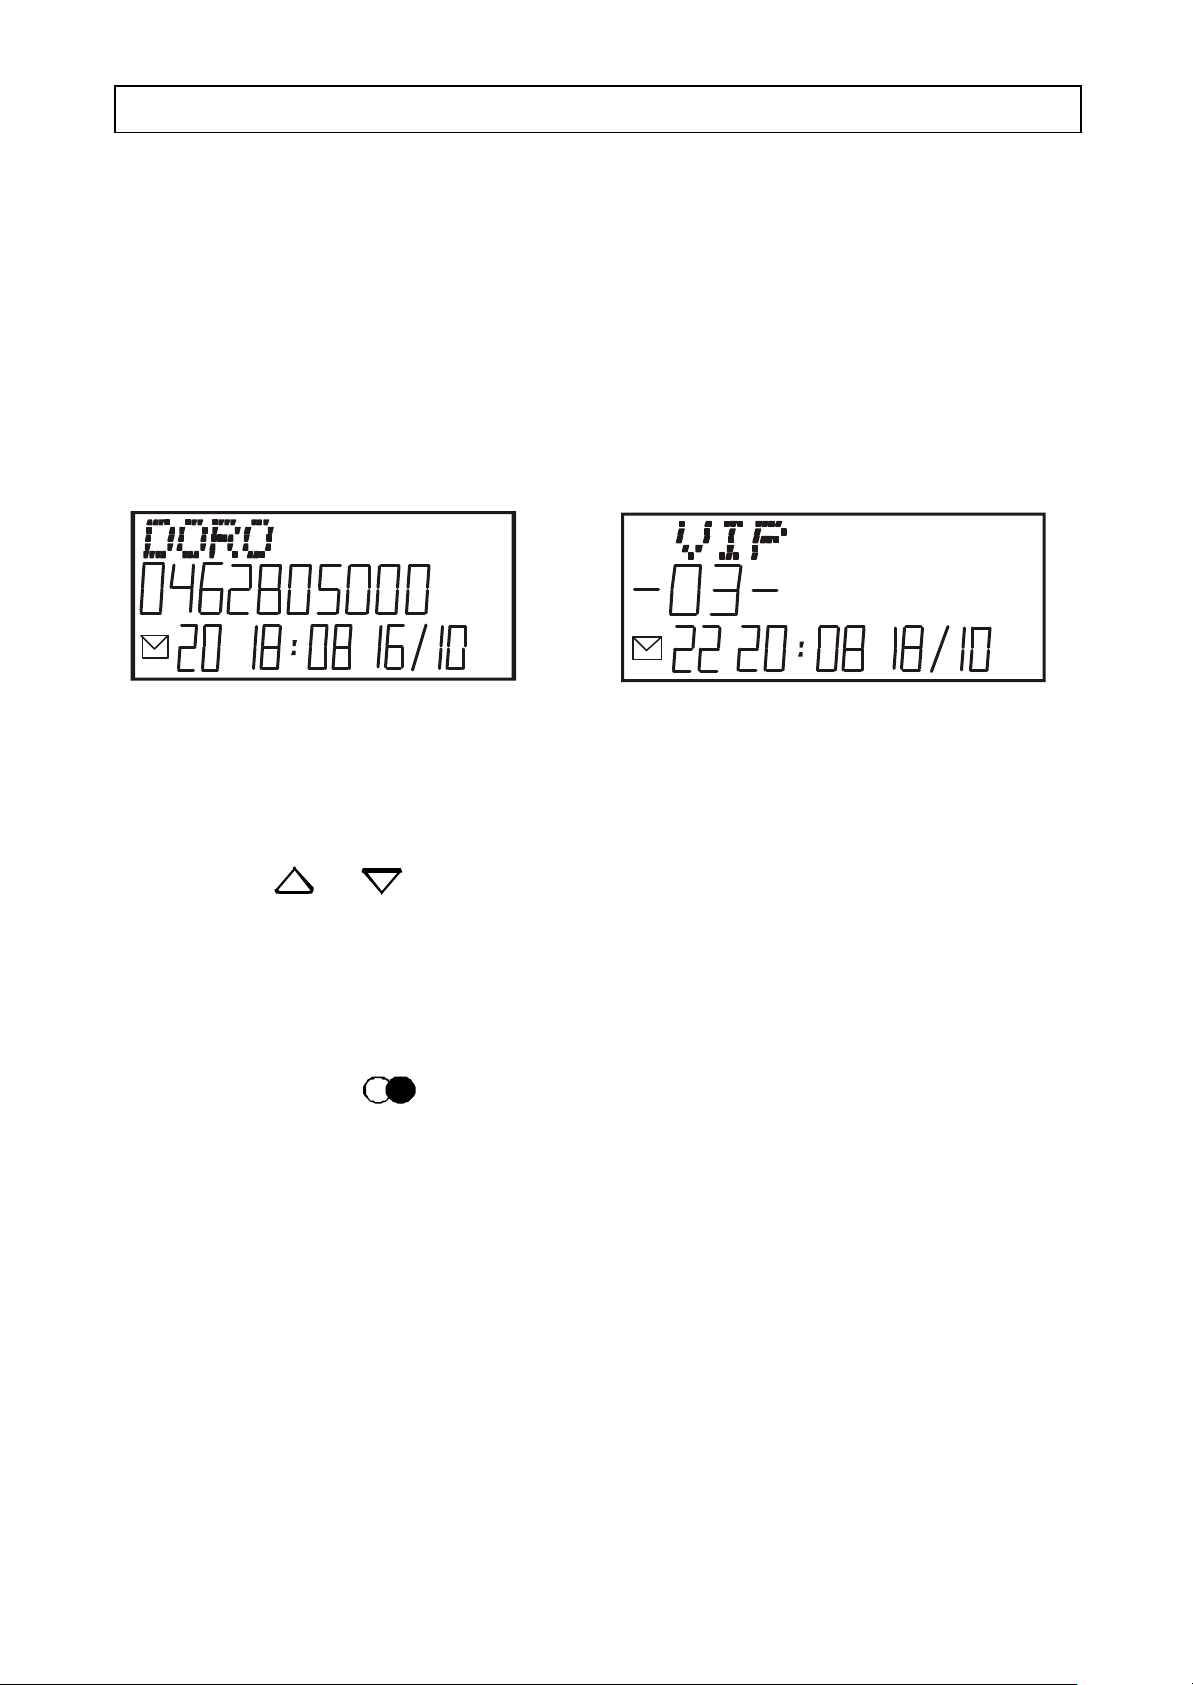
The time & date when a call is received, the phone number and the ascending calle r
displa y log number will be shown. For example: Phone number 0462805000, time
received 18:08 on the 16th of October. Caller display ID log number is 20. DORO is
stored in the phonebook memory.
OUT OF AREA
If the display shows "OUT OF AREA" instead of a telephone number, this means that
no infor mation was received from the Network. The call may have been an international
call or from a PBX.
PROTECT
If the display shows "PROTECT" it indicates that the calling number is an unlisted
(silent) number or the caller has barred the number so it will not be displayed. It could
also come from a mobile telephone or a PBX.
CALLER DISPLAY LOG FULL
When the call log is full (15 calls) the oldest call will be deleted automatically.
8
Page 11

CALLING NUMBER DISPLAY AUDIOLINE SENSOR 150
DIALLING FROM THE CALLER DISPLAY LOG
It is possible to dial numbers stored in the call log.
n Scroll to the required telephone number.
n Press the talk button , the number will be dialled automatically.
ERASE CALLER DISPLAY NUMBER
You can delete incoming numbers from the call log in two ways.
ERASE ONE NUMBER
n Scroll to the number you wish to delete.
n Press the button twice to erase the displayed number.
ERASE ALL NUMBERS
n Scroll to a telephone number in the call list.
n Press and hold down the button until the display shows "ERASE ALL?".
n Press and release the button again. All numbers in the call log will be erased.
9
Page 12
AUDIOLINE SENSOR 150 PHONEBOOK
PHONEBOOK (MEMORIES)
Ten of your most frequently called numbers can be stored in the phonebook memory
for quick and easy dialling.
The phonebook can also be used to enable the Sensor 150 to display the name of a caller.
When a stored telephone number calls the caller display becomes operative on your
telephone line, both the telephone number and name will be visible on the display. If the
telephone is in standby mode, the new call indicator on the telephone will flash and the
information on the display will alternate between the words new calls and VIP.
New call Standby mode
PROGRAMMING
n Press the MENU button. The display will show "VOLUME".
n Press the or until the display shows "PHONE BOOK". Press OK.
n The display shows a memory location. Scroll to the desired memory location
using the scroll buttons.
n Press and hold down the OK button. Release when the memory location
number vanishes from the display.
n Enter the phone number (Incl area code) with the keypad, if you wish to store
a Pause, press the button, press the OK button.
n Now can you assign a name to the number.
Press on the corresponding keypad digit to store the first letter. After a few
seconds the cursor will move to the next letter.
- Use the C button to erase an incorrect entry.
- Use the 0 button to put in a space
P When you have finished, press the OK button.
P Continue to enter names and numbers following the procedure above or press the
MENU button to exit.
10
Page 13
PHONEBOOK AUDIOLINE SENSOR 150
LETTERS
You can use the keypad digits to enter a name into memory. Please refer to the table
below.
Keypad Letter/Sign
1 . , ? - ! & + 1
2 A B C Å Ä Æ 2
3 D E F 3
4 G H I 4
5 J K L 5
6 M N O Ö Ø 6
7 P Q R S 7
8 T U V 8
9 W X Y Z 9
* *
0 Space or 0
# #
DIALLING FROM MEMORY
n Press the MENU button. The display will show "VOLUME".
n Press the or scroll buttons until the display shows "PHONE BOOK".
Press OK.
n The display will show a stored memory location. Scroll to the desired memory to
be dialled using the scroll buttons.
P Press the talk button . The telephone number will automatically be dialled.
ERASING
n Scroll to the number/name you wish to erase.
P Press twice on the C button to erase the information in the memory.
P Press the MENU button to return to standby mode.
11
Page 14

AUDIOLINE SENSOR 150 SETTINGS
LEAST COST ROUTING (LCR)
Many t elephone network service providers offer discounted charges on certain types of
telephone calls. To take advantage of the cheaper call charges you must be registered with
an alternative operator dialling an access code before you dial any telephone number. If,
for example, international calls are cheaper on another network, you can program the
telephone to automatically connect you to that alternative network when you make the
international call.
The selection of network connection is normally achieved by dialling an override code
(up to four digits) pr ior to the number you are calling. The Sensor 150 is able to store this
code and automatically insert it before an international access number.
PROGRAMMING
n Press the MENU button. The display will show "VOLUME".
n Press the or buttons until the display shows "SETTINGS" Press OK.
n Press the or until the display shows "LCR". Press OK.
P The word OFF o r ON will flash on the display. Press the scroll buttons to turn
the function on/off. Press OK.
P The left hand side of the display will flash, enter the telephone number to be
recognised (ie. area/std dialling code) up to a maximum of four digits.
P Press the OK button.
P The right hand side of the display will now flash, enter the telephone number
to be dialled (ie. LCR number followed by the area/std code). The maximum number
of digits which can be entered is eight.
P Press the OK button to store and return to standby.
12
Page 15

TROUBLESHOOTING AUDIOLINE SENSOR 150
TROUBLESHOOTING
IF THE CALLER DISPLAY DOES NOT WORK:
If the Caller Display does not work, first make contact with your network provider to see
if:
# The service is activated on your telephone line.
# Check that your subscription to the service is up to date.
# Ensure you have followed the instructions in this manual.
# Check that all cords and connections are correct and check battery condition.
NO CALLER DISPLAY INFORMATION ON INCOMING CALL:
# Follow the directions above.
# If “OUT OF RANGE” shows in the display it means that no information was sent,
it may have been an international call or from a PBX.
# If “PROTECT” shows in the display it means that caller has withheld their number
or it is a “SILENT” number.
DISPLAY IS BLANK:
# Check and replace the back up batteries (see page 2).
NO SIGNAL IN HANDSET:
# Check that the handset cord is correctly connected.
# Check that the line cord is connected from the Sensor 150 and the wall socket.
# Chec k that the telephone line is working by connecting another telephone to the
socket.
# Adjust the handset volume between HI and LO settings (see page 4).
NO RING SIGNAL:
Check that the ringer is not set to the off position (see page 4).
CLEANING
The casing should be cleaned by wiping with a damp cloth.
# Do not use abrasives, solvents or spray polish that may enter through holes in the
earpiece and mouthpiece and cause damage.
# Do not place the telephone in direct sunlight or use in extreme humidity.
# Clean the display with a soft dry cloth. Do not push on the display, it can be
damaged.
REN (RN for New Zealand)
The REN (Ringer Equivalance Number) or RN is of significance only if you wish to
connect more than 1 telephone to your telephone line. Your telephone line has a
maximum REN capacity of 3 (RN of 5). Your Audioline Sensor 150 has a REN of 0.5
(RN of 0.5), thus it is feasible to connect 2 (4) more telephones of a value of 1 to your
system. You should not exceed a value of 3 (5) on the complete system, otherwise the
volume of the ringer in any phone will decrease and one telephone may not ring at all.
13
Page 16

AUDIOLINE SENSOR 150 OTHER
THUNDERSTORM WARNING
It is recommende d that you disconnect your telephone during a thunderstorm as you can
get a shock from your telephone (and other electrical appliances). We recommend you
follow these simple precautions during a thunderstorm:
# Do not use your telephone unless the call is urgent.
# If you must use your telephone, make the call as brief as possible and keep clear of
electrical equipment and metal fixtures.
# Do not stand in bare feet on uncovered concrete floors.
# Do not touch brick or concrete walls.
NOTE: Do not install your telephone in damp or high humidity locations, such as a
laundry or bathroom. If any damage is caused by such elements it is not covered by
the manufacturers warranty.
GUARANTEE
If you believe your Audioline Sensor 150 is malfunctioning, please refer to the relevant
section and/or consult the troubleshooting guide in this manual to ensure that you have
followed the instructions carefully.
The Audioline Sensor 150 is guaranteed for a period of 12 months from the date of
purchase. In the unlikely event of a fault during this period, please contact us for
assistance. If the product is then found to be faulty you will be asked to return it directly
to us with a copy of the purchase receipt.
AUSTRALIA NEW ZEALAND
DORO Australia Pty Ltd Atlas Gentech (NZ) Limited
PO Box 6760 Private Bag 14927, Panmure
Baulkham Hills BC NSW 2153 Australia Auckland
Helpline Consumer Support
Ph: (02) 8853 8444 Ph: 0900 50-025 (Toll Call)
Fax: (02) 8853-8489 Fax: (09) 574-2722
Email: helpline@doro.com.au Email: support@atlasgentech.co.nz
NOTE: The guarantee does not extend to damage caused by misuse, negligence, excessive voltage, faults on the telephone line or lightning. This guarantee in no
way affects your statutory rights. Audioline is the trademark of DORO AB.
The grant of a Telepermit for any item of terminal equipment indicates only that Telecom has accepted that the item complies with the minimum conditions for connection to its
network. It indicates no endorsement of the product by Telecom, nor does it provide any sort of warranty. Above all, it provides no assurance that any item will work correctly
in all respects with another item of Telepermitted equipment o f a different make or model, nor does it imply that any product is compatible with all of Telecom’s network services.
This equipment shall not be set to make automatic calls to the Telecom “111" Emergency Service.
This Equipment may not provide for the effective hand-over of a call to another device connected to the same line .
This unit will only work in conjunction with a tone signalling (DTMF) telephone, but some telephones may not be compatible. Since noise or speech from the telephone can upset
dialling from this unit, errors may result if the devices are used together in other than quiet conditions.
Where it is necessary to dial prefix digits, such as a Caller Display override code (“0196" or “0197"), this unit will have to be used in conjunction with an associated tone signalling
(DTMF) telephone.
Note that some telephones are NOT compatible with this unit and dialling errors may result if the two devices are used together in other than quiet conditions. The Telecom Faults
Service is NOT to be called should such problems arise. In such cases, it is recommended that the prefix and wanted number are dialled manually.
If a charge for local calls is unacceptable, the “Dial” button should NOT be used for local calls. Only the 7-digits of the local number should be dialled from your telephone. DO
NOT dial the area code digit or the "0" prefix.
Notes For Operation In New Zealand
14
Page 17

 Loading...