

Page 1

PMR 46 DE_041212_dtp 04.12.12 12:31 Seite U1
Sprechfunkgeräte-Set
Walkie-Talkie Set
Bedienungsanleitung
Operating Instructions
PMR 46
D
GB
Page 2

PMR 46 DE_041212_dtp 04.12.12 12:31 Seite U2
Page 3

PMR 46 DE_041212_dtp 04.12.12 12:31 Seite 1
Inhaltsverzeichnis
1 Sicherheitshinweise . . . . . . . . . . . . . . . . . . . . . . . . . . . . . . . . . . . . .2
Bestimmungsgemäße Verwendung . . . . . . . . . . . . . . . . . . . . . . . . . . . . .2
Verwendungsbereich . . . . . . . . . . . . . . . . . . . . . . . . . . . . . . . . . . . . . . . .2
Netzteil . . . . . . . . . . . . . . . . . . . . . . . . . . . . . . . . . . . . . . . . . . . . . . . . . . .2
Akkus . . . . . . . . . . . . . . . . . . . . . . . . . . . . . . . . . . . . . . . . . . . . . . . . . . . .2
Medizinische Geräte . . . . . . . . . . . . . . . . . . . . . . . . . . . . . . . . . . . . . . . . .2
Entsorgung . . . . . . . . . . . . . . . . . . . . . . . . . . . . . . . . . . . . . . . . . . . . . . . .2
Konformitätserklärung . . . . . . . . . . . . . . . . . . . . . . . . . . . . . . . . . . . . . . . .3
2 Funkgeräte in Betrieb nehmen . . . . . . . . . . . . . . . . . . . . . . . . . . . .4
Sicherheitshinweise . . . . . . . . . . . . . . . . . . . . . . . . . . . . . . . . . . . . . . . . .4
Verpackungsinhalt prüfen . . . . . . . . . . . . . . . . . . . . . . . . . . . . . . . . . . . . .4
Gürtelclip . . . . . . . . . . . . . . . . . . . . . . . . . . . . . . . . . . . . . . . . . . . . . . . . .4
Akkus einlegen . . . . . . . . . . . . . . . . . . . . . . . . . . . . . . . . . . . . . . . . . . . . .4
Akkus aufladen . . . . . . . . . . . . . . . . . . . . . . . . . . . . . . . . . . . . . . . . . . . . .4
3 Bedienelemente . . . . . . . . . . . . . . . . . . . . . . . . . . . . . . . . . . . . . . . . .7
4 Funkgeräte bedienen . . . . . . . . . . . . . . . . . . . . . . . . . . . . . . . . . . . .8
Funkgeräte ein-/ausschalten . . . . . . . . . . . . . . . . . . . . . . . . . . . . . . . . . .8
Einstellen der Lautstärke . . . . . . . . . . . . . . . . . . . . . . . . . . . . . . . . . . . . .8
Senden und empfangen . . . . . . . . . . . . . . . . . . . . . . . . . . . . . . . . . . . . . .8
Rufton senden . . . . . . . . . . . . . . . . . . . . . . . . . . . . . . . . . . . . . . . . . . . . .8
Kanalwahl . . . . . . . . . . . . . . . . . . . . . . . . . . . . . . . . . . . . . . . . . . . . . . . . .9
CTCSS-Code wählen . . . . . . . . . . . . . . . . . . . . . . . . . . . . . . . . . . . . . . . .9
DCS-Code wählen . . . . . . . . . . . . . . . . . . . . . . . . . . . . . . . . . . . . . . . . .10
Kanalüberwachung (Monitoring) . . . . . . . . . . . . . . . . . . . . . . . . . . . . . . .11
VOX-Modus . . . . . . . . . . . . . . . . . . . . . . . . . . . . . . . . . . . . . . . . . . . . . . .11
Automatischer Kanal-Scan . . . . . . . . . . . . . . . . . . . . . . . . . . . . . . . . . . .12
Automatischer Subkanal (CTCSS)-Scan . . . . . . . . . . . . . . . . . . . . . . . .12
Automatischer DCS-Scan . . . . . . . . . . . . . . . . . . . . . . . . . . . . . . . . . . . .12
Rufton wählen . . . . . . . . . . . . . . . . . . . . . . . . . . . . . . . . . . . . . . . . . . . .13
Bestätigungston . . . . . . . . . . . . . . . . . . . . . . . . . . . . . . . . . . . . . . . . . . .13
Tastenton . . . . . . . . . . . . . . . . . . . . . . . . . . . . . . . . . . . . . . . . . . . . . . . .13
Zweikanal-Überwachung . . . . . . . . . . . . . . . . . . . . . . . . . . . . . . . . . . . .14
Tastensperre . . . . . . . . . . . . . . . . . . . . . . . . . . . . . . . . . . . . . . . . . . . . . .15
Stoppuhr . . . . . . . . . . . . . . . . . . . . . . . . . . . . . . . . . . . . . . . . . . . . . . . . .15
Headset . . . . . . . . . . . . . . . . . . . . . . . . . . . . . . . . . . . . . . . . . . . . . . . . . .15
5 Anhang . . . . . . . . . . . . . . . . . . . . . . . . . . . . . . . . . . . . . . . . . . . . . . .16
Falls es Probleme gibt . . . . . . . . . . . . . . . . . . . . . . . . . . . . . . . . . . . . . .16
Steckerbelegung für die Headset-Buchse . . . . . . . . . . . . . . . . . . . . . . .16
Technische Daten . . . . . . . . . . . . . . . . . . . . . . . . . . . . . . . . . . . . . . . . . .17
Pflegehinweise / Garantie . . . . . . . . . . . . . . . . . . . . . . . . . . . . . . . . . . . .17
D
1
Page 4

PMR 46 DE_041212_dtp 04.12.12 12:31 Seite 2
Sicherheitshinweise
1 Sicherheitshinweise
Lesen Sie diese Bedienungsanleitung sorgfältig durch.
Bestimmungsgemäße Verwendung
Diese Sprechfunkgeräte sind geeignet für die Kommunikation mit anderen
Sprechfunkgeräten gleichen Standards. Jede andere Verwendung gilt als
nicht bestimmungsgemäß. Eigenmächtige Veränderungen oder Umbauten
sind nicht zulässig. Öffnen Sie die Geräte in keinem Fall selbst und führen
Sie keine eigenen Reparaturversuche durch.
Verwendungsbereich
Vermeiden Sie Belastungen durch Rauch, Staub, Erschütterungen, Chemikalien, Feuchtigkeit, Hitze oder direkte Sonneneinstrahlung. Verwenden
Sie die Funkgeräte nicht in explosionsgefährdeten Bereichen.
Netzteil
a Achtung: Verwenden Sie nur das mitgelieferte Netzteil, da andere
Netzteile die Funkgeräte beschädigen können.
Sie dürfen den Zugang zum Netzteil nicht durch Möbel oder andere
Gegenstände versperren.
Akkus
a Achtung: Werfen Sie Akkus nicht ins Feuer. Verwenden Sie
nur Akkus des gleichen Typs! Achten Sie auf die richtige Polung!
Bei verkehrter Polung der Akkus besteht beim Aufladen Explosionsgefahr.
Medizinische Geräte
a Achtung: Benutzen Sie das Gerät nicht in der Nähe von
medizinischen Geräten. Eine Beeinflussung kann nicht völlig
ausgeschlossen werden. Funkgeräte können in Hörgeräten
einen unangenehmen Brummton verursachen.
Entsorgung
Wollen Sie Ihr Gerät entsorgen, bringen Sie es zur Sammelstelle Ihres kommunalen Entsorgungsträgers (z. B. Wertstoffhof). Nach dem Elektro- und Elektronikgerätegesetz sind
Besitzer von Altgeräten gesetzlich verpflichtet, alte Elektro-
2
Page 5
PMR 46 DE_041212_dtp 04.12.12 12:31 Seite 3
und Elektronikgeräte einer getrennten Abfallerfassung zuzuführen. Das nebenstehende Symbol bedeutet, dass Sie das
Gerät auf keinen Fall in den Hausmüll werfen dürfen!
Gefährdung von Gesundheit und Umwelt durch Akkus
und Batterien! Akkus und Batterien nie öffnen, beschädigen,
verschlucken oder in die Umwelt gelangen lassen.
Sie können giftige und umweltschädliche Schwermetalle enthalten. Sie sind gesetzlich verpflichtet, Akkus und Batterien
beim batterievertreibenden Handel sowie bei zuständigen
Sammelstellen, die entsprechende Behälter bereitstellen,
sicher zu entsorgen. Die Entsorgung ist unentgeltlich. Die
nebenstehenden Symbole bedeuten, dass Sie Akkus und
Batterien auf keinen Fall in den Hausmüll werfen dürfen und
sie über Sammelstellen der Entsorgung zugeführt werden
müssen.
Verpackungsmaterialien entsorgen Sie entsprechend den
lokalen Vorschriften.
a Achtung: Setzen Sie das Gerät niemals tropfenden oder spritzenden
Flüssigkeiten aus und sorgen Sie dafür, dass keine flüssigkeitsgefüllten
Gefäße wie z. B. Gläser auf dem Gerät stehen.
Konformitätserklärung
Dieses Gerät erfüllt die Anforderungen der EU-Richtlinien:
- 1999/5/EG Richtlinie über Funkanlagen und Telekommunikationsendeinrichtungen und die gegenseitige Anerkennung ihrer Konformität.
- 2005/32/EG Richtlinie „Energiebetriebene Produkte“.
Sicherheitshinweise
Die Konformität mit der o. a. Richtlinie wird durch das CE-Zeichen auf
dem Gerät bestätigt.
Für die komplette Konformitätserklärung nutzen Sie bitte den kostenlosen
Download von unserer Website www.audioline.de
Dieses Produkt ist für den Betrieb innerhalb Deutschlands entwickelt worden. Es arbeitet auf einer EU-harmonisierten Frequenz (446 MHz) und
darf daher außerhalb Deutschlands in allen EU-Mitgliedstaaten betrieben
werden.
.
D
3
Page 6
PMR 46 DE_041212_dtp 04.12.12 12:31 Seite 4
Funkgeräte in Betrieb nehmen
2 Funkgeräte in Betrieb nehmen
Sicherheitshinweise
a Achtung: Lesen Sie vor der Inbetriebnahme unbedingt die
Sicherheitshinweise in Kapitel 1.
Verpackungsinhalt prüfen
Zum Lieferumfang gehören:
- 2 Funkgeräte mit Gürtelclip - 6 Akkus, AAA, 600 mAh NiMH
- 2 Headsets - 1 Ladestation
- 1 Bedienungsanleitung - 1 Netzteil
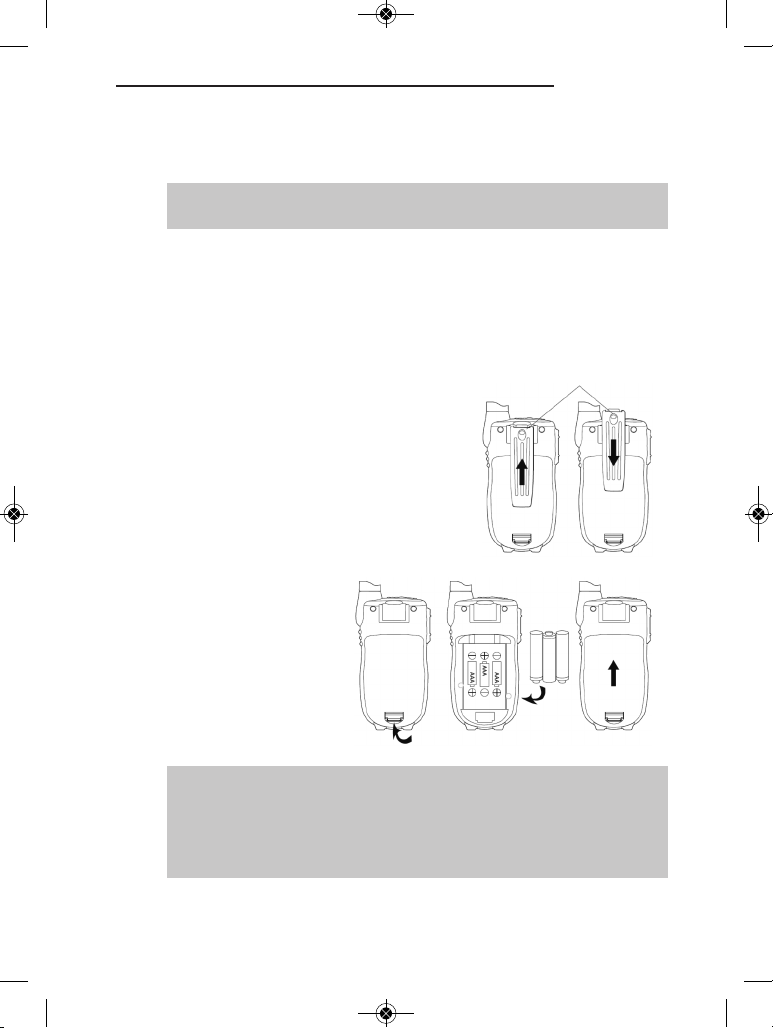
Gürtelclip
Zum Entfernen des Gürtelclips heben Sie die
Sperre mit einem Fingernagel an (s. Skizze)
und schieben ihn aus der Halterung.
Zum Anbringen des Gürtelclips schieben Sie
ihn in die Halterung bis er hörbar einrastet.
Akkus einlegen
Öffnen Sie das Akkufach.
Legen Sie die mitgelieferten Akkus ein. Achten Sie
auf die richtige Polung!
Schließen Sie das Akkufach.
a Achtung: Verwenden Sie nur die mitgelieferten Akkus oder Akkus der
gleichen Bauweise und Kapazität.
Wenn die Akkus falsch eingesetzt werden besteht Explosionsgefahr.
Setzen Sie Akkus niemals übermäßiger Hitze wie direkter Sonneneinstrahlung, Feuer o. ä. aus.
4
Page 7
PMR 46 DE_041212_dtp 04.12.12 12:31 Seite 5
Funkgeräte in Betrieb nehmen
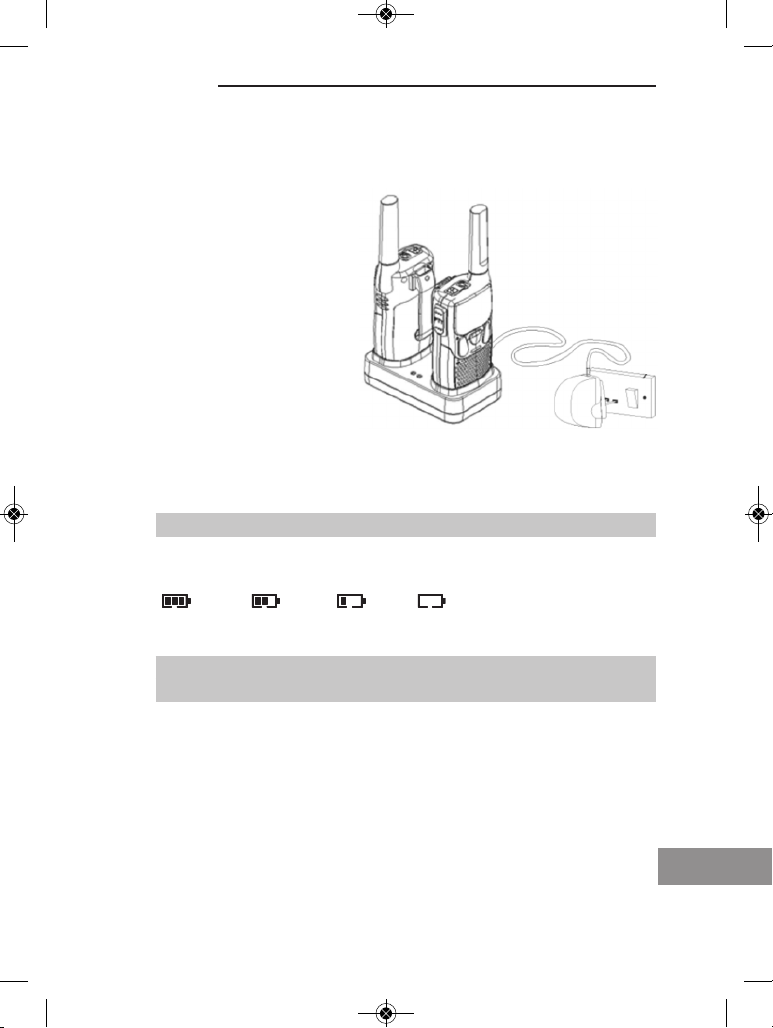
Akkus aufladen
Schließen Sie die Ladestation an.
Verwenden Sie aus Sicherheitsgründen nur das mitgelieferte Ladegerät.
Laden Sie die Funkgeräte
vor der ersten Inbetriebnahme für mindestens 10 Stunden. Wenn die Funkgeräte
korrekt platziert sind, leuchten die Ladeanzeigen. Die
roten LEDs leuchten auch,
wenn die Akkupacks komplett aufgeladen sind.
Für eine optimale Akkulebensdauer trennen Sie
dann bitte die Funkgeräte von der Ladestation.
Schalten Sie die Funkgeräte zum Laden aus, um die Ladezeit zu verkürzen. Neue Akkus benötigen ca. 14 Stunden Ladezeit.
a Achtung: Laden Sie die Funkgeräte nicht mit fremden Aufladegeräten.
Der aktuelle Akkuladezustand wird im Display angezeigt:
voll halb schwach leer
Sobald die Anzeige im Display blinkt und Warntöne zu hören sind, muss
das Funkgerät aufgeladen werden.
D
5
Page 8
PMR 46 DE_041212_dtp 04.12.12 12:31 Seite 6
Funkgeräte in Betrieb nehmen
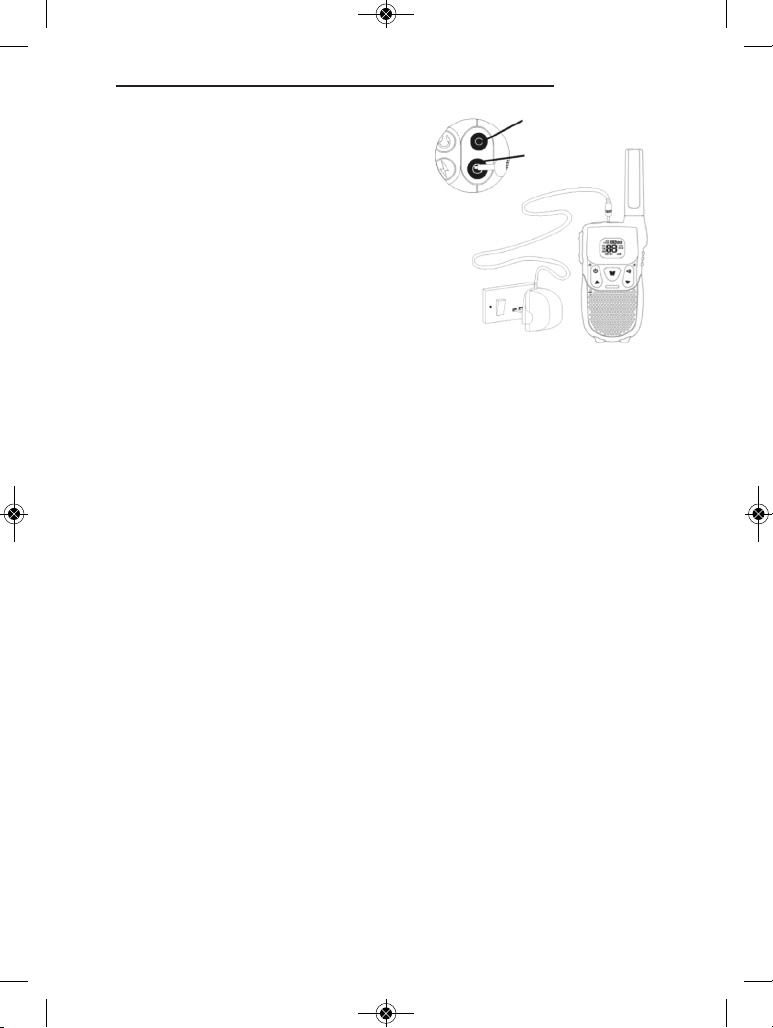
Alternativ können Sie jedes einzelne
Funkgerät direkt mit dem Netzgerät
aufladen.
Heben Sie die Abdeckung an der Oberseite des Gerätes ab und stecken Sie
den Ladestecker in die passende
Buchse.
Schalten Sie die Funkgeräte zum
Laden aus um die Ladezeit zu verkürzen.
Anschluss für Headset
Anschluss für Ladegerät
6
Page 9
1
3
4
6
10
9
8
5
7
2
1
2
3
4
5
10
11
12
13
6 7 8 9
PMR 46 DE_041212_dtp 04.12.12 12:31 Seite 7
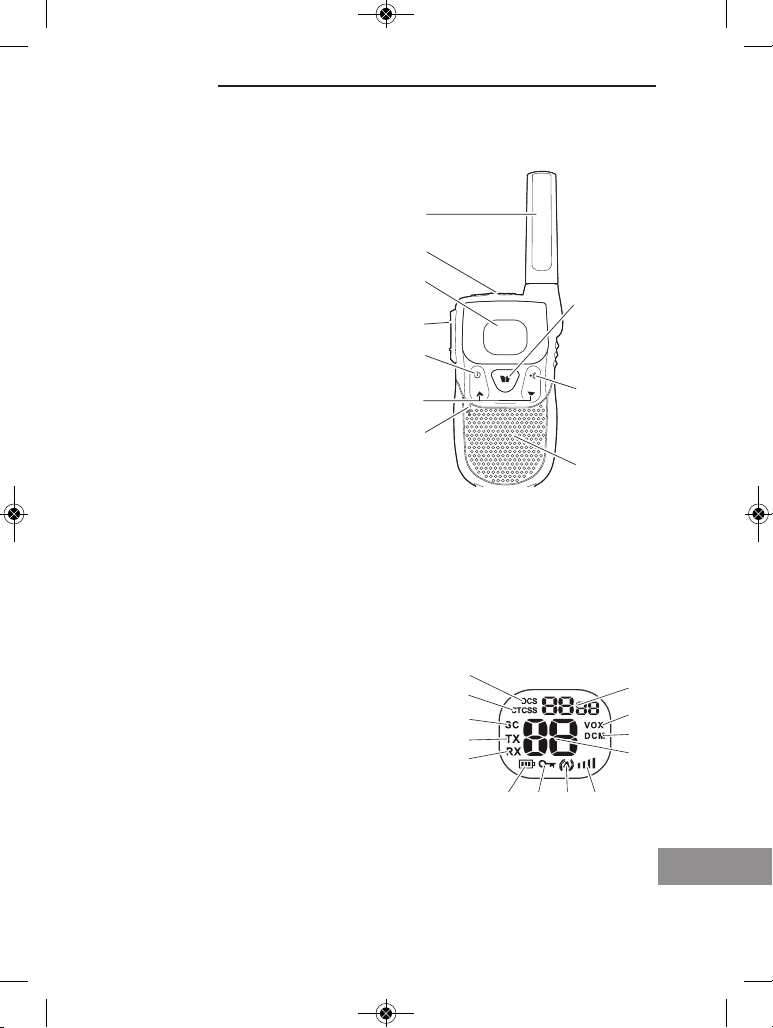
3 Bedienelemente
Handset
1 Antenne
2 Anschluss für Ladegerät und
Headset
3 Display
4 PTT-(Sprech)taste
5 Ein/Aus-Taste
6 Auf/Ab-Tasten
für Kanalwahl, Lautstärke und
weitere Einstellungen
7 Mikrofon
8 Lautsprecher
9 Rufton senden
10 Menü-Taste
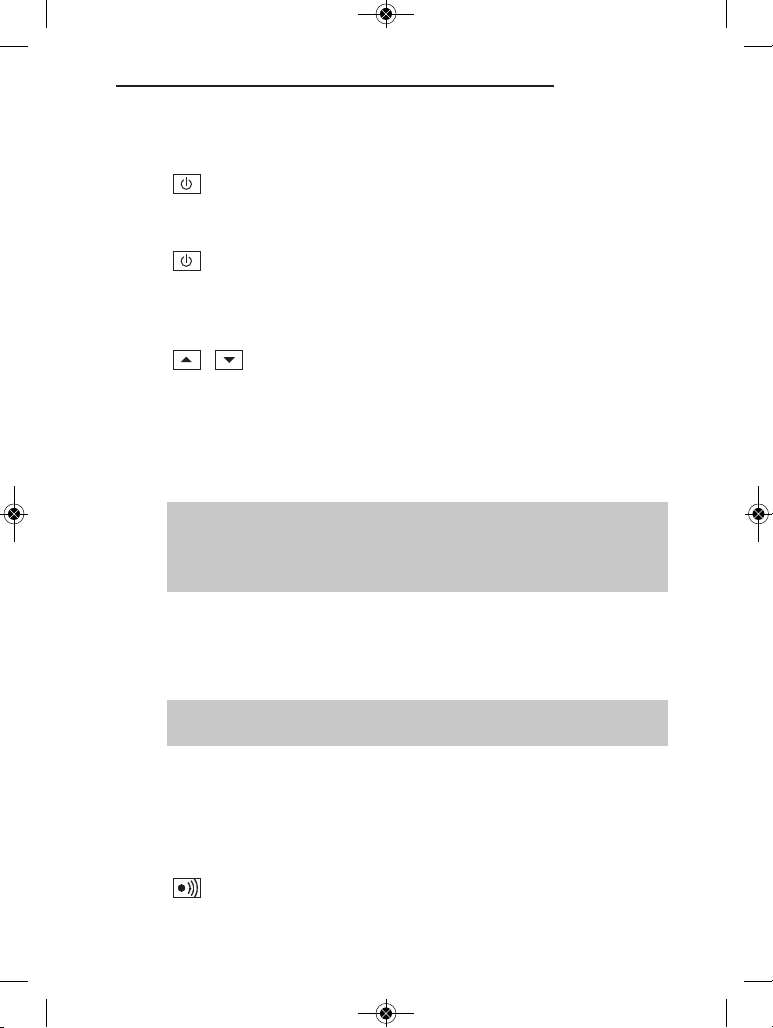
Display
1 DCS aktiv (Advanced Digital Code)
2 CTCSS aktiv (Sub-Kanal)
3 Scan-Mode
4 Anzeige „Senden“
5 Anzeige „Empfangen“
6 Akkukapazitätsanzeige
7 Tastensperre
8 Rufsignal aktiviert
9 Lautstärkeanzeige
10 Kanalanzeige
11 2-Kanal-Überwachung
12 VOX-Mode
13 Sub-Kanalanzeige (CTCSS) oder Code-Anzeige (DCS)
Bedienelemente
D
7
Page 10
PMR 46 DE_041212_dtp 04.12.12 12:31 Seite 8
Funkgeräte bedienen
4 Funkgeräte bedienen
Funkgeräte ein-/ausschalten
Zum Einschalten Ein/Aus-Taste drücken und gedrückt
halten. Sie hören einen Signalton und im Display wird der
derzeitige Kanal angezeigt.
Zum Ausschalten Ein/Aus-Taste drücken und gedrückt
halten. Sie hören einen Signalton.
Einstellen der Lautstärke
/
Senden und empfangen
Senden Drücken Sie die PTT-(Sprech)taste. TX wird angezeigt.
☞ Halten Sie das Funkgerät ca. 5 bis 7 cm vom Mund entfernt, warten
Sie ca. 1 Sekunde und sprechen Sie mit normaler Lautstärke.
Um mit anderen Teilnehmern zu sprechen, müssen alle Funkgeräte auf
den gleichen Kanal eingestellt sein.
Drücken Sie ▲ oder ▼ um die Lautstärke zu erhöhen
oder zu verringern.
Empfangen Das Funkgerät ist ständig in Empfangsbereitschaft, wenn
☞ Sie können keine Funksignale empfangen, wenn Sie
die PTT-(Sprech)taste gedrückt halten.
Rufton senden
Der Rufton macht andere Teilnehmer darauf aufmerksam, dass Sie ein
Gespräch beginnen möchten. Die anderen Teilnehmer müssen den gleichen Kanal und CTCSS-Code/DCS-Code verwenden.
8
es eingeschaltet ist und die PTT-(Sprech)taste bzw. die
Ruftaste nicht gedrückt ist.
Rufton senden.
RX wird angezeigt.
Page 11

PMR 46 DE_041212_dtp 04.12.12 12:31 Seite 9
Kanalwahl
Drücken Sie die Menü-Taste.
/
Kanal Frequenz (MHz) Kanal Frequenz (MHz)
1 446.00625 5 446.05625
2 446.01875 6 446.06875
3 446.03125 7 446.08125
4 446.04375 8 446.09375
Drücken Sie ▲ oder ▼ um den gewünschten Kanal zu
wählen.
Bestätigen Sie die Einstellung mit der PTT-
(Sprech)taste.
CTCSS-Code wählen
CTCSS = Continous Tone Coded Squelch System = Selektivruf.
Es werden alle Gespräche an Funkgeräten signalisiert, die sich im Empfangsbereich befinden. Voraussetzung dafür ist, dass alle Funkgeräte auf
den gleichen Kanal eingestellt sind. Um gegenseitige Störungen zu vermeiden, kann auf dem eingestellten Kanal ein CTCSS-Code festgelegt
werden. Es sind 38 CTCSS-Codes pro Kanal möglich.
Hinweis: CTCSS- und DCS-Codes können nur alternativ verwendet werden.
2 x Drücken Sie die Menü-Taste 2 mal.
/
CTCSS-Code auswählen und mit der PTT-(Sprech)taste
bestätigen.
☞ Jeder CTCSS-Code entspricht einer bestimmten Tonfrequenz, die das
Sprechfunkgerät sendet. Die Kommunikation zwischen zwei Teilnehmern
ist nur dann möglich, wenn beide denselben Kanal und CTCSS-Code
verwenden. Eine Ausnahme ist der CTCSS-Code “00” (= OF / Aus).
Bei dieser Einstellung können, unabhängig vom CTCSS-Code, alle
Gespräche auf dem eingestellten Kanal gehört werden.
Um am Funkverkehr teilnehmen zu können, muss dann ggf. vom
CTCSS-Code “00" auf den verwendeten CTCSS-Code gewechselt
werden.
Funkgeräte bedienen
D
9
Page 12

PMR 46 DE_041212_dtp 04.12.12 12:31 Seite 10
Funkgeräte bedienen
Wenn Sie mit Funkgeräten kommunizieren möchten, die keinen CTCSSCode verwenden, müssen Sie an Ihrem Funkgerät den CTCSS-Code “00"
auswählen.
CTCSS Frequenz (Hz) CTCSS Frequenz (Hz)
1 67,0 20 131,8
2 71,9 21 136,5
3 74,4 22 141,3
4 77,0 23 146,2
5 79,7 24 151,4
6 82,5 25 156,7
7 85,4 26 162,2
8 88,5 27 167,9
9 91,5 28 173,8
10 94,8 29 179,9
11 97,4 30 186,2
12 100,0 31 192,8
13 103,5 32 203,5
14 107,2 33 210,7
15 110,9 34 218,1
16 114,8 35 225,7
17 118,8 36 233,6
18 123,0 37 241,8
19 127,3 38 250,3
DCS-Code wählen
DCS = Advanced Digital Code
Jeder Kanal stellt Ihnen alternativ zum vorgenannten CTCSS-Code 83
DCS-Codes zur Verfügung, um Ihre Verbindungen noch sicherer zu
machen. Bitte beachten Sie, dass an jedem der teilnehmenden Funkgeräte
derselbe DCS-Code eingestellt sein muss. Die Einstellung „00“ / „OF“
bedeutet, dass der DCS-Code ausgeschaltet ist.
Hinweis: DCS- und CTCSS-Codes können nur alternativ verwendet werden.
3 x Drücken Sie die Menü-Taste 3 mal.
10
/
DCS-Code auswählen und mit der PTT-(Sprech)taste
bestätigen.
Page 13

PMR 46 DE_041212_dtp 04.12.12 12:31 Seite 11
Kanalüberwachung (Monitoring)
Im Normalfall unterdrückt das Funkgerät sehr schwache Empfangssignale.
Mit der „Monitoring“-Funktion können Sie auf dem eingestellten Kanal
jedoch alle Signale empfangen.
+
Drücken Sie gleichzeitig die Menü-Taste und die Taste ▼.
Im Display erscheint RX.
Zum Beenden drücken Sie die Menü-Taste erneut.
VOX-Modus
VOX = Voice operated transmission = Geräuschaktivierte Übertragung.
Bei eingeschaltetem VOX-Modus sendet Ihr Gerät sobald es ein Geräusch
wahrnimmt. Beim Einschalten des VOX-Modus stellen Sie gleichzeitig die
Empfindlichkeit ein. Je höher die angezeigte Ziffer desto empfindlicher ist
die Einstellung.
☞ Wenn Sie anfangen zu sprechen, tritt eine kurze Verzögerung auf,
bevor das Funkgerät sendet. Wenn für ca. 2 Sekunden kein Geräusch
wahrgenommen wird, wird die Übertragung beendet.
In einer lauten oder windigen Umgebung ist die Verwendung des VOXModus nicht empfehlenswert.
4 x Drücken Sie die Menü-Taste 4 mal.
VOX wird angezeigt und „OF“ blinkt im Display.
/
Wählen Sie die gewünschte Empfindlichkeit (drei Stufen)
mit den Auf/Ab-Tasten und bestätigen Sie die Einstellung
mit der PTT-(Sprech)taste.
Funkgeräte bedienen
Wenn der VOX-Modus aktiviert ist, wird VOX im Display
angezeigt.
Zum Ausschalten wählen Sie statt einer Empfindlichkeitsstufe „OF“ und bestätigen mit der PTT-(Sprech)taste.
D
11
Page 14

PMR 46 DE_041212_dtp 04.12.12 12:31 Seite 12
Funkgeräte bedienen
Automatischer Kanal-Scan
Ist diese Funktion eingeschaltet, werden alle Kanäle kontinuierlich solange
nachein ander abgesucht, bis auf einem Kanal ein Signal empfangen wird.
5 x Drücken Sie die Menü-Taste 5 mal.
/
/
Automatischer Subkanal (CTCSS)-Scan
Ist diese Funktion eingeschaltet, werden für den eingestellten Kanal kontinuierlich alle Subkanäle (CTCSS) solange nachein ander abgesucht, bis
ein Signal empfangen wird.
6 x Drücken Sie die Menü-Taste 6 mal.
/
/
Drücken Sie ▲ oder ▼ um den Kanal-Scan zu starten.
Wird ein Signal empfangen, hält das Gerät an.
Drücken Sie ▲ oder ▼ um mit dem Scannen der 8 Kanäle fortzufahren.
Drücken Sie die PTT-(Sprech)taste um sich in den Funk-
verkehr einzuschalten oder den Scan zu stoppen.
Drücken Sie ▲ oder ▼ um den Subkanal-Scan zu starten.
Wird ein Signal empfangen, hält das Gerät an.
Drücken Sie ▲ oder ▼ um mit dem Scannen fortzufahren.
Drücken Sie die PTT-(Sprech)taste um sich in den Funk-
verkehr einzuschalten oder den Scan zu stoppen.
Automatischer DCS-Scan
Ist diese Funktion eingeschaltet, werden für den eingestellten Kanal kontinuierlich alle DCS-Kanäle solange nachein ander abgesucht, bis ein Signal
empfangen wird.
7 x Drücken Sie die Menü-Taste 7 mal.
/
12
Drücken Sie ▲ oder ▼ um den DCS-Kanal-Scan zu starten.
Page 15

PMR 46 DE_041212_dtp 04.12.12 12:31 Seite 13
Wird ein Signal empfangen, hält das Gerät an.
/
Drücken Sie ▲ oder ▼ um mit dem Scannen fortzufahren.
Drücken Sie die PTT-(Sprech)taste um sich in den Funk-
verkehr einzuschalten oder den Scan zu stoppen.
Rufton wählen
Sie haben 15 Ruftöne zur Auswahl.
8 x Drücken Sie die Menü-Taste 8 mal.
/
Wählen Sie den gewünschten Rufton.
Bestätigen Sie mit der PTT-(Sprech)taste.
Bestätigungston
Der Bestätigungston ist zu hören, wenn Sie die PTT-(Sprech)taste loslassen. Dadurch wird Ihrem Gesprächspartner signalisiert, dass Ihre Übertragung beendet ist.
9 x Drücken Sie die Menü-Taste 9 mal.
/
Wählen Sie „ON“ oder „OF“ und bestätigen Sie mit der
PTT-(Sprech)taste.
Funkgeräte bedienen
Tastenton
Bei aktiviertem Tastenton ist bei jeder Tastenbetätigung ein kurzer Ton zu
hören.
10 x Drücken Sie die Menü-Taste 10 mal.
/
Wählen Sie „ON“ oder „OF“ und bestätigen Sie mit der
PTT-(Sprech)taste.
D
13
Page 16

PMR 46 DE_041212_dtp 04.12.12 12:31 Seite 14
Funkgeräte bedienen
Zweikanal-Überwachung
Bei aktivierter Zweikanal-Überwachung werden abwechselnd zwei von
Ihnen festzulegende Kanäle überwacht. Wird auf einem dieser Kanäle ein
Signal empfangen, bleibt das Gerät auf diesem stehen. Sie können sich
dann in den Funkverkehr auf diesem Kanal einschalten.
/
11 x Drücken Sie die Menü-Taste 11 mal. DCM erscheint im
/
/
/
Stellen Sie den ersten der zu überwachenden Kanäle ein.
Display und „OF“ blinkt.
Wählen Sie den zweiten Kanal.
Starten Sie die Zweikanal-Überwachung mit der PTT-
(Sprech)taste
oder
Drücken Sie die Menü-Taste.
Wählen Sie den CTCSS-Code für den zweiten Kanal.
Starten Sie die Zweikanal-Überwachung mit der PTT-
(Sprech)taste
oder
Drücken Sie die Menü-Taste.
Wählen Sie den DCS-Code für den zweiten Kanal.
Starten Sie die Zweikanal-Überwachung mit der PTT-
(Sprech)taste.
14
Zum Ausschalten der Zweikanal-Überwachung drücken
Sie die Menü-Taste 11 mal, wählen Sie „OF“ und drücken
Sie die PTT-(Sprech)taste.
Page 17

PMR 46 DE_041212_dtp 04.12.12 12:31 Seite 15
Tastensperre
Die Tastensperre verhindert das ungewollte Ändern von Einstellungen. Im
Display erscheint das Symbol . Sie können weiterhin senden, empfangen, den eingestellten Kanal rufen oder das Gerät ausschalten.
Tastensperre einschalten
Drücken und halten Sie die Menütaste, bis das Symbol
im Display erscheint.
Tastensperre ausschalten
Drücken und halten Sie die Menütaste, bis das Symbol
wieder verschwindet.
Stoppuhr
Hinweis: Bei aktiver Zweikanal-Überwachung kann die Stoppuhr nicht
genutzt werden.
Drücken und halten Sie die Ruftaste für ca. 3 Sekunden.
Drücken Sie ▲ um die Stoppuhr zu starten.
Um die Stoppuhr anzuhalten drücken Sie ▲ erneut.
Um die Stoppuhr zurückzusetzen drücken Sie ▼.
Zum Beenden der Funktion drücken und halten Sie die
Ruftaste für ca. 3 Sekunden.
Funkgeräte bedienen
Headset
Benutzen Sie das in der Verpackung enthaltene Headset.
Stecken Sie das Funkgerät beispielsweise in die Brusttasche, um beide
Hände frei zu haben. Da das mitgelieferte Headset über eine zusätzliche
PTT-(Sprech)taste verfügt, können Sie über diese am Headset senden.
Vorsicht beim Betrieb mit Headset: Zu hohe Lautstärke kann zu bleibenden Gehörschäden führen. Kontrollieren Sie deshalb vorher die
Lautstärkeeinstellung.
D
15
Page 18

PMR 46 DE_041212_dtp 04.12.12 12:31 Seite 16
Anhang
5 Anhang
Falls es Probleme gibt
Haben Sie Probleme mit Ihren Funkgeräten, kontrollieren Sie zuerst die
folgenden Hinweise. Bei Garantieansprüchen wenden Sie sich an Ihren
Fachhändler. Die Garantiezeit beträgt 2 Jahre.
Fragen und Antworten
Fragen Antworten
Keine Funktion - Funkgerät nicht geladen
- Tastensperre aktiviert
Senden nicht möglich - PTT-(Sprech)taste zum Senden
vollständig drücken
- Kanal wird von anderen Teilnehmern
benutzt
Kein Empfang - PTT-(Sprech)taste loslassen
- Lautstärke zu gering eingestellt
- Sie befinden sich außerhalb des
Empfangsbereichs, ändern Sie Ihre
Position
- Hindernisse wie Bäume und
Gebäude haben einen negativen
Einfluss auf die Reichweite
- CTCSS-Code/DCS-Code ist nicht identisch mit
dem des Gesprächspartners
- Kanal wird von anderen Teilnehmern
benutzt
Steckerbelegung für die Headset-Buchse
Wollen Sie statt des mitgelieferten Headsets ein anderes Headset anschließen achten Sie bitte auf eine korrekte Steckerbelegung (s. Skizze).
3-poliger 2,5 mm Stereoklinkenstecker
1 = Mikrofon
2 = Lautsprecher
3 = Masse
16
Page 19

PMR 46 DE_041212_dtp 04.12.12 12:31 Seite 17
Technische Daten
Merkmal Wert
Ausgangsleistung 0,5 W
Reichweite bis zu 8 km bei freier Sichtlinie
Gesamt-Betriebszeit Bis zu 14 Std. (Basierend auf 5 %
Senden, 5 % Empfangen und 90 %
Stand-by-Zeit)
Max. Gesprächsdauer Bis zu 100 Min.
Ladezeit ca. 10 Std.
Akkus 3 x NiMH 1,2 V, 600 mAh
Stromversorgung Eingang: 230 / 240 V, 50 Hz, 36 mA
Ausgang: 9 V, 300 mA DC
Pflegehinweise / Garantie
Pflegehinweise
Reinigen Sie die Gehäuseoberflächen mit einem weichen und fusselfreien
Tuch. Verwenden Sie keine Reinigungsmittel oder Lösungsmittel.
Garantie
AUDIOLINE-Geräte werden nach den modernsten Produktionsverfahren
hergestellt und geprüft. Ausgesuchte Materialien und hoch entwickelte
Technologien sorgen für einwandfreie Funktion und lange Lebensdauer.
Die Garantie gilt nicht für die in den Produkten verwendeten Batterien,
Akkus oder Akkupacks. Die Garantiezeit beträgt 24 Monate, gerechnet
vom Tage des Kaufs.
Innerhalb der Garantiezeit werden alle Mängel, die auf Material- oder Herstellungsfehler zurückzuführen sind, kostenlos beseitigt.
Der Garantieanspruch erlischt bei Eingriffen durch den Käufer oder durch
Dritte. Schäden, die durch unsachgemäße Behandlung oder Bedienung,
natürliche Abnutzung, durch falsches Aufstellen oder Aufbewahren, durch
unsachgemäßen Anschluss oder Installation sowie durch höhere Gewalt
oder sonstige äußere Einflüsse entstehen, fallen nicht unter die Garantieleistung.
Wir behalten uns vor, bei Reklamationen die defekten Teile auszubessern,
zu ersetzen oder das Gerät auszutauschen. Ausgetauschte Teile oder aus-
Anhang
D
17
Page 20

PMR 46 DE_041212_dtp 04.12.12 12:31 Seite 18
Anhang
getauschte Geräte gehen in unser Eigentum über. Schadenersatzansprüche sind ausgeschlossen, soweit sie nicht auf Vorsatz oder grober Fahrlässigkeit des Herstellers beruhen.
Sollte Ihr Gerät dennoch einen Defekt innerhalb der Garantiezeit
aufweisen, wenden Sie sich bitte unter Vorlage Ihrer Kaufquittung ausschließlich an das Geschäft, in dem Sie Ihr
AUDIOLINE-Gerät gekauft haben. Alle Gewährleistungsansprüche nach
diesen Bestimmungen sind ausschließlich gegenüber Ihrem Fachhändler
geltend zu machen. Nach Ablauf von zwei Jahren nach Kauf und Übergabe unserer Produkte können Gewährleistungsrechte nicht mehr geltend
gemacht werden.
18
Page 21

PMR 46 GB_041212_dtp 04.12.12 12:33 Seite 1
1 Safety Information . . . . . . . . . . . . . . . . . . . . . . . . . . . . . . . . . . . . . . .2
Intended use . . . . . . . . . . . . . . . . . . . . . . . . . . . . . . . . . . . . . . . . . . . . . . .2
Ambient conditions . . . . . . . . . . . . . . . . . . . . . . . . . . . . . . . . . . . . . . . . . .2
Power supply . . . . . . . . . . . . . . . . . . . . . . . . . . . . . . . . . . . . . . . . . . . . . .2
Rechargeable batteries . . . . . . . . . . . . . . . . . . . . . . . . . . . . . . . . . . . . . . .2
Medical equipment . . . . . . . . . . . . . . . . . . . . . . . . . . . . . . . . . . . . . . . . . .2
Disposal . . . . . . . . . . . . . . . . . . . . . . . . . . . . . . . . . . . . . . . . . . . . . . . . . .2
Declaration of Conformity . . . . . . . . . . . . . . . . . . . . . . . . . . . . . . . . . . . . .3
2 Preparing the Walkie-Talkies for Use . . . . . . . . . . . . . . . . . . . . . . .4
Safety information . . . . . . . . . . . . . . . . . . . . . . . . . . . . . . . . . . . . . . . . . . .4
Checking the package contents . . . . . . . . . . . . . . . . . . . . . . . . . . . . . . . .4
Belt clip . . . . . . . . . . . . . . . . . . . . . . . . . . . . . . . . . . . . . . . . . . . . . . . . . . .4
Inserting the batteries . . . . . . . . . . . . . . . . . . . . . . . . . . . . . . . . . . . . . . . .4
Charging the batteries . . . . . . . . . . . . . . . . . . . . . . . . . . . . . . . . . . . . . . .5
3 Operating Elements . . . . . . . . . . . . . . . . . . . . . . . . . . . . . . . . . . . . .7
4 Operating the Walkie-Talkies . . . . . . . . . . . . . . . . . . . . . . . . . . . . . .8
Switching the walkie-talkie on/off . . . . . . . . . . . . . . . . . . . . . . . . . . . . . . .8
Volume control . . . . . . . . . . . . . . . . . . . . . . . . . . . . . . . . . . . . . . . . . . . . .8
Transmitting and receiving . . . . . . . . . . . . . . . . . . . . . . . . . . . . . . . . . . . .8
Transmit ringing tone . . . . . . . . . . . . . . . . . . . . . . . . . . . . . . . . . . . . . . . .8
Selecting a channel . . . . . . . . . . . . . . . . . . . . . . . . . . . . . . . . . . . . . . . . .9
Selecting the CTCSS code . . . . . . . . . . . . . . . . . . . . . . . . . . . . . . . . . . . .9
Selecting the DCS code . . . . . . . . . . . . . . . . . . . . . . . . . . . . . . . . . . . . .10
Monitoring the current channel . . . . . . . . . . . . . . . . . . . . . . . . . . . . . . . .11
VOX mode . . . . . . . . . . . . . . . . . . . . . . . . . . . . . . . . . . . . . . . . . . . . . . .11
Scanning channels . . . . . . . . . . . . . . . . . . . . . . . . . . . . . . . . . . . . . . . . .12
Scanning subchannels (CTCSS) . . . . . . . . . . . . . . . . . . . . . . . . . . . . . .12
Scanning DCS . . . . . . . . . . . . . . . . . . . . . . . . . . . . . . . . . . . . . . . . . . . .12
Selecting the ringing tone . . . . . . . . . . . . . . . . . . . . . . . . . . . . . . . . . . . .13
Roger Beep . . . . . . . . . . . . . . . . . . . . . . . . . . . . . . . . . . . . . . . . . . . . . . .13
Key Tone . . . . . . . . . . . . . . . . . . . . . . . . . . . . . . . . . . . . . . . . . . . . . . . . .13
Dual Watch Mode . . . . . . . . . . . . . . . . . . . . . . . . . . . . . . . . . . . . . . . . . .14
Key Lock . . . . . . . . . . . . . . . . . . . . . . . . . . . . . . . . . . . . . . . . . . . . . . . . .15
Stop Watch . . . . . . . . . . . . . . . . . . . . . . . . . . . . . . . . . . . . . . . . . . . . . . .15
Headset . . . . . . . . . . . . . . . . . . . . . . . . . . . . . . . . . . . . . . . . . . . . . . . . . .15
5 Appendix . . . . . . . . . . . . . . . . . . . . . . . . . . . . . . . . . . . . . . . . . . . . .16
In Case of Problems . . . . . . . . . . . . . . . . . . . . . . . . . . . . . . . . . . . . . . . .16
Pin assignment for the headset jack . . . . . . . . . . . . . . . . . . . . . . . . . . .16
Technical Properties . . . . . . . . . . . . . . . . . . . . . . . . . . . . . . . . . . . . . . . .17
Maintenance / Guarantee . . . . . . . . . . . . . . . . . . . . . . . . . . . . . . . . . . . .17
Contents
GB
1
Page 22

PMR 46 GB_041212_dtp 04.12.12 12:33 Seite 2
Safety Information
1 Safety Information
Please read this operating instruction manual thoroughly.
Intended use
These walkie-talkies have been conceived for communication with other
walkie-talkies complying to the same standards. Any other use is considered unintended use. Unauthorised modification or reconstruction is not permitted. Under no circumstances open the devices or complete any repair
work yourself.
Ambient conditions
Prevent excessive exposure to smoke, dust, vibration, chemicals, moisture,
heat and direct sunlight.
Do not use the walkie-talkies in potentially explosive areas.
Power supply
a Caution: Only use the power adapter plug supplied because other
power supplies could damage the walkie-talkie equipment.
Ensure access to the power adapter plug is not obstructed by furniture or
such.
Rechargeable batteries
a Caution: Never throw batteries into a fire. Only use batteries of the
same type! Pay attention to correct polarity. Incorrect polarity of the
batteries represents a risk of explosion during charging.
Medical equipment
a Caution: Never use the walkie-talkies in the vicinity of medical
equipment. Effects on such equipment cannot be fully ruled out. Walkietalkies can cause an unpleasant humming sound in hearing aids.
Disposal
In order to dispose of your device, take it to a collection point
provided by your local public waste authorities (e.g. recycling
centre). According to laws on the disposal of electronic and
electrical devices, owners are obliged to dispose of old elec-
2
Page 23

PMR 46 GB_041212_dtp 04.12.12 12:33 Seite 3
tronic and electrical devices in a separate waste container.
The adjacent symbol indicates that the device must not be
disposed of in normal domestic waste!
Batteries represent a hazard to both health and the environment! Never open, damage or swallow batteries, nor
allow them to get into the environment.
They may contain toxic and ecologically hazardous heavy
metals. You are legally obliged to dispose of batteries at the
point of sale or at appropriate collection points provided by
your local public waste authorities. Disposal is free of charge.
The adjacent symbols indicate that batteries must not be disposed of in normal domestic waste and but at authorised collection points.
Packaging materials must be disposed of according to local
regulations.
a Caution: The apparatus shall not be exposed to dripping or
splashing and that no objects filled with liquids, such as vases,
shall be placed on the apparatus.
Declaration of Conformity
This device fulfils the requirements stipulated in the EU directives:
- 1999/5/EU directive on radio equipment and telecommunications
terminal equipment and the mutual recognition of their conformity.
- 2005/32/EU directive “Energy-using products“.
Safety Information
Conformity with the above mentioned directive is confirmed by the CE
symbol on the device.
Please refer to the free download in our Website www.audioline.de
complete declaration of conformity.
This product has been developed for use within Germany. It operates on
an EU-harmonised frequency band (446 MHz) and, thus, may be used
outside Germany in all other EU member states.
for
GB
3
Page 24

PMR 46 GB_041212_dtp 04.12.12 12:33 Seite 4
Preparing the Walkie-Talkies for Use
2 Preparing the Walkie-Talkies for Use
Safety information
a Caution: It is essential to read the Safety Information in
Chapter 1 before starting up.
Checking the package contents
The package contains:
- 2 walkie-talkies with belt clip - 1 operating manual
- 6 rechargeable batteries - a power adapter with charging
AAA / 600 mAh NiMH plug
Belt clip
For removing the belt clip insert your finger nail
and pull up the belt clip latch away from the unit.
While pulling the belt clip latch push up the belt
clip as shown.
For attaching the belt clip slide it into the slot
until a “click“ indicates that it is locked into it’s
position.
Inserting the batteries
Open the battery compartment cover.
Insert the batteries supplied.
Pay attention to correct polarity.
Close the battery compartment cover.
a Caution: Only use the batteries supplied or ones of the same type.
Danger of explosion if battery is incorrectly replaced.
Batteries shall not be exposed to excessive heat such as sunshine,fire or
the like.
4
Page 25

PMR 46 GB_041212_dtp 04.12.12 12:33 Seite 5
Preparing the Walkie-Talkies for Use
Charging the batteries
Connect the charging station to the mains. For safety reasons, only use
the power adapter plug supplied.
Before using the walkie-talkies for the first time, charge them for at least 14
hours. When the walkie-talkies are connected correctly, the red LEDs light up.
The LEDs only signal that
the connection is correct
and continue to light up
even when the battery
packs are fully charged.
Disconnect the units after that time to extend the batteries’ life.
Always turn off the PMR units when charging. This will shorten the charging time.New batteries take up to 14 hours to fully charge.
a Caution: Do not charge the walkie-talkies with charging units from
other manufacturers.
The current battery charge status is indicated in the display:
Full Half empty Low Empty
As soon as the indicator flashes in the display and acoustic warning
signals are issued, the batteries needs to be recharged.
GB
5
Page 26

PMR 46 GB_041212_dtp 04.12.12 12:33 Seite 6
Preparing the Walkie-Talkies for Use
Alternatively you can charge each
PMR by connecting the charger
directly.
Lift the charge socket cover located
on the upper side of the handset and
Insert the round connector of the
9.0V DC/300mA adaptor into the
charge jack.
Always turn off the PMR units when
charging. This will shorten the charging time.
Headset jack
Charger jack
6
Page 27

1
3
4
6
10
9
8
5
7
2
1
2
3
4
5
10
11
12
13
6 7 8 9
PMR 46 GB_041212_dtp 04.12.12 12:33 Seite 7
3 Operating Elements
Handset
1 Antenna
2 Connection socket for headset/
charger
3 Display
4 PTT button
5 On/Off key
6 Up/Down Keys for changing
channels, volume and other
settings
7 Microphone
8 Loudspeaker
9 Transmit ring tone
10 Menu key
Display
1 DCS activated (Advanced Digital Code)
2 CTCSS activated (sub channel)
3 Scan mode
4 Send
5 Receive
6 Battery charge capacity
7 Key lock
8 Call signal activated
9 Volume
10 Channel
11 Dual watch function activated
12 VOX mode
13 Subchannel (CTCSS) or Code (DCS)
Operating elements
GB
7
Page 28

PMR 46 GB_041212_dtp 04.12.12 12:33 Seite 8
Operating the Walkie-Talkies
4 Operating the Walkie-Talkies
Switching the walkie-talkie on/off
For switching on the walkie-talkie press and hold down
the menu key. A special “beep" sound will be heard and
the LCD screen will display the current channel.
For switching off the walkie-talkie press and hold down
the menu key. A special “beep" sound will be heard and
the LCD screen will turn blank.
Volume control
/
Transmitting and receiving
Transmitting Press the PTT button. TX will be displayed on the LCD
☞ Hold the walkie-talkie approx. 5 to 7 cm from your mouth, wait for
approx. 1 second and speak at a normal volume. In order to talk to other
subscribers, the respective walkie-talkies must be set to the same channel.
Press ▲ or ▼ to increase or decrease the volume.
screen.
Receiving The unit is continuously in receive mode when the unit is
☞ Radio signals cannot be received when the PTT button is being
pressed.
Transmit ringing tone
The ringing tone indicates to other subscribers that you want to talk to
them. A condition for this is that the other subscribers are using the same
channel.
8
turned ON and not transmitting. When a signal is received on the current channel, the receive signal icon
will be displayed on the LCD screen.
Send ringing tone.
RX
Page 29

PMR 46 GB_041212_dtp 04.12.12 12:33 Seite 9
Operating the Walkie-Talkies
Selecting a channel
Press the menu key.
/
Channel Frequency (MHz) Channel Frequency (MHz)
1 446.00625 5 446.05625
2 446.01875 6 446.06875
3 446.03125 7 446.08125
4 446.04375 8 446.09375
Selecting the CTCSS code
CTCSS: Continous Tone Coded Squelch System
All the calls on walkie-talkies which occur within the range of reception are
signalled. A condition for this is that all the walkie-talkies are set to the
same channel. To prevent mutual interference, a CTCSS code can be
defined for the set channel. 38 CTCSS codes can be set per channel.
Note: CTCSS- and DCS-codes can only be used alternatively.
2 x Press the menu key twice.
/
☞ Each CTCSS code complies to a specific tone frequency transmitted
by the walkie-talkie. Communication between the subscribers is only then
possible when both parties are using the same channel and CTCSS code.
An exception is CTCSS code “00” (= OF / off). In the case of this setting,
all the calls on the set channel can be heard regardless of the CTCSS
code. To be able to participate in the radio communication, it may be
necessary to switch from CTCSS code “00” to the CTCSS code being
used.
Press ▲ or ▼ to select the desired channel.
Press the PTT button to confirm.
Select the CTCSS code and confirm with the PTT but-
ton.
If you want to communicate with the walkie-talkies which are not
using a CTCSS, you must select CTCSS code “00” on your walkie-talkie.
GB
9
Page 30

PMR 46 GB_041212_dtp 04.12.12 12:33 Seite 10
Operating the Walkie-Talkies
CTCSS frequency (Hz) CTCSS frequency (Hz)
1 67,0 20 131,8
2 71,9 21 136,5
3 74,4 22 141,3
4 77,0 23 146,2
5 79,7 24 151,4
6 82,5 25 156,7
7 85,4 26 162,2
8 88,5 27 167,9
9 91,5 28 173,8
10 94,8 29 179,9
11 97,4 30 186,2
12 100,0 31 192,8
13 103,5 32 203,5
14 107,2 33 210,7
15 110,9 34 218,1
16 114,8 35 225,7
17 118,8 36 233,6
18 123,0 37 241,8
19 127,3 38 250,3
Selecting the DCS code
DCS = Advanced Digital Code
Alternatively to the above mentioned CTCSS code the unit offers 83 DCS
codes to let you set up group of users for more secured private communication. Please note that every subscriber has to set the same DCS code.
Note: DCS- and CTCSS-codes can only be used alternatively.
3 x Press the menu key 3 times.
/
Select the DCS code and confirm with the PTT button.
10
Page 31

PMR 46 GB_041212_dtp 04.12.12 12:33 Seite 11
Operating the Walkie-Talkies
Monitoring the current channel
Normally the walkie-talkie will not pick up very weak signals. But you can
monitor the current channel for all sounds.
+
Press the menu key and the key ▼simultaneously.
RX appears on the display.
Press the menu key again to stop monitoring.
VOX mode
VOX = Voice operated transmission.
In VOX mode your handset will transmit whenever it detects your voice (or
other noise) without the PTT button having to be pressed.
When turning on the VOX mode you will set the sensitivity. At the highest
level (3), the handset will pickup softer noise (including background noise);
at the lowest level, it will pick up only quite loud noise.
☞ When you start to speak, there is a slight delay before the walkie-talkie
starts to transmit. If no noise is detected for approx. 2 seconds the
transmission will be cut off.
VOX operation is not recommended if the PMR will be used in a noisy or
windy environment.
4 x Press the menu key 4 times.
VOX is displayed and „OF“ flashes on the display.
/
Select the sensitivity (3 Levels) using the up/down keys
and confirm by pressing the PTT button.
As long as the handset is in VOX mode, VOX will display
steadily on the display.
For deactivating the VOX mode select “OF“ instead of a
sensitivity and confirm by pressing the PTT button.
11
GB
Page 32

PMR 46 GB_041212_dtp 04.12.12 12:33 Seite 12
Operating the Walkie-Talkies
Scanning channels
When the Scan function is turned on, the handset will continuously scan
through all eight channels until it finds one on which another user is transmitting.
5 x Press the menu key 5 times.
/
/
Scanning subchannels (CTCSS)
With this function activated the handset will continuously scan through all
subchannels (CTCSS) for the preset channel until it finds one on which
another user is transmitting.
6 x Press the menu key 6 times.
/
/
Press ▲ or ▼ to start scanning.
When a signal is detected the unit will pause.
Press ▲ or ▼ to continue scanning.
Press the PTT button to communicate or to quit scanning
mode.
Press ▲ or ▼ to start scanning.
When a signal is detected the unit will pause.
Press ▲ or ▼ to continue scanning.
Press the PTT button to communicate or to quit scanning
mode.
Scanning DCS
12
With this function activated the handset will continuously scan through all
DCS channels for the preset channel until it finds one on which another
user is transmitting.
7 x Press the menu key 7 times.
/
Press ▲ or ▼ to start scanning.
When a signal is detected the unit will pause.
Page 33

PMR 46 GB_041212_dtp 04.12.12 12:33 Seite 13
Operating the Walkie-Talkies
/
Press ▲ or ▼ to continue scanning.
Press the PTT button to communicate or to quit scanning
mode.
Selecting the ringing tone
There are 10 ringing tones available for selection.
8 x Press the menu key 8 times.
/
Select the ringing tone. Confirm with the PTT button.
Roger Beep
The Roger Beep is a tone which is automatically transmitted whenever the
PTT button is released. This alerts the receiving party to inform that you
have intentionally ended the transmission, and you are now in receive
mode.
9 x Press the menu key 9 times.
/
Select “ON“ or “OF“ and confirm by pressing the PTT
button.
Key Tone
This feature allows the PMR to emit a confirmation tone after pressing
each button.
10 x Press the menu key 10 times.
/
Select “ON“ or “OF“ and confirm by pressing the PTT
button.
13
GB
Page 34

PMR 46 GB_041212_dtp 04.12.12 12:33 Seite 14
Operating the Walkie-Talkies
Dual Watch Mode
With the dual watch mode activated two channels of your choice are watched alternately. If a signal on one of these channels is detected the dual
watch mode is interrupted and you can take part in the communication on
this channel.
/
11 x Press the menu key 11 times. DCM appears on the dis-
/
/
/
Select the first channel (current channel).
play and „OF“ is flashing.
Select the second channel.
Press the PTT button to start the dual watch mode
or
Press the menu key.
Select the CTCSS code for the second channel.
Press the PTT button to start the dual watch mode
or
Press the menu key.
Select the DCS code for the second channel.
Press the PTT button to start the dual watch mode.
14
For deactivating the Dual Watch Mode press the menu
key 11 times, select “OF“ and press the PTT button.
Page 35

PMR 46 GB_041212_dtp 04.12.12 12:33 Seite 15
Operating the Walkie-Talkies
Key Lock
The Key Lock feature allows user to disable the keys ▲, ▼ and the menu
key so that the PMR settings could not be changed accidentally.
appears on the display. All other functions such as sending, receiving or
swiching off the unit can be used.
To activate key lock
Press and hold the menu key until the respective icon
appears on the display.
To deactivate key lock
Press and hold the menu key until the respective icon
disappears.
Stop Watch
Note: When Dual Watch Mode is activated this feature is not accessible.
Press and hold the call key for approx. 3 seconds.
Press ▲ to start the stop watch.
Press ▲ again to stop.
For resetting the stop watch press ▼.
Press and hold down the call key for approx. 3 seconds
to exit the function.
Headset
You can use the headset enclosed with the equipment to be able to work
faster, for example. Clip the walkie-talkie on the belt so that you have both
hands free. Since the headset supplied is equipped with an additional PTT
button, you can transmit simply by using the PTT button on the headset.
CAUTION: E
can cause hearing loss.
xcessive sound pressure from earphones and headphones
GB
15
Page 36

PMR 46 GB_041212_dtp 04.12.12 12:33 Seite 16
Appendix
5 Appendix
In Case of Problems
Should problems arise with the walkie-talkies, please refer to the following
information first. In the case of claims under the terms of guarantee, contact your sales outlet. There is a 2 year period of guarantee.
Problems and solutions
Problems Solutions
Equipment does
not function - Batteries have not been charged
- Key lock has been activated
Transmission not
possible - Press PTT button in fully to transmit
- Channel is being used by other
subscribers
No reception - Release PTT button
- Volume setting is too low
- You are outside the range of
reception, change your position
- Obstructions such as trees and
buildings impair the range
- CTCSS / DCS code set is not identical to that
of the other party
- Channel is being used by other
subscribers
Pin assignment for the headset jack
If you want to connect a headset instead of the one supplied please take
care for the correct pin assignment (refer to the diagram).
3-pin, 2.5 mm stereo jack plug
1 = Microphone
2 = Loudspeaker
3 = Earth
16
Page 37

PMR 46 GB_041212_dtp 04.12.12 12:33 Seite 17
Technical Properties
Feature Value
Output power 0.5 W
Range Up to 8 km in open space
Using time Up to 14 h (based on 5 %
“send“, 5 % “receive“ and 90 %
stand-by-time)
Max. talk time Up to 100 min
Charging time approx. 10 h
Batteries 3 x NiMH 1.2 V, 600 mAh
Power supply Input: 230 / 240 V, 50 Hz, 36 mA
Output: 9 V, 300 mA DC
Maintenance / Guarantee
Maintenance
Clean the housing surfaces with a soft, fluff-free cloth.
Never use cleaning agents or solvents.
Guarantee
AUDIOLINE equipment is produced and tested according to the latest production methods. The implementation of carefully chosen materials and
highly developed technologies ensure trouble-free functioning and a long
service life. The terms of guarantee do not apply to the batteries or power
packs used in the products.
The period of guarantee is 24 months from the date of purchase.
All deficiencies resulting from material or production faults which occur
during the period of guarantee will be eliminated free of charge.
Rights to claims under the terms of guarantee are annulled following intervention by the purchaser or third parties. Damage caused as a result of
improper handling or operation, incorrect positioning or storing, improper
connection or installation, Acts of God or other external influence are not
covered by the terms of guarantee. In the case of complaints, we reserve
the right to repair or replace defect parts or provide a replacement device.
Replacement parts or devices become our property. Rights to compensation in the case of damage are excluded where there is no evidence of
Appendix
GB
17
Page 38

PMR 46 GB_041212_dtp 04.12.12 12:33 Seite 18
Appendix
intent or gross negligence by the manufacturer.
If your device shows signs of defect during the period of guarantee, please
return it to the sales outlet in which you purchased the AUDIOLINE device
together with the purchase receipt. All rights to claims under the terms of
guarantee in accordance with this agreement must be asserted exclusively
with regard to your sales outlet.
Two years after the purchase and transfer of our products, claims under
the terms of guarantee can no longer be asserted.
18
Page 39

PMR 46 DE_041212_dtp 04.12.12 12:31 Seite U3
Page 40

4250711991111
PMR 46 DE_041212_dtp 04.12.12 12:31 Seite U4
Wichtige Garantiehinweise
Die Garantiezeit für Ihr AUDIOLINE-Produkt beginnt mit dem Kaufdatum. Ein
Garantieanspruch besteht bei Mängeln, die auf Material- oder Herstellungsfehler
zurückzuführen sind. Der Garantieanspruch erlischt bei Eingriffen durch den Käufer
oder durch Dritte. Schäden, die durch unsachgemäße Behandlung oder Bedienung,
natürliche Abnutzung, durch falsches Aufstellen oder Aufbewahren, durch unsachgemäßen Anschluss oder Installation sowie durch höhere Gewalt oder sonstige
äußere Einflüsse entstehen, fallen nicht unter die Garantieleistung.
BITTE WENDEN SIE SICH IM GARANTIEFALL AUSSCHLIESSLICH AN DEN
HÄNDLER, BEI DEM SIE DAS GERÄT GEKAUFT HABEN, UND VERGESSEN
SIE NICHT, DEN KAUFBELEG VORZULEGEN. UM UNNÖTIG LANGE WARTEZEITEN ZU VERMEIDEN, SENDEN SIE REKLAMATIONSGERÄTE BITTE NICHT
AN UNSERE BÜROADRESSE.
BEI FRAGEN ZUR BEDIENUNG UND GARANTIELEISTUNG LESEN SIE BITTE
DIE BEDIENUNGSANLEITUNG, FRAGEN SIE IHREN FACHHÄNDLER ODER
WENDEN SIE SICH AN UNSERE
AUDIOLINE GmbH
Neuss
Internet: www.audioline.de
E-Mail: info@audioline.de
Version 1.0 • 04.12.2012
Service Hotline
Die Rufnummer der Service-Hotline finden Sie auf unserer Internetseite www.audioline.de
 Loading...