

Page 1
Schnurloses DECT Telefon
Cordless DECT telephone
Bedienungsanleitung
Operating Instructions
Oyster200
Page 2

2
Oyster200
Bedienungsanleitung 3. . . . . . . . . . . . . . . . . . . . . . . . . .
Operating Instructions 25. . . . . . . . . . . . . . . . . . . . . . . . .
2
Page 3

1
Inhaltsverzeichnis
1 Sicherheitshinweise 4. . . . . . . . . . . . . . . . . . . . . .
2 Telefon in Betrieb nehmen 5. . . . . . . . . . . . . . . . . .
3 Bedienelemente 7. . . . . . . . . . . . . . . . . . . . . . . . .
4 Wie bediene ich mein Telefon? 8. . . . . . . . . . . . . . .
5 Telefonieren 11. . . . . . . . . . . . . . . . . . . . . . . . . . . .
6 Nebenstellenanlagen / CLIP 13. . . . . . . . . . . . . . . . .
7 Menüstruktur 14. . . . . . . . . . . . . . . . . . . . . . . . . . .
8 Rufnummernspeicher 17. . . . . . . . . . . . . . . . . . . . .
9 Anrufliste 18. . . . . . . . . . . . . . . . . . . . . . . . . . . . . .
10 Besondere Funktionen 19. . . . . . . . . . . . . . . . . . . . .
11 Erweitern des Telefonsystems 20. . . . . . . . . . . . . . .
12 Falls es Probleme gibt 21. . . . . . . . . . . . . . . . . . . . .
13 Technische Eigenschaften 22. . . . . . . . . . . . . . . . . .
14 Pflegehinweise / Garantie 23. . . . . . . . . . . . . . . . . .
15 Stichwortverzeichnis 24. . . . . . . . . . . . . . . . . . . . . .
3
Page 4
Sicherheitshinweise
1 Sicherheitshinweise
Lesen Sie diese Bedienungsanleitung sorgfältig durch.
Bestimmungsgemäße Verwendung
Dieses Telefon ist geeignet für das Telefonieren innerhalb eines Telefonnetzes. Jede andere Verwendung gilt als nicht bestimmungsgemäß. Eigenmächtige Veränderungen oder
Umbauten sind nicht zulässig. Öffnen Sie das Gerät in keinem Fall selbst und führen Sie
keine eigenen Reparaturversuche durch.
Aufstellungsort
Vermeiden Sie Belastungen durch Rauch, Staub, Erschütterungen, Chemikalien, Feuchtigkeit, Hitze oder direkte Sonneneinstrahlung.
Verwenden Sie das Mobilteil nicht in explosionsgefährdeten Bereichen.
Netzteil
Achtung: Verwenden Sie nur das mitgelieferte Steckernetzteil, da andere Netz-
teile das Telefon beschädigen können. Sie dürfen den Zugang zum Steckernetzteil nicht durch Möbel oder andere Gegenstände versperren.
Aufladbare Akkus
Achtung: Werfen Sie Akkus nicht ins Feuer und tauchen Sie sie nicht ins
Wasser.
Stromausfall
Bei Stromausfall kann mit dem Telefon nicht telefoniert werden. Halten Sie für Notfälle ein
schnurgebundenes Telefon bereit, welches ohne externe Stromversorgung arbeitet.
Medizinische Geräte
Achtung: Benutzen Sie das Telefon nicht in der Nähe von medizinischen Gerä-
ten. Eine Beeinflussung kann nicht völlig ausgeschlossen werden.
DECT1−Telefone können in Hörgeräten einen unangenehmen Brummton verursachen.
Entsorgung
Wollen Sie Ihr Gerät entsorgen, bringen Sie es zur Sammelstelle Ihres kommunalen Entsorgungsträgers (z.B. Wertstoffhof). Das nebenstehende Symbol bedeutet, daß Sie das Gerät auf keinen Fall in den Hausmüll werfen dürfen! Nach
dem Elektro− und Elektronikgerätegesetz sind Besitzer von Altgeräten gesetzlich
gehalten, alte Elektro− und Elektronikgeräte einer getrennten Abfallerfassung
zuzuführen.
Akkus entsorgen Sie beim batterievertreibenden Handel sowie bei zuständigen
Sammelstellen, die entsprechende Behälter bereitstellen. Verpackungs-
materialien entsorgen Sie entsprechend den lokalen Vorschriften.
1
DECT: Digital Enhanced Cordless Telecommunication = Standard für kabellose Tele-
fone.
4
Page 5

Telefon in Betrieb nehmen
2 Telefon in Betrieb nehmen
Sicherheitshinweise
Achtung: Lesen Sie vor der Inbetriebnahme unbedingt die Sicherheitshinweise
in Kapitel 1.
Verpackungsinhalt prüfen
Zum Lieferumfang gehören:
− eine Basisstation mit Netzteil − ein Telefonanschlusskabel
− ein Mobilteil − ein Akkupack
− eine Bedienungsanleitung
Basisstation anschließen
Achtung: Stellen Sie die Basisstation mit einem Mindestabstand von 1 m zu an-
deren elektronischen Geräten auf, da es sonst zu gegenseitigen Störungen kommen kann.
Schließen Sie die Basisstation wie auf der Skizze abgebildet an. Verwenden Sie aus Sicherheitsgründen nur das mitgelieferte Netzteil sowie das beigefügte Telefonanschlusskabel.
Netzsteckdose
Telefonanschlussdose
5
Page 6
Telefon in Betrieb nehmen
Akkus einlegen
Legen Sie das Akkupack in das geöffnete Akkufach und stecken Sie den Stecker in die
Anschlussbuchse. Legen Sie das Anschlusskabel in den grauen Bereich entlang des Akkupacks. Verwenden Sie beim Austauschen
nur Akkupacks des gleichen Typs. Schließen
Sie das Akkufach.
Akkus aufladen
Stellen Sie das Mobilteil bei der ersten Inbetriebnahme für mindestens 14 Stunden in die
Basisstation / Ladestation.
Sie können das Mobilteil im zugeklappten oder aufgeklappten Zustand in die Ba-
Haben Sie das Mobilteil richtig in die Basisstation gestellt, ertönt ein Hinweissignal und
die Ladekontrollleuchte leuchtet. Das Mobilteil erwärmt sich beim Laden. Dies ist normal
und ungefährlich. Laden Sie das Mobilteil nicht mit fremden Aufladegeräten. Der aktuelle
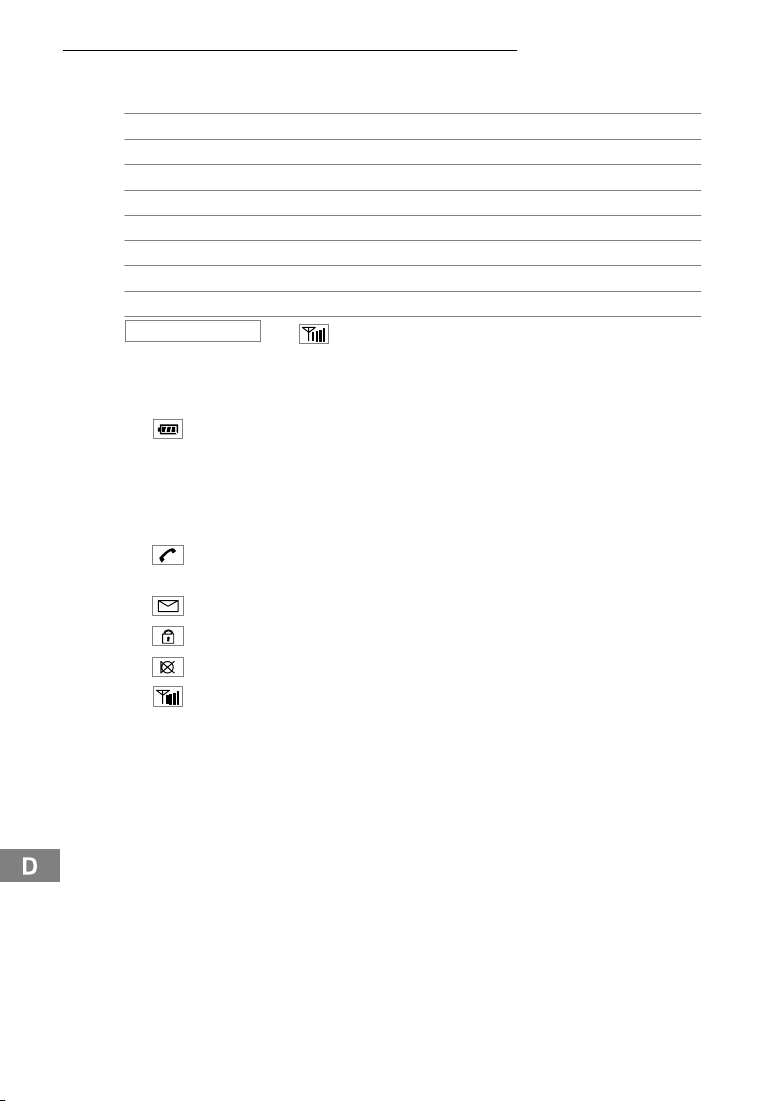
Akkuladezustand wird im Display angezeigt:
2
sisstation stellen.
Voll Halb Schwach Leer
Uhrzeit des Mobilteils einstellen
Die Uhrzeit stellen Sie über das Menü ein. Auf Seite 16 finden Sie die Position im Menü.
Nebenstellenanlagen
Auf Seite 13 erhalten Sie weitere Informationen, falls Sie Ihr Telefon an einer Nebenstellenanlage anschließen möchten.
6
Page 7
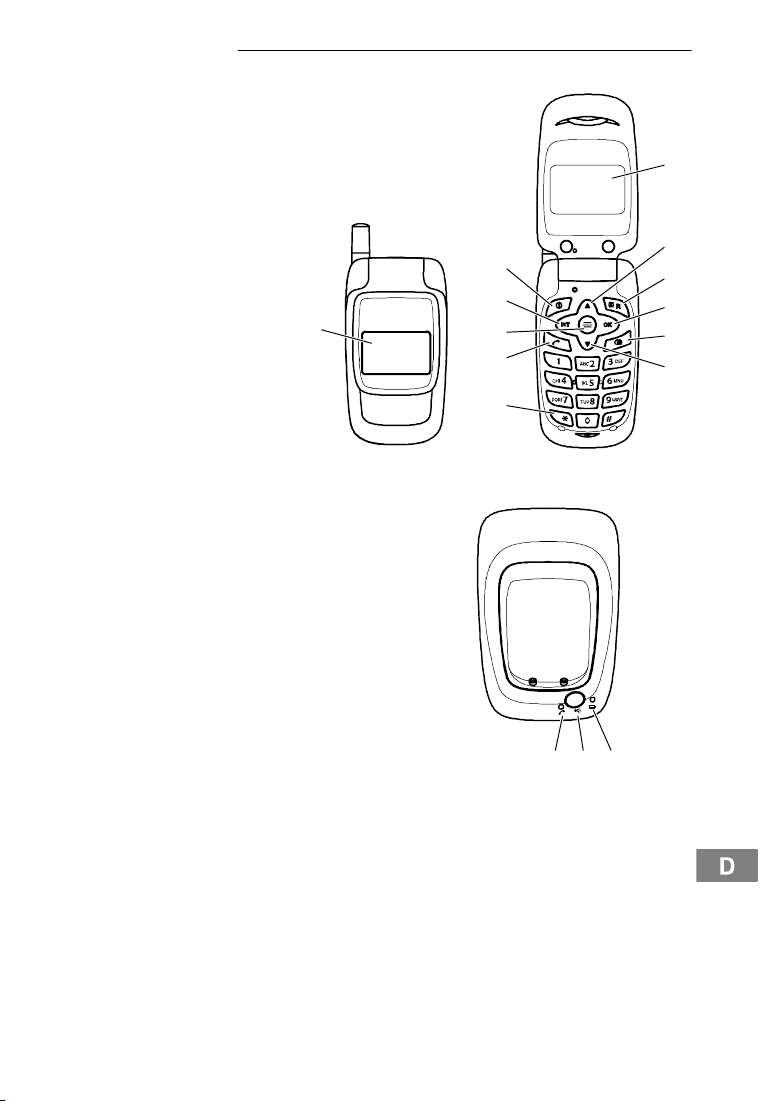
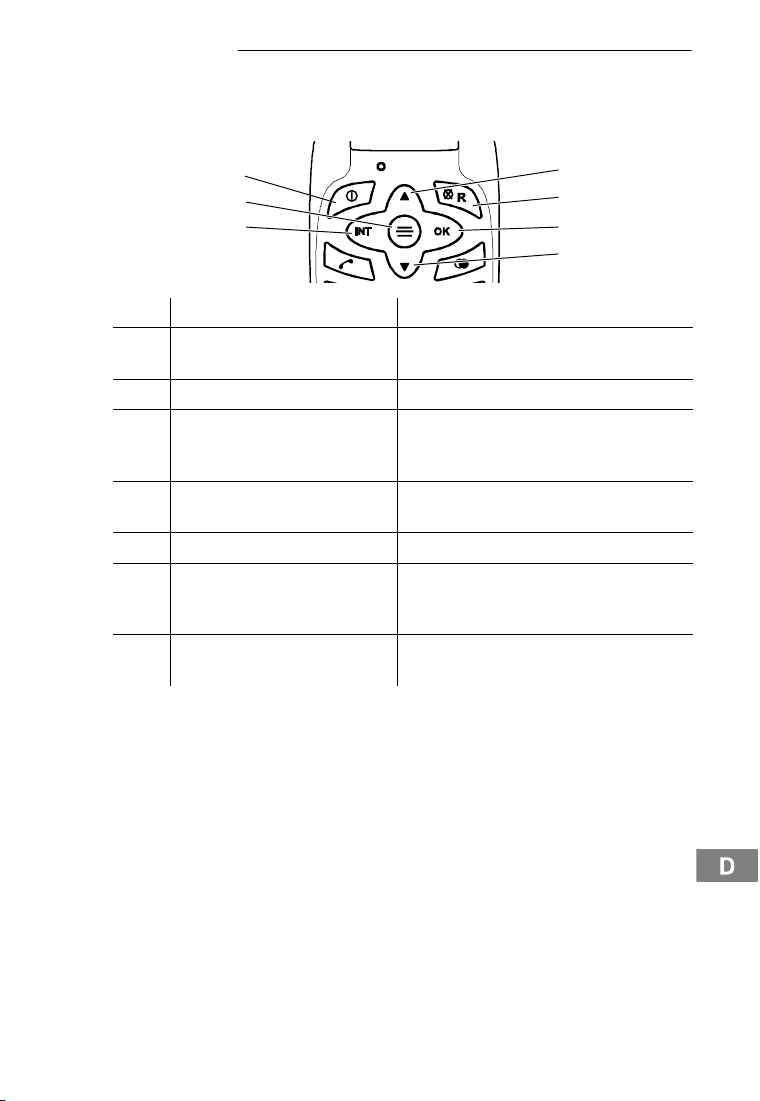
3 Bedienelemente
Mobilteil
1 Display 1 (außen)
2 Display 2 (innen)
3 Rufnummernspeicher öffnen / Aufwärts bewegen
4 R−Taste / Löschen
5 OK−Taste
6 Wahlwiederholung /
Wahlpause
7 Rufnummernspeicher
öffnen / Abwärts bewegen
8 Temporäre Tonwahl
9 Gesprächstaste
10 Menütaste
11 Interngespräche /
Mikrofon stummschalten
12 Tastensperre /
Mobilteil aus− / einschalten
Basisstation
1 LED Gesprächsanzeige
2 Pagingtaste (Mobilteil suchen)
3 LED Akkuladekontrollanzeige
1
Bedienelemente
12
11
10
9
8
2
3
4
5
6
7
21 3
Die Tasten werden in dieser Bedienungsanleitung mit einer einheitlichen Kontur abgebildet. Abweichungen von Tastensymbolen Ihres Telefons gegenüber den hier abgebildeten Tastensymbolen sind möglich.
7
Page 8
Wie bediene ich mein Telefon?
4 Wie bediene ich mein Telefon?
Darstellungen und Schreibweisen
ë Nummern eingeben
* Abgebildete Taste kurz drücken
2 sec * Abgebildete Taste 2 Sekunden drücken
halten * Abgebildete Taste halten
loslassen * Abgebildete Taste loslassen
{í} Mobilteil klingelt
è Mobilteil aufklappen
é Mobilteil zuklappen
SPEICHERN NR
Symbole im Display
Display Beschreibung
MT1 Interne Rufnummer des Mobilteils Seite 20
13:23 Anzeige der Uhrzeit Seite 16
oder
Konstant: Anzeige der Batteriekapazität.
Blinkend: Laden Sie die Akkus.
Durchlaufende Segmente: Die Akkus werden geladen. Seite 6
Konstant: Sie führen ein Gespräch.
Blinkend: Es erreicht Sie ein Anruf. Seite 11
Es sind neue Anrufe in der Anrufliste. Seite 18
Die Tastensperre ist aktiviert. Seite 12
Das Mikrofon ist stummgeschaltet. Seite 12
Konstant: Die Verbindung zur Basisstation ist gut.
Blinkend: Die Verbindung zur Basisstation ist schwach. Nähern Sie sich
der Basisstation. Je mehr Balken das Symbol zeigt, desto besser ist die
Verbindung zur Basisstation.
Text oder Symbole im Display
8
Page 9
Wie bediene ich mein Telefon?
Navigationstasten
Alle Beschreibungen in dieser Bedienungsanleitung gehen davon aus, dass sich das Mobilteil im Standby−Modus befindet. Den Standby−Modus erreichen Sie durch Drücken der
Taste .
7
6
Taste Im Standby−Modus Im Menü
− öffnet den Rufnummern-
1
speicher
2 − eine Ebene zurück / Ziffern löschen
3 − öffnet Call by Call−Speicher
− öffnet den Rufnummernspei-
4
cher
5 − Interngespräche
6 − öffnet das Hauptmenü
− Tastensperre / Mobilteil aus− /
7
einschalten
− in den Menüs aufwärts blättern
− ändern von Einstellungen
− öffnet angezeigtes Menü
− Programmier− und Speichervorgänge
bestätigen
− in den Menüs abwärts blättern
− ändern von Einstellungen
− Programmier− und Speichervorgänge
abbrechen und in den Standby−Modus
zurückkehren
1
2
35
4
9
Page 10
Wie bediene ich mein Telefon?
Navigation im Menü
Alle Funktionen sind über unterschiedliche Menüs zu erreichen. Den Weg zur gewünschten Funktion entnehmen Sie der Menüstruktur. Seite 14
Hauptmenü öffnen
+ oder , Gewünschtes Untermenü auswählen
O Untermenü öffnen
+ oder , Gewünschte Funktion auswählen
O Funktion öffnen
+ oder , Gewünschte Einstellung auswählen
ë Über Tastenfeld Nummern eingeben
O Eingaben bestätigen
Löschen / eine Ebene zurück
Programmier− und Speichervorgänge abbrechen und
Jeder Vorgang wird automatisch abgebrochen, wenn innerhalb von 30 Sekun-
Einträge im Rufnummernspeicher erstellen − Beispiel
Wie Sie in den Menüs navigieren und Eingaben vornehmen, ist hier anhand des Beispiels
Einträge im Rufnummernspeicher erstellen, erklärt. Verfahren Sie bei allen Einstellungen wie bei diesem Beispiel.
Hauptmenü öffnen
+ oder ,
SPEICHERN NR
+ oder , z. B.:
ë, O Rufnummer eingeben und bestätigen
3
den keine Eingabe erfolgt.
, O Funktion auswählen und bestätigen
01−
in den Standby−Modus zurückkehren
4
Speicherplatz auswählen
10
Page 11
Telefonieren
5 Telefonieren
Anruf annehmen
{í}, è oder Anruf annehmen
Gespräch beenden
oder é Gespräch beenden
Anrufen
ë Rufnummer eingeben (max. 24 Ziffern)
Bei Falscheingabe letzte Ziffer löschen
Rufnummer wählen
Sie können auch zuerst die Gesprächstaste drücken und erhalten damit das Frei-
zeichen. Die eingegebenen Ziffern Ihrer gewünschten Rufnummer werden sofort
gewählt. Eine Korrektur einzelner Ziffern der Rufnummer ist bei dieser Form des
Gesprächaufbaus nicht möglich.
Wahlwiederholung
Ihr Telefon speichert die 10 zuletzt gewählten Rufnummern in einer Wahlwiederholungsliste.
£ Wahlwiederholungsliste öffnen
+ oder ,, Eintrag auswählen und Verbindung herstellen
Eingegangene Anrufe zurückrufen
Ihr Telefon speichert 10 eingegangene Anrufe in einer Anrufliste.
, + oder ,
ANRUFLISTE
+ oder ,, Eintrag auswählen und Verbindung herstellen
Rufnummern aus dem Rufnummernspeicher wählen
Sie müssen Rufnummern gespeichert haben. Seite 10 und 17
+ oder , Rufnummernspeicher öffnen
+ oder ,, Eintrag auswählen und Verbindung herstellen
Rufnummern direkt wählen
5
halten 0 Gewünschte Rufnummer wird direkt gewählt
Die Taste 0 wählt die Rufnummer vom Speicherplatz 0−", die Taste 1
Intern telefonieren
Interne Gespräche führen
Sie müssen zwei oder mehr Mobilteile (MT1, MT2, ...) an einer Basisstation angemeldet
haben, um interne, kostenlose Gespräche führen zu können.
MT1: I, z. B. 2 Interne Rufnummer des gewünschten Mobilteils
MT2: Internes Gespräch am anderen Mobilteil annehmen
MT1 / MT2: oder I Internes Gespräch beenden
, O Anrufliste öffnen
wählt die Rufnummer vom Speicherplatz 1−", usw.
6
wählen
11
Page 12
Telefonieren
Externe Gespräche intern weiterleiten
MT1: I, z. B 2 Während des externen Gesprächs interne Rufnummer
MT2: Internes Gespräch am anderen Mobilteil annehmen
MT1: Gespräch weiterleiten
Sollte sich das gerufene Mobilteil nicht melden, können Sie sich das externe
Gespräch durch Drücken Taste I wieder zurückholen.
Einstellen der Hörerlautstärke
Sie können während eines Gesprächs die Lautstärke in 3 Stufen anpassen.
+ oder , Gewünschte Lautstärke auswählen
Anzeige der Gesprächsdauer
Während eines Gesprächs wird die Gesprächsdauer in Stunden, Minuten und Sekunden
angezeigt.
Mikrofon im Mobilteil stummschalten
Sie können während eines Telefongesprächs das Mikrofon des Mobilteils aus− und einschalten.
I Mikrofon ausschalten (stummschalten)
I Mikrofon einschalten
Tastensperre
8
Tastensperre einschalten
Bei eingeschalteter Tastensperre können eingehende Anrufe wie gewohnt an-
genommen werden.
Tastensperre ausschalten
Mobilteil suchen (Paging)
Wenn Sie Ihr Mobilteil verlegt haben, können Sie es über einen Suchton leicht wiederfinden.
{«} Suchton starten
, è oder Suchton beenden
Mobilteil aus− und einschalten
Um die Akkus zu schonen, können Sie das Mobilteil ausschalten.
2 sec Mobilteil ausschalten
Mobilteil einschalten
wählen
7
12
Page 13
Nebenstellenanlagen / CLIP
6 Nebenstellenanlagen / CLIP
R−Taste an Nebenstellenanlagen
Ist Ihr Telefon an einer Nebenstellenanlage angeschlossen, können Sie über die R−Taste
Funktionen, wie z. B. Anrufe weiterleiten und automatischen Rückruf, nutzen. Ob Ihr Telefon an Ihrer Nebenstellenanlage einwandfrei funktioniert, erfahren Sie bei dem Händler,
bei dem die Anlage gekauft wurde.
Amtskennziffer
Bei Nebenstellenanlagen ist es erforderlich, eine Amtskennziffer vorzuwählen, um ein
Freizeichen zu bekommen. Speichern Sie die Amtskennziffer in Ihrem Mobilteil Seite
15. Bei einer Wahl aus der Anrufliste wird sie automatisch vor die Rufnummer gesetzt.
Wahlpause
Bei wenigen, älteren Nebenstellenanlagen dauert es einige Zeit, bis das Freizeichen zu
hören ist. Fügen Sie in diesem Fall eine Wahlpause ein. Sie können dann direkt weiterwählen, ohne das Freizeichen abwarten zu müssen.
2 sec £ Wahlpause einfügen
Nach der Amtskennzahl wartet Ihr Telefon für 3 Sekunden mit dem Wählen der eigentli-
chen Rufnummer.
Die Wahlpause kann auch bei der Eingabe von Rufnummern im Rufnummern-
speicher gespeichert werden.
Rufnummernanzeige (CLIP1)
Wenn diese Funktion an Ihrer Telefonleitung zur Verfügung steht, wird Ihnen bereits die
Rufnummer des Anrufers angezeigt, wenn das Telefon klingelt. Hat der Anrufer das Übertragen seiner Rufnummer unterdrückt, wird eine entsprechende Meldung angezeigt. Die
Rufnummer kann nicht angezeigt und somit auch nicht in der Anrufliste gespeichert werden.
Die Rufnummernanzeige ist ein optionaler Service Ihres Netzbetreibers. Fragen
Sie Ihren Netzbetreiber nach weiteren Informationen.
1
CLIP: Calling Line Identification Presentation
13
Page 14
Menüstruktur
7 Menüstruktur
Hauptmenü
In das Hauptmenü gelangen Sie durch Drücken der Taste . Wie Sie sich im Menü
bewegen und Eingaben vornehmen, zeigt Ihnen Seite 10.
SPEICHERN NR 0− ë Rufnummer
1−
...
ANRUFLISTE 10− O LOESCHEN
1−
...
CALL BY CALL 1− ë Rufnummer
2−
3−
TASTENTOENE TYP 1
TYP 2
AUS
RUFTON MELODIE TYP 1
TYP 2
...
RUFTON LAUT LEVEL 1
LEVEL 2
LEVEL 3
AUS
VIP TONRUF 2VIP TONRUF 1 ë Rufnummer TYP 1
VIP TONRUF 2 TYP 2
...
14
1
Für das Anzeigen und Speichern von Rufnummern in Anruflisten wird die Rufnummernanzeige (CLIP
Netzbetreibers. Fragen Sie Ihren Netzbetreiber nach weiteren Informationen. Weitere
Informationen über die Rufnummernanzeige Seite 13.
2
Hier können Sie zwei Rufnummern einer bestimmten Tonrufmelodie zuordnen. Ihr
Mobilteil meldet sich dann bei eingehenden Anrufen dieses Anrufers mit der eingestellten Tonrufmelodie. Für diese Funktion wird die Rufnummernanzeige (CLIP
3
CLIP: Calling Line Identification Presentation
3
) benötigt. Die Rufnummernanzeige ist ein optionaler Service Ihres
3
) benötigt.
Page 15
Menüstruktur
9
PIN AENDERN 1ë PIN [−−−−] ë NEU [−−−−] ë OK [−−−−]
WAHLHILFE
2
EIN
AUS
AMTSKENNZ
ANMELDEN
3
ë Amtskennziffer
4
ë PIN [−−−−] BASIS 1 SUCHEN
BASIS 2
BASIS 3
BASIS 4
012345" Oë AC − 0000
4
MT RESET ë PIN [−−−−] BESTAETIGEN
WWDH LÖSCH ë PIN [−−−−] BESTAETIGEN
LISTE LÖSCH ë PIN [−−−−] BESTAETIGEN
BASIS WAEHLE 5BESTE BASIS
BASIS 1
BASIS 2
BASIS 3
BASIS 4
WARTEN
1
Die Werkseinstellung des PIN−Codes ist "0000". Wenn Sie den PIN−Code ändern, bewahren Sie den neuen PIN−Code gut auf. Sollten Sie den PIN−Code vergessen oder
verloren haben, wenden Sie sich an unsere Service−Hotline Seite 21.
2
WAHLHILFE = Intelligente Rufnummernwahl. Weitere Informationen über besondere
Funktionen Seite 19.
3
Weitere Informationen über Nebenstellenanlagen Seite 13.
4
Weitere Informationen über das Anmelden von Mobilteilen Seite 20. Der AC−PIN
(Authentication Code) ist 0000" und nicht veränderbar.
5
Es werden alle Basisstationen angezeigt an die das Mobilteil angemeldet ist. Wählen
Sie eine Basisstation aus oder schalten Sie die automatische Wahl (BESTE BASIS)
von Basisstationen ein. Weitere Informationen Seite 20.
15
Page 16

Menüstruktur
10
BASIS MENU
ë PIN [−−−−] SPERRLISTE
1
1−
2−
3−
4−
5−
WAHLVERF
2
TON
PULSWAHL
UHRZEIT ë hh:mm
ABMELDEN
3
1 2 3 ...
16
1
Weitere Informationen zur Rufnummernsperre Seite 19.
2
Weitere Informationen zum Wahlverfahren Seite 19.
3 Hier können Sie angemeldete Mobilteile von Ihrer Basisstation abmelden. Weitere Informationen Seite 20.
Page 17

Rufnummernspeicher
8 Rufnummernspeicher
Im Rufnummernspeicher können Sie 10 Rufnummern speichern.
Einträge im Rufnummernspeicher erstellen
Hauptmenü öffnen
+ oder ,
SPEICHERN NR
+ oder , z. B.:
ë, O Rufnummer eingeben und bestätigen
, O Funktion auswählen und bestätigen
01−
Speicherplatz auswählen
Einträge im Rufnummernspeicher ändern
Hauptmenü öffnen
+ oder ,
SPEICHERN NR
+ oder , z. B.:
Ziffern löschen
ë, O Neue Rufnummer eingeben und bestätigen
, O Funktion auswählen und bestätigen
01−
Speicherplatz auswählen
Eintrag aus dem Rufnummernspeicher löschen
Hauptmenü öffnen
+ oder ,
SPEICHERN NR
+ oder , z. B.:
, O Ziffern löschen und bestätigen
, O Funktion auswählen und bestätigen
01−
Speicherplatz auswählen
11
12
17
Page 18

Anrufliste
9 Anrufliste
Insgesamt werden 10 Rufnummern in einer Anrufliste gespeichert. Wurde eine neue Ruf-
nummer gespeichert, erscheint das Symbol
Meldungen im Display:
im Display.
Beim Klingeln
des Telefons
UNBEKANNT −O− Die Rufnummer wurde nur teilweise oder fehler-
ANONYM −P− Der Anrufer hat das Senden seiner Rufnummer
In der Anrufliste
gespeichert
haft empfangen.
Die Information der Rufnummer ist nicht verfügbar.
Es könnte sich um ein internationales Gespräch
handeln.
unterdrückt.
Rufnummern aus der Anrufliste anzeigen
Hauptmenü öffnen
+ oder ,
ANRUFLISTE
+ oder , Gewünschten Eintrag auswählen
Die Anzeige ANRUF:" informiert Sie, wie oft der Anrufer angerufen hat. Nach An-
, O Anrufliste öffnen
zeige der Rufnummer wird auf Anzeige des Datums und der Uhrzeit des Anrufs
umgeschaltet.
Rufnummern aus der Anrufliste löschen
Einzelne Rufnummer löschen
Hauptmenü öffnen
+ oder ,
ANRUFLISTE
+ oder , Gewünschten Eintrag auswählen
O Löschvorgang aktivieren
LOESCHEN
LOESCHEN
, O Anrufliste öffnen
O Löschvorgang bestätigen
oder
Löschvorgang abbrechen
Alle Rufnummern löschen
Hauptmenü öffnen
+ oder ,
LISTE LÖSCH
PIN [−−−−] ë Aktuell eingestellten PIN−Code eingeben
BESTAETIGEN
BESTAETIGEN
, O Löschvorgang aktivieren
O Löschvorgang bestätigen
oder
Löschvorgang abbrechen
18
Page 19

Besondere Funktionen
10 Besondere Funktionen
Wahlverfahren
Sie können Ihr Telefon sowohl an den analogen Vermittlungsstellen (Impuls−Wahlverfahren) als auch an den neuen digitalen Vermittlungsstellen (Ton−Wahlverfahren) betreiben.
Temporäre Tonwahl
Können Sie Ihr Telefon nur mit dem Impuls−Wahlverfahren betreiben, brauchen Sie nicht
auf die Vorteile des Ton−Wahlverfahrens (z. B.: Abfrage eines Anrufbeantworters im Telefonnetz) zu verzichten. Während einer bestehenden Verbindung können Sie vorübergehend zum Ton−Wahlverfahren wechseln.
* Während des Gesprächs drücken
Nach Gesprächsende wird wieder automatisch auf das Impuls−Wahlverfahren zurückge-
schaltet.
Call by Call
Bei der Funktion können Sie eine gespeicherte Call by Call Nummer vor der eigentlichen
Rufnummer vorwählen. Sie können 3 unterschiedliche Call−by−Call−Nummern mit jeweils
10 Stellen speichern Seite 14. Die ausgewählte Call−by−Call−Nummer wird vor der Rufnummer im Display angezeigt. Wenn Sie zuerst die Gesprächstaste drücken, um ein Freizeichen zu hören und dann eine Rufnummer eingeben, kann keine gespeicherte Call by
Call Nummer vorgewählt werden.
Call by Call Nummer vorwählen
13
O Call by Call Speicher öffnen
+ oder ,, O Call by Call Nummer auswählen und bestätigen
ë, Rufnummer eingeben und Verbindung herstellen
Sperrliste
Anrufsperre − Beispiele
14
Mit dieser Funktion können Sie Nummern mit bis zu 4 Ziffern sperren. Die eingebene Anrufsperre gilt für alle angemeldeten Mobilteile.
Geben Sie niemals eine Notrufnummer oder eine Anfangsziffer einer Notrufnum-
mer ein. Diese Notrufnummern können dann nicht mehr gewählt werden.
Z. B.: Ziffer 1 sperrt die Notrufnummern 112 und 110!
0 Alle Ferngespräche sind gesperrt.
00 Alle Auslandsgespräche sind gesperrt.
017 Mobiltelefonnummern die mit 017" beginnen sind gesperrt.
019 Rufnummern die mit 019" beginnen sind gesperrt.
WAHLHILFE
15
Wenn Sie WAHLHILFE (intelligente Rufnummernwahl) in Ihrem Mobilteil aktiviert haben,
werden Rufnummern automatisch vervollständigt. Ihr Mobilteil vergleicht die eingegebenenen Anfangsziffern von Rufnummern mit den Rufnummern in Ihrem Rufnummernspeicher und vervollständigt diese bei Übereinstimmung. Mit der Gesprächstaste wird die angezeigte Rufnummer gewählt.
19
Page 20

Erweitern des Telefonsystems
11 Erweitern des Telefonsystems
Sie können Ihr Telefonsystem mit weiteren Oyster 200−Mobilteilen und Oyster 200−Ba-
sisstationen erweitern.
Mehrere Mobilteile
Sie können insgesamt 6 Mobilteile an Ihre Basisstation anmelden.
Anmelden von Mobilteilen
Bevor Sie den Anmeldevorgang eines Mobilteils durchführen, setzen Sie die Basisstation
in den Registriermodus.
6 sec Registriermodus starten
Führen Sie jetzt den Anmeldevorgang an Ihrem Mobilteil durch Seite 15. Benutzen Sie
zur Anmeldung den aktuell eingestellten PIN−Code Seite 15.
Nach dem Anmelden wird dem Mobilteil eine interne Rufnummer gegeben. Diese interne
Rufnummer wird im Display angezeigt.
Abmelden von Mobilteilen
Jedes Mobilteil kann sich selbst oder andere an dieser Basisstation angemeldete
Mobilteile abmelden. Im Display des abgemeldeten Mobilteils erscheint dann die
Meldung ABGEMELDET .
Mehrere Basisstationen
Ihre Mobilteile können gleichzeitig an 5 verschiedenen Basisstationen angemeldet sein.
Jede Basisstation benötigt eine eigene Telefonsteckdose. Es können Anschlüsse mit der
selben und auch mit unterschiedlichen Rufnummern sein.
Laufende Gespräche können nicht von einer zur anderen Basisstation übertra-
gen werden.
Erhöhung der Reichweite
Platzieren Sie die Basisstationen so, dass sich die Reichweite der einzelnen Basisstatio-
nen überschneidet. Testen Sie die Reichweite Ihrer Mobilteile, da Hindernisse in Gebäu-
den die Reichweite einschränken. Melden Sie das Mobilteil an alle Basisstationen an.
Schalten Sie die Funktion automatische Wahl von Basisstationen ein Seite 15. Das
Mobilteil sucht sich automatisch die nächstgelegene Basisstation mit der besten Verbin-
dung.
Mobilität durch verschiedene Standorte
Melden Sie das Mobilteil an verschiedenen Standorten an Basisstationen an. Schalten
Sie die Funktion automatische Wahl von Basisstationen ein Seite 15. An welchem
Standort Sie sich auch befinden, das Mobilteil sucht sich automatisch eine in Reichweite
liegende Basisstation.
20
Page 21

Falls es Probleme gibt
12 Falls es Probleme gibt
Service Hotline
Haben Sie Probleme mit Ihrem Telefon, kontrollieren Sie zuerst die folgenden Hinweise.
Bei technischen Problemen können Sie sich an unsere Service−Hotline unter Tel. 0180 5
00 13 88 (Kosten Telekom bei Drucklegung: 12ct/min) wenden. Bei Garantieansprüchen
wenden Sie sich an Ihren Fachhändler. Die Garantiezeit beträgt 2 Jahre.
Fragen und Antworten
Fragen Antworten
Keine Verbindung zur
Basisstation möglich
Kein Telefongespräch
möglich
Verbindung abgehackt,
fällt aus
Das System reagiert
nicht mehr
Die Akkus sind in
kürzester Zeit leer
Die Rufnummernanzeige
1
(CLIP
) funktioniert nicht
− Prüfen Sie, ob Sie sich mit dem richtigen PIN−Code an
der Basisstation angemeldet haben. Seite 15
− Das Telefon ist nicht korrekt angeschlossen oder gestört. Verwenden Sie nur das mitgelieferte Telefonanschlusskabel.
− Testen Sie mit einem anderen Telefon, ob Ihr Telefonanschluss in Ordnung ist.
− Das Netzteil ist nicht eingesteckt oder es liegt ein totaler
Stromausfall vor.
− Die aufladbaren Akkus sind leer oder defekt.
− Sie haben sich zu weit von der Basisstation entfernt.
− Wahlverfahren falsch eingestellt. Seite 16
− Sie haben sich zu weit von der Basisstation entfernt.
− Falscher Aufstellungsort der Basisstation.
− Setzen Sie alle Funktionen in den Werkszustand
zurück. Seite 15
− Ziehen Sie kurzzeitig das Netzteil aus der Steckdose.
− Die Akkus sind leer oder defekt.
− Stellen Sie das Mobilteil richtig auf die Basisstation.
Reinigen Sie die Kontaktflächen am Mobilteil und an der
Basisstation mit einem weichen, trockenen Tuch.
− Stellen Sie das Mobilteil für 14 Stunden in die Basisstation.
− Die Rufnummernanzeige ist ein optionaler Service Ihres
Netzbetreibers. Bitte fragen Sie Ihren Netzbetreiber
nach weiteren Informationen.
− Der Anrufer hat das Übertragen seiner Rufnummer unterdrückt.
1
CLIP: Calling Line Identification Presentation
21
Page 22

Technische Eigenschaften
13 Technische Eigenschaften
Technische Daten
Merkmal Wert
Standard DECT
Stromversorgung Eingang: 230 V, 50 Hz
Reichweite Außen: ca. 300 m
Standby bis zu 150 h
Max. Gesprächsdauer bis zu 13 h
Akkupack 3.6V 400mAh NI−MH
Wahlverfahren Ton−Wahlverfahren
Zulässige Umgebungstemperatur 10°C bis 30°C
Zulässige relative Luftfeuchtigkeit 20% bis 75%
Flash−Funktion 100 ms
Werkseinstellungen
Werkseinstellungen wiederherstellen (MT RESET) Seite 15
Mobilteil
Sprache: Deutsch Hörerlautstärke: 2 Basiswahl: Basis 1
Tastensperre: Aus Tonrufmelodie: 1 MT Name: MT1
Tastenton: Aus Tonruflautstärke: 2 Wahlhilfe: Aus
Basisstation
16
1
Ausgang: 9 V, 300 mA
Innen: ca. 50 m
Impuls−Wahlverfahren
Flash−Zeit: 100ms Wahlverfahren: Ton PIN−Code: 0000
Amtskennziffer: Leer
Konformitätserklärung
Dieses Gerät erfüllt die Anforderungen der EU−Richtlinie:
1999/5/EG Richtlinie über Funkanlagen und Telekommunikationsendeinrich-
tungen und die gegenseitige Anerkennung ihrer Konformität. Die Konformität
mit der o. a. Richtlinie wird durch das CE−Zeichen auf dem Gerät bestätigt.
Für die komplette Konformitätserklärung nutzen Sie bitte den kostenlosen
Download von unserer Website www.audioline.de.
1
DECT: Digital Enhanced Cordless Telecommunication = Standard für kabellose Tele-
fone.
22
Page 23

Pflegehinweise / Garantie
14 Pflegehinweise / Garantie
Pflegehinweise
Reinigen Sie die Gehäuseoberflächen mit einem weichen und fusselfreien Tuch.
Verwenden Sie keine Reinigungsmittel oder Lösungsmittel.
Garantie
AUDIOLINE − Geräte werden nach den modernsten Produktionsverfahren hergestellt und
geprüft. Ausgesuchte Materialien und hoch entwickelte Technologien sorgen für einwandfreie Funktion und lange Lebensdauer. Ein Garantiefall liegt nicht vor, wenn die Ursache
einer Fehlfunktion des Gerätes bei dem Telefonnetzbetreiber oder einer eventuell zwischengeschalteten Nebenstellenanlage liegt. Die Garantie gilt nicht für die in den Produkten verwendeten Batterien, Akkus oder Akkupacks. Die Garantiezeit beträgt 24 Monate,
gerechnet vom Tage des Kaufs.
Innerhalb der Garantiezeit werden alle Mängel, die auf Material− oder Herstellungsfehler
zurückzuführen sind, kostenlos beseitigt. Der Garantieanspruch erlischt bei Eingriffen
durch den Käufer oder durch Dritte. Schäden, die durch unsachgemäße Behandlung oder
Bedienung, durch falsches Aufstellen oder Aufbewahren, durch unsachgemäßen Anschluss oder Installation sowie durch höhere Gewalt oder sonstige äußere Einflüsse entstehen, fallen nicht unter die Garantieleistung. Wir behalten uns vor, bei Reklamationen
die defekten Teile auszubessern, zu ersetzen oder das Gerät auszutauschen. Ausgetauschte Teile oder ausgetauschte Geräte gehen in unser Eigentum über. Schadenersatzansprüche sind ausgeschlossen, soweit sie nicht auf Vorsatz oder grober Fahrlässigkeit
des Herstellers beruhen.
Sollte Ihr Gerät dennoch einen Defekt innerhalb der Garantiezeit aufweisen, wenden Sie
sich bitte unter Vorlage Ihrer Kaufquittung ausschließlich an das Geschäft, in dem Sie Ihr
AUDIOLINE − Gerät gekauft haben. Alle Gewährleistungsansprüche nach diesen Bestimmungen sind ausschließlich gegenüber Ihrem Fachhändler geltend zu machen. Nach Ablauf von zwei Jahren nach Kauf und Übergabe unserer Produkte können Gewährleistungsrechte nicht mehr geltend gemacht werden.
23
Page 24

Stichwortverzeichnis
15 Stichwortverzeichnis
A
Abmelden von Mobilteilen, 20
Akkuladezustand, 6
Akkus aufladen, 6
Akkus einlegen, 6
Amtskennziffer, 13
Anmelden von Mobilteilen, 20
Anruf annehmen, 11
Anrufen, 11
Anrufliste, 18
automatische Wahl, 15, 20
B
Basisstation anschließen, 5
Bedienelemente, 7
Besondere Funktionen, 19
C
Call−by−Call, 14, 19
D
Darstellungen, 8
E
Eingegangene Anrufe zurückru-
fen, 11
Eintrag aus dem Rufnummern-
speicher löschen, 17
Einträge im Rufnummernspei-
cher ändern, 17
Einträge im Rufnummernspei-
cher erstellen, 17
Einträge im Rufnummernspei-
cher erstellen, 10
Erhöhung der Reichweite, 20
Erweitern des
Telefonsystems, 20
Externe Gespräche intern wei-
terleiten, 12
F
Falls es Probleme gibt, 21
Fehlerbehebung, 21
Fragen und Antworten, 21
G
Garantie, 23
Gespräch beenden, 11
Gesprächsdauer, 12
H
Hauptmenü, 14
Hörerlautstärke, 12
I
Intern Telefonieren, 11
Interne Gesprache führen, 11
K
Konformitätserklärung, 22
M
Mehrere Basisstationen, 20
Mehrere Mobilteile, 20
Meldungen, 18
Menüstruktur, 14
Mikrofon stummschalten, 12
Mobilität, 20
Mobilteil aus− und
einschalten, 12
Mobilteil suchen, 12
N
Navigationstasten, 9
Nebenstellenanlagen, 13
P
Paging, 12
Pflegehinweise, 23
R
R−Taste an Nebenstellenanla-
gen, 13
Rufnummern aus dem Rufnum-
mernspeicher wählen, 11
Rufnummern aus der Anrufliste
anzeigen, 18
Rufnummern aus der Anrufliste
löschen, 18
Rufnummern sperren, 16, 19
Rufnummernanzeige, 13
Rufnummernspeicher, 17
S
Schreibweisen, 8
Service Hotline, 21
Sicherheitshinweise, 4
Sperrliste, 16, 19
Symbole im Display, 8
T
Tastensperre, 12
Technische Daten, 22
Telefon in Betrieb nehmen, 5
Telefonieren, 11
Temporäre Tonwahl, 19
U
Uhrzeit einstellen, 6, 16
V
Verpackungsinhalt, 5
W
Wahlhilfe, 15, 19
Wahlpause, 13
Wahlverfahren, 16, 19
Wahlwiederholung, 11
Werkseinstellungen, 22
Wie bediene ich mein
Telefon?, 8
24
Page 25

17
Contents
1 Safety Information 26. . . . . . . . . . . . . . . . . . . . . . . .
2 Putting the Telephone into Operation 27. . . . . . . . . . .
3 Operating Elements 29. . . . . . . . . . . . . . . . . . . . . . .
4 How to Operate the Telephone 30. . . . . . . . . . . . . . .
5 Telephoning 33. . . . . . . . . . . . . . . . . . . . . . . . . . . .
6 Private Branch Exchanges / CLIP 35. . . . . . . . . . . . .
7 Menu Structure 36. . . . . . . . . . . . . . . . . . . . . . . . . .
8 Phone Number Memory 39. . . . . . . . . . . . . . . . . . . .
9 Call Log 40. . . . . . . . . . . . . . . . . . . . . . . . . . . . . . .
10 Special Functions 41. . . . . . . . . . . . . . . . . . . . . . . .
11 Expanding the Telephone System 42. . . . . . . . . . . . .
12 In the Case of Problems 43. . . . . . . . . . . . . . . . . . .
13 Technical Properties 44. . . . . . . . . . . . . . . . . . . . . .
14 Maintenance / Guarantee 45. . . . . . . . . . . . . . . . . . .
15 Index 46. . . . . . . . . . . . . . . . . . . . . . . . . . . . . . . . .
25
Page 26

Safety Information
1 Safety Information
Please read this operating instruction manual thoroughly.
Intended use
The telephone is suitable for telephoning within a public telephone network system. Any
other use is considered unintended use. Unauthorised modification or reconstruction is
not permitted. Under no circumstances open the device or complete any repair work yourself.
Installation location
Prevent excessive exposure to smoke, dust, vibration, chemicals, moisture, heat and direct sunlight.
Do not use the handset in potentially explosive areas.
Power supply
Attention: Only use the power adapter plug supplied because other power sup-
plies could damage the telephone. Ensure access to the power adapter plug is
not obstructed by furniture or such.
Rechargeable battery pack
Attention: Do not throw batteries into a fire or immerse them in water.
Power failure
The telephone cannot be used to make calls in the event of a power failure. Always keep
a cord connected telephone which operates without an external power supply available in
case of emergency situations.
Medical equipment
Attention: Never use the telephone in the vicinity of medical equipment. Effects
on such equipment cannot be fully ruled out.
DECT1 telephones can cause an unpleasant humming sound in hearing aids.
Disposal
If your device has come to the end of its service life, bring it to a collection point
provided by your local public waste authorities (e.g. recycling company). The adjacent symbol indicates that the old device must be disposed of separate from
domestic waste. According to laws on the disposal of electronic and electrical devices, owners are obliged to dispose of old electronic and electrical devices in
a separate waste container.
Batteries must be disposed of at the point of sale or at appropriate collection
points provided by the public waste authorities. Packaging materials must be
disposed of according to local regulations.
26
1
DECT: Digital Enhanced Cordless Telecommunication = Standard for cordless tele-
phones.
Page 27

Putting the Telephone into Operation
2 Putting the Telephone into Operation
Safety information
Attention: It is essential to read the Safety Information in Chapter 1 before
starting up.
Checking the contents of the package
The package contains:
− a base station with power adapter plug − a telephone connection cable
− a handset − a rechargeable battery pack
− an operating manual
Connecting the base station
Attention: Position the base station at least 1 m away from other electronic
devices, otherwise there is a risk of mutual disturbance.
Connect the base station as illustrated in the diagram. For reasons of safety, only use the
power adapter plug supplied and telephone connection line enclosed.
Mains power outlet
Telephone line socket
27
Page 28

Putting the Telephone into Operation
Inserting the batteries
Insert the battery pack in the open battery
compartment and plug the connector in the
connection socket. Lay the cable in the grey
area beside the batteries. When replacing the
batteries, only use ones of the same type.
Close the battery compartment.
Charging the batteries
Before the handset is used for the first time, insert it in the base station/charging station for
at least 14 hours.
You can insert the handset in the base station when the display is flapped open
When the handset is inserted in the base station properly, you will hear a confirmation signal and the charge control lamp lights up. The handset warms up during the charging
process. This is normal and does not represent a risk. Do not charge the handset with
charging units from other manufacturers. The current battery charge status is indicated
on the display:
Full Half empty Low Empty
18
or closed.
Setting the time on the handset
The information on Page 38 explains how to set the time on the handset.
Private branch exchanges
The information on Page 35 explains how to install your telephone in a private branch exchange.
28
Page 29

3 Operating Elements
Handset
1 Display 1 (outer)
2 Display 2 (inner)
3 Open phone number memory / Scroll upwards
4 R−button / Delete
5 OK button
6 Redial /
Dialling pause
7 Open phone number
memory / Scroll downwards
8 Temporary tone dialling
9 Call button
10 Menu button
11 Internal call /
Muting
12 Key lock /
Switch handset on/off
Base station
1 LED, call indicator
2 Paging button (locate handset)
3 LED, battery charge control lamp
1
Operating Elements
12
11
10
9
8
2
3
4
5
6
7
21 3
The buttons in this operating manual are depicted with a uniform contour. Variations in
the symbols on the telephone buttons compared to those depicted here are possible.
29
Page 30

How to Operate the Telephone
4 How to Operate the Telephone
Display and notation of operation sequences
ë Enter digits
* Press the button depicted briefly
2 sec * Press the button depicted for 2 seconds
Press and hold * Press and hold the button depicted
Release * Release the button depicted
{í} Handset rings
è Open handset
é Close handset
SPEICHERN NR
Icons in the display
Display Description
MT1 Internally assigned call number of the handset. Page 42
13:23 Time display. Page 38
or
On: Indicates the battery charge capacity.
Flashing: The batteries need to be charged.
Run−through segments: The batteries are being charged. Page 28
On: A call is currently being made.
Flashing: A call has been received. Page 33
New calls have been registered in the calls log.. Page 40
The key lock is activated. Page 34
The microphone is switched off (muting). Page 34
On: The connection to the base station is good.
Flashing: The connection to the base station is poor. Move towards the
base station. The more bars in the icon, the better the connection to the
base station.
Text or icon in the display
30
Page 31

How to Operate the Telephone
Navigation buttons
All the descriptions in this operating manual assume that the handset is in Standby mode.
Standby mode can be activated by pressing the button.
7
6
Button In Standby mode In a menu
− Open the phone number me-
1
2 − Move one level back / Deleting digits
3 − Open the call by call memory
4
5 − Internal call
6 − Open the main menu
7
mory
− Open the phone number memory
− Key lock / Switch handset on/
off
− Scroll upwards in the menu
− Change settings
− Open the menu displayed
− Confirm the programming and saving
processes
− Scroll downwards in the menu
− Change settings
− Cancel programming and saving processes and return to Standby mode
1
2
35
4
31
Page 32

How to Operate the Telephone
Navigating in the menu
All the functions can be accessed via the various menus. Refer to the menu structure to
find how to access the respective functions. Page 36
Open the main menu
+ or , Select the submenu required
O Open the submenu
+ or , Select the function required
O Open the function
+ or , Select the setting required
ë Enter numbers using the digit keys
O Confirm the input
Delete / Move one level back
Cancel programming and saving processes and return
Every process is automatically cancelled if there is no input within 30 seconds.
19
to Standby mode
Creating entries in the phone number memory − example
The way in which to navigate through the menus and enter data is explained by means of
the example Creating entries in the phone number memory. Proceed as in this example for all the settings.
Open the main menu
+ or ,
SPEICHERN NR
+ or , e.g:
ë, O Enter the phone number and confirm
, O Select the function and confirm
01−
Select the memory location
20
32
Page 33

Telephoning
5 Telephoning
Taking a call
{í}, è or Take the call
Ending a call
or é End the call
Making a call
ë Enter the phone number (max. 24 digits)
Delete the last digit if incorrect
Dial the phone number
It is also possible to press the Call button first to obtain the dialling tone. The digits
in the phone number then entered are dialled immediately. It is not possible to correct wrong digits individually using this dialling procedure.
Redialling
The telephone stores the last 10 phone numbers dialled in a redialling list.
£ Open the redialling list
+ or ,, Select an entry and dial the number
Calling back missed calls
The telephone stores the numbers of the last 10 calls received in a call log.
, + or ,
ANRUFLISTE
+ or ,, Select an entry and dial the number
Dialling phone numbers from the phone book
You must have already stored some phone numbers. Pages 32 and 39
+ or , Open the phone number memory
+ or ,, Select an entry and dial the number
21
Dialling the phone numbers directly
Press and hold 0 The phone number selected is dialled directly
The 0 button dials the phone number stored in memory location 0", the
Internal Calls
Making internal calls
There must be two or more handsets (HS1, HS2, ...) registered on a base station in order
to make internal calls free of charge.
HS1: I, e.g. 2 Dial the internal call number of the handset required
HS2: Take the call on the other handset
HS1 / HS2: or I End the internal call
, O Open the call log
1 button dials the phone number in memory location 1", etc.
22
33
Page 34

Telephoning
Transferring external calls internally
HS1: I, e.g. 2 Dial the internal call number of the handset required
HS2: Take the call on the other handset
HS1: Forward the call
If the handset called does not answer, take the external call back by pressing
the I button.
Adjusting the receiver volume
The volume can be adjusted to one of 3 settings during a call.
+ or , Select the required volume
Talk time display
The duration of a call is displayed in hours, minutes and seconds during the call.
Muting the microphone in the handset
The microphone in the handset can be activated and deactivated during a telephone
conversation.
I Deactivate the microphone (muting)
I Activate the microphone
Key lock
24
Activate the key lock function
Calls can still be taken in the normal way even when the key lock function is acti-
vated.
Deactivate the key lock function
Searching for the handset (Paging)
If you have mislaid your handset, you can locate it with the aid of a search tone.
{«} Start the search tone
, è or End the search tone
Switching the handset on and off
You can switch the handset off to save the batteries.
2 sec Switch the handset off
Switch the handset on
during the external call
23
34
Page 35

Private Branch Exchanges / CLIP
6 Private Branch Exchanges / CLIP
R button on private branch exchanges
If the telephone is connected to a private branch exchange, functions such as transferring
calls and automatic call back can be used via the R button. The dealer where you purchased the exchange can provide information as to whether the telephone will work properly with the exchange.
Number for an outside line
In the case of private branch exchanges, it is necessary to dial a number to get an outside
line with its corresponding dialling tone. Save the number for an outside line in your handset, Page 37. It is automatically prefixed to a phone number dialled from the call log.
Dialling pause
When using some older private branch exchanges, it takes a little time before the dialling
tone becomes audible. Particularly in the case of such private branch exchanges, it is
possible to insert a dialling pause after the number for the outside line so that the number
can be dialled in a continuous process without having to wait for the dialling tone.
2 sec £ Insert dialling pause
After dialling the number for the outside line, the telephone then waits 3 seconds before
dialling the actual phone number.
The dialling pause can also be entered with the phone numbers in the phone
number memory.
Caller number display (CLIP1)
If this function is available with your telephone line, the number of the caller appears in the
display when the phone rings. If the caller has suppressed transmission of his phone
number, a corresponding message appears in the display. The phone number is not displayed and, as a result, is not stored in the calls list.
The CLIP (caller number display) function is an optional service offered by tele-
phone network providers. Contact your network provider for further information.
1
CLIP: Calling Line Identification Presentation
35
Page 36

Menu Structure
7 Menu Structure
Main menu
Access the Main menu by pressing the button. The way to navigate through the
menus is described on Page 32.
SPEICHERN NR 0− ë Phone number
1−
...
ANRUFLISTE 10− O LOESCHEN
1−
...
CALL BY CALL 1− ë Phone number
2−
3−
TASTENTOENE TYP 1
TYP 2
AUS
RUFTON MELODIE TYP 1
TYP 2
...
RUFTON LAUT LEVEL 1
LEVEL 2
LEVEL 3
AUS
VIP TONRUF 2VIP TONRUF1 ë Number TYP 1
VIP TONRUF 2 TYP 2
...
36
1
The (CLIP3) feature is necessary to display and save phone numbers in various call
logs. The CLIP (caller number display) function is an optional service offered by telephone network providers. Contact your network provider for further information. Further
information on the caller number display (CLIP), Page 35.
2
This can be used to assign a specific ringing melody to two phone numbers. Your
handset then rings with this melody when a call is received from this caller. This function requires the caller number display (CLIP
3
CLIP: Calling Line Identification Presentation
3
) function is enabled.
Page 37

Menu Structure
25
PIN AENDERN 1ë PIN [−−−−] ë NEU [−−−−] ë OK [−−−−]
WAHLHILFE
2
EIN
AUS
AMTSKENNZ
ANMELDEN
3
ë Number for an outside line
4
ë PIN [−−−−] BASIS 1 SUCHEN
BASIS 2
BASIS 3
BASIS 4
012345" Oë AC − 0000
4
MT RESET ë PIN [−−−−] BESTAETIGEN
WWDH LÖSCH ë PIN [−−−−] BESTAETIGEN
LISTE LÖSCH ë PIN [−−−−] BESTAETIGEN
BASIS WAEHLE 5BESTE BASIS
BASIS 1
BASIS 2
BASIS 3
BASIS 4
WARTEN
1
The default setting of the PIN code is 0000". If you change the PIN code, keep a note
of the new PIN code in a safe place. If you forget or lose the PIN code, please contact
our Service Hotline, Page 43.
2
Further information on special functions, Page 41.
3
Further information on private branch exchanges, Page 35.
4
Further information on registering handsets, Seite 42. The AC−PIN (Authentication
Code) is 0000" and cannot be changed.
5
All the base stations to which the handset is registered are displayed. Select a base
station manually or activate the automatic dialling (BESTE BASIS) of base stations.
Further information, Page 42.
37
Page 38

Menu Structure
26
BASIS MENU
ë PIN [−−−−] SPERRLISTE
1
1−
2−
3−
4−
5−
WAHLVERF
2
TON
PULSWAHL
UHRZEIT ë hh:mm
ABMELDEN
3
1 2 3 ...
38
1
Further information on call barring, Page 41.
2
Further information on dialling modes, Page 41.
3 This can be used to deregister handsets from your base station.
Further information, Page 42.
Page 39

Phone Number Memory
8 Phone Number Memory
Up to 10 phone numbers can be stored in the phone number memory.
Creating entries in the phone number memory
Open the main menu
+ or ,
SPEICHERN NR
+ or , e.g:
ë, O Enter the phone number and confirm
, O Select the function and confirm
01−
Select the memory location
Modifying entries in the phone number memory
Open the main menu
+ or ,
SPEICHERN NR
+ or , e.g:
Delete the digits
ë, O Enter the new phone number and confirm
, O Select the function and confirm
01−
Select the memory location
Deleting an entry from the phone number memory
Open the main menu
+ or ,
SPEICHERN NR
+ or , e.g:
, O Delete the digits and confirm
, O Select the function and confirm
01−
Select the memory location
27
28
39
Page 40

Call Log
9 Call Log
A total of 10 phone numbers are stored in a call log. When a new call is registered, the
icon appears in the display.
Messages in the Display:
When the
phone rings
UNBEKANNT −O− The number has only been partially or incorrectly
ANONYM −P− The caller has suppressed the transmission of his
Stored in the
call log
received.
The particulars of the number are not available. This
could have been an international call.
telephone number or it was not possible to transmit
the number.
Displaying phone numbers in the call log
Open the main menu
+ or ,
ANRUFLISTE
+ or , Select the required entry
The ANRUF:" indicator shows how often the caller has called. After displaying
, O Open the call log
the phone number, the date and time the call was received appears in the display.
Deleting phone numbers from the call log
Deleting individual phone numbers
Open the main menu
+ or ,
ANRUFLISTE
+ or , Select the required entry
O Activate the deleting process
LOESCHEN
LOESCHEN
, O Open the call log
O Confirm the deleting process
or
Cancel the deleting process
Delete all phone numbers
Open the main menu
+ or ,
LISTE LÖSCH
PIN [−−−−] ë Enter the current PIN code
BESTAETIGEN
BESTAETIGEN
, O Activate the deleting process
O Confirm the deleting process
or
Cancel the deleting process
40
Page 41

Special Functions
10 Special Functions
Dialling mode
The telephone can be operated in new, digital exchanges (TONE) as well as analogue
exchanges (PULSE).
Temporary tone dialling
If you only operate the telephone using the PULSE dialling mode, you can still make use
of the advantages of TONE dialling mode (e.g.: remote access of the answering machine
in the conventional telephone network). You can temporarily switch to Tone dialling when
a connection has already been made.
* Press the button during the call
When the call is ended, the equipment automatically switches back to Pulse dialling.
Call by call
This function enables a stored call by call number to be dialled prior to the actual phone
number. Up to 3 different call by call numbers, each with 10 digits, can be stored; Page
36. The call by call number selected is displayed preceding the phone number. If you
press the Call button first to obtain a dialling tone and then enter the phone number, no
stored call by call number can be predialled.
29
Predialling a call by call number
O Open the call by call memory
+ or ,, O Select the call by call number and confirm
ë, Enter the phone number and dial it
Call barring
Call barring − examples
30
This function can be used to bar sequences of up to 4 digits. The numbers defined for call
barring apply to all the registered handsets.
Never enter an emergency call number or the first digit of an emergency call num-
ber. These emergency call numbers cannot be dialled if you do.
E. g.: Barring digit 1 would bar all emergency call numbers beginning with 1".
0 All long−distance calls are barred.
00 All international calls are barred.
017 All mobile phone numbers beginning with 017" are barred.
019 All phone numbers beginning with 019" are barred.
WAHLHILFE
31
If you activate WAHLHILFE in the handset, phone numbers are automatically completed.
The handset compares the initial digits of phone numbers entered with the phone numbers in the phone number memory and completes them if they match. The phone number
displayed is dialled after pressing the Call button.
41
Page 42

Expanding the Telephone System
11 Expanding the Telephone System
You can expand your telephone system by adding more Oyster 200 handsets and Oy-
ster 200 base stations.
Multiple handsets
Up to 6 handsets can be registered on the base station.
Registering handsets
Before starting with the registration process for a handset, switch the base station to Re-
gistration mode.
6 sec Initiate Registration mode
Complete the registration process for your handset, Page 37. The currently valid PIN
code is used for registration purposes, Page 37.
The handset is automatically assigned an internal call number following registration. The
internal call number appears in the display.
Deregistering handsets
Each handset can deregister itself or other handsets registered on the base sta-
tion. After deregistration, the message ABGEMELDET appears in the display of
the deregistered handset.
Multiple base stations
Your handsets can be simultaneously registered on up to 5 different base stations. Each
base station requires its own telephone cable socket. Connections can be used with the
same call number or with different ones.
Calls in progress, however, cannot be transferred from one base station to
another.
Increasing the range
Position the base stations so that the ranges of the individual base stations overlap. Test
the range of your handsets because obstructions in buildings restrict the range. Register
the handset on all the base stations. Activate the BESTE BASIS selection of base station,
Page 37. The handset then automatically searches for the nearest base station with
the best connection.
Mobility through registration at various locations
Register the handset on base stations at various locations. Activate the BESTE BASIS
selection of base station, Page 37. Regardless of your current location, the handset
automatically searches for a base station within range.
42
Page 43

In the Case of Problems
12 In the Case of Problems
Service hotline
Should problems arise with the telephone, please refer to the following information first. In
the case of technical problems, you can contact our hotline service, tel. 0180 5 00 13 88
(cost via Telekom at time of going to print: 12 ct/min). In the case of claims under the
terms of guarantee, contact your sales outlet. There is a 2 year period of guarantee.
Problems and solutions
Problems Solutions
No connection to base
station possible
No telephone calls
possible
Connection is disturbed
or cut off
The system no longer
responds
The batteries are empty
in a short time
The CLIP1 function does
not work
− Check that the handset has been registered on the base
station with the correct PIN code. Page 37
− The telephone line is not connected properly or is defective. Only use the telephone connection cable supplied.
− Test whether the telephone connection is in order by
using another telephone.
− The power adaptor plug is not plugged in or there is a
complete power failure.
− The rechargeable batteries are empty or defective.
− The handset is too far from the base station.
− Dialling mode is set incorrectly. Page 38
− The handset is too far from the base station.
− The base station is in an unsuitable location.
− Reset all the functions to their default settings.
Page 37
− Disconnect the power adapter plug briefly from the
power socket.
− The batteries are empty or defective.
− Place the handset in the base station properly. Clean
the contact surfaces on the handset and base station
with a soft, dry cloth.
− Place the handset in the base station for 14 hours.
− The CLIP (caller number display) function is an optional
service offered by telephone network providers. Contact
your network provider for further information.
− The caller has suppressed the transmission of their
phone number.
1
CLIP: Calling Line Identification Presentation
43
Page 44

Technical Properties
13 Technical Properties
Technical data
Feature Value
Standard DECT
Power supply Input: 230 V, 50 Hz
Range Outdoors: Approx. 300 m
Standby Up to 150 h
Max. talk time Up to 13 h
Battery pack 3.6 V 400 mAh NI−MH
Dialling mode Tone dialling mode
Permissible ambient temperature 10°C to 30°C
Permissible relative humidity 20% to 75%
Flash function 100 ms
Default settings
Restore the default settings (MT RESET), Page 37
Handset
Language: German Receiver volume: 2 Base selection: Base 1
Key lock: Off Ringing melody: 1 HS name: MT1
Key beep: Off Ringing volume: 2 Smart Dial: Off
Base station
32
1
Output: 9 V, 300 mA
Indoors: Approx. 50 m
Pulse dialling mode
Recall (Flash) time: 100 ms Dialling mode: Tone PIN code: 0000
Access code: Empty
Declaration of Conformity
This device fulfils the requirements stipulated in the EU directive:
1999/5/EU directive on radio equipment and telecommunications terminal
equipment and the mutual recognition of their conformity. Conformity with the
above mentioned directive is confirmed by the CE symbol on the device.
To view the complete Declaration of Conformity, please refer to the free download available on our web site www.audioline.de.
1
DECT: Digital Enhanced Cordless Telecommunication = Standard for cordless tele-
phones.
44
Page 45

Maintenance / Guarantee
14 Maintenance / Guarantee
Maintenance
Clean the housing surfaces with a soft, fluff−free cloth.
Never use cleaning agents or solvents.
Guarantee
AUDIOLINE equipment is produced and tested according to the latest production methods. The implementation of carefully chosen materials and highly developed technologies ensure trouble−free functioning and a long service life. The terms of guarantee do not
apply where the cause of equipment malfunction is the fault of the telephone network operator or any interposed private branch extension system. The terms of guarantee do not
apply to the batteries or power packs used in the products. The period of guarantee is 24
months from the date of purchase.
All deficiencies resulting from material or production faults which occur during the period
of guarantee will be eliminated free of charge. Rights to claims under the terms of guarantee are annulled following intervention by the purchaser or third parties. Damage caused
as a result of improper handling or operation, incorrect positioning or storing, improper
connection or installation, Acts of God or other external influence are not covered by the
terms of guarantee. In the case of complaints, we reserve the right to repair or replace defect parts or provide a replacement device. Replacement parts or devices become our
property. Rights to compensation in the case of damage are excluded where there is no
evidence of intent or gross negligence by the manufacturer.
If your equipment shows signs of defect during the period of guarantee, please return it to
the sales outlet in which you purchased the AUDIOLINE equipment together with the purchase receipt. All rights to claims under the terms of guarantee in accordance with this
agreement must be asserted exclusively with regard to your sales outlet. Two years after
the purchase and transfer of our products, claims under the terms of guarantee can no
longer be asserted.
45
Page 46

Index
15 Index
A
Automatic dialling, 37
Automatic selection, 42
B
Bar list, 38
Barring list, 41
Barring phone numbers, 41
Battery charge status, 28
C
Call barring, 38
Call log, 40
Call−by−Call, 36
Call−by−call, 41
Caller number
display (CLIP), 35
Calling back missed calls, 33
Charging the batteries, 28
Connecting the base station, 27
Creating entries in the phone
number memory, 32, 39
D
Declaration of Conformity, 44
Default settings, 44
Deleting an entry from the
phone number memory, 39
Deleting phone numbers from
the call log, 40
Deregistering handsets, 42
Dialling mode, 41
Dialling pause, 35
Dialling phone numbers from
the phone book, 33
Displaying phone numbers in
the call log, 40
E
Ending a call, 33
Expanding the telephone sy-
stem, 42
Explanations, 30
G
Guarantee, 45
H
How to operate
the telephone, 30
I
Icons in the display, 30
In the case of problems, 43
Increasing the range, 42
Inserting the batteries, 28
Internal calls, 33
K
Key lock, 34
M
Main menu, 36
Maintenance , 45
Making a call, 33
Making internal calls, 33
Menu Structure, 36
Messages, 40
Mobility, 42
Modifying entries in the phone
number memory, 39
Multiple base stations, 42
Multiple handsets , 42
Muting the microphone, 34
N
Navigation buttons, 31
Notation, 30
Number for an outside line, 35
O
Operating elements, 29
P
Package contents, 27
Paging, 34
Phone number memory, 39
Private branch exchanges, 35
Problems and solutions, 43
Putting the telephone into ope-
ration, 27
R
R button on private branch ex-
changes, 35
Receiver volume, 34
Redialling, 33
Registering handsets, 42
S
Safety information, 26
Searching for the handset, 34
Service hotline, 43
Setting the time, 28, 38
Special functions, 41
Switching the handset on and
off , 34
T
Taking a call, 33
Talk time, 34
Technical data, 44
Telephoning, 33
Temporary tone dialling, 41
Transferring external calls inter-
nally, 34
Troubleshooting, 43
W
Wahlhilfe, 37, 41
46
Page 47

Index
47
Page 48

Wichtige Garantiehinweise
Die Garantiezeit für Ihr AUDIOLINE − Produkt beginnt mit dem Kaufdatum. Ein Garantieanspruch
besteht bei Mängeln, die auf Material− oder Herstellungsfehler zurückzuführen sind. Der
Garantieanspruch erlischt bei Eingriffen durch den Käufer oder durch Dritte. Schäden, die durch
unsachgemäße Behandlung oder Bedienung, natürliche Abnutzung, durch falsches Aufstellen
oder Aufbewahren, durch unsachgemäßen Anschluss oder Installation sowie durch höhere Gewalt
oder sonstige äußere Einflüsse entstehen, fallen nicht unter die Garantieleistung.
BITTE WENDEN SIE SICH IM GARANTIEFALL AUSSCHLIESSLICH AN DEN HÄNDLER, BEI
DEM SIE DAS GERÄT GEKAUFT HABEN, UND VERGESSEN SIE NICHT, DEN KAUFBELEG
VORZULEGEN.
UM UNNÖTIG LANGE WARTEZEITEN ZU VERMEIDEN, SENDEN SIE
REKLAMATIONSGERÄTE BITTE NICHT
BEI FRAGEN ZUR BEDIENUNG UND GARANTIELEISTUNG LESEN SIE BITTE DIE
BEDIENUNGSANLEITUNG ODER WENDEN SIE SICH AN UNSERE HOTLINE:
0180 500 13 88 (Kosten Telekom bei Drucklegung: 12ct/min)
AN UNSERE BÜROADRESSE.
AUDIOLINE GmbH
Neuss
Service Hotline 0180 500 13 88
(Kosten Telekom bei Drucklegung: 12ct/min)
Internet: www.audioline.de − E−mail: info@audioline.de
Version 1.0 − 19.04.2006
 Loading...