

Page 1

CLD60
Telephone with Caller Display
User guide
Page 2

TABLE OF CONTENTS AUDIOLINE CLD60
AUDIOLINE CLD 60
User guide
TABLE OF CONTENTS
Installation .................. 2 Caller Display ................. 11
Function ................... 2 Explanation ................. 11
Assembley instructions ....... 3 Call Indications .............. 11
Parts List/Battery ............ 3 To View the new call information. 12
Assembly .................. 3 Erase phone number ........... 13
Table/Wall Mounting ........ 4 Memory Full ................ 13
Wall Installation/Display ...... 5 Autodial ....................14
Set Date and Time ........... 6
Set Language ............... 6 Telephone book ................ 14
Explanation of Phone Book ..... 14
The telephone ................ 7 Text input ...................15
To Call/Call Timer ........... 7 Store Phone Number/Name ..... 16
Last Number Redial .......... 7 Erase Number/Name ..........17
Volume control ............. 8 Dialling a Phone Book number ..17
Mute button .................8
Pause function ...............8 Special functions .............. 18
Ringing signal .............. 8 Least Cost Routing(LCR) ......18
Network Feature buttons .......9 E-mail indicator .............. 20
Call Waiting/Call Forward .....9 Message waiting ............. 20
Call Forward continued ........10
Trouble shooting .............. 21
If the phone doesn't work ....... 21
Other Information ............ 22
Guarantee ................... 23
1
Page 3

AUDIOLINE CLD60 INSTALLATION
FUNCTIONS
DIAL
ERASE
CW
1 Erase button 10 Switch for ringing signal
2 Dial button 11 Dial button, 0-9, *, #
3 Memory button 12 Network feature buttons
4 Store button 13 Scrolling button UP
5 Mute button 14 Scrolling button DOWN
6 Recall button 15 Indicator
7 Outlet for handset cord (on the side) 16 Display
8 Redial/Pause button 17 Outlet for line cord (at rear)
9 Outlet for handset cord (on handset) 18 Switch for handset volume
2
Page 4

INSTALLATION AUDIOLINE CLD60
ASSEMBLY INSTRUCTIONS
PARTS LIST
1 - CLD60 Telephone
1 - Telephone Handset
1 - Line cord
1 - 3 x 1.5volt AA Batteries (supplied)
BATTERY
The Caller Display and memory functions need 3 x 1.5 volt AA batteries to function.
P Remove the line cord before you change the battery.
P To install the batteries unscrew and remove the battery cover from the battery holder
(on the base of the telephone) and insert the new batteries ensuring correct polarity.
P Indication of flat batteries will be seen in the telephone display (see diagram page
5). Remove the old batteries, wait a couple of minutes to enable the Caller Display
to reset correctly, and then insert the new batteries. Observing correct polarity.
P Reconnect the line cord.
ASSEMBLY
P Plug the Line cord into the telephone (17 on the diagram on page 2) by inserting the
plug until you hear a click.
P Plug the Handset into the telephone (7 on the diagram on page 2) again listen for the
click.
P To remove either of the plugs depress the plastic tab on the plug and withdraw.
Do not position the telephone in direct sunlight. The rubber feet on the base of the
telephone can leave marks on sensitive surfaces.
3
Page 5
AUDIOLINE CLD60 INSTALLATION
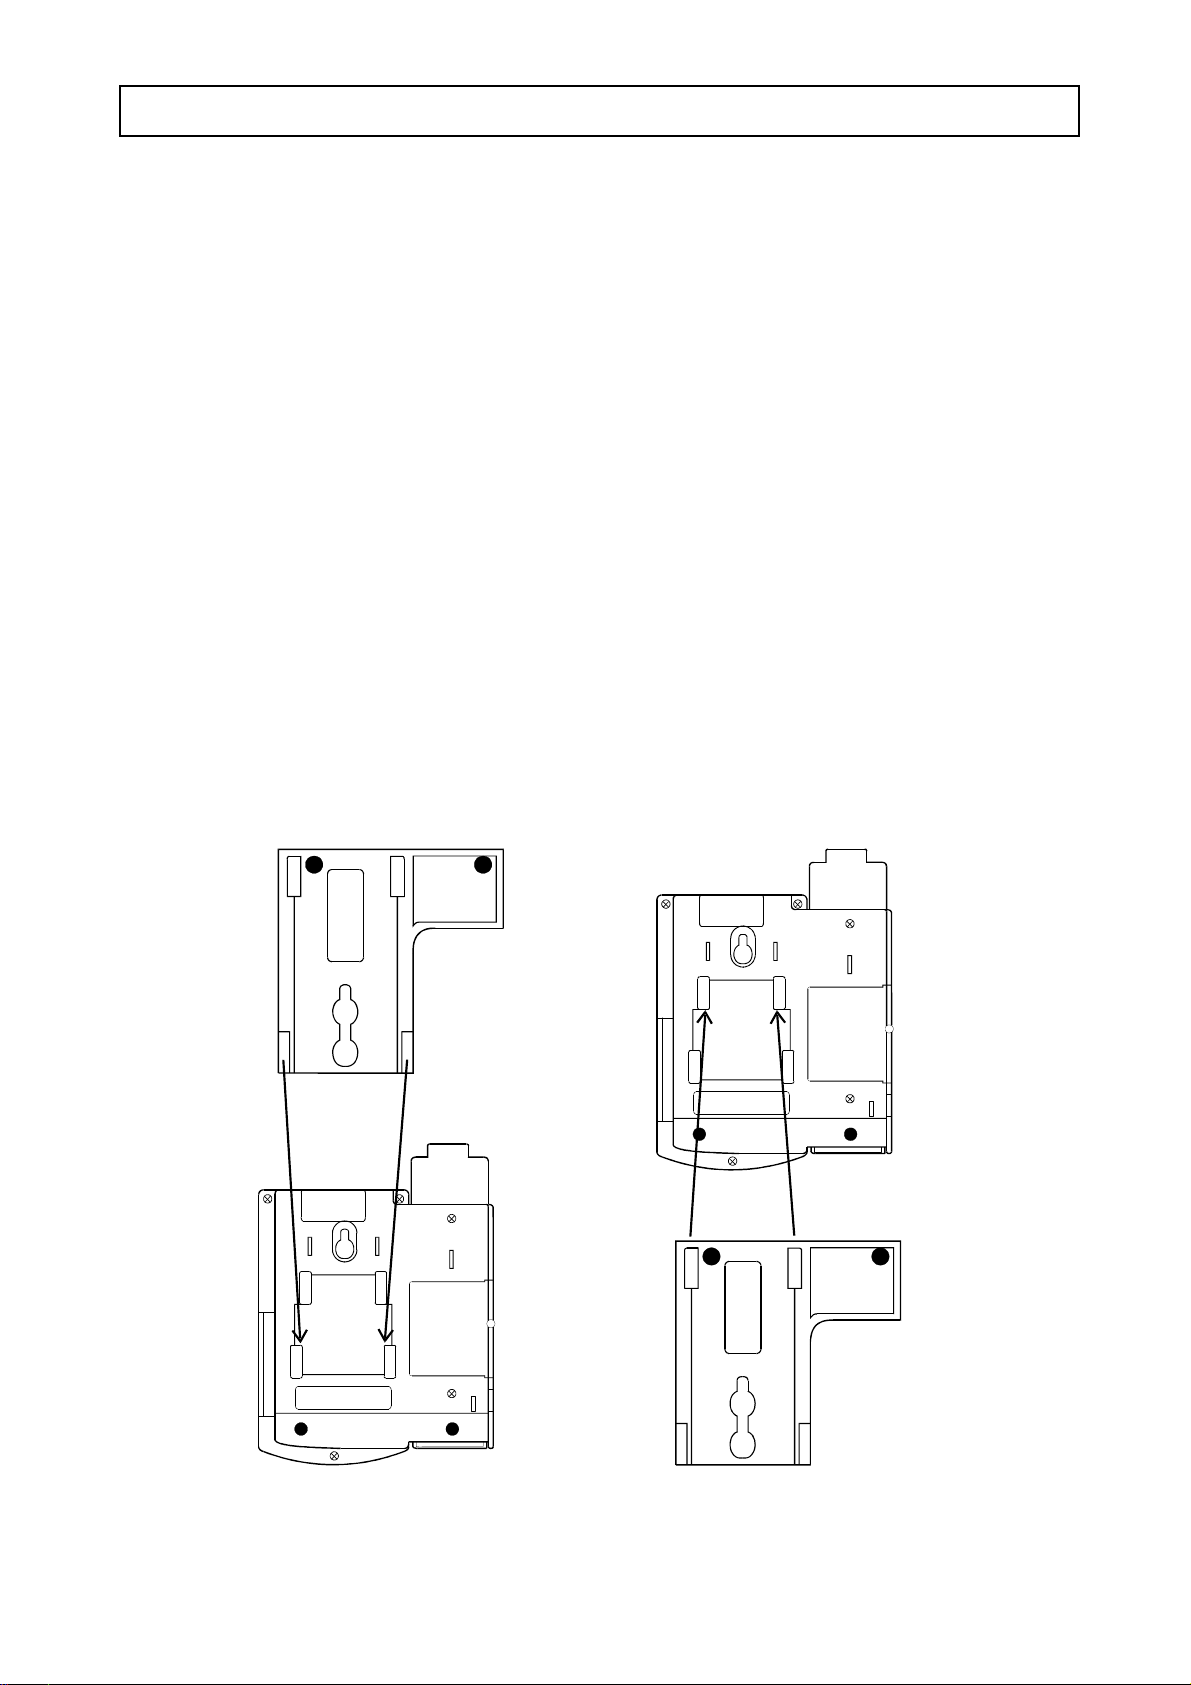
SLIDE SUPPORT
On the base of the CLD60 is a “slide support”. This is used to position the phone
correctly for use when desk/wall mounting. Please refer to the diagram below for correct
positioning.
DESKTOP USE
When this “slide support” is slid onto the base of the phone from the top downwards the
CLD60 is ready for desk top use. See diagram below.
WALL MOUNTING
When this “slide support” is slid onto the base of the phone from the bottom upwards, the
CLD60 is ready for wall mounting. See diagram below and Page 4.
Desktop position Wall mount position
4
Page 6
INSTALLATION AUDIOLINE CLD60
WALL INSTALLATION
To install the telephone on the wall:
P The CLD60 will fit directly onto the standard Telstra wall plate, or
P Use the slide support as a template to mark the position of the 2 screw holes for
attaching directly to the wall. The distance between the two holes will be 82mm.
P Screw in the mounting screws until there is a 3mm gap between the wall and the screw
head.
P Fasten the slide support to the telephone in the “wall mount” position and hook the
telephone onto the screws and press down into place.
P Connect the line cord to the wall socket - The phone is now ready to program.
THE DISPLAY
With the Handset in place the telephone is on “Standby”.
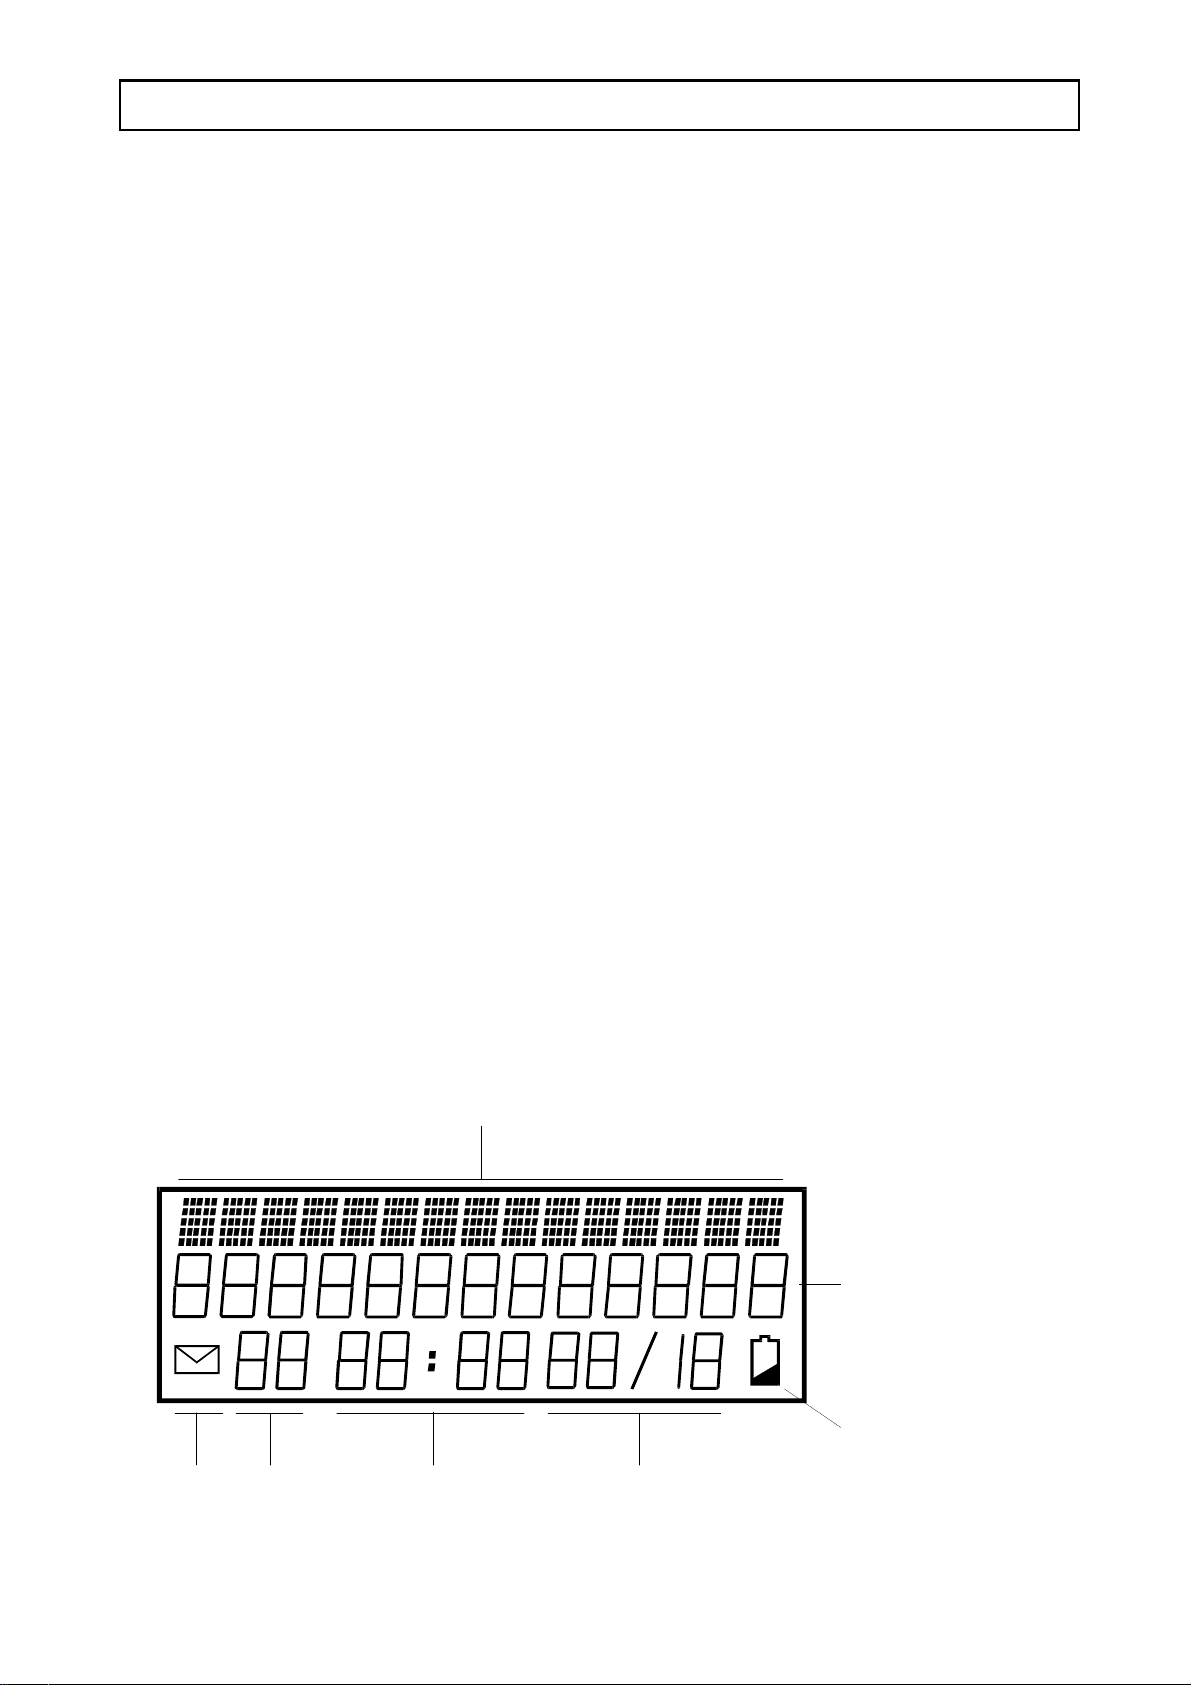
The display (16 in the diagram on page 2) has 15 alpha-numeric characters on the top line
for the display of text messages, 13 segments on the second line to indicate the Caller
Display phone number, and on the 3rd line, will show the new calls received, flashing
envelope, Caller Display memory store number, the time, the date, and the battery low
indicator. See diagram below.
Presentation of text message
Caller Display
New Caller Display Low battery
Calls Memory Time Date
5
Page 7
AUDIOLINE CLD60 PROGRAMMING
SET DATE AND TIME
To set the correct date and time on the display do the following:
P Press the [STORE] button (4 on the diagram on page 2) for 2 seconds and release.
The display will show "LANGUAGE".
P Press the UP Arrow until the display shows "SET TIME".
P Press [ERASE] button. The hours will flash on the display. Press the UP or
DOWN arrows to step to the correct hour. Press [ERASE] button to store the
hours.
P The minutes on the display now flash. Use the UP and DOWN arrows
to set the minutes. Press [ERASE] button to store the minutes.
P The days on the display now flash. Use the UP and DOWN arrows to
set the day. Press [ERASE] to store the day.
P The month on the display will now flash. Press the UP and DOWN
arrows to set the month. Press the [DIAL] button (2 on the diagram on Page 2) to store
the month and return to standby.
SET LANGUAGE
The telephone display will show text in a choice of languages. The language choice is:
Swedish, English, Finish, Danish, Norwegian, Turkish, German, Dutch, Portuguese,
Italian, Spanish and French. To set your chosen language do the following:
Press the [STORE] button down for 2 seconds, release the button.
The display will show "LANGUAGE".
Press [ERASE] button.
P Press the UP or DOWN arrows to choose your language.
P Press the [DIAL] button to store the setting and return to standby.
6
Page 8
THE TELEPHONE AUDIOLINE CLD60
MAKE A CALL
# Lift handset and wait for Dial Tone.
# Dial the number.
# Finish the call by replacing the handset.
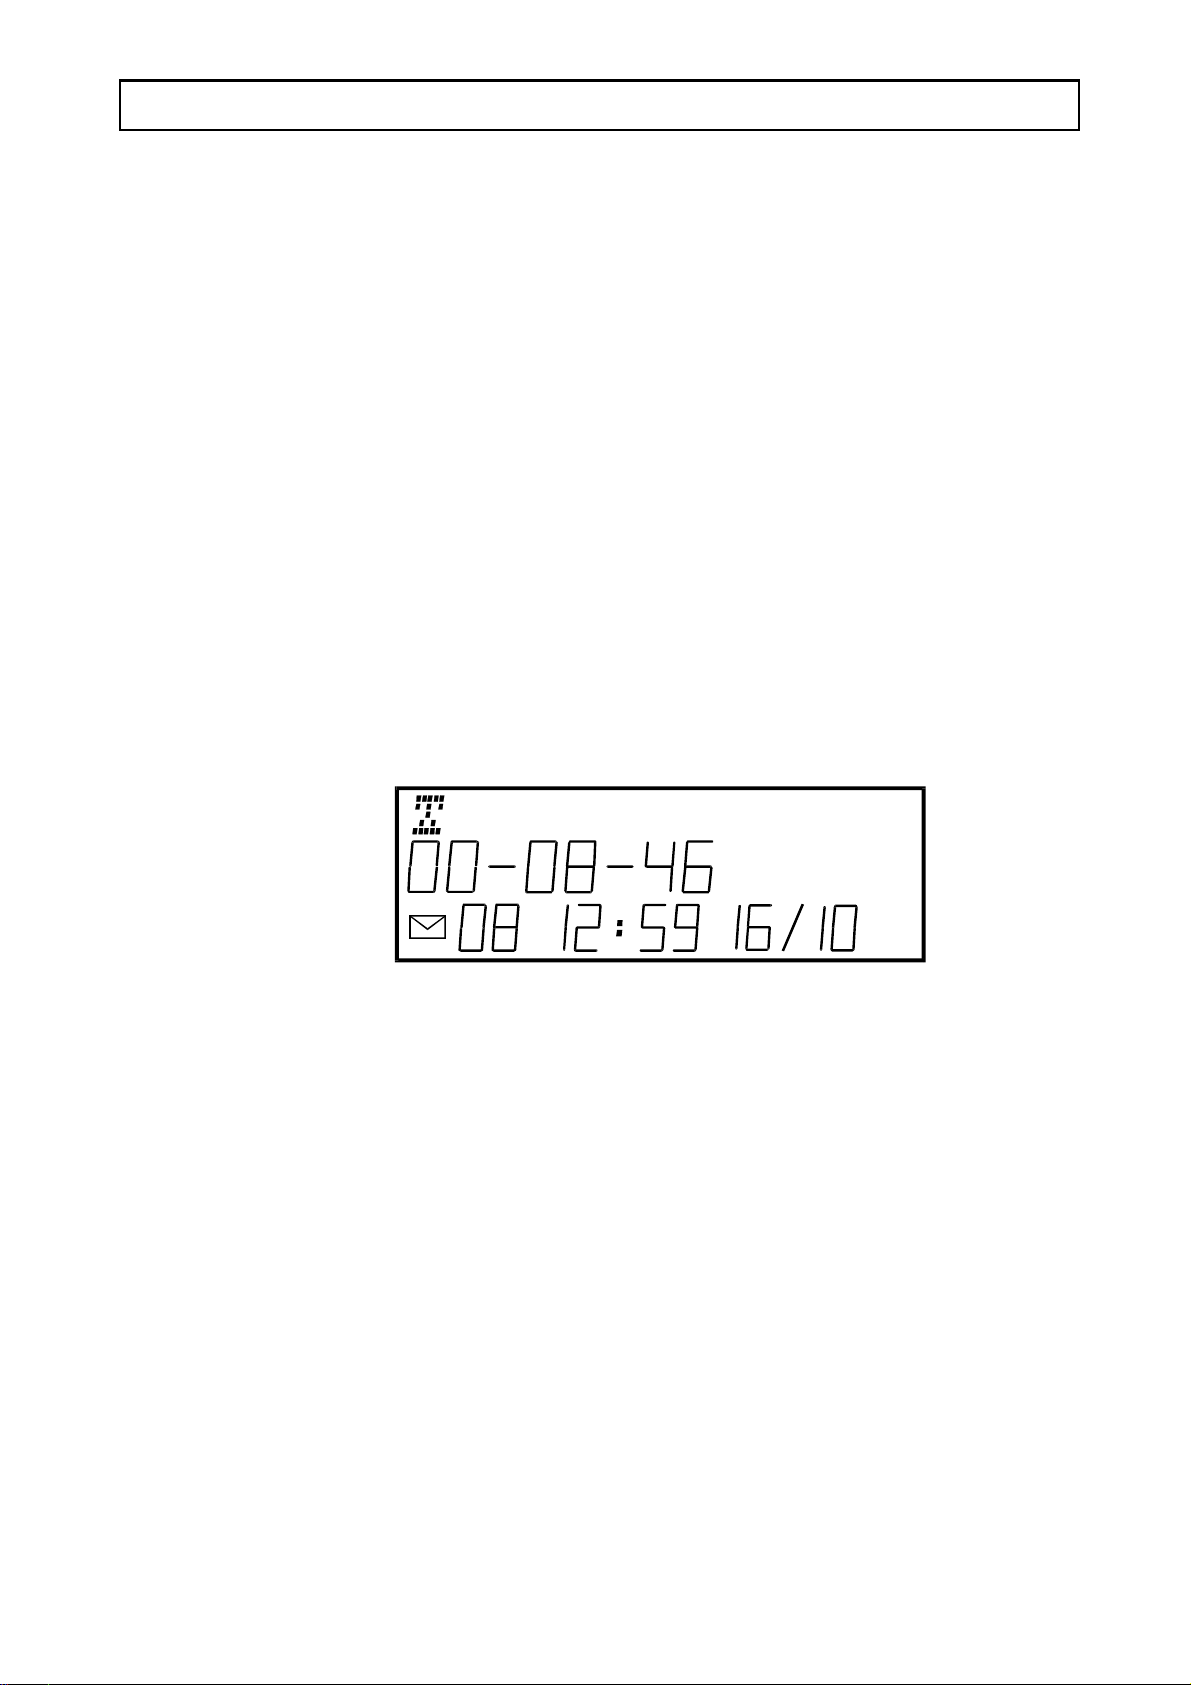
CALL TIMER
Outgoing Calls
The telephone has a call timer function that will show the length of a call on the display.
The example in the diagram below shows a call of 8 minutes 46 seconds duration.
Incoming Calls
On an incoming call the timer will show after about 30 seconds into the call and indicate
the total call time when the call is completed.
LAST NUMBER REDIAL
If the number you called is busy or if you want to call the previous number again, simply;
P Lift the handset and wait for Dial Tone.
P Press the [REDIAL/II] button (8 on the diagram on page 2) . The phone will call the last
number you dialled.
7
Page 9

AUDIOLINE CLD60 THE TELEPHONE
VOLUME CONTROL
The sound level in the handset is adjusted with the switch on the side of the handset. The
sound level changes between HIgh and LOw (18 on the diagram on page 2).
MUTE BUTTON
The [MUTE] button (5 on the diagram on Page 2) will cut off the handset microphone
when pressed. This will allow you to speak privately to a third party while waiting on
your call. Push the [MUTE] button again to switch the handset microphone back on.
The word “MUTE” shows in the display when the [MUTE] button is pressed.
PAUSE FUNCTION
When you make a call with a number stored in the telephones [MEMORY] (3 on the
diagram on page 2) and you need a pause during the dialling , eg., on an international or
a call through a switchboard, you can insert a pause with the [REDIAL/II] button (8 on
diagram on page 2).
The display will show a “P” indicating a dialling pause.
RING SIGNAL
On the right hand side of the telephone (10 on the diagram on page 2) there is a switch
that allows you to change the volume of the ringing signal. The switch has three positions;
Off, Low, and High. The symbol indicates the ring signal is turned off.
8
Page 10

THE TELEPHONE AUDIOLINE CLD60
NETWORK FEATURE BUTTONS
The buttons CW, CALL FWD 1 and 2 above the dialling buttons (12 on the diagram on
page 2), are used for easy access to the frequently used Telstra network services.
CALL WAITING (CW)
To switch between callers when you hear the call waiting tones simply press the [CW]
button. The first caller is put on hold and you can talk to the second caller. Each
subsequent press of the [CW] button allows you to toggle between the callers.
When your conversation is finished hang up by placing the handset on the cradle.
CALL FORWARD (CALL FWD)
Call Forward or Call Diversion is a network feature that allows your calls to be
forwarded to another number under certain conditions. For example, if your telephone is
not answered or you are going to be out, you can program the CLD 60 to forward your
calls to the number of your choice.
CALL FWD 1
Immediate
When leaving home you can program the CLD 60 to forward all your calls immediately
to another number, for example your mobile phone:
# Lift the handset
# Press the [CALL FWD 1] button
# Dial the forward number, eg, your mobile or office number
# Press the [#] button to store
# Listen for the facility tone and replace the handset.
9
Page 11

AUDIOLINE CLD60 THE TELEPHONE
CALL FWD 1
Immediate continued
When arriving home you can cancel the immediate call forward by:
# Lift the handset
# Press the [CALL FWD 1] button
# Listen for the facility tone and replace the handset.
CALL FWD 2
No Answer
Similarly, you can program the CLD 60 to forward all your calls, if your home telephone
is not answered within 7 rings, to another number:
# Lift the handset
# Press the [CALL FWD 2] button
# Dial the forward number, eg, your mobile or office number
# Press the [#] button to store
# Listen for the facility tone and replace the handset.
When arriving home you can cancel the no answer call forward by:
# Lift the handset
# Press the [CALL FWD 2] button
# Listen for the facility tone and replace the handset.
If you make a mistake when entering the forward number simply press the [ERASE]
button and then the [CALL FWD 1/2] button again and re-enter the forward number.
10
Page 12

CALLING NUMBER DISPLAY AUDIOLINE CLD60
CALLER DISPLAY
The Caller Display function will allow you to see in the telephone display the phone
number of the person calling you before you answer an incoming call. The CLD 60 is
also able to display the number of an incoming call when you are on the telephone,
Calling Number Display on Call Waiting, giving you the freedom to decide if you will
talk to the caller. Each incoming calls phone number is stored with the time and the date
of the call.
Up to 70 calls can be stored in the CLD 60 call memory.
NOTE: Whilst the CLD 60 telephone has the Caller Display capability, it will only
display caller information if, the Calling Number Display service is available from, and
you have subscribed to, this carrier service. Check with your Telephone Service
Provider for full details.
CALL INDICATIONS
Details of each incoming call, time and date etc., are stored in the Caller Display
memory. The telephone display will tell you how many new calls have been received, and
the total number of calls in the Caller Display memory. The envelope in the display and
the red indicator will flash telling you new calls have been received.
In the following example there are four new calls and a total of fifteen in the memory.
11
Page 13

AUDIOLINE CLD60 CALLING NUMBER DISPLAY
TO VIEW THE NEW CALL INFORMATION
By using the UP or the DOWN arrows you can view the new phone numbers
in the display.
The phone numbers display in time order. The UP arrow scrolls from the beginning
of the memory, the oldest phone number will be displayed first. The DOWN arrow
scrolls from end of memory, with the latest number being displayed first. When you come
to the end or the top of the list, a message will tell you.
Each memory shows the time and date information, the calling number and the numbers
memory sequence position.
Example.
Phone number 046-2805000, received 10:56 the 14 of October. Sequence number 17
(the 17th call that has been stored).
OUT OF RANGE
If the display shows "OUT OF RANGE" instead of a phone number, it means that no
information was sent with this number. The call may have been an international call or
from a PABX.
PROTECT
If the display shows "PROTECT" it indicates that the calling number is an unlisted
(silent) number or the caller has barred the number so it will not be displayed. It could
also come from a mobile telephone or a PABX.
12
Page 14

CALLING NUMBER DISPLAY AUDIOLINE CLD60
ERASE CALLER DISPLAY NUMBER
Removing a phone number from the Caller Display memory can be done in two ways,
one by one or all at a time.
ERASE ONE NUMBER
P Scroll to the number you want to erase.
P Press the [ERASE] button twice quickly to delete the number in the display.
ERASE ALL NUMBERS
P Scroll to any phone number using the UP and DOWN arrows
P Hold the [ERASE] button down until the display shows "ERASE ALL?"
P Press the [ERASE] button again. All phone numbers are now erased from the memory.
MEMORY FULL
The Caller Display memory can store up to 70 phone numbers (including name and
display text message). If the memory becomes full, the oldest number (number 1) will
disappear and the new number will take its place. The new number becomes number 70
and all others will be renumbered consecutively.
13
Page 15

AUDIOLINE CLD60 CALLING NUMBER DISPLAY
AUTODIAL
With this function the telephone will automatically dial the number which shows in the
display. To autodial a number, do the following:
P Press the UP or the DOWN arrows to scroll to the desired number
P Lift the handset and press the [DIAL] button, the phone number will automatically dial
THE PHONE BOOK
The telephone has a PHONE BOOK function where 20 names and phone numbers can
be stored. When one of these numbers is calling, the display shows both the name and
the number.
In standby the red indicator will double flash and the display changes between "NEW
CALL" and "VIP" on the top line.
In this way you know if one of the phone numbers from the PHONE BOOK (called a
VIP-number) has called.
The PHONE BOOK can also be used to dial a phone number, (see dial a PHONE
BOOK on page 17).
Incoming calls/reading Standby
14
Page 16

PHONE BOOK AUDIOLINE CLD60
TEXT INPUT
When you want to store name and number information in the PHONE BOOK you will
need to use letters and numbers. The Table below shows the multiple functions of the
push button dial.
Push button number 4 has 4 characters G, H, I, or 4.
When you input numbers and names into the PHONE BOOK you will be shown how to
access these multiple characters.
Button Letter/sign
1 . , ? - ! & + 1
2 A B C Å Ä Æ 2
3 D E F 3
4 G H I 4
5 J K L 5
6 M N O Ö Ø 6
7 P Q R S 7
8 T U V 8
9 W X Y Z 9
* *
0 Space 0
# #
15
Page 17

AUDIOLINE CLD60 PHONE BOOK
STORE PHONE NUMBER/NAME
To store information in the PHONE BOOK do the following:
P Press the [MEMORY] button. The display will show how many number/names there
are stored in the PHONE BOOK.
P Press [ERASE] button.
P Enter the phone number (incl. area code).
P When you have entered all the digits, press the [DIAL] button to enter the number.
P Enter the name of the person one letter at a time followed by the button. To enter the
name, A.SMITH, for example,
A press button 2 once then [ERASE] button
. press button 1 once then [ERASE] button
S press button 7 four times then [ERASE] button
M press button 6 once then [ERASE] button
I press button 4 three times then [ERASE] button
T press button 8 once then [ERASE] button
H press button 4 twice
# When you have typed the whole name, press the [DIAL] button to store,
# To enter more names/numbers press the [ERASE] button to access the next memory
location.
# Then press the [MEMORY] button to end.
If the following letter is not on the same push button, you can go directly to the next
letter, without having to press [ERASE] button. If you make a mistake when entering
the characters simply press the arrow to move back and re-enter.
16
Page 18

PHONE BOOK AUDIOLINE CLD60
ERASE NUMBER/NAME
To erase a number/name from the PHONE BOOK do the following:
P Press the [MEMORY] button, and the display will show how many number/names
there are stored in the PHONE BOOK.
P Press the UP or the DOWN arrows until you see the number/name you wish
to erase in the display.
P Press the [ERASE] button twice to erase the entry.
P Press the [MEMORY] button to end.
DIALING A PHONE BOOK NUMBER
To dial a number stored in the PHONE BOOK do the following:
P Press the [MEMORY] button and the display will show how many number/names there
are stored in the phone book.
P Press the UP or the DOWN arrows until the number/name you want shows
in the display. (The list is alphabetical)
P Lift the handset and press the [DIAL] button and the telephone will automatically dial
the number.
17
Page 19

AUDIOLINE CLD60 SPECIAL FUNCTIONS
LEAST COST ROUTING(LCR)
In countries where there are more than one telecommunications carrier you are not limited
to using only one telephone network. If, for example, international calls are cheaper on
another network, you can program the telephone to automatically connect you to that
alternative network when you make the international call.
The selection of carrier is normally done by dialling a four digit overide code prior to the
number you are calling. The CLD 60 is able to store this code and automatically insert
it before the international access number.
For example; if you normally have international calls via Telstra and Optus were to offer
special rates for a certain time, you are able to program the Optus overide number into
memory so that when you dial the international access code (0011) the telephone
automatically dials the override code prior to the international number.
NOTE: To use an alternative carrier’s services you must be registered with or
subscribed to the carrier or to its available services. For more information contact
the carrier/s that are offering the required service.
18
Page 20

SPECIAL FUNCTIONS AUDIOLINE CLD60
TO PROGRAM LCR
# Press the [STORE] button down for 2 seconds, release the button.
The display will show "LANGUAGE".
# Press the DOWN arrow. The display will show "LCR".
# Press [ERASE] button. The display will show "OFF".
# Pressing the UP or DOWN arrows selects “ON” or “OFF”respectively.
# Press the [ERASE] button to continue.
# The first digit on the second line of the display will flash, now enter the digits
(maximum 4) you wish to change, for example, 0011.
# If there are less than 4 digits, press the [ERASE] button to move the cursor to the right
of the “-”. If 4 digits have been entered the cursor will automatically move to the right
of the “-”.
# Now enter the overide number, for example, 1456 (Optus) and the international
access code 0011.
# Press the [DIAL] button to save and return to standby.
In the example shown, each time an international number is dialled the CLD 60 will dial
the overide number and then the international access code, for example, if you dial 0011
46 46 2805000 the CLD 60 will dial 1456 0011 46 46 2805000.
The LCR programming should be set to “OFF” if you no longer use or wish to use the
advertised service. However it is possible to overide the the LCR programming for “one
off” calls by pressing the [MUTE] button before you dial the number.
19
Page 21

AUDIOLINE CLD60 SPECIAL FUNCTIONS
E-MAIL INDICATOR
With Email becoming more popular it could become a problem for a individuals with
access to the Internet, to call the Internet Service Provider (ISP) every time to check if
there is any Email waiting.
Some of the Internet Service Providers (ISP’s) now have a service that will call you whe n
you have received an Email message. This call is too short in duration to ring your
telephone, but if you have the ISP’s number stored in the PHONE BOOK then the
message “VIP” “MSG WAITING” will show in the display each time there is an Email
message waiting for you. Refer to page 16 for details to program the PHONE BOOK.
MESSAGE WAITING
If you have an answering service on your telephone, the answering service will send you
a message informing you of a message that has been received by them. The indication
that a message is waiting for you at the answering service is “MSG WAITING” showing
in the telephone display and indicator (15 on the diagram in page 2) will be flashing.
NOTE: This function may not operate correctly in Australia.
For more information on Network Message storage contact the carrier/s that are
offering the required service. Network message storage is a subscription service.
TROUBLESHOOTING AUDIOLINE CLD60
20
Page 22

IF THE CALLER DISPLAY DOES NOT WORK:
If the Caller Display does not work, first make contact with your network provider to see
if:
# The service is activated in your area.
# Check that your subscription to the service is up to date.
# Ensure you have followed the instructions in this manual.
# Check that all cords and connections are correct.
NO CALLER DISPLAY INFORMATION ON INCOMING CALL:
# Follow the directions above.
# If “OUT OF RANGE” shows in the display it means that no information was sent, it
may have been an international call or from a PABX.
# If “PROTECT” shows in the display it means that the call was from a “silent” number
or the caller had barred their number from being sent.
DISPLAY IS BLANK:
# Check and replace the back up batteries (see page 3).
NO SIGNAL IN HANDSET:
# Check that the handset cord is correctly connected.
# Check that the line cord is connected to the CLD 60 and the wall socket.
# Check that the telephone line is working by connecting another telephone to the
socket.
# Move the handset volume switch (item 18 on page 2) between HI and LO settings.
NO RING SIGNAL:
Check that the ringer switch (item 10 on page 2) is not set to the off position.
21
Page 23

AUDIOLINE CLD60 OTHER INFORMATION
WARNING
It is recommended that you disconnect your telephone during a thunderstorm as you can
get a shock from your telephone (and other electrical appliances). We recommend you
follow these simple precautions during a thunderstorm:
# Do not use your telephone unless the call is urgent.
# If you must use your telephone, make the call as brief as possible and keep clear of
electrical equipment and metal fixtures.
# Do not stand in bare feet on uncovered concrete floors.
# Do not touch brick or concrete walls.
Note: Do not install your telephone in damp or high humidity locations, such as a laundry
or bathroom. If any damage is caused by such elements it is not covered by the
manufacturers warranty.
CLEANING
The casing should be cleaned by wiping with a damp cloth.
# Do not use abrasives, solvents or spray polish that may enter through holes in the
earpiece and mouthpiece and cause damage.
# Do not place the telephone in direct sunlight or use in extreme humidity.
# Clean the display with a soft dry cloth. Do not push on the display, it can be damaged.
REN
The REN number of the CLD 60 is 1. The REN (Ringer Equivalance Number) is
designated to represent the amount of power that a telephone draws from the telephone
line. Most normal exchange lines have a REN capacity of 3. If you wish to connect any
other equipment to the line, simply add up the REN numbers of each piece and ensure
that the total does not exceed 3. If you exceed 3, one telephone may not ring.
22
Page 24

GUARANTEE AUDIOLINE CLD60
GUARANTEE
If you believe your CLD 60 is malfunctioning, please refer to the relevant section and/or
consult the troubleshooting guide in this manual to ensure that you have followed the
instructions carefully.
The CLD 60 is guaranteed for a period of 12 months from the date of purchase. In the
unlikely event of a fault during this period, please contact our Helpline for assistance. If
the product is then found to be faulty you will be asked to return it directly to DORO
with a copy of the purchase receipt.
DORO Australia Pty Ltd
PO Box 6760
Baulkham Hills BC NSW 2153 Australia
Helpline (02) 8853 8444 Fax: (02) 8853-8489
Email: doro@doro.com.au
NOTE: The guarantee does not extend to damage caused by misuse, negligence,
excessive voltage, faults on the telephone line or lightning. This guarantee in no
way affects your statutory rights. DORO is the trademark of DORO AB.
23
Page 25

 Loading...