

Page 1
CLD50
Caller Display
INSTALLATION
3 x 1.5 V batteries (AAA) must be installed prior to use, otherwise the CLD 50 will not work.
NOTE: Remove the line cord when installing or replacing batteries.
1. Remove the screw from the battery compartment on the base of the unit and remove the battery
cover.
2. Fit the batteries (supplied), observing correct polarity.
The display will show: time 14.10, date 13/10 and NO CALLS.
3. Connect the line cord to the "LINE" socket on the rear of the unit and to a telephone network
wall socket.
When you receive a call and the Caller Display service is implemented on your telephone line the
date and time of the internal clock will be changed to the current time automatically. If you wish
to set the time yourself, see the relevant section in this manual.
BATTERY LOW WARNING
When the batteries are low, the battery indicator will illuminate. Call information may be lost
during this procedure.
WALL MOUNTING
Use the bracket provided to mark two holes on the wall (check for hidden pipes, cables before
drilling holes). Use screws (not provided) to fix the bracket to the wall and slide the CLD50 into
position.
Do not place the unit in direct sunlight or use near water or during a thunderstorm. In some
situations the rubber feet on the bottom of the unit can leave marks on a sensitive surface.
Page 2
CALLER DISPLAY
When you have subscribed to your telephone network ‘Caller display’ service, the telephone number
(or related information), date and time of your calls will be displayed by the CLD50. Up to 100 calls
can be stored in the CLD50 call list.
Caller display is an optional telephone Network service which may require a subscription.
Check with your telephone Network operator for full details. If the Caller Display service is
not implemented on your telephone line, incoming call information will not be displayed.
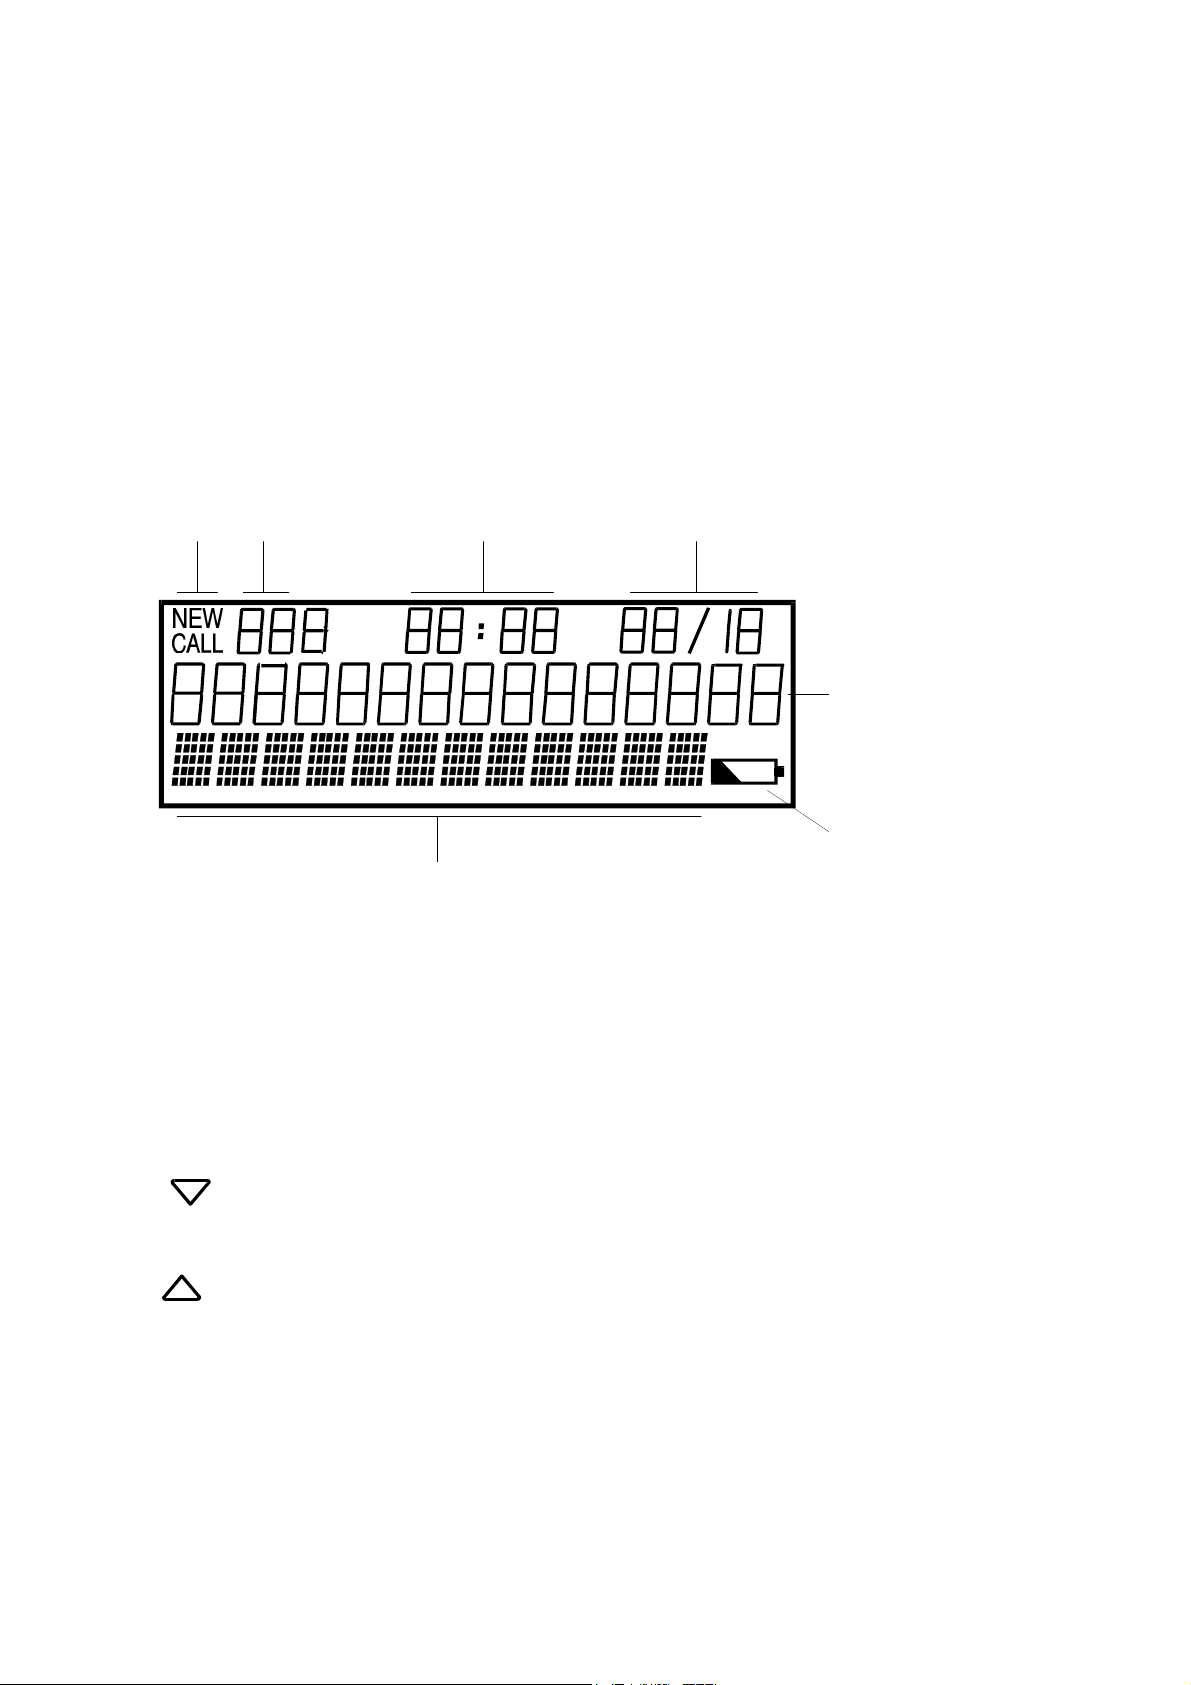
When the CLD50 is in standby mode, the 14 digit/12 character display will show: the current date
& time and how many incoming calls are stored in the call list.
Number /
New Position Time Date
Telephone number
Low battery
Text information
NEW CALLS
When a new call is received, the word NEW will flash in the left hand corner of the display. If the
list is not reviewed, the display will show the number of new calls, the words NEW CALL and the
total number of calls.
READING THE CALL LIST
Press the button to see the latest call in the list. Continue to press this button to review the list
in descending order. When you reach the end of the list the display will show TOP OF LIST.
Press the button to see the oldest call in the list. Continue to press this button to review the list
in ascending order. When you reach the end of the list the display will show END OF LIST.
When the call list is full, 100 calls, the oldest call will be deleted automatically.
OTHER INFORMATION
The display will also show the following information:
PAYPHONE The call has been made from a payphone.
OUT OF AREA The service does not provide the caller’s information.
PRIVATE CALL The caller has prevented their number from being transmitted.
MOBILE The call is from a mobile phone.
Page 3

DELETING ONE NUMBER FROM THE CALL LIST
1. Scroll to the number you wish to delete.
2. Press the ERASE button twice quickly (the number will be erased).
DELETING ALL CALLS FROM THE CALL LIST
1. Press and Hold the ERASE button for 3 seconds (all numbers will be erased).
VIP NUMBERS
Two VIP (Very Important Person) telephone numbers can be stored in the memory. When the
associated number calls the display will show: VIP NUMBER.
STORING
1. Press and Hold the buttons until the display shows SET VIP 1. If you want to store
VIP 2 instead, press the ERASE button once.
2. Repeatedly press the button to program the first digit of the number.
3. Press the button to move on to the next digit.
4. Repeat points 2 & 3 until the complete number is stored, then repeatedly press the ERASE
button to return to standby mode.
ERASING
1. Hold the buttons until the display shows "SET VIP 1".
If you want to erase VIP 2 instead, press the ERASE button once.
2. Use the storing procedure above to enter the new number and over-write the old number.
CHOOSE LANGUAGE
The languages available are English, Finish, Swedish, Norway, Spanish, Danish and Turkish.
1. Press and Hold the buttons until the display shows SET VIP 1.
2. Press the ERASE button twice, the display shows "ENGLISH".
3. Use the buttons to select a language.
4. Repeatedly press the ERASE button to return to standby mode.
12 / 24 HOUR TIME
A 12 or 24 hour clock display is available.
1. Press and Hold the buttons until the display shows "SET VIP 1"
2. Press the ERASE button three times until the display shows "12H / 24H".
3. Use the buttons to select either 12 or 24 hour time.
4. When the chosen setting is flashing in the display, repeatedly press the ERASE button.
SETTING DATE AND TIME
1. Press and Hold the buttons until the display shows "SET VIP 1".
2. Press the ERASE button four times until the display shows "SET TIME".
3. The hour digit(s) will flash on the display. Use the button to set the correct hour.
4. Press the button. The minute digit(s) will flash on the display. Use the button to set
the correct minute(s).
5. Press the button. The day digits will flash on the display. Use the button to set the
correct day of the month.
6. Press the button. The month digit will flash on the display. Use the button to set the
correct month, then repeatedly press the ERASE button to return to standby mode.
Page 4

REN
The REN (Ringer Equivalence Number) of the CLD50 is 0.1. This number determines how many
telephones can be connected to your telephone line. Most normal exchange lines have a REN
capacity of 3.
FAULT FINDING
In the first instance check with your Network operator that the caller display service is implemented
on your telephone line. Secondly, check that the line cord is connected and the batteries are fitted.
NUMBERS ARE NOT DISPLAYED
P Check that the service is implemented on your telephone line.
P If the product has been installed behind a PABX, caller display information will not be
displayed.
THE DISPLAY IS BLANK
P Check/change batteries.
CLEANING
Unplug the product from the telephone network before cleaning. The casing should be cleaned by
wiping with a damp cloth. Do not use abrasives or spray polish that may cause damage.
GUARANTEE
The AUDIOLINE CLD50 is guaranteed for a period of 12 months from the date of purchase. In the
unlikely event of a fault occurring during this period, please return it with a copy of the purchase
receipt to:
DORO Australia Pty Ltd
13 Columbia Way
Norwest Business Park
Baulkham Hills NSW 2153
Ph: (02) 8853-8444 Fax: (02) 8853-8489
Email: doro@doro.com.au
This guarantee does not extend to damage caused by misuse, negligence, excessive voltage, faults
on the telephone line or lightening. This guarantee in no way affects your statutory rights.
Audioline is the trademark of DORO AB.
 Loading...