

Page 1
Babyphon
mit digitaler, rauschfreier Funkübertragung
Baby Monitor
with digital, noiseless Radio Communication
Bedienungsanleitung
Operating Instructions
Baby Care 5
Page 2

Baby Care 5
Bedienungsanleitung____3
Operating Instructions__19
2
Page 3

1
Inhaltsverzeichnis
1 Allgemeine Hinweise 4. . . . . . . . . . . . . . . . . . . . . . . . . . . . . . . .
Bestimmungsgemäße Verwendung 4. . . . . . . . . . . . . . . . . . . . . . .
Sicherheitshinweise 4. . . . . . . . . . . . . . . . . . . . . . . . . . . . . . . . . .
Entsorgung 4. . . . . . . . . . . . . . . . . . . . . . . . . . . . . . . . . . . . . . . .
2 Menüstruktur 5. . . . . . . . . . . . . . . . . . . . . . . . . . . . . . . . . . . . . .
3 Bedienelemente 6. . . . . . . . . . . . . . . . . . . . . . . . . . . . . . . . . . . .
Babygerät (Sender) 6. . . . . . . . . . . . . . . . . . . . . . . . . . . . . . . . . .
Elterngerät (Empfänger) 7. . . . . . . . . . . . . . . . . . . . . . . . . . . . . . .
Ladeschale 7. . . . . . . . . . . . . . . . . . . . . . . . . . . . . . . . . . . . . . . .
4 Inbetriebnahme 8. . . . . . . . . . . . . . . . . . . . . . . . . . . . . . . . . . . .
Sicherheitshinweise 8. . . . . . . . . . . . . . . . . . . . . . . . . . . . . . . . . .
Verpackungsinhalt prüfen 8. . . . . . . . . . . . . . . . . . . . . . . . . . . . . .
Elterngerät 8. . . . . . . . . . . . . . . . . . . . . . . . . . . . . . . . . . . . . . . .
Babygerät 8. . . . . . . . . . . . . . . . . . . . . . . . . . . . . . . . . . . . . . . . .
5 Bedienung Ihres Babyphons 9. . . . . . . . . . . . . . . . . . . . . . . . . .
Lautstärke 9. . . . . . . . . . . . . . . . . . . . . . . . . . . . . . . . . . . . . . . . .
Akkuladeanzeige / Akku-Leerwarnung 9. . . . . . . . . . . . . . . . . . . . .
Sprache 9. . . . . . . . . . . . . . . . . . . . . . . . . . . . . . . . . . . . . . . . . .
Uhrzeit 9. . . . . . . . . . . . . . . . . . . . . . . . . . . . . . . . . . . . . . . . . . .
Babyalarm 10. . . . . . . . . . . . . . . . . . . . . . . . . . . . . . . . . . . . . . . .
Schlaflieder 10. . . . . . . . . . . . . . . . . . . . . . . . . . . . . . . . . . . . . . . .
Schlaflieder auswählen und starten 11. . . . . . . . . . . . . . . . . . . . . . .
Temperatur 11. . . . . . . . . . . . . . . . . . . . . . . . . . . . . . . . . . . . . . . .
Temperaturbereich ändern 11. . . . . . . . . . . . . . . . . . . . . . . . . . . . .
Temperaturalarm einstellen 12. . . . . . . . . . . . . . . . . . . . . . . . . . . .
Umstellen von ° C auf ° F 12. . . . . . . . . . . . . . . . . . . . . . . . . . . . . .
Funkruf zwischen Baby- und Elterngerät (Paging) 12. . . . . . . . . . . .
Zum Baby sprechen 12. . . . . . . . . . . . . . . . . . . . . . . . . . . . . . . . . .
Nachtlicht 13. . . . . . . . . . . . . . . . . . . . . . . . . . . . . . . . . . . . . . . . .
Taschenlampe 13. . . . . . . . . . . . . . . . . . . . . . . . . . . . . . . . . . . . . .
Babyfütterung 13. . . . . . . . . . . . . . . . . . . . . . . . . . . . . . . . . . . . . .
Erste bzw. nächste Babyfütterungszeit einstellen 13. . . . . . . . . . . . .
Babyfütterungsintervalle einstellen 14. . . . . . . . . . . . . . . . . . . . . . .
Babyfütterungsalarm einschalten 14. . . . . . . . . . . . . . . . . . . . . . . .
Babyfütterungsalarm ausschalten 14. . . . . . . . . . . . . . . . . . . . . . . .
Anpassen der Empfindlichkeit des Babyphons 14. . . . . . . . . . . . . . .
Eco Mode 14. . . . . . . . . . . . . . . . . . . . . . . . . . . . . . . . . . . . . . . . .
6 Fehlerbeseitigung 15. . . . . . . . . . . . . . . . . . . . . . . . . . . . . . . . . .
7 Technische Daten 16. . . . . . . . . . . . . . . . . . . . . . . . . . . . . . . . . .
Reinigung und Pflege 16. . . . . . . . . . . . . . . . . . . . . . . . . . . . . . . . .
Konformitätserklärung 16. . . . . . . . . . . . . . . . . . . . . . . . . . . . . . . .
8 Garantie 17. . . . . . . . . . . . . . . . . . . . . . . . . . . . . . . . . . . . . . . . . .
Service−Hotline Deutschland: Tel. 0180 5 001388 Kosten aus dem dt. Festnetz bei Drucklegung: 14 ct/Min,
ggf. abweichende Kosten aus dem Mobilfunk
3
Page 4

− Allgemeine Hinweise −
1 Allgemeine Hinweise
Bitte lesen Sie diese Bedienungsanleitung sorgfältig durch. Öffnen Sie niemals die Geräte und führen
Sie keine Reparaturen durch. Wenden Sie sich im Garantiefall an Ihren Fachhändler. Im Zuge von
Projektverbesserungen behalten wir uns technische und optische Veränderungen am Artikel vor.
Bestimmungsgemäße Verwendung
Das Babyphon dient zur Raumüberwachung. Das Babygerät (Sender) überträgt Stimmen und andere
Geräusche vom Baby zum Elterngerät (Empfänger). Jede andere Verwendung gilt als nicht
bestimmungsgemäß. Die Verwendung dieser Geräte ersetzt nicht die persönliche Anwesenheit und
das Aufpassen auf Ihr Kind. Schadensersatzansprüche, die über die gesetzlichen Bestimmungen
hinausgehen, sind ausgeschlossen.
Sicherheitshinweise
Das Babyphon wurde entwickelt, um Ihnen zusätzliche Sicherheit zu bieten, wenn Sie einmal nicht im
selben Zimmer wie Ihr Baby sein können. Es ist KEIN Ersatz für das Aufpassen durch Erwachsene.
Während der Benutzung muss sich ein Elternteil immer in Reichweite des Babyphons aufhalten. Ihr
Babyphon ist weder ein medizinisches Gerät noch kann es den "plötzlichen Kindstod" verhindern.
Verlassen Sie sich in Bezug auf das Wohlbefinden Ihres Kindes nicht auf dieses Gerät. Überprüfen
Sie regelmäßig persönlich, ob es Ihrem Kind gut geht.
Legen Sie niemals etwas über Ihr Babyphon bzw. decken Sie es niemals ab.
Legen Sie das Eltern− oder Babygerät niemals in Wassernähe oder in einer feuchten Umgebung ab.
Achten Sie bei Auslandsreisen darauf, dass die am Netzteil angegebene Spannung mit der
Spannung vor Ort übereinstimmt.
Werfen Sie Batterien/Akkus niemals in den Hausmüll. Beachten Sie die
Entsorgungsmöglichkeiten Ihrer Kommunalbehörden.
Verwenden Sie in Ihrem Elterngerät niemals Einwegbatterien. Verwenden Sie nur die
empfohlenen Akkus − 2 x AAA 1,2 V 800 mAH NiMH.
Verwenden Sie nur das mitgelieferte Netzteil, andernfalls riskieren Sie die Beschädigung Ihres
Babyphons.
Ziehen Sie das Netzteil und entfernen Sie die Batterien/Akkus, wenn Sie das Babyphon nicht
benutzen.
Besprühen Sie das Gerät nicht mit Reinigungspolitur. Ziehen Sie das Netzteil, bevor Sie das
Gerät reinigen.
Während der Benutzung können die Netzteile warm werden.
Setzen Sie Ihr Eltern− oder Babygerät keinem direkten Sonnenlicht aus.
Die Ladekapazität der wiederaufladbaren Akkus im Elterngerät lässt mit der Zeit nach, so dass diese
unter Umständen ersetzt werden müssen. Neue Akkus können über unsere Hotline bezogen werden.
Entsorgung
Wollen Sie Ihr Gerät entsorgen, bringen Sie es zur Sammelstelle Ihres kommunalen
Entsorgungsträgers (z. B. Wertstoffhof). Das nebenstehende Symbol bedeutet, dass Sie das
Gerät auf keinen Fall in den Hausmüll werfen dürfen! Nach dem Elektro− und
Elektronikgerätegesetz sind Besitzer von Altgeräten gesetzlich gehalten, alte Elektro− und
Elektronikgeräte einer getrennten Abfallerfassung zuzuführen.
Akkus/Batterien entsorgen Sie beim batterievertreibenden Handel
sowie bei zuständigen Sammelstellen, die entsprechende Behälter
bereitstellen.
Verpackungsmaterialien entsorgen Sie entsprechend den lokalen
Vorschriften.
4
Service−Hotline Deutschland: Tel. 0180 5 001388 Kosten aus dem dt. Festnetz bei Drucklegung: 14 ct/Min,
ggf. abweichende Kosten aus dem Mobilfunk
Page 5

− Menüstruktur −
2 Menüstruktur
1. Ebene 2. Ebene 3. Ebene 4. Ebene
Nachtlicht Ein?IAus?
Schlaflied Abspielen?IStopp?
Empfindlk. Stufe
Geräu. Alarm Ein?IAus?
Temperatur Bereichswahl
Uhr Zeit einst.
Fütterung Zeit einst.
Neu wählen
Lautst.
Temp. Alarm
Grad CIGrad F
Stundeformat
Fü.Intervall
Alarm
Twinkle
Silent Night
Minuet in G
Danny Boy
Blue Danube
Alle absp.
Stufe
Obere Gr. xx
Untere Gr. xx
Ein?IAus?
Lautst.
Jahr
Monat
Ta g
Stunde
Minute
12 Std?I24 Std?
Stunde
Minute
Stunde
Minute
Ein?IAus?
Lautst.
Stufe
Stufe
Sprache Deutsch
Service−Hotline Deutschland: Tel. 0180 5 001388 Kosten aus dem dt. Festnetz bei Drucklegung: 14 ct/Min,
Espanol
Italiano
PYCCKÈÉ
English
Francais
ggf. abweichende Kosten aus dem Mobilfunk
5
Page 6
− Bedienelemente −
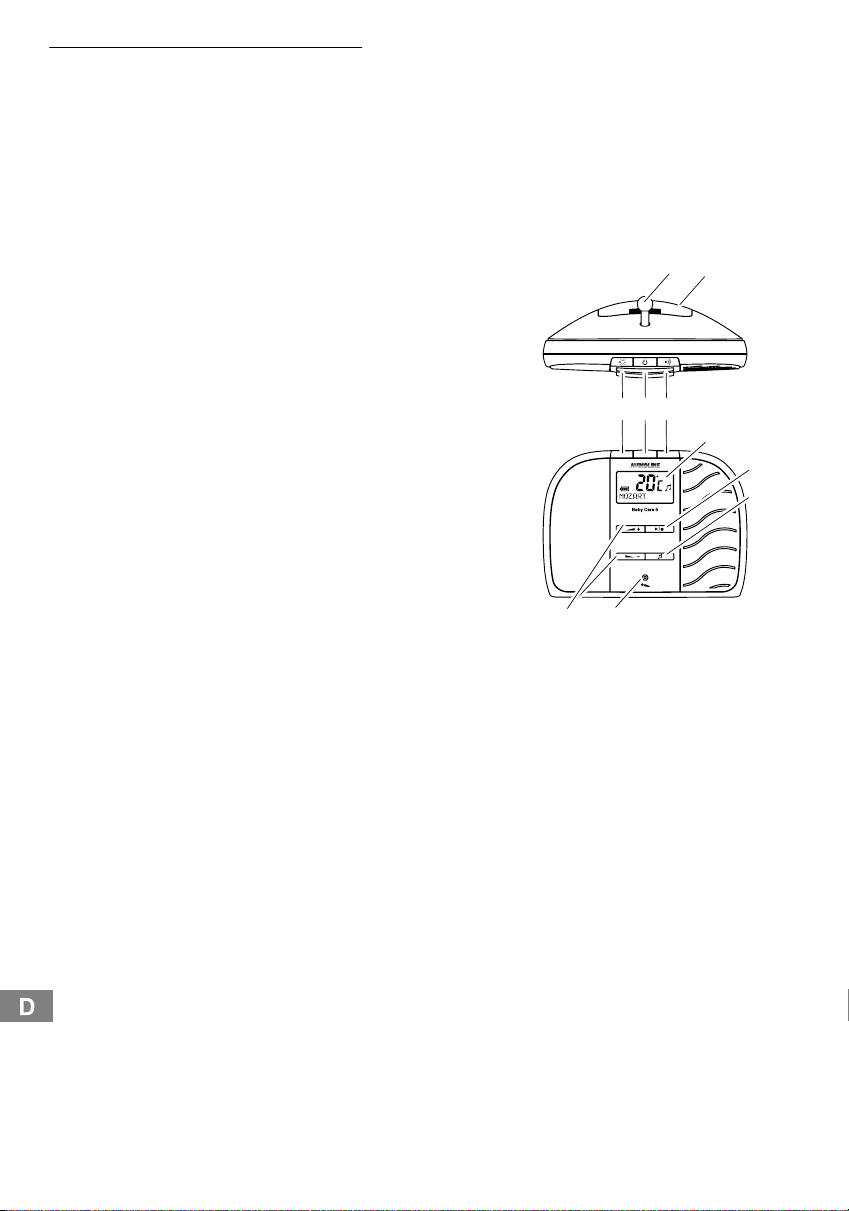
3 Bedienelemente
Babygerät (Sender)
1 Temperatur Sensor
Fühlt die Temperatur im Babyzimmer.
2 Batteriefachdeckel
Für nicht aufladbare Batterien
(sind nicht im Lieferumfang enthalten).
3 Nachtlicht−Taste
Drücken Sie diese Taste, um das Nachtlicht einzuschalten.
Das Licht scheint leicht durch die Vorderleiste. Drücken
Sie die Taste erneut, um das Licht auszuschalten. Es
erlischt langsam.
4 Ein/Aus−Taste
Drücken Sie diese Taste kurz, um das Gerät
einzuschalten. Halten Sie diese Taste gedrückt, um das
Gerät auszuschalten.
5 Funkruf−Taste
Halten Sie die Taste 2 Sekunden gedrückt. Das
Elterngerät gibt einen Alarmton. Mit dieser Funktion
können Sie Hilfe rufen oder ein verlegtes Elterngerät
wiederfinden.
1
345
2
6
7
8
6 Display
Zeigt die aktuellen Einstellungen an:
Batterielevel, Datum und Zeit, Temperatur,
Schlaflieder Ein/Aus, Schlaflied−Melodie.
7 Play/Stopp−Taste, Schlaflieder
Zum Starten oder Stoppen der Schlaflieder.
8 Musik−Taste
Zum Auswählen der Schlaflied−Melodien.
9 Mikrofon
Übermittelt die Geräusche aus dem Babyzimmer.
10 Lautstärke−Tasten Up/Down
Volume −: Reduzieren der Schlaflied−Lautstärke.
Volume +: Erhöhen der Schlaflied−Lautstärke.
6
Service−Hotline Deutschland: Tel. 0180 5 001388 Kosten aus dem dt. Festnetz bei Drucklegung: 14 ct/Min,
ggf. abweichende Kosten aus dem Mobilfunk
910
Page 7
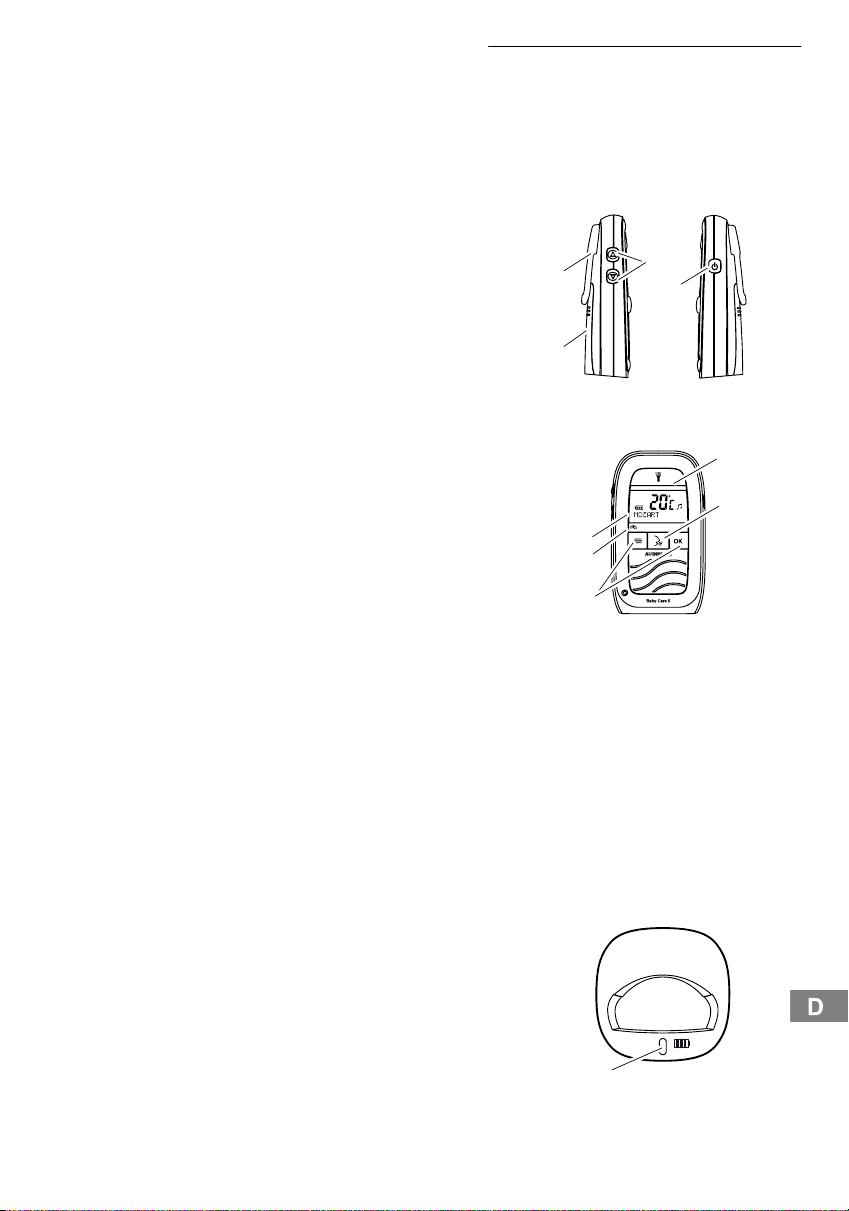
Elterngerät (Empfänger)
11 Akkufachdeckel
Wiederaufladbare Akkus.
12 Gürtelclip
13 Lautstärke−Tasten Up/Down
Stellen Sie die Lautstärke ein, in der Sie die Geräusche
aus dem Babyzimmer hören möchten und nutzen Sie
diese Tasten zur Navigation im Menü.
14 Ein/Aus−Taste
Drücken Sie diese Taste, um das Gerät einzuschalten.
Halten Sie die Taste gedrückt, um auszuschalten.
15 Menü−Taste, OK−Taste
Die Menü−Taste und OK−Taste bilden mit den Up/Down
Tasten eine Einheit und dienen der Einstellung des
Babyphons. Drücken Sie die Menü−Taste, um Zugang zu
den Menüoptionen zu bekommen. Danach wählen Sie mit
den Up/Down−Tasten eine Option aus und bestätigen
diese mit der OK−Taste. Mit der Menü−Taste verlassen Sie
auch die aktuelle Menüebene um einen Schritt zurück.
16 Verbindungs−LED
Grünes Licht: Verbunden mit Babygerät
Blinkendes Licht: Verbindung unterbrochen.
− Bedienelemente −
12
11
17
16
15
13
14
18
19
17 Display
Zeigt die aktuellen Einstellungen an:
Batterielevel, Datum und Zeit, Temperatur,
Schlaflieder Ein/Aus, Schlaflied−Melodie.
18 Lampen−Taste
Halten Sie die Lampen−Taste gedrückt, um einen weichen
Lichtstrahl zu erzeugen.
19 Sprech−Taste (zur Babyberuhigung)
Halten Sie die Sprech−Taste gedrückt, um zu Ihrem Baby
oder Partner zu sprechen.
Ladeschale
20 Ladeleuchte
Wenn das Elterngerät in die Ladeschale gelegt wird,
leuchtet die rote Ladeleuchte, um den Ladevorgang
anzuzeigen. Die Leuchte bleibt eingeschaltet, um
anzuzeigen, dass ein optimaler Ladevorgang eingehalten
wird.
20
Service−Hotline Deutschland: Tel. 0180 5 001388 Kosten aus dem dt. Festnetz bei Drucklegung: 14 ct/Min,
ggf. abweichende Kosten aus dem Mobilfunk
7
Page 8
− Inbetriebnahme −
4 Inbetriebnahme
Sicherheitshinweise
Lesen Sie vor Inbetriebnahme unbedingt die "Allgemeinen Hinweise" am Anfang dieser
Bedienungsanleitung.
Verpackungsinhalt prüfen
Zum Lieferumfang gehören:
1 Elterngerät (Empfänger)
1 Babygerät (Sender) 1 Netzteil mit Netzschnur
1 Tragetasche
1 Ladeschale mit Netzteil
2 wiederaufladbare Akkus Typ AAA, 800 mAh
Elterngerät
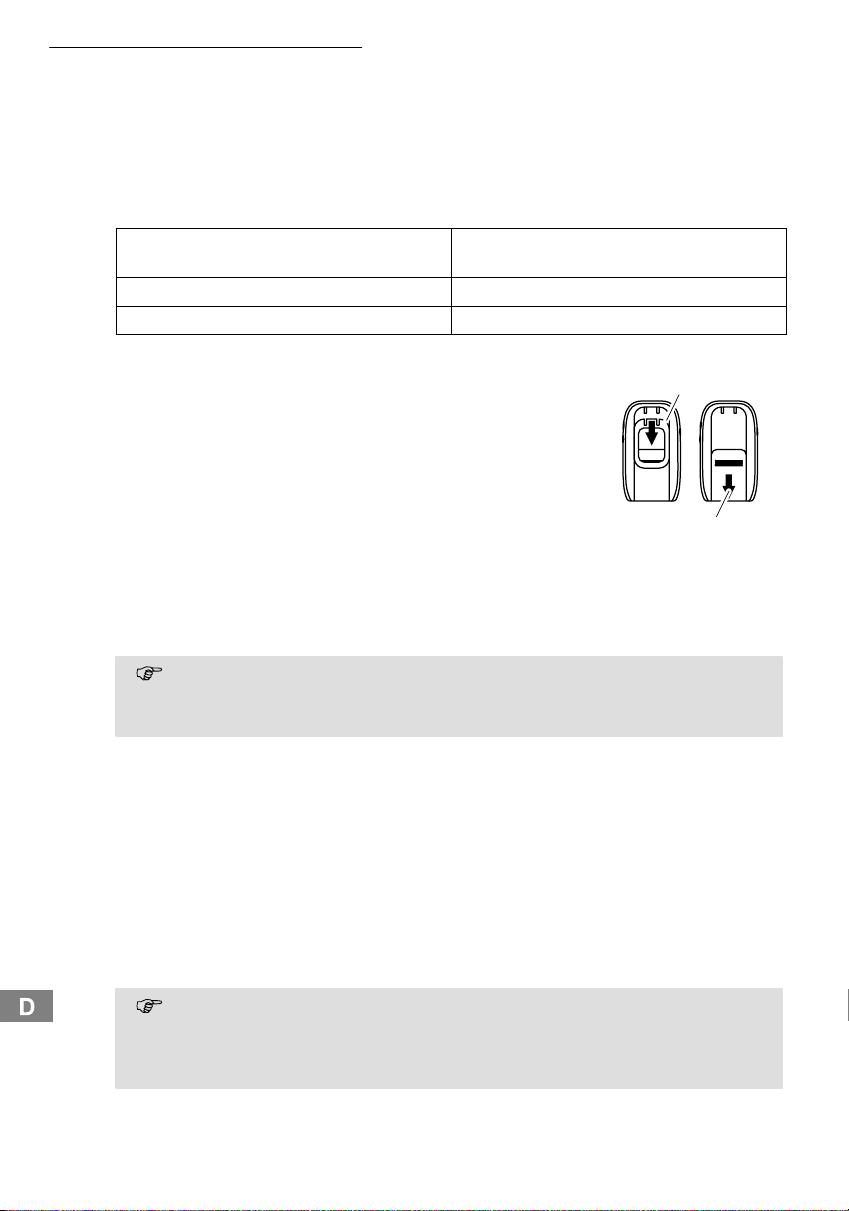
1. Entfernen Sie den Gürtelclip, indem Sie den Clip (12) oben
anheben und nach unten schieben.
2. Entfernen Sie anschließend den Akkufachdeckel (11) an der Rückseite
des Elterngeräts, indem Sie auf den Deckel drücken und ihn nach unten
schieben. Legen Sie die wiederaufladbaren Akkus entsprechend der
Markierungen im Gerät ein und schließen Sie den Deckel wieder.
3. Stellen Sie das Elterngerät in die Ladeschale.
4. Stecken Sie das Netzteil in die Steckdose.
Die rote Ladeleuchte an der Ladeschale leuchtet auf, um anzuzeigen, dass das Elterngerät
geladen wird (die Leuchte bleibt eingeschaltet, um anzuzeigen, dass optimal geladen wird).
5. Drücken Sie die Ein/Aus−Taste, um das Gerät einzuschalten.
Vor der ersten Benutzung oder nach einer langen Nutzungspause muss das Elterngerät
13 Stunden geladen werden. Während dieser Zeit kann das Elterngerät in der Ladeschale
weiter genutzt werden, wenn es eingeschaltet ist. Ohne Akkus ist ein Betrieb von der
Ladestation nicht möglich.
Babygerät
1. Bei einem Stromausfall kann Ihr Babyphon auf Batterieversorgung umschalten. Aus diesem
Grund wird das Einlegen von Batterien in das Babygerät empfohlen.
2. Entfernen Sie den Batteriedeckel an der Rückseite des Babygeräts, indem Sie auf den Deckel
drücken und ihn nach unten schieben. Legen Sie 3 Alkaline−Batterien des
Typs AA (nicht im Lieferumfang enthalten) entsprechend der Markierung im Gerät ein und
schließen Sie den Deckel wieder. Verwenden Sie keine Akkus im Babygerät.
3. Stecken Sie das Stromkabel in den Eingang an der Seite des Babygeräts und stecken Sie das
Netzteil in die Steckdose.
4. Drücken Sie die Ein/Aus−Taste, um das Gerät einzuschalten.
Das Babygerät sollte in ca. 1 bis 1,5 m Entfernung vom Kinderbett auf einer geraden
Oberfläche aufgestellt werden. Stellen Sie das Babygerät niemals in das Kinderbett, Bett oder
in den Laufstall. Stellen Sie sicher, dass sich das Gerät, die Kabel und das Netzteil außerhalb
der Reichweite von Babys und anderen Kleinkindern befindet. Stellen Sie die Geräte niemals
auf antike oder polierte Oberflächen.
12
11
8
Service−Hotline Deutschland: Tel. 0180 5 001388 Kosten aus dem dt. Festnetz bei Drucklegung: 14 ct/Min,
ggf. abweichende Kosten aus dem Mobilfunk
Page 9

− Bedienung −
5 Bedienung Ihres Babyphons
Sobald Sie Ihr Babyphon eingeschaltet haben, können Sie die Geräusche aus dem Babyzimmer über
das Elterngerät hören. Außerdem können Sie die Geräusche "sehen", da die grünen und roten
Sensorleuchten oben am Elterngerät mit dem Geräuschpegel aufleuchten und erlöschen.
Wenn die Verbindung zwischen Eltern− und Babygerät zu irgendeinem Zeitpunkt ausfällt,
blinkt die grüne "Verbindungsleuchte" am Elterngerät, es ertönt ein Warnton, der auf die fehlende Verbindung hinweist und die grünen und roten Sensorleuchten reagieren nicht mehr
auf Geräusche. Befolgen Sie die Anweisungen im Kapitel "Fehlerbeseitigung", um die "Verbindung" wiederherzustellen.
Lautstärke
Mit den Up/Down−Tasten an der Seite des Elterngeräts können Sie die Lautstärke einstellen, mit der
Sie Ihr Baby hören. Diese Einstellung verändert nicht die Empfindlichkeit des Babyphons, nur die
Lautstärke mit der Sie die Geräusche hören, wird verändert.
Akkuladeanzeige / Akku-Leerwarnung
Das Elterngerät funktioniert außerhalb der Ladeschale bis zu 10 Stunden. Dies hängt jedoch davon
ab, wie stark die Akkus geladen sind. Wenn die Akkus nur gering geladen sind, beginnt das
"Batteriesymbol" am Elterngerät zu blinken und ein Warnton ertönt. Sie sollten das Gerät zurück in die
Ladeschale legen, um die Akkus zu laden. Auch in der Ladeschale können Sie Ihr Elterngerät weiter
benutzen.
Sprache
Ihr Babyphon kann für verschiedene Sprachen eingestellt werden.
Sprache ändern
Am Elterngerät
1. Drücken Sie die Menü−Taste, um danach mit den Up/Down−Tasten den Eintrag [Language]
auszuwählen. Danach OK−Taste betätigen.
2. Das Display zeigt [English]. Drücken Sie die Up/Down−Tasten, um die gewünschte Sprache
auzuwählen. Danach OK−Taste betätigen. Das Display zeigt [Gespeichert] und die gewünschte
Sprache ist jetzt aktiviert.
Uhrzeit
Sie können am Elterngerät Datum und Uhrzeit einstellen und zwischen den Formaten 12 und 24
Stundenanzeige wählen (voreingestellt ist die 24 Stundenanzeige). Wenn Sie die
Fütterungs−Funktion" nutzen wollen, müssen
Wenn Sie Ihr Babyphon von der Stromversorgung getrennt haben, müssen Sie die Uhrzeit
neu einstellen.
Uhrzeit einstellen
Am Elterngerät
1. Drücken Sie die Menü−Taste, um danach mit den Up/Down−Tasten den Eintrag [Uhr]
auszuwählen. Danach OK−Taste betätigen.
2. Das Display zeigt [Zeit einst]. OK−Taste betätigen.
3. Das Display zeigt [Jahr]. Mit den Up/Down−Tasten das aktuelle Jahr auswählen. OK−Taste
betätigen.
4. Das Display zeigt [Monat]. Mit den Up/Down−Tasten den aktuellen Monat auswählen. OK−Taste
betätigen.
Service−Hotline Deutschland: Tel. 0180 5 001388 Kosten aus dem dt. Festnetz bei Drucklegung: 14 ct/Min,
ggf. abweichende Kosten aus dem Mobilfunk
Sie die Uhrzeit einstellen.
9
Page 10

− Bedienung −
5. Das Display zeigt [Tag]. Mit den Up/Down−Tasten den aktuellen Tag auswählen. OK−Taste
betätigen.
6. Das Display zeigt [Stunde]. Mit den Up/Down−Tasten die aktuelle Stunde im 24 Stundenformat
auswählen. OK−Taste betätigen.
7. Das Display zeigt [Minute]. Mit den Up/Down−Tasten die aktuelle Minute auswählen. OK−Taste
betätigen. Das Display zeigt [Gespeichert] und ein Quittungssignal wird ausgegeben. Datum und
Uhrzeit werden nun angezeigt.
12 oder 24 Stundenformat einstellen
Am Elterngerät
1. Drücken Sie die Menü−Taste, um danach mit den Up/Down−Tasten den Eintrag [Uhr]
auszuwählen. Danach OK−Taste betätigen.
2. Das Display zeigt [Zeit einst]. OK−Taste betätigen. Mit den Up/Down−Tasten den Eintrag
[Stundeformat] wählen. OK−Taste betätigen.
3. Das Display zeigt [12 Std?]. OK−Taste betätigen oder Menü−Taste betätigen, falls Sie keine
Änderung vornehmen möchten. Das Display zeigt [Gespeichert], um zu bestätigen, dass das 12
Stundenformat aktiviert ist.
Bei der 12 Stundenanzeige wird ein kleines a" für AM oder ein kleines p" für PM im Display
angezeigt.
4. Um in das 24 Stundenformat zu wechseln, wiederholen Sie die oben genannten Schritte. Im
Schritt 3 wird [24 Std?] angezeit. Danach OK−Taste betätigen.
Babyalarm
Sie können das Elterngerät so einstellen, dass ein zusätzlicher Warnton ausgegeben wird, wenn der
Geräuschpegel im Babyzimmer so laut ist, dass am Elterngerät die roten Geräuschsensorleuchten
aufleuchten. Dieses ist besonders hilfreich, wenn die Lautstärke Ihres Elterngeräts ganz nach unten
gestellt ist, weil Sie nur die Geräuschsensorleuchten zur Überwachung benutzen möchten.
Am Elterngerät
1. Drücken Sie die Menü−Taste, um danach mit den Up/Down−Tasten den Eintrag [Geräu. Alarm]
auszuwählen. Danach OK−Taste betätigen.
2. Das Display zeigt [Ein?]. Danach OK−Taste betätigen. OK−Taste betätigen oder Menü−Taste
betätigen, falls Sie keine Änderung vornehmen möchten. Das Display zeigt [Gespeichert] und
ein Quittungssignal ertönt.
3. Wenn Sie die Alarmierungslautstärke einstellen wollen, drücken Sie die Menü−Taste und
navigieren zum Eintrag [Geräu. Alarm], betätigen die OK−Taste und navigieren zum Eintrag
[Lautst] und drücken die OK−Taste. Das Display zeigt [Stufe] und eine Anzahl von Balken.
Diese Balken sind repräsentativ für die gewünschte Alarmierungslautstärke. Ändern Sie die
Lautstärke mit den Up/Down−Tasten (alle Balken = max. Lautstärke).
4. Das Display zeigt [Gespeichert]. Ein Alarmierungston wird dann am Elterngerät ausgegeben,
wenn die Geräusche im Babyzimmer so laut geworden sind, dass auch die roten LEDs
aufleuchten.
5. Um den Babyalarm auszuschalten, verfahren Sie in gleicher Weise. Das Display zeigt jetzt
[Aus?]. Danach OK−Taste betätigen. Das Display zeigt [Gespeichert].
Schlaflieder
10
Ihr Baby kann mit sanften Schlafliedern des Babygeräts einschlafen. Sie haben 5 verschiedene
Melodien zur Auswahl oder Sie können alle nacheinander abspielen lassen [Abspielen?]. Sie
können die Schlaflieder sowohl am Babygerät als auch am Elterngerät ein− und ausschalten. Im
eingeschalteten Zustand wird eine Musiknote in beiden Displays angezeigt und der Titel des gerade
aktuellen Schlafliedes. Die Schlaflieder werden 15 Minuten lang abgespielt.
Service−Hotline Deutschland: Tel. 0180 5 001388 Kosten aus dem dt. Festnetz bei Drucklegung: 14 ct/Min,
ggf. abweichende Kosten aus dem Mobilfunk
Page 11

− Bedienung −
Schlaflieder auswählen und starten
Am Babygerät
1. Drücken Sie die Musik−Taste. Das Display wird eingeschaltet. Das Schlaflied wird angezeigt.
2. Drücken Sie die Musik−Taste erneut so oft, bis Sie das gewünschte Schlaflied gefunden haben
oder wählen Sie [Alle absp?].
3. Drücken Sie die Play/Stopp−Taste, um die Auswahl zu starten oder zu stoppen.
Am Elterngerät
1. Drücken Sie die Menü−Taste, um danach mit den Up/Down−Tasten den Eintrag [Schlaflied]
auszuwählen. Danach OK−Taste betätigen.
2. Das Display zeigt [Abspielen?]. Drücken Sie die Up/Down−Tasten, um den Eintrag [Neu
wählen] auszuwählen. Danach OK−Taste betätigen.
3. Das Display zeigt das aktuelle Schlaflied. Drücken Sie die Up/Down−Tasten, um das gewünschte
Schlaflied auszuwählen oder wählen Sie [Alle absp.]. Das Display bestätigt die Aktion mit der
Meldung [Gespeichert].
4. Das Display zeigt [Schlaflied]. Danach 2−mal die OK−Taste betätigen.
5. Um das Abspielen zu stoppen, drücken Sie 2−mal die OK−Taste wenn Sie sich immer noch im
Schlaflied Menü befinden.
Wenn Sie das Abspielen nicht stoppen, wird es automatisch nach 15 Minuten beendet.
Temperatur
Es ist sehr wichtig für die Gesundheit Ihres Babys, dass es sich in einem gleichmäßigen
Temperaturbereich befindet. Dazu gehören Raum−, Körper−, Kleidungs− und Schlafraumtemperatur
(erkundigen Sie sich bei Ihrem örtlichen Gesundheitsamt nach den geeigneten Temperaturen). Ihr
Babyphon kann Sie bei der Temperaturüberwachung unterstützen, indem die Temperaturen am
Eltern− und Babygerät angezeigt werden. Des Weiteren können Sie sich alarmieren lassen, wenn die
Temperaturen sich außerhalb der erlaubten Grenzen befinden.
Temperaturbereich ändern
Falls Sie möchten, können Sie eine untere und obere Temperaturschwelle an Ihrem Babygerät
programmieren. Wenn die Temperatur im Babyzimmer sich dann unterhalb oder oberhalb dieser
Grenzen verändert, blinkt die Temperaturanzeige am Elterngerät und ein Alarmton wird ausgegeben
(falls er aktiviert wurde). Zusätzlich wird Hoch" oder Niedrig" angezeigt.
Am Elterngerät
1. Drücken Sie die Menü−Taste, um danach mit den Up/Down−Tasten den Eintrag [Temperatur]
auszuwählen. Danach OK−Taste betätigen.
2. Das Display zeigt [Bereichswahl]. Danach OK−Taste betätigen. Der aktuelle obere
Temperaturwert [Obere Gr. xx] wird angezeigt.
3. Drücken Sie die Up/Down−Tasten, um die gewünschte obere Temperaturgrenze einzustellen.
Danach OK−Taste betätigen. Das Display zeigt erst [Gespeichert] und danach wird der untere
aktuelle Temperaturwert [Untere Gr. xx] angezeigt.
4. Drücken Sie die Up/Down−Tasten, um die gewünschte untere Temperaturgrenze einzustellen.
Danach OK−Taste betätigen. Das Display zeigt [Gespeichert].
Sie haben nun den Temperaturbereich, der überwacht werden soll, programmiert.
Service−Hotline Deutschland: Tel. 0180 5 001388 Kosten aus dem dt. Festnetz bei Drucklegung: 14 ct/Min,
ggf. abweichende Kosten aus dem Mobilfunk
11
Page 12

− Bedienung −
Temperaturalarm einstellen
Falls Sie möchten, können Sie Ihr Elterngerät so programmieren, dass es einen zweifachen Alarmton
aussendet, wenn die Raumtemperatur im Babyzimmer sich außerhalb des Temperaturbereiches
befindet.
Am Elterngerät
1. Drücken Sie die Menü−Taste, um danach mit den Up/Down−Tasten den Eintrag [Temperatur]
auszuwählen. Danach OK−Taste betätigen.
2. Drücken Sie die Up/Down−Tasten, um den Eintrag [Temp. Alarm] auszuwählen. Danach
OK−Taste betätigen.
3. Das Display zeigt [Ein?]. Danach OK−Taste betätigen oder Menü−Taste betätigen, falls Sie keine
Änderung vornehmen möchten. Das Display zeigt [Gespeichert]. Die Alarmierung ist
eingeschaltet.
4. Wenn Sie die Alarmierungslautstärke einstellen wollen, wählen Sie mit den Up/Down−Tasten den
Unterpunkt [Lautst] und bestätigen Sie ihn mit der OK−Taste. Das Display zeigt [Stufe] und eine
Anzahl von Balken. Diese Balken sind repräsentativ für die gewünschte Alarmierungslautstärke.
Ändern Sie die Lautstärke mit den Up/Down−Tasten. Das Display zeigt [Gespeichert].
5. Um die Alarmierung auszuschalten, verfahren Sie in gleicher Weise. Das Display zeigt jetzt im
Schritt 3 [Aus?]. Danach OK−Taste betätigen.
Umstellen von ° C auf ° F
Sie können die Temperaturanzeige in Grad Celsius oder in Grad Fahrenheit ausgeben. Die
Voreinstellung ist Grad Celsius. Wenn Sie umschalten möchten verfahren Sie wie folgt:
Am Elterngerät
1. Drücken Sie die Menü−Taste, um danach mit den Up/Down−Tasten den Eintrag [Temperatur]
auszuwählen. Danach OK−Taste betätigen.
2. Drücken Sie die Up/Down−Tasten, um den Eintrag [Grad F?] auszuwählen. Danach OK−Taste
oder Menü−Taste betätigen, falls Sie keine Änderung vornehmen möchten. Das Display zeigt
[Gespeichert]. Die Temperaturanzeige erfolgt jetzt in ° F.
3. Um die Temperaturanzeige in ° C umzuschalten, verfahren Sie in gleicher Weise. Im Schritt 2
zeigt das Display jetzt [Grad C?]. Danach OK−Taste betätigen.
Funkruf zwischen Baby- und Elterngerät (Paging)
Diese Funktion ist nützlich, wenn sich ein Elternteil im Babyzimmer befindet und Kontakt mit dem
anderen Elternteil aufnehmen möchte. Außerdem hilft diese Funktion dabei, ein verlegtes Elterngerät
zu finden.
Am Babygerät
1. Drücken und halten Sie die Funkruf−Taste ca. 2 Sekunden. Das Elterngerät sendet eine
Signaltonfolge.
Am Elterngerät
1. Wenn die Signaltonfolge ertönt, drücken Sie eine beliebige Taste, um sie auszuschalten.
2. Sie können sich auch mit Ihrem Partner im Babyzimmer unterhalten. Dazu halten Sie die
Sprech−Taste gedrückt und sprechen in das Mikrofon des Elterngeräts. Um den Partner aus dem
Babyzimmer hören zu können, müssen Sie die Sprech−Taste wieder loslassen.
Zum Baby sprechen
Sie können von Ihrem Elterngerät aus beruhigend auf das Baby einwirken, z. B. indem Sie sagen: ich
komme sofort".
Am Elterngerät
1. Halten Sie die Sprech−Taste gedrückt und sprechen in das Mikrofon des Elterngeräts.
12
Service−Hotline Deutschland: Tel. 0180 5 001388 Kosten aus dem dt. Festnetz bei Drucklegung: 14 ct/Min,
ggf. abweichende Kosten aus dem Mobilfunk
Page 13

− Bedienung −
Um Ihr Baby aus dem Babyzimmer hören zu können, müssen Sie die Sprech−Taste wieder
loslassen.
Nachtlicht
Das Babygerät hat ein Nachtlicht, das durch einmaliges Berühren ein weiches, gleichmäßiges Licht
ausstrahlt, das Ihrem Baby Sicherheit vermittelt und Ihnen ermöglicht, Ihr Baby in einem dunklen
Raum zu sehen. Sie können das Nachtlicht auch von Ihrem Elterngerät aus ein− und ausschalten.
Am Babygerät
1. Drücken Sie die Licht−Taste oben am Gerät. Ein weiches Licht wird langsam eingeschaltet.
Durch erneutes Drücken der Taste erlischt das Licht langsam.
Am Elterngerät
1. Drücken Sie die Menü−Taste, um danach mit den Up/Down−Tasten den Eintrag [Nachtlicht]
auszuwählen. Danach OK−Taste betätigen.
2. Das Display zeigt [Ein?]. Drücken Sie die OK−Taste, wenn Sie das Nachtlicht einschalten wollen.
Das Display bestätigt die Aktion mit der Meldung [Gespeichert] und ein Quittungssignal wird
ausgegeben. Das Nachtlicht wird sachte eingeschaltet. Das Symbol einer Glühbirne erscheint im
Display Ihres Elterngeräts.
3. Um das Nachtlicht auszuschalten, verfahren Sie in gleicher Weise. Das Display zeigt jetzt [Aus?].
Danach OK−Taste betätigen. Das Display zeigt [Gespeichert] und sendet einen Quittungston
aus. Die Glühbirne erlischt im Display.
Taschenlampe
Ihr Elterngerät hat eine nützliche Taschenlampenfunktion. Per Tastendruck kann ein weiches Licht
erzeugt werden; nützlich, um in das dunkle Babyzimmer hineinzuleuchten.
Am Elterngerät
1. Drücken und halten Sie die Lampen−Taste, um die Lampe zu aktivieren.
Die Taschenlampe funktioniert nur bei eingeschaltetem Elterngerät.
Babyfütterung
Wenn Ihr Baby sich an feste Fütterungsintervalle gewöhnt hat, können Sie Ihr Elterngerät auch dazu
nutzen, sich an die Fütterungszeiten erinnern zu lassen. Sie haben die Wahl zwischen der
Programmierung einer nächsten Fütterung oder nachfolgenden Fütterungsintervallen. Allerdings
muss dazu das Datum und die Uhrzeit bereits programmiert sein. Wenn das erfolgt ist, können Sie:
1. Uhrzeit einstellen (24 Stunden) z. B. 10:30 und danach, wenn Sie möchten
2. Intervalle für weitere Fütterungen festlegen z. B. alle 3 Stunden 30 Minuten. Denken Sie daran,
dass Sie die Fütterungszeit mit berücksichtigen.
3. Abschließend muss der Babyfütterungsalarm noch eingeschaltet werden. Wenn der
Fütterungszeitpunkt erreicht ist, sendet das Elterngerät eine Signaltonfolge aus und das Display
zeigt [Fütterung]. Drücken Sie eine beliebige Taste, um die Signaltonfolge auszuschalten. Falls
Sie ein Fütterungsintervall
Fütterungstermin erneut alarmieren.
eingestellt haben, wird das Elterngerät Sie zum nächsten
Erste bzw. nächste Babyfütterungszeit einstellen
Am Elterngerät
1. Drücken Sie die Menü−Taste, um danach mit den Up/Down−Tasten den Eintrag [Fütterung]
auszuwählen. Danach OK−Taste betätigen.
2. Das Display zeigt [Zeit einst]. Danach OK−Taste betätigen.
3. Das Display zeigt [Stunde] und eine Nummer zwischen 00 und 23 für die Stunden eines Tages.
Drücken Sie die Up/Down−Tasten, um die gewünschte Stunde einzustellen. Danach OK−Taste
betätigen.
Service−Hotline Deutschland: Tel. 0180 5 001388 Kosten aus dem dt. Festnetz bei Drucklegung: 14 ct/Min,
ggf. abweichende Kosten aus dem Mobilfunk
13
Page 14

− Bedienung −
4. Das Display zeigt [Minute] und eine Nummer zwischen 00 und 59 für die Minuten einer Stunde.
Drücken Sie die Up/Down−Tasten, um die gewünschte Minuten einzustellen. Danach OK−Taste
betätigen. Das Display zeigt [Gespeichert]. Die Fütterungszeit ist jetzt programmiert.
Babyfütterungsintervalle einstellen
Am Elterngerät Nach den Schritten 1 bis 4:
5. Das Display zeigt [Zeit einst.]. Mit den Up/Down−Tasten den Eintrag [Fü.Intervall] auswählen.
Danach OK−Taste betätigen.
6. Das Display zeigt [Stunde] und eine zweistellige Nummer, stellvertretend für die Stunden
zwischen den Fütterungszeiten (z. B. 03). Drücken Sie die Up/Down−Tasten, um das
gewünschte Stundenintervall einzustellen. Danach OK−Taste betätigen.
7. Das Display zeigt [Minute] und eine zweistellige Nummer, stellvertretend für die Minuten
zwischen den Fütterungszeiten (z. B. 30).
Drücken Sie die Up/Down−Tasten, um das gewünschte Minutenintervall einzustellen. Danach
OK−Taste betätigen. Das Display zeigt [Gespeichert]. Das Fütterungsintervall (in diesem Fall
3 Stunden 30 Minuten) ist jetzt programmiert. Denken Sie bitte daran, dass Sie den Alarm noch
aktivieren müssen (siehe nächster Absatz).
Berücksichtigen Sie bei der Intervall−Programmierung bitte auch die Zeit, die Sie für die
Fütterung benötigen.
Babyfütterungsalarm einschalten
Am Elterngerät Nach den Schritten 1 bis 7:
8. Das Display zeigt [Fü.Intervall]. Mit den Up/Down−Tasten den Eintrag [Alarm] auswählen.
Danach OK−Taste betätigen.
9. Das Display zeigt [Ein?]. Danach OK−Taste betätigen oder Menü−Taste betätigen, falls Sie keine
Änderung vornehmen möchten. Danach OK−Taste betätigen.
10. Wenn Sie die Alarmierungslautstärke einstellen wollen, wählen Sie mit den Up/Down−Tasten den
Unterpunkt [Lautst] und bestätigen Sie ihn mit der OK−Taste. Das Display zeigt [Stufe] und eine
Anzahl von Balken. Diese Balken sind repräsentativ für die gewünschte Alarmierungslautstärke.
Ändern Sie die Lautstärke mit den den Up/Down−Tasten. Danach OK−Taste betätigen. Das
Display zeigt [Gespeichert]. Die Alarmierung wiederholt sich zum nächsten Fütterungstermin.
Um die Alarmierung auszuschalten, betätigen Sie eine beliebige Taste am Elterngerät.
Babyfütterungsalarm ausschalten
Wenn Sie zu den Fütterungszeiten nicht mehr alarmiert werden möchten, müssen Sie den Alarm
ausschalten. Folgen Sie den Schritten 8−9.
11. Das Display zeigt jetzt [Aus?]. Danach OK−Taste betätigen. Das Display zeigt [Gespeichert].
Der Alarm ist jetzt ausgeschaltet und es wird zum nächsten Fütterungszeitpunkt keine Sinalfolge
ertönen.
Anpassen der Empfindlichkeit des Babyphons
Einige Babys sind lauter als andere. Sie können die Empfindlichkeit für Ihr Babyphon dem Baby
anpassen. Setzen Sie die Empfindlichkeit für ein Baby mit zarter Stimme auf High" und für eines mit
kräftiger Stimme auf Low". Besonders dann, wenn das Baby im Schlaf auch laute Geräusche macht.
Am Elterngerät
1. Drücken Sie die Menü−Taste, um danach mit den Up/Down−Tasten den Eintrag [Empfindlk.]
auszuwählen. Danach OK−Taste betätigen.
2. Das Display zeigt [Stufe]. Drücken Sie die Up/Down−Tasten, um die geeignete Empfindlichkeit
auszuwählen. Danach OK−Taste betätigen. Das Display zeigt [Gespeichert].
Eco Mode
Das Babygerät ist mit einer speziellen Sendetechnik ausgestattet. Es sendet mit erheblich reduzierter
Sendeleistung bzw. Strahlung bei gleichzeitiger Erhöhung der Empfangsempfindlichkeit auf der
Empfängerseite.
14
Service−Hotline Deutschland: Tel. 0180 5 001388 Kosten aus dem dt. Festnetz bei Drucklegung: 14 ct/Min,
ggf. abweichende Kosten aus dem Mobilfunk
Page 15

− Fehlerbeseitigung −
6 Fehlerbeseitigung
Bei technischen Problemen steht Ihnen unsere Hotline unter der Rufnummer
0180 5 00 13 88 (Kosten aus dem dt. Festnetz bei Drucklegung 14 ct/Min., ggf. abweichende Kosten
aus dem Mobilfunk) zur Verfügung.
Wenden Sie sich im Garantiefall an Ihren Fachhändler. Die Garantiezeit beträgt 2 Jahre.
Fehler
Geräte lassen sich
nicht einschalten.
Die grüne
"Verbindungsleuchte" am
Elterngerät blinkt
und Sie können
keine Geräusche
aus dem
Babyzimmer
hören.
Sie können Ihr
Baby im
Elterngerät nicht
hören, aber die
"Verbindungsleuchte" leuchtet
immer noch
durchgehend.
Ihr Babyphon gibt
einen hohen
Piepton aus.
Ursachen
− Prüfen Sie, ob die Stromversorgung besteht und ob alle Verbindungen fest
sind.
− 1. Sie befinden sich möglicherweise außerhalb der Reichweite. Gehen Sie
näher an das Babygerät und warten Sie 5 Sekunden, damit sich die
"Verbindung" aufbauen kann.
− 2. Unter Umständen müssen Sie die "Verbindung" zwischen den beiden
Geräten neu einrichten. Schalten Sie beide Geräte aus und gehen Sie wie
folgt vor:
Am Babygerät:
− Drücken Sie die Ein/Aus−Taste kurz.
Am Elterngerät:
− Drücken Sie die Ein/Aus−Taste kurz. Die grüne "Verbindungsleuchte"
leuchtet (dies kann einige Sekunden dauern).
− 1. Prüfen Sie, ob die Lautstärke am Elterngerät eingeschaltet ist.
− 2. Sie sollten die Empfindlichkeit Ihres Babyphons erhöhen.
− Dies kann passieren, wenn sich Eltern− und Babygerät zu nah beieinander
befinden. Erhöhen Sie den Abstand zwischen den Geräten.
Service−Hotline Deutschland: Tel. 0180 5 001388 Kosten aus dem dt. Festnetz bei Drucklegung: 14 ct/Min,
ggf. abweichende Kosten aus dem Mobilfunk
15
Page 16

− Technische Daten −
7 Technische Daten
Merkmal Wert
Betriebsfrequenz 1,8 GHz
Reichweite Unter optimalen Bedingungen bis zu 300 m. Innerhalb
Netzteil, Babygerät (Sender) Input: 230 VAC, 35 mA
Nicht aufladbare Batterien
für Babygerät (Sender)
(nicht im Lieferumfang enthalten)
Sendeleistung Durchschnitt: 10 mW
Netzteil mit Ladeschale für Elterngerät
(direkt verdrahtet)
Wiederaufladbare Akkus für
Elterngerät (Empfänger)
Betriebszeit mit aufgeladenen
Akkus
Zulässige Umgebungstemperatur 10 °C bis 30 °C
Zulässige relative Luftfeuchtigkeit 20 % bis 75 %
von Gebäuden reduziert sich die Reichweite (bis zu
50 m) aufgrund von Wänden, Türen usw.
Output: 6 V
Typ AA, 1,5 V Alkaline
Maximum: 250 mW
Input: 230 VAC, 30 mA
Output: 6 V
Typ AAA 1,2 V 800 mAh NiMH
Ca. 10 Stunden
, 300 mA, Innen = +
DC
, 200 mA
DC
Reinigung und Pflege
Reinigen Sie die Geräte mit einem trockenen, weichen, flusenfreien Tuch. Verwenden Sie keine
Reinigungsmittel oder Lösungsmittel.
Konformitätserklärung
Dieses Gerät erfüllt die Anforderungen der EU−Richtlinie:
1999/5/EG Richtlinie über Funkanlagen und Telekommunikationsendeinrichtungen und
die gegenseitige Anerkennung ihrer Konformität. Die Konformität mit oben genannter
Richtlinie wird durch das CE−Symbol auf dem Gerät bestätigt.
Für die komplette Konformitätserklärung nutzen Sie bitte den kostenlosen Download von
unserer Website www.audioline.de.
16
Service−Hotline Deutschland: Tel. 0180 5 001388 Kosten aus dem dt. Festnetz bei Drucklegung: 14 ct/Min,
ggf. abweichende Kosten aus dem Mobilfunk
Page 17

8 Garantie
AUDIOLINE − Geräte werden nach den modernsten Produktionsverfahren hergestellt und geprüft.
Ausgesuchte Materialien und hoch entwickelte Technologien sorgen für einwandfreie Funktion und
lange Lebensdauer. Die Garantie gilt nicht für die in den Produkten verwendeten Batterien, Akkus
oder Akkupacks. Die Garantiezeit beträgt 24 Monate, gerechnet vom Tage des Kaufs.
Innerhalb der Garantiezeit werden alle Mängel, die auf Material− oder Herstellungsfehler
zurückzuführen sind, kostenlos beseitigt. Der Garantieanspruch erlischt bei Eingriffen durch den
Käufer oder durch Dritte. Schäden, die durch unsachgemäße Behandlung oder Bedienung, natürliche
Abnutzung, durch falsches Aufstellen oder Aufbewahren, durch unsachgemäßen Anschluss oder
Installation sowie durch höhere Gewalt oder sonstige äußere Einflüsse entstehen, fallen nicht unter
die Garantieleistung. Wir behalten uns vor, bei Reklamationen die defekten Teile auszubessern, zu
ersetzen oder das Gerät auszutauschen. Ausgetauschte Teile oder ausgetauschte Geräte gehen in
unser Eigentum über. Schadenersatzansprüche sind ausgeschlossen, soweit sie nicht auf Vorsatz
oder grober Fahrlässigkeit des Herstellers beruhen.
Sollte Ihr Gerät dennoch einen Defekt innerhalb der Garantiezeit aufweisen, wenden Sie sich bitte
unter Vorlage Ihrer Kaufquittung ausschließlich an das Geschäft, in dem Sie Ihr AUDIOLINE − Gerät
gekauft haben. Alle Gewährleistungsansprüche nach diesen Bestimmungen sind ausschließlich
gegenüber Ihrem Fachhändler geltend zu machen. Nach Ablauf von zwei Jahren nach Kauf und
Übergabe unserer Produkte können Gewährleistungsrechte nicht mehr geltend gemacht werden.
− Garantie −
Service−Hotline Deutschland: Tel. 0180 5 001388 Kosten aus dem dt. Festnetz bei Drucklegung: 14 ct/Min,
ggf. abweichende Kosten aus dem Mobilfunk
17
Page 18

Notizen
Notizen
18
Service−Hotline Deutschland: Tel. 0180 5 001388 Kosten aus dem dt. Festnetz bei Drucklegung: 14 ct/Min,
ggf. abweichende Kosten aus dem Mobilfunk
Page 19

− Contents −
1 General Information 20. . . . . . . . . . . . . . . . . . . . . . . . . . . . . . . . .
Intended use 20. . . . . . . . . . . . . . . . . . . . . . . . . . . . . . . . . . . . . . . . .
Safety notes 20. . . . . . . . . . . . . . . . . . . . . . . . . . . . . . . . . . . . . . . . .
Disposal 20. . . . . . . . . . . . . . . . . . . . . . . . . . . . . . . . . . . . . . . . . . . .
2 Menu Structure 21. . . . . . . . . . . . . . . . . . . . . . . . . . . . . . . . . . . .
3 Operating Elements 22. . . . . . . . . . . . . . . . . . . . . . . . . . . . . . . . .
Baby unit (Sender) 22. . . . . . . . . . . . . . . . . . . . . . . . . . . . . . . . . . . .
Parent unit (Receiver) 23. . . . . . . . . . . . . . . . . . . . . . . . . . . . . . . . . .
Charger Pod 23. . . . . . . . . . . . . . . . . . . . . . . . . . . . . . . . . . . . . . . . .
4 Starting Up 24. . . . . . . . . . . . . . . . . . . . . . . . . . . . . . . . . . . . . . .
Safety notes 24. . . . . . . . . . . . . . . . . . . . . . . . . . . . . . . . . . . . . . . . .
Checking the package contents 24. . . . . . . . . . . . . . . . . . . . . . . . . . .
At the Parent Unit 24. . . . . . . . . . . . . . . . . . . . . . . . . . . . . . . . . . . . .
At the Baby Unit 24. . . . . . . . . . . . . . . . . . . . . . . . . . . . . . . . . . . . . .
5 Operation 25. . . . . . . . . . . . . . . . . . . . . . . . . . . . . . . . . . . . . . . . .
Volume 25. . . . . . . . . . . . . . . . . . . . . . . . . . . . . . . . . . . . . . . . . . . . .
Battery Charge indicator and battery low warning 25. . . . . . . . . . . . . . .
Language 25. . . . . . . . . . . . . . . . . . . . . . . . . . . . . . . . . . . . . . . . . . .
Clock 25. . . . . . . . . . . . . . . . . . . . . . . . . . . . . . . . . . . . . . . . . . . . . .
Baby alert! 26. . . . . . . . . . . . . . . . . . . . . . . . . . . . . . . . . . . . . . . . . .
Lullaby 26. . . . . . . . . . . . . . . . . . . . . . . . . . . . . . . . . . . . . . . . . . . . .
To select and start a lullaby 26. . . . . . . . . . . . . . . . . . . . . . . . . . . . . .
Temperature 27. . . . . . . . . . . . . . . . . . . . . . . . . . . . . . . . . . . . . . . . .
Changing the temperature range 27. . . . . . . . . . . . . . . . . . . . . . . . . .
Setting the Temperature Alert 27. . . . . . . . . . . . . . . . . . . . . . . . . . . . .
Changing from Centigrade to Fahrenheit 27. . . . . . . . . . . . . . . . . . . . .
Parent to parent paging 28. . . . . . . . . . . . . . . . . . . . . . . . . . . . . . . . .
Talk to your Baby 28. . . . . . . . . . . . . . . . . . . . . . . . . . . . . . . . . . . . . .
Night Light 28. . . . . . . . . . . . . . . . . . . . . . . . . . . . . . . . . . . . . . . . . .
Torch 28. . . . . . . . . . . . . . . . . . . . . . . . . . . . . . . . . . . . . . . . . . . . . .
Time for a Feed 29. . . . . . . . . . . . . . . . . . . . . . . . . . . . . . . . . . . . . . .
To set the first or next feed time 29. . . . . . . . . . . . . . . . . . . . . . . . . . .
To set the interval for following feeds 29. . . . . . . . . . . . . . . . . . . . . . . .
To turn the feed alarm on 29. . . . . . . . . . . . . . . . . . . . . . . . . . . . . . . .
To turn the feed alarm off 30. . . . . . . . . . . . . . . . . . . . . . . . . . . . . . . .
Customise your Baby Monitor to your Baby 30. . . . . . . . . . . . . . . . . . .
Eco Mode 30. . . . . . . . . . . . . . . . . . . . . . . . . . . . . . . . . . . . . . . . . . .
6 Troubleshooting 31. . . . . . . . . . . . . . . . . . . . . . . . . . . . . . . . . . .
7 Technical Data 32. . . . . . . . . . . . . . . . . . . . . . . . . . . . . . . . . . . . .
Cleaning and upkeep 32. . . . . . . . . . . . . . . . . . . . . . . . . . . . . . . . . . .
Declaration of Conformity 32. . . . . . . . . . . . . . . . . . . . . . . . . . . . . . . .
8 Guarantee 33. . . . . . . . . . . . . . . . . . . . . . . . . . . . . . . . . . . . . . . .
Service−Hotline Germany: Tel. 0180 5 001388, cost via German landline at time of going to print: 14 ct/min.,
different costs possible via mobile telephone systems
19
Page 20

− General Information −
1 General Information
Please read this operating instruction manual thoroughly.
Under no circumstances open the equipment or complete any repair work yourself. In the case of
claims under the terms of guarantee, contact your sales outlet.
We reserve the right to make technical and appearance modifications to the product during the course
of product improvement.
Intended use
The Baby Monitor serves to monitor rooms. The baby unit (sender) transmits vocal sounds and other
noises from the baby to the parent unit (receiver). Any other use is considered unintended use.
Use of the equipment is no substitute for personal attention and supervision of a child. Rights to
claims for liability beyond the scope of legal regulations are excluded.
Safety notes
The Baby Monitor has been designed to provide added reassurance for those times when you cannot
be in the same room as your baby. It is NOT a substitute for adult supervision. A parent must always
stay within range of the monitor during use. Your Baby Monitor is not a medical device, nor a device to
prevent cases of Sudden Infant Death Syndrome or `cot death´, and you should not rely on it for your
baby´s wellbeing. It is important that you regularly check on your baby personally
Never place anything over your Baby Monitor or cover it in any way.
Do not place your Parent or Baby Unit near water or in a damp environment.
If travelling abroad, make sure that the voltage shown on the mains power adaptor corresponds
to the local mains power supply.
Never dispose of batteries in the household rubbish. Check with you local authority for correct
disposal options.
Never use non−rechargeable batteries in your Parent Unit. Use only the recommended type
− 2 x AAA 1.2 V 800 mAH NiMH.
Use only the mains adaptor supplied or you may risk damaging your Baby Monitor.
When your Baby Monitor is not in use, it is recommended that you disconnect it from the mains
supply and remove the batteries.
Do not spray it with cleaning polish. Disconnect it from the mains power before cleaning.
The adaptors may become warm during use, please take care when handling.
Do not place your Parent or Baby Unit in direct sunlight.
The charge capacity of the re−chargeable batteries in the Parent Unit will reduce with time and will
eventually need to be replaced. New re-chargeable batteries are obtainable from our Helpline.
Disposal
In order to dispose of your device, take it to a collection point
provided by your local public waste authorities (e.g. recycling centre). The adjacent symbol
indicates that the device must not be disposed of in normal domestic waste! According to
laws on the disposal of electronic and electrical devices, owners are obliged to dispose of old
electronic and electrical devices in a separate waste container.
Batteries/Rechargeable batteries must be disposed of at the point of
sale or at the appropriate collection points provided by the public waste
authorities.
Packaging materials must be disposed of according to local
regulations.
20
Service−Hotline Germany: Tel. 0180 5 001388, cost via German landline at time of going to print: 14 ct/min.,
different costs possible via mobile telephone systems
Page 21

− Menu Structure −
2 Menu Structure
1. Level 2. Level 3. Level 4. Level
Night Light On?IOff?
Lullaby Play?IStop?
Sensitivity Level
Sound Alert On?IOff?
Temperature Set Range
Clock Set Time
Feed Time Set Time
Select new
Volume
Temp. Alert
Degree CIDegree F
Hour Format
Set Interval
Alarm
Twinkle
Silent Night
Minuet in G
Danny Boy
Blue Danube
Play All
Level
Up Limit xx
Low Limit xx
Alert On?IAlert Off?
Volume
Year
Month
Day
Hour
Minute
12 Hrs?I24 Hrs?
Hour
Minute
Hour
Minute
On?IOff?
Volume
Level
Level
Language Deutsch
Service−Hotline Germany: Tel. 0180 5 001388, cost via German landline at time of going to print: 14 ct/min.,
Espanol
Italiano
PYCCKÈÉ
English
Francais
different costs possible via mobile telephone systems
21
Page 22

− Operating Elements −
3 Operating Elements
Baby unit (Sender)
1 Temperature Sensor
Picks up the temperature in your baby’s room.
2 Battery Cover
For non rechargeable batteries (not supplied).
3 Night Light Key
Press to turn On the night light. The light will glow softly
through the front panel. Press again to fade the
light to Off.
4 Power Key On/Off
Press and release to turn ON the Baby unit.
Press and hold to turn OFF.
5 Page Key
Press and hold for 2 seconds to Page" the Parent
Unit with an audible alert. Useful to call for assistance or to
locate a missing Parent Unit.
6 Display
Indicates the current settings of your Baby Monitor
including: Battery level, Date and Time, Temperature,
Lullaby on/off, Lullaby melody.
7 Play/Stop Key (Lullabies)
Starts or stops the lullaby music.
8 Music Key (Lullabies)
Selects the lullaby melody.
9 Microphone
Picks up the sounds from your baby’s room.
10 Volume Key Up/Down
Volume −: Reduces the lullaby volume.
Volume +: Increases the lullaby volume.
345
910
1
2
6
7
8
22
Service−Hotline Germany: Tel. 0180 5 001388, cost via German landline at time of going to print: 14 ct/min.,
different costs possible via mobile telephone systems
Page 23

Parent unit (Receiver)
11 Battery Cover
Rechargeable batteries.
12 Belt Clip
13 Volume Key Up/Down
Adjust the volume at which you hear the sounds from your
baby’s room and also to navigate through the menu‘s.
14 Power Key On/Off
Press and release to switch the unit ON.
Press and hold to switch OFF.
15 Menu Key, OK Key
The Menu and OK key work as a team with the Up and Down
keys to help you adjust the features of your Baby Monitor.
Press the Menu Key to enter the menu options, use the Up
and Down keys to scroll through the menu choices and the OK
Key to select. Press the Menu key, if you want to step back
one level in the Menu.
16 Link Light
Green light ON means Linked" to the Baby Unit.
A flashing light means the Link" has been lost.
− Operating Elements −
12
11
17
16
13
14
18
19
17 Display
15
Indicates the current settings of your Baby Monitor including:
Battery level, Date and Time, Temperature, Lullaby on/off,
Lullaby melody.
18 Torch Key
Press and hold to emit a soft beam of light from the top of the Parent Unit.
19 Talk Key
Press and hold to talk to your baby or partner in the baby‘s
room via the Baby Unit.
Charger Pod
20 Charging Light
When the Parent unit is placed in the Charger Pod the red
charger light comes ON to indicate that the batteries are
charging. The light will remain ON to ensure optimum charge is
maintained.
20
Service−Hotline Germany: Tel. 0180 5 001388, cost via German landline at time of going to print: 14 ct/min.,
different costs possible via mobile telephone systems
23
Page 24

− Starting Up −
4 Starting Up
Safety notes
It is essential to read the General Information" at the beginning of this manual before starting
up.
Checking the package contents
The package contains:
1 Parent unit (receiver) 1 mains adapter with charger pod
1 Baby unit (sender) 1 mains adapter with power cord
1 Handy Transport bag
2 NiMH rechargeable batteries
Type AAA, 800 mAh
At the Parent Unit
1. Remove the Belt Clip by lifting the clip (12) at the top and sliding it
downwards.
2. Then remove the battery cover (11) on the back of the Parent
Unit by applying pressure and sliding it down. Insert the
rechargeable batteries as marked on the unit and close the
cover again.
3. Place the Parent Unit into the Charger Pod.
4. Plug the mains adaptor into a mains power socket. The red charger light on the charger pod will
illuminate indicating that the Parent Unit is charging (the light will remain on to ensure optimum
charge is maintained).
5. Press and release the Power Key" to turn the Parent Unit on.
Before first use, or if it has been out of use for a long time, the Parent Unit will need to be
charged for 13 hours. During this time, the Parent Unit will operate from the Charger pod when
switched on. Note that the Parent Unit cannot be used without batteries, even if it is placed
in the charger.
At the Baby Unit
1. In event of a power failure, your Baby Monitor can switch to battery power. It is therefore
recommended that you insert non-rechargeable batteries in the Baby Unit.
2. Remove the battery cover on the back of the Baby Unit by applying pressure and sliding it down.
Insert 3 alkaline batteries of the type AA (not provided) as marked on the unit and close the cover
again. Do not use rechargeable batteries in the Baby Unit.
3. Plug the power cord into the power input at the side of the Baby Unit and plug the adaptor plug
into a mains power socket.
4. Press and release the Power Key" to turn the Baby Unit on.
The Baby Unit should be placed about 1 m to 1.5 m away from the baby‘s cot on a flat surface.
Never place the Baby Unit inside the cot, bed or playpen. Make sure the unit, cords and mains
adaptor are out of reach of the baby and other young children. Never place either Unit on
antique or polished surfaces.
12
11
24
Service−Hotline Germany: Tel. 0180 5 001388, cost via German landline at time of going to print: 14 ct/min.,
different costs possible via mobile telephone systems
Page 25

5 Operation
Once you have set up your Baby Monitor, you will be able to hear the sounds in your baby´s room
through the Parent Unit. You will also be able to see those sounds as green and red sound sensor
lights around the top of the Parent Unit, which rise and fall with the volume level − the more lights, the
louder the noise, with the red lights being the loudest.
If the connection between the Parent Unit and Baby Unit is broken at any time the green Link"
light on the Parent Unit will flash and the green and red sensor lights will cease to react to any
sounds. To re−establish the Link", follow the directions in the Troubleshooting" chapter.
Volume
You can adjust the volume at which you hear your baby by using the Up/Down Keys on the side of
the Parent Unit. This will not effect the sensitivity of your Baby Monitor, only the volume at which you
hear those sounds through the Parent Unit.
Battery Charge indicator and battery low warning
The Parent Unit will work up to 10 hours out of the Charger Pod, but this depends on the level of
charge in the batteries. The charge level is indicated by the battery icon on the Display. If the charge
becomes low, a battery low warning beep" will sound and the battery icon on the Parent Unit´s
Display will begin to flash. If this occurs you should return the Parent Unit to the Charger Pod to
re−charge the batteries. You can still use your Parent Unit from the Charger Pod.
Language
Your Baby Monitor can be set to Display its information in different languages.
To change the language
At the Parent Unit
1. Press the Menu Key, then use the Up/Down Keys to scroll to [Language]. Press the OK Key.
2. The Display shows [ENGLISH]. Use the Up/Down Keys to scroll to your chosen language. Press
the OK Key. The Display briefly shows [Saved] and your chosen language will now be set.
− Operation −
Clock
You can set the Display of the Parent Unit to show the current day and time. This can be shown as
either the 24 or 12 hour clock (your monitor is pre−set to show the 24 hour clock). You will need to set
the clock if you wish to use the Feed Timer feature.
If you have unplugged your Baby Monitor from the power supply, you will need to reset the
Clock the next time you use it.
To set the time
At the Parent Unit
1. Press the Menu Key then use the Up/Down Keys to scroll to [Clock]. Press the OK Key.
2. Display shows [Set time]. Press the OK Key.
3. Display shows [Year]. Use the Up/Down Keys to scroll to the correct year. Press the OK Key.
4. Display shows [Month]. Use the Up/Down Keys to scroll to the correct month. Press the
OK Key.
5. Display shows [Day]. Use the Up/Down Keys to scroll to the correct day. Press the OK Key.
6. Display shows [Hour]. Use the Up/Down Keys to scroll to the correct hour using the 24 hour
clock. Press the OK Key.
Service−Hotline Germany: Tel. 0180 5 001388, cost via German landline at time of going to print: 14 ct/min.,
different costs possible via mobile telephone systems
25
Page 26

− Operation −
7. Display shows [Minute]. Use the Up/Down Keys to scroll to the correct minute. Press the
OK Key. The display briefly shows [Saved] and gives a confirming beep". The date and time will
now be displayed on the Parent Unit.
To select the 12 or 24 hour clock format
At the Parent Unit
1. Press the Menu Key then use the Up/Down Keys to scroll to [Clock]. Press the OK Key.
2. The Display shows [Set time]. Press the Up/Down Keys to scroll to [Hour Format]. Press the
OK Key.
3. The Display shows [12 Hrs?] (asking if you would like to change to the 12 hour clock format).
Press the OK Key or if you do not want to change, press the Menu Key to exit without changing.
The Display briefly shows [Saved] to confirm that the 12 hour clock has been set.
Time displayed in the 12 hour clock format will include a small a" to denote AM and a small
p" for PM.
4. To change back to the 24 hour clock format ,repeat the steps above, at step 3 the Display will
show [24 Hrs?]. Press the OK Key to confirm.
Baby alert!
You can set your Parent Unit to give an extra warning beep" should the noise levels in your baby’s
room activate the red lights on the sound sensor. This is particularly useful if the volume of your
Parent Unit is turned down and you are just using the sensor lights to monitor the noise levels in your
baby’s room.
On the Parent Unit
1. Press the Menu Key then use the Up/Down Keys to scroll to [Sound Alert]. Press the OK Key.
2. The Display shows [On?]. Press the OK Key to turn the alert on or Menu Key to exit without
change. The Display will briefly show [Saved] and a confirmation tone sounds.
3. If you want to change the volume level of the alarm tone, press the Menu Key and navigate to
the [Sound Alert] Menu, press the OK Key and navigate to the [Volume] Menu and press the
OK Key and adjust the volume. The display shows [Level] and a row of blocks representing the
volume of the Baby Alert tone. Use the Up/Down Keys to select the required volume level
(full =l oudest).
4. The display will briefly show [Saved]. An alert tone will now sound at the Parent Unit should your
babys noise levels reach the red.
5. To turn the Baby Alert alarm off, just follow the steps above. The display will show [Off?]. Press
the OK Key. The Display will briefly show [Saved].
Lullaby
Your baby can be soothed to sleep by a gentle lullaby from the Baby Unit. There are 5 tunes from
which to choose, or you can opt to play through all of them in turn by selecting [Play All]. The lullaby
feature can be turned on and off from both the Baby Unit and the Parent Unit and is indicated on both
by a musical note icon. The icon and the lullaby title show on both Displays whilst the lullaby is
playing. The lullabies will play for 15 minutes.
To select and start a lullaby
At the Baby Unit
1. Press the Music Key. The Display will illuminate. The lullaby is shown.
2. Continue to press the Music Key to scroll to the tune of your choice, or to select
[Play all?].
3. Press the Play/Stop Key again to start or stop the lullaby.
26
Service−Hotline Germany: Tel. 0180 5 001388, cost via German landline at time of going to print: 14 ct/min.,
different costs possible via mobile telephone systems
Page 27

− Operation −
At the Parent Unit
1. Press the Menu Key, then use the Up/Down Keys to scroll to [Lullaby]. Press the OK Key.
2. The Display shows [Play?]. Use the Up/Down Keys to scroll to [Select New]. Press the OK Key.
3. The Display shows the current lullaby. Use the Up/Down Keys to scroll to your choice of tune, or
to [Play All]. Press the OK Key. The Display briefly shows [Saved].
4. The Display shows [Lullaby]. Press the OK Key twice.
5. To stop playing press the OK Key twice when you are still in the lullaby mode.
Even if you do not stop the lullaby, it will automatically stop playing after 15 minutes.
Temperature
It is very important for your baby’s health to ensure that they are a kept at a safe temperature. This
includes the room temperature, baby’s temperature, baby clothing and bedding (contact your local
health authority to ensure you are aware of the current guidelines). Your Baby Monitor can help by
displaying the current room temperature on the Baby Unit and the Parent Unit − and can even be set
to alert you if the temperature falls outside of a definable range.
Changing the temperature range
If you wish, you can set the upper and lower temperature limits of your Baby Monitor so that if the
temperature in the babys room goes above or below your pre−set range and the temperature
displayed on the Parent Unit will flash and an alert, if set, will sound. Additional High" or Low" is
shown.
At the Parent Unit
1. Press the Menu Key, then use the Up/Down Keys to scroll to [Temperature]. Press the OK Key.
2. Use the Up/Down Keys to scroll to [Set Range]. Press the OK Key. The current upper
temperature range is displayed as [Up Limit xx].
3. Use the Up/Down Keys to scroll up or down the temperature setting until you reach the number
of degrees you wish to set as the maximum, then press the OK Key. The Display briefly shows
[Saved]. The lower range limit is now displayed as [Low Limit xx].
4. Use the Up/Down Keys to scroll up or down the temperature settings until you reach the number
of degrees you wish to set as the minimum, then press the OK Key. The display briefly shows
[Saved].
You have now set your minimum and maximum temperature range.
Setting the Temperature Alert
If you wish, you can set your Parent Unit to give an additional double−beep" warning to alert you that
the temperature has moved outside of the set temperature range.
At the Parent Unit
1. Press the Menu Key, then use the Up/Down Keys to scroll to [Temperature]. Press the OK Key.
2. Use the Up/Down Keys to scroll to [Temp Alert]. Press the OK Key.
3. The Display will show [On?]. Press the OK Key to turn the alert on, or Menu Key to exit without
change. Display briefly shows [Saved]. The Temperature alert is now on.
4. If you wish to turn the Temperature Alert, follow the instructions above. At step 3 the Display will
show [Off?]. Press the OK Key to confirm.
Changing from Centigrade to Fahrenheit
You can choose whether to view the temperature of your babys room in degrees Centigrade or degrees
Fahrenheit. Your monitor is pre−set to Centigrade, but if you wish to change it, follow the steps below.
At the Parent Unit
1. Press the Menu Key, then use the keys to scroll to [Temperature]. Press the OK Key.
Service−Hotline Germany: Tel. 0180 5 001388, cost via German landline at time of going to print: 14 ct/min.,
different costs possible via mobile telephone systems
27
Page 28

− Operation −
2. Use the Up/Down Keys to scroll to [Degree F?]. Press the OK Key to select Fahrenheit or
Menu Key to exit without change. Display will briefly show [Saved]. The temperature of your
babys room will now be shown in degrees Fahrenheit.
3. If you wish to change the temperature display back to degrees Centigrade, follow the above
steps. At step 2 the display will show [Degree C?]. Press the OK Key.
Parent to parent paging
Useful if one parent is in the baby’s room and needs to contact the other. Also helps to find a mislaid
Parent Unit.
At the Baby Unit
1. Press and hold the Page Key for 2 seconds. The Parent Unit will emit a tone.
At the Parent Unit
1. When the Page tone sounds you can silence it by pressing any key on the Parent Unit.
2. If you wish, you can then speak to your partner in the baby’s room. Press and hold the Talk Key
and speak into the front of the Parent Unit. Release the Talk Key and you can hear what is said
in the baby’s room again.
Talk to your Baby
You can speak to your baby from the Parent Unit −perhaps to re−assure them that you are on your
way.
At the Parent Unit
1. Press and hold the Talk Key and speak into the front of the Parent Unit. Release the key to hear
your baby again.
Please note that you will not be able to hear your baby while you are speaking to
them until you release the Talk Key again.
Night Light
Torch
28
The Baby Unit has a one touch night light which emits a soft starry glow, providing comfort and
re−assurance for your baby and allowing you to see them in a darkened room. You may also turn the
night light on and off from the Parent Unit.
At the Baby Unit
1. Press the Light Key on the top of the unit. A soft light will gently turn on. Press again and the light
will fade away.
At the Parent Unit
1. Press the Menu Key, then use the Up/Down Keys to scroll to [Night Light]. Press the OK Key.
2. The Display will show [On?] (asking if you would like to switch the night light on). Press the
OK Key. The display will briefly show [Saved] and gives a confirming beep". The night light on
the Baby Unit will gently turn on. A lightbulb icon will appear on the Display of the Parent Unit to
let you know the night light on the Baby Unit is on.
3. To turn the night light off again from the Parent Unit, follow the above steps. The Display will show
[Off?]. Press the OK Key. The Display will briefly show [Saved] and gives a confirming beep".
The lightbulb icon will disappear.
Your Parent Unit has a useful Torch feature. At the press of a button a soft beam of light is emitted
from the top of the Parent Unit − helpful when peeping into a darkened room to check on your baby.
Service−Hotline Germany: Tel. 0180 5 001388, cost via German landline at time of going to print: 14 ct/min.,
different costs possible via mobile telephone systems
Page 29

At the Parent Unit
1. Press and hold the Torch Key (indicated by the lightbulb icon above the Display) to turn the light
on. A soft beam of light will turn on.
The torch only works whilst the Parent Unit is turned on.
Time for a Feed
If your baby is in a routine of regular feeding intervals, you may wish to set your Baby Monitor to alert
you when your baby’s feeds are due. You have the choice to either set an alert just for your baby’s
next feed time, or for your baby’s next feed time plus subsequent feeds based on the interval time
between them.
Firstly you will need to ensure that you have set the date and time on your Parent Unit’s inbuilt clock.
Once you have done this, you can either:
1. Set the Time of day or night (24hr clock) at which your baby’s next feed is due (eg. 10.30) and
then if you wish,
2. set the Interval between your baby’s following feed start times, (eg. every 3hrs 30mins) − be sure
to include the time it takes to feed your baby.
3. Finally, you will need to switch the Feed Alarm on. Now, when your baby’s next
feed is due, your Parent Unit will start beeping and the Display will show [Feed Alarm]. Pressing
any button on the Parent Unit will silence the alert and you can feed your baby. If you have set the
, the alert will sound again when the next feed is due.
interval
To set the first or next feed time
At the Parent Unit
1. Press the Menu Key, then use the Up/Down Keys to scroll to [Feed Time]. Press the OK Key.
2. The Display shows [Set time]. Press the OK Key.
3. The Display shows [Hour] and a number between 00 and 23, representing hours of the day. Use
the Up/Down Keys to scroll to the hour of your baby’s feed. Press the OK Key.
4. The Display shows [Minute] and a number between 00 and 59, representing the minutes of an
hour. Use the Up/Down Keys to scroll to the minutes past the hour of your baby’s feed. Press the
OK Key. The Display briefly shows [Saved] and the time of your baby’s first feed is stored.
To set the interval for following feeds
At the Parent Unit Follow steps 1−4 above then,
5. The Display shows [Set Time]. Use the Up/Down Keys to scroll to [Set Interval]. Press the
OK Key.
6. The Display shows [Hour] and a two digit number representing the hours between your baby’s
feeds. Use the Up/Down Keys to scroll to the hour between your babys feeds (e.g. 03) Press the
OK Key.
7. Display shows [Minute]. Use the Up/Down Keys to scroll to the minutes after the hour between
your baby’s feed’s (eg. 30) Press the OK Key. Display briefly shows [Saved] and the interval
between your baby’s feeds is stored (in this case as 3hrs 30mins).
When calculating feed interval, please remember to include the time it takes to feed your baby.
Please remember to turn the alarm on as detailed in the next section.
To turn the feed alarm on
At the Parent Unit Follow steps 1−7 then,
8. The Display shows [Set Interval]. Use the Up/Down Keys to scroll to [Set Interval]. Press the
OK Key to set or the Menu Key to exit without change.
9. The Display shows [On?]. Press the OK Key.
− Operation −
Service−Hotline Germany: Tel. 0180 5 001388, cost via German landline at time of going to print: 14 ct/min.,
different costs possible via mobile telephone systems
29
Page 30

− Operation −
10. If you will change the volume level of the alarm tone, select with the Up/Down Keys the subitem
[Volume] and press the OK Key. The display shows [Level] and a row of blocks representing the
volume of the Baby Alert tone. Use the Up/Down Keys to select the required volume level
(full = loudest). Press the OK Key. Display briefly shows [Saved]. The alarm will now sound at
the Parent Unit each time a feed is due. Press any button on the Parent Unit to silence the alarm.
To turn the feed alarm off
If you no longer want the alarm to sound when a feed is due, you will need to turn the feed alarm off.
Follow steps 8−9 above.
11. Display shows [Off?]. Press the OK Key. The Display briefly shows [Saved]. The alarm is now
turned off and will not sound when the next feed is due.
Customise your Baby Monitor to your Baby
Some babys are louder than others! You can customise the sound sensitivity of your Baby Monitor to
suit your baby. Set the sensitivity High" for a quiet sleeper with a soft cry and set to Low" sensitivity if
they tend to make noise whilst sleeping or can make quite loud noises before they are truly crying.
At the Parent Unit
1. Press the Menu Key, then use the Up/Down Keys to scroll to [Sensitivity]. Press the OK Key.
2. The Display shows [Level] and a row of blocks indicating the volume level
(full = high sensitivity). Use the Up/Down Keys to select the sensitivity level. Press the OK Key.
The Display briefly shows [Saved].
Eco Mode
The Baby Unit is equipped with a special transmission technology.
The low radiation feature works by lowering the radiated radio transmission power from the Baby Unit,
and at the same time increasing the sensitivity of the receiver to maintain the normal range.
30
Service−Hotline Germany: Tel. 0180 5 001388, cost via German landline at time of going to print: 14 ct/min.,
different costs possible via mobile telephone systems
Page 31

− Troubleshooting −
6 Troubleshooting
In the case of technical problems, contact our Hotline, tel. 0180 5 00 13 88 (Cost via German landline
at time of going to print: 14 ct/min., different costs possible via mobile telephone systems). In the case
of claims under the terms of guarantee, contact your sales outlet. There is a 2 year period of
guarantee.
Faults
Units cannot be
turned on.
The green Link"
light on the Parent
Unit is flashing
and you cannot
hear the sounds
from your baby‘s
room.
Can’t hear your
baby on the
Parent Unit, but
the Link" light is
still glowing
steadily.
Your Baby Monitor
is emitting an high
pitched
ear−piercing noise.
Causes
− Check that you have turned the power on from the mains and that the
connections are firm.
− 1. You may have moved out of range −move closer to the Baby Unit and
wait 5 seconds for the Link" to establish.
− 2. You may need to re−establish the Link" between the two units. Turn both
units off and then:
On the Baby Unit:
−Press and release the On/Off key.
On the Parent Unit:
−Press and release the On/Off key. The green Link" light comes on (this
may take a few seconds).
− 1. Check the volume is turned up on the Parent Unit.
− 2. You may need to turn up the sensitivity of your Baby Monitor.
− This may happen if your Parent and Baby Units are too close together.
Move them further apart.
Service−Hotline Germany: Tel. 0180 5 001388, cost via German landline at time of going to print: 14 ct/min.,
different costs possible via mobile telephone systems
31
Page 32

− Technical Data −
7 Technical Data
Feature Value
Operating Frequency 1.8 GHz
Range Up to 300 m under optimum conditions. The range is
Power supply, baby unit (sender) Input: 230 VAC, 35 mA
Non rechargeable batteries
for the baby unit (sender)
(not included in the package contents)
Transmitting power Average: 10 mW
Power supply, parent unit (receiver)
(hard wired)
Rechargeable batteries
for the parent unit (receiver)
Operating time with charged battery Approx. 10 hours
Permissible ambient temperature 10 °C to 30 °C
Permissible relative humidity 20 % to 75 %
Cleaning and upkeep
Clean the equipment with a dry, soft, lint−free cloth. Never use cleaning agents or solvents.
Declaration of Conformity
This device fulfils the requirements stipulated in the EU directive:
1999/5/EU directive on radio equipment and telecommunications terminal equipment
and the mutual recognition of their conformity. Conformity with the above mentioned
directive is confirmed by the CE symbol on the device.
To view the complete Declaration of Conformity, please refer to the free download available
on our web site www.audioline.de.
reduced in buildings (up to 50 m) as a result of walls,
doors etc.
Output: 6 V
Type: AA, 1.5 V Alkaline
Maximum: 250 mW
Input: 230 VAC, 30 mA
Output: 6 V
Type: AAA, 1.2 V, 800 mAh NiMH
, 300 mA, Center is +
DC
, 200 mA
DC
32
Service−Hotline Germany: Tel. 0180 5 001388, cost via German landline at time of going to print: 14 ct/min.,
different costs possible via mobile telephone systems
Page 33

− Guarantee −
8 Guarantee
AUDIOLINE equipment is produced and tested according to the latest production methods. Carefully
selected materials and highly developed technology ensure perfect functioning and a long service life.
The terms of guarantee do not apply to the batteries or power packs used in the products. The period
of guarantee is 24 months from the date of purchase.
All deficiencies related to material or manufacturing errors within the period of guarantee will be
redressed free of charge. Rights to claims under the terms of guarantee are annulled following
tampering by the purchaser or third parties. Damage caused as the result of improper handling or
operation, incorrect positioning or storage, improper connection or installation or Acts of God and
other external influences are excluded from the terms of guarantee. In the case of complaints, we
reserve the right to repair defect parts, replace them or replace the entire device. Replaced parts or
devices become our property. Rights to compensation in the case of damage are excluded where
there is no evidence of intent or gross negligence by the manufacturer.
If your device does show signs of a defect within the period of guarantee, please contact the sales
outlet where you purchased the AUDIOLINE device, producing the purchase receipt as evidence. All
claims under the terms of guarantee in accordance with this agreement can only be asserted at the
sales outlet. No claims under the terms of guarantee can be asserted after a period of two years from
the date of purchase and hand−over of the product.
Service−Hotline Germany: Tel. 0180 5 001388, cost via German landline at time of going to print: 14 ct/min.,
different costs possible via mobile telephone systems
33
Page 34

Notes
Notes
34
Service−Hotline Germany: Tel. 0180 5 001388, cost via German landline at time of going to print: 14 ct/min.,
different costs possible via mobile telephone systems
Page 35

Notes
Notes
Service−Hotline Germany: Tel. 0180 5 001388, cost via German landline at time of going to print: 14 ct/min.,
different costs possible via mobile telephone systems
35
Page 36

Wichtige Garantiehinweise
Die Garantiezeit für Ihr AUDIOLINE − Produkt beginnt mit dem Kaufdatum. Ein
Garantieanspruch besteht bei Mängeln, die auf Material− oder Herstellungsfehler
zurückzuführen sind. Der Garantieanspruch erlischt bei Eingriffen durch den Käufer oder
durch Dritte. Schäden, die durch unsachgemäße Behandlung oder Bedienung, natürliche
Abnutzung, durch falsches Aufstellen oder Aufbewahren, durch unsachgemäßen Anschluss
oder Installation sowie durch höhere Gewalt oder sonstige äußere Einflüsse entstehen, fallen
nicht unter die Garantieleistung.
BITTE WENDEN SIE SICH IM GARANTIEFALL AUSSCHLIESSLICH AN DEN
HÄNDLER, BEI DEM SIE DAS GERÄT GEKAUFT HABEN, UND VERGESSEN SIE
NICHT, DEN KAUFBELEG VORZULEGEN.
UM UNNÖTIG LANGE WARTEZEITEN ZU VERMEIDEN, SENDEN SIE
REKLAMATIONSGERÄTE BITTE NICHT
BEI FRAGEN ZUR BEDIENUNG UND GARANTIELEISTUNG LESEN SIE BITTE DIE
BEDIENUNGSANLEITUNG ODER WENDEN SIE SICH AN UNSERE HOTLINE:
Service−Hotline Deutschland: Tel. 0180 5 001388 Kosten aus dem dt. Festnetz
bei Drucklegung: 14 ct/Min, ggf. abweichende Kosten aus dem Mobilfunk
AN UNSERE BÜROADRESSE.
AUDIOLINE GmbH
Neuss
Internet: www.audioline.de − E−mail: info@audioline.de
Version 1.1 − 18.09.2008
Page 37

W I C H T I G E R H I N W E I S
In verschiedenen Versionen des BabyCare 5 werden die Displaytexte unterschiedlich angezeigt:
Seite 5 im Bereich Fütterung:
Stundeˆ oder die Stundeˆ
Fü.Intervallˆ oder Essenabstandˆ
Seite 11 im Bereich Temperaturbereich ändern:
Zusätzlich wird Hochˆ oder Niedrigˆ angezeigt.
Oder
Zusätzlich wird Hochˆ oder Leiseˆ (entspricht Niedrigˆ) angezeigt
Seite 13 im Bereich Erste bzw. nächste Babyfütterungszeit einstellen:
Seite 14 im Bereich Babyfütterungsintervalle einstellen:
Stundeˆ oder die Stundeˆ
Fü.Intervallˆ oder Essenabstandˆ
In der beigefügten Bedienungsanleitung ist nur einer der vorgenannten Displayanzeigen abgedruckt.
Die verschiedenen Displaytexte haben keine Auswirkungen auf die betreffenden Funktionen Ihres
Gerätes.
Wir danken für Ihr Verständnis.
Baby Care 5
Baby Care 5 Twin
Page 38

W I C H T I G E R H I N W E I S
Eco Mode
Das Babygerät ist mit einer speziellen Sendetechnik ausgestattet.
Es sendet mit erheblich reduzierter Sendeleistung bzw. Strahlung bei gleichzeitiger Erhöhung der
Empfangsempfindlichkeit auf der Empfängerseite.
IMPORTANT NOTE
Eco Mode
The Baby Unit is performed with a special transmission technology.
The low radiation feature works by lowering the radiated radio transmission power from the Baby Unit,
and at the same time increasing the sensitivity of the receiver to maintain the normal range.
Baby Care 5
 Loading...