

Page 1
Babyphone
Bedienungsanleitung
Operating Instructions
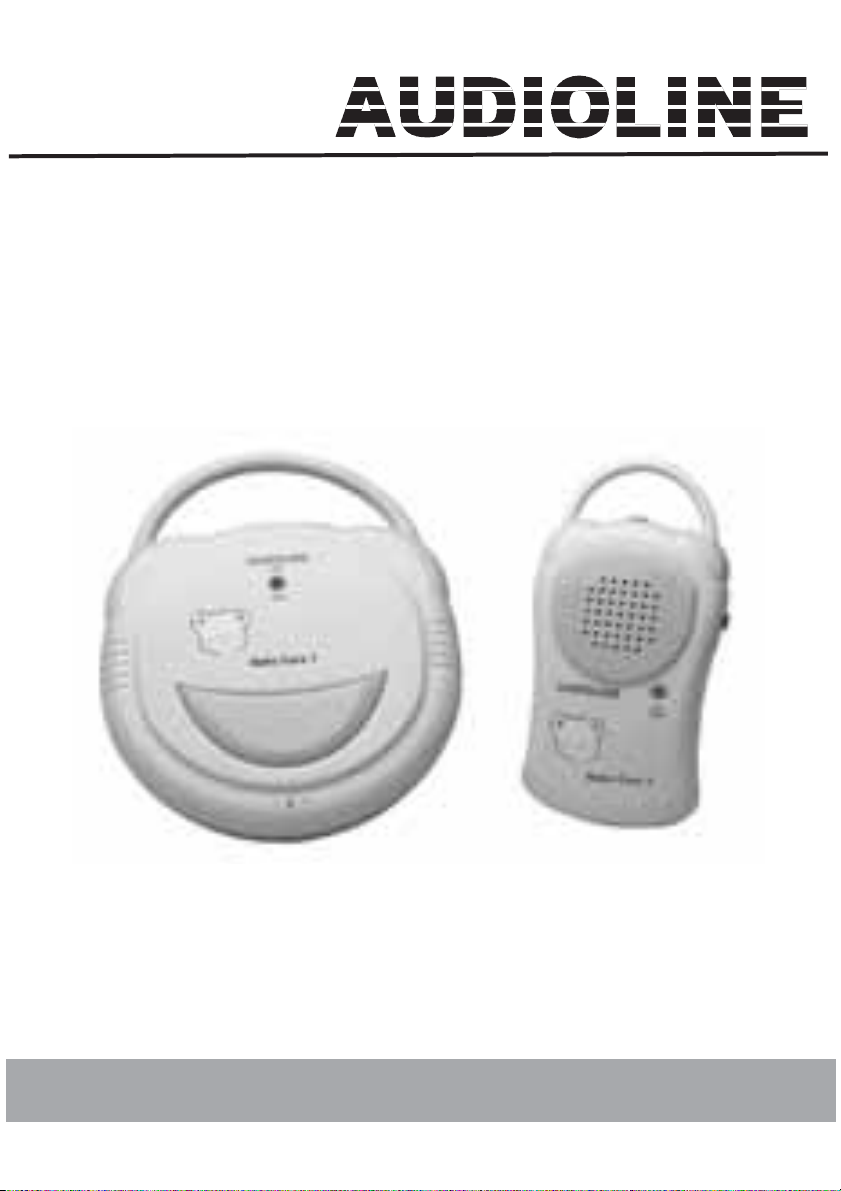
Baby Care 1
Page 2

- Inhaltsverzeichnis -
1 Allgemeine Sicherheitshinweise.....................................................................................................3
2 Bedienelemente................................................................................................................................5
3 Inbetriebnahme.................................................................................................................................6
3.1 Betrieb mit Steckernetzteil..........................................................................................................6
3.2 Betrieb mit Batterien...................................................................................................................6
3.2.1 Batterien im Babyteil einsetzen......................................................................................6
3.2.2 Batterien im Elternteil einsetzen.....................................................................................6
4 Bedienung .........................................................................................................................................7
4.1 Das Babyteil ...............................................................................................................................7
4.2 Das Elternteil ..............................................................................................................................7
5 Wichtige Informationen ...................................................................................................................8
5.1 Fehlersuche................................................................................................................................8
5.2 Technische Daten ......................................................................................................................8
5.3 Garantie......................................................................................................................................8
5.4 Konformitätserklärung ................................................................................................................9
Operating Instructions ________________________________11
2
Page 3

- Allgemeine Hinweise -
1 Allgemeine Sicherheitshinweise
Mit dem Baby Care 1 Babyphone haben Sie ein Qualitätsprodukt aus dem Hause AUDIOLINE
erworben. Bitte lesen Sie diese Bedienungsanleitung sorgfältig durch, um alle Möglichkeiten kennen zu
lernen. Bei eventuell auftretenden Fragen, wenden Sie sich bitte an unseren Service unter der ServiceHotline 0180 5 00 13 88. Öffnen Sie das Gerät in keinem Fall selbst und führen Sie keine eigenen
Reparaturversuche aus. Bei Gewährleistungsansprüchen wenden Sie sich bitte an Ihren Fachhändler.
Zum Lieferumfang gehören
ein Elternteil Steckernetzteil für Elternteil
ein Babyteil Steckernetzteil für Babyteil mit Kfür miide
3
Page 4

- Allgemeine Hinweise -
Aufstellort
Stellen Sie die Geräte nicht in die unmittelbare Umgebung von anderen elektronischen Geräten wie z. B.
Mikrowellen oder HIFI-Geräten, da es sonst zu gegenseitiger Beeinflussung kommen kann. Der
Aufstellort hat einen entscheidenden Einfluss auf einen einwandfreien Betrieb.
Stellen Sie die Geräte auf eine ebene und rutschfeste Fläche. Normalerweise hinterlassen die Füße
keine Spuren auf der Aufstellfläche. Wegen der Vielzahl der verwendeten Lacke und Oberflächen kann
es jedoch nicht ausgeschlossen werden, dass durch die Gerätefüße Spuren auf der Abstellfläche
entstehen.
Reinigung und Pflege
Die Gehäuseoberflächen können mit einem trockenen, weichen und fusselfreien Tuch gereinigt werden.
Niemals Reinigungsmittel oder gar aggressive Lösungsmittel verwenden. Außer einer gelegentlichen
Gehäusereinigung ist keine weitere Pflege erforderlich. Die Gummifüße des Babyphones sind nicht
gegen alle Reinigungsmittel beständig. Der Hersteller kann daher nicht für evtl. Schäden an Möbeln o. ä.
haftbar gemacht werden.
CE-Zeichen
Das Babyphone stimmt mit den grundlegenden Anforderungen der R&TTE-Directive überein. Dies wird
durch das CE-Zeichen bestätigt.
4
Page 5
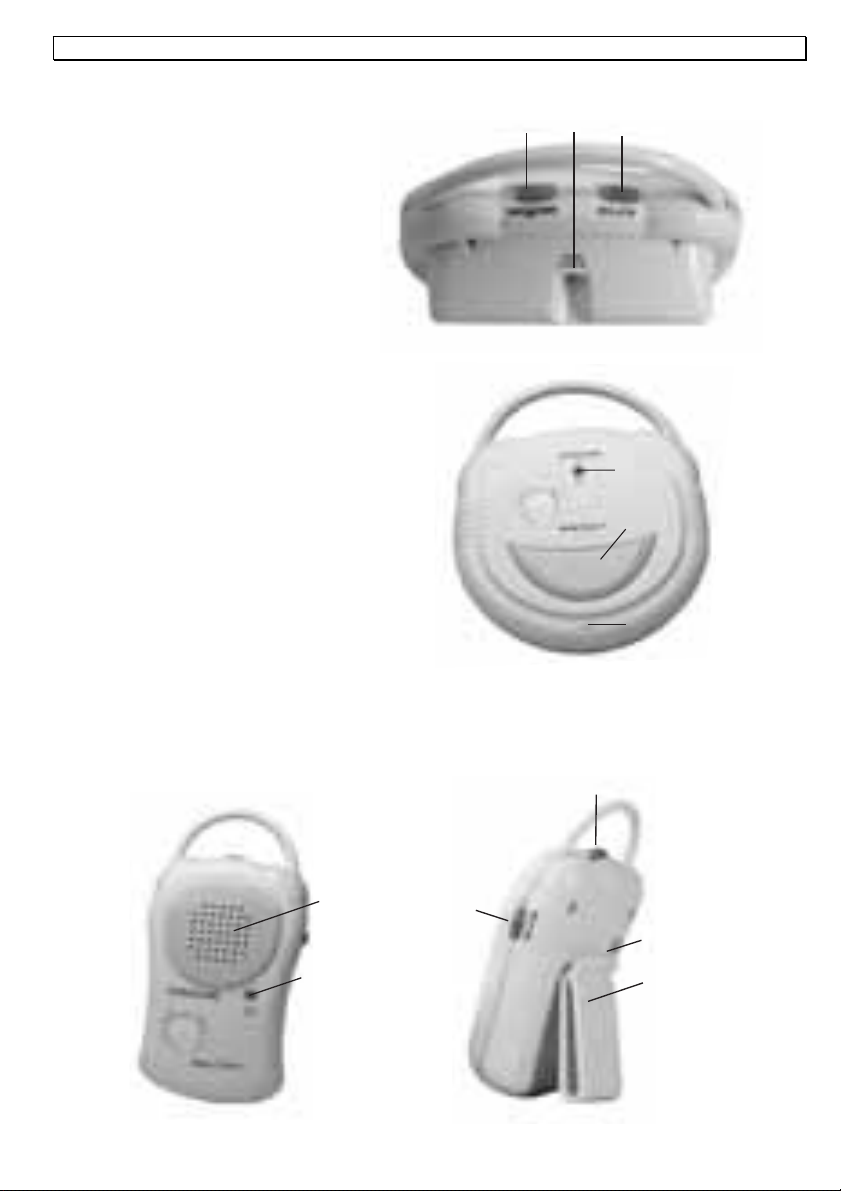
2 Bedienelemente
Babyteil
1 Ein/Aus und Auto
2 Anschluss Steckernetzteil
3 Kanalumschalter
4 Kontrollleuchte
Ein/Aus und Batteriekapazität
5 Nachtlicht Ein/Aus
6 Mikrofon
- Bedienelemente -
2
1
3
4
5
6
Elternteil
7 Ein/Aus und Lautstärke
8 Kanalumschalter
9 Lautsprecher
10
10 Kontrollleuchte
Ein/Aus und Batteriekapazität
11 Anschluss Steckernetzteil
12 Gürtelclip
7
9
8
11
12
5
Page 6

- Inbetriebnahme -
3 Inbetriebnahme
Das Eltern- und Babyteil können mit den mitgelieferten Netzteilen oder mit Batterien (nicht im
Lieferumfang) betrieben werden. Natürlich können Sie auch das Babyteil mit Batterien und das Elternteil
mit einem Netzteil betreiben, oder umgekehrt.
Achtung: Um die Entstehung elektromagnetischer Felder zu verringern, empfehlen wir die Verwendung
von Batterien.
3.1 Betrieb mit Steckernetzteil
Verwenden Sie das Netzteil mit dem Kabelbinder für das Babyteil. Damit können Sie die Kabellänge von
der Steckdose zum Babyteil so beeinflussen, dass die Länge immer optimal passt. Um die Länge zu
verändern, drücken Sie kräftig in der Mitte auf den Kabelbinder. Rollen Sie dann die gewünschte Länge
ab oder wieder auf und verschließen Sie den Kabelbinder.
Hinweis:
6
Page 7

- Bedienung -
4 Bedienung
4.1 Das Babyteil
Plazieren Sie das Babyteil in der Nähe des Babys. Beachten Sie den Mindestabstand von einem
Meter. Für eine optimale Übertragung sollte das eingebaute Mikrofon (6) in Richtung des Kindes zeigen.
Wählen Sie nun am Kanalschalter (3) einen der beiden Kanäle A oder B. Das Eltern- und Babyteil
müssen auf den gleichen Kanal eingestellt sein.
Schalten Sie das Babyteil ein, indem Sie den Schiebeschalter (1) in die Stellung EIN stellen. Das
Babyteil ist nun betriebsbereit. In der Stellung EIN ist das Babyteil ständig in Betrieb. Das eingebaute
Mikrofon überträgt ständig die Geräusche Ihres Kindes.
Über die Taste Nachtlicht (5) können die das Nachtlicht ein- und ausschalten.
Bei Batteriebetrieb leuchtet die Kontrollleuchte (4) grün, wenn die Batteriekapazität ausreichend ist.
Leuchtet die Kontrollleuchte rot, sollten Sie die Batterien austauschen. Beim Betrieb mit Netzteil leuchtet
die Kontrollleuchte immer rot.
Um das Babyteil auszuschalten, schieben Sie den Schiebeschalter (1) auf die Stellung AUS.
Verringerung der Strahlung/Batteriesparmodus
Schieben Sie den Schiebeschalter (1) in die Stellung AUTO. Bei dieser Einstellung sendet das Babyteil
nur dann, wenn Geräusche empfangen werden. Hierdurch wird die Strahlung verringert, da das Babyteil
nur dann sendet, wenn das Baby Geräusche macht. Außerdem verlängert sich bei Batteriebetrieb die
Lebensdauer der Batterie.
Hinweise:
Überprüfen Sie vor jedem Einsatz die einwandfreie Funktion beider Geräte.
Überprüfen Sie bei der Verwendung der Funktion AUTO, ob die Lautstärke der Babygeräusche
ausreicht, um eine Übertragung auszulösen.
4.2 Das Elternteil
Plazieren Sie das Elternteil in Ihrer Nähe. Das Elternteil besitzt einen drehbaren Gürtelclip. Ist der
Gürtelclip nach unten gedreht, können Sie das Elternteil auf eine ebene Fläche stellen. Ist der Gürtelclip
nach oben gedreht, können Sie das Elternteil an einen Gürtel befestigen und so immer bei sich tragen.
Sie können das Elternteil auch an dem Bügel an einer beliebigen Stelle aufhängen.
Wählen Sie nun am Kanalschalter (8) einen der beiden Kanäle A oder B. Das Eltern- und Babyteil
müssen auf den gleichen Kanal eingestellt sein. Schalten Sie das Elternteil ein, indem Sie den
Schieberegler (7) in die Richtung EIN drehen. Das Elternteil ist nun betriebsbereit. Regeln Sie die
gewünschte Lautstärke mit dem Schieberegler (7). In Richtung EIN wird die Lautstärke größer und in
Richtung AUS verringert sich die Lautstärke.
Bei Batteriebetrieb leuchtet die Kontrollleuchte (10) grün, wenn die Batteriekapazität ausreichend ist.
Leuchtet die Kontrollleuchte rot, sollten Sie die Batterien austauschen. Beim Betrieb mit Netzteil leuchtet
die Kontrollleuchte immer rot.
Um das Elternteil auszuschalten, schieben Sie den Schieberegler (7) auf die Stellung AUS.
7
Page 8

- Wichtige Informationen -
5 Wichtige Informationen
5.1 Fehlersuche
Keine Funktion Überprüfen Sie die Stromversorgung (Batterien oder Netzteil) beim Eltern-
Keine Übertragung
Übertragungsstörungen
Fremdempfang Weichen Sie auf den anderen Kanal aus.
Bei technischen Problemen können Sie sich unter der Rufnummer 0180 5 0013 88 auch an unsere
Hotline wenden.
5.2 Technische Daten
Stromversorgung Babyteil Steckernetzteil DC 9.0V/200mA oder
Stromversorgung Elternteil Steckernetzteil DC 9.0V/200mA oder
Frequenzen Kanal A = 40.690 MHz
Sendeleistung Ca. 10mW
und Babyteil.
Verringern Sie den Abstand des Babyteils zum Baby. Beachten Sie aber
den Mindestabstand von einem Meter.
Verringern Sie den Abstand Eltern- und Babyteil.
Überprüfen Sie den Kanalwahlschalter. Eltern- und Babyteil müssen auf
dem gleichen Kanal arbeiten.
Wählen Sie den anderen Kanal am Eltern- und Babyteil.
Verringern Sie den Abstand Eltern- und Babyteil.
Überprüfen Sie den Batteriezustand.
Vergrößern Sie die Entfernung zwischen Eltern- und Babyteil. Pfeifton
Verringern Sie die Lautstärke am Elternteil.
Überprüfen Sie den Batteriezustand. Rauschen
Überprüfen Sie den Kanalwahlschalter. Eltern- und Babyteil müssen auf
dem gleichen Kanal arbeiten.
4 x Batterien 1,5V Typ Baby-Zellen (LR14)
4 x Batterien 1,5V Typ Mikro-Zellen (AAA)
Kanal B = 40.675 MHz
5.3 Garantie
AUDIOLINE - Geräte werden nach den modernsten Produktionsverfahren hergestellt und geprüft.
Ausgesuchte Materialien und hochentwickelte Technologien sorgen für einwandfreie Funktion und lange
Lebensdauer. Sollte Ihr Gerät dennoch einen Defekt innerhalb der Garantiezeit aufweisen, wenden Sie
sich bitte unter Vorlage Ihrer Kaufquittung ausschließlich an das Geschäft, in dem Sie Ihr AUDIOLINE Gerät gekauft haben. Die Garantiezeit beträgt 24 Monate, gerechnet vom Tage des Kaufs. Diese
Garantie gilt nicht für die in den Produkten verwendeten Batterien oder Akkupacks.
Garantiebedingungen: Innerhalb der Garantiezeit werden alle Mängel, die auf Material- oder
Herstellungsfehler zurückzuführen sind, kostenlos beseitigt. Der Garantieanspruch erlischt bei Eingriffen
durch den Käufer oder durch Dritte. Schäden, die durch unsachgemäße Behandlung oder Bedienung,
durch falsches Aufstellen oder Aufbewahren, durch unsachgemäßen Anschluss oder Installation sowie
durch höhere Gewalt oder sonstige äußere Einflüsse entstehen, fallen nicht unter die Garantieleistung.
Wir behalten uns vor, bei Reklamationen die defekten Teile auszubessern oder zu ersetzen oder das
Gerät auszutauschen. Ausgetauschte Teile oder ausgetauschte Geräte gehen in unser Eigentum über.
Schadenersatzansprüche sind ausgeschlossen, soweit sie nicht auf Vorsatz oder grober Fahrlässigkeit
des Herstellers beruhen. Alle Gewährleistungsansprüche nach diesen Bestimmungen sind
ausschließlich gegenüber Ihrem Fachhändler geltend zu machen. Nach Ablauf von zwei Jahren nach
Kauf und Übergabe unserer Produkte können Gewährleistungsrechte nicht mehr geltend gemacht
werden.
8
Page 9

- Wichtige Informationen -
5.4 Konformitätserklärung
WIR AUDIOLINE GmbH
IN HELLERSBERGSTRAßE 2A
ALS INVERKEHRBRINGER IN DER EU ERKLÄREN VOLLVERANTWORTLICH, DASS DAS
PRODUKT
MODEL: Baby Care 1
BESCHREIBUNG: Babyphone
KONFORM IST MIT DEN GRUNDLIEGENDEN ANFORDERUNGEN DER RICHTLINIE: 1999/5/EC
BEVOLLMÄCHTIGTER:
Unterschrift: ________________________________
Name: MANFRED ZINNOW
Position in der Firma: GESCHÄFTSFÜHRER
Datum der Ausstellung: 26.02.2004
Eine Kopie dieser Erklärung wird bis 10 Jahre nach der letzten Produktion aufbewahrt.
D-41460 NEUSS
GERMANY
Hellersbergstraße 2a,
LIEFERANT: AUDIOLINE GmbH
D-41460 NEUSS
PRODUKT: Baby Care 1
CE0359
Dieses Produkt ist für den Betrieb innerhalb Deutschlands entwickelt worden. Dieses
Produkt arbeitet auf einer nicht EU-harmonisierten Frequenz.
9
Page 10

10
Page 11

- Contents -
1 General safety information ........................................................................................................... 12
2 User controls ................................................................................................................................. 14
3 Setting up ....................................................................................................................................... 15
3.1 Operation with plug-in mains power supply............................................................................. 15
3.2 Battery operation ..................................................................................................................... 15
3.2.1 Fitting batteries in the baby unit .................................................................................. 15
3.2.2 Fitting batteries in the parent unit................................................................................ 15
4 Operation........................................................................................................................................ 16
4.1 The baby unit........................................................................................................................... 16
4.2 The parent unit ........................................................................................................................ 16
5 Important information ................................................................................................................... 17
5.1 Troubleshooting....................................................................................................................... 17
5.2 Technical data ......................................................................................................................... 17
5.3 Declaration of conformity......................................................................................................... 18
11
Page 12

- General information -
1 General safety information
With the Baby Care 1 Babyphone you have purchased a quality AUDIOLINE product. Please read
these operating instructions carefully in order to learn about all the options. Under no circumstances
open the unit yourself and do not try to carry out your own repairs. For any claims under the warranty,
please refer to your dealer.
The following items are supplied
one parent unit
one baby unit
one instruction manual
Intended use
The unit is designed for transmitting speech signals such as noises made by children. Warning or signal
tones from breathing or heartbeat monitors CANNOT be transmitted.
NOTE: The use of this unit CANNOT replace the personal supervision of a child or other person
requiring care. No liability that falls outside the statutory regulations can be accepted.
Safety Information
x The unit is not suitable for medicinal applications.
x Maintain a safe distance of at least one metre when using the unit.
x Use only high-quality batteries.
x For safety reasons, use only the original power supplies provided. The unit may set on fire if
unsuitable power supplies are used.
x When using a power supply, make sure that the cable and plug are in perfect condition. Kinked or
chafed cables can cause a short-circuit. Caution: Fire hazard.
x Ensure that all components are adequately ventilated during operation. Do not place pillows or
towels on the units.
x Do not use the units in areas where there is a risk of explosion.
x The units are designed for use in protected rooms with a temperature range of 10 °C to 30 °C. The
units must not be installed in damp rooms such as a bathroom or laundry room. Avoid proximity to
sources of heat such as radiators and do not expose the unit to direct sunlight.
x If the useful life of the complete equipment has expired, please dispose of it carefully in accordance
with the statutory requirements and in a manner friendly to the environment.
Range/Channel selection
The maximum range is up to 300m. If there is another Babyphone working on the same channel within
this radius, signals from this may also be received. In this case, choose another channel. You will find
information on the radio frequencies in the chapter entitled Technical Data.
Plug-in power supply for parent unit
Plug-in power supply for baby unit with cable tidy
Batteries
x Use only high-quality batteries in battery mode.
x Always change all four batteries at the same time.
x Do not throw batteries into the fire or immerse in water.
x If you are not using the units over an extended period, please remove the batteries. Long-term
storage with the batteries fitted can cause the batteries to leak.
x Do not dispose of old or defective batteries with the normal household waste. You are legally
obliged to return all batteries and rechargeable batteries to suitable collection points.
12
Page 13

- General information -
Position
Do not set up the units in the immediate vicinity of other electrical equipment such as microwaves or hi-fi
systems, as this may result in mutual interference. The location has a decisive influence on trouble-free
operation.
Place the units on a flat and non-slip surface. The feet do not normally leave any marks on the surface.
However, due to the large number of varnishes and surfaces in use, it may not be possible to prevent
marks occurring on the surface due to the feet of the unit.
Cleaning and care
The surface of the case can be cleaned with a soft, dry, lint-free cloth. Never use cleaning agents,
particularly aggressive solvents. No attention is necessary apart from cleaning the case occasionally.
The rubber feet of the Babyphone are not resistant to all cleaning agents. The manufacturer can
therefore not accept any liability for possible damage to furniture or the like.
CE mark
The Babyphone complies with the basic requirements of the R&TTE Directive. This is confirmed by the
CE mark.
13
Page 14

- User controls -
2 User controls
Baby unit
1 On/Off and Auto
2 Connection for power supply
3 Channel changeover switch
4 Indicator light
On/Off and battery capacity
5 Nightlight On/Off
6 Microphone
Parent unit
2
1
3
4
5
6
7 On/Off and volume
8 Channel changeover switch
9 Loudspeaker
14
10
10 Indicator light
On/Off and battery capacity
11 Connection for power supply
12 Belt clip
7
9
8
11
12
Page 15

- Setting up -
3 Setting up
The parent and baby units can be operated with the power supplies provided or with batteries (not
included). Of course, you can also use the baby unit with batteries and the parent unit with a power
supply or vice versa.
Note: We recommend the use of batteries in order to reduce the production of electromagnetic fields.
3.1 Operation with plug-in mains power supply
Use the power supply with the cable tidy for the baby unit. With this, you can change the length of the
cable from the socket to the baby unit so that it is always just right. To change the length, press hard on
the middle of the cable tidy. Then uncoil or rewind the required length and close the cable tidy.
Note: If the cable tidy has not yet been connected to one of the power supplies, then either of the two
power supplies can be used.
Insert the small round plug into the socket provided on the rear of the parent or baby unit and plug the
power supply into a mains socket (230V/50Hz).
Ensure that the plug-in mains power supply is adequately ventilated.
3.2 Battery operation
3.2.1 Fitting batteries in the baby unit
Note: You can also use rechargeable batteries for the parent and baby units. However, these will not be
automatically recharged via the power supply provided.
1. The battery compartment is located on the rear.
2. Open the battery compartment with a small screwdriver.
Note: For safety reasons, the battery compartment is locked by means of a screw so that the baby
cannot open the compartment. This ensures that the baby is unable to come into contact with the
batteries.
3. Insert four Type LR14 (Baby) batteries. In doing so, ensure that the polarity is correct.
4. Close the battery compartment.
The batteries should be changed immediately if the indicator light (4) shows red during battery operation.
3.2.2 Fitting batteries in the parent unit
1. The battery compartment is located on the rear.
2. Rotate the belt clip upwards.
3. Open the battery compartment with a sharp object.
4. Insert four Type AAA (Micro) batteries. In doing so, ensure that the polarity is correct.
5. Close the battery compartment.
The batteries should be changed immediately if the indicator light (10) shows red during battery
operation.
15
Page 16

- Operation -
4 Operation
4.1 The baby unit
Position the baby unit near to the baby. Please observe the minimum distance of one metre. For best
transmission, the integral microphone (6) should be pointing towards the child.
Now select one of the two channels A or B with the channel switch (3).The parent and baby units must
be set to the same channel.
Switch on the baby unit by moving the slide switch (1) to the ON position. The baby unit is now ready for
use. In the ON position, the baby unit is always in operation. The in-built microphone will continuously
transmit any noises made by your child.
You can switch the night light on and off by means of the Night light button (5).
In battery mode, the indicator light (4) shows green when there is sufficient battery capacity. You should
change the batteries if the indicator light shows red. When used with the power supply, the indicator light
always shows red.
To switch off the baby unit, move the slide switch (1) to the OFF position.
Reducing radiation/Battery saving mode
Move the slide switch (1) to the AUTO position. With this setting, the baby unit will only transmit when
noises are received. This reduces radiation, as the baby unit will only transmit when the baby makes a
noise. Furthermore, in battery mode, the life of the batteries will be increased.
Note:
Check that both units are working properly each time before using.
When using the AUTO function, check whether the noises made by the baby are loud enough to initiate
a transmission.
4.2 The parent unit
Position the parent unit near to you. The parent unit has a rotating belt clip. If the belt clip is turned
downwards, you can place the parent unit on a flat surface. If the belt clip is turned upwards, you can fix
the parent unit to your belt and thus have it with you at all times. You can also hang up the parent unit in
any convenient place using the clip.
Now select one of the two channels A or B with the channel switch (8).The parent and baby units must
be set to the same channel. Switch on the parent unit by turning the slide switch (7) to the ON position.
The parent unit is now ready for use. Set the required volume with the slide switch (7). The volume
becomes louder in the ON direction and reduces in the OFF direction.
In battery mode, the indicator light (10) shows green when there is sufficient battery capacity. You should
change the batteries if the indicator light shows red. When used with the power supply, the indicator light
always shows red.
To switch off the parent unit, move the slide switch (7) to the OFF position.
16
Page 17

- Important information -
5 Important information
5.1 Troubleshooting
Nothing happens Check the power supply (batteries or mains power supply) for the parent
No transmission
Interference
Foreign reception Switch to the other channel.
5.2 Technical data
Power supply, baby unit Plug-in mains power supply DC 9.0V/200mA
Power supply, parent unit Plug-in mains power supply DC 9.0V/200mA
Frequencies Channel A = 40.690 MHz
Transmitter power ca. 10mW
and baby units.
Move the baby unit closer to the baby. Please observe the minimum
distance of one metre however.
Move the parent and baby units closer together.
Check the channel selector switch. The parent and baby units must be
working on the same channel.
Select the other channel on the parent and baby units.
Move the parent and baby units closer together.
Check the condition of the batteries.
Move the parent and baby units further apart. Whistling sound
Reduce the volume on the parent unit.
Check the condition of the batteries. Noise
Check the channel selector switch. The parent and baby units must be
working on the same channel.
or 4 x Type LR14 (Baby) batteries 1.5V
or 4 x Type AAA (Micro) batteries 1.5V
Channel B = 40.675 MHz
5.3 Guarantee
AUDIOLINE equipment is manufactured and tested in accordance with the most up to date production
methods. Selected materials and highly developed technology ensure trouble-free operation and long
life. If your unit should develop a fault within the guarantee period, however, please contact the shop
where you bought your AUDIOLINE equipment exclusively and have your purchase receipt available for
inspection. The warranty period is 24 months from the day of purchase. This warranty is not applicable to
the batteries or battery packs used in the various products.
Warranty conditions: Within the guarantee period, all defects due to material or manufacturing faults
will be repaired free of charge. The guarantee is invalidated if the equipment has been tampered with by
the purchaser or third parties. Any damage caused by improper handling or operation, by incorrect
positioning or storage, by improper connection or installation or by excessive force or other external
influences is not covered by the guarantee. In the case of complaint, we reserve the right to repair or
replace defective parts or to exchange the equipment. Exchanged parts or exchanged equipment
become our property. Claims for compensation are excluded insofar as they do not relate to criminal
intent or gross negligence on the part of the manufacturer. All guarantee claims according to these
conditions must be raised exclusively with your dealer. Rights under the guarantee can no longer be
enforced after the expiry of 24 months from purchase and delivery of our products. In the case of
unnecessary or unjustified demands on the customer service department, we will levy our usual service
charges for materials, time, postage and packing. Any complaints must be reported as soon as a
problem is found. The guarantee is valid within the German Federal Republic.
17
Page 18
- Important information -
5.4 Declaration of conformity
WE AUDIOLINE GmbH
OF HELLERSBERGSTRAßE 2A
DECLARE UNDER OUR SOLE RESPONSIBILITY AS EU DISTRIBUTOR THAT THE PRODUCT
MODEL: Baby Care 1
DESCRIPTION: Babyphone
IS IN CONFORMITY WITH THE BASIC REQUIREMENTS OF DIRECTIVE: 1999/5/EC
AUTHORISED SIGNATORY:
Signature: ________________________________
Name: MANFRED ZINNOW
Position in the company: MANAGING DIRECTOR:
Date of issue: 26.02.2004
A copy of this declaration will be retained for 10 years after cessation of production.
D-41460 NEUSS
GERMANY
Hellersbergstraße 2a,
D-41460 NEUSS
PRODUCT: Baby Care 1
CE0359
This product was developed for the operation within Germany. This product transmits
in a non-EU-harmonised frequency band.
SUPPLIER: AUDIOLINE GmbH
18
Page 19

Page 20

WICHTIGE GARANTIEHINWEISE
Die Garantiezeit für Ihr AUDIOLINE - Produkt beginnt mit dem Kaufdatum. Ein
Garantieanspruch besteht bei Mängeln, die auf Material- oder
Herstellungsfehler zurückzuführen sind. Der Garantieanspruch erlischt bei
Eingriffen durch den Käufer oder durch Dritte. Schäden, die durch
unsachgemäße Behandlung oder Bedienung, natürliche Abnutzung, durch
falsches Aufstellen oder Aufbewahren, durch unsachgemäßen Anschluss oder
Installation sowie durch höhere Gewalt oder sonstige äußere Einflüsse
entstehen, fallen nicht unter die Garantieleistung.
BITTE WENDEN SIE SICH IM GARANTIEFALL AUSSCHLIESSLICH AN
DEN HÄNDLER, BEI DEM SIE DAS GERÄT GEKAUFT HABEN, UND
VERGESSEN SIE NICHT, DEN KAUFBELEG VORZULEGEN.
UM UNNÖTIG LANGE WARTEZEITEN ZU VERMEIDEN, SENDEN SIE
REKLAMATIONSGERÄTE BITTE NICHT AN UNSERE BÜROADRESSE.
BEI FRAGEN ZUR BEDIENUNG UND GARANTIELEISTUNG, LESEN SIE
BITTE DIE BEDIENUNGSANLEITUNG ODER WENDEN SIE SICH AN
UNSERE HOTLINE:
0180 500 13 88
AUDIOLINE GmbH
Neuss
Service Hotline 0180 5 00 13 88
Internet: www.audioline.de
E-mail: info@audioline.de
 Loading...